
:max_bytes(150000):strip_icc():format(webp)/GettyImages-664800650-4349941504c24712b81975694798236b.jpg)
Updated Ideas That Will Help You Out in Learning How to Send WhatsApp Animated Gifs for 2024
Ideas That Will Help You Out in Learning How to Send WhatsApp Animated Gifs
Ideas That Will Help You Out in Learning How to Send WhatsApp Animated Gifs
An easy yet powerful editor
Numerous effects to choose from
Detailed tutorials provided by the official channel
While chatting on WhatsApp, expressing your thoughts, suggestions, and situations become easier if assisted with some animations and for this GIFs are available.

So, if you too are keen to try these animated images but clueless about how to use them, we are here to help you. Learn about different ways to send WhatsApp animated GIFs in the following parts.
In this article
01 [How to send WhatsApp GIF using Integrated library](#Part 1)
02 [How to send GIF Stored on your device](#Part 2)
03 [How to create WhatsApp GIF using videos](#Part 3)
04 [Best tool for creating interesting GIFs in a hassle-free manner- Wondershare Filmora](#Part 4)
Part 1 How to send WhatsApp GIF using Integrated library
The WhatsApp feature on your iPhone as well as Android devices comes integrated with a GIF library powered by Tenor that allows you to search for GIFs using desired keywords. The steps to send GIFs through the method for both iPhone, as well as Android, are almost the same.
Step 1. Open WhatsApp and select the contact or the group chat to whom you wish to send the GIF.
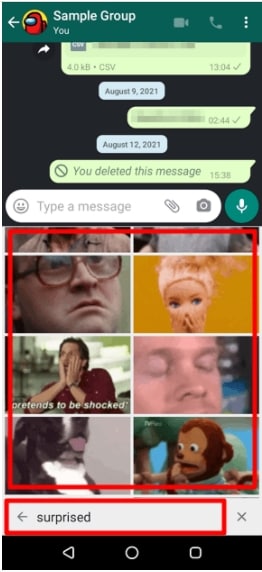
On your Android phone, click on the smiley emoji at the input section and then choose GIF at the bottom of the screen. A sample of GIF will appear. On your iPhone, you need to click on the sticker icon to launch GIF options.
Step 2. Enter the desired keyword at the search icon to look out for a more specific GIF.
Step 3. Tap on the selected GIF and then if needed add a caption as well.
Step 4. Finally, click on the Send icon to share the GIF to the chat.
Part 2 How to send GIF Stored on your device
Several third-party apps can let you create GIFs as needed. Moreover, you can also download these animations from online sites to your device.
Once you have done WhatsApp animated GIF download to your device, these GIF files can be sent on WhatsApp by attaching them like any other image or video.
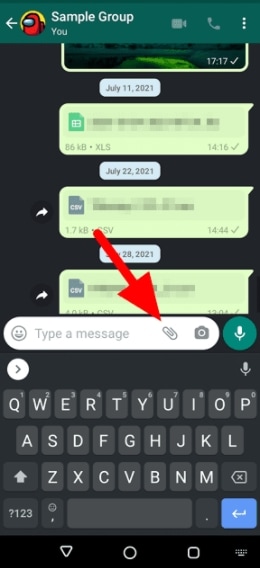
Step 1. Launch WhatsApp and select the desired contact. Click on the attach or gallery icon at the input area to browse and add the saved GIF.
Note: The size of the GIF has to be less than 16MB.
Step 2. Add a caption if needed.
Step 3. Click on the Send icon.
Part 3 How to create WhatsApp GIF using videos
Another way is by creating GIFs using the videos on your device. The videos to be shared as GIF has to be less than 6 seconds and thus the longer videos need to be trimmed.
Steps to create WhatsApp GIF using videos
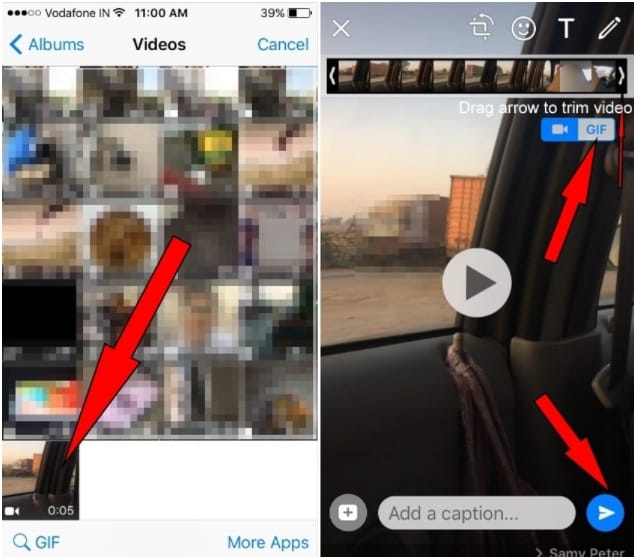
Step 1. Launch the WhatsApp chat to which you want to send the GIF. Click on the gallery icon to browse and add the video from the device. Alternatively, you can also record a video to be used as GIF.
Step 2. After the video is added, trim it under 6 seconds using the slider at the top. Add the caption or other available elements if needed.
Step 3. Click on the GIF button and then tap on the Send icon.
Part 4 Best tool for creating interesting GIFs in a hassle-free manner- Wondershare Filmora
Above we have mentioned in part 2 that there are several third-party apps available that can be used for creating GIFs. Among the myriad of options available, we suggest Wondershare Filmora Video Editor owing to its user-friendly interface and fast processing.
Wondershare Filmora
Get started easily with Filmora’s powerful performance, intuitive interface, and countless effects!
Try It Free Try It Free Try It Free Learn More >

Using the software, you can quickly create animated GIF stickers for WhatsApp using images and videos in all key formats. Several elements to further pep up your animations can be added like text, sound, effects, and more. Additionally, you can even edit the added media files using features like rotate, split, trim, speed-up, speed-down, and more.
Once installed on your Windows or Mac devices, Wondershare Filmora works as a complete video editing tool.
Steps to create Animated WhatsApp GIF using Wondershare Filmora
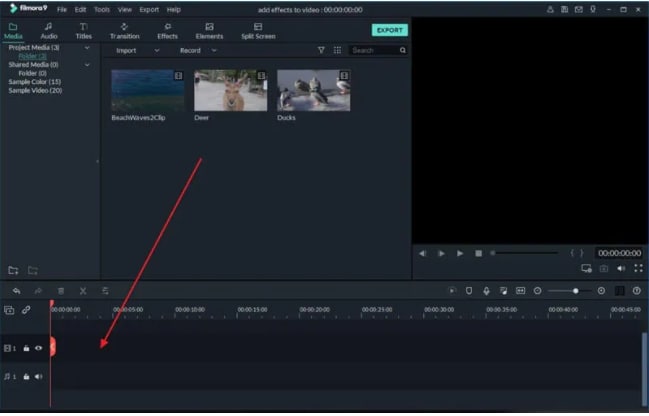
Step 1. Run the software on your system, browse and import the images and videos from which animations have to be created.
Step 2. Next, drag and move the media files to the timeline of the tool.
Step 3. Next, add effects, text, and other elements as needed..
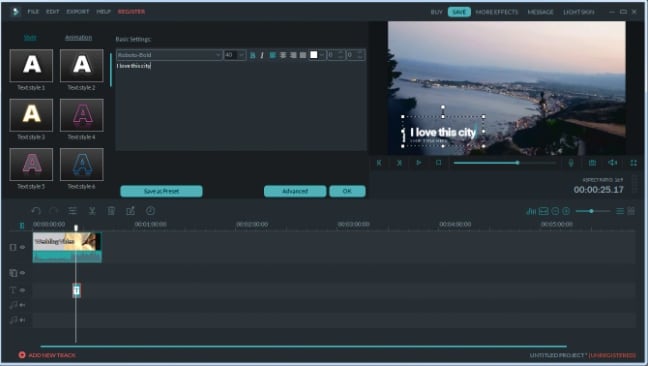
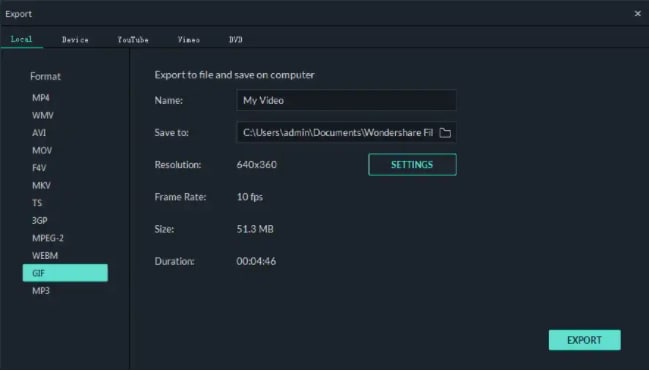
Step 4. At the Local section, save the created media file as GIF. Give the desired name and then select the desktop location. Click on the EXPORT button to start processing.
● Key Takeaways from This Episode →
●WhatsApp GIFs on your phone can be sent by either searching them from the integrated library or using the ones saved to your device.
●GIFs can also be created using videos.
●Wondershare Filmora is the best third-party app for effortlessly creating impressing GIFs.
While chatting on WhatsApp, expressing your thoughts, suggestions, and situations become easier if assisted with some animations and for this GIFs are available.
So, if you too are keen to try these animated images but clueless about how to use them, we are here to help you. Learn about different ways to send WhatsApp animated GIFs in the following parts.
In this article
01 [How to send WhatsApp GIF using Integrated library](#Part 1)
02 [How to send GIF Stored on your device](#Part 2)
03 [How to create WhatsApp GIF using videos](#Part 3)
04 [Best tool for creating interesting GIFs in a hassle-free manner- Wondershare Filmora](#Part 4)
Part 1 How to send WhatsApp GIF using Integrated library
The WhatsApp feature on your iPhone as well as Android devices comes integrated with a GIF library powered by Tenor that allows you to search for GIFs using desired keywords. The steps to send GIFs through the method for both iPhone, as well as Android, are almost the same.
Step 1. Open WhatsApp and select the contact or the group chat to whom you wish to send the GIF.
On your Android phone, click on the smiley emoji at the input section and then choose GIF at the bottom of the screen. A sample of GIF will appear. On your iPhone, you need to click on the sticker icon to launch GIF options.
Step 2. Enter the desired keyword at the search icon to look out for a more specific GIF.
Step 3. Tap on the selected GIF and then if needed add a caption as well.
Step 4. Finally, click on the Send icon to share the GIF to the chat.
Part 2 How to send GIF Stored on your device
Several third-party apps can let you create GIFs as needed. Moreover, you can also download these animations from online sites to your device.
Once you have done WhatsApp animated GIF download to your device, these GIF files can be sent on WhatsApp by attaching them like any other image or video.
Step 1. Launch WhatsApp and select the desired contact. Click on the attach or gallery icon at the input area to browse and add the saved GIF.
Note: The size of the GIF has to be less than 16MB.
Step 2. Add a caption if needed.
Step 3. Click on the Send icon.
Part 3 How to create WhatsApp GIF using videos
Another way is by creating GIFs using the videos on your device. The videos to be shared as GIF has to be less than 6 seconds and thus the longer videos need to be trimmed.
Steps to create WhatsApp GIF using videos
Step 1. Launch the WhatsApp chat to which you want to send the GIF. Click on the gallery icon to browse and add the video from the device. Alternatively, you can also record a video to be used as GIF.
Step 2. After the video is added, trim it under 6 seconds using the slider at the top. Add the caption or other available elements if needed.
Step 3. Click on the GIF button and then tap on the Send icon.
Part 4 Best tool for creating interesting GIFs in a hassle-free manner- Wondershare Filmora
Above we have mentioned in part 2 that there are several third-party apps available that can be used for creating GIFs. Among the myriad of options available, we suggest Wondershare Filmora Video Editor owing to its user-friendly interface and fast processing.
Wondershare Filmora
Get started easily with Filmora’s powerful performance, intuitive interface, and countless effects!
Try It Free Try It Free Try It Free Learn More >
Using the software, you can quickly create animated GIF stickers for WhatsApp using images and videos in all key formats. Several elements to further pep up your animations can be added like text, sound, effects, and more. Additionally, you can even edit the added media files using features like rotate, split, trim, speed-up, speed-down, and more.
Once installed on your Windows or Mac devices, Wondershare Filmora works as a complete video editing tool.
Steps to create Animated WhatsApp GIF using Wondershare Filmora
Step 1. Run the software on your system, browse and import the images and videos from which animations have to be created.
Step 2. Next, drag and move the media files to the timeline of the tool.
Step 3. Next, add effects, text, and other elements as needed..
Step 4. At the Local section, save the created media file as GIF. Give the desired name and then select the desktop location. Click on the EXPORT button to start processing.
● Key Takeaways from This Episode →
●WhatsApp GIFs on your phone can be sent by either searching them from the integrated library or using the ones saved to your device.
●GIFs can also be created using videos.
●Wondershare Filmora is the best third-party app for effortlessly creating impressing GIFs.
Best 10 Photo Animator Templates
What’s the Best 10 Photo Animator Templates That Bring Your Images to Life?
An easy yet powerful editor
Numerous effects to choose from
Detailed tutorials provided by the official channel
Using free 3d motion graphics, we can animate the image and bring it back to life.
Using a 3d animation photo maker online we can animate any image using a template and bring it back to life. This must have gotten you excited? We are as excited as you are as we give you an overview of 3d photo animation online.
In this article
01 [What is 3D Image Animate?](#Part 1)
02 [What is 3D Photo Motion?](#Part 2)
03 [How to Create 3D Animations from a Single Still Image?](#Part 3)
Part 1 What is 3D Image Animate?
3D Image Animate is making a moving scene using just a simple image. It is quite a complicated process and requires high technical skills to achieve a moving animation out of a still image. For your convenience, here we list some of the examples that will make you understand what 3D Image Animate is.
01Resuscitate a Person or Object
This first 3D Image Animate example depicts turning a real-life still image of a person and making him move out of that still image. Sounds absurd, right? Well, just look at this example below.
02Pan View of Car
This next example shows a still image of a car is turned into a moving scene as if the camera person is shooting a pan view of a parked Car.
03Dispersing Elements
Here is another amazing 3D Photo Animate example for you. In this one, you’ll get to see an image that is stacked with several elements, fruits, and veggies (in this case), which get dispersed out of the canvas. Go ahead check it out.
Part 2 What is 3D Photo Motion?
3D photo motion is basically a contemporary technology that helps us to bring life into the pictures. In simple words, using 3D photo motion and animation tools we can make still images into moving ones. 3D animation photo maker online offers you several motion templates. You can apply any of the available motion templates to a still image and make it animated. 3D photo motion helps convert 2D images to life like moving 3D images. This can be useful when working with a project that deals with many still images. By using animation on still images, the project can become more attractive and hence has a higher chance of getting liked!
Part 3 How to Create 3D Animations from a Single Still Image?
01Simple steps to create 3d animations from a single still image
When it comes to animation, Adobe is recognized as one of the best tools. Animation with Adobe is one of the most convenient ways of animation. Here is how you can convert any 2D image to a 3D animated image using adobe. For those of you who are used to animating with adobe, it must be simple to follow the few steps listed below:
● Firstly, you need to convert the 2D layers of the still image to 3D postcards (planes that possess 3D properties). In case the layer you are starting with is a text layer, any transparency will be retained.
● Now to convert the object into 3D, wrap the 2D layer around any 3D object such as cube, cone, or sphere. Choose the shape that suits your layer.
● Next, you need to create a 3D mesh from greyscale information in a 2D image.
● Now you need to simulate a metalworking technique called “Repousse”. By doing so, you will be extruding a 2D object in a 3D space
● Next, you need to build a 3D volume from any multi-frame file like DICOM. Photoshop automatically converts the individual slices of the file into a 3D object that can be manipulated in 3D space from any angle. Furthermore, if you wish to optimize the display, you can also apply any 3D volume render effects.
02Best 10 Photo Animator Templates to Bring Your Images to Life
3D motion photo animator
The first tool on the list of 3d photo animators onlineis an excellent tool called 3D motion photo Animator. The tool helps to split landscape shots into numerous panels depending on the distance of the object from the camera. Furthermore, the plug-in also adds a soft parallax movement into the layers, giving the final image a beautiful 3D effect. The tool also has several editing options and a wide range of lens flare. The animator tool allows you to tweak the weather by using the weather effect options available in the tool.
3D photo animator
This 3d animation photo maker online takes the hype of the parallax effect in animation to a whole different level. The animator allows you to add parallax effects to any still image to make it appear 3 dimensional. Moreover, you can also add depth to the animated image to enhance the 3 dimensional effects and make it appear more realistic.
Live photo animation
Live photo animation is another seamless tool that offers free 3d motion graphics. The tool which is mainly meant for animation gives you the ability to mask the object and a keyframe from vivid natural movements. Once the subject and the background have been isolated and processed, they work independently from each other. This means that, due to independent operation, live photo animation becomes even more realistic since the subject can be animated without affecting the background. The tool also has cool zooming and 3D tracking effects.
Easy 3D face photo Animator
Most tools for 3d photo animation online fail to make the image look completely 3 dimensional. Even after the animation is performed, the people and the objects continue to look 2 dimensional. However easy 3D face photo Animator solves the problem. Using this tool, you can individually animate a face and make it 3 dimensional. It uses several panels to recreate the effect that’d be provided by a video recorder.
Live photo Animator
Looking for an animating tool to animate still images and transform them into stunning videos like action pictures? Live photo Animator is just the perfect tool for you then. The tool has a simple interface and helps generate realistic 3d action images. The plug-in works on the principle of duplicating action elements in an image. These action images include water, dust, fire, and other different kinds of moving objects in an image.
Photo Animator tool
The photo Animator tool kit is a great tool to generate animated 3D images. This quick time-saving tool is your go-to tool for photo effects and zooming. Moreover, the pack also consists of 50 preset animation templates that you can choose from. All you need to do is drag and drop the still images into the tool, and then you need to select the template that you’d like to apply to the image. The tool then processes the image and animates it to convert the still image into a 3d one.
Media animator
Think of smooth and seamless media transitions? Media animator is the perfect tool for you. This software offers a set of seamless and dynamically animated media transitions. The smooth transition effects make the images produced by this tool perfect for using the 3D animations in your official presentations and slideshows.
3D photo Animator
Have an attractive image that you wish to enhance by using animation? Here’s a simple software that can help you add a touch of flair to any simple image. The software has amazing 3d animation powers. When you zoom on the images produced by the software, the entire perspective changes, and the image looks entirely 3D.
Particular photo animation
The animating tool is the best for those who wish to finish animation quickly. The software has an amazing and stylish way of making slideshows. The tool has several templates that concentrate on the particular motion.
Key Takeaways from This Episode
● 3d animation is one of the most budding fields these days. It makes our photos life-like and brings back real life memories.
● Using 3D animation, still images are brought back to life and memories from years back are revived.
● We looked at a few of the best tools for animating an image and converting them to 3D. 3D images can also help make your project reports and presentations much more attractive and earn you the extra edge over your colleagues.
● We recommend you to try a few of these cool tools and get your hands dirty with animation today!
What Make Aesthetic Cartoon Drawing More Understandable
That Will Make Aesthetic Cartoon Drawing More Understandable
An easy yet powerful editor
Numerous effects to choose from
Detailed tutorials provided by the official channel
When you are trying to make an aesthetic drawings cartoon, the primary thing to focus on is the composition. Composition is the combination, arrangement, and organization of objects within the borders of drawing space. To have a great aesthetic cartoon drawing, you must focus on bringing the eyes of the viewer toward your center of interest within an aesthetically-pleasing composition. When we create illustrations, we are often concerned with putting in a lot of details that will overload the image and lose the meaning that we originally wanted it to convey.

We engage our audience and viewer more by composing a perfect aesthetic drawing. In addition, many rules define a good composition drawing, but these rules are mainly guidelines. Also pay attention to your personal preferences and instincts. In this guide, we’ll teach you how to make an excellent aesthetic cartoon painting more understandable.
In this article
01 [Canvas Aesthetic Painting Ideas](#Part 1)
02 [Blender Aesthetic Painting Ideas](#Part 2)
03 [How to Create Super-Detailed Aesthetic Cartoon Painting](#Part 3)
Part 1 Canvas Aesthetic Painting Ideas
There are times you do not need to be a famous painter or an art professional to create beautiful wall art. Canvas painting is an all-in-one application for all skill levels, from beginners to experts. It also provides you with different painting ideas ranging from beach scenes to abstract designs to create pieces that look stunning and professional.
We have compiled a list of canvas aesthetic painting ideas to help you begin your journey as an aesthetic cartoon painter. Look through the images to determine which ones match the style of painting you wish to add to your drawing and get inspiration to create your designs.
01Disney Canvas Art
These are aesthetic cartoon painting ideas relating to 2020 Disney Canvas Art. You can get ideas from this to begin your journey into the world of painting.

02Hippie Painting Canva Art
If you are also looking for other aesthetic cartoon painting ideas to choose from, you can select from this 2020 Cute Canvas Paintings “Hippie Painting” Canvas Art.

03Spongebob Painting
These painting ideas are a part of the Canvas Aesthetic Cartoon Painting ideas of 2020 called Spongebob Painting Disney Canvas Art.

04Babs Bunny Pa Et Mini Lerret
These are a painting about “Babs Bunny Pa Et Mini Lerret.” A 2020 Mini Canvas Art Hippie Painting Canvas idea that you can choose from

Part 2 Blender Aesthetic Painting Ideas
Blender is an accessible and open-source 3D creation suite that supports the entirety of the 3D pipeline modeling, rigging, animation, simulation, compositing rendering, motion tracking, video editing, and 2D animation pipeline. It is a fact that this is one of the best open-source software you can choose from to make your aesthetic cartoon drawing.
It is entirely free software, and various artists can use it to start digging in and playing with it. Here are some of the blender aesthetic cartoon painting ideas you can choose from:
01Princess Ira and Amina
This is a fictional aesthetic drawing cartoon of an African princess having gold gifted powers with her face painting inspired by Nigerian traditional face decorations. However, her crown is adorned with crosses, crystals, and chains which incorporate several elements from different cultural designs available from all over the world to portray unity.

02Survival Knife Weekly Drills 045
This was a design painting inspired based on BUCK KNIVES in pain texturing and focuses on making a practical game-ready asset.

03Radiance
This is a blender aesthetic cartoon painting idea of a graduation project made for the Concept Art specialized cursus at New3dge School.

04 The character looks dev
This blender cartoon painting’s inspiration came from Edward, the short film’s main character. It is a work in progress but a lovely painting that can inspire you.
Part 3 How to Create Super-Detailed Aesthetic Cartoon Painting
To create a super detailed aesthetic cartoon drawing, you do not need to be a trained artist, nor do you need a fancy cartoon picture maker. All you need to create a cartoon painting photo is a simple and Free picture from a cartoon editor to help you carry out the task more effectively.
However, you can also convert your cartoon paint into creative animation using Wondershare Filmora Video Editor . Filmora is a powerful all-in-one tool for editing that you can use to that can be used for free to animate your cartoon with its tons of effects, filters, and keyframing features that can help you carry this out effectively.
For Win 7 or later (64-bit)
For macOS 10.12 or later
Here is how to create a super detailed aesthetic cartoon painting:

Step 1: Open the Picsart editor on your desktop browser and click on the new project
Step 2: Next is to click on Upload to select the photo that you want to cartoon paint from the computer library of your hard drive
Step 2: Click on the toolbar, select the effect feature from the dropdown above your photo, and click on Magic to view all available one-click cartoon filters. However, almost all of the Magic effects on this editor will help you achieve an aesthetic cartoon photo effect.
Step 4: Click on Adjust and Blend above your photo workspace on the editor. This will help you manually adjust the effects (color burn, fade, saturation, brightness, etc.).
Step 5: Preview your result and once you are happy with the new cartoon photo painting, click on the Share button and download it from the top right corner of the editor to save it on your device.
● Ending Thoughts →
● This article explained creating and gave inspiration and ideas for the aesthetic cartoon painting you can choose from to make yours. In addition, the report also recommends Filmora as an influential editor if you intend to create an animation from your cartoon painting due to its tons of features.
● So, now you can start building your aesthetic drawings and cartoons!
When you are trying to make an aesthetic drawings cartoon, the primary thing to focus on is the composition. Composition is the combination, arrangement, and organization of objects within the borders of drawing space. To have a great aesthetic cartoon drawing, you must focus on bringing the eyes of the viewer toward your center of interest within an aesthetically-pleasing composition. When we create illustrations, we are often concerned with putting in a lot of details that will overload the image and lose the meaning that we originally wanted it to convey.
We engage our audience and viewer more by composing a perfect aesthetic drawing. In addition, many rules define a good composition drawing, but these rules are mainly guidelines. Also pay attention to your personal preferences and instincts. In this guide, we’ll teach you how to make an excellent aesthetic cartoon painting more understandable.
In this article
01 [Canvas Aesthetic Painting Ideas](#Part 1)
02 [Blender Aesthetic Painting Ideas](#Part 2)
03 [How to Create Super-Detailed Aesthetic Cartoon Painting](#Part 3)
Part 1 Canvas Aesthetic Painting Ideas
There are times you do not need to be a famous painter or an art professional to create beautiful wall art. Canvas painting is an all-in-one application for all skill levels, from beginners to experts. It also provides you with different painting ideas ranging from beach scenes to abstract designs to create pieces that look stunning and professional.
We have compiled a list of canvas aesthetic painting ideas to help you begin your journey as an aesthetic cartoon painter. Look through the images to determine which ones match the style of painting you wish to add to your drawing and get inspiration to create your designs.
01Disney Canvas Art
These are aesthetic cartoon painting ideas relating to 2020 Disney Canvas Art. You can get ideas from this to begin your journey into the world of painting.
02Hippie Painting Canva Art
If you are also looking for other aesthetic cartoon painting ideas to choose from, you can select from this 2020 Cute Canvas Paintings “Hippie Painting” Canvas Art.
03Spongebob Painting
These painting ideas are a part of the Canvas Aesthetic Cartoon Painting ideas of 2020 called Spongebob Painting Disney Canvas Art.
04Babs Bunny Pa Et Mini Lerret
These are a painting about “Babs Bunny Pa Et Mini Lerret.” A 2020 Mini Canvas Art Hippie Painting Canvas idea that you can choose from
Part 2 Blender Aesthetic Painting Ideas
Blender is an accessible and open-source 3D creation suite that supports the entirety of the 3D pipeline modeling, rigging, animation, simulation, compositing rendering, motion tracking, video editing, and 2D animation pipeline. It is a fact that this is one of the best open-source software you can choose from to make your aesthetic cartoon drawing.
It is entirely free software, and various artists can use it to start digging in and playing with it. Here are some of the blender aesthetic cartoon painting ideas you can choose from:
01Princess Ira and Amina
This is a fictional aesthetic drawing cartoon of an African princess having gold gifted powers with her face painting inspired by Nigerian traditional face decorations. However, her crown is adorned with crosses, crystals, and chains which incorporate several elements from different cultural designs available from all over the world to portray unity.
02Survival Knife Weekly Drills 045
This was a design painting inspired based on BUCK KNIVES in pain texturing and focuses on making a practical game-ready asset.
03Radiance
This is a blender aesthetic cartoon painting idea of a graduation project made for the Concept Art specialized cursus at New3dge School.
04 The character looks dev
This blender cartoon painting’s inspiration came from Edward, the short film’s main character. It is a work in progress but a lovely painting that can inspire you.
Part 3 How to Create Super-Detailed Aesthetic Cartoon Painting
To create a super detailed aesthetic cartoon drawing, you do not need to be a trained artist, nor do you need a fancy cartoon picture maker. All you need to create a cartoon painting photo is a simple and Free picture from a cartoon editor to help you carry out the task more effectively.
However, you can also convert your cartoon paint into creative animation using Wondershare Filmora Video Editor . Filmora is a powerful all-in-one tool for editing that you can use to that can be used for free to animate your cartoon with its tons of effects, filters, and keyframing features that can help you carry this out effectively.
For Win 7 or later (64-bit)
For macOS 10.12 or later
Here is how to create a super detailed aesthetic cartoon painting:
Step 1: Open the Picsart editor on your desktop browser and click on the new project
Step 2: Next is to click on Upload to select the photo that you want to cartoon paint from the computer library of your hard drive
Step 2: Click on the toolbar, select the effect feature from the dropdown above your photo, and click on Magic to view all available one-click cartoon filters. However, almost all of the Magic effects on this editor will help you achieve an aesthetic cartoon photo effect.
Step 4: Click on Adjust and Blend above your photo workspace on the editor. This will help you manually adjust the effects (color burn, fade, saturation, brightness, etc.).
Step 5: Preview your result and once you are happy with the new cartoon photo painting, click on the Share button and download it from the top right corner of the editor to save it on your device.
● Ending Thoughts →
● This article explained creating and gave inspiration and ideas for the aesthetic cartoon painting you can choose from to make yours. In addition, the report also recommends Filmora as an influential editor if you intend to create an animation from your cartoon painting due to its tons of features.
● So, now you can start building your aesthetic drawings and cartoons!
How To Create Pinterest Slideshow in Simple Ways
How to Make Pinterest Slideshow in Simple Ways
An easy yet powerful editor
Numerous effects to choose from
Detailed tutorials provided by the official channel
Slideshows are a collection of images arranged together that an audience can quickly swipe through to view the content. Pinterest is known for its one-pin to one post feature. You cannot post more than one image or video in a pin.
Thus, business people could start sharing all of the images or products, services, or articles mostly because it can be stressful to do that. But with the Pinterest slideshow, you can now upload all the images you want to at once in one pin. Moreso, even have people view the pins simultaneously just by swiping through.
In this article
01 [How to display Pinterest’s latest pins in a slideshow? ](#Part 1)
02 [How to upload multiple photos to Pinterest?](#Part 2)
03 [How to display Pinterest’s latest pins in a slideshow? ](#Part 3)
Part 1 How to Display Pinterest Latest Pins in A Slideshow
Using Pinterest’s latest pins in a slideshow is another way to display the latest pins from any Pinterest user or blogger’s blog. Each image is linked to its pin page on Pinterest instead of the board or profile page if you use the Pinterest profile or board widget.
To install this widget, you need the user or board’s RSS feed URL, then use it as the input for a blogger slide show gadget.
Here are the tricky steps to follow for the Pinterest slide show;
Step 1: Constructing Pinterest RSS feed URL
The Pinterest RSS feed URL of a user is different from aboard.
● It would be the user’s profile URL + feed/RSS for a user. To get your Profile URL, click on your username in the top right corner of your screen, and you will see a URL in your web browser’s URL. That is your profile URL.
● For the board URL, you will get that after clicking on the board from the homepage. The URL would appear on your browser’s URL bar.

Step 2: Reformatting the feed for the slideshow gadget:
The RSS feed from step one is not very compatible with the blogger slideshow gadget. It accepts RSS feed in Media RSS format, but you can convert with Yahoo pipe. Simply plug in your feed URL in the Yahoo pipe URL.
You have to replace the value of the feed URL with the feed URL you got in step one and the pin count with the number of pins displayed on the slide show.
With this, you have successfully converted your feed URL to the media version of the Pinterest feed.
Step 3: Add the slideshow widget
Take the following step to add the slideshow widget.
Go to Dashboard > Layout and click on ‘Add A Gadget.’
Now Add, A Gadget window, scroll down and select Slideshow.

Under Source, select Other.

Put in the converted Pinterest RSS feed URL from step 2 into the Feed URL text box.
Click Save and view your blog.
Part 2 How to Upload Multiple Photos to Pinterest
If you want to display multiple photos of your product or share your brand story with pictures, then this is a feature you will grab. Pinterest allows you to display various products at a time. But first, you must also have a business account to do this.
When you upload multiple photos on Pinterest, they are known as carousel pins. This feature is a great advertising tool and will help you during the Pinterest slideshow.
This is because people would see your carousel on their home feed just like any other pin you have posted. They may also tap on the carousel and swipe through the different photos on the carousel. When the pinner saves it, they have kept the entire image.
Here is a step-by-step method to upload multiple photos to Pinterest.
Step 1: Log into your Pinterest
First, log into your Pinterest business account to access the feature. If you do not have a business account, it is elementary to do so. There is no need for you to enter any billing information if you are wondering about that. It is a straightforward process. Just open your account, click on the drop-down menu near your profile picture, see ‘convert to business,’ then upgrade your account, and you are good to go.
You should also ensure that the photos you want to upload are on your computer. If you have originally planned to use it to explain an article visually, then make sure the particular image that represents that article is correctly saved on your computer. The images should be 1:1 or 2:3 in ratio, and the format either ‘png’ or ‘jpeg.’
Add your pictures and upload. If you want to reorder your pin, you can replace or remove images within the carousel.

Step 2: Add Title
Add a title, description, and website of the carousel pin. Your title will be a snippet of what the blog post or article will be about or the recipe’s title. Your description should be the same as your Pinterest text, and you can also choose to let it appear only on your first image on your carousel pin.
Step 3: Select a Board
The last step is to select a board relevant to your carousel pin. Thus, you have your carousel pin and images. However, you cannot view this immediately as in a standard pin or video pin. But you can go back to your board to view your pin when it is ready.
Part 3 How to Make Pinterest Slideshow In 5 Simple Ways
Slideshows are a beautiful way to enhance your Pinterest account and generate more leads on your Profile. If you’ve been wondering if and how you can make slideshows on Pinterest, here’s a guaranteed step you can follow. But then Pinterest slideshows are instead referred to as a showcase.
However, to access this feature, you must first own a business account on Pinterest.
Here are five (5) simple ways you can make Slideshow on Pinterest:
Step 1: Go to your Pinterest Profile
Click settings next to your profile photo in the top right corner.

Step 2: Select Profile
When the Settings window appears, select Profile.

Step 3: Click Edit
Next to Featured Boards, click Edit.

Step 4: Select Boards
After clicking Edit for your Featured Boards, you’ll reach a screen where you may edit the boards you want to highlight. Select which boards you’d like to feature by clicking on each drop-down menu.
Opening a new Pinterest page is a good idea. Scroll down to Boards with the most Pin impressions under Analytics>Profile. These are the boards that I highlighted.

Step 5: Save
When you’ve decided which boards to include in your Featured, click Save.
● Bonus – Wondershare Filmora
With this feature, you can also tweak your Pinterest slides and make them look professional and befitting to your audience using Wondershare Filmora Video Editor .
For Win 7 or later (64-bit)
For macOS 10.12 or later
Wondershare Filmora is an online video editing software with several unique features, including split-screen, freeze-frame, loop images, and videos to help you create top-notch visual content for your brand. With features like the Chroma key, you can easily create special effects in your Pinterest slideshow background.
You can also use color match and video effects to enhance the quality of the slide.
● Ending Thoughts →
● Making a Pinterest slideshow can be confusing if you do not have the correct information. But if you do, it’ll be a great way to spice up your social media content and create more leads for your business.
● Pinterest is a social media platform that keeps growing and adding more features by the day. It is also increasing the number of users per day. Try out the simple steps stated on how to make a slideshow on Pinterest. Finally, by incorporating Filmora in your levelling up plans, you will be able to bring your brand in front of your target customer and present it nicely.
Slideshows are a collection of images arranged together that an audience can quickly swipe through to view the content. Pinterest is known for its one-pin to one post feature. You cannot post more than one image or video in a pin.
Thus, business people could start sharing all of the images or products, services, or articles mostly because it can be stressful to do that. But with the Pinterest slideshow, you can now upload all the images you want to at once in one pin. Moreso, even have people view the pins simultaneously just by swiping through.
In this article
01 [How to display Pinterest’s latest pins in a slideshow? ](#Part 1)
02 [How to upload multiple photos to Pinterest?](#Part 2)
03 [How to display Pinterest’s latest pins in a slideshow? ](#Part 3)
Part 1 How to Display Pinterest Latest Pins in A Slideshow
Using Pinterest’s latest pins in a slideshow is another way to display the latest pins from any Pinterest user or blogger’s blog. Each image is linked to its pin page on Pinterest instead of the board or profile page if you use the Pinterest profile or board widget.
To install this widget, you need the user or board’s RSS feed URL, then use it as the input for a blogger slide show gadget.
Here are the tricky steps to follow for the Pinterest slide show;
Step 1: Constructing Pinterest RSS feed URL
The Pinterest RSS feed URL of a user is different from aboard.
● It would be the user’s profile URL + feed/RSS for a user. To get your Profile URL, click on your username in the top right corner of your screen, and you will see a URL in your web browser’s URL. That is your profile URL.
● For the board URL, you will get that after clicking on the board from the homepage. The URL would appear on your browser’s URL bar.
Step 2: Reformatting the feed for the slideshow gadget:
The RSS feed from step one is not very compatible with the blogger slideshow gadget. It accepts RSS feed in Media RSS format, but you can convert with Yahoo pipe. Simply plug in your feed URL in the Yahoo pipe URL.
You have to replace the value of the feed URL with the feed URL you got in step one and the pin count with the number of pins displayed on the slide show.
With this, you have successfully converted your feed URL to the media version of the Pinterest feed.
Step 3: Add the slideshow widget
Take the following step to add the slideshow widget.
Go to Dashboard > Layout and click on ‘Add A Gadget.’
Now Add, A Gadget window, scroll down and select Slideshow.
Under Source, select Other.
Put in the converted Pinterest RSS feed URL from step 2 into the Feed URL text box.
Click Save and view your blog.
Part 2 How to Upload Multiple Photos to Pinterest
If you want to display multiple photos of your product or share your brand story with pictures, then this is a feature you will grab. Pinterest allows you to display various products at a time. But first, you must also have a business account to do this.
When you upload multiple photos on Pinterest, they are known as carousel pins. This feature is a great advertising tool and will help you during the Pinterest slideshow.
This is because people would see your carousel on their home feed just like any other pin you have posted. They may also tap on the carousel and swipe through the different photos on the carousel. When the pinner saves it, they have kept the entire image.
Here is a step-by-step method to upload multiple photos to Pinterest.
Step 1: Log into your Pinterest
First, log into your Pinterest business account to access the feature. If you do not have a business account, it is elementary to do so. There is no need for you to enter any billing information if you are wondering about that. It is a straightforward process. Just open your account, click on the drop-down menu near your profile picture, see ‘convert to business,’ then upgrade your account, and you are good to go.
You should also ensure that the photos you want to upload are on your computer. If you have originally planned to use it to explain an article visually, then make sure the particular image that represents that article is correctly saved on your computer. The images should be 1:1 or 2:3 in ratio, and the format either ‘png’ or ‘jpeg.’
Add your pictures and upload. If you want to reorder your pin, you can replace or remove images within the carousel.
Step 2: Add Title
Add a title, description, and website of the carousel pin. Your title will be a snippet of what the blog post or article will be about or the recipe’s title. Your description should be the same as your Pinterest text, and you can also choose to let it appear only on your first image on your carousel pin.
Step 3: Select a Board
The last step is to select a board relevant to your carousel pin. Thus, you have your carousel pin and images. However, you cannot view this immediately as in a standard pin or video pin. But you can go back to your board to view your pin when it is ready.
Part 3 How to Make Pinterest Slideshow In 5 Simple Ways
Slideshows are a beautiful way to enhance your Pinterest account and generate more leads on your Profile. If you’ve been wondering if and how you can make slideshows on Pinterest, here’s a guaranteed step you can follow. But then Pinterest slideshows are instead referred to as a showcase.
However, to access this feature, you must first own a business account on Pinterest.
Here are five (5) simple ways you can make Slideshow on Pinterest:
Step 1: Go to your Pinterest Profile
Click settings next to your profile photo in the top right corner.
Step 2: Select Profile
When the Settings window appears, select Profile.
Step 3: Click Edit
Next to Featured Boards, click Edit.
Step 4: Select Boards
After clicking Edit for your Featured Boards, you’ll reach a screen where you may edit the boards you want to highlight. Select which boards you’d like to feature by clicking on each drop-down menu.
Opening a new Pinterest page is a good idea. Scroll down to Boards with the most Pin impressions under Analytics>Profile. These are the boards that I highlighted.
Step 5: Save
When you’ve decided which boards to include in your Featured, click Save.
● Bonus – Wondershare Filmora
With this feature, you can also tweak your Pinterest slides and make them look professional and befitting to your audience using Wondershare Filmora Video Editor .
For Win 7 or later (64-bit)
For macOS 10.12 or later
Wondershare Filmora is an online video editing software with several unique features, including split-screen, freeze-frame, loop images, and videos to help you create top-notch visual content for your brand. With features like the Chroma key, you can easily create special effects in your Pinterest slideshow background.
You can also use color match and video effects to enhance the quality of the slide.
● Ending Thoughts →
● Making a Pinterest slideshow can be confusing if you do not have the correct information. But if you do, it’ll be a great way to spice up your social media content and create more leads for your business.
● Pinterest is a social media platform that keeps growing and adding more features by the day. It is also increasing the number of users per day. Try out the simple steps stated on how to make a slideshow on Pinterest. Finally, by incorporating Filmora in your levelling up plans, you will be able to bring your brand in front of your target customer and present it nicely.
What Wikipedia Won’t Tell You About Character Rigging
What Wikipedia Won’t Tell You Specifically About Character Rigging
An easy yet powerful editor
Numerous effects to choose from
Detailed tutorials provided by the official channel
The function of character rigging can easily be compared to that of bones, muscles and joints. They act as skeletons to virtual animations. You can also imagine them as strings used on dolls. These digitalized bones function inter-connectedly in a 3D animation.
In this article
01 [Intro to Character Rigging](#Part 1)
02 [8 Tips for Character Rigging](#Part 2)
03 [10 Best Character Rigging Services to Buy Online](#Part 3)
04 [How to Make 3d Character Rig? Are There Any Plugins or Easy](#Part 4)
Part 1 Intro to Character Rigging
As you already know by now that the process of rigging a character can be quite a tedious task. It involves a lot of creative thinking, precision and a keen eye to notice all the small details.
Once you have a model character to work on, riggers set off to creating a skeleton to match the character. These skele-animations can be used to move the entire model as if tugging on strings (not literally).
The movement of the chain of skeletons or rigs is interdependent. Which means if you pull on any one bone, it moves all the other bones in the same sequence. Similar to how bones move within the human body.
Riggers use programs and tools to create a series of bone like structures that can deformed and animated freely according to the preference of the animators.
Movements like positioning, curving and rotation can be recorded and then played back in the animation.
This requires the rigger to constantly coordinate between modelers, animators till the end of the project. This entire process can take weeks or even months.
Amazingly enough, its 20and there are online tools and tutorials you can use to easily learn complex animations like they make in large scale movies and games.
Part 2 8 Tips for Character Rigging
01The Right Rig for the Job
Rigging is a skill all animators gets good at overtime. The more you practice the more familiar you are with the tools you are using. It will also help you understand that not all rigs are meant for the same set of movements.
You need to be able to discern what rig is it that you need and discard what you don’t. If the rig is being used in a game, then the focus will be more on the experience while for movies its attention.
02Deformers for Facial Rigging
Constructing a realistic facial rig can be quite a task but is indeed satisfying once finished. Human facial features require a great degree of flexibility which is why using a variety of deformers for different parts of the face. They are better suited for creating joints over the face and can be done more quickly.
03IK and FK
Though you can use one without the other, it is best to use both of them in an animation. You can’t work without both arms can you? Applying both Inverse and Forward Kinematics in your rig design can help it make more stylistic.
04Learn Python and Maya API: Learn Python and Maya API
If you wish to take your rigging skills to the next level then learning Maya API and Python are great millstones. This way, you can create high quality and sophisticated rigs with high intense flexibility on Maya. Also, Python allows you to write new scripts for PlugIns.
05Delegate to an Animator
After rigging for several hours it is easy to feel like you are only seeing from one perspective. Get in touch with an animator earlier on in the project can help you get feedback to stay consistent in the rigging process.
06Learn Web Technologies: Learn Web Technologies
To be a good animator or rigging specialist involves a lot of learning. Animation technology is constantly changing therefore it is highly recommended to stay up to date with the latest web technologies. Learning HTML, Java Script and CSS is becoming vital to being a part of the gaming world.
07Use Scalable Tools
Not all the characters or objects you rig are going to be of the same size. Selecting the right rigging software is crucial for you to be able to scale your animations. You won’t need to use everything, just the tools that serve your purpose.
08Use a Clean Interface
If you have ever heard of the phrase ‘clean workplace – cleaner work’ then you should know how an untidy interface can affect your workflow. This won’t necessarily change the results but can surely better your experience.
Part 3 Best Character Rigging Services to Buy Online
Don’t feel confused about where to begin. The first step to get into rigging is to master a software, any software, here are of the best ones you can choose from;
01Maya
Offers the best animation features on the market.

02Blender
Vast variety of tools for sculpting, rigging or VFX.

03Modo
Has a more simplified approach towards modelling and rigging.

043ds Max
Leverages high flexibility and ease of use to riggers.
05Sculptris
Excellentfor beginners who need a gateway software to start art.

06ZBrush
Lets you work on your sculpting skills with digital clay.

07Cheetah 3D
Developed by Macintosh to be an easy to learn modelling software.

08Rhinoceros 3D
Harbours a mathematical approach to modelling and modular design.

09Fusion 360
Offers a wide range of simulation tools.

10Cinema 4D
Recognized by professionals for well-equipped arsenal of digital rendering.

Part 4 How to Make Character Rig? Are There Any Plugins or Easy
How to Make Character Rig? Are There Any Plugins or Easy
When we imagine animation, most of the time we are baffled by the end product? But what really goes on behind the mesmerizing colors and whimsical characters.
The basic is of course building rigs to support the entire movement of the character and confine it to actual physical laws that makes it almost a mimic of reality. The entire process of rigging rather simplifies the path to achieve that goal.
In Cinema, character rigging has multiple layers that goes into creating the entire skeleton animation. Setting up a character rig can take anywhere between a few hours or a few days. It probably takes mainstream movies ten times that time.
Let us break down the process of making a rig so that it is simpler to understand.
The process;
Weight Painting: An integral part of the entire rigging process. Although, weight painting can be rendered automatically by the software that you are using, but that can end up making the animation look less realistic. You can instead fine tune the weight of each bone in the rig. You can also copy similar looking bones and apply them to different mesh and repurpose them to function differently.
Placing Bones: After designing a bone structure of character, you can copy the same and use it for similar characters. This is why in games and animation, you notice characters with similar features and traits.
Inverse Kinematics: Not all bones are meant to move in a forward direction. This is why inverses Kinematics are applied to certain bones like the legs, shoulders or even a dragon’s tail. Setting up the IK of your rig would keep specific bones pointed in the right direction so as to make the animation look more natural.
Applying Constraints: The physical realm is built with restrictions. There are things you can do or can’t do according to the natural order of things so as to make your character movement more naturalistic.
Simulation Skeletons: Now comes the part where the magic happens. After fully completing a skeletal animation you can now simulate the motion over the mesh and record the result of the simulation through a series of frames.
Create an animated movie: You can play back the simulation in an animation software such as Blender and then create your own animated movie with Filmora with its easy drag and drop interface. Movies are a collage of frames, so you need to animate according to the fps you want for your video.
Facial Rigs: Facial expressions are more complex than whole body movements. It requires the attention dedicated to a project of its own. Here is where you can play with deforming shapes together to replicate facial muscle movement.
● Key Takeaways from This Episode →
● Rigging has become science in its own right but that does not mean you can’t be artistic with it.
● What you should remember that creating skeletal animation is all about movement and applying physical restrictions to it.
● Start simple and practice until you master the most complex features of any of the top rigging software services raging in the market.
The function of character rigging can easily be compared to that of bones, muscles and joints. They act as skeletons to virtual animations. You can also imagine them as strings used on dolls. These digitalized bones function inter-connectedly in a 3D animation.
In this article
01 [Intro to Character Rigging](#Part 1)
02 [8 Tips for Character Rigging](#Part 2)
03 [10 Best Character Rigging Services to Buy Online](#Part 3)
04 [How to Make 3d Character Rig? Are There Any Plugins or Easy](#Part 4)
Part 1 Intro to Character Rigging
As you already know by now that the process of rigging a character can be quite a tedious task. It involves a lot of creative thinking, precision and a keen eye to notice all the small details.
Once you have a model character to work on, riggers set off to creating a skeleton to match the character. These skele-animations can be used to move the entire model as if tugging on strings (not literally).
The movement of the chain of skeletons or rigs is interdependent. Which means if you pull on any one bone, it moves all the other bones in the same sequence. Similar to how bones move within the human body.
Riggers use programs and tools to create a series of bone like structures that can deformed and animated freely according to the preference of the animators.
Movements like positioning, curving and rotation can be recorded and then played back in the animation.
This requires the rigger to constantly coordinate between modelers, animators till the end of the project. This entire process can take weeks or even months.
Amazingly enough, its 20and there are online tools and tutorials you can use to easily learn complex animations like they make in large scale movies and games.
Part 2 8 Tips for Character Rigging
01The Right Rig for the Job
Rigging is a skill all animators gets good at overtime. The more you practice the more familiar you are with the tools you are using. It will also help you understand that not all rigs are meant for the same set of movements.
You need to be able to discern what rig is it that you need and discard what you don’t. If the rig is being used in a game, then the focus will be more on the experience while for movies its attention.
02Deformers for Facial Rigging
Constructing a realistic facial rig can be quite a task but is indeed satisfying once finished. Human facial features require a great degree of flexibility which is why using a variety of deformers for different parts of the face. They are better suited for creating joints over the face and can be done more quickly.
03IK and FK
Though you can use one without the other, it is best to use both of them in an animation. You can’t work without both arms can you? Applying both Inverse and Forward Kinematics in your rig design can help it make more stylistic.
04Learn Python and Maya API: Learn Python and Maya API
If you wish to take your rigging skills to the next level then learning Maya API and Python are great millstones. This way, you can create high quality and sophisticated rigs with high intense flexibility on Maya. Also, Python allows you to write new scripts for PlugIns.
05Delegate to an Animator
After rigging for several hours it is easy to feel like you are only seeing from one perspective. Get in touch with an animator earlier on in the project can help you get feedback to stay consistent in the rigging process.
06Learn Web Technologies: Learn Web Technologies
To be a good animator or rigging specialist involves a lot of learning. Animation technology is constantly changing therefore it is highly recommended to stay up to date with the latest web technologies. Learning HTML, Java Script and CSS is becoming vital to being a part of the gaming world.
07Use Scalable Tools
Not all the characters or objects you rig are going to be of the same size. Selecting the right rigging software is crucial for you to be able to scale your animations. You won’t need to use everything, just the tools that serve your purpose.
08Use a Clean Interface
If you have ever heard of the phrase ‘clean workplace – cleaner work’ then you should know how an untidy interface can affect your workflow. This won’t necessarily change the results but can surely better your experience.
Part 3 Best Character Rigging Services to Buy Online
Don’t feel confused about where to begin. The first step to get into rigging is to master a software, any software, here are of the best ones you can choose from;
01Maya
Offers the best animation features on the market.
02Blender
Vast variety of tools for sculpting, rigging or VFX.
03Modo
Has a more simplified approach towards modelling and rigging.
043ds Max
Leverages high flexibility and ease of use to riggers.
05Sculptris
Excellentfor beginners who need a gateway software to start art.
06ZBrush
Lets you work on your sculpting skills with digital clay.
07Cheetah 3D
Developed by Macintosh to be an easy to learn modelling software.
08Rhinoceros 3D
Harbours a mathematical approach to modelling and modular design.
09Fusion 360
Offers a wide range of simulation tools.
10Cinema 4D
Recognized by professionals for well-equipped arsenal of digital rendering.
Part 4 How to Make Character Rig? Are There Any Plugins or Easy
How to Make Character Rig? Are There Any Plugins or Easy
When we imagine animation, most of the time we are baffled by the end product? But what really goes on behind the mesmerizing colors and whimsical characters.
The basic is of course building rigs to support the entire movement of the character and confine it to actual physical laws that makes it almost a mimic of reality. The entire process of rigging rather simplifies the path to achieve that goal.
In Cinema, character rigging has multiple layers that goes into creating the entire skeleton animation. Setting up a character rig can take anywhere between a few hours or a few days. It probably takes mainstream movies ten times that time.
Let us break down the process of making a rig so that it is simpler to understand.
The process;
Weight Painting: An integral part of the entire rigging process. Although, weight painting can be rendered automatically by the software that you are using, but that can end up making the animation look less realistic. You can instead fine tune the weight of each bone in the rig. You can also copy similar looking bones and apply them to different mesh and repurpose them to function differently.
Placing Bones: After designing a bone structure of character, you can copy the same and use it for similar characters. This is why in games and animation, you notice characters with similar features and traits.
Inverse Kinematics: Not all bones are meant to move in a forward direction. This is why inverses Kinematics are applied to certain bones like the legs, shoulders or even a dragon’s tail. Setting up the IK of your rig would keep specific bones pointed in the right direction so as to make the animation look more natural.
Applying Constraints: The physical realm is built with restrictions. There are things you can do or can’t do according to the natural order of things so as to make your character movement more naturalistic.
Simulation Skeletons: Now comes the part where the magic happens. After fully completing a skeletal animation you can now simulate the motion over the mesh and record the result of the simulation through a series of frames.
Create an animated movie: You can play back the simulation in an animation software such as Blender and then create your own animated movie with Filmora with its easy drag and drop interface. Movies are a collage of frames, so you need to animate according to the fps you want for your video.
Facial Rigs: Facial expressions are more complex than whole body movements. It requires the attention dedicated to a project of its own. Here is where you can play with deforming shapes together to replicate facial muscle movement.
● Key Takeaways from This Episode →
● Rigging has become science in its own right but that does not mean you can’t be artistic with it.
● What you should remember that creating skeletal animation is all about movement and applying physical restrictions to it.
● Start simple and practice until you master the most complex features of any of the top rigging software services raging in the market.
Is It That Easy to Make My Animated Character
Is It That Easy to Make My Own Animated Character?
An easy yet powerful editor
Numerous effects to choose from
Detailed tutorials provided by the official channel
Using animated characters and avatars is a fun way to present your profile. Character animation is a unique ability that entails bringing animated characters to life. It creates an illusion of thoughts, emotions, and personality.
Everyone has a question, how to make my own animated character. This tutorial will help create an animated character of yourself.
In this article
01 [Can I Create My Own GIF?](#Part 1)
02 [How Can I Make My Picture a Cartoon Character?](#Part 2)
Part 1 Can I Create My Own GIF?
Despite being 30 years old, GIFs are still famously used by many in chats and many ways in phones, computers, etc. There are many online websites and software to create GIFs. Animated visuals make a brand’s communication with its customers more charismatic and engaging. With the correct visual stimuli, a GIF’s usefulness can be increased even more. Finding GIFs to publish is simple, but creating your own is more complicated. You can make a GIF on your mobile or computer without needing Photoshop in various ways.
We use paper and pencils or software to do character animations. A thoroughly analyzed concept, a great deal of discussion, study, and critical decisions go into producing an animated cartoon or GIF character, ensuring that the ideas come to life in the greatest possible way.
To understand how you can create your GIF, let’s discuss converting a video or multiple photos to GIF online. With the help of ezgif.com, which works on both mobile and computer.
01Converting Images to GIF
● Step 1: To convert Images to GIFs, click on “GIF maker” on the home page
● Step 2: You can select on the image or multiple images to convert it into GIF
● Step 3: Click on “Upload and made as GIF”
● Step 4: Later, you can make necessary changes like changing the order, time for each image, resizing the image, setting loop count, and many additional effects. Now, click on create GIF.
● Step 5: Finally, the GIF you created will be previewable in a box at the corner.
02Converting Videos to GIF
● Step 1: First, you need to choose the ‘video to gif’ option.
● Step 2: Choose the video that must be converted to GIF and click on “Upload.”
● Step 3: You can make desired changes like splitting, cutting, cropping the video. Enter the start and end times of the video.
● Step 4: After you’ve finished with all of the effects, click “Make GIF.” A preview of the GIF will appear below, depending on the size of the video.
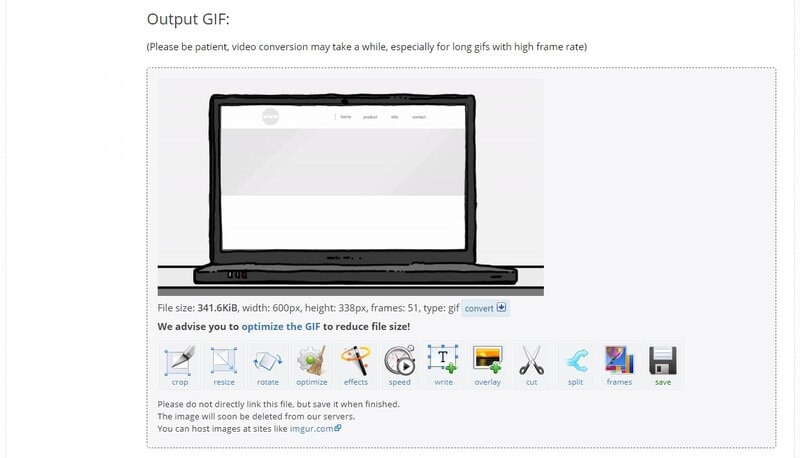
Part 2 How Can I Make My Picture a Cartoon Character
01What App Turns You into a Disney Character
Let us learn how to design your own animated character in this part.
● Voila AI Artist
Moho supports both Windows and macOS. Moho is a motion graphics program that includes tools for working with 2D vector animation and other animation effects. Moho assists you to create graphics on a tablet and use the built-in graphics editor to construct storyboards and control objects in layers. The software includes various graphic elements and characters, realistic physics, and Unity integration.
Moho has a rating of 5 on Amazon.
Through this YouTube tutorial, you will design your own animated character.
02What app is Best for Animation
● Moho
Moho supports both Windows and macOS. Moho is a motion graphics program that includes tools for working with 2D vector animation and other animation effects. Moho allows you to create graphics on a tablet and use the built-in graphics editor to construct storyboards and control objects in layers. The software includes a variety of graphic elements and characters, as well as realistic physics and Unity integration. Moho has a rating of 5 on Amazon.
● OpenTooz
OpenTooz supports both Windows and macOS. Being a professional animation cartoon-making applications suite, it produced Futurama and Sponge Bob. OpenToonz has a lot of drawing tools, effects and also a skeletal character animation feature. It also allows you to transfer photos from tracing, make a sketch, and has a large set of drawing tools and effects.
This app has a rating of 8.2 out of 10.
● Cinema 4D
Cinema 4D supports both Windows and macOS. Cinema 4D is a professional solution for producing 3D models, dynamic graphics, and realistic renderings with an elementary interface that even a beginner can comprehend. Basic capabilities, procedural and polygonal modeling, are supported, and a variety of package modules for various uses, such as scene visualization, object dynamics simulation, character animation, and more.
This app has a rating of 8 out of 10.
03Which app is the Best for Animation Free
● Adobe Animate
Both Windows and macOS are compatible with Adobe Animate. This is a powerful web design program and Adobe’s best iPad animation app, allowing even novices to create professional-looking vector graphics and animations. It’s just as simple to process a finished image as it is to create one from scratch with Animate. Good overlay, 3D models, and interfaces are all supported by the app. The content can be helpful on websites, online movies, and games once exported.
● Pencil2D
Pencil2D supports both Windows and macOS. This open-source animation software for mobile apps is a lightweight tool for working with simple 2D visuals. Allows you to sketch pixel and animate characters on the fly without putting your creativity at risk. You can add effects and filters by efficiently processing vector and raster graphics. It also includes valuable hints and examples to assist aspiring artists in getting started. It’s fun to experiment with free iPad animation applications and computer animation apps.
● Synfig Studio
Synfig Studio supports Windows and macOS. Synfig is a simple, easy open-source 2D animation editor that lets you make animations, add filters, shading and morphing effects, and more. Skeletal animation is supported, allowing you to build cartoon figures, which is lovely. The finished product can be rendered later or on a different computer entirely.
All these applications will be helpful to create an animated character of yourself.
● Wondershare Filmora Video Editor
We propose Wondershare Filmora, in this case, create animation videos by adding keyframes, resulting in a smooth and natural animation. Wondershare Filmora has various animation effects that cover a wide range of animated transitions with multiple versions. You can change the revealed length, conceal length, gradient size, and direction or position to get different outcomes.
To get started with animation, all you need is a white plane. Aside from that, color correction and an audio mixer will take your animation video to the next level. Download it for free to give it a try! Below is a tutorial on how to make animation using Filmora.
For Win 7 or later (64-bit)
For macOS 10.12 or later
● Key Takeaways from This Episode →
● Discussed an app that converts images or videos into GIFs
● Best apps for animations
● The proposal of the best software for animation, which is Wondershare Filmora Video Editor .
Using animated characters and avatars is a fun way to present your profile. Character animation is a unique ability that entails bringing animated characters to life. It creates an illusion of thoughts, emotions, and personality.
Everyone has a question, how to make my own animated character. This tutorial will help create an animated character of yourself.
In this article
01 [Can I Create My Own GIF?](#Part 1)
02 [How Can I Make My Picture a Cartoon Character?](#Part 2)
Part 1 Can I Create My Own GIF?
Despite being 30 years old, GIFs are still famously used by many in chats and many ways in phones, computers, etc. There are many online websites and software to create GIFs. Animated visuals make a brand’s communication with its customers more charismatic and engaging. With the correct visual stimuli, a GIF’s usefulness can be increased even more. Finding GIFs to publish is simple, but creating your own is more complicated. You can make a GIF on your mobile or computer without needing Photoshop in various ways.
We use paper and pencils or software to do character animations. A thoroughly analyzed concept, a great deal of discussion, study, and critical decisions go into producing an animated cartoon or GIF character, ensuring that the ideas come to life in the greatest possible way.
To understand how you can create your GIF, let’s discuss converting a video or multiple photos to GIF online. With the help of ezgif.com, which works on both mobile and computer.
01Converting Images to GIF
● Step 1: To convert Images to GIFs, click on “GIF maker” on the home page
● Step 2: You can select on the image or multiple images to convert it into GIF
● Step 3: Click on “Upload and made as GIF”
● Step 4: Later, you can make necessary changes like changing the order, time for each image, resizing the image, setting loop count, and many additional effects. Now, click on create GIF.
● Step 5: Finally, the GIF you created will be previewable in a box at the corner.
02Converting Videos to GIF
● Step 1: First, you need to choose the ‘video to gif’ option.
● Step 2: Choose the video that must be converted to GIF and click on “Upload.”
● Step 3: You can make desired changes like splitting, cutting, cropping the video. Enter the start and end times of the video.
● Step 4: After you’ve finished with all of the effects, click “Make GIF.” A preview of the GIF will appear below, depending on the size of the video.
Part 2 How Can I Make My Picture a Cartoon Character
01What App Turns You into a Disney Character
Let us learn how to design your own animated character in this part.
● Voila AI Artist
Moho supports both Windows and macOS. Moho is a motion graphics program that includes tools for working with 2D vector animation and other animation effects. Moho assists you to create graphics on a tablet and use the built-in graphics editor to construct storyboards and control objects in layers. The software includes various graphic elements and characters, realistic physics, and Unity integration.
Moho has a rating of 5 on Amazon.
Through this YouTube tutorial, you will design your own animated character.
02What app is Best for Animation
● Moho
Moho supports both Windows and macOS. Moho is a motion graphics program that includes tools for working with 2D vector animation and other animation effects. Moho allows you to create graphics on a tablet and use the built-in graphics editor to construct storyboards and control objects in layers. The software includes a variety of graphic elements and characters, as well as realistic physics and Unity integration. Moho has a rating of 5 on Amazon.
● OpenTooz
OpenTooz supports both Windows and macOS. Being a professional animation cartoon-making applications suite, it produced Futurama and Sponge Bob. OpenToonz has a lot of drawing tools, effects and also a skeletal character animation feature. It also allows you to transfer photos from tracing, make a sketch, and has a large set of drawing tools and effects.
This app has a rating of 8.2 out of 10.
● Cinema 4D
Cinema 4D supports both Windows and macOS. Cinema 4D is a professional solution for producing 3D models, dynamic graphics, and realistic renderings with an elementary interface that even a beginner can comprehend. Basic capabilities, procedural and polygonal modeling, are supported, and a variety of package modules for various uses, such as scene visualization, object dynamics simulation, character animation, and more.
This app has a rating of 8 out of 10.
03Which app is the Best for Animation Free
● Adobe Animate
Both Windows and macOS are compatible with Adobe Animate. This is a powerful web design program and Adobe’s best iPad animation app, allowing even novices to create professional-looking vector graphics and animations. It’s just as simple to process a finished image as it is to create one from scratch with Animate. Good overlay, 3D models, and interfaces are all supported by the app. The content can be helpful on websites, online movies, and games once exported.
● Pencil2D
Pencil2D supports both Windows and macOS. This open-source animation software for mobile apps is a lightweight tool for working with simple 2D visuals. Allows you to sketch pixel and animate characters on the fly without putting your creativity at risk. You can add effects and filters by efficiently processing vector and raster graphics. It also includes valuable hints and examples to assist aspiring artists in getting started. It’s fun to experiment with free iPad animation applications and computer animation apps.
● Synfig Studio
Synfig Studio supports Windows and macOS. Synfig is a simple, easy open-source 2D animation editor that lets you make animations, add filters, shading and morphing effects, and more. Skeletal animation is supported, allowing you to build cartoon figures, which is lovely. The finished product can be rendered later or on a different computer entirely.
All these applications will be helpful to create an animated character of yourself.
● Wondershare Filmora Video Editor
We propose Wondershare Filmora, in this case, create animation videos by adding keyframes, resulting in a smooth and natural animation. Wondershare Filmora has various animation effects that cover a wide range of animated transitions with multiple versions. You can change the revealed length, conceal length, gradient size, and direction or position to get different outcomes.
To get started with animation, all you need is a white plane. Aside from that, color correction and an audio mixer will take your animation video to the next level. Download it for free to give it a try! Below is a tutorial on how to make animation using Filmora.
For Win 7 or later (64-bit)
For macOS 10.12 or later
● Key Takeaways from This Episode →
● Discussed an app that converts images or videos into GIFs
● Best apps for animations
● The proposal of the best software for animation, which is Wondershare Filmora Video Editor .
What Is A GIF
What Is A GIF

Shanoon Cox
Mar 27, 2024• Proven solutions
GIF stands for Graphic Interchange Format and this animated graphic image can be usually found on web pages. They appear like a twirling icon or a banner or just have few letters that go larger like a magic. Note that animated GIF file is actually specified as a GIF89a and this single file use to contain so many images inside a particular folder. The fact is that this group of images use to follow an endless loop on screen and it creates a feel like document never ends and frames keep on arriving on screen. In few cases, it may follow one or two looped sequences and then animation stops automatically. These animated GIF files are commonly used on social media platform as well as for web ad banners.

What is a GIF?
As we already discussed, GIF stands for Graphic Interchange Format. It is a useful file extension for an animated raster file and is second most popular image file format throughout the world. You might be aware that JPEG is on first ranking at World Wide Web.
In technical terms, GIF makes sue of LZW compression algorithm whose owner is Unisys. Note that, Unisys follows particular licensing statements so users need to have license before using GIF images. But in regular practices, most of the web developers or file downloader’s keep on ignoring this licensing term and they are using it freely. Hence GIF’s have proposed a patent free kind of replacement via PNG.
If you want to make GIF online, Filmora meme maker is your ultimate solution. It helps you make image, GIF and video memes directly without watermark. It is totally FREE to use and no sign up. You can change text size, color and position to create caption when you are editing. You can also put text inside or outside in GIF. Try it now!
Application of GIF
You may easily find numerous GIF files on social media. These day’s people are using them commonly to entertain audience on their pages or channels. They are also being used for active conversations in comments or replies. Many people are utilizing GIFs just to convey unique reactions on internet at different channels. They are commonly used for illustrations and one of the most prominent applications is in the business world for marketing needs. It can help to explain your business products with entertainment and increased user engagement. The artistic world of GIFs can easily boost your customers online.
Many big brands these days are using GIF files to add a breathtaking moment to internet for their targeted audience and these small sized files are definitely do miracles. Actually popularity of GIF’s and their ability to deliver content interactively has revolutionized the world. That is why GIFs these days use to define Lexicon of internet and Oxford dictionary has recently decided to add this GIF to their list of words. In the world of art, GIF images have received great attention and most of art galleries or popular institutions are making use of GIFs to showcase incredible art work of their talented graphic artists.
How to make a GIF?
Now you might be interested to create your own GIF. Actually market is loaded with so many tools to do so. You can make use of Adobe Photoshop too or some other popular software are KickmyGraphics, Photoscape, Microsoft GIF Animator etc. If we talk about online tools then gifmaker.me, Ezgif.com and Giphy are the common options. It is also much easier to find GIF creator applications for smartphones, the list of some popular applications include: Gif Studio, Gif Me Camera air GIFBOOM for Android users whereas iPhone users can download GIFX, Daycap, MyFace When, Giffer etc.
It is possible to develop gifs from collection of still images or even from moving videos and this task is much easier that anyone can perform. In order to execute this task with ease, we would like to recommend Wondershare Filmora for you. The reason behind this recommendation is the simple and most interactive interface of this software tool. Using Filmora, you can easily combine number of stills into GIFs or turn small videos into GIFs. The more interesting thing is that Filmora also allows easy customization of Gifs as users can add overlays, elements and text etc to their GIFs using Filmora platform.


How to make GIFs with Wondershare Filmora
Here are few simple to execute steps to accomplish this task:
1. Import media files
The very first task for users is to import some editable video file or collection of photos to timeline of Wondershare Filmora. This software tool extends support to more than 150 media file formats so you can easily upload any of your image ranging somewhere between png, jpg, avi, mpeg, wav, mkv, mp4 or wmv etc.
2. Drag to timeline
Users can simply drag their video/image file and drop it on Filmora timeline. Once your file reaches there then it can be edited using wide range of tools.

3. Edit media files
There are unlimited editing options with so many interesting features of Filmora. Users can easily pick anything like slow down, speed up, combine, rotate, split, crop etc. to develop eye catching video as per available content.
4. Add text effect to GIF files
It is right time to update text based information to your GIFs. Few small messages always appear good in GIFs.

5. Save and export
Once you are done with all these steps then simply save your file with GIF extension and it is now ready to get uploaded on social media platforms.

Check this video tutorial to know more details:
Download Mac Version ](https://tools.techidaily.com/wondershare/filmora/download/ )
Shanoon Cox
Shanoon Cox is a writer and a lover of all things video.
Follow @Shanoon Cox
Shanoon Cox
Mar 27, 2024• Proven solutions
GIF stands for Graphic Interchange Format and this animated graphic image can be usually found on web pages. They appear like a twirling icon or a banner or just have few letters that go larger like a magic. Note that animated GIF file is actually specified as a GIF89a and this single file use to contain so many images inside a particular folder. The fact is that this group of images use to follow an endless loop on screen and it creates a feel like document never ends and frames keep on arriving on screen. In few cases, it may follow one or two looped sequences and then animation stops automatically. These animated GIF files are commonly used on social media platform as well as for web ad banners.
What is a GIF?
As we already discussed, GIF stands for Graphic Interchange Format. It is a useful file extension for an animated raster file and is second most popular image file format throughout the world. You might be aware that JPEG is on first ranking at World Wide Web.
In technical terms, GIF makes sue of LZW compression algorithm whose owner is Unisys. Note that, Unisys follows particular licensing statements so users need to have license before using GIF images. But in regular practices, most of the web developers or file downloader’s keep on ignoring this licensing term and they are using it freely. Hence GIF’s have proposed a patent free kind of replacement via PNG.
If you want to make GIF online, Filmora meme maker is your ultimate solution. It helps you make image, GIF and video memes directly without watermark. It is totally FREE to use and no sign up. You can change text size, color and position to create caption when you are editing. You can also put text inside or outside in GIF. Try it now!
Application of GIF
You may easily find numerous GIF files on social media. These day’s people are using them commonly to entertain audience on their pages or channels. They are also being used for active conversations in comments or replies. Many people are utilizing GIFs just to convey unique reactions on internet at different channels. They are commonly used for illustrations and one of the most prominent applications is in the business world for marketing needs. It can help to explain your business products with entertainment and increased user engagement. The artistic world of GIFs can easily boost your customers online.
Many big brands these days are using GIF files to add a breathtaking moment to internet for their targeted audience and these small sized files are definitely do miracles. Actually popularity of GIF’s and their ability to deliver content interactively has revolutionized the world. That is why GIFs these days use to define Lexicon of internet and Oxford dictionary has recently decided to add this GIF to their list of words. In the world of art, GIF images have received great attention and most of art galleries or popular institutions are making use of GIFs to showcase incredible art work of their talented graphic artists.
How to make a GIF?
Now you might be interested to create your own GIF. Actually market is loaded with so many tools to do so. You can make use of Adobe Photoshop too or some other popular software are KickmyGraphics, Photoscape, Microsoft GIF Animator etc. If we talk about online tools then gifmaker.me, Ezgif.com and Giphy are the common options. It is also much easier to find GIF creator applications for smartphones, the list of some popular applications include: Gif Studio, Gif Me Camera air GIFBOOM for Android users whereas iPhone users can download GIFX, Daycap, MyFace When, Giffer etc.
It is possible to develop gifs from collection of still images or even from moving videos and this task is much easier that anyone can perform. In order to execute this task with ease, we would like to recommend Wondershare Filmora for you. The reason behind this recommendation is the simple and most interactive interface of this software tool. Using Filmora, you can easily combine number of stills into GIFs or turn small videos into GIFs. The more interesting thing is that Filmora also allows easy customization of Gifs as users can add overlays, elements and text etc to their GIFs using Filmora platform.
How to make GIFs with Wondershare Filmora
Here are few simple to execute steps to accomplish this task:
1. Import media files
The very first task for users is to import some editable video file or collection of photos to timeline of Wondershare Filmora. This software tool extends support to more than 150 media file formats so you can easily upload any of your image ranging somewhere between png, jpg, avi, mpeg, wav, mkv, mp4 or wmv etc.
2. Drag to timeline
Users can simply drag their video/image file and drop it on Filmora timeline. Once your file reaches there then it can be edited using wide range of tools.
3. Edit media files
There are unlimited editing options with so many interesting features of Filmora. Users can easily pick anything like slow down, speed up, combine, rotate, split, crop etc. to develop eye catching video as per available content.
4. Add text effect to GIF files
It is right time to update text based information to your GIFs. Few small messages always appear good in GIFs.
5. Save and export
Once you are done with all these steps then simply save your file with GIF extension and it is now ready to get uploaded on social media platforms.
Check this video tutorial to know more details:
Download Mac Version ](https://tools.techidaily.com/wondershare/filmora/download/ )
Shanoon Cox
Shanoon Cox is a writer and a lover of all things video.
Follow @Shanoon Cox
Also read:
- Updated 2024 Approved Top 8 Tools Tell You How to Make Slideshows for Instagram
- Ways on How to Liven Up Your Animate Website on Scroll for 2024
- Whats Rigging Animation
- 10 Top Memorable Japanese Cat Cartoons for 2024
- New The Most Efficient Techniques to Make 3D Animation Character for 2024
- New 2024 Approved Fuel Your Creativity with 10 Awesome Collection of 2D Animation Examples
- Updated What Is Anime? Anime VS Manga VS Cartoon
- Updated 2024 Approved 12 Dubbed Anime Websites to Watch for Free
- In 2024, How to Create an Animated Sticky Navbar
- Updated How to Make a Video a Live Photo 2023
- New How to Animate - Adobe Animate Tutorial for All
- New Tutorial Guide to Animate Pictures in Canva
- 10 Creative Wallpaper Collage Ideas and Photos for 2024
- Updated In 2024, Know All About Animated Business Logos and the Best Tools to Create One
- Updated 2024 Approved How to Combine Multiple GIFs Into One with GIF Combiner
- Top 15 Greatest Claymation Movies of All Time
- New The Only Guide Youll Ever Need to Learn That Make 2D Rigging Clear to You
- How to Create a Whiteboard Video Step by Step
- 2024 Approved 15 Top Pics Collage Apps
- New The Best 8 Places for High-Quality Royalty Free Gifs for 2024
- Updated 10 Amazing Whiteboard Animation Video Examples You Need to Bookmark for 2024
- Updated Best 8 Tools Tell You How to Make Slideshows for Instagram for 2024
- New Amazing Ways to Find Suitable Animated Graphic Maker for 2024
- Updated In-Depth Study of Cartoon Painting Starts From Learning to Draw It
- Updated Everything You Need to Know About Becoming a Motion Graphic Designer for 2024
- New How to Create Benime Whiteboard Animation in Android for 2024
- Updated Make Well Done Animated GIF
- New In 2024, 12 Best Stop Motion Studios Worth Recommending
- How to Cartoonize Photo Photoshop in Simple Steps
- New Top 10 Banned Anime Around the World and Why
- Updated Whats the Best 10 Photo Animator Templates That Bring Your Images to Life?
- Updated In 2024, OBS Animated Lower Thirds Alternatives
- New 2024 Approved Great Guide for Beginners on 2D Animation Making
- New Top 10 Video to GIF Converters Top Picks for 2024
- 2024 Approved Ways to Master to Find 10 Best Free Animated Text Generator
- Updated 2024 Approved 10 Trendy Free Logo Animation Templates
- Updated Handy Tip From Adobe Animate Rigging Tutorial for All Learners
- Updated Some Must-Know Useful Lego Animation Ideas for 2024
- New In 2024, How To Create Pinterest Slideshow in Simple Ways
- All About 3D Medical Animation for 2024
- Updated 2024 Approved How To Create Pinterest Slideshow in Simple Ways
- Updated 2024 Approved 10 Cartoon Characters That Should Top Your List
- New Finding The Best Animated Profile Picture Maker
- 5 Solutions For Xiaomi Redmi 12 5G Unlock Without Password
- In 2024, 4 Ways to Transfer Music from Realme 12 Pro 5G to iPhone | Dr.fone
- Easy steps to recover deleted pictures from Motorola Moto G 5G (2023).
- In 2024, How to Transfer Contacts from Vivo Y200e 5G To Phone | Dr.fone
- Xiaomi 13T Pro support - Forgotten screen lock.
- Why is iPogo not working On Oppo A38? Fixed | Dr.fone
- In 2024, How to Change Motorola Moto G23 Location on Skout | Dr.fone
- In 2024, How Can I Catch the Regional Pokémon without Traveling On Gionee F3 Pro | Dr.fone
- How do I reset my Itel P55 Phone without technical knowledge? | Dr.fone
- In 2024, How I Transferred Messages from Nubia Red Magic 8S Pro+ to iPhone 12/XS (Max) in Seconds | Dr.fone
- In 2024, How to fix iCloud lock on your Apple iPhone 13 Pro and iPad
- A Detailed VPNa Fake GPS Location Free Review On Motorola G54 5G | Dr.fone
- In 2024, The Ultimate Guide to Get the Rare Candy on Pokemon Go Fire Red On Vivo Y100 5G | Dr.fone
- In 2024, How to Unlock Xiaomi Redmi Note 12 Pro 5G Phone without Google Account?
- A Detailed VPNa Fake GPS Location Free Review On Oppo A1 5G | Dr.fone
- In 2024, Ways to trade pokemon go from far away On Nubia Z50 Ultra? | Dr.fone
- Top 15 Augmented Reality Games Like Pokémon GO To Play On Apple iPhone 11 Pro | Dr.fone
- Reasons for Poco X5 Stuck on Boot Screen and Ways To Fix Them | Dr.fone
- How to Find iSpoofer Pro Activation Key On Xiaomi Redmi 13C 5G? | Dr.fone
- In 2024, 9 Best Free Android Monitoring Apps to Monitor Phone Remotely For your Samsung Galaxy Z Flip 5 | Dr.fone
- Remove Device Supervision From your Apple iPhone 13 Pro Max | Dr.fone
- How to remove ROG Phone 8 Pro PIN
- How Do You Get Sun Stone Evolutions in Pokémon For Vivo Y56 5G? | Dr.fone
- Why is iPogo not working On Lava Yuva 3 Pro? Fixed | Dr.fone
- In 2024, How To Enable USB Debugging on a Locked Oppo A18 Phone
- In 2024, How to Hide/Fake Snapchat Location on Your Infinix Note 30 VIP Racing Edition | Dr.fone
- Title: Updated Ideas That Will Help You Out in Learning How to Send WhatsApp Animated Gifs for 2024
- Author: Elon
- Created at : 2024-05-19 03:05:41
- Updated at : 2024-05-20 03:05:41
- Link: https://animation-videos.techidaily.com/updated-ideas-that-will-help-you-out-in-learning-how-to-send-whatsapp-animated-gifs-for-2024/
- License: This work is licensed under CC BY-NC-SA 4.0.
