
:max_bytes(150000):strip_icc():format(webp)/bestfirestickapps-5bcba08546e0fb005177a983-0591296fac8241ccb8497f9f29901acd.jpg)
Updated In 2024, 12 Websites with Triggered Animate on Scroll Examples
12 Websites with Triggered Animate on Scroll Examples
12 Captivating Websites with Triggered Animate on Scroll Examples
An easy yet powerful editor
Numerous effects to choose from
Detailed tutorials provided by the official channel
It is impossible to imagine any website that doesn’t have any dynamic elements. It has almost become a compulsion to use dynamic elements in websites. Nowadays we look for websites that are more engaging and interactive.
This is where the popular Scroll-Triggered Animations in websites come in. Filmora Pro is one of the best website development companies that develops websites with a triggered animate scroll for customers all around the world. Filmora Pro wonderfully animate elements on scroll for the websites they develop.
In this article
01 [What Are Scroll-Triggered Animations?](#Part 1)
02 [Best 12 Websites With Triggered Animate On Scroll Examples](#Part 2)
Part 1 What Are Scroll-Triggered Animations?
Scroll-triggered animations are that strong trend that has been with us for many years. It is the most effective way to animate elements on scrolls like the graphics, texts, videos, and photos and bring all of them to life while you scroll down a website page. Scroll animations are used to grab the attention of the user and make a website more interesting and attractive.
Part 2 Best 12 Websites with triggered animate on scroll examples
Given below are the 12 best Websites with triggered animate on scroll examples.
01Joey Bada$ Political MC

The website of Joey Bada$ Political MC is considered to be one of the most exquisite examples of how scroll-triggered animations can be used effectively to say a story. This website is a collaboration between Shoes Up - The French magazine and American MC. This is a satirical website and resembles a political campaign. To build this website scroll-triggered animation was used all through. The scrolling is designed in such a way that it changes from horizontal to vertical. Each scroll delivers many interesting facts about Joey’s political beliefs.
02Vincent Saïsset

Vincent Saïsset, the first thing that you will see is a white background with a very big white letter V on it. The letter V symbolizes the artist’s initials. There is an arrow pointing downward that encourages you to start exploring the website. As you start to scroll you will see a wave of animated typefaces with a monochromatic interplay. The website is designed with horizontal and vertical scroll transitions. It also has a playful micro-interaction that is there between the letters and the cursor.
03Home Société

The website of Home Société amazingly depicts all the interior design work of the company. The design of this website is very simple but at the same rich with graphic elements, animations, and typography. The animated elements used are rhythmically intersecting and overlapping with each other. The images that are used in the background are changing constantly with eye-catching typefaces. The best part that it makes different from other websites is the horizontal scroll; this portrays a whole new dimension giving the users an experience of infinite scroll.
04Sally

This company is from NYC and they rent cars to Lyft, Via Juno, and Uber. The website of Sally might look minimal when it comes to color and designs or exquisite detailing. But what makes the website captivating is a car’s 3D model and seventy other animations which gives the look that the car is moving. It is the perfect example where you can animate elements on scroll one can move the model from one section to the other by moving the cursor or just scrolling. All the transitions used are synchronized eloquently and there is no hitch in the entire website.
05Yuto Takahashi

The website of Yuto Takahashi’s is that of a portfolio website. This website is another amazing example of scroll-triggered animations. The very first thing that one will notice is a rotating circle that is made with the words of the artist’s name. Then instructions will pop up and ask one to hold on to the mouse to access the artist’s works. The typefaces used are Serif that surrounds the photographs. With every new scroll, some sort of liquid animation can be viewed over the photographs. While if one clicks any of the featured works one can see scroll-triggered animations are used on every single work.
06Editorial New

The website of Editorial New is a collaboration between the Pangram Pangram Foundry and the Locomotive. The typeface of this website has a reflection of the designs of the ‘90s. The website starts with a newspaper look-alike section that keeps rotating as you scroll and stops until it covers the screen completely. You will then come across various typefaces showcasing their versatility. You will also find a magazine cover being created by using the beautiful font. While you click on the Randomize button you will see that the cover changes and shows font in various other sizes.
07Danilo De Marco

The website of Danilo De Marco’s is a collaboration with Studio K95. This website is developed with the view of promoting all these works. In this website, the scroll-triggered animations are used in some specific sections, yet they are prominent. The logo along with the font used is animated in an enchanting way. The vibrant green color used will not let you move away from the screen. The typography used is very dominant. And if you click on any of his featured work you will be directed to reach the page that is solely dedicated to that particular work. While scrolling the photographs it will seem as they are drifting further away.
08K24 Moscow

K24 Moscow is one of the most captivating websites built for a modern architectural project. The website recalls the spirit of Russian suprematism and avant-garde. Scroll-triggered animations are used to animate elements on scroll throughout the full presentation. With every new scroll, you will discover something new. The combination of white, black, and red color sections that move and overlap with changes in size make a distinct typeface. These combine to make it an exciting website while keeping the Russian avant-garde spirit.
09Green Chameleon

The website of Green Chameleon was created to showcase all of their cherished achievements and memories from 2018. On the website at the very beginning, you will be greeted with an introductory graphic and then you will begin exploring the site. You will have the feeling like you have entered into a time capsule. You will be able to see the works month by month. And when you click on any particular project the picture will get displayed right on the center of the screen. With it, you will find relevant information underneath. The background color keeps changing while navigating through a 3D space.
10Bewegen

The website of Bewegen is a showcase of animations, rich content, and interactions. Bewegen is a popular world-class system known for sharing bikes. The scroll-triggered animations along with the zoom shots give a detailed view of the popular Bewegen Pedelec bike. While one scroll down further one will get related information about the bike-sharing system and also get details on how to use it. There is also the option where anyone can create their sharing system just by choosing the city and the number of heads to be included in the project while choosing the color and other features of the bike.
11Wtower

The website of Wtower is built to an interactive virtual world that tells the story of the world’s largest water tower in past - Ural’s White Tower. This website is another amazing storytelling website where the scroll-triggered animation fits like puzzle pieces. The scrolling takes to a 3D space where you will be able to learn how the tower originated and what the current state is in present. You will find a progress bar at the bottom and this appears every time there is some useful element to be delivered. Also, you can check how much of the story you have listened to and how much is left.
12Parmigiani Fleurier

The website of Parmigiani Fleurier is a website for Swiss watchmakers. This website is also another amazing animate on scroll example. The layout of the website is elegant as well as demure. While one scroll one can explore the entire collection by using the rows used on both sides of the screen. After you find the model that attracts your eye, you can view the detailed information that shows in an asymmetrical pattern around the watch. You will also come to know about other details like the case, dial, strap, winding system, and other technical specifications. The animations used are very subtle and well-balanced.
Part 3 Advantages and Disadvantages of These 12 Websites
| Name of Website | Advantage | Disadvantage |
|---|---|---|
| Joey Bada$ Political MC | Scroll-triggered animation was used all through. The scrolling is designed in such a way that it changes from horizontal to vertical. | Resource intensive. |
| Vincent Saïsset | It has a playful micro-interaction that is there between the letters and the cursor. | Components use is intensive. |
| Home Société | The horizontal scroll portrays a whole new dimension giving the users an experience of infinite scroll. | Memory usage is high. |
| Sally | The captivating part is the car’s 3D model and seventy other animations which give the look that the car is moving. | Very resource intensive. |
| Yuto Takahashi | With every new scroll, some sort of liquid animation can be viewed over the photographs | Requires High Bandwidth. |
| Editorial New | While a click is made on the Randomize button it will be seen that the cover changes and shows font in various other sizes. | Needs good Internet. |
| Danilo De Marco | The typography used is very dominant. | Resource intensive. |
| K24 Moscow | The combination of white, black, and red color sections that move and overlap with changes in size make a distinct typeface. | Requires High Bandwidth. |
| Green Chameleon | One will have the feeling like one has entered into a time capsule. | The website is resource-intensive. |
| Bewegen | There is also the option where anyone can create their sharing system just by choosing the city and the number of heads to be included in the project while choosing the color and other features of the bike. | Components use is intensive. |
| Wtower | A progress bar at the bottom and appears every time there is some useful element to be delivered. | The website is resource-intensive. |
| Parmigiani Fleurier | One can explore the entire collection by using the rows used on both sides of the screen. | Very resource-intensive |
Key Takeaways from This Episode
● At the end of this article, you have understood what Scroll-triggered animations are all about.
● You also got the view as to why you need Scroll-triggered animations while you develop a website for yourself.
● The article also tells you about the 12 best captivating Scroll-triggered animation websites which will give you various ideas for your next website.
It is impossible to imagine any website that doesn’t have any dynamic elements. It has almost become a compulsion to use dynamic elements in websites. Nowadays we look for websites that are more engaging and interactive.
This is where the popular Scroll-Triggered Animations in websites come in. Filmora Pro is one of the best website development companies that develops websites with a triggered animate scroll for customers all around the world. Filmora Pro wonderfully animate elements on scroll for the websites they develop.
In this article
01 [What Are Scroll-Triggered Animations?](#Part 1)
02 [Best 12 Websites With Triggered Animate On Scroll Examples](#Part 2)
Part 1 What Are Scroll-Triggered Animations?
Scroll-triggered animations are that strong trend that has been with us for many years. It is the most effective way to animate elements on scrolls like the graphics, texts, videos, and photos and bring all of them to life while you scroll down a website page. Scroll animations are used to grab the attention of the user and make a website more interesting and attractive.
Part 2 Best 12 Websites with triggered animate on scroll examples
Given below are the 12 best Websites with triggered animate on scroll examples.
01Joey Bada$ Political MC
The website of Joey Bada$ Political MC is considered to be one of the most exquisite examples of how scroll-triggered animations can be used effectively to say a story. This website is a collaboration between Shoes Up - The French magazine and American MC. This is a satirical website and resembles a political campaign. To build this website scroll-triggered animation was used all through. The scrolling is designed in such a way that it changes from horizontal to vertical. Each scroll delivers many interesting facts about Joey’s political beliefs.
02Vincent Saïsset
Vincent Saïsset, the first thing that you will see is a white background with a very big white letter V on it. The letter V symbolizes the artist’s initials. There is an arrow pointing downward that encourages you to start exploring the website. As you start to scroll you will see a wave of animated typefaces with a monochromatic interplay. The website is designed with horizontal and vertical scroll transitions. It also has a playful micro-interaction that is there between the letters and the cursor.
03Home Société
The website of Home Société amazingly depicts all the interior design work of the company. The design of this website is very simple but at the same rich with graphic elements, animations, and typography. The animated elements used are rhythmically intersecting and overlapping with each other. The images that are used in the background are changing constantly with eye-catching typefaces. The best part that it makes different from other websites is the horizontal scroll; this portrays a whole new dimension giving the users an experience of infinite scroll.
04Sally
This company is from NYC and they rent cars to Lyft, Via Juno, and Uber. The website of Sally might look minimal when it comes to color and designs or exquisite detailing. But what makes the website captivating is a car’s 3D model and seventy other animations which gives the look that the car is moving. It is the perfect example where you can animate elements on scroll one can move the model from one section to the other by moving the cursor or just scrolling. All the transitions used are synchronized eloquently and there is no hitch in the entire website.
05Yuto Takahashi
The website of Yuto Takahashi’s is that of a portfolio website. This website is another amazing example of scroll-triggered animations. The very first thing that one will notice is a rotating circle that is made with the words of the artist’s name. Then instructions will pop up and ask one to hold on to the mouse to access the artist’s works. The typefaces used are Serif that surrounds the photographs. With every new scroll, some sort of liquid animation can be viewed over the photographs. While if one clicks any of the featured works one can see scroll-triggered animations are used on every single work.
06Editorial New
The website of Editorial New is a collaboration between the Pangram Pangram Foundry and the Locomotive. The typeface of this website has a reflection of the designs of the ‘90s. The website starts with a newspaper look-alike section that keeps rotating as you scroll and stops until it covers the screen completely. You will then come across various typefaces showcasing their versatility. You will also find a magazine cover being created by using the beautiful font. While you click on the Randomize button you will see that the cover changes and shows font in various other sizes.
07Danilo De Marco
The website of Danilo De Marco’s is a collaboration with Studio K95. This website is developed with the view of promoting all these works. In this website, the scroll-triggered animations are used in some specific sections, yet they are prominent. The logo along with the font used is animated in an enchanting way. The vibrant green color used will not let you move away from the screen. The typography used is very dominant. And if you click on any of his featured work you will be directed to reach the page that is solely dedicated to that particular work. While scrolling the photographs it will seem as they are drifting further away.
08K24 Moscow
K24 Moscow is one of the most captivating websites built for a modern architectural project. The website recalls the spirit of Russian suprematism and avant-garde. Scroll-triggered animations are used to animate elements on scroll throughout the full presentation. With every new scroll, you will discover something new. The combination of white, black, and red color sections that move and overlap with changes in size make a distinct typeface. These combine to make it an exciting website while keeping the Russian avant-garde spirit.
09Green Chameleon
The website of Green Chameleon was created to showcase all of their cherished achievements and memories from 2018. On the website at the very beginning, you will be greeted with an introductory graphic and then you will begin exploring the site. You will have the feeling like you have entered into a time capsule. You will be able to see the works month by month. And when you click on any particular project the picture will get displayed right on the center of the screen. With it, you will find relevant information underneath. The background color keeps changing while navigating through a 3D space.
10Bewegen
The website of Bewegen is a showcase of animations, rich content, and interactions. Bewegen is a popular world-class system known for sharing bikes. The scroll-triggered animations along with the zoom shots give a detailed view of the popular Bewegen Pedelec bike. While one scroll down further one will get related information about the bike-sharing system and also get details on how to use it. There is also the option where anyone can create their sharing system just by choosing the city and the number of heads to be included in the project while choosing the color and other features of the bike.
11Wtower
The website of Wtower is built to an interactive virtual world that tells the story of the world’s largest water tower in past - Ural’s White Tower. This website is another amazing storytelling website where the scroll-triggered animation fits like puzzle pieces. The scrolling takes to a 3D space where you will be able to learn how the tower originated and what the current state is in present. You will find a progress bar at the bottom and this appears every time there is some useful element to be delivered. Also, you can check how much of the story you have listened to and how much is left.
12Parmigiani Fleurier
The website of Parmigiani Fleurier is a website for Swiss watchmakers. This website is also another amazing animate on scroll example. The layout of the website is elegant as well as demure. While one scroll one can explore the entire collection by using the rows used on both sides of the screen. After you find the model that attracts your eye, you can view the detailed information that shows in an asymmetrical pattern around the watch. You will also come to know about other details like the case, dial, strap, winding system, and other technical specifications. The animations used are very subtle and well-balanced.
Part 3 Advantages and Disadvantages of These 12 Websites
| Name of Website | Advantage | Disadvantage |
|---|---|---|
| Joey Bada$ Political MC | Scroll-triggered animation was used all through. The scrolling is designed in such a way that it changes from horizontal to vertical. | Resource intensive. |
| Vincent Saïsset | It has a playful micro-interaction that is there between the letters and the cursor. | Components use is intensive. |
| Home Société | The horizontal scroll portrays a whole new dimension giving the users an experience of infinite scroll. | Memory usage is high. |
| Sally | The captivating part is the car’s 3D model and seventy other animations which give the look that the car is moving. | Very resource intensive. |
| Yuto Takahashi | With every new scroll, some sort of liquid animation can be viewed over the photographs | Requires High Bandwidth. |
| Editorial New | While a click is made on the Randomize button it will be seen that the cover changes and shows font in various other sizes. | Needs good Internet. |
| Danilo De Marco | The typography used is very dominant. | Resource intensive. |
| K24 Moscow | The combination of white, black, and red color sections that move and overlap with changes in size make a distinct typeface. | Requires High Bandwidth. |
| Green Chameleon | One will have the feeling like one has entered into a time capsule. | The website is resource-intensive. |
| Bewegen | There is also the option where anyone can create their sharing system just by choosing the city and the number of heads to be included in the project while choosing the color and other features of the bike. | Components use is intensive. |
| Wtower | A progress bar at the bottom and appears every time there is some useful element to be delivered. | The website is resource-intensive. |
| Parmigiani Fleurier | One can explore the entire collection by using the rows used on both sides of the screen. | Very resource-intensive |
Key Takeaways from This Episode
● At the end of this article, you have understood what Scroll-triggered animations are all about.
● You also got the view as to why you need Scroll-triggered animations while you develop a website for yourself.
● The article also tells you about the 12 best captivating Scroll-triggered animation websites which will give you various ideas for your next website.
Techniques for Making After Effects 2D Animation
Blender is a widely popular animation tool that designers primarily use to create 3D animations. It offers a full-scale editing panel and a plethora of features that allow designers to create visually enticing 3D animations for videos, games, and marketing purposes. But, can you use Blender to create 2D animations? Even though the tool is marketed as a 3D animation creator, it’s worth noting that one can use it for 2D animations as well. Now, the process may not be as straightforward as using a dedicated 2D animation creator, you can still get the job done using Blender. This will be pretty helpful if you are already a Blender user and want to create 2D animations for a project.
To help you along the way, we have put together a detailed guide on how to create Blender 2D animations and use them in your videos to make them look more stunning. So, without any further ado, let’s get started.
In this article
01 [Is Blender 2D Animation As Awesome AS 3D?](#Part 1)
02 [How to Mix 2D & 3D Animation in Blender?](#Part 2)
03 [5 Amazing Blender 2D Animation Examples](#Part 3)
Part 1 Is Blender 2D Animation As Awesome AS 3D?
There’s no arguing the fact that Blender is a remarkable tool for 3D animations. Its worldwide popularity is clear proof of what one can achieve while creating a 3D animation with Blender. But, the real question is - are Blender 2D animations as good as their 3D alternatives. Well, the answer is Yes! Blender has a built-in feature known as Grease Pencil that’s specifically designed to create 2D animations. With Grease Pencil, you can create different 2D layouts from scratch and turn them into visually appealing animations to engage the potential viewers.
Part 2 How to Mix 2D & 3D Animation in Blender?
So, how can you create 2D animations in Blender? Well, it depends! The process to create a 2D animation in Blender mainly depends on what you want to design. You can find different Blender 2D animation tutorials on YouTube and use them to get started with 2D animations in Blender. But, we would like to point out that there’s a generic process that’ll remain consistent in every situation. If you are also getting started with creating 2D animations in Blender, here’s the step-by-step process that’ll help you start sailing in the right direction and make the 2D animation designing a hassle-free task.
Step 1
First and foremost, launch Blender on your system and set it up to get started. On the home screen, click on “File>New” and then, select “2D Animation”.

Step 2
Now, click on the Grease Pencil tool and use it to draw any shape on the canvas. If you want to add multiple objects to the animation, you can also draw multiple shapes.

Step 3
The next step would be to apply the array modifier to these shapes, considering you want to add a specific movement to them. So, add an array modifier first and then apply it over the desired shapes.
Step 4
After you have applied the array modifier, go ahead and start adding colors to the animation. Keep in mind the more colors you use, the better the Blender 2D animation will appear at the end.

Step 5
Now, through the editing panel, right-click on the shape you’ve drawn on the screen and then, select “Rotation and Scale”. A separate editing window will pop up on your screen. Here you can customize the movement of the object by changing its scaling options through keyframing.
That’s it; your 2D animation is now ready and you can save it on your computer.
Part 3 5 Amazing Blender 2D Animation Tutorials
So, now that you know how to create Blender 2D animations, let’s take a look at a few of the 2D animation tutorials that’ll help you get started with your first animation. All these tutorials are available on YouTube and share a detailed insight into different elements of using Blender to create 2D animation.
1. Blender Guru’s Donut Tutorial
If you search Blender on YouTube, this will be the first video you’ll see in the search results. With 11 million views on YouTube, this Blender 2D animation tutorial is one of the most sought-after tutorials on the platforms.
This 14-minute long video will walk you through the step-by-step process of creating a dedicated 2D animation for a donut using different elements of Blender. What’s more interesting is that there’s a second part to this video that’ll help you move a step forward and dive into advanced editing. Basically, if you want to get familiar with Blender’s 2D animation architecture, this video will help you embark on the right track.
2. Blender Lighting Tutorial
Gleb Alexandrov is undoubtedly one of the most talented animation experts who has created hundreds of stunning animations during his career. In this video, he has shared his years of knowledge and expertise and explained different ways to use lighting in your Blender 2D animation.
If you have ever worked on animation or even a regular YouTube video in the past, you may already be familiar with the importance of lighting. If the lighting is right, the subjects look more stunning and the overall frame becomes visually engaging. If you also want to know how to use lighting in a 2D animation, this 19-minutes long video is your answer.
3. Blender Fundamentals
If you are an absolute beginner, it would be better to first familiarize yourself with different elements of the software. Without knowing what a particular tool can do, you’ll most likely struggle to pour your creativity into the Blender 2D animation. So, before working on your first 2D animation, make sure to take your time to go through these Blender 2D animation tutorials uploaded by the tech giant itself.
Keep in mind that it’s not a single video, but a series of episodes that’ll walk you through the basics of Blender and how to start with your first 2D/3D animation. If you are serious about working with Blender, this series is your one-stop solution to get familiar with the application.
4. Character Creation and Rigging
Every 2D animation requires at least one character that would act as the main subject of the animation. And, in case you are planning to create a 3D animation with extensive movement, you’ll also have to incorporate Rigging to ensure that any movement looks realistic.
This video is for anyone who has a basic understanding of 2D animation in Blender and wants to step up their game. Here you’ll learn how to design a specific character on the canvas and how to use rigging to configure its movement. Again, this is not a single video, but a series of episodes, which means it would be better if you sit with your coffee in your hand.
5. CG Geek’s 2D Animation Tutorial in Blender
Now, if you are specifically looking for a video that only talks about Blender 2D animations and nothing else, this tutorial by CG Geek is the most suitable option. In this video, CG Geek goes on explaining how to use the Grease Pencil feature in Blender for 2D animation. He has also explained how to keyframe your 2D animation on Blender’s timeline so that any movement looks as realistic as possible.
6. Wondershare Filmora - A Reliable Alternative to Blender for Video Editors
Now, if you are a video editor and only want to create an animation for one of your videos, it would not be a wise decision to use Blender. Why? Because the tool has a steep learning curve and it’s not worth investing your time if you only want to create a 10-seconds animation. So, what’s the next best solution?
The answer is Wondershare Filmora Video Editor . It’s a full-scale video editing tool that’s designed to help editors enhance their productivity through ready-to-use templates. It has a built-in media library where you’ll find dozens of animation templates. You can simply drag these templates to your timeline and customize them to match the overall theme of your video itself.
With its timeline-based editing panel, you’ll be able to speed up the overall editing process and create visually stunning videos in no time. The tool also has a stack of ready-to-use transitions, special effects, and sounds that you can apply to the video and improve the overall production quality. In short, if your only goal is to add a 2D animation to your video, it won’t be a wise decision to rely on Blender. Instead, download and install Wondershare Filmora Pro on your system and use it to edit the video.
For Win 7 or later (64-bit)
For macOS 10.12 or later
Key Takeaways from This Episode
● Even though Blender is a3D animation software, one can use it to create stunning 2D animations as well..
● Blender has a dedicated feature known as “Grease Pencil” that’ll allow you to create your 2D animations and customize them to make them look stunning.
● Despite its advanced features, Blender is difficult to use. So, if you are looking for an alternative to Blender (only if you want to create 2D animations for your videos), Wondershare Filmora Pro is the right solution.
02 [How to Mix 2D & 3D Animation in Blender?](#Part 2)
03 [5 Amazing Blender 2D Animation Examples](#Part 3)
Part 1 Is Blender 2D Animation As Awesome AS 3D?
There’s no arguing the fact that Blender is a remarkable tool for 3D animations. Its worldwide popularity is clear proof of what one can achieve while creating a 3D animation with Blender. But, the real question is - are Blender 2D animations as good as their 3D alternatives. Well, the answer is Yes! Blender has a built-in feature known as Grease Pencil that’s specifically designed to create 2D animations. With Grease Pencil, you can create different 2D layouts from scratch and turn them into visually appealing animations to engage the potential viewers.
Part 2 How to Mix 2D & 3D Animation in Blender?
So, how can you create 2D animations in Blender? Well, it depends! The process to create a 2D animation in Blender mainly depends on what you want to design. You can find different Blender 2D animation tutorials on YouTube and use them to get started with 2D animations in Blender. But, we would like to point out that there’s a generic process that’ll remain consistent in every situation. If you are also getting started with creating 2D animations in Blender, here’s the step-by-step process that’ll help you start sailing in the right direction and make the 2D animation designing a hassle-free task.
Step 1
First and foremost, launch Blender on your system and set it up to get started. On the home screen, click on “File>New” and then, select “2D Animation”.
Step 2
Now, click on the Grease Pencil tool and use it to draw any shape on the canvas. If you want to add multiple objects to the animation, you can also draw multiple shapes.
Step 3
The next step would be to apply the array modifier to these shapes, considering you want to add a specific movement to them. So, add an array modifier first and then apply it over the desired shapes.
Step 4
After you have applied the array modifier, go ahead and start adding colors to the animation. Keep in mind the more colors you use, the better the Blender 2D animation will appear at the end.
Step 5
Now, through the editing panel, right-click on the shape you’ve drawn on the screen and then, select “Rotation and Scale”. A separate editing window will pop up on your screen. Here you can customize the movement of the object by changing its scaling options through keyframing.
That’s it; your 2D animation is now ready and you can save it on your computer.
Part 3 5 Amazing Blender 2D Animation Tutorials
So, now that you know how to create Blender 2D animations, let’s take a look at a few of the 2D animation tutorials that’ll help you get started with your first animation. All these tutorials are available on YouTube and share a detailed insight into different elements of using Blender to create 2D animation.
1. Blender Guru’s Donut Tutorial
If you search Blender on YouTube, this will be the first video you’ll see in the search results. With 11 million views on YouTube, this Blender 2D animation tutorial is one of the most sought-after tutorials on the platforms.
This 14-minute long video will walk you through the step-by-step process of creating a dedicated 2D animation for a donut using different elements of Blender. What’s more interesting is that there’s a second part to this video that’ll help you move a step forward and dive into advanced editing. Basically, if you want to get familiar with Blender’s 2D animation architecture, this video will help you embark on the right track.
2. Blender Lighting Tutorial
Gleb Alexandrov is undoubtedly one of the most talented animation experts who has created hundreds of stunning animations during his career. In this video, he has shared his years of knowledge and expertise and explained different ways to use lighting in your Blender 2D animation.
If you have ever worked on animation or even a regular YouTube video in the past, you may already be familiar with the importance of lighting. If the lighting is right, the subjects look more stunning and the overall frame becomes visually engaging. If you also want to know how to use lighting in a 2D animation, this 19-minutes long video is your answer.
3. Blender Fundamentals
If you are an absolute beginner, it would be better to first familiarize yourself with different elements of the software. Without knowing what a particular tool can do, you’ll most likely struggle to pour your creativity into the Blender 2D animation. So, before working on your first 2D animation, make sure to take your time to go through these Blender 2D animation tutorials uploaded by the tech giant itself.
Keep in mind that it’s not a single video, but a series of episodes that’ll walk you through the basics of Blender and how to start with your first 2D/3D animation. If you are serious about working with Blender, this series is your one-stop solution to get familiar with the application.
4. Character Creation and Rigging
Every 2D animation requires at least one character that would act as the main subject of the animation. And, in case you are planning to create a 3D animation with extensive movement, you’ll also have to incorporate Rigging to ensure that any movement looks realistic.
This video is for anyone who has a basic understanding of 2D animation in Blender and wants to step up their game. Here you’ll learn how to design a specific character on the canvas and how to use rigging to configure its movement. Again, this is not a single video, but a series of episodes, which means it would be better if you sit with your coffee in your hand.
5. CG Geek’s 2D Animation Tutorial in Blender
Now, if you are specifically looking for a video that only talks about Blender 2D animations and nothing else, this tutorial by CG Geek is the most suitable option. In this video, CG Geek goes on explaining how to use the Grease Pencil feature in Blender for 2D animation. He has also explained how to keyframe your 2D animation on Blender’s timeline so that any movement looks as realistic as possible.
6. Wondershare Filmora - A Reliable Alternative to Blender for Video Editors
Now, if you are a video editor and only want to create an animation for one of your videos, it would not be a wise decision to use Blender. Why? Because the tool has a steep learning curve and it’s not worth investing your time if you only want to create a 10-seconds animation. So, what’s the next best solution?
The answer is Wondershare Filmora Video Editor . It’s a full-scale video editing tool that’s designed to help editors enhance their productivity through ready-to-use templates. It has a built-in media library where you’ll find dozens of animation templates. You can simply drag these templates to your timeline and customize them to match the overall theme of your video itself.
With its timeline-based editing panel, you’ll be able to speed up the overall editing process and create visually stunning videos in no time. The tool also has a stack of ready-to-use transitions, special effects, and sounds that you can apply to the video and improve the overall production quality. In short, if your only goal is to add a 2D animation to your video, it won’t be a wise decision to rely on Blender. Instead, download and install Wondershare Filmora Pro on your system and use it to edit the video.
For Win 7 or later (64-bit)
For macOS 10.12 or later
Key Takeaways from This Episode
● Even though Blender is a3D animation software, one can use it to create stunning 2D animations as well..
● Blender has a dedicated feature known as “Grease Pencil” that’ll allow you to create your 2D animations and customize them to make them look stunning.
● Despite its advanced features, Blender is difficult to use. So, if you are looking for an alternative to Blender (only if you want to create 2D animations for your videos), Wondershare Filmora Pro is the right solution.
How to Make Your Characters Interactive in Unity Animation Rigging
Learn How to Make Your Characters Interactive in Unity Animation Rigging
An easy yet powerful editor
Numerous effects to choose from
Detailed tutorials provided by the official channel
Animation is one such aspect that is formed from the integration of several varied factors and processes. One of the most vital ones is the process of rigging. Thus, we will be discussing Unity character rigging as Unity is one of the most efficient platforms for animation.
Additionally, we will introduce you to one of the best tools you can use to edit videos and nurture the creative skills you carry in yourself. So, without any further delay, let us start our discussion.
In this article
01 [What is Unity Rigging?](#Part 1)
02 [Is It Better to Rig in Unity or Blender?](#Part 2)
03 [How To Use Animation Rigging In Unity](#Part 3)
Part 1 What is Unity Rigging?
To understand what Unity rigging is, we must start our discussion first by discussing rigging in animation. In animation, rigging is the process in which your animation characters are separated into two parts. One is the mesh-like structure of the characters. And the other is the skeletal structure given to the characters.
You integrate bones and joints and join them accordingly in the characters present in your animation. It is similar to the presence of the human skeletal system. Moreover, just like the skeletal system in humans helps in the movements of the different parts of the body, the bone and joint structure through rigging also enables the characters in animation to move.
Therefore, we can say that rigging is the process by which you can enable your characters’ in animation to move and show different facial expressions, etc. So, it is obvious that without the process of rigging, the animation is impossible, which makes rigging one of the most crucial aspects of animation.
Now that we know what rigging in animation is, we will be discussing what is animation rigging in Unity. Unity technologies have developed a cross-platform gaming engine called ‘Unity’. And this platform also offers the ones interested in animation to learn animation rigging.
The Unity platform offers robust and effective tools for animation rigging. And these tools assist the animators to create real-time rigs in Unity. Most commonly, the set of tools in Unity for rigging is used on the characters. But, if one likes, they can also use the tools on ani Game Object that includes animations and skeletons.
Therefore, when you utilise the platform of Unity or the toolsets of Unity to perform rigging in animation, it can be referred to as unity rigging. It is one of the most powerful and renowned platforms for animation, creating the finest and most professional animation creations.

Part 2 Is It Better to Rig in Unity or Blender?
Another platform that can ideally assist you in animation is Blender. A common question arises as to whether one should choose blender rigging over Unity or vice versa. We have laid down the following table to compare the different features of Blender with that of Unity.
| | Unity | Blender | |
| ——————- | ————————————————————————————————————————- | ————————————————————————————————————————————— |
| About | It is a game engine that enables you in creating human-machine interfaces, AR simulations, customize splash screens, etc. | It is a computer graphics software that is open source and is mainly used for creating 3D models. |
| Types Supported | Supports 3D | |
| Best Purpose | Ideal for film, architecture, automotive, transportation, and other industries | Ideal for animation and design that assists in VFX, simulation, organizations of all sizes with rendering, modeling, and video editing. |
There are many features that Blender lacks, but Unity includes. The features included in Unity but are absent in Blender are as follows.
● Drawing
● Games
● In-Game Analytics
● Multi-player Gaming Network
● Player Management
● Virtual Reality
● IT Asset Management
● Prototype Creation
Therefore, it is preferred to opt for Unity rigging than Blender rigging, as Blender lacks a considerable number of features.
Part 3 How To Use Animation Rigging In Unity
Now, we will be introducing you to the different steps that will help you in unity rig animation. The following list includes the steps in the sequence that, when you deploy, will help you rig in the platform of Unity.
Step 1Installation
The first step is to install the “animation rigging package” of Unity. You will get the animation rigging package in the “Package Manager”. You will be able to avail of this animation package in Unity 2019.1 and above.
This package offers you a library that consists of rig constraints. And this library of rig constraints enables you to create procedural motion during the runtime. And the general term used for this is called “runtime rigging”.
The “Asset’s Animator Root” consist of the “Rig Builder Component”, which is the source where the rigs are accumulated. The rigs here are the constraints put together in groups. With these steps you will be able to create Unity humanoid rig that will make your animation creations look the finest, most realistic and most professional.

Step 2Rig Builder set-up
After installing the unity animation rigging package, the next step is to set up the rig builder. You will have to use the “Animator component” in this step. Using the “Animator component”, integrate the “Rig Builder component” with the “GameObject”. Generally, in the hierarchy of rig, it is the topmost “Transform”.
Then, you will have to make a new child GameObject. To which, you will have to integrate the “Rig component”. After this step, you need to access the “Animator root”, where you will find the “Rig Builder component”. In the “Rig Builder component”, you need to assign the “Rig to the Rig Layers” list.
It will complete the task of creating the most basic rig. The further steps will help you install the required behaviours in the character or characters.

Step 3Bone Rendering
Whether it is unity rigging or 3D, bone rendering is the most crucial step to enable your animation characters to gain movement. The “Unity Editor” will help you interact and work with the character’s skeleton in the “Scene view.”
You can add “Transform” lists and then display them in various visual styles with the help of the “Bone Renderer: component. It enables you to integrate numerous “Bone Renderer” components, each of them having its unique style of display. As a result, gameplay debugging, rig setup, keyframing, and other artist workflows are facilitated.

Step 4Adding Rig Effectors
This step enables one to add Gizmos to Transforms, facilitating selection and visualisation. The “Effector” are invisible during “Game View”, and this step enhances the quality of the character animation.

Step 5Managing the Rig Constraints
Your characters gain “runtime animation” through the rig constraints, and thus, these are the building blocks facilitating assembling the rigs. The rigs are combined in multiple and varied ways to obtain the desired motions and movements in the characters.

Step 6Working with the Two Bone IK Constraint
The first step here is to rest your character to the “Bind Pose.” you can do so by opting for the “Menu Bar” and selecting the “Animation Rigging” option. You will find the “Bind Pose” option there, and you will have to click on it.

Then add a child GameObject below “Character Rig”. Then add a new child GameObject below “Right Arm IK”. Integrate two new child GameObjects beneath the “Right Arm Ik” by naming the first and the second one “RH IK Target” and “RH IK Hint”, respectively.

Integrate the “Rig Builder Component” with the “Animator root GameObject”. Then proceed with selecting the “CharecterRig GameObject” and integrating a “Rig Component”. Select “Two Bone IK Contrainst” to the “Right Arm IK.”

Then, incorporate a “Box Effector” to the RH IK Target. Integrate a “Ball Effector” to the “RH IK Hint”.

Then select the “RH IK Hint” and “Right Elbow”. Select “Animation Rigging>align Transform”. Move away from the “Ball Effector”. Select the “Right Arm IK GameObject” and integrate the required bones. Integrate the Character Rig GameObkect with Rig Layer list by selecting the option of “Ninja”. Then press “Play” and see your creation come to life.

Now, you might as well want to showcase your creativity in editing and video making. For that, we have the best tool for you- FILMORA. This is the finest video editing tool with the most proficient features included in the following list.
● Over 8effects for editing videos
● Keyboard shortcut, audio ducking colour, colour match
● You can also change the speed of the videos
● Every professional-level video editing tool that you need is included in Wondershare Filmora Video Editor
The features are innumerable and so can not be possibly listed differently. So, you can readily try out this tool yourself, and if you do not want to purchase in the first instance, you can easily avail of its free trial. Although, we can guarantee that after using its free trial, you would definitely want to use every avail feature of the tool!

For Win 7 or later (64-bit)
For macOS 10.12 or later
● Key Takeaways from This Episode →
● A short introduction to the process of rigging, with which we proceeded on describing and understanding what unity rigging is. We also stated how important it is in the sphere of animation.
● Next, we compared rigging in Blender and Unity. After comparing the different factors, we decided that it is optimum to choose Unity for character rigging because of the lack of features in Blender.
● Lastly, we introduced you to the best video editing tool that will equally assist you in nurturing your creativity, video editing, and animation skills.
Animation is one such aspect that is formed from the integration of several varied factors and processes. One of the most vital ones is the process of rigging. Thus, we will be discussing Unity character rigging as Unity is one of the most efficient platforms for animation.
Additionally, we will introduce you to one of the best tools you can use to edit videos and nurture the creative skills you carry in yourself. So, without any further delay, let us start our discussion.
In this article
01 [What is Unity Rigging?](#Part 1)
02 [Is It Better to Rig in Unity or Blender?](#Part 2)
03 [How To Use Animation Rigging In Unity](#Part 3)
Part 1 What is Unity Rigging?
To understand what Unity rigging is, we must start our discussion first by discussing rigging in animation. In animation, rigging is the process in which your animation characters are separated into two parts. One is the mesh-like structure of the characters. And the other is the skeletal structure given to the characters.
You integrate bones and joints and join them accordingly in the characters present in your animation. It is similar to the presence of the human skeletal system. Moreover, just like the skeletal system in humans helps in the movements of the different parts of the body, the bone and joint structure through rigging also enables the characters in animation to move.
Therefore, we can say that rigging is the process by which you can enable your characters’ in animation to move and show different facial expressions, etc. So, it is obvious that without the process of rigging, the animation is impossible, which makes rigging one of the most crucial aspects of animation.
Now that we know what rigging in animation is, we will be discussing what is animation rigging in Unity. Unity technologies have developed a cross-platform gaming engine called ‘Unity’. And this platform also offers the ones interested in animation to learn animation rigging.
The Unity platform offers robust and effective tools for animation rigging. And these tools assist the animators to create real-time rigs in Unity. Most commonly, the set of tools in Unity for rigging is used on the characters. But, if one likes, they can also use the tools on ani Game Object that includes animations and skeletons.
Therefore, when you utilise the platform of Unity or the toolsets of Unity to perform rigging in animation, it can be referred to as unity rigging. It is one of the most powerful and renowned platforms for animation, creating the finest and most professional animation creations.
Part 2 Is It Better to Rig in Unity or Blender?
Another platform that can ideally assist you in animation is Blender. A common question arises as to whether one should choose blender rigging over Unity or vice versa. We have laid down the following table to compare the different features of Blender with that of Unity.
| | Unity | Blender | |
| ——————- | ————————————————————————————————————————- | ————————————————————————————————————————————— |
| About | It is a game engine that enables you in creating human-machine interfaces, AR simulations, customize splash screens, etc. | It is a computer graphics software that is open source and is mainly used for creating 3D models. |
| Types Supported | Supports 3D | |
| Best Purpose | Ideal for film, architecture, automotive, transportation, and other industries | Ideal for animation and design that assists in VFX, simulation, organizations of all sizes with rendering, modeling, and video editing. |
There are many features that Blender lacks, but Unity includes. The features included in Unity but are absent in Blender are as follows.
● Drawing
● Games
● In-Game Analytics
● Multi-player Gaming Network
● Player Management
● Virtual Reality
● IT Asset Management
● Prototype Creation
Therefore, it is preferred to opt for Unity rigging than Blender rigging, as Blender lacks a considerable number of features.
Part 3 How To Use Animation Rigging In Unity
Now, we will be introducing you to the different steps that will help you in unity rig animation. The following list includes the steps in the sequence that, when you deploy, will help you rig in the platform of Unity.
Step 1Installation
The first step is to install the “animation rigging package” of Unity. You will get the animation rigging package in the “Package Manager”. You will be able to avail of this animation package in Unity 2019.1 and above.
This package offers you a library that consists of rig constraints. And this library of rig constraints enables you to create procedural motion during the runtime. And the general term used for this is called “runtime rigging”.
The “Asset’s Animator Root” consist of the “Rig Builder Component”, which is the source where the rigs are accumulated. The rigs here are the constraints put together in groups. With these steps you will be able to create Unity humanoid rig that will make your animation creations look the finest, most realistic and most professional.
Step 2Rig Builder set-up
After installing the unity animation rigging package, the next step is to set up the rig builder. You will have to use the “Animator component” in this step. Using the “Animator component”, integrate the “Rig Builder component” with the “GameObject”. Generally, in the hierarchy of rig, it is the topmost “Transform”.
Then, you will have to make a new child GameObject. To which, you will have to integrate the “Rig component”. After this step, you need to access the “Animator root”, where you will find the “Rig Builder component”. In the “Rig Builder component”, you need to assign the “Rig to the Rig Layers” list.
It will complete the task of creating the most basic rig. The further steps will help you install the required behaviours in the character or characters.
Step 3Bone Rendering
Whether it is unity rigging or 3D, bone rendering is the most crucial step to enable your animation characters to gain movement. The “Unity Editor” will help you interact and work with the character’s skeleton in the “Scene view.”
You can add “Transform” lists and then display them in various visual styles with the help of the “Bone Renderer: component. It enables you to integrate numerous “Bone Renderer” components, each of them having its unique style of display. As a result, gameplay debugging, rig setup, keyframing, and other artist workflows are facilitated.
Step 4Adding Rig Effectors
This step enables one to add Gizmos to Transforms, facilitating selection and visualisation. The “Effector” are invisible during “Game View”, and this step enhances the quality of the character animation.
Step 5Managing the Rig Constraints
Your characters gain “runtime animation” through the rig constraints, and thus, these are the building blocks facilitating assembling the rigs. The rigs are combined in multiple and varied ways to obtain the desired motions and movements in the characters.
Step 6Working with the Two Bone IK Constraint
The first step here is to rest your character to the “Bind Pose.” you can do so by opting for the “Menu Bar” and selecting the “Animation Rigging” option. You will find the “Bind Pose” option there, and you will have to click on it.
Then add a child GameObject below “Character Rig”. Then add a new child GameObject below “Right Arm IK”. Integrate two new child GameObjects beneath the “Right Arm Ik” by naming the first and the second one “RH IK Target” and “RH IK Hint”, respectively.
Integrate the “Rig Builder Component” with the “Animator root GameObject”. Then proceed with selecting the “CharecterRig GameObject” and integrating a “Rig Component”. Select “Two Bone IK Contrainst” to the “Right Arm IK.”
Then, incorporate a “Box Effector” to the RH IK Target. Integrate a “Ball Effector” to the “RH IK Hint”.
Then select the “RH IK Hint” and “Right Elbow”. Select “Animation Rigging>align Transform”. Move away from the “Ball Effector”. Select the “Right Arm IK GameObject” and integrate the required bones. Integrate the Character Rig GameObkect with Rig Layer list by selecting the option of “Ninja”. Then press “Play” and see your creation come to life.
Now, you might as well want to showcase your creativity in editing and video making. For that, we have the best tool for you- FILMORA. This is the finest video editing tool with the most proficient features included in the following list.
● Over 8effects for editing videos
● Keyboard shortcut, audio ducking colour, colour match
● You can also change the speed of the videos
● Every professional-level video editing tool that you need is included in Wondershare Filmora Video Editor
The features are innumerable and so can not be possibly listed differently. So, you can readily try out this tool yourself, and if you do not want to purchase in the first instance, you can easily avail of its free trial. Although, we can guarantee that after using its free trial, you would definitely want to use every avail feature of the tool!
For Win 7 or later (64-bit)
For macOS 10.12 or later
● Key Takeaways from This Episode →
● A short introduction to the process of rigging, with which we proceeded on describing and understanding what unity rigging is. We also stated how important it is in the sphere of animation.
● Next, we compared rigging in Blender and Unity. After comparing the different factors, we decided that it is optimum to choose Unity for character rigging because of the lack of features in Blender.
● Lastly, we introduced you to the best video editing tool that will equally assist you in nurturing your creativity, video editing, and animation skills.
What’s Rigging Animation and Why It Matters
What’s Rigging Animation and Why It Matters
An easy yet powerful editor
Numerous effects to choose from
Detailed tutorials provided by the official channel
Today there is a lot pre-made skeletons you can use and reuse as many times as you want, making only a few minor adjustments to the base design. If your creativity is sparking like firecrackers, then a rig can make it look more defined and/or realistic.
Not convinced? Let’s talk more about Rigging Animation.
In this article
01 [What is Rigging Animation](#Part 1)
02 [The Ultimate Collection for Free Maya Rigs [2022]](#Part 2)
Part 1 What is Rigging Animation
01Why Your Animators Need to Know How to Rig
Walk into any professional animation studio toady, you would notice unfamiliar skeleton figures in at least one of the screens.
This is called skeleton animation and is a major technique used in creating animated models that give us that 36vibe of the character in movies. It helps animators in controlling its movement just like a puppet. Hidden call back to the Matrix.
What you see in most movies or games, are characters and models who supported by a network of digital mechanical skeletons all rigged to move in a certain way.
02How Does Rigging Work?
The process of rigging is usually the second step in a long line of other methods applied after creating a model.
There is a series of interdependent bones that need to be constructed which is representation of the skeletal structure which is the basic goal in rigging animation.
With the right digital animation software you can reposition, repurpose and scale these bones in more ways than one.
The next step would involve recording the different movements of these bones on a timeline. This part of the process is called keyframing in animation.
These simple steps are actually more intricate than they actually are. Each movement acts as trigger to another set of movements like how the shoulder bone is connected to the forearm of our body.
This movement of the model becomes even more realistic once its weight scale has been determined. Painting weight can be considered to be the most unnerving challenge in the entire process.
Which is where Inverse Kinematics can help in making things 5easier by just reversing forward kinematic movements.
All of these aspects of rigging makes it possible to help animation mimic real life movements.
03How is Rigging Used?
Rigging is a technique which has only started gaining more prominence in recent times due to how crucial it is to the gaming and animation movie industry.
Not only is it used on characters but all mechanical objects in animations can also be rigged. With the help of a computerized program physicality is added to the bone structure and is recorded through a series of frames. These recording are then played back.
There are other applications to the and modelling process which goes beyond the entertainment industry such as giving virtual medical demonstrations or modeling a product.
This entire process can get much more repetitive and complex when it comes to rigging something as dynamic as the human face.
04Intro to Rigging Software
You might already be aware by now that there are some major animation software on the market that can provide you with just about every tool you need to make jaw dropping rigger animations.
Software like Blender, Cinema 4D, Maya and Houdini employs fantastic Skeletal Animation and digital motion capturing techniques. They open the doors to more realistic animations that can be used to create far more interactive and personalized digital worlds.
Maya and 3Ds Max is used to do real time animation rigging and is considered by most to be the industry standard by most animators.
Blender on the other hand is a free to use software. Though not quite as strong as Maya, it is an open source software which is equipped with everything you need to rig and animate models.
You can import completed animated files onto game engines and all types of other applications. The most common format for importing animated files is .fbx.
Part 2 The Ultimate Collection for Free Maya Rigs [2022]
01How’s Maya Rigs?
To tell the truth, every year you have spent on learning animation would come into great use in making your imagination come to life. Maya is probably the one software which gives you credit for just knowing it.
Maya has several levels of features you need to practice before you can call yourself a Maya master.
The best way to get your hands practiced on animating on Maya is by becoming well versed with all the stats and proportions while working with rigs. You would surely need to get your hands on high quality rig packages that makes the learning experience even more worth it.
With time, you would get better at understanding of the specifics of building a structure you would be showing in the final result. However getting stuck with the wrong type of rig can end up making your animating experience counterintuitive.
Here is a list of Maya Rigs you can start on right away;
02Best Free Maya Rigs of 2022
● Basic Rigs

Understanding the Basic Functionality of inanimate objects is a clear place to start in animation rigging. It helps you get a strong grasp over animation principals like bouncing a ball, before moving on to more challenging rigging packages.
● Ultimate Rigs
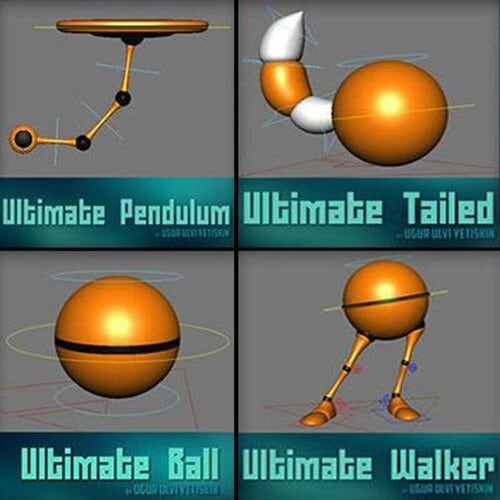
As you keep trying out different basic rigging functionalities, you eventually would need an ultimate rigging pack which is a complete set of all basic rigs. It is a great option to download and have this as a backup.
● Flour Sack
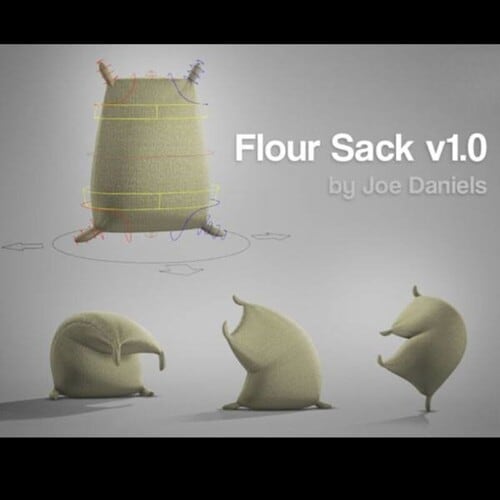
The Flour Sack free Rig is old school trainer pack. It simplifies your understanding character emotions by applying posing and adding weight to an object with a whimsical undefined structure.
● Wall E

If you are easily familiar with this character then you should remember how beautifully Wall-E was able express himself. It certainly is a step up on your journey to improving motion capture techniques. Try making your own Dreamworks style animation with Filmora from Wondershare where you can pair your animations with a few amazing film editing tools.
● JuiceBox
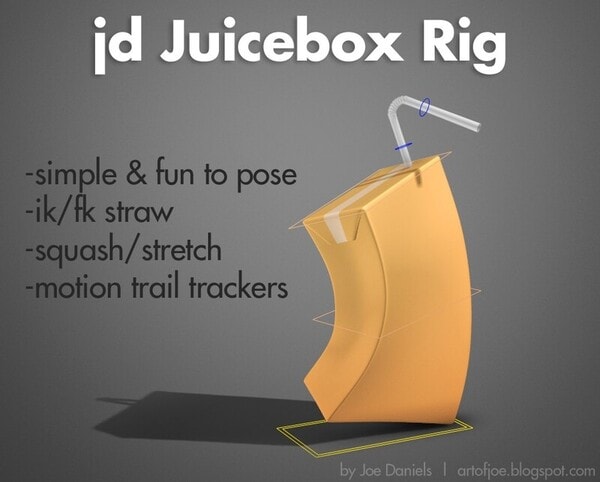
Another favored animation teaching prop is the Juice Box. It follows similar principals like the Flour Sack but the straw adds a different dimension to it. This is where an animator can try out more ways to get creative without a simple straw getting in their way.
● The Walking Egg
An egg shaped mechanical quadruped robot who has the ability to contract its legs into its body. Its legs are probably its best feature since it is lockable at then joints. A fun part of this robot is that its screen eyes can turn into guns.
● Cartoon Chameleon
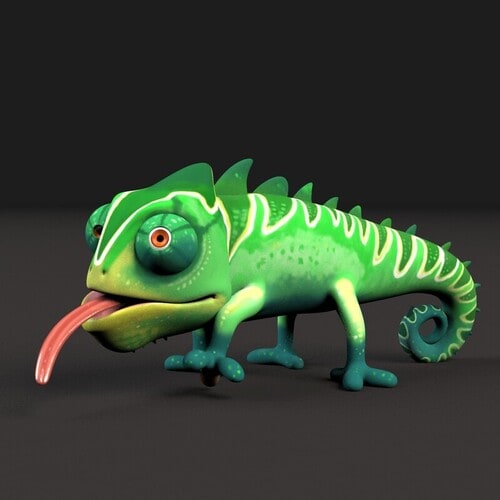
This chameleon has all basic body and facial functions needed by a quadruped. It is a funny whimsical character similar to ‘Pasacal’ from the movie “Tangled” which you can play with. Its tongue is a special feature although you may need to work on its control.
● Judy Hopps
Time to master the art of animating emotions and Judy with her amazing big round eyes can easily be adjusted with the help of floating controllers. The dynamic features of this rig has micro facial controls which you practice with.
● Roboter 2.0.1
Interested in Robots? Try playing with this humanoid figure but be warned that it might not feel as easy to replicate natural human body motion. It might take some practice but you can try taking on the initial steps by practicing on a robot rig. At least you can excuse any minor imperfections.
● Bony and Beefy
The next challenge would be to master this incredibly advanced rig. There are various different body specifications which you will need to be familiar with. This rig gives you a fair advantage by already toggling all visibility controls.
● Key Takeaways from This Episode →
● Rigging is a fantastic way to learn the foundations of animations and how it all ties into the final result. It involves creating skeletal animations of bones that share parental relationship with each other; one bone moves an entire set. You can record these movements and then play them over timeline.
● You can practice rigging with both simple and advanced animations. Complex rigging structures like facial features may require separate project of its own. There are various rigging software like Blender and Maya which provides you with everything you need to carry out a successful rigging process.
● Get started with rigging animation by practicing on free Maya Rigs. Find out which rig suits you best according to your skills level.
Today there is a lot pre-made skeletons you can use and reuse as many times as you want, making only a few minor adjustments to the base design. If your creativity is sparking like firecrackers, then a rig can make it look more defined and/or realistic.
Not convinced? Let’s talk more about Rigging Animation.
In this article
01 [What is Rigging Animation](#Part 1)
02 [The Ultimate Collection for Free Maya Rigs [2022]](#Part 2)
Part 1 What is Rigging Animation
01Why Your Animators Need to Know How to Rig
Walk into any professional animation studio toady, you would notice unfamiliar skeleton figures in at least one of the screens.
This is called skeleton animation and is a major technique used in creating animated models that give us that 36vibe of the character in movies. It helps animators in controlling its movement just like a puppet. Hidden call back to the Matrix.
What you see in most movies or games, are characters and models who supported by a network of digital mechanical skeletons all rigged to move in a certain way.
02How Does Rigging Work?
The process of rigging is usually the second step in a long line of other methods applied after creating a model.
There is a series of interdependent bones that need to be constructed which is representation of the skeletal structure which is the basic goal in rigging animation.
With the right digital animation software you can reposition, repurpose and scale these bones in more ways than one.
The next step would involve recording the different movements of these bones on a timeline. This part of the process is called keyframing in animation.
These simple steps are actually more intricate than they actually are. Each movement acts as trigger to another set of movements like how the shoulder bone is connected to the forearm of our body.
This movement of the model becomes even more realistic once its weight scale has been determined. Painting weight can be considered to be the most unnerving challenge in the entire process.
Which is where Inverse Kinematics can help in making things 5easier by just reversing forward kinematic movements.
All of these aspects of rigging makes it possible to help animation mimic real life movements.
03How is Rigging Used?
Rigging is a technique which has only started gaining more prominence in recent times due to how crucial it is to the gaming and animation movie industry.
Not only is it used on characters but all mechanical objects in animations can also be rigged. With the help of a computerized program physicality is added to the bone structure and is recorded through a series of frames. These recording are then played back.
There are other applications to the and modelling process which goes beyond the entertainment industry such as giving virtual medical demonstrations or modeling a product.
This entire process can get much more repetitive and complex when it comes to rigging something as dynamic as the human face.
04Intro to Rigging Software
You might already be aware by now that there are some major animation software on the market that can provide you with just about every tool you need to make jaw dropping rigger animations.
Software like Blender, Cinema 4D, Maya and Houdini employs fantastic Skeletal Animation and digital motion capturing techniques. They open the doors to more realistic animations that can be used to create far more interactive and personalized digital worlds.
Maya and 3Ds Max is used to do real time animation rigging and is considered by most to be the industry standard by most animators.
Blender on the other hand is a free to use software. Though not quite as strong as Maya, it is an open source software which is equipped with everything you need to rig and animate models.
You can import completed animated files onto game engines and all types of other applications. The most common format for importing animated files is .fbx.
Part 2 The Ultimate Collection for Free Maya Rigs [2022]
01How’s Maya Rigs?
To tell the truth, every year you have spent on learning animation would come into great use in making your imagination come to life. Maya is probably the one software which gives you credit for just knowing it.
Maya has several levels of features you need to practice before you can call yourself a Maya master.
The best way to get your hands practiced on animating on Maya is by becoming well versed with all the stats and proportions while working with rigs. You would surely need to get your hands on high quality rig packages that makes the learning experience even more worth it.
With time, you would get better at understanding of the specifics of building a structure you would be showing in the final result. However getting stuck with the wrong type of rig can end up making your animating experience counterintuitive.
Here is a list of Maya Rigs you can start on right away;
02Best Free Maya Rigs of 2022
● Basic Rigs
Understanding the Basic Functionality of inanimate objects is a clear place to start in animation rigging. It helps you get a strong grasp over animation principals like bouncing a ball, before moving on to more challenging rigging packages.
● Ultimate Rigs
As you keep trying out different basic rigging functionalities, you eventually would need an ultimate rigging pack which is a complete set of all basic rigs. It is a great option to download and have this as a backup.
● Flour Sack
The Flour Sack free Rig is old school trainer pack. It simplifies your understanding character emotions by applying posing and adding weight to an object with a whimsical undefined structure.
● Wall E
If you are easily familiar with this character then you should remember how beautifully Wall-E was able express himself. It certainly is a step up on your journey to improving motion capture techniques. Try making your own Dreamworks style animation with Filmora from Wondershare where you can pair your animations with a few amazing film editing tools.
● JuiceBox
Another favored animation teaching prop is the Juice Box. It follows similar principals like the Flour Sack but the straw adds a different dimension to it. This is where an animator can try out more ways to get creative without a simple straw getting in their way.
● The Walking Egg
An egg shaped mechanical quadruped robot who has the ability to contract its legs into its body. Its legs are probably its best feature since it is lockable at then joints. A fun part of this robot is that its screen eyes can turn into guns.
● Cartoon Chameleon
This chameleon has all basic body and facial functions needed by a quadruped. It is a funny whimsical character similar to ‘Pasacal’ from the movie “Tangled” which you can play with. Its tongue is a special feature although you may need to work on its control.
● Judy Hopps
Time to master the art of animating emotions and Judy with her amazing big round eyes can easily be adjusted with the help of floating controllers. The dynamic features of this rig has micro facial controls which you practice with.
● Roboter 2.0.1
Interested in Robots? Try playing with this humanoid figure but be warned that it might not feel as easy to replicate natural human body motion. It might take some practice but you can try taking on the initial steps by practicing on a robot rig. At least you can excuse any minor imperfections.
● Bony and Beefy
The next challenge would be to master this incredibly advanced rig. There are various different body specifications which you will need to be familiar with. This rig gives you a fair advantage by already toggling all visibility controls.
● Key Takeaways from This Episode →
● Rigging is a fantastic way to learn the foundations of animations and how it all ties into the final result. It involves creating skeletal animations of bones that share parental relationship with each other; one bone moves an entire set. You can record these movements and then play them over timeline.
● You can practice rigging with both simple and advanced animations. Complex rigging structures like facial features may require separate project of its own. There are various rigging software like Blender and Maya which provides you with everything you need to carry out a successful rigging process.
● Get started with rigging animation by practicing on free Maya Rigs. Find out which rig suits you best according to your skills level.
Secret Shortcut to Adobe Animate Character Tutorial
How-to Guide: Secret Shortcut to Adobe Animate Character Tutorial
An easy yet powerful editor
Numerous effects to choose from
Detailed tutorials provided by the official channel
Whether you are a beginner or an experienced graphics designer, you can use Adobe Character Animator to animate 2D characters easily. But, if you are an absolute beginner, it might take a few weeks to get familiar with the software’s features/workflow.

Irrespective of your experience with the tool, this Adobe animate character tutorial will help you get started and edit visually appealing animated shorts.
In this article
01 [How Do I Animate a Character in Adobe Animation?](#Part 1)
02 [Is Adobe Character Animator Easy to Use?](#Part 2)
03 [How to Rig a Simple Character | Adobe Animate Tutorial](#Part 3)
04 [One-Stop Solution to Edit High-Quality Videos in Every Situation](#Part 4)
Part 1 How Do I Animate a Character in Adobe Animation?
1. Start With a Script
If you want to create an animation that engages the customers, you must always start your journey with a script. Like a short movie, even an animated sketch requires a script. It’ll set the tone for the entire animation and help you start sailing in the right direction.

If you have a full production team, the writers will take care of scriptwriting and you’ll just have to suggest a few changes in between. But, if you are working on your own, you’ll have to handle the script writing all-by-yourself. In any case, however, make sure to start by crafting a beautiful script with an amazing storyline.
2. Record the Voiceover
The next step in our Adobe Animate character tutorial is recording the voiceover for the video. Unless you are planning to create a GIF animation, you would need a dedicated voiceover for your animated video to make it more appealing.

Now, before you even begin with animating the character, recording the audio will help you clear out one task from the list. To record the voiceover, you can try different types of audio recording software and equipment.
3. Start Creating the Character
At this point in our Adobe animate character tutorial, we are ready to design the actual character itself. To do this, launch Adobe Character Animator on your system. On its home screen, you’ll see a tab containing different types of characters (along with their dedicated Photoshop and Illustrator versions). Click on any of these characters and it’ll automatically open in the editing panel of Adobe character animator.

Now, you can start with animating the character. In the top-left corner, you’ll see two different options, i.e., “
If you double-tap the “Scene” tab the character will open up in a real-time environment where it’ll react to your movement and speech. Make sure that the webcam stays turned on throughout the process. Then, simply press the “Record” button and start recording the entire scene for your animation.
Part 2 Is Adobe Character Animator Easy to Use?
That’s how you can animate a character in Adobe character animator and create visually stunning animations. However, many beginners want to know if it’s easy to use Adobe character animator. The answer is Yes! With Character Animator, Adobe has developed a relatively easy-to-use interface that anyone can use easily.
Part 3 How to Rig a Simple Character | Adobe Animate Tutorial
Now, if you aspire to become a skilled graphic designer, here are a few tutorials that’ll help you get started with Adobe Character Animator and explore all its features.
1. Getting Started With Adobe Character Animator
This 15 minutes Adobe animate character tutorial by Okay Samurai is the best thing you’ll find on the Internet, especially if you are a complete beginner and want to learn different elements of the software.
2. Creating Illustrator Puppet
Adobe Character Animator lets users create both Illustrator and Photoshop puppets. If you want to become an expert in the former, this hour-long YouTube video is the best tutorial for you.
3. Getting Started With Advanced Rigging
This is another useful Adobe Animate character tutorial that’s exclusively designed to help editors understand the basics of creating a character such as “Surr”. For people who don’t know, it’s a free character in the Illustrator puppet library that you can directly import into your project.
4. Animation Workflow in Adobe Character Animator
If you are looking for an all-in-one tutorial to understand the entire workflow of working with the software, this tutorial by Okay Samurai is the best place to get started.
5. Adding an Illustrator Puppet on Live Footage
In this tutorial, you’ll understand how you can create an Illustrator puppet and add it to real-life footage, even when there’s camera movement.
6. Using the Walk Behavior in Adobe Character Animator
This tutorial will be the perfect knowledge hub. In this tutorial, you’ll learn about the basics of using the walk behavior in Adobe Character Animator and how to apply it to different characters to make it walk across the scene.
7. Creating and Implementing Replays
Replays are one of the most powerful (and one of the latest) features of Adobe Character Animator. With Replays, you can record a gesture/movement and apply a trigger to use it anytime you want throughout the animation. This tutorial will help you understand how to implement the replays in the software and use them to craft the perfect storyline.
8. Cartoon Workflow in Character Animator
Thanks to this amazing 1 hour 40 minutes long Adobe animate character tutorial, you’ll be able to get familiar with the complete workflow of pairing the software with other tools and compiling a cartoon animation at the end using Adobe After Effects.
9. Running an Animated Livestream
If you are a YouTuber or have your own Instagram brand, this will be a pretty exciting way to engage with your audience. Simply use the livestream feature, create a stunning 2D character, and interact with your audience in a more interactive manner.
10. Working With Adobe Fresco and Character Animator
This is also a useful Adobe character animate tutorial by David Werner that’ll help you understand how to use both Adobe Fresco and Character Animator together. After this tutorial, you’ll be able to import your Fresco drawings into Character Animator and customize them to create visually engaging animations.
Key Takeaways from This Episode
● Adobe Character Animator is among the most powerful animation tools you can use in 2021 to create stunning animations
● You should always start designing an animation in Character Animator by writing dedicated scripts.
● You can also pair Adobe Character Animator with other Adobe editing tools such as Illustrator, Photoshop, and Adobe Fresco
Whether you are a beginner or an experienced graphics designer, you can use Adobe Character Animator to animate 2D characters easily. But, if you are an absolute beginner, it might take a few weeks to get familiar with the software’s features/workflow.
Irrespective of your experience with the tool, this Adobe animate character tutorial will help you get started and edit visually appealing animated shorts.
In this article
01 [How Do I Animate a Character in Adobe Animation?](#Part 1)
02 [Is Adobe Character Animator Easy to Use?](#Part 2)
03 [How to Rig a Simple Character | Adobe Animate Tutorial](#Part 3)
04 [One-Stop Solution to Edit High-Quality Videos in Every Situation](#Part 4)
Part 1 How Do I Animate a Character in Adobe Animation?
1. Start With a Script
If you want to create an animation that engages the customers, you must always start your journey with a script. Like a short movie, even an animated sketch requires a script. It’ll set the tone for the entire animation and help you start sailing in the right direction.
If you have a full production team, the writers will take care of scriptwriting and you’ll just have to suggest a few changes in between. But, if you are working on your own, you’ll have to handle the script writing all-by-yourself. In any case, however, make sure to start by crafting a beautiful script with an amazing storyline.
2. Record the Voiceover
The next step in our Adobe Animate character tutorial is recording the voiceover for the video. Unless you are planning to create a GIF animation, you would need a dedicated voiceover for your animated video to make it more appealing.
Now, before you even begin with animating the character, recording the audio will help you clear out one task from the list. To record the voiceover, you can try different types of audio recording software and equipment.
3. Start Creating the Character
At this point in our Adobe animate character tutorial, we are ready to design the actual character itself. To do this, launch Adobe Character Animator on your system. On its home screen, you’ll see a tab containing different types of characters (along with their dedicated Photoshop and Illustrator versions). Click on any of these characters and it’ll automatically open in the editing panel of Adobe character animator.
Now, you can start with animating the character. In the top-left corner, you’ll see two different options, i.e., “
If you double-tap the “Scene” tab the character will open up in a real-time environment where it’ll react to your movement and speech. Make sure that the webcam stays turned on throughout the process. Then, simply press the “Record” button and start recording the entire scene for your animation.
Part 2 Is Adobe Character Animator Easy to Use?
That’s how you can animate a character in Adobe character animator and create visually stunning animations. However, many beginners want to know if it’s easy to use Adobe character animator. The answer is Yes! With Character Animator, Adobe has developed a relatively easy-to-use interface that anyone can use easily.
Part 3 How to Rig a Simple Character | Adobe Animate Tutorial
Now, if you aspire to become a skilled graphic designer, here are a few tutorials that’ll help you get started with Adobe Character Animator and explore all its features.
1. Getting Started With Adobe Character Animator
This 15 minutes Adobe animate character tutorial by Okay Samurai is the best thing you’ll find on the Internet, especially if you are a complete beginner and want to learn different elements of the software.
2. Creating Illustrator Puppet
Adobe Character Animator lets users create both Illustrator and Photoshop puppets. If you want to become an expert in the former, this hour-long YouTube video is the best tutorial for you.
3. Getting Started With Advanced Rigging
This is another useful Adobe Animate character tutorial that’s exclusively designed to help editors understand the basics of creating a character such as “Surr”. For people who don’t know, it’s a free character in the Illustrator puppet library that you can directly import into your project.
4. Animation Workflow in Adobe Character Animator
If you are looking for an all-in-one tutorial to understand the entire workflow of working with the software, this tutorial by Okay Samurai is the best place to get started.
5. Adding an Illustrator Puppet on Live Footage
In this tutorial, you’ll understand how you can create an Illustrator puppet and add it to real-life footage, even when there’s camera movement.
6. Using the Walk Behavior in Adobe Character Animator
This tutorial will be the perfect knowledge hub. In this tutorial, you’ll learn about the basics of using the walk behavior in Adobe Character Animator and how to apply it to different characters to make it walk across the scene.
7. Creating and Implementing Replays
Replays are one of the most powerful (and one of the latest) features of Adobe Character Animator. With Replays, you can record a gesture/movement and apply a trigger to use it anytime you want throughout the animation. This tutorial will help you understand how to implement the replays in the software and use them to craft the perfect storyline.
8. Cartoon Workflow in Character Animator
Thanks to this amazing 1 hour 40 minutes long Adobe animate character tutorial, you’ll be able to get familiar with the complete workflow of pairing the software with other tools and compiling a cartoon animation at the end using Adobe After Effects.
9. Running an Animated Livestream
If you are a YouTuber or have your own Instagram brand, this will be a pretty exciting way to engage with your audience. Simply use the livestream feature, create a stunning 2D character, and interact with your audience in a more interactive manner.
10. Working With Adobe Fresco and Character Animator
This is also a useful Adobe character animate tutorial by David Werner that’ll help you understand how to use both Adobe Fresco and Character Animator together. After this tutorial, you’ll be able to import your Fresco drawings into Character Animator and customize them to create visually engaging animations.
Key Takeaways from This Episode
● Adobe Character Animator is among the most powerful animation tools you can use in 2021 to create stunning animations
● You should always start designing an animation in Character Animator by writing dedicated scripts.
● You can also pair Adobe Character Animator with other Adobe editing tools such as Illustrator, Photoshop, and Adobe Fresco
10 Classical Animated Cartoon Types With Examples
10 Classical Animated Cartoon Types With Examples
An easy yet powerful editor
Numerous effects to choose from
Detailed tutorials provided by the official channel
In today’s time, animation has advanced way more and we can name more than one series, starting from “BoJack Horseman” to “The Flintstones” which can be simply termed as a funny cartoon.
In this article, we will look at the 10 best classical animated cartoon types along with relevant examples to help you understand.
In this article
01 [The Best Animated Series of All Time](#Part 1)
02 [Anyway We Can Create Animation Ourselves?](#Part 2)
Part 1 The Best Animated Series of All Time
Here are 10 classical animated cartoon types with an example for each of them. A lot of us have our earliest TV memories tied to an animated series or the nostalgia of one of the very popular 90s cartoons. In this list, you might as well find one of those funny cartoons or even one of your very favorite Disney cartoons.
01 Doug (1991-1994)
For people who were more into Nickelodeon than Disney/ABC, Doug was one of the most popular 90s cartoons. The funny cartoon show was rated to be one of the most relatable goobers on children’s TV. Along with that, the funny cartoon was known for the ingenuity and creative character names like Doug Funnie, Patti Mayonnaise, Skeeter, Porkchop, Tippi Dink, Roger Klotz, and Mosquito Valentine.
02 Popeye The Sailor (1960-1963)
“Popeye” initially started out as a comic strip in newspapers, but after the theatrical short features started airing on TV during the 1950s, soon 220 cartoons were created in just two years, making it one of the most popular television shows of all time. It had rudimentary animation and focused on the popularity of the character “Popeye the Sailor” which is still a very well-known character.
03 Pokemon (1997-Present)
It’s that good and it keeps going on. Pokemon was initially a series of games for the Nintendo Gameboy and from there it grew to be immensely popular where children across the globe simply loved the cute cartoon characters in the show. The Japanese pocket monsters became an integral part of life when the animated television series started airing.
04 Dexter’s Laboratory (1996-2003)
In 1996 Cartoon Network audiences were introduced to a show named Dexter’s Laboratory with Dexter as the primary character of the cartoon show. The boy genius had a massive hidden laboratory under his house. Every episode would feature Dexter planning an exciting experiment which was a favorite of kids. The series is one of the highest-rated series on the Cartoon Network and it also received a Primetime Emmy Award in 1996.
05 Alvin and the Chipmunks (1983-1990)
Alvin and the Chipmunks have been known since the 1960s. Although the show “Alvin and the Chipmunks’’ became popular on NBC in 1983. It featured three main characters: Alvin, Simon, and the loveable Theodore who got into all kinds of hijinks. The series had a large following, especially after the Chip-ettes, female versions of the Chipmunks, were introduced.
06 Scooby Doo, Where Are You! (1969-1970)

Barely any other two-season title has ever become as popular as “Scooby Doo, Where Are You!” The animation franchise is existent even today. The main attraction of this very funny cartoon was the cowardly Great Dane with a speech impediment. The dog solved crimes with teen friends and perfectly captured the imaginations of children as well as teenagers with subtle horror elements and some really hilarious catchphrases.
07 The Flintstones (1960-1966)

The Flintstones is inspired by “The Honeymooners’’ and was also the first animated series released in primetime. It was also the most successful one of its kind until “The Simpsons” was released 30 years later. The popularity of the series was because of its satirical take on modern suburban culture through the use of absurd, anachronistic elements in a Stone Age setting.
08 The Simpsons (1987-1990)

The Simpsons are simply one of the most popular and revolutionary 90s cartoons. It became a cultural juggernaut during its time and has been rated highly by viewers of all ages. The series emphasizes animation which has increased its appeal to modern viewers.
09 Sealab 2021 (2000-2005)
Sealab 2021 is one of Adult Swim’s initial launches of cartoons. It follows a forgotten ’70s adventure cartoon that turns the environmentally-friendly adventure into a blend of workplace resentments and absurd humor.
10 Teen Titans Go (2013- Present)
This is one of the modern and fast-paced animated series with jokes infused in every quarter of a minute. The funny cartoon animation is popular for its pop-culture references, sly hits at the DC universe, and a well-presented set of self-deprecating jokes.
Part 2 Anyway We Can Create Animation Ourselves?
There can be a number of reasons why you may need to create an animation. With modern technology, it is very easy and possible to quickly and effectively create animations suited for your purposes. Before you go on to creating animations, you need to know about the 5 key kinds of animation popular in modern times. They are:
3D computer animation
Traditional animation
Stop motion
2D Vector-based animation
Motion graphics
No matter which one you are going to create, what you need is an efficient and versatile tool like the Wondershare Filmora . This tool is an advanced and highly functional tool that is used and recommended by professionals all across the globe. The tool enables you to create all kinds of animations with increased ease. The video editing tool comes with a vast range of professional tools that can help you create the perfect video for storytelling.
With Filmora you can create animations just as you imagine. With a range of customization options, you can actually, “breathe life into your clips.” Amongst the key features of the tools, the mentionable ones are:
Motion tracking
A vast range of animation options
Ease in and ease out features
Pan and zoom
A range of text styles and editing options to adjust lights and flares warps and distorts, etc.
Filmora is the perfect tool to bring your imagination to life and express your cinematic flair. The vast range of tools and easy usability help you make the most of your venture and create the perfect animations for your purposes, seamlessly and really quickly.
Key Takeaways from This Episode
● Animation is a vast and versatile field. With the advancement of computer technology and the transformation of the animation industry, we have moved far ahead with our approaches than where we were with the 90s cartoons.
● This article has brought forward the various animation styles that have been a part of the animation industry.
● From the old funny cartoons to the latest dramatic animated web series, you have read about it all to help you better understand the distinctions and the evolution of animation over time.
● Along with BoJack Horseman or just one of the popular Disney cartoons, you have also read about how to create your own animations all by yourself. Filmora Pro is the perfect tool for making animations for a variety of purposes, including marketing videos.
● We hope all of that information will help you make the most of your animation venture!
In today’s time, animation has advanced way more and we can name more than one series, starting from “BoJack Horseman” to “The Flintstones” which can be simply termed as a funny cartoon.
In this article, we will look at the 10 best classical animated cartoon types along with relevant examples to help you understand.
In this article
01 [The Best Animated Series of All Time](#Part 1)
02 [Anyway We Can Create Animation Ourselves?](#Part 2)
Part 1 The Best Animated Series of All Time
Here are 10 classical animated cartoon types with an example for each of them. A lot of us have our earliest TV memories tied to an animated series or the nostalgia of one of the very popular 90s cartoons. In this list, you might as well find one of those funny cartoons or even one of your very favorite Disney cartoons.
01 Doug (1991-1994)
For people who were more into Nickelodeon than Disney/ABC, Doug was one of the most popular 90s cartoons. The funny cartoon show was rated to be one of the most relatable goobers on children’s TV. Along with that, the funny cartoon was known for the ingenuity and creative character names like Doug Funnie, Patti Mayonnaise, Skeeter, Porkchop, Tippi Dink, Roger Klotz, and Mosquito Valentine.
02 Popeye The Sailor (1960-1963)
“Popeye” initially started out as a comic strip in newspapers, but after the theatrical short features started airing on TV during the 1950s, soon 220 cartoons were created in just two years, making it one of the most popular television shows of all time. It had rudimentary animation and focused on the popularity of the character “Popeye the Sailor” which is still a very well-known character.
03 Pokemon (1997-Present)
It’s that good and it keeps going on. Pokemon was initially a series of games for the Nintendo Gameboy and from there it grew to be immensely popular where children across the globe simply loved the cute cartoon characters in the show. The Japanese pocket monsters became an integral part of life when the animated television series started airing.
04 Dexter’s Laboratory (1996-2003)
In 1996 Cartoon Network audiences were introduced to a show named Dexter’s Laboratory with Dexter as the primary character of the cartoon show. The boy genius had a massive hidden laboratory under his house. Every episode would feature Dexter planning an exciting experiment which was a favorite of kids. The series is one of the highest-rated series on the Cartoon Network and it also received a Primetime Emmy Award in 1996.
05 Alvin and the Chipmunks (1983-1990)
Alvin and the Chipmunks have been known since the 1960s. Although the show “Alvin and the Chipmunks’’ became popular on NBC in 1983. It featured three main characters: Alvin, Simon, and the loveable Theodore who got into all kinds of hijinks. The series had a large following, especially after the Chip-ettes, female versions of the Chipmunks, were introduced.
06 Scooby Doo, Where Are You! (1969-1970)
Barely any other two-season title has ever become as popular as “Scooby Doo, Where Are You!” The animation franchise is existent even today. The main attraction of this very funny cartoon was the cowardly Great Dane with a speech impediment. The dog solved crimes with teen friends and perfectly captured the imaginations of children as well as teenagers with subtle horror elements and some really hilarious catchphrases.
07 The Flintstones (1960-1966)
The Flintstones is inspired by “The Honeymooners’’ and was also the first animated series released in primetime. It was also the most successful one of its kind until “The Simpsons” was released 30 years later. The popularity of the series was because of its satirical take on modern suburban culture through the use of absurd, anachronistic elements in a Stone Age setting.
08 The Simpsons (1987-1990)
The Simpsons are simply one of the most popular and revolutionary 90s cartoons. It became a cultural juggernaut during its time and has been rated highly by viewers of all ages. The series emphasizes animation which has increased its appeal to modern viewers.
09 Sealab 2021 (2000-2005)
Sealab 2021 is one of Adult Swim’s initial launches of cartoons. It follows a forgotten ’70s adventure cartoon that turns the environmentally-friendly adventure into a blend of workplace resentments and absurd humor.
10 Teen Titans Go (2013- Present)
This is one of the modern and fast-paced animated series with jokes infused in every quarter of a minute. The funny cartoon animation is popular for its pop-culture references, sly hits at the DC universe, and a well-presented set of self-deprecating jokes.
Part 2 Anyway We Can Create Animation Ourselves?
There can be a number of reasons why you may need to create an animation. With modern technology, it is very easy and possible to quickly and effectively create animations suited for your purposes. Before you go on to creating animations, you need to know about the 5 key kinds of animation popular in modern times. They are:
3D computer animation
Traditional animation
Stop motion
2D Vector-based animation
Motion graphics
No matter which one you are going to create, what you need is an efficient and versatile tool like the Wondershare Filmora . This tool is an advanced and highly functional tool that is used and recommended by professionals all across the globe. The tool enables you to create all kinds of animations with increased ease. The video editing tool comes with a vast range of professional tools that can help you create the perfect video for storytelling.
With Filmora you can create animations just as you imagine. With a range of customization options, you can actually, “breathe life into your clips.” Amongst the key features of the tools, the mentionable ones are:
Motion tracking
A vast range of animation options
Ease in and ease out features
Pan and zoom
A range of text styles and editing options to adjust lights and flares warps and distorts, etc.
Filmora is the perfect tool to bring your imagination to life and express your cinematic flair. The vast range of tools and easy usability help you make the most of your venture and create the perfect animations for your purposes, seamlessly and really quickly.
Key Takeaways from This Episode
● Animation is a vast and versatile field. With the advancement of computer technology and the transformation of the animation industry, we have moved far ahead with our approaches than where we were with the 90s cartoons.
● This article has brought forward the various animation styles that have been a part of the animation industry.
● From the old funny cartoons to the latest dramatic animated web series, you have read about it all to help you better understand the distinctions and the evolution of animation over time.
● Along with BoJack Horseman or just one of the popular Disney cartoons, you have also read about how to create your own animations all by yourself. Filmora Pro is the perfect tool for making animations for a variety of purposes, including marketing videos.
● We hope all of that information will help you make the most of your animation venture!
How to Create a YouTube Intro Animation Like a Pro
How to Create a YouTube Intro Animation like a Pro
An easy yet powerful editor
Numerous effects to choose from
Detailed tutorials provided by the official channel
YouTube video intro animation is the short introductory clips and plays at the beginning of a YouTube video. YouTube intro videos as in almost everywhere, most times probably without giving them a second chance or understanding what their purpose is. There is no difference in YouTube videos, as without a proper setup, even if the content is excellent, your audience is not likely to hang around.
There is some free animation intro for YouTube that you can choose from to create your own YouTube intro. In this article, we will show a comprehensive guide on how to get an intro animation template free download and create your own free YouTube animation intro like a professional. So, let’s move on to explore how is the YouTube intro animation download process works using YouTube Intro Animation Makers through this article.
In this article
01 [What is YouTube Intro Animation?](#Part 1)
02 [How does YouTube Intro Animation Maker works?](#Part 2)
03 [5 of YouTube Intro Animation examples (2022)](#Part 3)
04 [How to Create a YouTube Intro Animation FAST](#Part 4)
Part 1 What is YouTube Intro Animation?
An animation video for YouTube intro is a short animated clip usually 5 to seconds in length and plays before the main YouTube video content. The intro YouTube animation is the primary step to creating your online persona and branding your content on YouTube. You can get YouTube intro animation for free online and include them in your YouTube content. A YouTube intro easily and quickly provides viewers insight into what they should expect from the channel. It is used to familiarize the viewer with the channel’s theme, feel, and look, which gives them context before reaching the main content.
Intro animation YouTube is sometimes called video bumpers, as they catch viewers’ attention and help reinforce your brand. In the general video, intros boost the video quality. You can also get a good video intro from intro animation free download websites for your YouTube content.
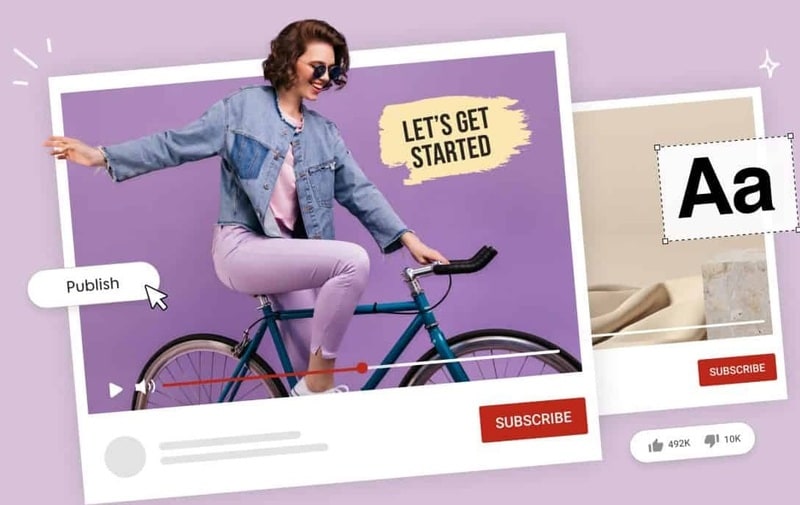
Part 2 How do YouTube Intro Animation Maker works?
You can create compelling, engaging, and best intro animation on YouTube by using free animation intro for YouTube or creating a YouTube intro animation by yourself. You don’t need be a pro in video editing or a creator to make animated video intros for your YouTube channel if you have the best intro animation software to create intro videos like a professional. Here are some benefits of YouTube intro animation maker and how it works:
● A YouTube intro animation maker has a built-in editor in your browser
● A YouTube intro animation maker is affordable, fast, and easy to use
● A YouTube intro animation maker can broadcast-quality logo animation and intros
● A YouTube intro animation maker has a wide variety of templates to make your YouTube animation intro
Using a YouTube intro animation maker, you are ready to create unskippable YouTube intros using the most versatile tool to turn your viewers into lifelong channel subscribers.
Part 3 5 of YouTube Intro Animation examples (2022)
To be successful on YouTube, capture and retain your viewers’ attention and increase your conversions. The best method to achieve this is by using an excellent YouTube animated intro to create a lasting impression to make your video worth watching. You can also get Professional YouTube animated intro from intro animation download websites. This action will look at 5 make YouTube intro animation examples and ideas from where you can draw your inspiration in 2022.
01Ted Talk
Ted Talk, free fire intro animation, is a perfect example of a beautiful and captured sequence that helps to tell the audience what the brand is all about and their ideas and worth spreading. The good news about this intro is that you don’t need to be a professional, hire an animator, or invest in any flashy or expensive animation to show your brand on YouTube.
To achieve this intro, all you require is some intro animation in After Effects template free that can work for your brand so that you’ll be able to retain your audience and make them wanting to come back for more.
02Jazza
Jazza is a perfect example of free intro animation templates that you can use all over again to showcase your brand. The main idea for making a gaming intro animation video free download is to bring about an attractive, eye-capturing video intro through it.
This intro communicates a passion for teaching people to paint, animate, and draw. This same template can also create a vlog animation intro for the Jazza language lesson website, as it is a tremendous sequential presentation that represents Jazza mission.
03Salma Jafra
Salma Jafra Video intro tells a short story about the video’s main takeaways and includes an 8 seconds vlog intro animation sequence. Everything, including a brand color, is purple, which helps the audience recognize our videos on YouTube.
In addition to the free animation for YouTube intro, she plugged in her content to the end of the video or outro to generate enough traffic and adhere to SEO guidelines to ensure that the targeted audience finds the videos.
04SciShow
SciShow enables viewers to understand the brand and the kind of free YouTube intro animation video. The main trick of the video is to instantly grab viewers’ attention and convince them that the video is for them.
This intro animation video free download is a perfect example of how you can introduce your theme, tone, and brand name into your YouTube animation intro video download. This type of intro allows viewers to know what to expect quickly, and superb animation and design show off the value of production. Examples of a brand that can benefit from this type of YouTube animation intro download template is sleep studies.
05”Pump Red” Cinema Template

“Pump Red” Cinema Template is perfect for capturing reviewers’ imagination with an eye-catching, captivating, and intelligent video intro. By following the examples in this Minecraft animation intro template, you are more likely to retain your visitors or viewers from the moment they hit the play button on your YouTube video by using a catching soundtrack, on-brand messaging, and exciting visuals.
Part 4 How to Create a YouTube Intro Animation FAST
Whether you are using any streaming channel, YouTube, or selling videos on any e-commerce website, making animation for YouTube intro plays a vital role in promoting your brand. With it, creating an introduction may not seem as complicated as it sounds.
The section explains in detail how to make a YouTube intro animation free with the Wondershare Filmora Video Editor video editor from animated intro download templates or create a custom intro from scratch even if there is no existing footage or image to begin with. The following method will guide you through the process, and then you can keep your video saved for reuse in all creations to maintain consistency and give your brand a unique identity:
Wondershare Filmora
Get started easily with Filmora’s powerful performance, intuitive interface, and countless effects!
Try It Free Try It Free Try It Free Learn More >

01Step Launch Intro Animation Software
Launch Wondershare Filmora Video Editor editor, add intro background to Filmora by going to the media tab at the top and selecting any sample colors category from the left pane. All the solid and gradient colors in the media library are available at the right, then over the mouse to the color title you want to use as a background and click on the + icon in the middle to add it to the timeline.
02Step Add Different effects
Add sound effects or audio to YouTube animated intro to make it more recognizable. In Wondershare Filmora Video Editor , visit the built-in audio library by double-clicking the audio thumbnail from the library and listening to the soundtrack. Repeat the process to find the perfect sound effects or background music for your video intro. D-and-drop the audio to the video.

03Step Adding Branding Element
In the animated video intro, add the company name, branding element, and channel name to create brand awareness by clicking on the title tab and hovering the mouse to the text you want to use. Then drag and drop it to track above the video.
Go to the Effects tab and select category from the top left pane. Click and drag your preferred effects from the library effects to the timeline.
04Step Export
Once you finish creating your animated video intro with all the required ingredients, go to Export at the top center area of the interface to export the animated video intro, and once done, share it on social media.
To make YouTube intro animation templates free download with Filmora templates, follow the steps listed below:
Step Select Effects
Log onto the Filmora effects page on filmstock with the same wsid used on Filmora and select the effect you want
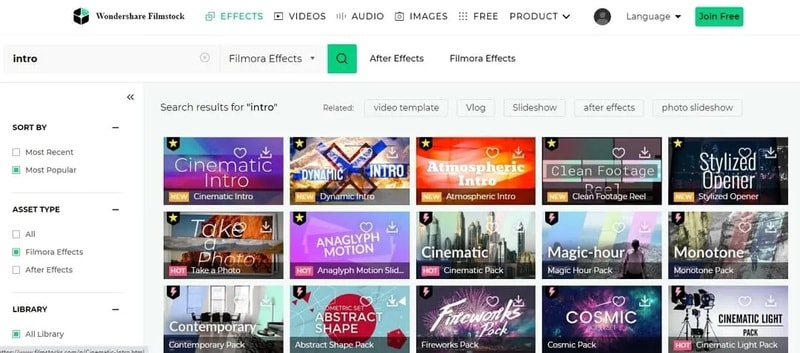
Step Select template
Select the preferred intro templates by clicking on the download now and following the instructions on the screen to attend a download template. After downloading, see in red cycle under the transition, titles, and filter based on the element included in the effect part. Add this downloaded title or transition to the animated intro video.
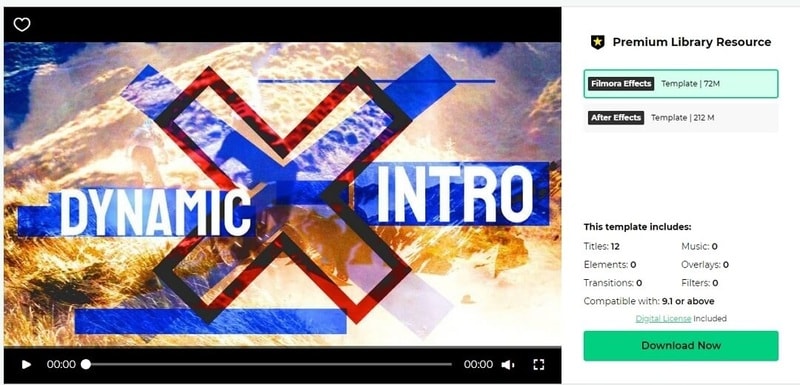
Step Finalization
Delete your animated video intro from the templates that you selected.
● Key Takeaways from This Episode →
● Introduction about what is YouTube Intro?
● How Intro Animation Maker works with examples.
● The process to develop your own YouTube intro animation for free with Wondershare Filmora Video Editor .
YouTube video intro animation is the short introductory clips and plays at the beginning of a YouTube video. YouTube intro videos as in almost everywhere, most times probably without giving them a second chance or understanding what their purpose is. There is no difference in YouTube videos, as without a proper setup, even if the content is excellent, your audience is not likely to hang around.
There is some free animation intro for YouTube that you can choose from to create your own YouTube intro. In this article, we will show a comprehensive guide on how to get an intro animation template free download and create your own free YouTube animation intro like a professional. So, let’s move on to explore how is the YouTube intro animation download process works using YouTube Intro Animation Makers through this article.
In this article
01 [What is YouTube Intro Animation?](#Part 1)
02 [How does YouTube Intro Animation Maker works?](#Part 2)
03 [5 of YouTube Intro Animation examples (2022)](#Part 3)
04 [How to Create a YouTube Intro Animation FAST](#Part 4)
Part 1 What is YouTube Intro Animation?
An animation video for YouTube intro is a short animated clip usually 5 to seconds in length and plays before the main YouTube video content. The intro YouTube animation is the primary step to creating your online persona and branding your content on YouTube. You can get YouTube intro animation for free online and include them in your YouTube content. A YouTube intro easily and quickly provides viewers insight into what they should expect from the channel. It is used to familiarize the viewer with the channel’s theme, feel, and look, which gives them context before reaching the main content.
Intro animation YouTube is sometimes called video bumpers, as they catch viewers’ attention and help reinforce your brand. In the general video, intros boost the video quality. You can also get a good video intro from intro animation free download websites for your YouTube content.
Part 2 How do YouTube Intro Animation Maker works?
You can create compelling, engaging, and best intro animation on YouTube by using free animation intro for YouTube or creating a YouTube intro animation by yourself. You don’t need be a pro in video editing or a creator to make animated video intros for your YouTube channel if you have the best intro animation software to create intro videos like a professional. Here are some benefits of YouTube intro animation maker and how it works:
● A YouTube intro animation maker has a built-in editor in your browser
● A YouTube intro animation maker is affordable, fast, and easy to use
● A YouTube intro animation maker can broadcast-quality logo animation and intros
● A YouTube intro animation maker has a wide variety of templates to make your YouTube animation intro
Using a YouTube intro animation maker, you are ready to create unskippable YouTube intros using the most versatile tool to turn your viewers into lifelong channel subscribers.
Part 3 5 of YouTube Intro Animation examples (2022)
To be successful on YouTube, capture and retain your viewers’ attention and increase your conversions. The best method to achieve this is by using an excellent YouTube animated intro to create a lasting impression to make your video worth watching. You can also get Professional YouTube animated intro from intro animation download websites. This action will look at 5 make YouTube intro animation examples and ideas from where you can draw your inspiration in 2022.
01Ted Talk
Ted Talk, free fire intro animation, is a perfect example of a beautiful and captured sequence that helps to tell the audience what the brand is all about and their ideas and worth spreading. The good news about this intro is that you don’t need to be a professional, hire an animator, or invest in any flashy or expensive animation to show your brand on YouTube.
To achieve this intro, all you require is some intro animation in After Effects template free that can work for your brand so that you’ll be able to retain your audience and make them wanting to come back for more.
02Jazza
Jazza is a perfect example of free intro animation templates that you can use all over again to showcase your brand. The main idea for making a gaming intro animation video free download is to bring about an attractive, eye-capturing video intro through it.
This intro communicates a passion for teaching people to paint, animate, and draw. This same template can also create a vlog animation intro for the Jazza language lesson website, as it is a tremendous sequential presentation that represents Jazza mission.
03Salma Jafra
Salma Jafra Video intro tells a short story about the video’s main takeaways and includes an 8 seconds vlog intro animation sequence. Everything, including a brand color, is purple, which helps the audience recognize our videos on YouTube.
In addition to the free animation for YouTube intro, she plugged in her content to the end of the video or outro to generate enough traffic and adhere to SEO guidelines to ensure that the targeted audience finds the videos.
04SciShow
SciShow enables viewers to understand the brand and the kind of free YouTube intro animation video. The main trick of the video is to instantly grab viewers’ attention and convince them that the video is for them.
This intro animation video free download is a perfect example of how you can introduce your theme, tone, and brand name into your YouTube animation intro video download. This type of intro allows viewers to know what to expect quickly, and superb animation and design show off the value of production. Examples of a brand that can benefit from this type of YouTube animation intro download template is sleep studies.
05”Pump Red” Cinema Template
“Pump Red” Cinema Template is perfect for capturing reviewers’ imagination with an eye-catching, captivating, and intelligent video intro. By following the examples in this Minecraft animation intro template, you are more likely to retain your visitors or viewers from the moment they hit the play button on your YouTube video by using a catching soundtrack, on-brand messaging, and exciting visuals.
Part 4 How to Create a YouTube Intro Animation FAST
Whether you are using any streaming channel, YouTube, or selling videos on any e-commerce website, making animation for YouTube intro plays a vital role in promoting your brand. With it, creating an introduction may not seem as complicated as it sounds.
The section explains in detail how to make a YouTube intro animation free with the Wondershare Filmora Video Editor video editor from animated intro download templates or create a custom intro from scratch even if there is no existing footage or image to begin with. The following method will guide you through the process, and then you can keep your video saved for reuse in all creations to maintain consistency and give your brand a unique identity:
Wondershare Filmora
Get started easily with Filmora’s powerful performance, intuitive interface, and countless effects!
Try It Free Try It Free Try It Free Learn More >
01Step Launch Intro Animation Software
Launch Wondershare Filmora Video Editor editor, add intro background to Filmora by going to the media tab at the top and selecting any sample colors category from the left pane. All the solid and gradient colors in the media library are available at the right, then over the mouse to the color title you want to use as a background and click on the + icon in the middle to add it to the timeline.
02Step Add Different effects
Add sound effects or audio to YouTube animated intro to make it more recognizable. In Wondershare Filmora Video Editor , visit the built-in audio library by double-clicking the audio thumbnail from the library and listening to the soundtrack. Repeat the process to find the perfect sound effects or background music for your video intro. D-and-drop the audio to the video.
03Step Adding Branding Element
In the animated video intro, add the company name, branding element, and channel name to create brand awareness by clicking on the title tab and hovering the mouse to the text you want to use. Then drag and drop it to track above the video.
Go to the Effects tab and select category from the top left pane. Click and drag your preferred effects from the library effects to the timeline.
04Step Export
Once you finish creating your animated video intro with all the required ingredients, go to Export at the top center area of the interface to export the animated video intro, and once done, share it on social media.
To make YouTube intro animation templates free download with Filmora templates, follow the steps listed below:
Step Select Effects
Log onto the Filmora effects page on filmstock with the same wsid used on Filmora and select the effect you want
Step Select template
Select the preferred intro templates by clicking on the download now and following the instructions on the screen to attend a download template. After downloading, see in red cycle under the transition, titles, and filter based on the element included in the effect part. Add this downloaded title or transition to the animated intro video.
Step Finalization
Delete your animated video intro from the templates that you selected.
● Key Takeaways from This Episode →
● Introduction about what is YouTube Intro?
● How Intro Animation Maker works with examples.
● The process to develop your own YouTube intro animation for free with Wondershare Filmora Video Editor .
Also read:
- Updated In 2024, All About 3D Medical Animation And Its Uses
- 2024 Approved What Make Aesthetic Cartoon Drawing More Understandable
- Updated 10 Great Apps to Turn Funny Animated Images Into Comics
- Updated Best Tips for Effortless Unity 3D Animation for 2024
- 2024 Approved Why These 10 Top Text Motion Templates Are Worth Your Attention
- Updated Best 10 Animated DP for WhatsApp for 2024
- Updated In 2024, Dead Simple Guide to Create New and Exciting Blackboard Animation
- 12 Best Stop Motion Studios Worth Recommending for 2024
- New 2024 Approved How to Find Some Different Ways to Animated Cartoon of Yourself
- New Ways to Create Animated Clipart in PowerPoint for 2024
- Dead Simple Guide to Create New and Exciting Blackboard Animation for 2024
- Updated Best Canva 10 Animated Templates
- New 2024 Approved Create Animated Video on Canva
- Updated Make Well Done Animated GIF
- 10 Best Romance Anime Movies You Need to Watch for 2024
- New 5 Websites with Animated Logos That Catch Your Eyes
- Formula to Animate Photos From 10 Animate Pictures App
- New In 2024, Adobe Auto Rigger Is AWESOME
- New 15 Top Collage Makers to Create Aesthetic Collages for 2024
- In 2024, Guide on How to Create GIF in WhatsApp iPhone
- New Techniques for Creating Animated Logo That Few People Know About for 2024
- Little Known Techniques of Motion Graphics in Premiere Pro
- New 2024 Approved Ways to Create an Adobe Collage
- New 4 Things You Should Know About Pinterest GIF for 2024
- How to Animate - Adobe Animate Tutorial for All
- New 5 Foolproof Amazing Anime Text to Speech Tips for 2024
- Updated How to Make Animated Videos for Business – an Ultimate Guide
- Updated Is Blender 2D Animation As Awesome As 3D for 2024
- New In 2024, Before You Learn 3D Animation Some Things You Should Know
- Updated 2024 Approved 12 Animation Video Maker That Can Triple Conversion Rates
- New How to Draw Skeleton Cartoon – A Step by Step Guide
- New In 2024, Apps to Animate Still Pictures
- New 2024 Approved Ideas of Learning How to Send WhatsApp Animated Gifs
- Updated Tutorial Guide to Animate Pictures in Canva
- New Why These 10+ Top Text Motion Templates Are Worth Your Attention
- In 2024, 4 Things You Should Know About Pinterest GIF
- New In 2024, Learn What Are Differences Between 2D And 3D Animation
- Popular Tips on Learning Animate Rigging for 2024
- Updated Some Must-Know Useful Lego Animation Ideas for You for 2024
- Tips and Tricks for Apple ID Locked Issue From Apple iPhone 12 Pro
- Best Samsung Galaxy A15 4G Pattern Lock Removal Tools Remove Android Pattern Lock Without Losing Data
- In 2024, Forgotten The Voicemail Password Of Samsung Galaxy A24? Try These Fixes
- In 2024, Does find my friends work on Poco C51 | Dr.fone
- How To Unlock Any Vivo V27e Phone Password Using Emergency Call
- How To Restore a Bricked OnePlus Ace 2 Pro Back to Operation | Dr.fone
- How to Lock Apps on Xiaomi 13T Pro to Protect Your Individual Information
- Catch or Beat Sleeping Snorlax on Pokemon Go For Lava Yuva 3 Pro | Dr.fone
- The Best Android Unlock Software For Lava Yuva 3 Device Top 5 Picks to Remove Android Locks
- How to Remove Find My iPhone without Apple ID On your iPhone SE (2020)?
- In 2024, How does the stardust trade cost In pokemon go On Nokia C110? | Dr.fone
- In 2024, Here are Some Pro Tips for Pokemon Go PvP Battles On Vivo Y28 5G | Dr.fone
- In 2024, How to Change Your OnePlus Ace 2 Pro Location on life360 Without Anyone Knowing? | Dr.fone
- Disabled iPhone 8 How to Unlock a Disabled iPhone 8? | Dr.fone
- In 2024, Guide to Mirror Your Vivo X Fold 2 to Other Android devices | Dr.fone
- In 2024, 9 Mind-Blowing Tricks to Hatch Eggs in Pokemon Go Without Walking On Apple iPhone 8 | Dr.fone
- How to recover deleted pictures from Vivo Y78+.
- In 2024, How I Transferred Messages from Motorola Moto G23 to iPhone 12/XS (Max) in Seconds | Dr.fone
- Easy steps to recover deleted messages from Y100 5G
- App Wont Open on Your Oppo Find X6 Pro? Here Are All Fixes | Dr.fone
- In 2024, Top 4 SIM Location Trackers To Easily Find Your Lost Realme C51 Device
- The way to recover deleted pictures on Infinix Note 30 VIP Racing Edition without backup.
- In 2024, Top 15 Apps To Hack WiFi Password On Infinix Note 30 Pro
- Why Apple Account Disabled On your iPhone 13 Pro? How to Fix
- Complete Tutorial for Vivo Y78t Hard Reset | Dr.fone
- Xiaomi 13T Stuck on Screen – Finding Solutions For Stuck on Boot | Dr.fone
- In 2024, Pokémon Go Cooldown Chart On Nokia 150 (2023) | Dr.fone
- 2 Ways to Monitor Vivo Y200 Activity | Dr.fone
- How to use iSpoofer on Huawei Nova Y91? | Dr.fone
- How do you play .mov files on Edge 40 Pro ?
- In 2024, Top 10 Telegram Spy Tools On Realme Narzo N53 for Parents | Dr.fone
- In 2024, How to Track Nokia C110 Location without Installing Software? | Dr.fone
- Title: Updated In 2024, 12 Websites with Triggered Animate on Scroll Examples
- Author: Elon
- Created at : 2024-05-19 03:05:19
- Updated at : 2024-05-20 03:05:19
- Link: https://animation-videos.techidaily.com/updated-in-2024-12-websites-with-triggered-animate-on-scroll-examples/
- License: This work is licensed under CC BY-NC-SA 4.0.
