
:max_bytes(150000):strip_icc():format(webp)/cq5dam.web.1280.1280-3-5c2a5dc746e0fb0001d115f0.jpeg)
Updated In 2024, 4 Things You Need to Know About Pinterest GIF
4 Things You Need to Know About Pinterest GIF
4 Things You Should Know About Pinterest GIF
An easy yet powerful editor
Numerous effects to choose from
Detailed tutorials provided by the official channel
Emojis formerly reigned supreme, but GIFs and memes have since supplanted them. When you add a GIF to a conversation, it becomes more exciting. GIFs are considerably better at communicating our feelings, and they deserve credit for that. Pinterest, like other social networking sites and chat apps, enables GIFs. Pinterest is a photo-sharing website where you can find home decor ideas, recipes, fashion inspiration, DIY projects, and more.
Compared to a static image, adding a GIF to Pinterest conveys more information. You can make GIFs for your DIY projects or use them to display all sides of a cushion, which would typically require many images. But what if you like a GIF you found on Pinterest? What’s the best way to get it? That is what we will demonstrate here. This article will show how to download Pinterest GIFs to your computer and mobile device.
In this article
01 [Are There Gifs on Pinterest?](#Part 1)
02 [How to Get Pinterest GIF Downloader](#Part 2)
03 [How to Get an Animated GIF on Pinterest](#Part 3)
Part 1 Are There Gifs on Pinterest?
You can submit GIF and animated GIF images from your computer or the Internet to Pinterest. Because the pictures on your board aren’t animated, you might conclude that animated GIFs don’t work on Pinterest. When you click on the photos and open them on their respective Web pages, they become animated. Because images posted from websites do not save on Pinterest’s servers, they are not animated. You can’t do anything if Pinterest doesn’t animate a GIF.
Part 2 How to Get Pinterest GIF Downloader
Compared to a static image, adding a GIF to Pinterest conveys more information. You can make GIFs for your DIY projects or use them to display all sides of a cushion, which would typically require many images.
But what if you’re a Pinterest fan of a GIF? What’s the best way to get it? That is what we will demonstrate here. We’ll show you how to complete a Pinterest GIF video download to your computer and mobile device in this session.
Let’s get started.
01How to Download Pinterest Videos Using Mobile?
Here are simple steps to follow to achieve this:
Make use of the native download button
Step 1: Select GIF to download
Go to the selected GIF and click it.
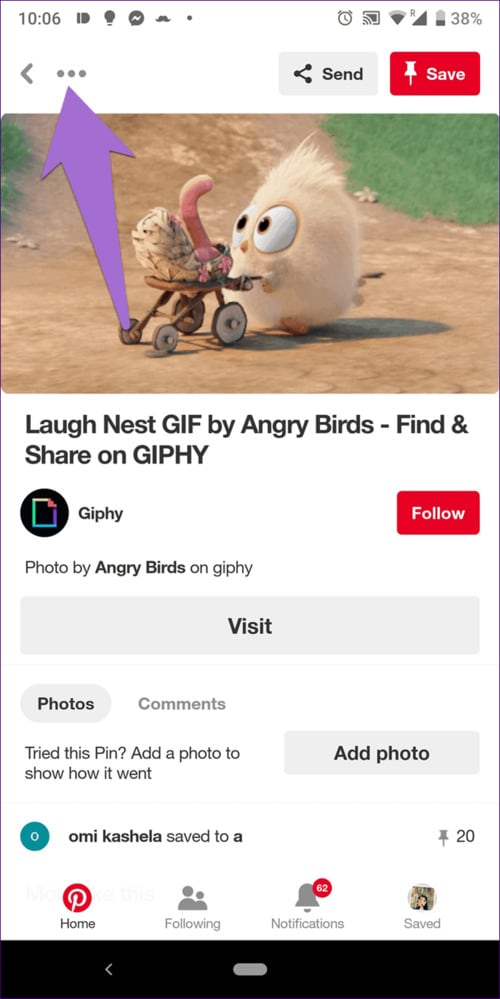
Step 2: Download Image
Click the three-dot icon at the top from the menu and select Download image.

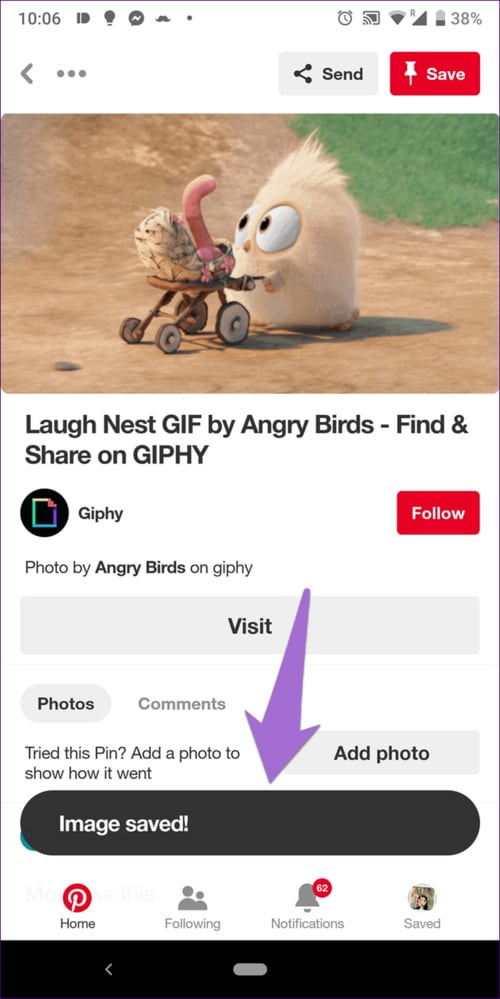
Step 3: Notification
After the image gets saved, you will receive a notification at the bottom. The freshly downloaded GIF will appear in your gallery or camera roll when you open it.
02How to Download Pinterest Videos by Computer?
Follow these simple step guides to achieve this:
Step 1: Open selected GIF
On your computer, open the GIF you want to use.
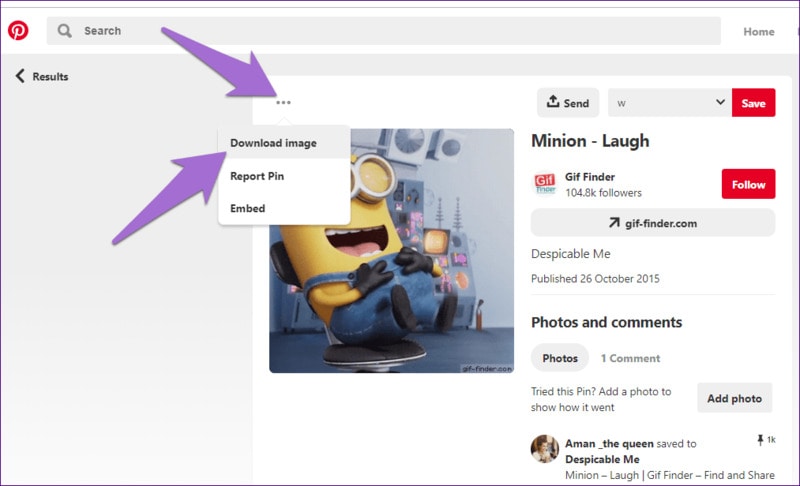
Step 2: Select Download
Select Download image from the menu by clicking on the three-dot icon above the GIF.
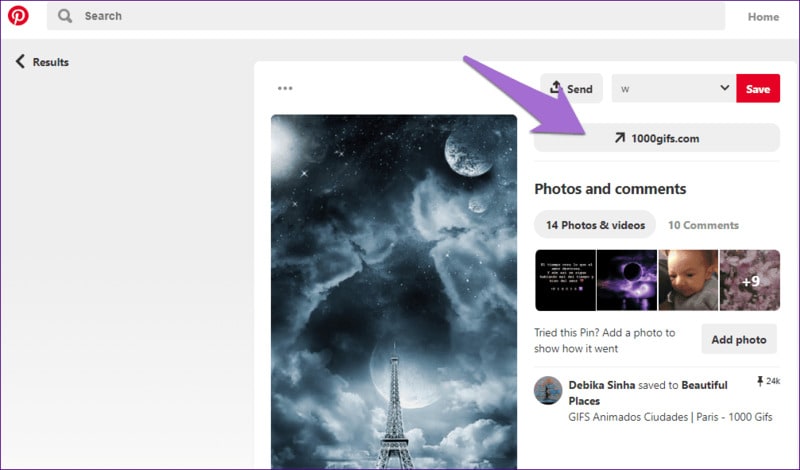
Step 3: Alternative
If the download option isn’t available for any reason, you’ll have to rely on the company’s
website. To do so, click on the GIF’s link.
You’ll reach the GIF’s host site. Right-click on the GIF and choose to Save image as… from the menu that appears. Ensure that the extension is . GIF. In some circumstances, you will have the opportunity to download the video.
Part 3 How to Get an Animated GIF on Pinterest
Save a picture from the Web to your hard drive before pinning it; GIFs pinned from Web pages are not animated. Open the Web page with the image you want to pin, then right-click the image and opt “Save as” to save it to a folder on your computer. You can save pictures off the Web in all major Web browsers, including Google Chrome, Mozilla Firefox, and Internet Explorer. Log in to Pinterest select “Upload a Pin” from the “+” menu. Select the animated GIF from your hard drive by clicking the “Choose Image” button. Click “Pin It” after selecting the board you wish to pin the image.
How to Upload a GIF to Pinterest
Now that you know how to download Pinterest GIFs, you may want to consider posting GIFs to Pinterest as well. Unfortunately, you cannot upload GIFs from mobile apps. To upload a GIF to your Pinterest account, you’ll need to utilize a computer.
If you have a GIF file on your computer, follow these instructions to add it.
Step 1: Log in to your Pinterest account
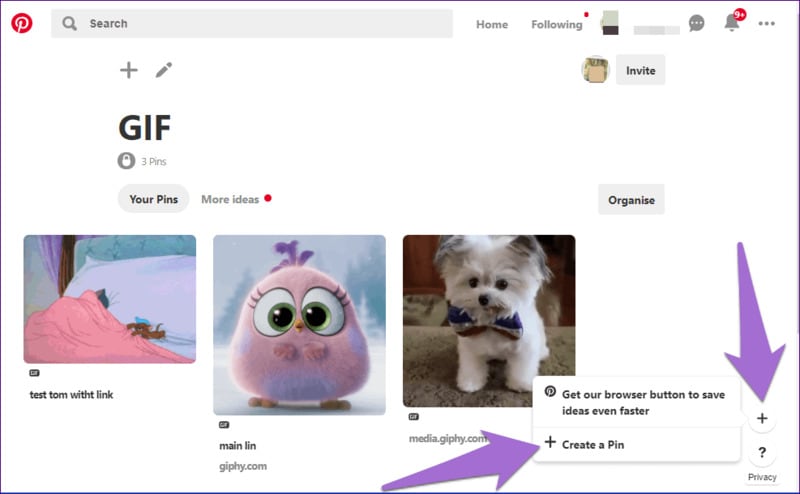
Log in to your Pinterest account, then go to the bottom of the page to the add icon. From the menu, choose to Create a Pin.
Step 2: Upload GIF
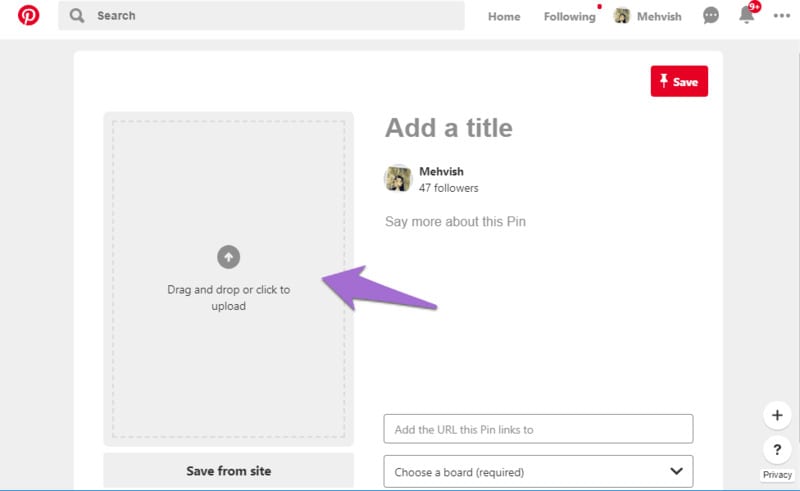
Drag and drop the GIF or upload it onto the pin creation screen from your computer.
Step 3: Save GIF
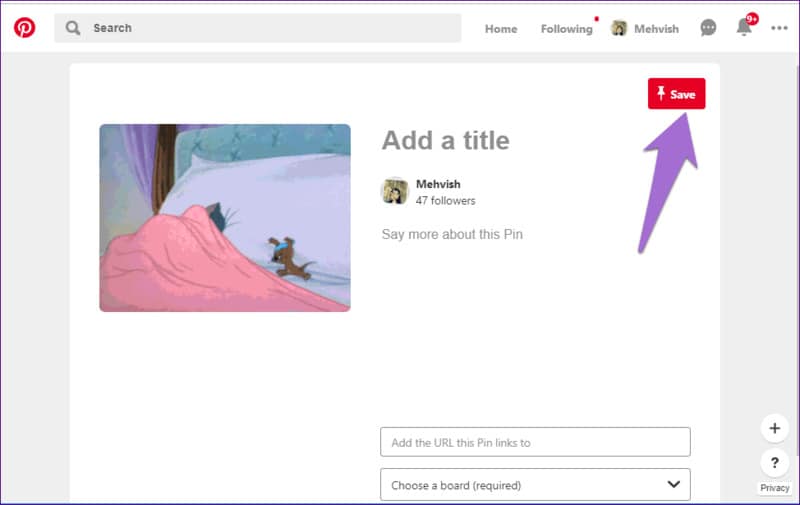
When the GIF appears on the next screen, describe it and select a board for the pin. Finally, press the Save button.
To save a file with the.GIF extension, you’ll need to use a GIF Pinterest downloader software or an application usable both online and offline. Wondershare Filmora is the most popular programs for this work because of the following benefits: it is elementary to use, and anyone can handle who isn’t technically inclined.
Wondershare Filmora Video Editor can convert Pinterest video to GIF from various video formats, including.wmv,.mp4,.mkv,.evo,.dat,.wav,.mpeg, and.avi, so you don’t have to worry about compatibility.
Wondershare Filmora
Get started easily with Filmora’s powerful performance, intuitive interface, and countless effects!
Try It Free Try It Free Try It Free Learn More >

The most important thing to know about Filmora video editing software is that it allows users to edit GIF files is one of the preferable programs for this task due to its advantages. It is elementary to use and is operational by any nontechnical person.
● Key Takeaways from This Episode →
● Now have learned how to easily download GIFs from Pinterest using Pinterest GIF downloader. By sincerely following the simple tips listed above, you can easily download video on GIF from Pinterest using any device on your mobile phone or your PC.
● However, Wondershare Filmora is one app that can meet all your needs to create a unique Pinterest GIF. And to top is all it is easy to use for none professionals
Emojis formerly reigned supreme, but GIFs and memes have since supplanted them. When you add a GIF to a conversation, it becomes more exciting. GIFs are considerably better at communicating our feelings, and they deserve credit for that. Pinterest, like other social networking sites and chat apps, enables GIFs. Pinterest is a photo-sharing website where you can find home decor ideas, recipes, fashion inspiration, DIY projects, and more.
Compared to a static image, adding a GIF to Pinterest conveys more information. You can make GIFs for your DIY projects or use them to display all sides of a cushion, which would typically require many images. But what if you like a GIF you found on Pinterest? What’s the best way to get it? That is what we will demonstrate here. This article will show how to download Pinterest GIFs to your computer and mobile device.
In this article
01 [Are There Gifs on Pinterest?](#Part 1)
02 [How to Get Pinterest GIF Downloader](#Part 2)
03 [How to Get an Animated GIF on Pinterest](#Part 3)
Part 1 Are There Gifs on Pinterest?
You can submit GIF and animated GIF images from your computer or the Internet to Pinterest. Because the pictures on your board aren’t animated, you might conclude that animated GIFs don’t work on Pinterest. When you click on the photos and open them on their respective Web pages, they become animated. Because images posted from websites do not save on Pinterest’s servers, they are not animated. You can’t do anything if Pinterest doesn’t animate a GIF.
Part 2 How to Get Pinterest GIF Downloader
Compared to a static image, adding a GIF to Pinterest conveys more information. You can make GIFs for your DIY projects or use them to display all sides of a cushion, which would typically require many images.
But what if you’re a Pinterest fan of a GIF? What’s the best way to get it? That is what we will demonstrate here. We’ll show you how to complete a Pinterest GIF video download to your computer and mobile device in this session.
Let’s get started.
01How to Download Pinterest Videos Using Mobile?
Here are simple steps to follow to achieve this:
Make use of the native download button
Step 1: Select GIF to download
Go to the selected GIF and click it.
Step 2: Download Image
Click the three-dot icon at the top from the menu and select Download image.
Step 3: Notification
After the image gets saved, you will receive a notification at the bottom. The freshly downloaded GIF will appear in your gallery or camera roll when you open it.
02How to Download Pinterest Videos by Computer?
Follow these simple step guides to achieve this:
Step 1: Open selected GIF
On your computer, open the GIF you want to use.
Step 2: Select Download
Select Download image from the menu by clicking on the three-dot icon above the GIF.
Step 3: Alternative
If the download option isn’t available for any reason, you’ll have to rely on the company’s
website. To do so, click on the GIF’s link.
You’ll reach the GIF’s host site. Right-click on the GIF and choose to Save image as… from the menu that appears. Ensure that the extension is . GIF. In some circumstances, you will have the opportunity to download the video.
Part 3 How to Get an Animated GIF on Pinterest
Save a picture from the Web to your hard drive before pinning it; GIFs pinned from Web pages are not animated. Open the Web page with the image you want to pin, then right-click the image and opt “Save as” to save it to a folder on your computer. You can save pictures off the Web in all major Web browsers, including Google Chrome, Mozilla Firefox, and Internet Explorer. Log in to Pinterest select “Upload a Pin” from the “+” menu. Select the animated GIF from your hard drive by clicking the “Choose Image” button. Click “Pin It” after selecting the board you wish to pin the image.
How to Upload a GIF to Pinterest
Now that you know how to download Pinterest GIFs, you may want to consider posting GIFs to Pinterest as well. Unfortunately, you cannot upload GIFs from mobile apps. To upload a GIF to your Pinterest account, you’ll need to utilize a computer.
If you have a GIF file on your computer, follow these instructions to add it.
Step 1: Log in to your Pinterest account
Log in to your Pinterest account, then go to the bottom of the page to the add icon. From the menu, choose to Create a Pin.
Step 2: Upload GIF
Drag and drop the GIF or upload it onto the pin creation screen from your computer.
Step 3: Save GIF
When the GIF appears on the next screen, describe it and select a board for the pin. Finally, press the Save button.
To save a file with the.GIF extension, you’ll need to use a GIF Pinterest downloader software or an application usable both online and offline. Wondershare Filmora is the most popular programs for this work because of the following benefits: it is elementary to use, and anyone can handle who isn’t technically inclined.
Wondershare Filmora Video Editor can convert Pinterest video to GIF from various video formats, including.wmv,.mp4,.mkv,.evo,.dat,.wav,.mpeg, and.avi, so you don’t have to worry about compatibility.
Wondershare Filmora
Get started easily with Filmora’s powerful performance, intuitive interface, and countless effects!
Try It Free Try It Free Try It Free Learn More >
The most important thing to know about Filmora video editing software is that it allows users to edit GIF files is one of the preferable programs for this task due to its advantages. It is elementary to use and is operational by any nontechnical person.
● Key Takeaways from This Episode →
● Now have learned how to easily download GIFs from Pinterest using Pinterest GIF downloader. By sincerely following the simple tips listed above, you can easily download video on GIF from Pinterest using any device on your mobile phone or your PC.
● However, Wondershare Filmora is one app that can meet all your needs to create a unique Pinterest GIF. And to top is all it is easy to use for none professionals
Types of Cartoon Styles You May Use for The Next Marketing Project
Types of Cartoon Styles You May Use for Your Next Marketing Project
An easy yet powerful editor
Numerous effects to choose from
Detailed tutorials provided by the official channel
The whole concept of animation originated mainly from Japan. The cartoons that are shown on TV have different cartoon art styles. These cartoon art styles have their history of origin. These numerous cartoon styles play a significant role in the whole animation industry. If you find which cartoon illustration styles to use for your next project, this is the perfect place for your answer.
You can use any cartoon art style in your upcoming marketing project and make it a success. This article focuses on different cartoon art styles and how you can develop your anime cartoon style. You can use these methods to draw cartoon styles of yourself.
In this article
01 [10 Types of Cartoon Styles With Examples](#Part 1)
02 [Drawing Myself in 5 Different Cartoon Styles](#Part 2)
03 [How You Can Develop a Cartoon Style for Animation](#Part 3)
Part 1 Types of Cartoon Styles With Examples
There are numerous kinds of cartoon styles. Different animators use different cartoon styles. You can even develop your anime cartoon style. The different types of Animation are:
012D Animation
animations are trendy cartoon styles. This style of animation needs no introduction. This type of anime cartoon style was produced by Walt Disney. The most exciting features of the images were that they had only two dimensions: height and width.
Even though several people suggested that 2D art styles cartoon were invented during the early twentieth century. Back then, it was not much popular; Walt Disney made these cartoon styles famous. Example:

02Traditional Animation
As the name suggests, traditional Animation is an old cartoon art style. These cartoon styles were first seen in the year 1877. Emil Reynaud discovered a new tool for demonstrating objects that are moving. In this type of Animation, all the images are drawn manually on paper with a pencil. This method of making cartoon styles is time-consuming. However, later computer applications and programs were developed, making this task much easier and more efficient. Example:

03Animation
animation cartoon styles came into existence with graphics and visual software development. The first 3D dimensional image was created in the year 1972. However, an attempt to make 3D Animation was made in 1961. Nowadays, 3D Animation is a widely used animation style. It is used in the entertainment industry and medical imaging to adequately explain the body and organisms. Example:

04Flipbook Animation
In flipbook animation, each frame is drawn on each notebook page. After drawing all the frames is complete, turn the pages quickly. When the pages are turned quickly, it seems to be a moving video because of the different frames drawn on each page. Example:

05Clay Animation
This animation method turns out to be very funny after it is completed. This method of Animation is quite tricky. In this animation method, the characters are made out of clay at first, and then the movements are recorded in a camera. These movements are then made smooth and compiled like a video with different scenes using the software. The main audience for this kind of Animation is children. Example:

06Typography Animation
Typography animation is also called kinetic typography. This style of Animation is text animation. This method was originated in the year 1899. Back then, this Animation was not much popular. This style of typography animation gained popularity after 60 years it first originated. Typography animation is considered a good method for e-learning while training employees. Example:

07Stop-Motion Animation
Stop-Motion animation is an age-old animation technique. The attempt to use this type of Animation was made 150 years ago. The specialty of this type of Animation is that the animator takes pictures of different frames by moving the objects in different positions and clicking the picture of each frame. These pictures are compiled to create a continuous video. This method of Animation is straightforward to go. Example:

08Sand Animation
Sand Animation was invented in the year 1969. This type of Animation involves sand and a luminous surface on which the Animation is done. This method is used in cartoon anime styles or different shows. In this type of Animation, the sand is used to create 2D images. This type of Animation is used for storytelling in reality shows. Example:

09Motion Graphics
Motion design was invented in the year 1960. It is one of the most popular cartoon art styles used nowadays. This type of Animation creates promotional videos, game screensavers, commercial advertising videos, etc. It is one of the universal animation techniques used globally for various purposes. Example:

10Mechanical Animation
Mechanical Animation is mainly used in producing technical equipment. The most fantastic thing about this animation method is that you can make changes to a product that has not yet been developed. This kind of Animation is used with 3D Animation to show the working of machines in and out. It is done together with 3D Animation to clearly visualize the machine.

Part 2 Drawing Myself in 5 Different Cartoon Styles
You can draw yourself using these 5 different cartoon styles:
01You can use 3D filters on Snapchat to draw a Pixar-like picture of yourself
The steps are:
Step 1: Install and run the “Snapchat” app on your phone.
Step2: Open the app and turn on the camera.
Step 3: There is a smiling face symbol on the right side of the camera button, tap on that.
Step 4: Click on the explore menu and select the “Cartoon 3D Style” option.
Step 5: Capture your video
Step 6: Then your cartoon character-like video is ready.
02You can also use Instagram to create a Disney-like character of yourself
The steps are:
Step 1: Open your Instagram account.
Step 2: Click on the ‘+’ icon. Select the “Story” option.
Step 3: Different effects appear on the screen.
Step 4: Scroll the effects and find an icon of a magnifying glass.
Step 5: Click on that icon and type cartoon on the search bar.
Step 6: After your search is finished, different cartoon filters will appear on your screen.
Step 7: Tap on any one of the effects. The effect opens.
Step 8: Tap on the bookmark icon to save the cartoon effect.
Step 9: Now you can go back to the effects options to use the cartoon effect.
Your Disney-like cartoon picture is ready!
03You can use Google meet
Step 1: When you open the Google meet app, there are filters to use while on a call.
Step 2: Choose one of the filters that have a cartoon effect.
Step 3: When you join any meeting, you will appear like a cartoon character from TV.
04You can use B612
Step 1: Install and open the app on your phone.
Step 2: After you open the app, a circle button appears at the bottom of your screen in the middle.
Step 3: Tap on the circle.
Step 4: Numerous filters will appear.
Step 5: Choose one cartoon-like filter from the options of effect in the menu.
Step 6: After selecting one effect, make a video of yourself using an effect.
Step 7: Your cartoon video is ready on your screen.
05You can use Wondershare Filmora Video Editor
For Win 7 or later (64-bit)
For macOS 10.12 or later
Step 1: Capture a video of yourself using your phone’s camera.
Step 2: Install and open the Filmora app on your phone.
Step 3: After you open the app, you will be given the option to choose a video.
Step 4: Choose the video of yourself.
Step 5: After choosing your video, there is an option “click edit” tap on that.
Step 6: A menu appears; select the “effects” option from the menu.
Step 7: Different effects will appear on your screen.
Step 8: Select the cartoon effect you want to use in your video.
Step 9: After you have selected the effect, it will take some time to process.
Step 10: Your cartoon-like video is ready.
How You Can Develop a Cartoon Style for Animation
Anyone can develop new cartoon styles by following these simple procedures or habits. The procedures are:
● You can take references from real-life objects.
Most of the Animation we see here has been taken from real-life references, be it a cat, car, house, etc. So, to develop the cartoon styles, you can take references from real-life objects. You can also search for a particular characteristic in things you won’t use as your reference. If you want to draw a cat, you can use a living cat as your reference.
● You can copy and try to make Animation like your favorite animator.
If you use this method, this will help you improve your skill. No animation is 100% real, no matter what kind of Animation it is or who is creating it. However, you cannot keep on making animations like your favorite animator because you will not be able to find your anime art styles and skills.
● You can create an animated character of your own.
After taking your reference from real-life objects and knowing about the animation styles and the basic principles of Animation, you can create your animated character. If you create your character, keeping all the skills and techniques in mind, you can develop outstanding animation styles.
● To develop your cartoon style, you need to practice drawing regularly.
To get s grasp this whole process of Animation, you need to draw and practice different cartoon art styles. You can draw anything you like, or you don’t like on paper or on a drawing tablet. You can also color sketchbooks to improve your skills in Animation.
You can use Filmora to make cartoon videos and, at the same time, make cartoon videos of normally captured videos. These cartoon videos can be compiled into one video. You can use this video to edit different types of videos. Filmora has a user-friendly interface that can help you create your cartoon video effortlessly.
● Ending Thoughts →
● I hope you have understood the different types of anime cartoon styles by now.
● These methods can help you make the best for your next marketing project.
● These methods are easy, efficient, and efficient. All the aforementioned methods were discovered in the late nineteenth and early twentieth century.
● With the advancement of technology, the process has become more accessible. However, you can use any cartoon-style art.
The whole concept of animation originated mainly from Japan. The cartoons that are shown on TV have different cartoon art styles. These cartoon art styles have their history of origin. These numerous cartoon styles play a significant role in the whole animation industry. If you find which cartoon illustration styles to use for your next project, this is the perfect place for your answer.
You can use any cartoon art style in your upcoming marketing project and make it a success. This article focuses on different cartoon art styles and how you can develop your anime cartoon style. You can use these methods to draw cartoon styles of yourself.
In this article
01 [10 Types of Cartoon Styles With Examples](#Part 1)
02 [Drawing Myself in 5 Different Cartoon Styles](#Part 2)
03 [How You Can Develop a Cartoon Style for Animation](#Part 3)
Part 1 Types of Cartoon Styles With Examples
There are numerous kinds of cartoon styles. Different animators use different cartoon styles. You can even develop your anime cartoon style. The different types of Animation are:
012D Animation
animations are trendy cartoon styles. This style of animation needs no introduction. This type of anime cartoon style was produced by Walt Disney. The most exciting features of the images were that they had only two dimensions: height and width.
Even though several people suggested that 2D art styles cartoon were invented during the early twentieth century. Back then, it was not much popular; Walt Disney made these cartoon styles famous. Example:
02Traditional Animation
As the name suggests, traditional Animation is an old cartoon art style. These cartoon styles were first seen in the year 1877. Emil Reynaud discovered a new tool for demonstrating objects that are moving. In this type of Animation, all the images are drawn manually on paper with a pencil. This method of making cartoon styles is time-consuming. However, later computer applications and programs were developed, making this task much easier and more efficient. Example:
03Animation
animation cartoon styles came into existence with graphics and visual software development. The first 3D dimensional image was created in the year 1972. However, an attempt to make 3D Animation was made in 1961. Nowadays, 3D Animation is a widely used animation style. It is used in the entertainment industry and medical imaging to adequately explain the body and organisms. Example:
04Flipbook Animation
In flipbook animation, each frame is drawn on each notebook page. After drawing all the frames is complete, turn the pages quickly. When the pages are turned quickly, it seems to be a moving video because of the different frames drawn on each page. Example:
05Clay Animation
This animation method turns out to be very funny after it is completed. This method of Animation is quite tricky. In this animation method, the characters are made out of clay at first, and then the movements are recorded in a camera. These movements are then made smooth and compiled like a video with different scenes using the software. The main audience for this kind of Animation is children. Example:
06Typography Animation
Typography animation is also called kinetic typography. This style of Animation is text animation. This method was originated in the year 1899. Back then, this Animation was not much popular. This style of typography animation gained popularity after 60 years it first originated. Typography animation is considered a good method for e-learning while training employees. Example:
07Stop-Motion Animation
Stop-Motion animation is an age-old animation technique. The attempt to use this type of Animation was made 150 years ago. The specialty of this type of Animation is that the animator takes pictures of different frames by moving the objects in different positions and clicking the picture of each frame. These pictures are compiled to create a continuous video. This method of Animation is straightforward to go. Example:
08Sand Animation
Sand Animation was invented in the year 1969. This type of Animation involves sand and a luminous surface on which the Animation is done. This method is used in cartoon anime styles or different shows. In this type of Animation, the sand is used to create 2D images. This type of Animation is used for storytelling in reality shows. Example:
09Motion Graphics
Motion design was invented in the year 1960. It is one of the most popular cartoon art styles used nowadays. This type of Animation creates promotional videos, game screensavers, commercial advertising videos, etc. It is one of the universal animation techniques used globally for various purposes. Example:
10Mechanical Animation
Mechanical Animation is mainly used in producing technical equipment. The most fantastic thing about this animation method is that you can make changes to a product that has not yet been developed. This kind of Animation is used with 3D Animation to show the working of machines in and out. It is done together with 3D Animation to clearly visualize the machine.
Part 2 Drawing Myself in 5 Different Cartoon Styles
You can draw yourself using these 5 different cartoon styles:
01You can use 3D filters on Snapchat to draw a Pixar-like picture of yourself
The steps are:
Step 1: Install and run the “Snapchat” app on your phone.
Step2: Open the app and turn on the camera.
Step 3: There is a smiling face symbol on the right side of the camera button, tap on that.
Step 4: Click on the explore menu and select the “Cartoon 3D Style” option.
Step 5: Capture your video
Step 6: Then your cartoon character-like video is ready.
02You can also use Instagram to create a Disney-like character of yourself
The steps are:
Step 1: Open your Instagram account.
Step 2: Click on the ‘+’ icon. Select the “Story” option.
Step 3: Different effects appear on the screen.
Step 4: Scroll the effects and find an icon of a magnifying glass.
Step 5: Click on that icon and type cartoon on the search bar.
Step 6: After your search is finished, different cartoon filters will appear on your screen.
Step 7: Tap on any one of the effects. The effect opens.
Step 8: Tap on the bookmark icon to save the cartoon effect.
Step 9: Now you can go back to the effects options to use the cartoon effect.
Your Disney-like cartoon picture is ready!
03You can use Google meet
Step 1: When you open the Google meet app, there are filters to use while on a call.
Step 2: Choose one of the filters that have a cartoon effect.
Step 3: When you join any meeting, you will appear like a cartoon character from TV.
04You can use B612
Step 1: Install and open the app on your phone.
Step 2: After you open the app, a circle button appears at the bottom of your screen in the middle.
Step 3: Tap on the circle.
Step 4: Numerous filters will appear.
Step 5: Choose one cartoon-like filter from the options of effect in the menu.
Step 6: After selecting one effect, make a video of yourself using an effect.
Step 7: Your cartoon video is ready on your screen.
05You can use Wondershare Filmora Video Editor
For Win 7 or later (64-bit)
For macOS 10.12 or later
Step 1: Capture a video of yourself using your phone’s camera.
Step 2: Install and open the Filmora app on your phone.
Step 3: After you open the app, you will be given the option to choose a video.
Step 4: Choose the video of yourself.
Step 5: After choosing your video, there is an option “click edit” tap on that.
Step 6: A menu appears; select the “effects” option from the menu.
Step 7: Different effects will appear on your screen.
Step 8: Select the cartoon effect you want to use in your video.
Step 9: After you have selected the effect, it will take some time to process.
Step 10: Your cartoon-like video is ready.
How You Can Develop a Cartoon Style for Animation
Anyone can develop new cartoon styles by following these simple procedures or habits. The procedures are:
● You can take references from real-life objects.
Most of the Animation we see here has been taken from real-life references, be it a cat, car, house, etc. So, to develop the cartoon styles, you can take references from real-life objects. You can also search for a particular characteristic in things you won’t use as your reference. If you want to draw a cat, you can use a living cat as your reference.
● You can copy and try to make Animation like your favorite animator.
If you use this method, this will help you improve your skill. No animation is 100% real, no matter what kind of Animation it is or who is creating it. However, you cannot keep on making animations like your favorite animator because you will not be able to find your anime art styles and skills.
● You can create an animated character of your own.
After taking your reference from real-life objects and knowing about the animation styles and the basic principles of Animation, you can create your animated character. If you create your character, keeping all the skills and techniques in mind, you can develop outstanding animation styles.
● To develop your cartoon style, you need to practice drawing regularly.
To get s grasp this whole process of Animation, you need to draw and practice different cartoon art styles. You can draw anything you like, or you don’t like on paper or on a drawing tablet. You can also color sketchbooks to improve your skills in Animation.
You can use Filmora to make cartoon videos and, at the same time, make cartoon videos of normally captured videos. These cartoon videos can be compiled into one video. You can use this video to edit different types of videos. Filmora has a user-friendly interface that can help you create your cartoon video effortlessly.
● Ending Thoughts →
● I hope you have understood the different types of anime cartoon styles by now.
● These methods can help you make the best for your next marketing project.
● These methods are easy, efficient, and efficient. All the aforementioned methods were discovered in the late nineteenth and early twentieth century.
● With the advancement of technology, the process has become more accessible. However, you can use any cartoon-style art.
Interesting Fundamentals and Ultimate Guide to Animated Characters Drawings
Interesting Fundamentals and Ultimate Guide to Animated Characters Drawings
An easy yet powerful editor
Numerous effects to choose from
Detailed tutorials provided by the official channel
Cartoon character have stamped their faces in our hearts from childhood. A cartoon artist represents a cartoon or a natural person’s unique features with simple shapes accurately to recognize the person with the drawing and does not require a lot of patience to do this. The goal of the cartoon is to attract, and the child should get attracted when they see a cartoon image as well as adults. Though the sparkle may appear a little dull, it remains unaltered.
Let us grab a chance to recreate our cartoon characters with easy tutorials about animated characters to draw. In addition to that, you will learn about basic drawing exercises to lead into cool animated characters to draw through this guide in a step-by-step manner.
In this article
01 [What Do I Need to Start Learning Animated Characters Drawings? ](#Part 1)
02 [6 Cartoon Characters that Anyone Can Draw (Provided with Free Video Tutorials)](#Part 2)
03 [4 Best Drawing Exercises for Creating Cartoon Characters](#Part 3)
Part 1 What Do I Need to Start Learning Animated Characters Drawings?
There are many software’s available, and anyone can create an animated character drawing, but still, the art of creating a perfect character needs a master. You don’t have to be a Disney-grade animator to make it; start with simple minor characters. Animation is the art of bringing a 3D illustrated cartoon into life. It is created by projecting a sequence of images one after the other immediately. Let us discuss the essential things you need to note before animating characters.
●Timeline is the most important for animation. Depending on the software, you have various options to change the duration and add effects.
●Animation is generally preferable in 24 frames per second, which means the total number of people in the frame for one second.
●There are two types of working they are one’s and two’s. 2D Animation is usually done in two’s, whereas 3D Animation is in one’s.
●In hand-drawn animations, keyframes are more critical to maintain. The keyframe is the position for the cartoon as per animator has decided.
●Breakdowns combine one or two keyframes, which decide the motion in between the keys.
●In-betweens are all the frames that come between to smooth the motion—automatically generated by the computer to move from key to key.
●Composting is creating or joining two or more images to create a single cartoon frame.
Part 2 6 Cartoon Characters that Anyone can Draw (With free Video Tutorials)
We will discuss animated characters to draw in hand. There are many cartoon characters, but we will look into six cartoon character drawings with their tutorial videos.
01 Smurfette
Smurfette stands out as the lone female Smurf in the entire bunch of blue critters around the village area. One of the rare designs with long hair and a dress is hers. Her design is a lot of fun to sketch.
So, in general, it’s best to work through the lesson as is, then turn it into Brainy, Papa, Joker, or even Smurf.
01Angelica Pickles
Angelica Pickles is one of the most challenging characters to depict from The Rugrats. But her design is so intricate that getting it proper will give you a true sense of accomplishment. Her pigtails, like her leggings, might be challenging to master, so keep practicing.
03Yogi Bear
Yogi Bear is a cartoon character on the sweeter side of the comic animal variety. Yogi Bear is a beloved character from Jellystone Park. As long as you get his tie and collar just right, this guy is a breeze to draw.
04Magilla Gorilla
Magilla Gorilla is another bizarre creature from Hanna-catalog. Barbera’s Because he comes with a bow tie, a little cap, and suspenders, this design is a little more complicated. Not to mention his enormous clown shoes. These small details can be a pain to draw, but Magilla is a very charming gorilla.
05Top Cat
Even further back in time, in the 1960s, there was the ever-popular Top Cat. He’s wearing a cap and a button-down vest, and he’s making some reasonably fancy dances. Give Top Cat a shot if you like The Flintstones’ basic Hanna-Barbera art style.
<
06Helga. G. Pataki
Helga is another character with some wacky hair. There’s a lot that’s bizarre about her. And half the fun of drawing her is figuring out how to do it. Just keep an eye on her head since getting it correct, especially with her rectangle hairdo, can be a little odd.
These are some of the cool animated characters to draw.
Part 3 4 Best Drawing Exercise for Creating Cartoon Characters
You’ll learn how to create cartoon characters individually, including their faces, hair, and facial expressions.
01How to Draw Cartoon Characters
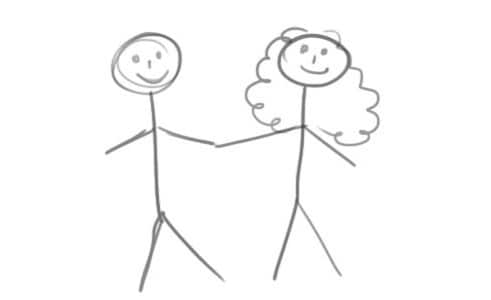
We’ll go through the fundamentals of human perception before getting into cartoon face drawing. Humans have a unique ability to synthesize the details that make up a structure or object in highly complicated ways into fundamental and simple ones. We can express everything with a few curves and geometric forms in this way. In cartoon face, we need to identify the character just by looking like looking at the below picture a girl and a boy.
02Here, you will learn How to Draw a Cartoon Face
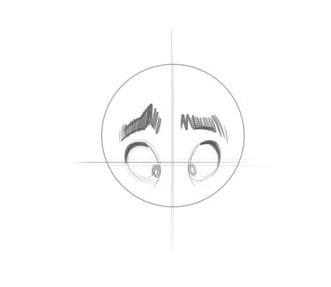
Let us begin with a sketch of a cartoon face. A circle is a basic cartoon shape. All you need is a circle. As seen in the image below, draw a vertical and horizontal line intersecting at the center.
Let us have a look at how to make cartoon eyeballs. Draw an oval shape with a slight lean to the side at the top for the eyes. Repeat on the other side.
Slightly thicken the characteristic to represent our character eyelashes at the top of the circle, place the brows above the eyelashes to create a shocking appearance, draw both pupils to the center in the same direction.
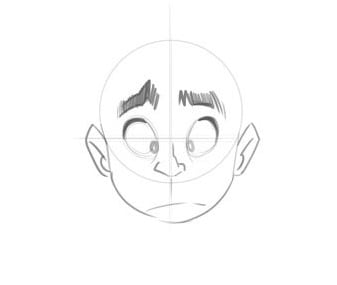
When creating a nose from the front, it’s typical to leave off many details. Even if you merely sketch its tip, it will likely provide a convincing impact. Drawing only one side of the nose is also quite frequent. Children’s mouths are extremely simple in cartoon style, regardless of gender.
The ears are viewed from the front; therefore, the internal holes are not visible. The circle has already established the shape of our head.
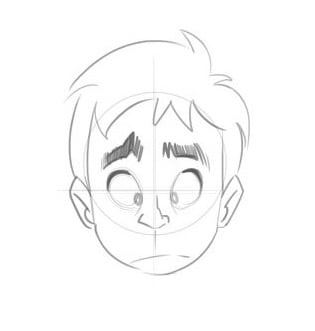
03Let’s learn about How to Draw a Cartoon Hair
Keep in mind that our characters’ hair is essential for identifying their personalities, and it can also indicate their age. So, all we need is an effortless and playful haircut to bring our boy to life. Because there is no particular method for drawing hair, you’ll have to experiment until you find the perfect look. Look for photo references on the internet! Take a look at a magazine shoot or a Google search.
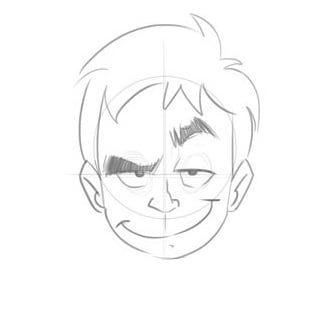
03How to Draw Characters with different Facial Expressions
By simply following the instructions below, you’ll notice that you can completely transform his expression: Lowering one brow and raising the other, eyelashes are used to cut the eyes in half, putting a smile on the face one side is higher.
To stay under the eyelashes, move the eye pupils up. That’s all there is to it! With just a few tweaks, we achieved the desired result. The circular form of the eyes, hair, ears, nose, chin and the circular shape of the ears are all the same! It’s that simple!
While working in cartooning or video making, Wondershare Wondershare Filmora Video Editor comes out with pros in mind, which can effortlessly convert conventional films into cartoon videos. If you want greater control over your cartoon video, you may also use keyframing to create it. You can fine-tune the parameters in Effects to achieve the best results. You can even change the Animation color after it has been created. It also allows you to use different text themes to showcase your videos.
We propose Wondershare Filmora Video Editor , in this case, to create animation videos by adding keyframes, resulting in a smooth and natural animation. To get started with Animation, all you need is a white plane. Aside from that, color correction and an audio mixer will take your animation video to the next level.
For Win 7 or later (64-bit)
For macOS 10.12 or later
● Key Takeaways from This Episode →
● Learn what are the key elements to make animation videos using software
● Tutorial on how to draw a cartoon character accurately
● In comparison, Wondershare Wondershare Filmora Video Editor is superior in making animation videos.
Cartoon character have stamped their faces in our hearts from childhood. A cartoon artist represents a cartoon or a natural person’s unique features with simple shapes accurately to recognize the person with the drawing and does not require a lot of patience to do this. The goal of the cartoon is to attract, and the child should get attracted when they see a cartoon image as well as adults. Though the sparkle may appear a little dull, it remains unaltered.
Let us grab a chance to recreate our cartoon characters with easy tutorials about animated characters to draw. In addition to that, you will learn about basic drawing exercises to lead into cool animated characters to draw through this guide in a step-by-step manner.
In this article
01 [What Do I Need to Start Learning Animated Characters Drawings? ](#Part 1)
02 [6 Cartoon Characters that Anyone Can Draw (Provided with Free Video Tutorials)](#Part 2)
03 [4 Best Drawing Exercises for Creating Cartoon Characters](#Part 3)
Part 1 What Do I Need to Start Learning Animated Characters Drawings?
There are many software’s available, and anyone can create an animated character drawing, but still, the art of creating a perfect character needs a master. You don’t have to be a Disney-grade animator to make it; start with simple minor characters. Animation is the art of bringing a 3D illustrated cartoon into life. It is created by projecting a sequence of images one after the other immediately. Let us discuss the essential things you need to note before animating characters.
●Timeline is the most important for animation. Depending on the software, you have various options to change the duration and add effects.
●Animation is generally preferable in 24 frames per second, which means the total number of people in the frame for one second.
●There are two types of working they are one’s and two’s. 2D Animation is usually done in two’s, whereas 3D Animation is in one’s.
●In hand-drawn animations, keyframes are more critical to maintain. The keyframe is the position for the cartoon as per animator has decided.
●Breakdowns combine one or two keyframes, which decide the motion in between the keys.
●In-betweens are all the frames that come between to smooth the motion—automatically generated by the computer to move from key to key.
●Composting is creating or joining two or more images to create a single cartoon frame.
Part 2 6 Cartoon Characters that Anyone can Draw (With free Video Tutorials)
We will discuss animated characters to draw in hand. There are many cartoon characters, but we will look into six cartoon character drawings with their tutorial videos.
01 Smurfette
Smurfette stands out as the lone female Smurf in the entire bunch of blue critters around the village area. One of the rare designs with long hair and a dress is hers. Her design is a lot of fun to sketch.
So, in general, it’s best to work through the lesson as is, then turn it into Brainy, Papa, Joker, or even Smurf.
01Angelica Pickles
Angelica Pickles is one of the most challenging characters to depict from The Rugrats. But her design is so intricate that getting it proper will give you a true sense of accomplishment. Her pigtails, like her leggings, might be challenging to master, so keep practicing.
03Yogi Bear
Yogi Bear is a cartoon character on the sweeter side of the comic animal variety. Yogi Bear is a beloved character from Jellystone Park. As long as you get his tie and collar just right, this guy is a breeze to draw.
04Magilla Gorilla
Magilla Gorilla is another bizarre creature from Hanna-catalog. Barbera’s Because he comes with a bow tie, a little cap, and suspenders, this design is a little more complicated. Not to mention his enormous clown shoes. These small details can be a pain to draw, but Magilla is a very charming gorilla.
05Top Cat
Even further back in time, in the 1960s, there was the ever-popular Top Cat. He’s wearing a cap and a button-down vest, and he’s making some reasonably fancy dances. Give Top Cat a shot if you like The Flintstones’ basic Hanna-Barbera art style.
<
06Helga. G. Pataki
Helga is another character with some wacky hair. There’s a lot that’s bizarre about her. And half the fun of drawing her is figuring out how to do it. Just keep an eye on her head since getting it correct, especially with her rectangle hairdo, can be a little odd.
These are some of the cool animated characters to draw.
Part 3 4 Best Drawing Exercise for Creating Cartoon Characters
You’ll learn how to create cartoon characters individually, including their faces, hair, and facial expressions.
01How to Draw Cartoon Characters
We’ll go through the fundamentals of human perception before getting into cartoon face drawing. Humans have a unique ability to synthesize the details that make up a structure or object in highly complicated ways into fundamental and simple ones. We can express everything with a few curves and geometric forms in this way. In cartoon face, we need to identify the character just by looking like looking at the below picture a girl and a boy.
02Here, you will learn How to Draw a Cartoon Face
Let us begin with a sketch of a cartoon face. A circle is a basic cartoon shape. All you need is a circle. As seen in the image below, draw a vertical and horizontal line intersecting at the center.
Let us have a look at how to make cartoon eyeballs. Draw an oval shape with a slight lean to the side at the top for the eyes. Repeat on the other side.
Slightly thicken the characteristic to represent our character eyelashes at the top of the circle, place the brows above the eyelashes to create a shocking appearance, draw both pupils to the center in the same direction.
When creating a nose from the front, it’s typical to leave off many details. Even if you merely sketch its tip, it will likely provide a convincing impact. Drawing only one side of the nose is also quite frequent. Children’s mouths are extremely simple in cartoon style, regardless of gender.
The ears are viewed from the front; therefore, the internal holes are not visible. The circle has already established the shape of our head.
03Let’s learn about How to Draw a Cartoon Hair
Keep in mind that our characters’ hair is essential for identifying their personalities, and it can also indicate their age. So, all we need is an effortless and playful haircut to bring our boy to life. Because there is no particular method for drawing hair, you’ll have to experiment until you find the perfect look. Look for photo references on the internet! Take a look at a magazine shoot or a Google search.
03How to Draw Characters with different Facial Expressions
By simply following the instructions below, you’ll notice that you can completely transform his expression: Lowering one brow and raising the other, eyelashes are used to cut the eyes in half, putting a smile on the face one side is higher.
To stay under the eyelashes, move the eye pupils up. That’s all there is to it! With just a few tweaks, we achieved the desired result. The circular form of the eyes, hair, ears, nose, chin and the circular shape of the ears are all the same! It’s that simple!
While working in cartooning or video making, Wondershare Wondershare Filmora Video Editor comes out with pros in mind, which can effortlessly convert conventional films into cartoon videos. If you want greater control over your cartoon video, you may also use keyframing to create it. You can fine-tune the parameters in Effects to achieve the best results. You can even change the Animation color after it has been created. It also allows you to use different text themes to showcase your videos.
We propose Wondershare Filmora Video Editor , in this case, to create animation videos by adding keyframes, resulting in a smooth and natural animation. To get started with Animation, all you need is a white plane. Aside from that, color correction and an audio mixer will take your animation video to the next level.
For Win 7 or later (64-bit)
For macOS 10.12 or later
● Key Takeaways from This Episode →
● Learn what are the key elements to make animation videos using software
● Tutorial on how to draw a cartoon character accurately
● In comparison, Wondershare Wondershare Filmora Video Editor is superior in making animation videos.
Guide on How to Create GIF in WhatsApp iPhone
2024 Guide on How to Create GIF in WhatsApp iPhone
An easy yet powerful editor
Numerous effects to choose from
Detailed tutorials provided by the official channel
Standing for Graphics Interchange Format, GIF is short animated images that you can see all over social media sites and other online platforms. These interesting animations can also be shared during your conversations on WhatsApp.

So, if you too are looking for ways to create as well as send GIFs on WhatsApp iPhone, you are on the right page. Keep reading to know all the possible ways to send WhatsApp GIFs on iPhone.
In this article
01 [How to send WhatsApp GIF from the integrated library on iPhone](#Part 1)
02 [How to send Live Photos as WhatsApp GIF on iPhone](#Part 2)
03 [How to create WhatsApp GIF using videos on iPhone](#Part 3)
04 [How to create excellent GIF effortlessly using Wondershare Filmora- All in One video editing software](#Part 4)
Part 1 How to send WhatsApp GIF from the integrated library on iPhone
If you have the latest version of WhatsApp installed on your phone, you can easily and quickly send the GIF from the integrated library having a collection of GIFs in several categories. The steps to send GIF in WhatsApp iPhone are as below.
Step 1. On your iPhone, launch WhatsApp and open the contact or a group to which you wish to send the GIF.
Step 2. Click on the Stickers icon at the typing section and then choose the GIF option at the bottom.
Step 3. Multiple GIFs in different categories will appear. You can further search for the desired GIF using a keyword at the search icon at the bottom-left corner. The list of the Recents and the Favorites can also be searched using their respective icons.
Note: To save any particular GIF in the favorites list, tap and hold the GIF and then click on Add To Favorites option.
StepTap on the selected GIF and then click on the Send icon at the bottom-right corner. Your WhatsApp GIF iPhone will be sent.

Part 2 How to send Live Photos as WhatsApp GIF on iPhone
Live Photos on your iPhone can also be sent as GIFs in WhatsApp conversations and the steps for the same are as below.
Note: The feature is available for users having iPhone 6 or later versions.
Step 1.Open the WhatsApp contact on your iPhone to whom you wish to send the GIF. Click on the + icon and then choose the option of Photo & Video Library.
Step 2. Search for the Live photo in your gallery and then press it. When the image pops out, slide upwards and then click on the Select as GIF option.
Step 3. Tap on the Send icon to share the selected Live photo as GIF.

Part 3 How to create WhatsApp GIF using videos on iPhone
In addition to the integrated library, you can also convert the videos on your iPhone to GIF and share them on WhatsApp. To be used as GIF, the length of the videos cannot be more than 6 seconds. Thus, for a larger video, you need to trim it to be under 6 seconds. Steps to get the task done are as follows.
Step 1.Launch WhatsApp on your iPhone and select the contact to which you want to share the GIF. Next, click on + sign and then choose Photo & Video Library option.
Step 2.Select the desired video from your phone gallery.
Step 3.After the video is added, an editing screen will open. Here you can trim the video to make it under 6 seconds using the slider at the top. Further changes can be made like adding a sticker, text, or making a freehand drawing.
Step 4.After all customizations are done, click on the GIF button.
Step 5.Finally, tap on the Send icon at the bottom-right corner to send the edited video as GIF.

Part 4 How to create excellent GIF effortlessly using Wondershare Filmora- All in One video editing software
WhatsApp in your iPhone has a built-in option to create GIFs using the videos on the device. Though the process is simple, the option for editing and customizations are limited. So, if you want to create GIFs using videos online and with advanced editing tools, we suggest using Wondershare Filmora Video Editor .
This all-in-one video editing software will let you edit and customize your files in several ways and in a few simple steps, your desired GIF will be ready.
Wondershare Filmora
Get started easily with Filmora’s powerful performance, intuitive interface, and countless effects!
Try It Free Try It Free Try It Free Learn More >
Key features of the software
● Add media files in all ley formats like MP4, MOV, MKV, PNG, and others to create GIFs.
● Simple and quick steps for creating the desired animation.
● Allows to customize the GIF using functions like slow-down, crop, rotate, and many more.
● Allows adding text, voice, and other elements.
● Option to share the created GIF to Vimeo, and YouTube directly.
● Software support to all latest Windows and Mac systems.
Steps to create WhatsApp GIF using Wondershare Filmora.
Step 1.Open the installed software on your system and import the desired images and videos from your system.
Step 2.Drag and drop the added videos and images to the timeline.

Step 3.Edit the file using features like crop, rotate, split, and others.
Step 4.Add text and other elements as needed.

Step 5.At the Local tab, save the customized media as GIF. Select the file name and the destination and then finally, click on the EXPORT button to start processing.
● Key Takeaways from This Episode →
●Gifs for WhatsApp iPhone can be added from the integrated library.
●Live Photos, as well as videos, can also be used to create and share them as GIF.
●For creating interesting and funny GIF in a hassle-free manner, Wondershare Filmora works as the best software.
Standing for Graphics Interchange Format, GIF is short animated images that you can see all over social media sites and other online platforms. These interesting animations can also be shared during your conversations on WhatsApp.
So, if you too are looking for ways to create as well as send GIFs on WhatsApp iPhone, you are on the right page. Keep reading to know all the possible ways to send WhatsApp GIFs on iPhone.
In this article
01 [How to send WhatsApp GIF from the integrated library on iPhone](#Part 1)
02 [How to send Live Photos as WhatsApp GIF on iPhone](#Part 2)
03 [How to create WhatsApp GIF using videos on iPhone](#Part 3)
04 [How to create excellent GIF effortlessly using Wondershare Filmora- All in One video editing software](#Part 4)
Part 1 How to send WhatsApp GIF from the integrated library on iPhone
If you have the latest version of WhatsApp installed on your phone, you can easily and quickly send the GIF from the integrated library having a collection of GIFs in several categories. The steps to send GIF in WhatsApp iPhone are as below.
Step 1. On your iPhone, launch WhatsApp and open the contact or a group to which you wish to send the GIF.
Step 2. Click on the Stickers icon at the typing section and then choose the GIF option at the bottom.
Step 3. Multiple GIFs in different categories will appear. You can further search for the desired GIF using a keyword at the search icon at the bottom-left corner. The list of the Recents and the Favorites can also be searched using their respective icons.
Note: To save any particular GIF in the favorites list, tap and hold the GIF and then click on Add To Favorites option.
StepTap on the selected GIF and then click on the Send icon at the bottom-right corner. Your WhatsApp GIF iPhone will be sent.
Part 2 How to send Live Photos as WhatsApp GIF on iPhone
Live Photos on your iPhone can also be sent as GIFs in WhatsApp conversations and the steps for the same are as below.
Note: The feature is available for users having iPhone 6 or later versions.
Step 1.Open the WhatsApp contact on your iPhone to whom you wish to send the GIF. Click on the + icon and then choose the option of Photo & Video Library.
Step 2. Search for the Live photo in your gallery and then press it. When the image pops out, slide upwards and then click on the Select as GIF option.
Step 3. Tap on the Send icon to share the selected Live photo as GIF.
Part 3 How to create WhatsApp GIF using videos on iPhone
In addition to the integrated library, you can also convert the videos on your iPhone to GIF and share them on WhatsApp. To be used as GIF, the length of the videos cannot be more than 6 seconds. Thus, for a larger video, you need to trim it to be under 6 seconds. Steps to get the task done are as follows.
Step 1.Launch WhatsApp on your iPhone and select the contact to which you want to share the GIF. Next, click on + sign and then choose Photo & Video Library option.
Step 2.Select the desired video from your phone gallery.
Step 3.After the video is added, an editing screen will open. Here you can trim the video to make it under 6 seconds using the slider at the top. Further changes can be made like adding a sticker, text, or making a freehand drawing.
Step 4.After all customizations are done, click on the GIF button.
Step 5.Finally, tap on the Send icon at the bottom-right corner to send the edited video as GIF.
Part 4 How to create excellent GIF effortlessly using Wondershare Filmora- All in One video editing software
WhatsApp in your iPhone has a built-in option to create GIFs using the videos on the device. Though the process is simple, the option for editing and customizations are limited. So, if you want to create GIFs using videos online and with advanced editing tools, we suggest using Wondershare Filmora Video Editor .
This all-in-one video editing software will let you edit and customize your files in several ways and in a few simple steps, your desired GIF will be ready.
Wondershare Filmora
Get started easily with Filmora’s powerful performance, intuitive interface, and countless effects!
Try It Free Try It Free Try It Free Learn More >
Key features of the software
● Add media files in all ley formats like MP4, MOV, MKV, PNG, and others to create GIFs.
● Simple and quick steps for creating the desired animation.
● Allows to customize the GIF using functions like slow-down, crop, rotate, and many more.
● Allows adding text, voice, and other elements.
● Option to share the created GIF to Vimeo, and YouTube directly.
● Software support to all latest Windows and Mac systems.
Steps to create WhatsApp GIF using Wondershare Filmora.
Step 1.Open the installed software on your system and import the desired images and videos from your system.
Step 2.Drag and drop the added videos and images to the timeline.
Step 3.Edit the file using features like crop, rotate, split, and others.
Step 4.Add text and other elements as needed.
Step 5.At the Local tab, save the customized media as GIF. Select the file name and the destination and then finally, click on the EXPORT button to start processing.
● Key Takeaways from This Episode →
●Gifs for WhatsApp iPhone can be added from the integrated library.
●Live Photos, as well as videos, can also be used to create and share them as GIF.
●For creating interesting and funny GIF in a hassle-free manner, Wondershare Filmora works as the best software.
Best 15 2D Animation Software Free That Worth to Try
Top 15 2D Animation Software Free That Worth to Try
An easy yet powerful editor
Numerous effects to choose from
Detailed tutorials provided by the official channel
When you are trying to create a funny cartoon, explainer videos, or other short informative content to post online, 2D animation software is a breeze to use.
With access to the best 2D animation software, you can create compelling and intricate stories that will help you sync with the audience.
01Wondershare Filmora
Price: Free, $99.99 (Perpetual); $59.99 (1-Year)
Pros
Numerous preset options
Both for beginners and professionals
Quick video trim/edits
Cons
Straightforward user interface
Lacks various shortcuts
May need high system requirements
What are users saying?
“I am solving the problem of getting an easy-to-use, all-in-one video editor. In addition, the editor gives you the ability to command over your audio files, whereas other editors just give you the basic audio editing capabilities. Lastly, the fully editable text effects and the vast numbers too.”
Key Features
Unlimited Video Tracks.
Audio Noise Reduction.
Automatic Audio Sync.
Motion Graphics animation support.
Auto color correction.
Available for Mac and Windows.
For Win 7 or later (64-bit)
For macOS 10.12 or later
02Opentoonz
Price: Free
Pros
Accessible plugin to automatically create animation effects
Unique Xsheets & Timelines features
Audio/Soundtrack Implementer
Cons
Somewhat Limited drawing capabilities
Intricate setup
A bit outdated UI design
What are users saying?
“Not a very self-explanatory 2D animation software. I had to look up some help, but it worked out in the end (youtube tutorials).”
Key Features
GTS scanning tool
Easy to modify picture styles
Add light and distortion effects
Works with black and white and colored scans
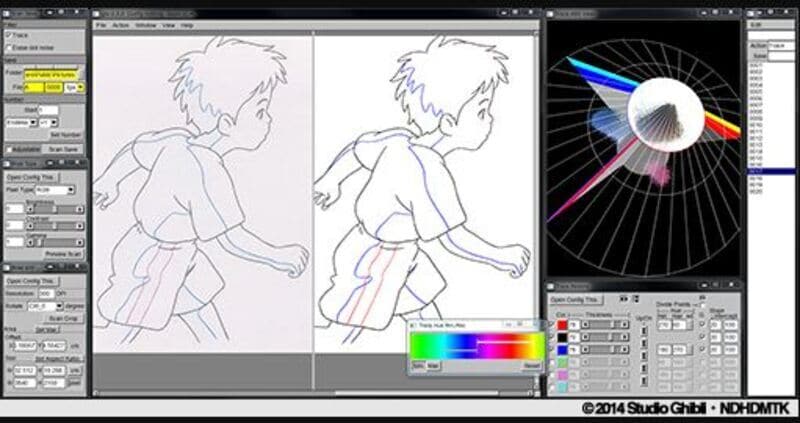
03Pencil 2D
Price: Free
Pros
Easy to use
Open sources
Supports multiple languages
Cons
It doesn’t support shape tools
Only for beginners
It doesn’t support 3D animation
What are users saying?
“The main thing against Pencil2d is the lack of complicated tools. Some tools are not there to bring better color effects, curves, drawing tools, etc. But honestly, this is not a big problem, the intention to be the most robust in the world but to be a tool that provides you a great introduction to animation with vector drawing.”
Key Features
Simplistic design to let you make animation easily
Raster and vector workflow switching
Cross-platform compatibility to free download
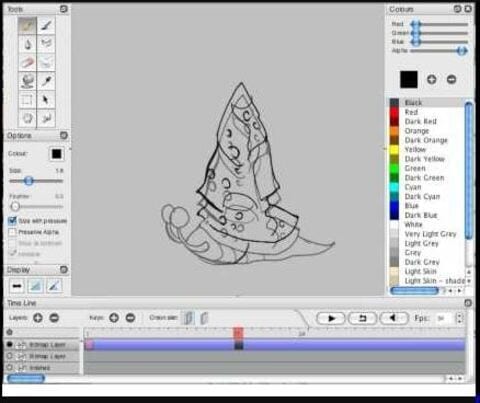
04Maefloresta/TupiTube
Price: Free
Pros
Great for beginners
Effective tools management
Friendly price plan
Cons
Differences in color correction
Certain confusing tools
Unable to erase unwanted frames
What are users saying?
“Honestly, I love the app, but I wish there were an eraser, but other than that, it is great for everything from experimental clips to my YT videos that will be coming out in a few months.”
Key Features
A free downloadable app that assists on tablets and smartphones
Simple software with tutorials
Interactive user interface that beginners can use with ease
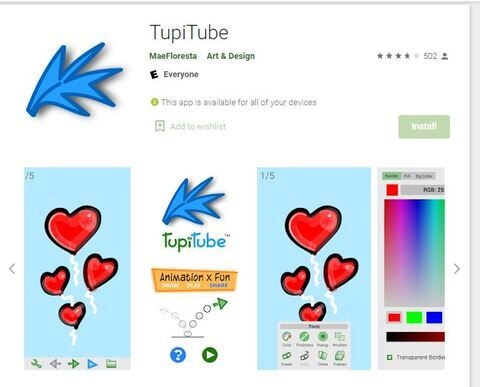
05Synfig
Price: Free
Pros
Offers 50+ layers
Easy to use layout
Lots of technical tools and functions
Cons
Difficult layout
Hard learning curve
Only a few tutorials available
What are users saying?
“It is cumbersome. You will look for tutorials to understand it, even if you have the best 2D animation software Background. - Though, it’s not famous so you may not wander for information about it as easily. - You do need high PC requirements to operate it, it is heavy. - You have to Constantly save because there are a few operations that make it crash.”
Key Features
Compatible with multiple content layers
The bone system assists for the cutout animations creation from bitmap images
Consistent with sound support to allow for the addition and syncing of narration and music to the video
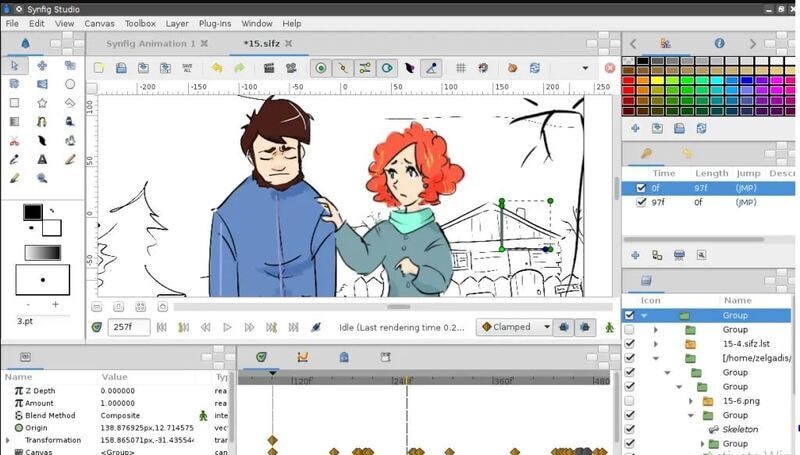
06CelAction 2D
Price: $1300 Studio Edition (Single License Use)
Pros
Fast to use
Low system requirements
Add-ons available
Cons
Less dynamic
Less in demand
Time-Consuming to learn
What are users saying?
**”**I found the software pretty responsive and may not be good for beginners. Being a beginner, I need easy-to-use free download 2D animation software with low learning, and it didn’t fit my needs entirely.”
Key Features
Quick and straightforward to use professionally
Features ergonomic controls
Simply manages complicated projects with different layers
Compatible with all modern Windows machines - 32 and 64-bit Also runs with Macs through Boot Camp
The multiplane camera helps you have more excellent controls
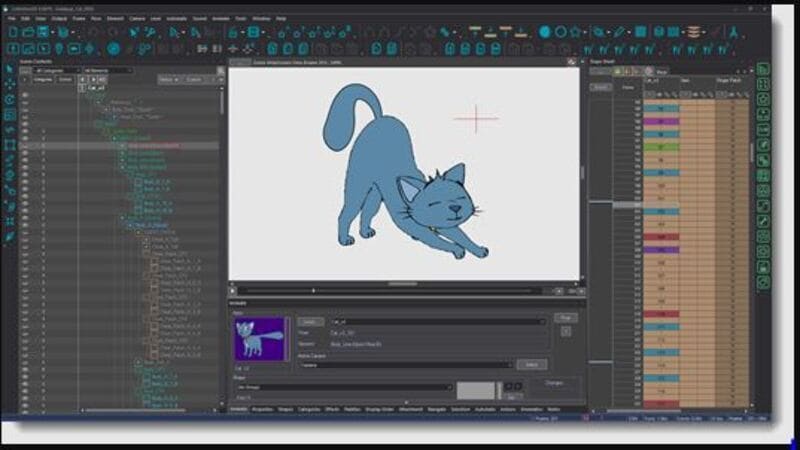
07Moho (Anime Studio) Pro
Price: $399 (Full Pack)
Pros
Regular updates available
Advanced features
Also good for beginners
Cons
Doesn’t automatically sync
Some functions are highly advanced
Lacks flexibility
What are users saying?
“I am freelance, and Moho12 has allowed me to give more character to animated characters that I can use for some clients. The compatibility that I get with Adobe Illustrator and the speed of the render makes it one of my central tools when it comes to working with character animations.”
Key Features
Improved freehand drawing tools
Beizer manages to make it simpler for you to design your videos
Brilliant warp feature assists in creating custom meshes to twist and bend your animations
Realistic motion blur
Best 2D Animation software for different layers at the same time
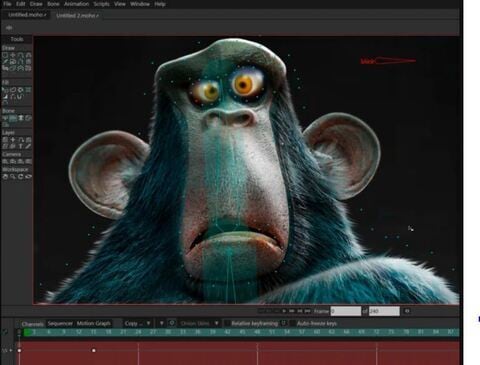
08FlipBook
Price: $19.99 (FlipBook Lite); $49.99 (FlipBook Studio); $149.99 (FlipBook Pro); $199.99 (FlipBook Pro HD)
Pros
Simple to draw
Easy to import from a scanner
Quick uploads
Cons
No free version
Challenging to make subtle changes
May not be user-friendly features
What are users saying?
“FlipBook does not contain a steep learning curve, and even first-time animators will be able to produce creative projects.”
Key Features
Modifications will be active while you draw the animation, so FlipBook is pretty quick
Easy to use the shift key to make speed painting
Ten animation layers for adding extra touches
Simple to use a scanner to import images

09Reallusion CrazyTalk Animator
Price: $199 (Pipeline); $99 (Pro)
Pros
Large library of appealing templates
Both for beginners and professionals
Easy to control characters
Cons
No drawing tools
A bit high learning curve
Hard to sync voice
What are users saying?
“This is a 2D animation maker online that makes sense. CTA makes sense in everything it does. One will find the tools exactly where they are supposed to be, and things work exactly the way one expects them to work.”
Key Features
Assists real-time facial expression with precise modification
Black magic to transform the image into a moving cartoon
You can make 2D visual effects for professionals
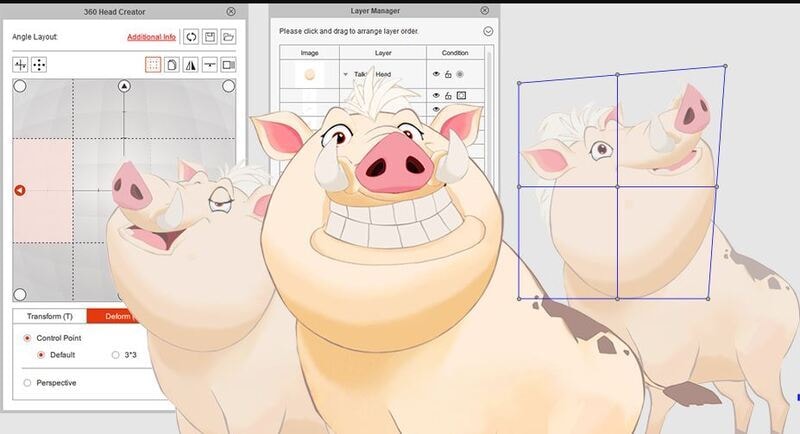
10Stop Motion Studio
Price: $59.99
Pros
Inbuilt sound editor
Easy to schedule
Not free
Cons
Certain hoops
No bone ringing tools or template designs
Only for 2D stop motion, 2D animation online
What are users saying?
“So I am in high school, Considering an animation class. Currently, we use this to make a claymation. I have noticed a few complexities with it. The camera does not aim well, which is a big hassle. It also Consists of a glitch where sometimes, if you hit the undo frame, it will delete all your other projects. When that happened to me, I was not happy. Now, this last part may just be nitpicking, but when I saw the official company’s animation, I saw their fingers in it, and the animation was not smooth.”
Key Features
Onionskin helps you to view previous frames via a transparent overlay
Audio recording and Chroma key and audio recording to better narrate and add voice effects
Simple
one-click upload to Facebook and YouTube
DSLR camera assistance for creating perfect 1080p recordings
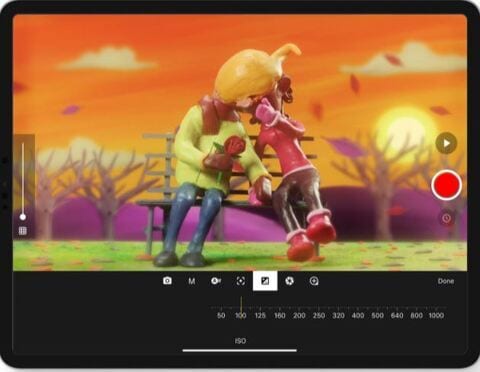
11Harmony
Price: $25.50/month (Harmony Essentials); $64.50/month (Harmony Advanced); $117.50/month (Harmony Premium)
Pros
Lots of animation and drawing tools
Offers various color controls
Flexible 2D animation
Cons
Complicated to learn
High system requirements
Not free
What are users saying?
“I have created really powerful 2D animations with Harmony; it offers almost every tool to be precise and creative in the artworks and the advanced tools for paperless animations, which they helped me a lot.”
Key Features
Smooth lines
Stabilizer
It offers 3, 4, and 5-point guides for curved perspectives.
It helps create cut-out animation.
Easy integration with software available in the production pipeline.
It offers 2D or 3D integration.
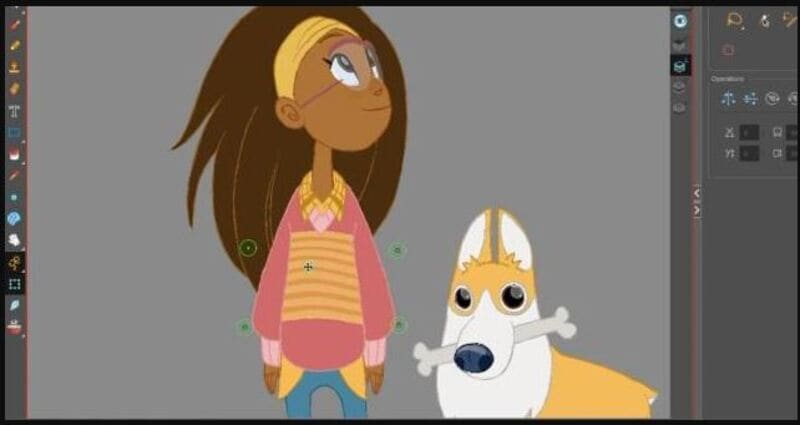
12Krita
Price: Free
Pros
Completely free
Easy to use
High compatibility
Cons
No dedicated support
Use only on desktop
Outdated UI
What are users saying?
“Krita helps me with my advertising videos as well as logos and other image editing use cases. I mainly use it to make thumbnails for my youtube channel and featured images for the articles on my website. I also use it to make some quick logos for my youtube channel and website.“
Key Features
This online 2D animation maker software allows you to add a stabilizer to the brush to smooth it.
Personalized brush with nine different brush engines.
Create comic panels with built-in vector drawing tools.
Create seamless patterns and textures by making image reference on the x and y-axis.
Import brush packs and texture from other artists.
You can flatten, combine, or order layers to organize your artwork.

13Animaker
Price: $10/mo (Basic); $19/mo (Starter); $49/mo (Pro); Custom Pricing (Enterprise)
Pros
Helpful app
Able to make beautiful videos
Tons of features
Cons
May not work on specific systems
Chunky UI
Time-Consuming
What are users saying?
“Firstly, it displays that you are limited to the materials that you can use. If you want it, you can go for its paid version, which I think is ideal for a company but still hard. Secondly, I am trying to execute a project for my science class, and so far, I’ve had three days to work on it.”
Key Features
Create animated videos in 6 unique video styles like 2D, handcraft, infographics, whiteboard, 2.5 D, and typography.
Beginners can create videos and use them as both animation and animated presentations.
Best free download 2D animation software has 200 sound effects to choose from.
It offers 100 background music tracks.
It helps you to record direct voice recordings.
Animaker allows the team to collaborate.
Export video in full HD quality.
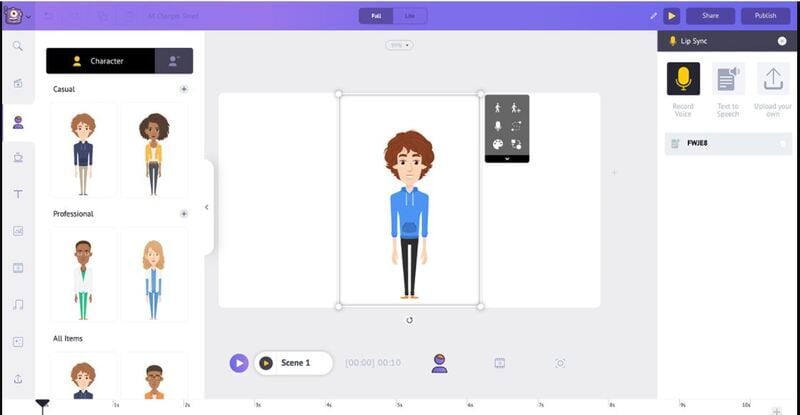
14SketchBook
Price: Free
Pros
Many options of pencils, brushes etc.
Various color options
Ideal for quick inspirations
Cons
It may be hard to enlarge projects
Lack of usability in some features
Some functions are confusing
What are users saying?
“Sketchbook has helped us in mobility. Since it is also available for tablets like iPad, it can be used to create quick artworks and concept arts and be used as a notebook to take notes. The different features also come in real handy, and the artwork created can be used to display professionally with a good amount of details.”
Key Features
It helps you draw basic shapes like circles, triangles, rectangles, etc.
Adjust the rules as per your desire.
Fill color into your artwork.
Also, import or export the layer as PSD.
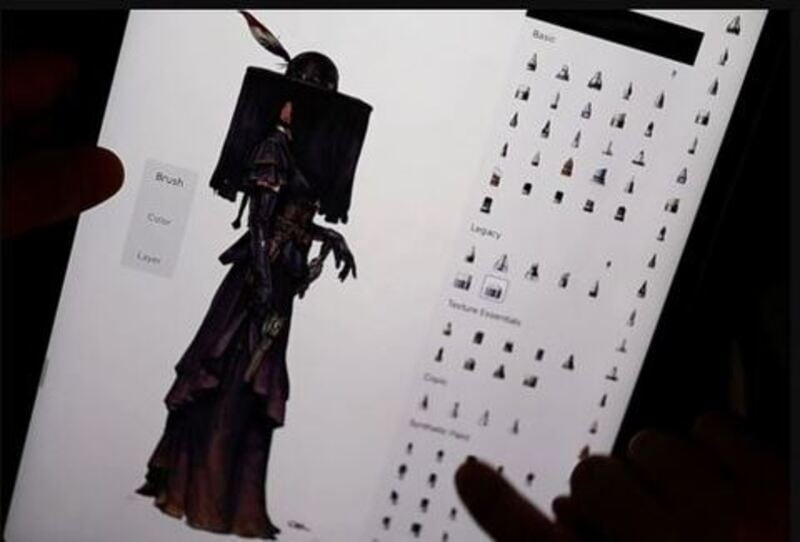
15Animate CC
Price: $20.99/mo
Pros
Helpful user interface
Various essential modules
Extremely smooth
Cons
High battery utilization
Steep learning curve
Lack some tools for handling sound
What are users saying?
“We use Animate to make educational videos, but we also use some of the drawing tools to create vector-based illustrations, and we can export them out from Animate to use them in printed products.“
Key Features
Create new poses for vector images or figures.
It helps you to arrange your layers in a parent-child hierarchy.
● Automatically matches mouth poses to voice inflections.
● Easy to export 360 VR animations.
● Create ads directly with Animate.
● Export images with the correct resolution by bypassing the image optimization and using image settings.
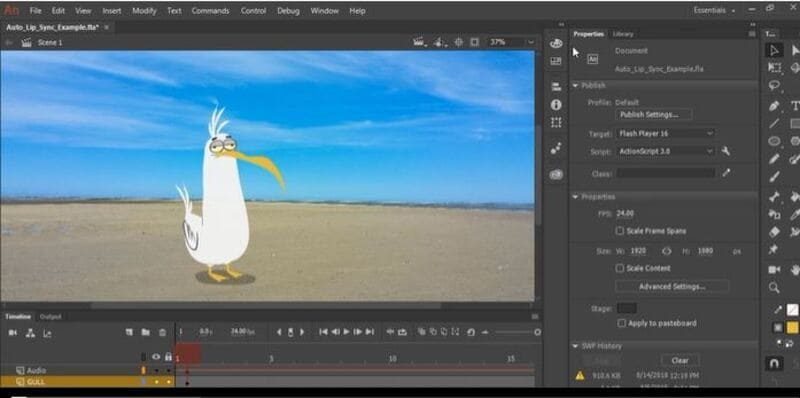
● Key Takeaways from This Episode →
● Using 2D animation software is simpler when you have the right software. You already have a storyboard and a script in mind, but now you can realize your vision in unique and intricate ways.
● So, if you want to make 3D animation, various 3D animation software options are also for you. If any of the products above will serve you well, you could use Filmora, which comes first in the series of 2D animation software.
When you are trying to create a funny cartoon, explainer videos, or other short informative content to post online, 2D animation software is a breeze to use.
With access to the best 2D animation software, you can create compelling and intricate stories that will help you sync with the audience.
01Wondershare Filmora
Price: Free, $99.99 (Perpetual); $59.99 (1-Year)
Pros
Numerous preset options
Both for beginners and professionals
Quick video trim/edits
Cons
Straightforward user interface
Lacks various shortcuts
May need high system requirements
What are users saying?
“I am solving the problem of getting an easy-to-use, all-in-one video editor. In addition, the editor gives you the ability to command over your audio files, whereas other editors just give you the basic audio editing capabilities. Lastly, the fully editable text effects and the vast numbers too.”
Key Features
Unlimited Video Tracks.
Audio Noise Reduction.
Automatic Audio Sync.
Motion Graphics animation support.
Auto color correction.
Available for Mac and Windows.
For Win 7 or later (64-bit)
For macOS 10.12 or later
02Opentoonz
Price: Free
Pros
Accessible plugin to automatically create animation effects
Unique Xsheets & Timelines features
Audio/Soundtrack Implementer
Cons
Somewhat Limited drawing capabilities
Intricate setup
A bit outdated UI design
What are users saying?
“Not a very self-explanatory 2D animation software. I had to look up some help, but it worked out in the end (youtube tutorials).”
Key Features
GTS scanning tool
Easy to modify picture styles
Add light and distortion effects
Works with black and white and colored scans
03Pencil 2D
Price: Free
Pros
Easy to use
Open sources
Supports multiple languages
Cons
It doesn’t support shape tools
Only for beginners
It doesn’t support 3D animation
What are users saying?
“The main thing against Pencil2d is the lack of complicated tools. Some tools are not there to bring better color effects, curves, drawing tools, etc. But honestly, this is not a big problem, the intention to be the most robust in the world but to be a tool that provides you a great introduction to animation with vector drawing.”
Key Features
Simplistic design to let you make animation easily
Raster and vector workflow switching
Cross-platform compatibility to free download
04Maefloresta/TupiTube
Price: Free
Pros
Great for beginners
Effective tools management
Friendly price plan
Cons
Differences in color correction
Certain confusing tools
Unable to erase unwanted frames
What are users saying?
“Honestly, I love the app, but I wish there were an eraser, but other than that, it is great for everything from experimental clips to my YT videos that will be coming out in a few months.”
Key Features
A free downloadable app that assists on tablets and smartphones
Simple software with tutorials
Interactive user interface that beginners can use with ease
05Synfig
Price: Free
Pros
Offers 50+ layers
Easy to use layout
Lots of technical tools and functions
Cons
Difficult layout
Hard learning curve
Only a few tutorials available
What are users saying?
“It is cumbersome. You will look for tutorials to understand it, even if you have the best 2D animation software Background. - Though, it’s not famous so you may not wander for information about it as easily. - You do need high PC requirements to operate it, it is heavy. - You have to Constantly save because there are a few operations that make it crash.”
Key Features
Compatible with multiple content layers
The bone system assists for the cutout animations creation from bitmap images
Consistent with sound support to allow for the addition and syncing of narration and music to the video
06CelAction 2D
Price: $1300 Studio Edition (Single License Use)
Pros
Fast to use
Low system requirements
Add-ons available
Cons
Less dynamic
Less in demand
Time-Consuming to learn
What are users saying?
**”**I found the software pretty responsive and may not be good for beginners. Being a beginner, I need easy-to-use free download 2D animation software with low learning, and it didn’t fit my needs entirely.”
Key Features
Quick and straightforward to use professionally
Features ergonomic controls
Simply manages complicated projects with different layers
Compatible with all modern Windows machines - 32 and 64-bit Also runs with Macs through Boot Camp
The multiplane camera helps you have more excellent controls
07Moho (Anime Studio) Pro
Price: $399 (Full Pack)
Pros
Regular updates available
Advanced features
Also good for beginners
Cons
Doesn’t automatically sync
Some functions are highly advanced
Lacks flexibility
What are users saying?
“I am freelance, and Moho12 has allowed me to give more character to animated characters that I can use for some clients. The compatibility that I get with Adobe Illustrator and the speed of the render makes it one of my central tools when it comes to working with character animations.”
Key Features
Improved freehand drawing tools
Beizer manages to make it simpler for you to design your videos
Brilliant warp feature assists in creating custom meshes to twist and bend your animations
Realistic motion blur
Best 2D Animation software for different layers at the same time
08FlipBook
Price: $19.99 (FlipBook Lite); $49.99 (FlipBook Studio); $149.99 (FlipBook Pro); $199.99 (FlipBook Pro HD)
Pros
Simple to draw
Easy to import from a scanner
Quick uploads
Cons
No free version
Challenging to make subtle changes
May not be user-friendly features
What are users saying?
“FlipBook does not contain a steep learning curve, and even first-time animators will be able to produce creative projects.”
Key Features
Modifications will be active while you draw the animation, so FlipBook is pretty quick
Easy to use the shift key to make speed painting
Ten animation layers for adding extra touches
Simple to use a scanner to import images
09Reallusion CrazyTalk Animator
Price: $199 (Pipeline); $99 (Pro)
Pros
Large library of appealing templates
Both for beginners and professionals
Easy to control characters
Cons
No drawing tools
A bit high learning curve
Hard to sync voice
What are users saying?
“This is a 2D animation maker online that makes sense. CTA makes sense in everything it does. One will find the tools exactly where they are supposed to be, and things work exactly the way one expects them to work.”
Key Features
Assists real-time facial expression with precise modification
Black magic to transform the image into a moving cartoon
You can make 2D visual effects for professionals
10Stop Motion Studio
Price: $59.99
Pros
Inbuilt sound editor
Easy to schedule
Not free
Cons
Certain hoops
No bone ringing tools or template designs
Only for 2D stop motion, 2D animation online
What are users saying?
“So I am in high school, Considering an animation class. Currently, we use this to make a claymation. I have noticed a few complexities with it. The camera does not aim well, which is a big hassle. It also Consists of a glitch where sometimes, if you hit the undo frame, it will delete all your other projects. When that happened to me, I was not happy. Now, this last part may just be nitpicking, but when I saw the official company’s animation, I saw their fingers in it, and the animation was not smooth.”
Key Features
Onionskin helps you to view previous frames via a transparent overlay
Audio recording and Chroma key and audio recording to better narrate and add voice effects
Simple
one-click upload to Facebook and YouTube
DSLR camera assistance for creating perfect 1080p recordings
11Harmony
Price: $25.50/month (Harmony Essentials); $64.50/month (Harmony Advanced); $117.50/month (Harmony Premium)
Pros
Lots of animation and drawing tools
Offers various color controls
Flexible 2D animation
Cons
Complicated to learn
High system requirements
Not free
What are users saying?
“I have created really powerful 2D animations with Harmony; it offers almost every tool to be precise and creative in the artworks and the advanced tools for paperless animations, which they helped me a lot.”
Key Features
Smooth lines
Stabilizer
It offers 3, 4, and 5-point guides for curved perspectives.
It helps create cut-out animation.
Easy integration with software available in the production pipeline.
It offers 2D or 3D integration.
12Krita
Price: Free
Pros
Completely free
Easy to use
High compatibility
Cons
No dedicated support
Use only on desktop
Outdated UI
What are users saying?
“Krita helps me with my advertising videos as well as logos and other image editing use cases. I mainly use it to make thumbnails for my youtube channel and featured images for the articles on my website. I also use it to make some quick logos for my youtube channel and website.“
Key Features
This online 2D animation maker software allows you to add a stabilizer to the brush to smooth it.
Personalized brush with nine different brush engines.
Create comic panels with built-in vector drawing tools.
Create seamless patterns and textures by making image reference on the x and y-axis.
Import brush packs and texture from other artists.
You can flatten, combine, or order layers to organize your artwork.
13Animaker
Price: $10/mo (Basic); $19/mo (Starter); $49/mo (Pro); Custom Pricing (Enterprise)
Pros
Helpful app
Able to make beautiful videos
Tons of features
Cons
May not work on specific systems
Chunky UI
Time-Consuming
What are users saying?
“Firstly, it displays that you are limited to the materials that you can use. If you want it, you can go for its paid version, which I think is ideal for a company but still hard. Secondly, I am trying to execute a project for my science class, and so far, I’ve had three days to work on it.”
Key Features
Create animated videos in 6 unique video styles like 2D, handcraft, infographics, whiteboard, 2.5 D, and typography.
Beginners can create videos and use them as both animation and animated presentations.
Best free download 2D animation software has 200 sound effects to choose from.
It offers 100 background music tracks.
It helps you to record direct voice recordings.
Animaker allows the team to collaborate.
Export video in full HD quality.
14SketchBook
Price: Free
Pros
Many options of pencils, brushes etc.
Various color options
Ideal for quick inspirations
Cons
It may be hard to enlarge projects
Lack of usability in some features
Some functions are confusing
What are users saying?
“Sketchbook has helped us in mobility. Since it is also available for tablets like iPad, it can be used to create quick artworks and concept arts and be used as a notebook to take notes. The different features also come in real handy, and the artwork created can be used to display professionally with a good amount of details.”
Key Features
It helps you draw basic shapes like circles, triangles, rectangles, etc.
Adjust the rules as per your desire.
Fill color into your artwork.
Also, import or export the layer as PSD.
15Animate CC
Price: $20.99/mo
Pros
Helpful user interface
Various essential modules
Extremely smooth
Cons
High battery utilization
Steep learning curve
Lack some tools for handling sound
What are users saying?
“We use Animate to make educational videos, but we also use some of the drawing tools to create vector-based illustrations, and we can export them out from Animate to use them in printed products.“
Key Features
Create new poses for vector images or figures.
It helps you to arrange your layers in a parent-child hierarchy.
● Automatically matches mouth poses to voice inflections.
● Easy to export 360 VR animations.
● Create ads directly with Animate.
● Export images with the correct resolution by bypassing the image optimization and using image settings.
● Key Takeaways from This Episode →
● Using 2D animation software is simpler when you have the right software. You already have a storyboard and a script in mind, but now you can realize your vision in unique and intricate ways.
● So, if you want to make 3D animation, various 3D animation software options are also for you. If any of the products above will serve you well, you could use Filmora, which comes first in the series of 2D animation software.
How to Insert a GIF Into Powerpoint
How to Insert a GIF into Powerpoint

Shanoon Cox
Mar 27, 2024• Proven solutions
Microsoft Powerpoint has been on the Internet for quite some time now. People who use this application make a common mistake of using too many slides with huge amounts of text and that is a major turnoff for the audience. Huge text is seen as a disaster. You should be able to convey an interesting story to your attentive audience without explaining every single detail on your slides for your presentation. Using a GIF to explain complicate things or just set it as a background can be much interesting.
You may also like: Top 26 Best Free GIF Makers Online >>
Why we need to insert GIF into the Powerpoint
- It allows us to instantly grab the audience’s short attention span.
- It allows the presentation to answer a lot of preconceived notion from the audience with less words.
- It is a good guide to bring up a pressing issue.
Tips when adding gif to your Powerpoint presentation
- Keep it easy to follow along.
- Make use of humor
- Combine GIF images with your text together.
Part 1: Make GIFs by yourself
There are many animated gif images on the internet, you can also make one by yourself. Wondershare Filmora is a powerful editing tools that allow you to convert video into GIF images, no matter what kind of video formats you got, including MKV, FLV, WMV, MP4, etc. You can also add advanced elements, animations, text, overlays to personlize your GIFs.
However, if you want to make a GIF online, Filmora meme maker is your ultimate solution. It helps you make image, GIF and video memes directly without watermark. It is totally FREE to use and no sign up. You can change text size, color and position to create caption when you are editing. You can also put text inside or outside in GIF. Just with a few clicks, your GIF is done . Try it now!
 Download Mac Version ](https://tools.techidaily.com/wondershare/filmora/download/ )
Part 2: How to Insert a GIF into Powerpoint
There are three main methods on using Microsoft Powerpoint to your advantage when you are trying to insert a GIF image into your presentation.
Method 1: Powerpoint Picture Insert Utility
Select the Insert tab located at the top of the Powerpoint application.
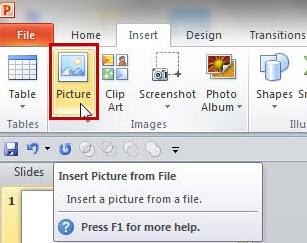
The next step is to select the Picture icon located in the Images ribbon area located also at the top of the computer window. Look for the image that you desire to add to the Powerpoint slide, then make sure to double click on the file to successfully insert your image.
You also have the option to move the GIF image on the page by clicking and dragging the image to the location that you want to place the picture.
Method 2: Copy and Paste
A helpful step is to first locate your desired GIF image, using Control + C to copy it first. Then, paste your image on the Powerpoint slide by pressing Control + V.
You can also highlight the file name, and then use the drag and drop feature to put your image directly into the Powerpoint slide of your choice.
Method 3: Embedding GIF’s from the web
The final method is to embed GIF images on the Internet into a Powerpoint slide. You can achieve this function by using the Insert Ribbon’s Pictures icon.
Select Pictures, then write in the image URL directly in the File input box. Then, select Insert. The Powerpoint application will download the GIF image that you selected into the current Powerpoint slide for your presentation. The GIF image is still available for you to access anytime if you are not connected to the Internet. It is due to being embedded.
Here we recommend the method 1 and 2, the method 3 will take a little time while Powerpoint downloading the GIF picture.
Customize the GIFs in Powerpoint
There are some important ways to customize your GIF images in the Powerpoint application.
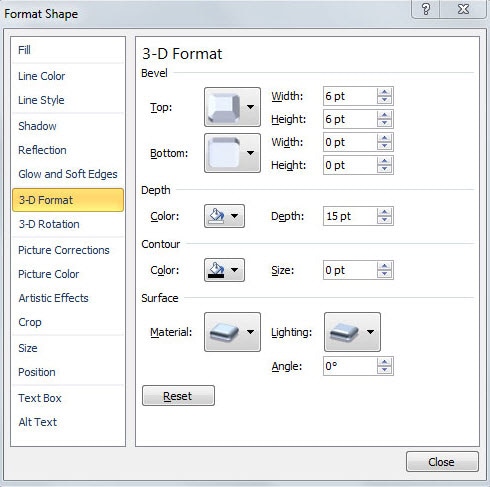
If you desire on changing the physical size of your GIF file or changing the appearance of the image, you can right click on your desired image and select Format Pictures. It will open up a brand new Format Picture window that will have a good variety of image editing menus at your fingertips at the left side of the computer window.
There is a feature where you can change the brightness and contrast on your images by selecting the Picture Corrections icon. Experiment and have fun.
Shanoon Cox
Shanoon Cox is a writer and a lover of all things video.
Follow @Shanoon Cox
Shanoon Cox
Mar 27, 2024• Proven solutions
Microsoft Powerpoint has been on the Internet for quite some time now. People who use this application make a common mistake of using too many slides with huge amounts of text and that is a major turnoff for the audience. Huge text is seen as a disaster. You should be able to convey an interesting story to your attentive audience without explaining every single detail on your slides for your presentation. Using a GIF to explain complicate things or just set it as a background can be much interesting.
You may also like: Top 26 Best Free GIF Makers Online >>
Why we need to insert GIF into the Powerpoint
- It allows us to instantly grab the audience’s short attention span.
- It allows the presentation to answer a lot of preconceived notion from the audience with less words.
- It is a good guide to bring up a pressing issue.
Tips when adding gif to your Powerpoint presentation
- Keep it easy to follow along.
- Make use of humor
- Combine GIF images with your text together.
Part 1: Make GIFs by yourself
There are many animated gif images on the internet, you can also make one by yourself. Wondershare Filmora is a powerful editing tools that allow you to convert video into GIF images, no matter what kind of video formats you got, including MKV, FLV, WMV, MP4, etc. You can also add advanced elements, animations, text, overlays to personlize your GIFs.
However, if you want to make a GIF online, Filmora meme maker is your ultimate solution. It helps you make image, GIF and video memes directly without watermark. It is totally FREE to use and no sign up. You can change text size, color and position to create caption when you are editing. You can also put text inside or outside in GIF. Just with a few clicks, your GIF is done . Try it now!
Download Mac Version ](https://tools.techidaily.com/wondershare/filmora/download/ )
Part 2: How to Insert a GIF into Powerpoint
There are three main methods on using Microsoft Powerpoint to your advantage when you are trying to insert a GIF image into your presentation.
Method 1: Powerpoint Picture Insert Utility
Select the Insert tab located at the top of the Powerpoint application.
The next step is to select the Picture icon located in the Images ribbon area located also at the top of the computer window. Look for the image that you desire to add to the Powerpoint slide, then make sure to double click on the file to successfully insert your image.
You also have the option to move the GIF image on the page by clicking and dragging the image to the location that you want to place the picture.
Method 2: Copy and Paste
A helpful step is to first locate your desired GIF image, using Control + C to copy it first. Then, paste your image on the Powerpoint slide by pressing Control + V.
You can also highlight the file name, and then use the drag and drop feature to put your image directly into the Powerpoint slide of your choice.
Method 3: Embedding GIF’s from the web
The final method is to embed GIF images on the Internet into a Powerpoint slide. You can achieve this function by using the Insert Ribbon’s Pictures icon.
Select Pictures, then write in the image URL directly in the File input box. Then, select Insert. The Powerpoint application will download the GIF image that you selected into the current Powerpoint slide for your presentation. The GIF image is still available for you to access anytime if you are not connected to the Internet. It is due to being embedded.
Here we recommend the method 1 and 2, the method 3 will take a little time while Powerpoint downloading the GIF picture.
Customize the GIFs in Powerpoint
There are some important ways to customize your GIF images in the Powerpoint application.
If you desire on changing the physical size of your GIF file or changing the appearance of the image, you can right click on your desired image and select Format Pictures. It will open up a brand new Format Picture window that will have a good variety of image editing menus at your fingertips at the left side of the computer window.
There is a feature where you can change the brightness and contrast on your images by selecting the Picture Corrections icon. Experiment and have fun.
Shanoon Cox
Shanoon Cox is a writer and a lover of all things video.
Follow @Shanoon Cox
Tutorials to Make Animated Images
Tutorials to Make Animated Images – Even if You’re Just Starting out
An easy yet powerful editor
Numerous effects to choose from
Detailed tutorials provided by the official channel
Not to mention, if you animate pictures, you’ll be able to stand apart in the crowd and maximize your brand exposure. By creating animated happy birthday images, you’ll be able to bring life to the still images.
In this guide, we’ll walk you through different ways to make animated images. Read this guide and you’ll be able to animate your images without any hassle.
In this article
01 [What are Animated Pictures?](#Part 1)
02 [Is It Possible to Animate Pictures On Your Own?](#Part 2)
03 [5 Best Tools to Make Animated Pictures](#Part 3)
Part 1 What are Animated Pictures?
For readers who aren’t familiar with animated images, here’s what you need to know. An animated image (also referred to as GIF) is designed by adding motion to a still image. Remember all the funny cat memes you see on Instagram? Well, they are a great example of animated images.
However, it’s important to understand that the applications of animated images aren’t only limited to social media and marketing. You can even animate your family photos and add life to those 20-year old pictures you’ve been saving forever. Not to mention, you can also create animated images of your favorite superhero movie. Love the Justice League starcast? Simply pick your favorite superhero and you’ll get stunning Justice League animated images.
Part 2 Is It Possible to Animate Pictures On Your Own?
When it comes to animating images, the majority of users want to know if it’s at all possible to create animated images by themselves. Even though animating an image is a tedious task, it’s safe to say that you can do it without any external help.
Of course, if you choose a tool like Adobe Photoshop to do the job, you’ll be out of luck because of the steep learning curve. But, there are hundreds of other alternatives you can use to animate pictures. There are ready-to-use 3D photo animators online that’ll allow you to animate any image within a few seconds. These tools are equipped with pre-installed animation templates that you can apply to any image and bring life to them.
Part 3 4 Best Tools to Make Animated Pictures
So, now that you know the key benefits of animated pictures, let’s take a look at the seven best tools you can use to create stunning animated images. To ensure we provide you with a diverse list of photo animators, we have included both platform-dependent and cross-platform solutions to the list.
01Motion Leap
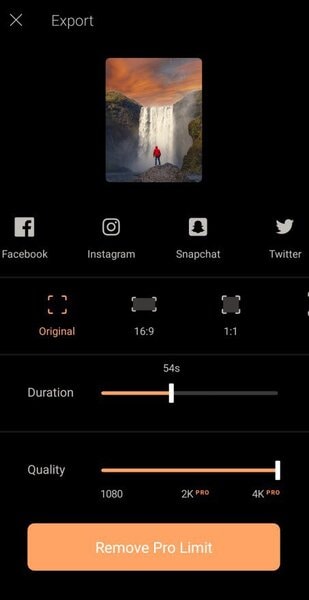
Motion Leap is a free 3D motion graphics generator that works on the Android platform. The tool offers an easy-to-use interface that editors can utilize to turn their still images into dedicated videos that play in loop. One of the major advantages of using Motion Leap for animating images is that it doesn’t leave a watermark on your pictures, even if you are using the free version of the tool. In fact, the free version offers all the necessary tools you’ll need to create animated pictures.
Since Motion Leap works on mobile, you don’t have to fire up your laptop every time you want to create an animated picture. Simply launch the app on your smartphone and you’ll be able to animate pictures right away. As of now, the only downside of Motion Leap is that it doesn’t save the output in GIF format, unless you have purchased the premium version.
Key Features:
● Add motion graphics by simply dragging objects on your screen
● Freeze specific areas within the image and apply dedicated filters
● Built-in editing panel to adjust different elements such as exposure, contrast, highlights, etc.
● Motion Leap is affordable
02Animate Me
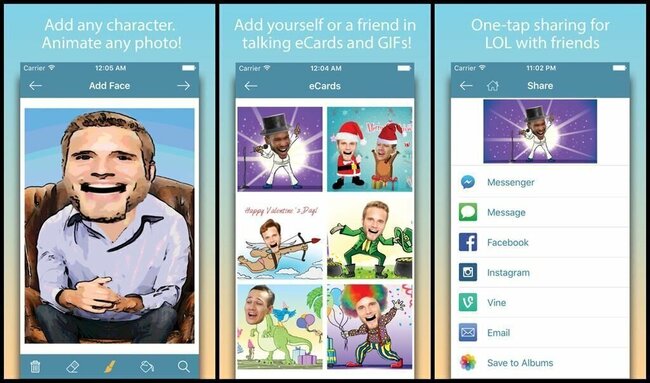
Animate Me is an exclusive iOS 3D photo animator that you can install on your iDevices and animate different types of images instantly. Though the app isn’t targeted towards professional marketers, it’s a fun tool if you want to animate your family photos or create happy birthday animated images. The app is available for free, which means you can create fun animated pictures without paying a single penny.
In addition to animating pictures, you can also use Animate Me to animate videos and create visually appealing eCards. In case you don’t know, e-Cards are used to communicate with others in a fun manner. With dozens of built-in e-card templates, you’ll be able to create high-quality e-cards right away. These templates support complete customization - so you can also use your face to customize the e-card.
Key Features of Animate Me:
● Hundreds of ready-to-use e-card templates
● Add sound effects to the characters used in an e-card
● Animate images and videos right on your smartphone
03Gyazo
Gyazo is a desktop-based screen capture tool that’s primarily designed to capture full or a specific portion of the screen. The tool is available for Windows, macOS, and Linux, which means you can use it across all desktop platforms without any hassle.
Apart from capturing screens, you can also use Gyazo to turn screen captures into dedicated GIFs with a single click. It’s worth noting that you won’t get any advanced editing options like other tools mentioned in the list, but Gyazo is still a reliable tool for users who want to animate screenshots.
Key Features:
● Capture screens and turn them into GIFs
● Animate pictures for free
● Available for Windows, macOS, and Linux
04GIFmaker.me
GIFMaker.me is an online 3D photo animator that’s primarily designed to turn regular images into GIFs. Being an online tool, you have the liberty to access GIFmaker.me across different platforms, be it mobile or desktop. The online editor offers an easy-to-use interface and provides an array of built-in features that you can use to create stunning GIFs.
All you have to do is decide the motion by dragging the subjects across the screen and the tool will automatically replicate it in a loop. Apart from creating GIFs from still images, you can also use GIFmaker to add animations to your videos. The tool has several ready-to-use animation templates that you can apply to your videos with the simple drag-&-drop functionality.
Key Features:
● Merge multiple images to create a custom GIF
● Reduce the size or reverse the motion of a particular GIF
● No sign-in required. You can start creating animated images directly with GIFmaker.me
Key Takeaways from This Episode
● Animated pictures can be used in different situations, be it for marketing purposes or simply for fun
● With dedicated tools, you can animate pictures all by yourself - without any professional assistance
● Wondershare Filmora Pro is an ideal video editing tool that provides a plethora of animation templates that you can apply to both videos and images.
Not to mention, if you animate pictures, you’ll be able to stand apart in the crowd and maximize your brand exposure. By creating animated happy birthday images, you’ll be able to bring life to the still images.
In this guide, we’ll walk you through different ways to make animated images. Read this guide and you’ll be able to animate your images without any hassle.
In this article
01 [What are Animated Pictures?](#Part 1)
02 [Is It Possible to Animate Pictures On Your Own?](#Part 2)
03 [5 Best Tools to Make Animated Pictures](#Part 3)
Part 1 What are Animated Pictures?
For readers who aren’t familiar with animated images, here’s what you need to know. An animated image (also referred to as GIF) is designed by adding motion to a still image. Remember all the funny cat memes you see on Instagram? Well, they are a great example of animated images.
However, it’s important to understand that the applications of animated images aren’t only limited to social media and marketing. You can even animate your family photos and add life to those 20-year old pictures you’ve been saving forever. Not to mention, you can also create animated images of your favorite superhero movie. Love the Justice League starcast? Simply pick your favorite superhero and you’ll get stunning Justice League animated images.
Part 2 Is It Possible to Animate Pictures On Your Own?
When it comes to animating images, the majority of users want to know if it’s at all possible to create animated images by themselves. Even though animating an image is a tedious task, it’s safe to say that you can do it without any external help.
Of course, if you choose a tool like Adobe Photoshop to do the job, you’ll be out of luck because of the steep learning curve. But, there are hundreds of other alternatives you can use to animate pictures. There are ready-to-use 3D photo animators online that’ll allow you to animate any image within a few seconds. These tools are equipped with pre-installed animation templates that you can apply to any image and bring life to them.
Part 3 4 Best Tools to Make Animated Pictures
So, now that you know the key benefits of animated pictures, let’s take a look at the seven best tools you can use to create stunning animated images. To ensure we provide you with a diverse list of photo animators, we have included both platform-dependent and cross-platform solutions to the list.
01Motion Leap
Motion Leap is a free 3D motion graphics generator that works on the Android platform. The tool offers an easy-to-use interface that editors can utilize to turn their still images into dedicated videos that play in loop. One of the major advantages of using Motion Leap for animating images is that it doesn’t leave a watermark on your pictures, even if you are using the free version of the tool. In fact, the free version offers all the necessary tools you’ll need to create animated pictures.
Since Motion Leap works on mobile, you don’t have to fire up your laptop every time you want to create an animated picture. Simply launch the app on your smartphone and you’ll be able to animate pictures right away. As of now, the only downside of Motion Leap is that it doesn’t save the output in GIF format, unless you have purchased the premium version.
Key Features:
● Add motion graphics by simply dragging objects on your screen
● Freeze specific areas within the image and apply dedicated filters
● Built-in editing panel to adjust different elements such as exposure, contrast, highlights, etc.
● Motion Leap is affordable
02Animate Me
Animate Me is an exclusive iOS 3D photo animator that you can install on your iDevices and animate different types of images instantly. Though the app isn’t targeted towards professional marketers, it’s a fun tool if you want to animate your family photos or create happy birthday animated images. The app is available for free, which means you can create fun animated pictures without paying a single penny.
In addition to animating pictures, you can also use Animate Me to animate videos and create visually appealing eCards. In case you don’t know, e-Cards are used to communicate with others in a fun manner. With dozens of built-in e-card templates, you’ll be able to create high-quality e-cards right away. These templates support complete customization - so you can also use your face to customize the e-card.
Key Features of Animate Me:
● Hundreds of ready-to-use e-card templates
● Add sound effects to the characters used in an e-card
● Animate images and videos right on your smartphone
03Gyazo
Gyazo is a desktop-based screen capture tool that’s primarily designed to capture full or a specific portion of the screen. The tool is available for Windows, macOS, and Linux, which means you can use it across all desktop platforms without any hassle.
Apart from capturing screens, you can also use Gyazo to turn screen captures into dedicated GIFs with a single click. It’s worth noting that you won’t get any advanced editing options like other tools mentioned in the list, but Gyazo is still a reliable tool for users who want to animate screenshots.
Key Features:
● Capture screens and turn them into GIFs
● Animate pictures for free
● Available for Windows, macOS, and Linux
04GIFmaker.me
GIFMaker.me is an online 3D photo animator that’s primarily designed to turn regular images into GIFs. Being an online tool, you have the liberty to access GIFmaker.me across different platforms, be it mobile or desktop. The online editor offers an easy-to-use interface and provides an array of built-in features that you can use to create stunning GIFs.
All you have to do is decide the motion by dragging the subjects across the screen and the tool will automatically replicate it in a loop. Apart from creating GIFs from still images, you can also use GIFmaker to add animations to your videos. The tool has several ready-to-use animation templates that you can apply to your videos with the simple drag-&-drop functionality.
Key Features:
● Merge multiple images to create a custom GIF
● Reduce the size or reverse the motion of a particular GIF
● No sign-in required. You can start creating animated images directly with GIFmaker.me
Key Takeaways from This Episode
● Animated pictures can be used in different situations, be it for marketing purposes or simply for fun
● With dedicated tools, you can animate pictures all by yourself - without any professional assistance
● Wondershare Filmora Pro is an ideal video editing tool that provides a plethora of animation templates that you can apply to both videos and images.
Also read:
- Updated 2024 Approved 10 Photoshop Cartoon Effects For Creatives
- Updated In 2024, Best 15 Classics Animated Cartoon Movies
- Updated 2024 Approved 12 Animation Video Maker That Can Triple Your Conversion Rates
- New 2024 Approved How to Create Slideshow in LinkedIn
- New 2024 Approved What Is Motion Graphics
- Updated In 2024, Tips for Animated Collage Maker
- New 2024 Approved Create Animated Social Media Posts in Canva
- New 2024 Approved 12 Dubbed Anime Websites to Watch for Free
- 10 Best Free GIF Apps for iPhone and iPad
- New How to Make a Photoshop Collage in Simple Steps for 2024
- Updated In 2024, Simple Shortcut to Convert Videos to Gifs on iPhone
- New 6 Types of Animation You May Like for 2024
- New In 2024, Secret Shortcut to Adobe Animate Character Tutorial
- Most Effective Tactics to Set WhatsApp Status
- Top 10 Video to GIF Converters Top Picks for 2024
- New 2024 Approved FREE Best Anime Streaming Sites to Download Anime
- How To Unlock Samsung Galaxy S23+ Phone Without Password?
- In 2024, 5 Ways to Transfer Music from Oppo A2 to Other Android Devices Easily | Dr.fone
- How to Fake GPS on Android without Mock Location For your Samsung Galaxy F14 5G | Dr.fone
- In 2024, 2 Ways to Monitor OnePlus Ace 2V Activity | Dr.fone
- In 2024, Detailed Guide on Removing iPhone 14 Pro Max Activation Lock without Previous Owner?
- In 2024, Hassle-Free Ways to Remove FRP Lock on Xiaomi Redmi Note 12T Prowith/without a PC
- Reasons for Xiaomi Redmi A2 Stuck on Startup Screen and Ways To Fix Them | Dr.fone
- In 2024, Why cant I install the ipogo On Apple iPhone 12 Pro | Dr.fone
- In 2024, How and Where to Find a Shiny Stone Pokémon For Samsung Galaxy A34 5G? | Dr.fone
- How to Remove Activation Lock From the iPhone SE (2022) Without Previous Owner?
- Title: Updated In 2024, 4 Things You Need to Know About Pinterest GIF
- Author: Elon
- Created at : 2024-05-19 03:05:46
- Updated at : 2024-05-20 03:05:46
- Link: https://animation-videos.techidaily.com/updated-in-2024-4-things-you-need-to-know-about-pinterest-gif/
- License: This work is licensed under CC BY-NC-SA 4.0.
