
:max_bytes(150000):strip_icc():format(webp)/samsungappstore-c0194a478ba54e90a798b3bb5ff4f6d5.jpg)
Updated Learn How to Draw Cartoons Step by Step with This Guide
Learn How to Draw Cartoons Step by Step with This Guide
Learn How to Draw Cartoons Step by Step with This Guide
An easy yet powerful editor
Numerous effects to choose from
Detailed tutorials provided by the official channel
Cartoon character drawing is usually a vital aspect of any child’s life who loves to watch cartoon series and can sometimes be someone’s favorite thing in the world.

A cartoon character is a series of single drawings that tell a joke or story. Although cartoons are mostly drawn, they can sometimes be animated. Kids like comics which makes them an essential part of every child’s life. Cartoons are not only used for entertainment purposes but also help kids and young children learn more about the world around them. For example, children learn about love, loss, friendship, and other essential life issues about life by watching cartoons.
However, cartoons are not only limited to children but are also for adults. In addition, cartoons created for an adult audience go deeper into real-life problems and explore darker themes. They aim to create content that matches the maturity and age of the audience. Watching cartoons is fun. But what if you could make them? This article will provide you with a guide on producing cool cartoon drawings that will match different audiences, both older and younger.
In this article
01 [How to Draw Cartoon Characters Step by Step](#Part 1)
02 [Cartoon Easy Drawing with Colour Step by Step](#Part 2)
03 [Cartoon Easy Sketch Drawing Step by Step](#Part 3)
Part 1 How to Draw Cartoon Characters Step by Step
Note that in the world we live in, Professionals were once students, and experts were once beginners. This means that everyone has a starting point, and they all have one thing in common: “learning.” Whether you are aspiring to become an English teacher, an astrophysicist, an artist, or a physician’s assistant, you must first learn the ins and outs of the field.
Those aspiring to become animators and cartoonists must first learn the basics of cartoon character drawing and practice some easy, simple cartoon drawing before cranking out the Mickey-Mouses of the entertainment world. However, we will cover the basic principles of easy cartoon drawing for beginners step by step to get your learning process started. Here is how to draw a Micky-Mouse perfectly:

Step 1:
● Use a pencil to begin your drawing.
● First, create a circle for the head and a curved line on the left side.
● Draw a horizontal line at the center.
Step 2: Next, draw an oval shape for the mouth and a “U” shape added to the bottom, and then you can add another parallel “U” shape and connect it with the oval.
Step 3: Draw the eye using two upside-down “U” shapes, and then you add his large ear on the right and a small one at the top of the head.
Step 4: You can draw a bean shape and another smaller one inside for the body.
Step 5: Add oval shapes for his feet to draw his legs and draw his tail on the right side just above the leg.
Step 6: Draw two elongated shapes for his arms, a small oval for the hand and a basic shape of his fingers.
Step 7: Draw the cheese and add a few small circles inside.
Step 8: Also include the facial features by drawing the inside of the nose, eyebrows, eyes, and whiskers.
Step 9:
● Draw his fingers and hair between his ears.
● Trace your pencil lines with a sharpie.
● Erase the pencil afterward.
Step 10: Finally, you can color your drawing and upload it to your website.
Part 1 Cartoon Easy Drawing with Colour Step by Step
Applying color to a drawing is very important to beautify your drawing and make it look stunning and attractive. Here is how to cartoon easy drawing a flower using a colored pencil:
Step 1: Using a color photocopy of a reference photo, crop and rearrange elements of the poppy composition. With light pressure and HB pencil, draw a composition onto a four-ply, 100% cotton museum board frequently found among framing supplies.
Step 2: With very light pressure, apply the first colored pencil layer and add more emphasis where the values will be deeper. While doing this, note that the pencil application will still appear granular, and the texture of the museum board is still visible.

Step 3: Create the veins in the leaves and the fuzzy texture of the stem and pod, and also, as the individual strands of stamens, put down a sheet of translucent drafting paper. Use heavy tracing paper with a very sharp 7H graphite pencil and apply heavy pressure in drawing the lines for stamens, fuzz, and veins on the drafting paper and impress them into the surface of the museum board. Then, with a contrasting layer of darker color, these features dramatically show up on the stem, leaves, center of the flower, pod, and center of the flower. Then add deeper values of rose in the shadowed areas of the flower petals.

Step 4: To make them appear less granular and intensify the colors, start by blending with a clear, alcohol-based blending marker. The solvent, wax, or vegetable oil then dissolves the binder in the colored pencil layer and fluidly releases the pigment. This will also help to “fill in” the dots of the tooth of the paper and make the color appear denser.

Step 5: Continue to intensify the color by using a non-pigmented blending pencil over a previous layer and repeat a layer or two of color, much like a “color sandwich.” Repeat this “ burnishing “ process for subsequent layerings of color, like a double-decker or triple-decker sandwich.
Also, make sure the rich, dark negative space is carried out the same way, layering colors and burnishing, then repeating the colors for deep, rich saturation.
Render the deep, smeary flecks of pollen by heavily applying “freckles” of burgundy, then slightly smudge them with the tip of a blending marker. Lastly, scratch a few of the tiny wisps of fuzz on the pod and stem carefully into the board via a sharp X-acto knife for a striking contrast of light against the deep background.

Part 2 Cartoon Easy Sketch Drawing Step by Step
This is the initial stage of the drawing process. It requires you to create an outline of the concept you want to draw before adding color. However, it is also referred to as a technique in shading. For example, if you’re going to sketch a cherry fruit, there are a few things to note here.
Try not to look at the cherry as a whole but look at its shapes and name them. This way, you are looking at the parts to the whole and not the entire piece.

Step 1: Draw two overlapping circles and draw two curved lines from each of the circles.
Step 2: Make a small rectangle at the top to join the two stems and draw a second set of curved lines.
Step 3: Draw thick lines inside the rectangle for the bumps and darken the lines and use your finger to smudge them a bit for the shaded effect.
Step 4: Draw a curved line from the stem on the right to the circle’s edge to create the bump.
Step 5: Holding your pencil at an angle, make light strokes going across the front of both cherries. Take note of the places where there is no light. This is where the light source is hitting the cherry the most.
Step 6: To darken, a shade over those places again, keep layering the shading technique until you get the effect you see on the cherries.
Step 7: Use the same technique to shade under the cherries, but use your finger to smudge it to smoother the shadow.
●Bonus:
You can add color, effect, or animate to your cartoon character drawing by using Wondershare Filmora Video Editor , the best editor on the internet. Filmora is a free software program with the same creating abilities and imaging editing similar to Adobe Illustrator. It is open software that runs on various programs, such as Windows, Mac, and Linux. Please get to know more about this exclusive tool from Wondershare on their official website.
For Win 7 or later (64-bit)
For macOS 10.12 or later
● Ending Thoughts →
● A step-by-step guide on drawing easy cartoons for painting and how to sketch your drawing correctly.
● Cartoon character drawings in easy and quick steps.
● Easy cartoon drawing for beginners.
● Lastly, to add color to your drawing, use Filmora software.
● So, use the tips and tricks to make your presentation’s best cartoon characters come alive and be a pro with Filmora.
Cartoon character drawing is usually a vital aspect of any child’s life who loves to watch cartoon series and can sometimes be someone’s favorite thing in the world.
A cartoon character is a series of single drawings that tell a joke or story. Although cartoons are mostly drawn, they can sometimes be animated. Kids like comics which makes them an essential part of every child’s life. Cartoons are not only used for entertainment purposes but also help kids and young children learn more about the world around them. For example, children learn about love, loss, friendship, and other essential life issues about life by watching cartoons.
However, cartoons are not only limited to children but are also for adults. In addition, cartoons created for an adult audience go deeper into real-life problems and explore darker themes. They aim to create content that matches the maturity and age of the audience. Watching cartoons is fun. But what if you could make them? This article will provide you with a guide on producing cool cartoon drawings that will match different audiences, both older and younger.
In this article
01 [How to Draw Cartoon Characters Step by Step](#Part 1)
02 [Cartoon Easy Drawing with Colour Step by Step](#Part 2)
03 [Cartoon Easy Sketch Drawing Step by Step](#Part 3)
Part 1 How to Draw Cartoon Characters Step by Step
Note that in the world we live in, Professionals were once students, and experts were once beginners. This means that everyone has a starting point, and they all have one thing in common: “learning.” Whether you are aspiring to become an English teacher, an astrophysicist, an artist, or a physician’s assistant, you must first learn the ins and outs of the field.
Those aspiring to become animators and cartoonists must first learn the basics of cartoon character drawing and practice some easy, simple cartoon drawing before cranking out the Mickey-Mouses of the entertainment world. However, we will cover the basic principles of easy cartoon drawing for beginners step by step to get your learning process started. Here is how to draw a Micky-Mouse perfectly:
Step 1:
● Use a pencil to begin your drawing.
● First, create a circle for the head and a curved line on the left side.
● Draw a horizontal line at the center.
Step 2: Next, draw an oval shape for the mouth and a “U” shape added to the bottom, and then you can add another parallel “U” shape and connect it with the oval.
Step 3: Draw the eye using two upside-down “U” shapes, and then you add his large ear on the right and a small one at the top of the head.
Step 4: You can draw a bean shape and another smaller one inside for the body.
Step 5: Add oval shapes for his feet to draw his legs and draw his tail on the right side just above the leg.
Step 6: Draw two elongated shapes for his arms, a small oval for the hand and a basic shape of his fingers.
Step 7: Draw the cheese and add a few small circles inside.
Step 8: Also include the facial features by drawing the inside of the nose, eyebrows, eyes, and whiskers.
Step 9:
● Draw his fingers and hair between his ears.
● Trace your pencil lines with a sharpie.
● Erase the pencil afterward.
Step 10: Finally, you can color your drawing and upload it to your website.
Part 1 Cartoon Easy Drawing with Colour Step by Step
Applying color to a drawing is very important to beautify your drawing and make it look stunning and attractive. Here is how to cartoon easy drawing a flower using a colored pencil:
Step 1: Using a color photocopy of a reference photo, crop and rearrange elements of the poppy composition. With light pressure and HB pencil, draw a composition onto a four-ply, 100% cotton museum board frequently found among framing supplies.
Step 2: With very light pressure, apply the first colored pencil layer and add more emphasis where the values will be deeper. While doing this, note that the pencil application will still appear granular, and the texture of the museum board is still visible.
Step 3: Create the veins in the leaves and the fuzzy texture of the stem and pod, and also, as the individual strands of stamens, put down a sheet of translucent drafting paper. Use heavy tracing paper with a very sharp 7H graphite pencil and apply heavy pressure in drawing the lines for stamens, fuzz, and veins on the drafting paper and impress them into the surface of the museum board. Then, with a contrasting layer of darker color, these features dramatically show up on the stem, leaves, center of the flower, pod, and center of the flower. Then add deeper values of rose in the shadowed areas of the flower petals.
Step 4: To make them appear less granular and intensify the colors, start by blending with a clear, alcohol-based blending marker. The solvent, wax, or vegetable oil then dissolves the binder in the colored pencil layer and fluidly releases the pigment. This will also help to “fill in” the dots of the tooth of the paper and make the color appear denser.
Step 5: Continue to intensify the color by using a non-pigmented blending pencil over a previous layer and repeat a layer or two of color, much like a “color sandwich.” Repeat this “ burnishing “ process for subsequent layerings of color, like a double-decker or triple-decker sandwich.
Also, make sure the rich, dark negative space is carried out the same way, layering colors and burnishing, then repeating the colors for deep, rich saturation.
Render the deep, smeary flecks of pollen by heavily applying “freckles” of burgundy, then slightly smudge them with the tip of a blending marker. Lastly, scratch a few of the tiny wisps of fuzz on the pod and stem carefully into the board via a sharp X-acto knife for a striking contrast of light against the deep background.
Part 2 Cartoon Easy Sketch Drawing Step by Step
This is the initial stage of the drawing process. It requires you to create an outline of the concept you want to draw before adding color. However, it is also referred to as a technique in shading. For example, if you’re going to sketch a cherry fruit, there are a few things to note here.
Try not to look at the cherry as a whole but look at its shapes and name them. This way, you are looking at the parts to the whole and not the entire piece.
Step 1: Draw two overlapping circles and draw two curved lines from each of the circles.
Step 2: Make a small rectangle at the top to join the two stems and draw a second set of curved lines.
Step 3: Draw thick lines inside the rectangle for the bumps and darken the lines and use your finger to smudge them a bit for the shaded effect.
Step 4: Draw a curved line from the stem on the right to the circle’s edge to create the bump.
Step 5: Holding your pencil at an angle, make light strokes going across the front of both cherries. Take note of the places where there is no light. This is where the light source is hitting the cherry the most.
Step 6: To darken, a shade over those places again, keep layering the shading technique until you get the effect you see on the cherries.
Step 7: Use the same technique to shade under the cherries, but use your finger to smudge it to smoother the shadow.
●Bonus:
You can add color, effect, or animate to your cartoon character drawing by using Wondershare Filmora Video Editor , the best editor on the internet. Filmora is a free software program with the same creating abilities and imaging editing similar to Adobe Illustrator. It is open software that runs on various programs, such as Windows, Mac, and Linux. Please get to know more about this exclusive tool from Wondershare on their official website.
For Win 7 or later (64-bit)
For macOS 10.12 or later
● Ending Thoughts →
● A step-by-step guide on drawing easy cartoons for painting and how to sketch your drawing correctly.
● Cartoon character drawings in easy and quick steps.
● Easy cartoon drawing for beginners.
● Lastly, to add color to your drawing, use Filmora software.
● So, use the tips and tricks to make your presentation’s best cartoon characters come alive and be a pro with Filmora.
How to Animate Picture Online Without Learning From Scratch
How to Animate Picture Online Without Learning from Scratch
An easy yet powerful editor
Numerous effects to choose from
Detailed tutorials provided by the official channel
The Internet is flooded with thousands of tools that aim to provide the best-animated video. But trusting all of them every time is not a go-to thing for everyone.

If you also fall into the same category of people who are looking to add animation to designs but are not able to find the best tools, you are on the right page.
In this article
01 [Ready to Add Animation to Your Designs?](#Part 1)
02 [The Secret of Animating Pictures Online](#Part 2)
Part 1 Ready to Add Animation to Your Designs?
Here we are discussing the top three Animated picture maker that is used for creating different videos with differnt types of online picture tools. These are as follows:
1. Powtoon
Powtoon is an interactive yet simple tool available to add animation to designs. It has all the basic functions available for motion graphics that are useful for presentation. It has a variety of characters and animations available, along with simple textual animation. A user can easily prepare the video with full animation.
(This video indicates how to use the Powtoon tool for creating the best-animated videos, along with an example.)
1. Animaker
Animaker is one of the wonderful animation programs to add animation to designs in an interactive yet simple manner. It has all the best features integrated into it, which let a user create the video of their choice. It is safe to use and, being a web-based program, offers all the options.
(This video indicates how to use the Animaker tool for creating the best-animated videos, along with an example.)
3. Moovly
Moovly is also one of the best animation tools available to add animation to the content. On the main page, the “add content” option is available from where a user can simply update the video and add animation to it.
(This video indicates how to use the Moovly tool for creating the best-animated videos, along with an example.)
Note: These tools are among those that even a layman can use. But some users are still not happy with the interface of these animate picture online tools and feel like they are lacking features. For all those out there, we have some other options too.
Part 2 The Secret of Animating Pictures Online
The secret behind animating pictures online is to save time and effort. With the help of online tools, one can get the outcome with the help of inbuilt templates. There will be no need to install any application or plugin when they wish to add any particular animation to the content. Some tools you can consider using to add animation to designs are as follows:
1. Pixtellar
Pixtellar is a great tool that helps in creating animated videos and images too. Along with creating animated videos and images, one can easily create posters, logos, photo collages, and so on.
However, before using it, be sure to do the registration, as without it, using it is impossible. After registering, the steps you need to follow to use it are as follows:
Step 1Create from Scratch
Choose the template of your choice or click on “Create from Scratch”. Here we are choosing the templates.

Step 2Choose social media
It will be redirected to the next page where you will find out templates according to the selected category. (Here we choose social media).

Step 3Click on “Animate”
Choose any of them based on your preferences. You will head to the next page where you can do the editing as per your needs by clicking on “Animate”.

Step 4Save the image
After making the changes and adding the animations, you are all set to save the image. The “Save” button is right at the top of the page!

2. Adobe Spark
Adobe Spark is a tool that has pre-built templates available for adding animations to the designs. From adding animations to editing the image and video, all the options are featured in this. It also gives users an idea of how they can simply create the video and images with the help of animations and other effects.
However, when you are using it, registration is a must. After performing the registration, you are all set to use it. The steps you need to follow to use this tool are as follows:
Step 1Start editing
After completing the registration, you will reach the main page where you can choose the option of your choice and start editing. Here we have chosen the template option.

Step 2Create From This Template
It asks you to be sure and click on “Create From This Template.”

Step 3Do the editing
It takes a few seconds to present the same in front of you. On this page, you are all set to do the editing as per your needs.

Step 4Save the image
After doing all the editing, you are all set to save the image. The “Save” button is right there at the top. Click on it and save the image!

3. Crello or VistaCreate
Crello, which turns out to be VistaCreate, is one of the most famous tools for adding motion to images. It has almost 8,000+ animated designs and motion graphics available, which are helpful in creating eye-catching videos.
When you are using this feature, registration or sign-up is important. On the main page, the signup option is available, helping users do it. After that, the steps are as follows:
Step 1Click on the “Template”
On the home page, you can either create your own or click on the “Template” option available. (We chose the template option here).

Step 2Select the template
Now select the template of your choice. Here we have selected the Happy New Year one.

Step 3Do the editing as required
Now you are all set to do the editing as required. Here all the options are available, which help in adding all the basic to advanced details to the image. You can use it.

Step 4Download the image
After doing the editing, you are all set to download the image. The downloading button is right there at the top.

Key Takeaways from This Episode
● Animated videos are eye-catching, and tools are helpful in making them more enhanced.
● Animation tools are very easy to use and precisely make the video.
● Editing options are available in the tools, which are helpful in adding extra effects to the image.
● The tools are free to use with all the in-built templates and other features.
The Internet is flooded with thousands of tools that aim to provide the best-animated video. But trusting all of them every time is not a go-to thing for everyone.
If you also fall into the same category of people who are looking to add animation to designs but are not able to find the best tools, you are on the right page.
In this article
01 [Ready to Add Animation to Your Designs?](#Part 1)
02 [The Secret of Animating Pictures Online](#Part 2)
Part 1 Ready to Add Animation to Your Designs?
Here we are discussing the top three Animated picture maker that is used for creating different videos with differnt types of online picture tools. These are as follows:
1. Powtoon
Powtoon is an interactive yet simple tool available to add animation to designs. It has all the basic functions available for motion graphics that are useful for presentation. It has a variety of characters and animations available, along with simple textual animation. A user can easily prepare the video with full animation.
(This video indicates how to use the Powtoon tool for creating the best-animated videos, along with an example.)
1. Animaker
Animaker is one of the wonderful animation programs to add animation to designs in an interactive yet simple manner. It has all the best features integrated into it, which let a user create the video of their choice. It is safe to use and, being a web-based program, offers all the options.
(This video indicates how to use the Animaker tool for creating the best-animated videos, along with an example.)
3. Moovly
Moovly is also one of the best animation tools available to add animation to the content. On the main page, the “add content” option is available from where a user can simply update the video and add animation to it.
(This video indicates how to use the Moovly tool for creating the best-animated videos, along with an example.)
Note: These tools are among those that even a layman can use. But some users are still not happy with the interface of these animate picture online tools and feel like they are lacking features. For all those out there, we have some other options too.
Part 2 The Secret of Animating Pictures Online
The secret behind animating pictures online is to save time and effort. With the help of online tools, one can get the outcome with the help of inbuilt templates. There will be no need to install any application or plugin when they wish to add any particular animation to the content. Some tools you can consider using to add animation to designs are as follows:
1. Pixtellar
Pixtellar is a great tool that helps in creating animated videos and images too. Along with creating animated videos and images, one can easily create posters, logos, photo collages, and so on.
However, before using it, be sure to do the registration, as without it, using it is impossible. After registering, the steps you need to follow to use it are as follows:
Step 1Create from Scratch
Choose the template of your choice or click on “Create from Scratch”. Here we are choosing the templates.
Step 2Choose social media
It will be redirected to the next page where you will find out templates according to the selected category. (Here we choose social media).
Step 3Click on “Animate”
Choose any of them based on your preferences. You will head to the next page where you can do the editing as per your needs by clicking on “Animate”.
Step 4Save the image
After making the changes and adding the animations, you are all set to save the image. The “Save” button is right at the top of the page!
2. Adobe Spark
Adobe Spark is a tool that has pre-built templates available for adding animations to the designs. From adding animations to editing the image and video, all the options are featured in this. It also gives users an idea of how they can simply create the video and images with the help of animations and other effects.
However, when you are using it, registration is a must. After performing the registration, you are all set to use it. The steps you need to follow to use this tool are as follows:
Step 1Start editing
After completing the registration, you will reach the main page where you can choose the option of your choice and start editing. Here we have chosen the template option.
Step 2Create From This Template
It asks you to be sure and click on “Create From This Template.”
Step 3Do the editing
It takes a few seconds to present the same in front of you. On this page, you are all set to do the editing as per your needs.
Step 4Save the image
After doing all the editing, you are all set to save the image. The “Save” button is right there at the top. Click on it and save the image!
3. Crello or VistaCreate
Crello, which turns out to be VistaCreate, is one of the most famous tools for adding motion to images. It has almost 8,000+ animated designs and motion graphics available, which are helpful in creating eye-catching videos.
When you are using this feature, registration or sign-up is important. On the main page, the signup option is available, helping users do it. After that, the steps are as follows:
Step 1Click on the “Template”
On the home page, you can either create your own or click on the “Template” option available. (We chose the template option here).
Step 2Select the template
Now select the template of your choice. Here we have selected the Happy New Year one.
Step 3Do the editing as required
Now you are all set to do the editing as required. Here all the options are available, which help in adding all the basic to advanced details to the image. You can use it.
Step 4Download the image
After doing the editing, you are all set to download the image. The downloading button is right there at the top.
Key Takeaways from This Episode
● Animated videos are eye-catching, and tools are helpful in making them more enhanced.
● Animation tools are very easy to use and precisely make the video.
● Editing options are available in the tools, which are helpful in adding extra effects to the image.
● The tools are free to use with all the in-built templates and other features.
https://images.wondershare.com/filmora/article-images/filmora9-website
2D Character Animation: Everything You Should Know About It
An easy yet powerful editor
Numerous effects to choose from
Detailed tutorials provided by the official channel
2D character animation is one of the significant kinds of animation popularly used for creating animated movies, marketing videos, cartoons, advertisements, educational content, corporate presentations, video games, etc.
With the popularity of video content, more and more businesses tend to use animation for promotion, as they magnify conversion rates by 20%. Some companies hire 2D character animation services; others try to make them online with software help.
In this article
01 [What is 2D Character Animation and What Does 2D Animation Do?](#Part 1)
02 [2D Character Animation Tips and Tricks](#Part 2)
03 [An Ultimate Guide to Create 2D Character Animation Online](#Part 3)
04 [5 Great 2D Character Animation Templates](#Part 4)
Part 1 What is 2D Character Animation and What Does 2D Animation Do?
2D animation is identified by having its characters and objects created in a 2D space. It means that they only have height and width to specify.
However, 2D animation is considered a traditional style, known from the 1800s. Initially, it was designed by merging the frames in which one drawing was followed by another and making them different; every second consists of 24 frames.
We all remember the classic Disney animations. Snow White and the Seven Dwarfs, The Little Mermaid, Bambi, etc. They are some of the highly famous 2D animation styles.
With the advancement of computer technologies, this process also got digitized through various 2D character animation software.
In this guide, we’ll talk about everything relatable to 2D character animation, and let’s proceed with the expert tips and tricks to create inspirational style within animation character 2D.
Part 2 2D Character Animation Tips and Tricks
01Look for a real-time reference
Using a real-world reference for 2D character animation can help you effectively animate faces. For example, when studios collaborate with voice-over artists, they often record their facial movements. It further helps 2D animators to ensure their expressions get captured convincingly.
If it seems impossible, you can consider using your face, so you have something to refer back to. You could also use a mirror and utter the words your character will speak. It will display the correct animated expressions.
02Observe real life
You need to use observation a lot more. One of the primary aspects of 2D character animation is bringing life to animate objections. Therefore, you must carefully consider how emotion can get portrayed and select each movement accordingly.
Take time watching how people in real-life environments talk and interact with each other, how they express emotions, how they move, etc. Please don’t spend much time doing this, as it is valuable to research.
03Simplicity is the key
2D character animation is never complex compared with 3D. Think carefully before creating a scene too complicated. You must not include too much information, which is hard to digest, and you may even find yourself compromising the scene’s realism. Try not to heavy the stage with too many pose changes or other elements, and keep it genuine.
04Draw animation again and again
Drawing animation consumes a lot of time. You can’t complete it within one day, so you better know deep down that one task only can be done after you have revamped it various times. For 2D character animation, you may need to draw objects on paper several times.
You can’t master the skill of animation character 2D quickly. Luckily, all pains will be relieved someday.
05Feedback is important
Feedback is an essential element of artistic development. It’s wise to actively seek out feedback from familiar figures who can help you enhance. Naturally, we may see work we have invested a great deal of time and effort indifferently to someone not so involved in the creative process. Feedback can equate to a valuable learning opportunity that will assist you produce the results hit the spot much more appropriately.
Part 3 An Ultimate Guide to Create 2D Character Animation Online
Let’s now look at making an illustrated 2D character animation move on a screen.
While there are nearly numerous options for 2D character animation tools and software, this tutorial will animate a character in Adobe After Effects.
Steps to create 2D character animation After Effects
01Step 1: Download and Install Duik
You need to install the Duik animation plugin for Adobe After Effects to simplify the whole process. You can animate and rig characters’ entire limbs with Duik using just the placement of their feet and hands.
While this isn’t an essential step, it can be valuable for beginners, as you’ll see in this tutorial. Luckily, Duik is available for free from Rainbox Laboratory.
02Step 2: Design Your Character
You need a moving character before you’re able to start animating. You can create this character in Adobe Illustrator and import it into After Effects.
Try creating a straightforward character with an aim on the character’s limbs.
In the example mentioned below, you can see that the body is a very rudimentary shape—a circle—with long legs that make it simple to consider the animation process.

Check the character’s joints. Making a round joint between the lower and upper parts of the legs, for instance, will help the character move more smoothly.

03Step 3: Make and Import Your Character Artwork
Now, you’ll need to make a few final adjustments before moving your character artwork. Break your character out into layers firstly. Every section of the character that will move independently needs a separate layer.
So, layers include his circular body, face, and the leg’s segments (i.e., lower leg, upper leg, and foot).

To import your character artwork, go to File, click the Import tab, and choose your character file. Ensure that you need to import it as a composition to ensure it includes the layers you just created.
04Step 4: Establish Initial Character Rigging
Now, the 2D character animation is almost over by the initial rigging.
Firstly, lower the opacity of all your layers to above 50% to see the critical joints within the character.
Next, you must ensure that the joints hinge in the ideal direction. It’s simple to do with the anchor point tool. For each character’s layer, place the anchor point at the center of gravity for each layer of the 2D character animation.
The anchor point would probably go between the eyes for the layer of the face (i.e., the nose, eyes, and mouth). For each legs’ section, hold the anchor point where the leg will hinge (e.g., the anchor point would be at the highest point for the leg’s upper portion, where it meets the body).

Then, use the parent tool to join the limbs’ sections. For instance, the parent of the foot would be the lower leg, and the upper portion is the parent of the lower leg.
It makes sure that the leg moves together as one unit with multiple hinge points.
Finally, use the Duik toolbar to create character controllers. Controllers control the rotation and position of critical elements within your character. For the ankles of the 2D character animation, you would select the controller that encompasses both the rotation and position.
05Step 5: Create Your Rig
Use the Duik toolbar to create a rig. Select each layer from the extremities inward from each limb, lasting with your controllers.
You would select the ankle for a leg, followed by the upper portion, the lower leg, and conclusively, the controller at the ankle. Then, select auto-rig within the Rigging area of the Duik toolbar.
The entire leg will move when you move that ankle controller. If your character contains them, repeat the process for the other leg, along with other limbs.
Before proceeding, test the limbs to make sure they hinge and move correctly. You need to adjust the opacity of the character back to 100% once you are satisfied with the movements.

06Step 6: Start Animating Your Character
You can begin animating after completing a rig. First, create keyframes—the ending and beginning points of the character’s movement. The character’s legs are at their most magnified are thus the endpoints for a walk cycle. Make sure that the beginning and ending of keyframes are identical to get an ideal loop.
Start adding in-between frames from there, like when one leg crosses over the other in the middle of a walking stride.
Moreover, you can add ‘easing” to the animation via 2D character animation After Effects’ Easy Ease tab, located under the Animation button, and Keyframe Assistant.
It will smoothen the transition between the keyframes. You will have a primary walking sequence at this instance.

Now, you can make further refinements to add detail and secondary movement, like a bobbing motion of the head. You can also modify elements like the keyframe velocity, further smoothing out the animation.
As you practice, you’ll get a better feel for your animation preferences and develop more advanced realistic 2D animation character design capabilities.
Part 4 5 Great 2D Character Animation Templates
1 – FrameStory Character Animation Toolkit
2 – Explainer Video Character Animation ToolKit
3 – 2D Character Animation After Effects Template
4 – Character Animation ToolKit
5 – Rigged Character Animation Mockup Template
Given above is a list of the best 2D character animation templates worth considering. Yet, if you are tired of using After Effects Templates, why not select Wondershare Filmora Template Mode?
It is a brand-new mode recently launched by Filmora to ramp up your story. It is a simplistic way to use compared with After Effects.
****Wondershare Filmora Video Editor Template Mode**
For Win 7 or later (64-bit)
For macOS 10.12 or later
Filmora Template Mode is a bold breakthrough that helps you create incredible videos in a minute. Forget about dragging n dropping the video clips into a timeline; Filmora template Mode provides you a new way of generating videos automatically by using various stylish video templates.
Steps to create a stunning animated video in 3 levels
01Step 1: Choose a template
Pick up a video template that best suits your needs.

02Step 2: Import Media
Import at least three video clips or images and let AI assist you in ramping the production process without hassle.

03Step 3: Export Project
Export media among multiple social media platforms.

● Key Takeaways from This Episode →
● Understanding 2D character animation tips and tricks
● A step by step guide to creating 2D character animation online
● Five best 2D character animation templates
● The best alternative of using the Template mode directly within the Wondershare Filmora
2D character animation is one of the significant kinds of animation popularly used for creating animated movies, marketing videos, cartoons, advertisements, educational content, corporate presentations, video games, etc.
With the popularity of video content, more and more businesses tend to use animation for promotion, as they magnify conversion rates by 20%. Some companies hire 2D character animation services; others try to make them online with software help.
In this article
01 [What is 2D Character Animation and What Does 2D Animation Do?](#Part 1)
02 [2D Character Animation Tips and Tricks](#Part 2)
03 [An Ultimate Guide to Create 2D Character Animation Online](#Part 3)
04 [5 Great 2D Character Animation Templates](#Part 4)
Part 1 What is 2D Character Animation and What Does 2D Animation Do?
2D animation is identified by having its characters and objects created in a 2D space. It means that they only have height and width to specify.
However, 2D animation is considered a traditional style, known from the 1800s. Initially, it was designed by merging the frames in which one drawing was followed by another and making them different; every second consists of 24 frames.
We all remember the classic Disney animations. Snow White and the Seven Dwarfs, The Little Mermaid, Bambi, etc. They are some of the highly famous 2D animation styles.
With the advancement of computer technologies, this process also got digitized through various 2D character animation software.
In this guide, we’ll talk about everything relatable to 2D character animation, and let’s proceed with the expert tips and tricks to create inspirational style within animation character 2D.
Part 2 2D Character Animation Tips and Tricks
01Look for a real-time reference
Using a real-world reference for 2D character animation can help you effectively animate faces. For example, when studios collaborate with voice-over artists, they often record their facial movements. It further helps 2D animators to ensure their expressions get captured convincingly.
If it seems impossible, you can consider using your face, so you have something to refer back to. You could also use a mirror and utter the words your character will speak. It will display the correct animated expressions.
02Observe real life
You need to use observation a lot more. One of the primary aspects of 2D character animation is bringing life to animate objections. Therefore, you must carefully consider how emotion can get portrayed and select each movement accordingly.
Take time watching how people in real-life environments talk and interact with each other, how they express emotions, how they move, etc. Please don’t spend much time doing this, as it is valuable to research.
03Simplicity is the key
2D character animation is never complex compared with 3D. Think carefully before creating a scene too complicated. You must not include too much information, which is hard to digest, and you may even find yourself compromising the scene’s realism. Try not to heavy the stage with too many pose changes or other elements, and keep it genuine.
04Draw animation again and again
Drawing animation consumes a lot of time. You can’t complete it within one day, so you better know deep down that one task only can be done after you have revamped it various times. For 2D character animation, you may need to draw objects on paper several times.
You can’t master the skill of animation character 2D quickly. Luckily, all pains will be relieved someday.
05Feedback is important
Feedback is an essential element of artistic development. It’s wise to actively seek out feedback from familiar figures who can help you enhance. Naturally, we may see work we have invested a great deal of time and effort indifferently to someone not so involved in the creative process. Feedback can equate to a valuable learning opportunity that will assist you produce the results hit the spot much more appropriately.
Part 3 An Ultimate Guide to Create 2D Character Animation Online
Let’s now look at making an illustrated 2D character animation move on a screen.
While there are nearly numerous options for 2D character animation tools and software, this tutorial will animate a character in Adobe After Effects.
Steps to create 2D character animation After Effects
01Step 1: Download and Install Duik
You need to install the Duik animation plugin for Adobe After Effects to simplify the whole process. You can animate and rig characters’ entire limbs with Duik using just the placement of their feet and hands.
While this isn’t an essential step, it can be valuable for beginners, as you’ll see in this tutorial. Luckily, Duik is available for free from Rainbox Laboratory.
02Step 2: Design Your Character
You need a moving character before you’re able to start animating. You can create this character in Adobe Illustrator and import it into After Effects.
Try creating a straightforward character with an aim on the character’s limbs.
In the example mentioned below, you can see that the body is a very rudimentary shape—a circle—with long legs that make it simple to consider the animation process.
Check the character’s joints. Making a round joint between the lower and upper parts of the legs, for instance, will help the character move more smoothly.
03Step 3: Make and Import Your Character Artwork
Now, you’ll need to make a few final adjustments before moving your character artwork. Break your character out into layers firstly. Every section of the character that will move independently needs a separate layer.
So, layers include his circular body, face, and the leg’s segments (i.e., lower leg, upper leg, and foot).
To import your character artwork, go to File, click the Import tab, and choose your character file. Ensure that you need to import it as a composition to ensure it includes the layers you just created.
04Step 4: Establish Initial Character Rigging
Now, the 2D character animation is almost over by the initial rigging.
Firstly, lower the opacity of all your layers to above 50% to see the critical joints within the character.
Next, you must ensure that the joints hinge in the ideal direction. It’s simple to do with the anchor point tool. For each character’s layer, place the anchor point at the center of gravity for each layer of the 2D character animation.
The anchor point would probably go between the eyes for the layer of the face (i.e., the nose, eyes, and mouth). For each legs’ section, hold the anchor point where the leg will hinge (e.g., the anchor point would be at the highest point for the leg’s upper portion, where it meets the body).
Then, use the parent tool to join the limbs’ sections. For instance, the parent of the foot would be the lower leg, and the upper portion is the parent of the lower leg.
It makes sure that the leg moves together as one unit with multiple hinge points.
Finally, use the Duik toolbar to create character controllers. Controllers control the rotation and position of critical elements within your character. For the ankles of the 2D character animation, you would select the controller that encompasses both the rotation and position.
05Step 5: Create Your Rig
Use the Duik toolbar to create a rig. Select each layer from the extremities inward from each limb, lasting with your controllers.
You would select the ankle for a leg, followed by the upper portion, the lower leg, and conclusively, the controller at the ankle. Then, select auto-rig within the Rigging area of the Duik toolbar.
The entire leg will move when you move that ankle controller. If your character contains them, repeat the process for the other leg, along with other limbs.
Before proceeding, test the limbs to make sure they hinge and move correctly. You need to adjust the opacity of the character back to 100% once you are satisfied with the movements.
06Step 6: Start Animating Your Character
You can begin animating after completing a rig. First, create keyframes—the ending and beginning points of the character’s movement. The character’s legs are at their most magnified are thus the endpoints for a walk cycle. Make sure that the beginning and ending of keyframes are identical to get an ideal loop.
Start adding in-between frames from there, like when one leg crosses over the other in the middle of a walking stride.
Moreover, you can add ‘easing” to the animation via 2D character animation After Effects’ Easy Ease tab, located under the Animation button, and Keyframe Assistant.
It will smoothen the transition between the keyframes. You will have a primary walking sequence at this instance.
Now, you can make further refinements to add detail and secondary movement, like a bobbing motion of the head. You can also modify elements like the keyframe velocity, further smoothing out the animation.
As you practice, you’ll get a better feel for your animation preferences and develop more advanced realistic 2D animation character design capabilities.
Part 4 5 Great 2D Character Animation Templates
1 – FrameStory Character Animation Toolkit
2 – Explainer Video Character Animation ToolKit
3 – 2D Character Animation After Effects Template
4 – Character Animation ToolKit
5 – Rigged Character Animation Mockup Template
Given above is a list of the best 2D character animation templates worth considering. Yet, if you are tired of using After Effects Templates, why not select Wondershare Filmora Template Mode?
It is a brand-new mode recently launched by Filmora to ramp up your story. It is a simplistic way to use compared with After Effects.
****Wondershare Filmora Video Editor Template Mode**
For Win 7 or later (64-bit)
For macOS 10.12 or later
Filmora Template Mode is a bold breakthrough that helps you create incredible videos in a minute. Forget about dragging n dropping the video clips into a timeline; Filmora template Mode provides you a new way of generating videos automatically by using various stylish video templates.
Steps to create a stunning animated video in 3 levels
01Step 1: Choose a template
Pick up a video template that best suits your needs.
02Step 2: Import Media
Import at least three video clips or images and let AI assist you in ramping the production process without hassle.
03Step 3: Export Project
Export media among multiple social media platforms.
● Key Takeaways from This Episode →
● Understanding 2D character animation tips and tricks
● A step by step guide to creating 2D character animation online
● Five best 2D character animation templates
● The best alternative of using the Template mode directly within the Wondershare Filmora
The Only Guide You’ll Ever Need to Learn About GIF Video Downloader
The Only Guide You’ll Ever Need to Learn About GIF Video Downloader
An easy yet powerful editor
Numerous effects to choose from
Detailed tutorials provided by the official channel
Want to escape the tiff of tedious video download processes? Stay tuned for best solutions
In this article
01 [Benefits of Using Video Downloader Online](#Part 1)
02 [How to Download Videos From Giphy?](#Part 2)
03 [How to Download Giphy Videos for Mobile/Computer?](#Part 3)
04 [Best 5 Tools for Converting Giphy to Mp4](#Part 4)
Part 1 Benefits of Using Video Downloader Online
Today’s information technology centered era has found a web solution for almost any and everything that can be possibly thought of. From informative articles to explanatory videos, you can find useful and need specific content in a diversity of ways. While reading does not sound a convenient cup of tea to most of us, videos are something more preferable.
When looking through descriptive solutions that could affordably serve your purpose, explanatory videos are the handiest choices owing to the ‘see and learn’ flexibility they provide viewers with. However, what attract more concern is, how to save these videos to your device. After all, you would never want to lose a useful video and most of us, of course have data pricing and usage limitations.
Online video downloader tools are certainly the most widely preferred and trusted solutions to the aforesaid concerns, and why not, they claim a range of choice benefits. Some of the obvious benefits of using these tools are listed below:
01Hassle Free Video Streaming
A seamless stream is something all of us would wish to be guaranteed of, before even thinking to watch a video. Whether looking through informative content or just as an entertainment choice, videos with frequent buffering intervals are always disapproving. One of the major reasons you should prefer an online video download is to escape the ‘and…that’s buffering again’ notch.
02Information Sharing
Living within a bunch of social media platforms and utilities, content sharing has become more of a habit than a requisite need. Any and everything ranging from useful to entertaining, unusual to funny; is shared across social media platforms every seconds.
Well, that’s absolutely fine, but what if you wish to share large video files through Instant Messaging tools and mails? Link sharing is not always convenient, owing to device version differences. To be on the safe side, it is quite better to download videos online and share them with your peers without having to worry about length and device compatibility.
03Cut Down on e-Learning Utilities
Imagine a scenario where you are into watching an explicitly useful video and the internet shuts down or you run out of data? This can be both annoying and critical at times. Why take the risk when you have dependable solutions? Just go for a quick video download using any of your preferred online tools and enjoy an uninterrupted streaming
04YouTube is not the End
Online video downloading tools provide you with the flexibility of surfing through a pool of content sites and support a range of video formats. Consequently, there is a visibly unlimited content access and download liberty that these tools assure you of. As a matter of fact, YouTube is definitely not the only video platform you are left with.
05Say ‘NO’ to Installation Procedures
Installing apps is something most of us tend to preferably avoid. While the running out of your device’s storage space is an evident concern, exposure to malware and spam content is an added risk to your smartphone or PC. Besides this, installation procedures may often be wary and time consuming. Taking the help of inbuilt download feature these online tools have is an affordable pick through.
06Convenient Usage
Not everyone around you is familiar with the know-how of technical utilities. Keeping that in mind, these online video download tools are developed to serve users within a range of technical backgrounds. Even if you don’t know anything about downloads, all you need to do is just copy a video link and paste it in the downloader’s URL bar and that’s actually it. You can see the video in your device gallery within a minimal time span.
Part 2 How to Download Videos From Giphy?
Giphy is a popular and preferred application you can choose to share video contents with social media communities across various platforms. The site has introduced a GIF Video downloader tool to facilitate quick and easy video downloads among its users. This tool allows you a high quality video download in mp4 format.
The tool is compatible with almost all common web browsers and confines the video download process to a single copy-paste step. You can even download live Giphy videos here, but you are required to wait for the video streaming to finish. To download videos to your heart’s content using this tool, here’s what you need to do:
Step 1: Copy a Video Link
Visit the official website of Giphy and type a matching keyword in the search box to look for a desired video. You can also refer to the site’s suggestion list that appears when you enter a particular keyword. When you have made your choice, just copy the video URL.
Step 2: Time to Paste
Paste the copied link in the Giphy search bar and click on ‘Download’ to receive a download link for your selected video. Click on the provided link to initiate the downloading process.
Part 3 How to Download Giphy Videos for Mobile/Computer?
Most of us have specific device preferences to get that perfect and comfortable video streaming experience. While some of us get glued to smartphones, others may find PCs more convenient. If device compatibility keeps you from watching your favorite videos, see through the following steps to download GIF videos on any of your preferred devices:
01Mobile Downloads
Downloading Giphy videos was never easier You just need to do the following to get your favorite one in your smartphone:
Step 1:
Visit the official Giphy website and search a video of your choice.
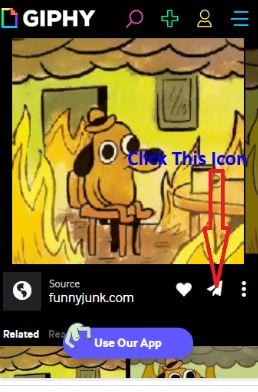
Step2:
Once found, copy the video URL and paste the same in the Giphy search bar.
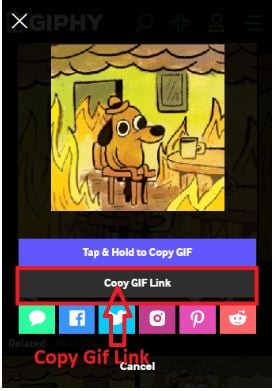
Step 3:
Click ‘Download’ and that’s it
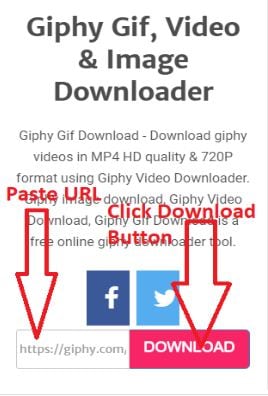
02PC Downloads
If you are among those who would rather prefer a wide screen video stream, you can choose download Giphy videos into your PC. After all, it’s nothing more than a few quick steps All you have to do is explained below:
Step 1: Video Selection
In your suitable browser, visit the official Giphy website. Select a video category from the top and select a video you wish to download.
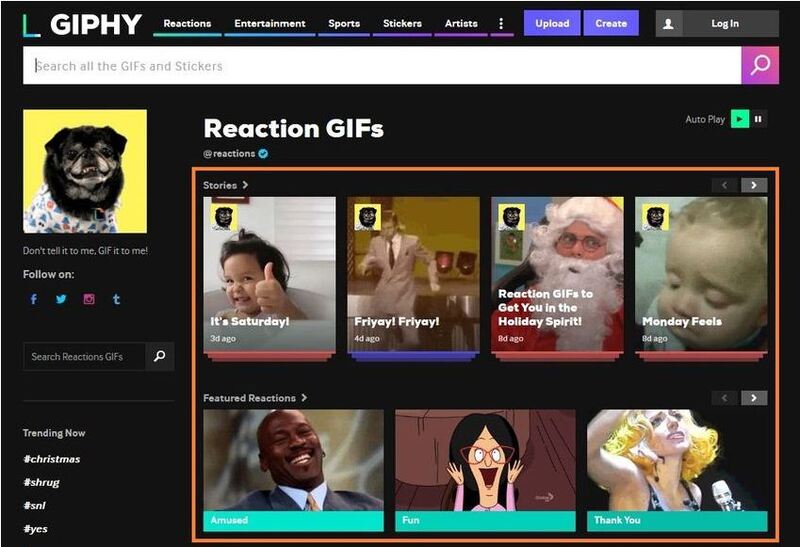
Step 2: Save Your Video
Right click on your previously selected video and choose ‘Save Image As’ fr4om the drop down menu. The ‘Save Image’ box opens up.
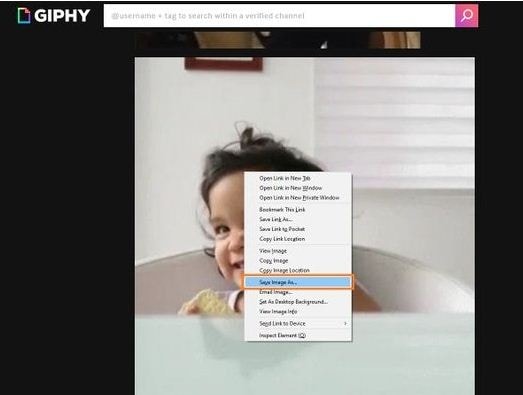
Step 3: Name Your Video
Using the ‘Save Image’ box, navigate to a suitable destination in your PC where you want to save your video. In the ‘File Name’ dialog box, give a name to the video file without changing the file extension. When you are done, click on ‘Save’. This will download and save your video in the selected target folder.
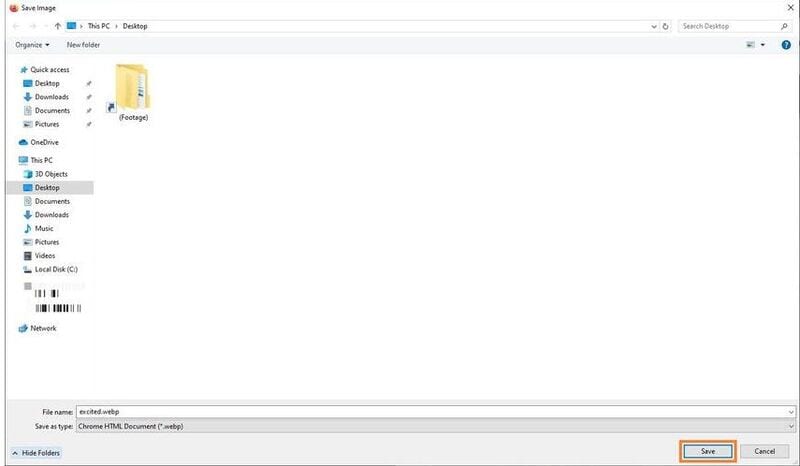
Part 4 Best 5 Tools for Converting Giphy to Mp4
While the short and specific GIFs on the Giphy website are quite interesting and impactful, you may sometimes encounter the need to go for a change of video format (for IM and mail sharing purposes). Having learnt about benefits of online video download, you would certainly want to browse through the best tools for converting Giphy videos to mp4.
Listed below are some of the most quick and convenient tools you can choose to convert Giphy video to mp4:
01**Wondershare Filmora Video Editor **
This is exceptionally excellent video converter software that has the potential to cater to all your conversion needs in a single go. Loaded with exciting features and available to users for free, this tool supports and ensures a hassle free inter conversion of almost all known video file formats. This is a single package solution to all your video editing and conversion requirements.
Wondershare Filmora
Get started easily with Filmora’s powerful performance, intuitive interface, and countless effects!
Try It Free Try It Free Try It Free Learn More >

Key Features:
Some of the most prominent features of this software include the following:
● The most appealing feature about this tool is that you don’t require an internet facility to use it.
● Highly stable and crash protected software, even on heavy loading (around 10 files at a time).
● Has the most convenient interface, suitable for users with varieties of technical aptitude.
● Comes with an inbuilt audio library that allows you to add relatable music to your video, once you are done with the conversion process.
● You can enhance your downloaded video with a range of amazing effects and texts in the tool’s editor window.
02Online-Convert
This is quite a handy tool to convert Giphy videos to mp4. It comes with an inbuilt video editor that gives you the liberty to cut, crop, trim and rotate your videos to exclusively extract the ‘most perfect’ parts and even decorate them with amazing frames. This one is also a free video converter tool.
Key Features
Listed below are some of the most viable features of this conversion tool:
● You can directly export the mp4 files to Cloud utilities.
● This tool supports almost all video formats.
● Has preloaded fundamental video editing features
03Convert GIF to Mp4
This one is a free online Giphy to mp4 converter tool, having a bit tricky interface, but has amazing editing features. You can cut, crop and trim videos, add music and adjust frame rates and even add subtitles to your videos with this tool. It however does not support external media sharing of the converted mp4 files.
Key Features:
Major attractions of this online tool comprise the following:
● This tool is loaded with hundreds of sound and video editing utilities.
● It comes with SubRip Subtitle (SRT) files that you can use to add interesting subtitles and make your videos more impactful.
● You can directly export the downloaded videos to your Google and IOS Dropbox.
04GIF-2-Mp4
This conversion tool has possibly has the most convenient user interface. Like most online tools, this too offers you a free GIF to video conversion service. However, you will have to compromise on the editing flexibility and data limit while using this tool, as it lacks any editing features and converts files within 50 MB. You can only adjust the resolution and quality of the converted mp4 files.
Key Features:
You can still prefer this conversion tool on account of the following features:
● This tool is simple and is developed with a view to assure user cohesiveness.
● You don’t need to go through wary software settings or wait for long durations for the conversion process to finish.
● Using this tool, you can share video files through email.
05CloudConvert
This is another excellent online tool to convert Giphy videos to mp4. It enables a quick file conversion and you are granted the liberty to make adjustments in video quality, file size and resolution. The tool’s handy interface converts GIF video to mp4 files in a matter of several seconds. However, it has a limitation of allowing utmost 25 conversions in 24 hours.
Key Features:
Using this tool for video conversion gives you access to the following features:
● This is a quick and free converter tool.
● You are not forced to watch unnecessary advertisements on the tool’s site.
● You can go for a parallel conversion of multiple files.
● You can make changes in the default video and sound settings.
● Key Takeaways from This Episode →
● Online video downloader tools are an advantageous means of hassle free video streaming.
● User credibility has flooded the online market with a range of video converter tools.
● Filmora is among the most preferred, quick and convenient GIF to mp4 converters available online.
Want to escape the tiff of tedious video download processes? Stay tuned for best solutions
In this article
01 [Benefits of Using Video Downloader Online](#Part 1)
02 [How to Download Videos From Giphy?](#Part 2)
03 [How to Download Giphy Videos for Mobile/Computer?](#Part 3)
04 [Best 5 Tools for Converting Giphy to Mp4](#Part 4)
Part 1 Benefits of Using Video Downloader Online
Today’s information technology centered era has found a web solution for almost any and everything that can be possibly thought of. From informative articles to explanatory videos, you can find useful and need specific content in a diversity of ways. While reading does not sound a convenient cup of tea to most of us, videos are something more preferable.
When looking through descriptive solutions that could affordably serve your purpose, explanatory videos are the handiest choices owing to the ‘see and learn’ flexibility they provide viewers with. However, what attract more concern is, how to save these videos to your device. After all, you would never want to lose a useful video and most of us, of course have data pricing and usage limitations.
Online video downloader tools are certainly the most widely preferred and trusted solutions to the aforesaid concerns, and why not, they claim a range of choice benefits. Some of the obvious benefits of using these tools are listed below:
01Hassle Free Video Streaming
A seamless stream is something all of us would wish to be guaranteed of, before even thinking to watch a video. Whether looking through informative content or just as an entertainment choice, videos with frequent buffering intervals are always disapproving. One of the major reasons you should prefer an online video download is to escape the ‘and…that’s buffering again’ notch.
02Information Sharing
Living within a bunch of social media platforms and utilities, content sharing has become more of a habit than a requisite need. Any and everything ranging from useful to entertaining, unusual to funny; is shared across social media platforms every seconds.
Well, that’s absolutely fine, but what if you wish to share large video files through Instant Messaging tools and mails? Link sharing is not always convenient, owing to device version differences. To be on the safe side, it is quite better to download videos online and share them with your peers without having to worry about length and device compatibility.
03Cut Down on e-Learning Utilities
Imagine a scenario where you are into watching an explicitly useful video and the internet shuts down or you run out of data? This can be both annoying and critical at times. Why take the risk when you have dependable solutions? Just go for a quick video download using any of your preferred online tools and enjoy an uninterrupted streaming
04YouTube is not the End
Online video downloading tools provide you with the flexibility of surfing through a pool of content sites and support a range of video formats. Consequently, there is a visibly unlimited content access and download liberty that these tools assure you of. As a matter of fact, YouTube is definitely not the only video platform you are left with.
05Say ‘NO’ to Installation Procedures
Installing apps is something most of us tend to preferably avoid. While the running out of your device’s storage space is an evident concern, exposure to malware and spam content is an added risk to your smartphone or PC. Besides this, installation procedures may often be wary and time consuming. Taking the help of inbuilt download feature these online tools have is an affordable pick through.
06Convenient Usage
Not everyone around you is familiar with the know-how of technical utilities. Keeping that in mind, these online video download tools are developed to serve users within a range of technical backgrounds. Even if you don’t know anything about downloads, all you need to do is just copy a video link and paste it in the downloader’s URL bar and that’s actually it. You can see the video in your device gallery within a minimal time span.
Part 2 How to Download Videos From Giphy?
Giphy is a popular and preferred application you can choose to share video contents with social media communities across various platforms. The site has introduced a GIF Video downloader tool to facilitate quick and easy video downloads among its users. This tool allows you a high quality video download in mp4 format.
The tool is compatible with almost all common web browsers and confines the video download process to a single copy-paste step. You can even download live Giphy videos here, but you are required to wait for the video streaming to finish. To download videos to your heart’s content using this tool, here’s what you need to do:
Step 1: Copy a Video Link
Visit the official website of Giphy and type a matching keyword in the search box to look for a desired video. You can also refer to the site’s suggestion list that appears when you enter a particular keyword. When you have made your choice, just copy the video URL.
Step 2: Time to Paste
Paste the copied link in the Giphy search bar and click on ‘Download’ to receive a download link for your selected video. Click on the provided link to initiate the downloading process.
Part 3 How to Download Giphy Videos for Mobile/Computer?
Most of us have specific device preferences to get that perfect and comfortable video streaming experience. While some of us get glued to smartphones, others may find PCs more convenient. If device compatibility keeps you from watching your favorite videos, see through the following steps to download GIF videos on any of your preferred devices:
01Mobile Downloads
Downloading Giphy videos was never easier You just need to do the following to get your favorite one in your smartphone:
Step 1:
Visit the official Giphy website and search a video of your choice.
Step2:
Once found, copy the video URL and paste the same in the Giphy search bar.
Step 3:
Click ‘Download’ and that’s it
02PC Downloads
If you are among those who would rather prefer a wide screen video stream, you can choose download Giphy videos into your PC. After all, it’s nothing more than a few quick steps All you have to do is explained below:
Step 1: Video Selection
In your suitable browser, visit the official Giphy website. Select a video category from the top and select a video you wish to download.
Step 2: Save Your Video
Right click on your previously selected video and choose ‘Save Image As’ fr4om the drop down menu. The ‘Save Image’ box opens up.
Step 3: Name Your Video
Using the ‘Save Image’ box, navigate to a suitable destination in your PC where you want to save your video. In the ‘File Name’ dialog box, give a name to the video file without changing the file extension. When you are done, click on ‘Save’. This will download and save your video in the selected target folder.
Part 4 Best 5 Tools for Converting Giphy to Mp4
While the short and specific GIFs on the Giphy website are quite interesting and impactful, you may sometimes encounter the need to go for a change of video format (for IM and mail sharing purposes). Having learnt about benefits of online video download, you would certainly want to browse through the best tools for converting Giphy videos to mp4.
Listed below are some of the most quick and convenient tools you can choose to convert Giphy video to mp4:
01**Wondershare Filmora Video Editor **
This is exceptionally excellent video converter software that has the potential to cater to all your conversion needs in a single go. Loaded with exciting features and available to users for free, this tool supports and ensures a hassle free inter conversion of almost all known video file formats. This is a single package solution to all your video editing and conversion requirements.
Wondershare Filmora
Get started easily with Filmora’s powerful performance, intuitive interface, and countless effects!
Try It Free Try It Free Try It Free Learn More >
Key Features:
Some of the most prominent features of this software include the following:
● The most appealing feature about this tool is that you don’t require an internet facility to use it.
● Highly stable and crash protected software, even on heavy loading (around 10 files at a time).
● Has the most convenient interface, suitable for users with varieties of technical aptitude.
● Comes with an inbuilt audio library that allows you to add relatable music to your video, once you are done with the conversion process.
● You can enhance your downloaded video with a range of amazing effects and texts in the tool’s editor window.
02Online-Convert
This is quite a handy tool to convert Giphy videos to mp4. It comes with an inbuilt video editor that gives you the liberty to cut, crop, trim and rotate your videos to exclusively extract the ‘most perfect’ parts and even decorate them with amazing frames. This one is also a free video converter tool.
Key Features
Listed below are some of the most viable features of this conversion tool:
● You can directly export the mp4 files to Cloud utilities.
● This tool supports almost all video formats.
● Has preloaded fundamental video editing features
03Convert GIF to Mp4
This one is a free online Giphy to mp4 converter tool, having a bit tricky interface, but has amazing editing features. You can cut, crop and trim videos, add music and adjust frame rates and even add subtitles to your videos with this tool. It however does not support external media sharing of the converted mp4 files.
Key Features:
Major attractions of this online tool comprise the following:
● This tool is loaded with hundreds of sound and video editing utilities.
● It comes with SubRip Subtitle (SRT) files that you can use to add interesting subtitles and make your videos more impactful.
● You can directly export the downloaded videos to your Google and IOS Dropbox.
04GIF-2-Mp4
This conversion tool has possibly has the most convenient user interface. Like most online tools, this too offers you a free GIF to video conversion service. However, you will have to compromise on the editing flexibility and data limit while using this tool, as it lacks any editing features and converts files within 50 MB. You can only adjust the resolution and quality of the converted mp4 files.
Key Features:
You can still prefer this conversion tool on account of the following features:
● This tool is simple and is developed with a view to assure user cohesiveness.
● You don’t need to go through wary software settings or wait for long durations for the conversion process to finish.
● Using this tool, you can share video files through email.
05CloudConvert
This is another excellent online tool to convert Giphy videos to mp4. It enables a quick file conversion and you are granted the liberty to make adjustments in video quality, file size and resolution. The tool’s handy interface converts GIF video to mp4 files in a matter of several seconds. However, it has a limitation of allowing utmost 25 conversions in 24 hours.
Key Features:
Using this tool for video conversion gives you access to the following features:
● This is a quick and free converter tool.
● You are not forced to watch unnecessary advertisements on the tool’s site.
● You can go for a parallel conversion of multiple files.
● You can make changes in the default video and sound settings.
● Key Takeaways from This Episode →
● Online video downloader tools are an advantageous means of hassle free video streaming.
● User credibility has flooded the online market with a range of video converter tools.
● Filmora is among the most preferred, quick and convenient GIF to mp4 converters available online.
Apps to Animate Still Pictures
Apps to Animate Still Pictures Which Could Make Your Pictures Become Internet Sensation
An easy yet powerful editor
Numerous effects to choose from
Detailed tutorials provided by the official channel
Now, it is a question of what to do with all those still photos lying in your phone. You can be pretty certain that you won’t be retiring from clicking images anytime soon. A tip to help make posting images more interesting would be using apps to animate your photos.
You can also find an app that animates your face specifically, which is great for instagram content and has a greater chance of getting reactions or comments. So without further to do let’s get animating.
In this article
01 [Review of General Methods: Can You Animate Still Pictures?](#Part 1)
02 [10 Best apps to animate still photos on Android & iOS](#Part 2)
03 [Additional Extension: 5 Apps to Animate Old Photos](#Part 3)
Part 1 Review of General Methods: Can You Animate Still Pictures?
It’s pretty obvious that you can! These days you can do whatever you want online so animating still pictures should be a piece of cake if you know-how.
A video is basically an entire collage of moving pictures. So if you can cut out pictures from a video why not turn still pictures into animations.
There are a number of ways you can use to animate still images →
● Videos are multiple pictures that move at a frame rate. Make short copies of a video by cutting out the essential moments and playing them in a loop.
● Add and play video animation elements over a picture. With the right software, this task is as easy as copy-pasting over another image.
● Apply an animated 3D image with a transparent background over another image. Remember, the bigger the element the closer it is. So size is directly translated as distance.
● You can use multiple filters and effects on an image with an animated portrait app. Find out what app you can use further on in this article.
● Turn an image into a GIF. No matter its small size and cartoonish style, GIF animation has a very wide appeal as online content.
Part 2 10 Best apps to animate still photos on Android & iOS
01GIPHY
Giphy is the largest internet catalog for GIF files, clips & stickers. No matter if it is a scene from a movie or an animation you have watched somewhere, using this application you can easily find, save & share or simply create something new.
Price: Free
Pros
● Quickly turns still photos into an animation.
● Easily share your work through all social media channels.
Cons
● Search tags are varied; you may need to search using unlikely words to get desired results.
Applicable System: Android
02GIPHY
One of the best ways to turn your photos & videos into GIFs is using ImgPlay. It has a clearer interface making it easy to use. Imgplay comes with paid- premium and non-paid version making it suitable for personal & professional application.
Price: Pro $4.99.
Pros
● It is not packed with unnecessary features.
Cons
● ImgPlay slaps a watermark on all its non-premium versions.
Applicable System: Android & iOS.
03Loopsie
The best Part is that Loopsie provides spectacular cinematographic effects to your animated stills. Stabilization algorithm efficiently removes shaking effects & blurs.
Price: Free.
Pros
● User friendly UI
● Easy to share on social media platforms.
Cons
● Paid version is a bit pricey.
Applicable System: Only on iOS.
04StoryZ
Looking for ways to create animated visuals form still images? This is where your quest ends. An advanced editing platform that offers overlays, movement & color filters. Banner Ads & watermarks can be removed by paying a small subscription fee.
Price: Free version available. Premium costs INR 789 a year.
Pros
● Double exposure effect combines video overlay & static imagery.
Cons
● Contains Ad & watermark.
Applicable System: Android.
05Animate Me
Animate Me offers you a package of postcards & greeting snapshots that you can animate according to your need. The paid subscription will get you updated sounds & effects every now & then.
Price: Free.
Pros
● Easy to use & beginners friendly.
Cons
● Editing features & tools are limited.
Applicable System: Windows**.**
06Movepic
Create animated stills, GIFs, live-wallpapers all with Movepic. It allows you to animate simply anything by drawing a path. You can also adjust the speed of animation manually.
Price: Free.
Pros
● Animate in a light motion.
● Easy to use.
Cons
● Free version leaves a watermark on images.
Applicable System: Android & iOS.
07Pixaloop
Pixaloop is a fun app packed with significant animation & editing features. 100% free to use software delivers live animated images in a few clicks. User friendly interface edits images using powerful & precise animation tools.
Price- Free.
Pros
● Offers all the necessary features & core tools.
● Provides accuracy & flexibility to the users.
Cons
● The animation process is a bit time consuming.
Applicable System: Android & iOS.
08Zoetropic
Zoetropic has a combination of 3D tools and Camera FX to animate your images. User friendly interface allows you to mask the still areas if you wish to keep it still.
Price: $199 (Pro)
Pros
● Easily customize motion areas.
● Apply overlays & audios.
Cons
● App price is higher than similar available apps.
Applicable System: Android & iOS.
9Motionleap
It is one of the most top reviewed apps on Playstore related to animating still photos. It has several features like programming directional cues, freeze portions of your photo or even apply filters.
Price: Free version. Pro version; $3.50/month, $18/year and $55 lifetime.
Pros
● Its free version does not apply watermark.
● Intuitive Interface.
Cons
● Best features are locked in Pro version.
Applicable System: Android & iOS.
Part 3 Additional Extension: 5 Apps to Animate Old Photos
It can be unanimously agreed upon that people have been storing photos for decades as a means of preserving memories. We don’t get much opportunity to meet familiar faces too often so why not just try and animate still images of relatives. Now we already know how we can start animating images on apps but restoring original images maybe a tad more complicated than that. This time a bit of the animation is dependent on the physical state of the picture so be sure it’s in mint condition.
These photos can be restored or manipulated digitally with the help of smart AI. We have listed down some of the apps to animate old photos and reconstruct faces;
01Photos Revive
You can add colour to old worn out photos and make them look more realistic in terms of tonal colorization using artificial intelligence. The app also asks you recollect any details of the photo that you might remember in terms of the image.
Applicable OS: iOS only.

02Remini
After going through several improvements and upgrades, you can use the app Remini to confidently restore low resolution images that are either pixelated, blurred or damaged into High Definition images. This app has already been used by users to process a hundred million photos.
Applicable OS: Android 1.7.2 or higher, & iOS 9.3 or higher.

03Colorize
Another app that uses AI to add colorization to your old images. It is a popular animate your family photo app which has amazing other tools and filters to try out.
Applicable OS: Android and iOS.

04Deep Nostalgia
Using this app which has been innovated by the geology platform MyHeritage uses ai to add gestures to still images to evoke nostalgia in the users.
Applicable OS: Online.

04Google Photoscan
Google scanner is a futuristic app for restoring photos of the past. The app uses a smart scanning technology that provides several scans of the same photo automatically.
Applicable OS: Android or iOS.

Key Takeaways from This Episode
● Animating photos are a new way of reimagining still images into moving live content. There are many methods and approaches you can choose to animate your images.
● Some of them being video animations, transparent background elements, Filters and effects and of course GIFs.
● There are dozens of apps with built in smart artificial intelligence to help restore old photos or make short animations out of them. Some of them are applicable for desktops while others available both on Android and iOS.
Now, it is a question of what to do with all those still photos lying in your phone. You can be pretty certain that you won’t be retiring from clicking images anytime soon. A tip to help make posting images more interesting would be using apps to animate your photos.
You can also find an app that animates your face specifically, which is great for instagram content and has a greater chance of getting reactions or comments. So without further to do let’s get animating.
In this article
01 [Review of General Methods: Can You Animate Still Pictures?](#Part 1)
02 [10 Best apps to animate still photos on Android & iOS](#Part 2)
03 [Additional Extension: 5 Apps to Animate Old Photos](#Part 3)
Part 1 Review of General Methods: Can You Animate Still Pictures?
It’s pretty obvious that you can! These days you can do whatever you want online so animating still pictures should be a piece of cake if you know-how.
A video is basically an entire collage of moving pictures. So if you can cut out pictures from a video why not turn still pictures into animations.
There are a number of ways you can use to animate still images →
● Videos are multiple pictures that move at a frame rate. Make short copies of a video by cutting out the essential moments and playing them in a loop.
● Add and play video animation elements over a picture. With the right software, this task is as easy as copy-pasting over another image.
● Apply an animated 3D image with a transparent background over another image. Remember, the bigger the element the closer it is. So size is directly translated as distance.
● You can use multiple filters and effects on an image with an animated portrait app. Find out what app you can use further on in this article.
● Turn an image into a GIF. No matter its small size and cartoonish style, GIF animation has a very wide appeal as online content.
Part 2 10 Best apps to animate still photos on Android & iOS
01GIPHY
Giphy is the largest internet catalog for GIF files, clips & stickers. No matter if it is a scene from a movie or an animation you have watched somewhere, using this application you can easily find, save & share or simply create something new.
Price: Free
Pros
● Quickly turns still photos into an animation.
● Easily share your work through all social media channels.
Cons
● Search tags are varied; you may need to search using unlikely words to get desired results.
Applicable System: Android
02GIPHY
One of the best ways to turn your photos & videos into GIFs is using ImgPlay. It has a clearer interface making it easy to use. Imgplay comes with paid- premium and non-paid version making it suitable for personal & professional application.
Price: Pro $4.99.
Pros
● It is not packed with unnecessary features.
Cons
● ImgPlay slaps a watermark on all its non-premium versions.
Applicable System: Android & iOS.
03Loopsie
The best Part is that Loopsie provides spectacular cinematographic effects to your animated stills. Stabilization algorithm efficiently removes shaking effects & blurs.
Price: Free.
Pros
● User friendly UI
● Easy to share on social media platforms.
Cons
● Paid version is a bit pricey.
Applicable System: Only on iOS.
04StoryZ
Looking for ways to create animated visuals form still images? This is where your quest ends. An advanced editing platform that offers overlays, movement & color filters. Banner Ads & watermarks can be removed by paying a small subscription fee.
Price: Free version available. Premium costs INR 789 a year.
Pros
● Double exposure effect combines video overlay & static imagery.
Cons
● Contains Ad & watermark.
Applicable System: Android.
05Animate Me
Animate Me offers you a package of postcards & greeting snapshots that you can animate according to your need. The paid subscription will get you updated sounds & effects every now & then.
Price: Free.
Pros
● Easy to use & beginners friendly.
Cons
● Editing features & tools are limited.
Applicable System: Windows**.**
06Movepic
Create animated stills, GIFs, live-wallpapers all with Movepic. It allows you to animate simply anything by drawing a path. You can also adjust the speed of animation manually.
Price: Free.
Pros
● Animate in a light motion.
● Easy to use.
Cons
● Free version leaves a watermark on images.
Applicable System: Android & iOS.
07Pixaloop
Pixaloop is a fun app packed with significant animation & editing features. 100% free to use software delivers live animated images in a few clicks. User friendly interface edits images using powerful & precise animation tools.
Price- Free.
Pros
● Offers all the necessary features & core tools.
● Provides accuracy & flexibility to the users.
Cons
● The animation process is a bit time consuming.
Applicable System: Android & iOS.
08Zoetropic
Zoetropic has a combination of 3D tools and Camera FX to animate your images. User friendly interface allows you to mask the still areas if you wish to keep it still.
Price: $199 (Pro)
Pros
● Easily customize motion areas.
● Apply overlays & audios.
Cons
● App price is higher than similar available apps.
Applicable System: Android & iOS.
9Motionleap
It is one of the most top reviewed apps on Playstore related to animating still photos. It has several features like programming directional cues, freeze portions of your photo or even apply filters.
Price: Free version. Pro version; $3.50/month, $18/year and $55 lifetime.
Pros
● Its free version does not apply watermark.
● Intuitive Interface.
Cons
● Best features are locked in Pro version.
Applicable System: Android & iOS.
Part 3 Additional Extension: 5 Apps to Animate Old Photos
It can be unanimously agreed upon that people have been storing photos for decades as a means of preserving memories. We don’t get much opportunity to meet familiar faces too often so why not just try and animate still images of relatives. Now we already know how we can start animating images on apps but restoring original images maybe a tad more complicated than that. This time a bit of the animation is dependent on the physical state of the picture so be sure it’s in mint condition.
These photos can be restored or manipulated digitally with the help of smart AI. We have listed down some of the apps to animate old photos and reconstruct faces;
01Photos Revive
You can add colour to old worn out photos and make them look more realistic in terms of tonal colorization using artificial intelligence. The app also asks you recollect any details of the photo that you might remember in terms of the image.
Applicable OS: iOS only.
02Remini
After going through several improvements and upgrades, you can use the app Remini to confidently restore low resolution images that are either pixelated, blurred or damaged into High Definition images. This app has already been used by users to process a hundred million photos.
Applicable OS: Android 1.7.2 or higher, & iOS 9.3 or higher.
03Colorize
Another app that uses AI to add colorization to your old images. It is a popular animate your family photo app which has amazing other tools and filters to try out.
Applicable OS: Android and iOS.
04Deep Nostalgia
Using this app which has been innovated by the geology platform MyHeritage uses ai to add gestures to still images to evoke nostalgia in the users.
Applicable OS: Online.
04Google Photoscan
Google scanner is a futuristic app for restoring photos of the past. The app uses a smart scanning technology that provides several scans of the same photo automatically.
Applicable OS: Android or iOS.
Key Takeaways from This Episode
● Animating photos are a new way of reimagining still images into moving live content. There are many methods and approaches you can choose to animate your images.
● Some of them being video animations, transparent background elements, Filters and effects and of course GIFs.
● There are dozens of apps with built in smart artificial intelligence to help restore old photos or make short animations out of them. Some of them are applicable for desktops while others available both on Android and iOS.
15 Top Pics Collage Apps
15 Best Pics Collage Apps in 2024: Top Picks
An easy yet powerful editor
Numerous effects to choose from
Detailed tutorials provided by the official channel
With a high-end camera in a mobile phone these days there is a huge collection of pictures from various events, trips, and of your near and dear ones. So why not be creative and make some interesting pics collage from these images? Surprise your friends, relatives, and other people on their special occasion by creating pics collage and for this, you would need the help of a good collage app.

With the myriad of options available, selecting a few can be a difficult task and to help you with this, we have shortlisted some of the popular ones in the write-up below.
Part 1 Top 11 Pics Collage apps for Android and iOS
Below we have shortlisted the best apps for the pics collage that will help you create a customized collage using multiple functions and tools.
01Pic Collage
This is one of the most widely used apps available for iOS and Android devices that helps you create interesting collages.
Key features
● Free app with basic features and allows to remove ads and get access to advanced features using the paid version
● Intuitive layout with multiple templates to create photo collage pics.
● Comes with an array of photo editing tools.
● Add images from your phone or also from social media accounts.

02Photo and Shape Collage Maker
This is a free Android-based app with a 3.6 rating.
Key features
● Create frame collage, shape collage, name collage, and others.
● Comes with predefined shapes for creating a collage.
● Allows editing the collage size, background, and other factors.
● Customized shape collage can be created your name, number, or face.
● Add stickers, text, and other elements.

03Diptic
This is a paid app for iOS devices that allows creating photos as well as video collages.
Key features:
● Comes with over 190 layouts to choose from
● Add multiple photos and videos in each layout.
● Option for customizing the layout.
● Use different filters for enhancing the images.
● Add captions, effects, and other interesting elements.
● Allows creating Diptics using photos and videos from the device, Facebook, Dropbox, and other sources.

04PhotoGrid
This is an Android and iOS based app for creating collages.
Key features
● Create collage using photos, and videos.
● Comes with a variety of templates for creating personalized collages.
● The built-in editor lets you customize the images.
● Background stickers, doodles, text, and other effects can be added.
● A free version supports basic features while the paid pro version removes ads and watermarks and offers advanced features.

05Ribbet
This app on Android and iOS is mainly a photo editing tool that also supports creating collages.
Key features
● Create a collage using different customizable templates.
● Edit images and change file parameters to suit requirements.
● Add special effects, frames, and text.
● Editing tools like clones, curves, and burning.

06Moldiv
Use this app on your Android and iOS devices to create collages and professionally edit images.
Key features
● Comes with a variety of free collage templates.
● A wide range of layouts is available that can be customized.
● Works as a pro image editing tool.
● Add stickers, filters, backgrounds, and other elements.
● Allows adding up to 9 photos in a frame.

07PicPlayPost
Just like its name, this is an interesting tool for creating collages on iOS and Android devices and supports other functions as well.
Key features
● Free app with IAP option.
● Allows creating an animated slideshow using images and videos.
● Option to choose aspect ratio depending on the platform you wish to use the collage.
● Add text watermark or a business logo using the app.
● A wide range of media file formats is supported.

08PiZap
This is a multitasking app for Android and iOS devices that support functions like creating a collage, meme, photo editing, and more.
Key features:
● Create photo collages, posters, and greeting cards, in a few simple steps.
● A wide range of templates is available including the ones for Twitter, YouTube, and other sites.
● Add text, memes, shapes, filters, and other elements.
● Free to use app with Pro version offering additional features and removing ads.

0910. Live Collage
Download this app on your Android and iOS devices for creating interesting collages.
Key features:
● A simple and clean interface makes collage-making easy and fast.
● Comes with a variety of templates including special ones for Facebook, and Instagram.
● Allows creating customized canvas size and 3D templates available as well.
● Add filters to enhance your images.

1011. Pic Stitch
The app on Android and iOS devices allows creating customized pic collages for all occasions.
Key features
● User-friendly interface to create a customized collage using images and videos.
● Comes with more than 200 templates.
● Multiple images editing options are supported.
● Share created collages to social media sites.
● Choose a customized aspect ratio and also add music.

1112. PicsArt
PicsArt collage is another widely used Android and iOS-based tool that can be used for multiple tasks including collage-making.
Key features
● Comes with multiple templates including the ones for social media as well as business requirements.
● Add up to 10 images on a grid.
● Comes with a free photo library to select images.
● Being a complete image editing tool it allows personalized images in different ways.

Additional Reading: Edit your videos professionally and create a video collage using Wondershare UniConverter
If you are looking for a video editing tool that can let your edit your videos like a professional Wondershare Filmora Video Editor is just the right choice. This Windows and Mac-based software support variety of basic, as well as advanced features, and this, makes the software for all users. With over 800 stunning effects, you can create a video masterpiece using your creativity. Media files in all key formats are supported and there are options to add texts, overlays, transitions, filters, as well as music files.
The split-screen feature of the software can be further used to play multiple videos in different frames making it look like a video collage.

Wondershare Filmora - Best Video Editor for Mac/Windows
5,481,435 people have downloaded it.
Build unique custom animations without breaking a sweat.
Focus on creating epic stories and leave the details to Filmora’s auto features.
Start a creative adventure with drag & drop effects and endless possibilities.
Filmora simplifies advanced features to save you time and effort.
Filmora cuts out repetition so you can move on to your next creative breakthrough.
● Key Takeaways from This Episode →
● Create stunning pic collages on your phone using apps.
● A wide range of apps for Android and iOS are available.
● Edit your videos professionally and create a video collage using Wondershare Filmora.
With a high-end camera in a mobile phone these days there is a huge collection of pictures from various events, trips, and of your near and dear ones. So why not be creative and make some interesting pics collage from these images? Surprise your friends, relatives, and other people on their special occasion by creating pics collage and for this, you would need the help of a good collage app.
With the myriad of options available, selecting a few can be a difficult task and to help you with this, we have shortlisted some of the popular ones in the write-up below.
Part 1 Top 11 Pics Collage apps for Android and iOS
Below we have shortlisted the best apps for the pics collage that will help you create a customized collage using multiple functions and tools.
01Pic Collage
This is one of the most widely used apps available for iOS and Android devices that helps you create interesting collages.
Key features
● Free app with basic features and allows to remove ads and get access to advanced features using the paid version
● Intuitive layout with multiple templates to create photo collage pics.
● Comes with an array of photo editing tools.
● Add images from your phone or also from social media accounts.
02Photo and Shape Collage Maker
This is a free Android-based app with a 3.6 rating.
Key features
● Create frame collage, shape collage, name collage, and others.
● Comes with predefined shapes for creating a collage.
● Allows editing the collage size, background, and other factors.
● Customized shape collage can be created your name, number, or face.
● Add stickers, text, and other elements.
03Diptic
This is a paid app for iOS devices that allows creating photos as well as video collages.
Key features:
● Comes with over 190 layouts to choose from
● Add multiple photos and videos in each layout.
● Option for customizing the layout.
● Use different filters for enhancing the images.
● Add captions, effects, and other interesting elements.
● Allows creating Diptics using photos and videos from the device, Facebook, Dropbox, and other sources.
04PhotoGrid
This is an Android and iOS based app for creating collages.
Key features
● Create collage using photos, and videos.
● Comes with a variety of templates for creating personalized collages.
● The built-in editor lets you customize the images.
● Background stickers, doodles, text, and other effects can be added.
● A free version supports basic features while the paid pro version removes ads and watermarks and offers advanced features.
05Ribbet
This app on Android and iOS is mainly a photo editing tool that also supports creating collages.
Key features
● Create a collage using different customizable templates.
● Edit images and change file parameters to suit requirements.
● Add special effects, frames, and text.
● Editing tools like clones, curves, and burning.
06Moldiv
Use this app on your Android and iOS devices to create collages and professionally edit images.
Key features
● Comes with a variety of free collage templates.
● A wide range of layouts is available that can be customized.
● Works as a pro image editing tool.
● Add stickers, filters, backgrounds, and other elements.
● Allows adding up to 9 photos in a frame.
07PicPlayPost
Just like its name, this is an interesting tool for creating collages on iOS and Android devices and supports other functions as well.
Key features
● Free app with IAP option.
● Allows creating an animated slideshow using images and videos.
● Option to choose aspect ratio depending on the platform you wish to use the collage.
● Add text watermark or a business logo using the app.
● A wide range of media file formats is supported.
08PiZap
This is a multitasking app for Android and iOS devices that support functions like creating a collage, meme, photo editing, and more.
Key features:
● Create photo collages, posters, and greeting cards, in a few simple steps.
● A wide range of templates is available including the ones for Twitter, YouTube, and other sites.
● Add text, memes, shapes, filters, and other elements.
● Free to use app with Pro version offering additional features and removing ads.
0910. Live Collage
Download this app on your Android and iOS devices for creating interesting collages.
Key features:
● A simple and clean interface makes collage-making easy and fast.
● Comes with a variety of templates including special ones for Facebook, and Instagram.
● Allows creating customized canvas size and 3D templates available as well.
● Add filters to enhance your images.
1011. Pic Stitch
The app on Android and iOS devices allows creating customized pic collages for all occasions.
Key features
● User-friendly interface to create a customized collage using images and videos.
● Comes with more than 200 templates.
● Multiple images editing options are supported.
● Share created collages to social media sites.
● Choose a customized aspect ratio and also add music.
1112. PicsArt
PicsArt collage is another widely used Android and iOS-based tool that can be used for multiple tasks including collage-making.
Key features
● Comes with multiple templates including the ones for social media as well as business requirements.
● Add up to 10 images on a grid.
● Comes with a free photo library to select images.
● Being a complete image editing tool it allows personalized images in different ways.
Additional Reading: Edit your videos professionally and create a video collage using Wondershare UniConverter
If you are looking for a video editing tool that can let your edit your videos like a professional Wondershare Filmora Video Editor is just the right choice. This Windows and Mac-based software support variety of basic, as well as advanced features, and this, makes the software for all users. With over 800 stunning effects, you can create a video masterpiece using your creativity. Media files in all key formats are supported and there are options to add texts, overlays, transitions, filters, as well as music files.
The split-screen feature of the software can be further used to play multiple videos in different frames making it look like a video collage.
Wondershare Filmora - Best Video Editor for Mac/Windows
5,481,435 people have downloaded it.
Build unique custom animations without breaking a sweat.
Focus on creating epic stories and leave the details to Filmora’s auto features.
Start a creative adventure with drag & drop effects and endless possibilities.
Filmora simplifies advanced features to save you time and effort.
Filmora cuts out repetition so you can move on to your next creative breakthrough.
● Key Takeaways from This Episode →
● Create stunning pic collages on your phone using apps.
● A wide range of apps for Android and iOS are available.
● Edit your videos professionally and create a video collage using Wondershare Filmora.
How to Obtain and Create Animated GIF Icons Like a Pro?
Versatile Video Editor - Wondershare Filmora
An easy yet powerful editor
Numerous effects to choose from
Detailed tutorials provided by the official channel
Are you looking for some interesting and animated GIF icons? Then simply read this guide to discover funny GIF icons and learn how to create them on your own.
GIF, which stands for Graphics Interchange Format, has now become extremely popular among social media. From sending our reactions to something to wishing others on special occasions, GIFs can be used in so many ways. Though, there are times when we would like to use animated GIF icons in your designs to make them more appealing. Therefore, in this post, I will let you know how to create some funny GIF icons and would also share a few resources to find readily available GIF icons.
![]()
In this article
01 [Smart Ways to Create Your Own Animated GIF Icons](#Part 1)
02 [Top 3 Resources to Get Free Animated GIF Icons](#Part 2)
Part 1 Smart Ways to Create Your Own Animated GIF Icons
While there are so many ways to come up with animated GIF icons, I would recommend exploring the following options:
Method 1: Use Adobe Photoshop to Create GIF Icons
If you are looking for a professional solution to create a live GIF icon, then I would recommend using Adobe Photoshop. While the application is not that easy to use, it will be an ideal long-term solution. In nutshell, you can create animated GIF icons by loading assets, duplicating layers, and then merging them in the following way:
Step 1 Load Assets on Photoshop
At first, you can simply launch Adobe Photoshop on your system and go to its File > Scripts to load media assets into your stack.
![]()
This will let you browse and load the media assets to your projects. In case you don’t have a layer created, then you can just go to its File > Layer and create a new layer.
![]()
You can now rename your layers and can go to its File > Window > Timeline to get a timeline view of the added assets.
![]()
Step 2 Work on the Video Timeline to Create a GIF
Great! Once you have got the timeline view on the application, you can click on its dropdown menu and choose to create a frame animation.
![]()
Afterward, you can select the added media and go to its Properties menu on the sidebar. From here, you can choose to create a new layer for each frame and then make frames from each layer.
![]()
This will create multiple frames on the timeline at the bottom. You can edit each frame on the timeline and can also set up its preferred duration.
![]()
You can also right-click the frames and select how many times your loading icon GIF would be repeated.
![]()
Step 3 Preview and Export your GIF from Photoshop
Lastly, you can get a preview of your animated GIF icons and can go to its File > Export and choose to save it for the web in a compatible (GIF) format.
![]()
Method 2: Make Stunning Animated GIF Icons with Wondershare Filmora
Since Adobe Photoshop can be quite complicated to use, you can consider using Wondershare Filmora to create all kinds of animated GIF icons. It is a user-friendly media editing application that has a wide range of readily available assets and would also let you import files from your system.
Besides that, there are tons of stickers, visual elements, captions, animations, transitions, and so on that would let you create and customize funny GIF icons. Therefore, if you want to create animated GIF icons using Filmora, then you can simply follow these steps:
Step 1 Load Media Files (Images and Videos) on Filmora
To get things started, you can just launch Wondershare Filmora on your system and go to its File > Import menu to load media files to it. You can also drag and drop your media files directly to the interface of Filmora.

Step 2 Create or Edit GIFs on Wondershare Filmora
After loading your images or video clips, you can drag and drop them to the timeline at the bottom. In case you can want to get rid of any video clip, you can just hover the mouse around and use its trimming tool to meet your requirements.

Once you have edited your videos or images, you can just go to their properties from the sidebar. From here, you can scale, reposition, rotate, flip, and perform other edits on your media files.

If you want to add texts to your GIFs, then just visit the “Titles” section of Filmora from the top. This will let you explore and include any caption effect that you can later edit on Filmora.

You can also go to the “Effects” section from the sidebar to explore a wide range of transitions, filters, stickers, and more that you can add to your GIFs.

Step 3 Export your Animated GIFs from Filmora
That’s it! Once you have worked on your funny GIF icons, you can get their preview, and click on the “Export” icon from the top. Here, you can select “GIF” as a target format and simply save them to a preferred location on your system.

Method 3: Take the Assistance of Canva to Create Animated GIFs
You might already know that Canva is already a popular online application that can be used to create social media posts, marketing video ads, brochures, GIFs, and more. Since Canva offers a wide range of assets (images, GIFs, and more), you can use it to create animated GIF icons on the go.
Step 1 Select a Template of your Choice on Canvas
Whenever you want to create a loading icon GIF, you can just go to your Canva account and look for any existing template. Apart from its existing template, you can also load a blank canvas.
![]()
Step 2 Use the Existing Designing Features of Canva
Great! Once you have opened your canvas, you can explore tons of assets on the side. For instance, you can add texts, borders, objects, and so on from the sidebar to your canvas. You can also select a relevant animation style and add it to your project.
![]()
Step 3 Export the Media as a GIF from Canva
After working on the live GIF icon on Canva, you can just go to the Export option from the top and save it as a GIF on your system.
![]()
Part 2 Top 3 Resources to Get Free Animated GIF Icons
If you are running short on time and would like to get some premade animated GIF icons, then you can explore the following options.
1. Icons8
Icons8 is one of the most popular resources for free animated GIF icons. You can explore a wide range of more than 3000 animated icons (free and paid) on the website and can download them on your system in a preferred format. For your convenience, these animated icons are listed in different categories on Icons8.
![]()
2. Giphy
Giphy is one of the most popular websites that is entirely dedicated to GIFs. Therefore, if you are looking for an animated Discord server icon, a professional icon, or a personal animation – you can find it all on Giphy. While it has an extensive range of icons, they aren’t listed in different categories, and finding the right GIF can be time-consuming.
![]()
3. Cliply
Lastly, you can also go to the official website of Cliply to explore tons of animated GIF icons. There are all kinds of GIF Discord server icons, 3D icons, professional sets, and more that you can download from Cliply.
![]()
Wondershare Filmora
Get started easily with Filmora’s powerful performance, intuitive interface, and countless effects!
Try It Free Try It Free Try It Free Learn More >
AI Portrait – The best feature of Wondershare Filmora for gameplay editing
The AI Portrait is a new add-on in Wondershare Filmora. It can easily remove video backgrounds without using a green screen or chroma key, allowing you to add borders, glitch effects, pixelated, noise, or segmentation video effects.

Conclusion
There you go! I’m sure that after going through this post, you can easily find all kinds of animated GIF icons. Though, if you have specific requirements and would like to come up with some customized loading or funny GIF icons, then you can consider using tools like Canva, Photoshop, or Filmora. Out of them, Wondershare Filmora has to be the best solution to create live GIF icons as it features tons of resources and will let you come up with any video or GIF on the go.
Are you looking for some interesting and animated GIF icons? Then simply read this guide to discover funny GIF icons and learn how to create them on your own.
GIF, which stands for Graphics Interchange Format, has now become extremely popular among social media. From sending our reactions to something to wishing others on special occasions, GIFs can be used in so many ways. Though, there are times when we would like to use animated GIF icons in your designs to make them more appealing. Therefore, in this post, I will let you know how to create some funny GIF icons and would also share a few resources to find readily available GIF icons.
![]()
In this article
01 [Smart Ways to Create Your Own Animated GIF Icons](#Part 1)
02 [Top 3 Resources to Get Free Animated GIF Icons](#Part 2)
Part 1 Smart Ways to Create Your Own Animated GIF Icons
While there are so many ways to come up with animated GIF icons, I would recommend exploring the following options:
Method 1: Use Adobe Photoshop to Create GIF Icons
If you are looking for a professional solution to create a live GIF icon, then I would recommend using Adobe Photoshop. While the application is not that easy to use, it will be an ideal long-term solution. In nutshell, you can create animated GIF icons by loading assets, duplicating layers, and then merging them in the following way:
Step 1 Load Assets on Photoshop
At first, you can simply launch Adobe Photoshop on your system and go to its File > Scripts to load media assets into your stack.
![]()
This will let you browse and load the media assets to your projects. In case you don’t have a layer created, then you can just go to its File > Layer and create a new layer.
![]()
You can now rename your layers and can go to its File > Window > Timeline to get a timeline view of the added assets.
![]()
Step 2 Work on the Video Timeline to Create a GIF
Great! Once you have got the timeline view on the application, you can click on its dropdown menu and choose to create a frame animation.
![]()
Afterward, you can select the added media and go to its Properties menu on the sidebar. From here, you can choose to create a new layer for each frame and then make frames from each layer.
![]()
This will create multiple frames on the timeline at the bottom. You can edit each frame on the timeline and can also set up its preferred duration.
![]()
You can also right-click the frames and select how many times your loading icon GIF would be repeated.
![]()
Step 3 Preview and Export your GIF from Photoshop
Lastly, you can get a preview of your animated GIF icons and can go to its File > Export and choose to save it for the web in a compatible (GIF) format.
![]()
Method 2: Make Stunning Animated GIF Icons with Wondershare Filmora
Since Adobe Photoshop can be quite complicated to use, you can consider using Wondershare Filmora to create all kinds of animated GIF icons. It is a user-friendly media editing application that has a wide range of readily available assets and would also let you import files from your system.
Besides that, there are tons of stickers, visual elements, captions, animations, transitions, and so on that would let you create and customize funny GIF icons. Therefore, if you want to create animated GIF icons using Filmora, then you can simply follow these steps:
Step 1 Load Media Files (Images and Videos) on Filmora
To get things started, you can just launch Wondershare Filmora on your system and go to its File > Import menu to load media files to it. You can also drag and drop your media files directly to the interface of Filmora.
Step 2 Create or Edit GIFs on Wondershare Filmora
After loading your images or video clips, you can drag and drop them to the timeline at the bottom. In case you can want to get rid of any video clip, you can just hover the mouse around and use its trimming tool to meet your requirements.
Once you have edited your videos or images, you can just go to their properties from the sidebar. From here, you can scale, reposition, rotate, flip, and perform other edits on your media files.
If you want to add texts to your GIFs, then just visit the “Titles” section of Filmora from the top. This will let you explore and include any caption effect that you can later edit on Filmora.
You can also go to the “Effects” section from the sidebar to explore a wide range of transitions, filters, stickers, and more that you can add to your GIFs.
Step 3 Export your Animated GIFs from Filmora
That’s it! Once you have worked on your funny GIF icons, you can get their preview, and click on the “Export” icon from the top. Here, you can select “GIF” as a target format and simply save them to a preferred location on your system.
Method 3: Take the Assistance of Canva to Create Animated GIFs
You might already know that Canva is already a popular online application that can be used to create social media posts, marketing video ads, brochures, GIFs, and more. Since Canva offers a wide range of assets (images, GIFs, and more), you can use it to create animated GIF icons on the go.
Step 1 Select a Template of your Choice on Canvas
Whenever you want to create a loading icon GIF, you can just go to your Canva account and look for any existing template. Apart from its existing template, you can also load a blank canvas.
![]()
Step 2 Use the Existing Designing Features of Canva
Great! Once you have opened your canvas, you can explore tons of assets on the side. For instance, you can add texts, borders, objects, and so on from the sidebar to your canvas. You can also select a relevant animation style and add it to your project.
![]()
Step 3 Export the Media as a GIF from Canva
After working on the live GIF icon on Canva, you can just go to the Export option from the top and save it as a GIF on your system.
![]()
Part 2 Top 3 Resources to Get Free Animated GIF Icons
If you are running short on time and would like to get some premade animated GIF icons, then you can explore the following options.
1. Icons8
Icons8 is one of the most popular resources for free animated GIF icons. You can explore a wide range of more than 3000 animated icons (free and paid) on the website and can download them on your system in a preferred format. For your convenience, these animated icons are listed in different categories on Icons8.
![]()
2. Giphy
Giphy is one of the most popular websites that is entirely dedicated to GIFs. Therefore, if you are looking for an animated Discord server icon, a professional icon, or a personal animation – you can find it all on Giphy. While it has an extensive range of icons, they aren’t listed in different categories, and finding the right GIF can be time-consuming.
![]()
3. Cliply
Lastly, you can also go to the official website of Cliply to explore tons of animated GIF icons. There are all kinds of GIF Discord server icons, 3D icons, professional sets, and more that you can download from Cliply.
![]()
Wondershare Filmora
Get started easily with Filmora’s powerful performance, intuitive interface, and countless effects!
Try It Free Try It Free Try It Free Learn More >
AI Portrait – The best feature of Wondershare Filmora for gameplay editing
The AI Portrait is a new add-on in Wondershare Filmora. It can easily remove video backgrounds without using a green screen or chroma key, allowing you to add borders, glitch effects, pixelated, noise, or segmentation video effects.
Conclusion
There you go! I’m sure that after going through this post, you can easily find all kinds of animated GIF icons. Though, if you have specific requirements and would like to come up with some customized loading or funny GIF icons, then you can consider using tools like Canva, Photoshop, or Filmora. Out of them, Wondershare Filmora has to be the best solution to create live GIF icons as it features tons of resources and will let you come up with any video or GIF on the go.
Also read:
- New In 2024, Are You Ready to Animate Game Character From Scratch?
- 2024 Approved 10 Realistic Cartoon Characters You Would Run Away From if You Met in Real Life
- Updated 2024 Approved 12 Top Stop Motion Studios Worth Recommending
- Updated How You Can Turn Yourself Into Anime Character Using Anime Filter for 2024
- Updated How to Make a 3D Cartoon of Yourself
- New 2024 Approved Tips to Create Animated Social Media Posts in Canva
- The Best 10 Sketch Animation Video Makers
- New 2024 Approved How to Animate - Adobe Animate Tutorias
- Updated In 2024, Ways to Create Animated Clipart in PowerPoint
- New Top 10 Best Batman Anime Movies 2024 Updated
- New Top 10 Apps to Enhance Your Instagram Story Slideshow for 2024
- In 2024, 10 Most Memorable Japanese Cat Cartoons
- In 2024, How to Animate - Adobe Animate Tutorias
- New OBS Animated Lower Thirds Alternatives for 2024
- New What Is A GIF for 2024
- Updated 2024 Approved How to Create Slideshow in LinkedIn
- 2024 Approved 10 Awesome Moving Animation PowerPoint Techniques
- How to Make Architecture Animation
- New In 2024, Have You Seen the Facebook Cartoon App Everyones Using Lately
- 10 Best Romance Anime Movies You Need to Watch for 2024
- New The Most Efficient Techniques for You to Make 3D Animation Character
- New In 2024, How to Animate - Adobe Animate Tutorias
- New In 2024, The Secret Sauce for Making GIF Instagram Story More Stunning
- 2024 Approved 5 Free Animated Gif Sources You Must Check
- New 2024 Approved 12 Animated Slideshow PowerPoint Templates and Tools to Make Them
- Updated In 2024, Top 12 2D Animation Studios All Should Check Out
- Updated The Art of Comics - Learn How to Do Funny Cartoon Drawings for 2024
- In 2024, How to Unlock Apple iPhone 13 mini Online? Here are 6 Easy Ways
- How to Easily Hard reset my Xiaomi 13T | Dr.fone
- In 2024, How to Bypass FRP from Tecno Phantom V Flip?
- How to Remove Find My iPhone without Apple ID On your iPhone 11 Pro?
- How to restore wiped call history on Vivo X100 Pro?
- Best Anti Tracker Software For Oppo Reno 8T | Dr.fone
- In 2024, How to Bypass FRP on Infinix Zero 5G 2023 Turbo?
- How To Unlock Apple iPhone 12 mini 3 Ways To Unlock
- Recommended Best Applications for Mirroring Your Xiaomi Redmi Note 12 4G Screen | Dr.fone
- Best Ways to Bypass iCloud Activation Lock from iPhone XS Max/iPad/iPod
- In 2024, Does PokeGo++ still work on Apple iPhone 8 Plus/iPad? | Dr.fone
- In 2024, How To Stream Anything From Honor Magic 6 Lite to Apple TV | Dr.fone
- How to Unlock a Network Locked Xiaomi Redmi Note 12R Phone?
- Title: Updated Learn How to Draw Cartoons Step by Step with This Guide
- Author: Elon
- Created at : 2024-05-19 03:04:56
- Updated at : 2024-05-20 03:04:56
- Link: https://animation-videos.techidaily.com/updated-learn-how-to-draw-cartoons-step-by-step-with-this-guide/
- License: This work is licensed under CC BY-NC-SA 4.0.
