
:max_bytes(150000):strip_icc():format(webp)/the-best-instagram-filters-for-2018-4177148-1-5bc5e4b6c9e77c00517f198d.jpg)
Updated That Will Make Aesthetic Cartoon Drawing More Understandable for 2024
That Will Make Aesthetic Cartoon Drawing More Understandable
That Will Make Aesthetic Cartoon Drawing More Understandable
An easy yet powerful editor
Numerous effects to choose from
Detailed tutorials provided by the official channel
When you are trying to make an aesthetic drawings cartoon, the primary thing to focus on is the composition. Composition is the combination, arrangement, and organization of objects within the borders of drawing space. To have a great aesthetic cartoon drawing, you must focus on bringing the eyes of the viewer toward your center of interest within an aesthetically-pleasing composition. When we create illustrations, we are often concerned with putting in a lot of details that will overload the image and lose the meaning that we originally wanted it to convey.

We engage our audience and viewer more by composing a perfect aesthetic drawing. In addition, many rules define a good composition drawing, but these rules are mainly guidelines. Also pay attention to your personal preferences and instincts. In this guide, we’ll teach you how to make an excellent aesthetic cartoon painting more understandable.
In this article
01 [Canvas Aesthetic Painting Ideas](#Part 1)
02 [Blender Aesthetic Painting Ideas](#Part 2)
03 [How to Create Super-Detailed Aesthetic Cartoon Painting](#Part 3)
Part 1 Canvas Aesthetic Painting Ideas
There are times you do not need to be a famous painter or an art professional to create beautiful wall art. Canvas painting is an all-in-one application for all skill levels, from beginners to experts. It also provides you with different painting ideas ranging from beach scenes to abstract designs to create pieces that look stunning and professional.
We have compiled a list of canvas aesthetic painting ideas to help you begin your journey as an aesthetic cartoon painter. Look through the images to determine which ones match the style of painting you wish to add to your drawing and get inspiration to create your designs.
01Disney Canvas Art
These are aesthetic cartoon painting ideas relating to 2020 Disney Canvas Art. You can get ideas from this to begin your journey into the world of painting.

02Hippie Painting Canva Art
If you are also looking for other aesthetic cartoon painting ideas to choose from, you can select from this 2020 Cute Canvas Paintings “Hippie Painting” Canvas Art.

03Spongebob Painting
These painting ideas are a part of the Canvas Aesthetic Cartoon Painting ideas of 2020 called Spongebob Painting Disney Canvas Art.

04Babs Bunny Pa Et Mini Lerret
These are a painting about “Babs Bunny Pa Et Mini Lerret.” A 2020 Mini Canvas Art Hippie Painting Canvas idea that you can choose from

Part 2 Blender Aesthetic Painting Ideas
Blender is an accessible and open-source 3D creation suite that supports the entirety of the 3D pipeline modeling, rigging, animation, simulation, compositing rendering, motion tracking, video editing, and 2D animation pipeline. It is a fact that this is one of the best open-source software you can choose from to make your aesthetic cartoon drawing.
It is entirely free software, and various artists can use it to start digging in and playing with it. Here are some of the blender aesthetic cartoon painting ideas you can choose from:
01Princess Ira and Amina
This is a fictional aesthetic drawing cartoon of an African princess having gold gifted powers with her face painting inspired by Nigerian traditional face decorations. However, her crown is adorned with crosses, crystals, and chains which incorporate several elements from different cultural designs available from all over the world to portray unity.

02Survival Knife Weekly Drills 045
This was a design painting inspired based on BUCK KNIVES in pain texturing and focuses on making a practical game-ready asset.

03Radiance
This is a blender aesthetic cartoon painting idea of a graduation project made for the Concept Art specialized cursus at New3dge School.

04 The character looks dev
This blender cartoon painting’s inspiration came from Edward, the short film’s main character. It is a work in progress but a lovely painting that can inspire you.
Part 3 How to Create Super-Detailed Aesthetic Cartoon Painting
To create a super detailed aesthetic cartoon drawing, you do not need to be a trained artist, nor do you need a fancy cartoon picture maker. All you need to create a cartoon painting photo is a simple and Free picture from a cartoon editor to help you carry out the task more effectively.
However, you can also convert your cartoon paint into creative animation using Wondershare Filmora Video Editor . Filmora is a powerful all-in-one tool for editing that you can use to that can be used for free to animate your cartoon with its tons of effects, filters, and keyframing features that can help you carry this out effectively.
For Win 7 or later (64-bit)
For macOS 10.12 or later
Here is how to create a super detailed aesthetic cartoon painting:

Step 1: Open the Picsart editor on your desktop browser and click on the new project
Step 2: Next is to click on Upload to select the photo that you want to cartoon paint from the computer library of your hard drive
Step 2: Click on the toolbar, select the effect feature from the dropdown above your photo, and click on Magic to view all available one-click cartoon filters. However, almost all of the Magic effects on this editor will help you achieve an aesthetic cartoon photo effect.
Step 4: Click on Adjust and Blend above your photo workspace on the editor. This will help you manually adjust the effects (color burn, fade, saturation, brightness, etc.).
Step 5: Preview your result and once you are happy with the new cartoon photo painting, click on the Share button and download it from the top right corner of the editor to save it on your device.
● Ending Thoughts →
● This article explained creating and gave inspiration and ideas for the aesthetic cartoon painting you can choose from to make yours. In addition, the report also recommends Filmora as an influential editor if you intend to create an animation from your cartoon painting due to its tons of features.
● So, now you can start building your aesthetic drawings and cartoons!
When you are trying to make an aesthetic drawings cartoon, the primary thing to focus on is the composition. Composition is the combination, arrangement, and organization of objects within the borders of drawing space. To have a great aesthetic cartoon drawing, you must focus on bringing the eyes of the viewer toward your center of interest within an aesthetically-pleasing composition. When we create illustrations, we are often concerned with putting in a lot of details that will overload the image and lose the meaning that we originally wanted it to convey.
We engage our audience and viewer more by composing a perfect aesthetic drawing. In addition, many rules define a good composition drawing, but these rules are mainly guidelines. Also pay attention to your personal preferences and instincts. In this guide, we’ll teach you how to make an excellent aesthetic cartoon painting more understandable.
In this article
01 [Canvas Aesthetic Painting Ideas](#Part 1)
02 [Blender Aesthetic Painting Ideas](#Part 2)
03 [How to Create Super-Detailed Aesthetic Cartoon Painting](#Part 3)
Part 1 Canvas Aesthetic Painting Ideas
There are times you do not need to be a famous painter or an art professional to create beautiful wall art. Canvas painting is an all-in-one application for all skill levels, from beginners to experts. It also provides you with different painting ideas ranging from beach scenes to abstract designs to create pieces that look stunning and professional.
We have compiled a list of canvas aesthetic painting ideas to help you begin your journey as an aesthetic cartoon painter. Look through the images to determine which ones match the style of painting you wish to add to your drawing and get inspiration to create your designs.
01Disney Canvas Art
These are aesthetic cartoon painting ideas relating to 2020 Disney Canvas Art. You can get ideas from this to begin your journey into the world of painting.
02Hippie Painting Canva Art
If you are also looking for other aesthetic cartoon painting ideas to choose from, you can select from this 2020 Cute Canvas Paintings “Hippie Painting” Canvas Art.
03Spongebob Painting
These painting ideas are a part of the Canvas Aesthetic Cartoon Painting ideas of 2020 called Spongebob Painting Disney Canvas Art.
04Babs Bunny Pa Et Mini Lerret
These are a painting about “Babs Bunny Pa Et Mini Lerret.” A 2020 Mini Canvas Art Hippie Painting Canvas idea that you can choose from
Part 2 Blender Aesthetic Painting Ideas
Blender is an accessible and open-source 3D creation suite that supports the entirety of the 3D pipeline modeling, rigging, animation, simulation, compositing rendering, motion tracking, video editing, and 2D animation pipeline. It is a fact that this is one of the best open-source software you can choose from to make your aesthetic cartoon drawing.
It is entirely free software, and various artists can use it to start digging in and playing with it. Here are some of the blender aesthetic cartoon painting ideas you can choose from:
01Princess Ira and Amina
This is a fictional aesthetic drawing cartoon of an African princess having gold gifted powers with her face painting inspired by Nigerian traditional face decorations. However, her crown is adorned with crosses, crystals, and chains which incorporate several elements from different cultural designs available from all over the world to portray unity.
02Survival Knife Weekly Drills 045
This was a design painting inspired based on BUCK KNIVES in pain texturing and focuses on making a practical game-ready asset.
03Radiance
This is a blender aesthetic cartoon painting idea of a graduation project made for the Concept Art specialized cursus at New3dge School.
04 The character looks dev
This blender cartoon painting’s inspiration came from Edward, the short film’s main character. It is a work in progress but a lovely painting that can inspire you.
Part 3 How to Create Super-Detailed Aesthetic Cartoon Painting
To create a super detailed aesthetic cartoon drawing, you do not need to be a trained artist, nor do you need a fancy cartoon picture maker. All you need to create a cartoon painting photo is a simple and Free picture from a cartoon editor to help you carry out the task more effectively.
However, you can also convert your cartoon paint into creative animation using Wondershare Filmora Video Editor . Filmora is a powerful all-in-one tool for editing that you can use to that can be used for free to animate your cartoon with its tons of effects, filters, and keyframing features that can help you carry this out effectively.
For Win 7 or later (64-bit)
For macOS 10.12 or later
Here is how to create a super detailed aesthetic cartoon painting:
Step 1: Open the Picsart editor on your desktop browser and click on the new project
Step 2: Next is to click on Upload to select the photo that you want to cartoon paint from the computer library of your hard drive
Step 2: Click on the toolbar, select the effect feature from the dropdown above your photo, and click on Magic to view all available one-click cartoon filters. However, almost all of the Magic effects on this editor will help you achieve an aesthetic cartoon photo effect.
Step 4: Click on Adjust and Blend above your photo workspace on the editor. This will help you manually adjust the effects (color burn, fade, saturation, brightness, etc.).
Step 5: Preview your result and once you are happy with the new cartoon photo painting, click on the Share button and download it from the top right corner of the editor to save it on your device.
● Ending Thoughts →
● This article explained creating and gave inspiration and ideas for the aesthetic cartoon painting you can choose from to make yours. In addition, the report also recommends Filmora as an influential editor if you intend to create an animation from your cartoon painting due to its tons of features.
● So, now you can start building your aesthetic drawings and cartoons!
How I Animate Discord Profile Pictures
How I Animate Discord Profile Pictures (& You Can Too)
An easy yet powerful editor
Numerous effects to choose from
Detailed tutorials provided by the official channel
Some users are still unaware of the fact that they can change the discord profile photo. If you are looking forward to the same, then you are on the right page.
Here we will discuss the process helpful for animating Discord profile pictures in just a few simple steps. Let’s get started!
In this article
01 [Where Can I Get Animated Avatar for Discord?](#Part 1)
02 [How to Get an Animated Profile Picture on Discord](#Part 2)
03 [Some Other Useful Tips to Improve Your Image Animate](#Part 3)
Part 1 Where Can I Get an Animated Avatar for Discord?
In this section, we will discuss how you can animate a PFP and how to get an animated avatar for Discord.
How Do You Animate a PFP?
The steps you need to follow to animate a PFP are:
Step 1: Firstly, you need to decide on what character you want to have as PFP. It can be a cartoon character, a painting, an illustration etc.
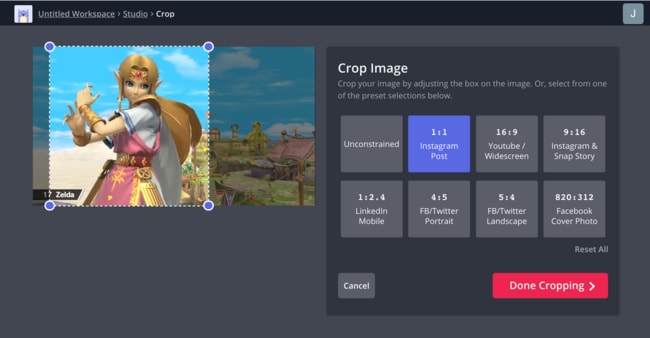
Step 2: Now, choose an online tool and begin to edit your image. When you upload the image, make sure to crop it to square. Please note that you need to make your image circle. So now, look for the rounded corner option and give the image the desired shape.
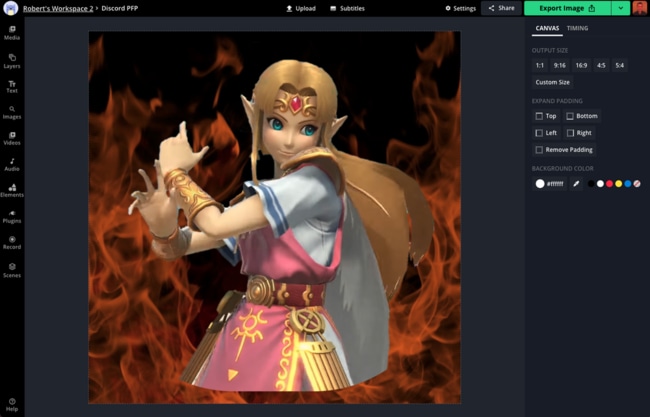
Step 3: It’s time to be creative with the image now. You can remove background, erase or add text and even add a background that suits your avatar. The customization depends all on your requirement. This is it. Now, you need to know how you can get an animated avatar on Discord.
Part 2 How to Get an Animated Profile Picture on Discord
If you are confused about how you will be able to get an animated profile picture on Discord, don’t worry at all. The steps are as follows:
Step 1: To get an animated discord profile picture, you will need to have Nitro. Otherwise the profile picture won’t save as animated. Also, if you use PC for this, things will be better. Now, open the desktop version of Discord.
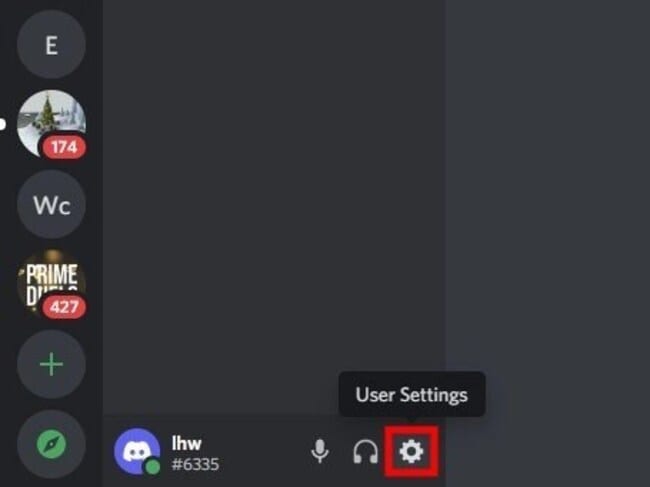
Step 2: Login to your account and go to User Settings by clicking the gear icon given next to your profile picture.
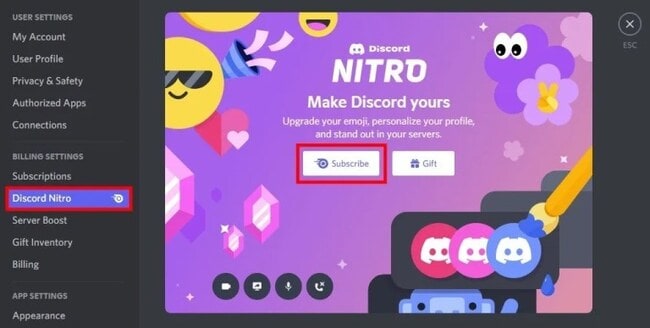
Step 3: In Settings, multiple options will be visible. You need to look for the “Discord Nitro” option. Clicking on this will lead you to Discord Nitro page.
Note: You need to click on “Subscribe” if you don’t have Discord Nitro.
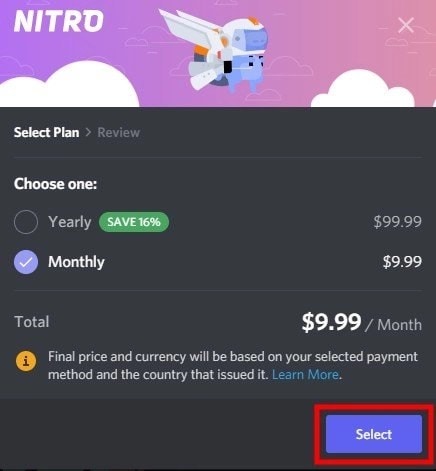
Step 4: Choose the plan once you subscribe. Hit on “Select” after choosing it.
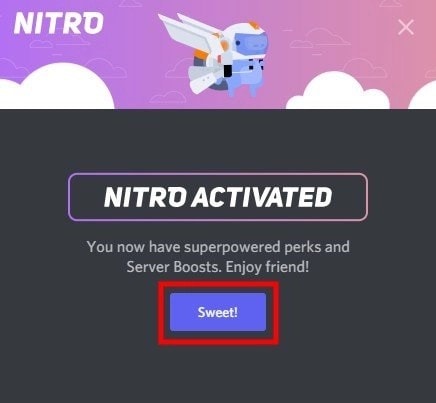
Step 5: Pay for it using the desired payment method. Enter your address and agree to the terms and conditions of Discord. After all the formalities are done, please click on “Sweet”. This will complete the subscription.
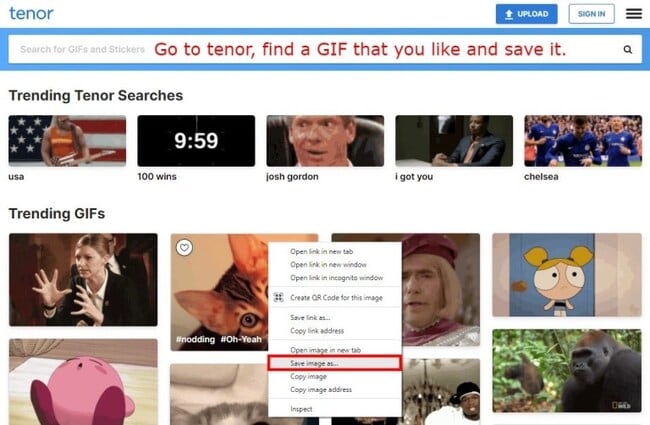
Step 6: Now, head to the GIF website like Tenor and choose the GIF that you like. Download it. You can right click on the GIF and click “Save Image as…” to get it.
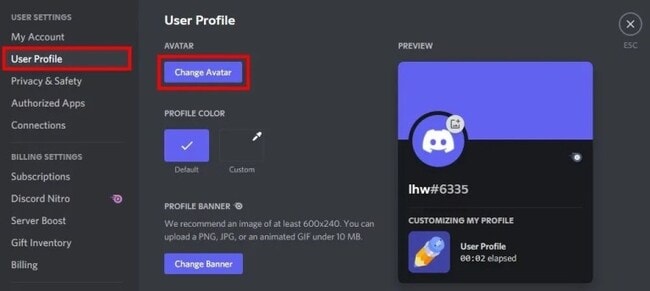
Step 7: After saving the GIF, go to the Settings of your Discord account. Hit on “User Profile” followed by “Change Avatar”.
Step 8: The dialog box will open where you need to find the GIF you just saved. After finding the GIF, click on “Open”.
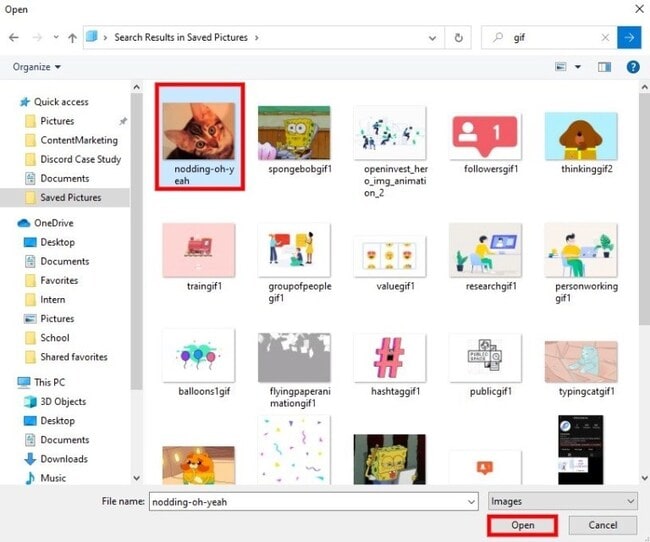
Note: You can take the animated avatar that you created yourself by using the steps in the previous part.
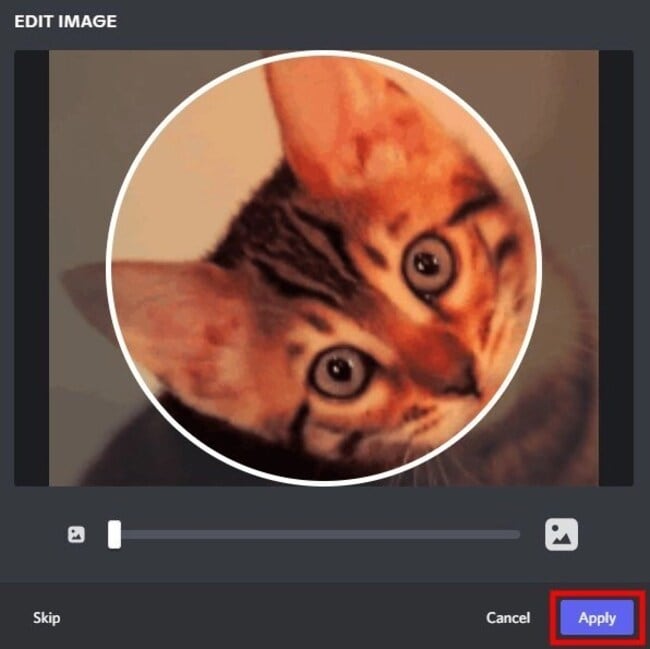
Step 9: Now, you will get to the Discord profile picture page. Here, you need to resize the GIF. Click on “Apply” when you are satisfied with the resizing or you can skip it too.
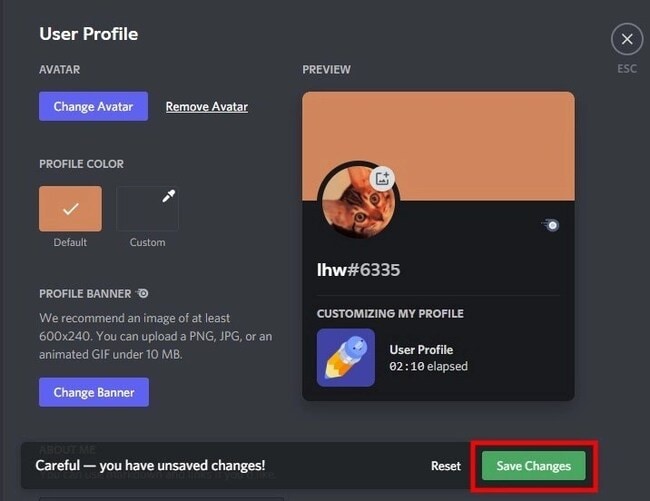
Step 10: Save the changes and you are good to go!
Part 3 Some Other Useful Tips to Improve Your Image Animate
If you’re wondering how to improve image animation, we’ve got some pointers for you. We all know that nitro is expensive and not everyone can get it for animating images. If you’re thinking the same thing, we’ve got the best tools for you right here.
Tools to consider for animating and improving the image:
01Adobe Spark
Adobe Spark is also among the best logo animation makers available and comes with the best features. It gives the final touch to the logo or video you have created. When you wish to animate your profile picture for Discord, the same can be done easily with it. The collection available on it is really very cool, and selecting from it can be an amazing experience. The templates are divided into categories along with the tabular ones so that you can choose them as per your requirements.
02Renderforest
Renderforest is also among the most loved software or applications loved by people around the world. It is helpful in creating logo animations too, for free. You can also choose from different templates available and customise them accordingly. Also, giving the animated effect to the logo is really very easy. If you wish to edit the logo, the same can be done easily. The major feature making it more appealing today is the transition effect, which is helpful in transforming a normal 2D logo into a 3D effect.

03Free Design logo
Free Design logo is an online application that always rules out the list. It features a 3D animation logo maker that is available for free. It has some logo samples and a catalogue available that are helpful for users to create excellent logos easily. Moreover, the templates available can be customised as per the need for stop. A user needs to download the application and, after it, they can have access to all the examples available for 3D logos.
04Tube arsenal
Tube Arsenal is also a famous application for users whenever they wish to animate a logo for their company. The interface appears to be similar to Renderforest, but the features are quite advanced. There is no technical knowledge required for using the same because it comes with an easy-to-use interface and templates that will be helpful in creating the logo of your choice.
Creative logo tips:
Some tips you can keep in mind while creating logo are as follows:
● Be specific to your brand. Be sure that you are not choosing a logo that may deviate customers from your brand perspective.
● Always choose colors in contrast because a single color logo does not seem to be appealing.
● Make sure to choose a template that is easy to understand. If the template seems to be difficult to understand, a user will not be able to get it.
● Create a logo with the minimum design because excessive design will make it tacky.
● Be sure not to add extra icons to the logo. This can be troublesome and make the logo unappealing.
● Go for white or a dark shade of background, because this will be helpful in making the text more visible.
Part 1 How to add an animated image/DP to WhatsApp?
Unfortunately, if you are looking forward to setting up an animated image on WhatsApp, it is not possible. The WhatsApp algorithm has been designed in such a manner that you can only use static images that is in JPG format. If the format is not the same, you can’t use it as the image over WhatsApp.
Key Takeaways from This Episode
● Nitro is helpful in setting up the animated image for discord.
● Filmora Pro is the best tool for editing images and animating them.
● WhatsApp doesn’t entertain setting up animated images over DP.
Some users are still unaware of the fact that they can change the discord profile photo. If you are looking forward to the same, then you are on the right page.
Here we will discuss the process helpful for animating Discord profile pictures in just a few simple steps. Let’s get started!
In this article
01 [Where Can I Get Animated Avatar for Discord?](#Part 1)
02 [How to Get an Animated Profile Picture on Discord](#Part 2)
03 [Some Other Useful Tips to Improve Your Image Animate](#Part 3)
Part 1 Where Can I Get an Animated Avatar for Discord?
In this section, we will discuss how you can animate a PFP and how to get an animated avatar for Discord.
How Do You Animate a PFP?
The steps you need to follow to animate a PFP are:
Step 1: Firstly, you need to decide on what character you want to have as PFP. It can be a cartoon character, a painting, an illustration etc.
Step 2: Now, choose an online tool and begin to edit your image. When you upload the image, make sure to crop it to square. Please note that you need to make your image circle. So now, look for the rounded corner option and give the image the desired shape.
Step 3: It’s time to be creative with the image now. You can remove background, erase or add text and even add a background that suits your avatar. The customization depends all on your requirement. This is it. Now, you need to know how you can get an animated avatar on Discord.
Part 2 How to Get an Animated Profile Picture on Discord
If you are confused about how you will be able to get an animated profile picture on Discord, don’t worry at all. The steps are as follows:
Step 1: To get an animated discord profile picture, you will need to have Nitro. Otherwise the profile picture won’t save as animated. Also, if you use PC for this, things will be better. Now, open the desktop version of Discord.
Step 2: Login to your account and go to User Settings by clicking the gear icon given next to your profile picture.
Step 3: In Settings, multiple options will be visible. You need to look for the “Discord Nitro” option. Clicking on this will lead you to Discord Nitro page.
Note: You need to click on “Subscribe” if you don’t have Discord Nitro.
Step 4: Choose the plan once you subscribe. Hit on “Select” after choosing it.
Step 5: Pay for it using the desired payment method. Enter your address and agree to the terms and conditions of Discord. After all the formalities are done, please click on “Sweet”. This will complete the subscription.
Step 6: Now, head to the GIF website like Tenor and choose the GIF that you like. Download it. You can right click on the GIF and click “Save Image as…” to get it.
Step 7: After saving the GIF, go to the Settings of your Discord account. Hit on “User Profile” followed by “Change Avatar”.
Step 8: The dialog box will open where you need to find the GIF you just saved. After finding the GIF, click on “Open”.
Note: You can take the animated avatar that you created yourself by using the steps in the previous part.
Step 9: Now, you will get to the Discord profile picture page. Here, you need to resize the GIF. Click on “Apply” when you are satisfied with the resizing or you can skip it too.
Step 10: Save the changes and you are good to go!
Part 3 Some Other Useful Tips to Improve Your Image Animate
If you’re wondering how to improve image animation, we’ve got some pointers for you. We all know that nitro is expensive and not everyone can get it for animating images. If you’re thinking the same thing, we’ve got the best tools for you right here.
Tools to consider for animating and improving the image:
01Adobe Spark
Adobe Spark is also among the best logo animation makers available and comes with the best features. It gives the final touch to the logo or video you have created. When you wish to animate your profile picture for Discord, the same can be done easily with it. The collection available on it is really very cool, and selecting from it can be an amazing experience. The templates are divided into categories along with the tabular ones so that you can choose them as per your requirements.
02Renderforest
Renderforest is also among the most loved software or applications loved by people around the world. It is helpful in creating logo animations too, for free. You can also choose from different templates available and customise them accordingly. Also, giving the animated effect to the logo is really very easy. If you wish to edit the logo, the same can be done easily. The major feature making it more appealing today is the transition effect, which is helpful in transforming a normal 2D logo into a 3D effect.
03Free Design logo
Free Design logo is an online application that always rules out the list. It features a 3D animation logo maker that is available for free. It has some logo samples and a catalogue available that are helpful for users to create excellent logos easily. Moreover, the templates available can be customised as per the need for stop. A user needs to download the application and, after it, they can have access to all the examples available for 3D logos.
04Tube arsenal
Tube Arsenal is also a famous application for users whenever they wish to animate a logo for their company. The interface appears to be similar to Renderforest, but the features are quite advanced. There is no technical knowledge required for using the same because it comes with an easy-to-use interface and templates that will be helpful in creating the logo of your choice.
Creative logo tips:
Some tips you can keep in mind while creating logo are as follows:
● Be specific to your brand. Be sure that you are not choosing a logo that may deviate customers from your brand perspective.
● Always choose colors in contrast because a single color logo does not seem to be appealing.
● Make sure to choose a template that is easy to understand. If the template seems to be difficult to understand, a user will not be able to get it.
● Create a logo with the minimum design because excessive design will make it tacky.
● Be sure not to add extra icons to the logo. This can be troublesome and make the logo unappealing.
● Go for white or a dark shade of background, because this will be helpful in making the text more visible.
Part 1 How to add an animated image/DP to WhatsApp?
Unfortunately, if you are looking forward to setting up an animated image on WhatsApp, it is not possible. The WhatsApp algorithm has been designed in such a manner that you can only use static images that is in JPG format. If the format is not the same, you can’t use it as the image over WhatsApp.
Key Takeaways from This Episode
● Nitro is helpful in setting up the animated image for discord.
● Filmora Pro is the best tool for editing images and animating them.
● WhatsApp doesn’t entertain setting up animated images over DP.
How to Convert Video to GIF (Fast & Easy!)
How to Convert Video to GIF (Fast & Easy!)
An easy yet powerful editor
Numerous effects to choose from
Detailed tutorials provided by the official channel
The use of GIFs has increased over time and not only on social media platforms, these interesting animations are used for various purposes like marketing, blogging, WhatsApp chats, and much more.

Though there are several online sites from where you can download the desired GIF, there is also an option to create a customized one using videos of images. So, if you too are keen to create a customized GIF, the article will look after your concerns. Learn how to make video to GIF Photoshop and using other tools. Keep reading!!
In this article
01 [Simple Alternative to Photoshop for creating a GIF from Videos- Wondershare Filmora](#Part 1)
02 [Simple Alternative to Photoshop for creating a GIF from Videos- Wondershare Filmora](#Part 2)
Part 1 Creating GIFs from videos using Photoshop
When it comes to any type of video editing task, the first software that comes to mind is Photoshop. Developed by Adobe, this is an excellent editing tool available for Windows and Mac. The software comes loaded with a wide range of functions that help you create desired graphics including GIFs.
Though the interface and the use of the software are a little complicated, once you get a hang of it, professional-looking files can be created in no time.
Steps to convert video to GIF Photoshop
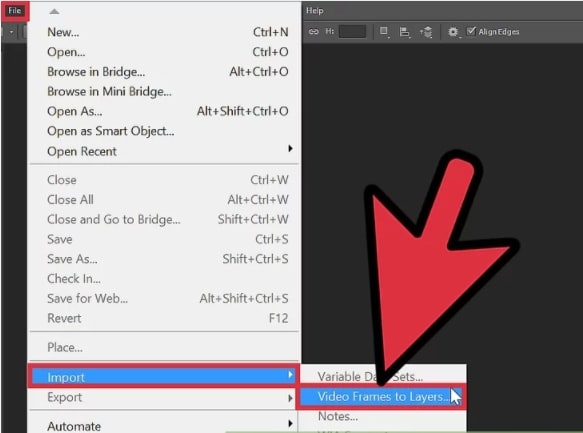
Step 1. Launch the Photoshop software on your system and select File > Import. Next tap on the “Video Frames to Layers” option. Choose the desired video (compatible format) and tap on Load.
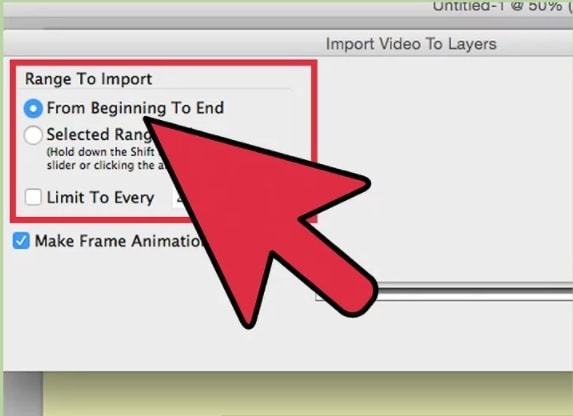
Step 2. Next, you need to select the Range to Import. For a few frames, choose the “Selected Frames Only” option.
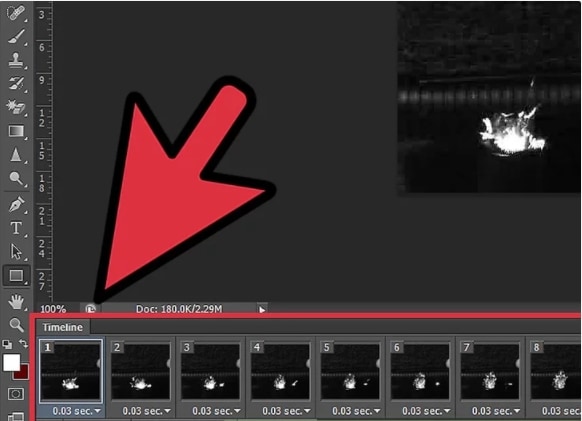
Step 3. You now need to cut the frames that are not needed by going to Window and then selecting the Animation. If needed, new frames can also be added here.
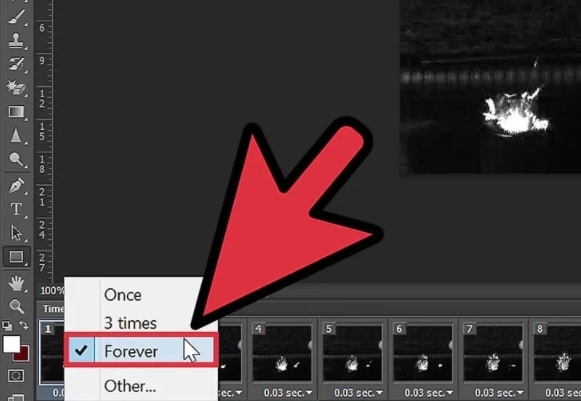
Step 4. To make your animation loop forever, select Forever from the bottom left side of the animation frames.
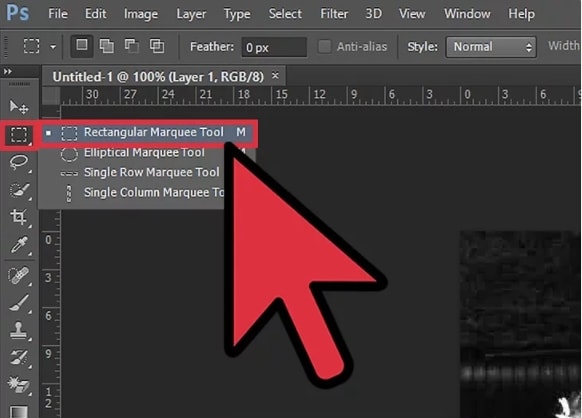
Step 5. Next, at the upper-left corner, go to the Rectangle marquee tool and choose the section you wish to focus on
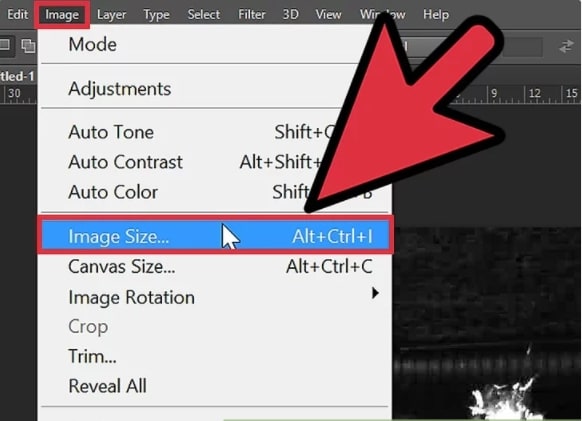
Step 6. Select the image size of the video that will make your GIF look appealing.
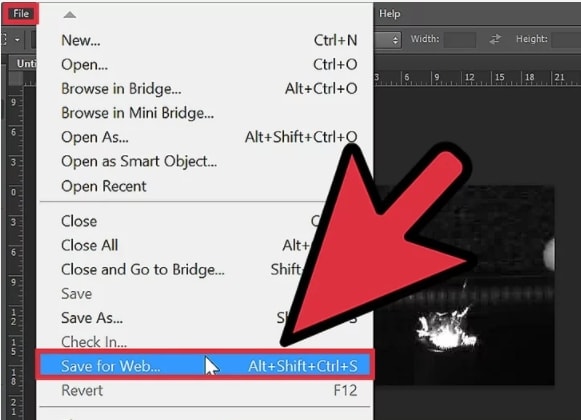
Step 7. Next, go to File > Save for Web & Devices for optimizing the image.
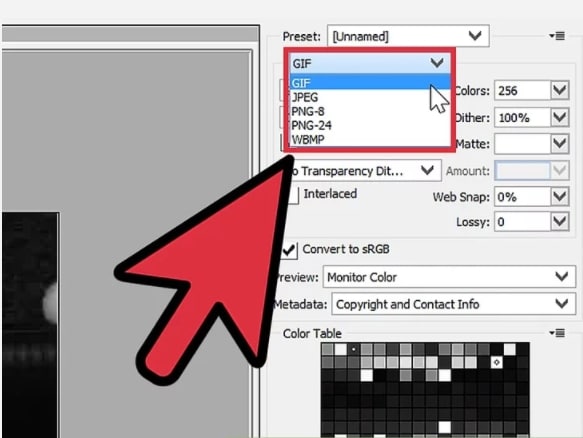
Step 8. Now select GIF at the preset section and check if the animation created is right by clicking on the Preview button.
Step 9. Finally, when all is done, click on the Save button and give a desired name to the file.
With the above steps you can make gif from video Photoshop.
Part 2 Simple Alternative to Photoshop for creating a GIF from Videos- Wondershare Filmora
The learning curve of Photoshop is quite steep and to create a GIF from videos using the tool is a complicated process involving multiple steps and especially if you are a beginner and have no prior experience of working with Photoshop software.
So, if you are looking for an alternative that is simple and fast, we suggest Wondershare Filmora Video Editor as the best option.
Wondershare Filmora
Get started easily with Filmora’s powerful performance, intuitive interface, and countless effects!
Try It Free Try It Free Try It Free Learn More >

Using the software videos and images in all key formats can be added to the interface for creating GIF animations. An array of editing options is available like cropping, splitting, rotating, cutting, and more. You can even add text, sound, effects, and other elements for further customization.
In a few simple steps, the software will let you create GIFs of high quality that can be used on several social media and other online platforms.
Steps to create GIF using Wondershare Filmora
Step 1. Download, install, and launch the Wondershare Filmora software on your system and then browse to import the media files from which you want to create a GIF.
Step 2. After the files are added to the interface, move them to the timeline at the bottom by dragging and dropping.
Step 3. Using the editing options you can trim, crop, rotate, and perform other functions.
Step 4. You can even add text, effects, and other elements for further customization.
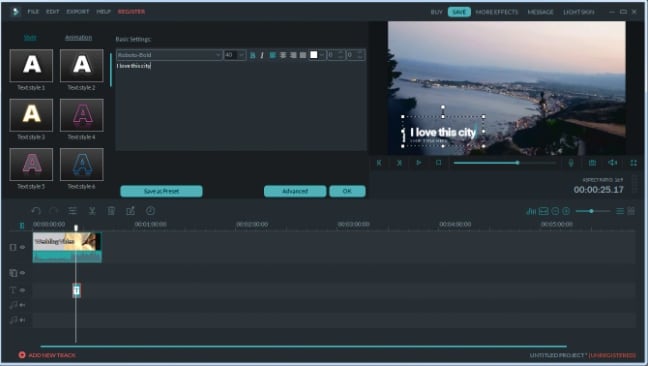
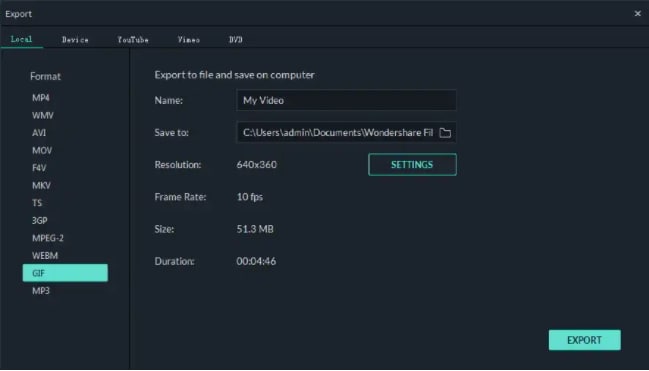
Step 5. Next, choose to save the created file as GIF under the Local tab. Choose the file name and the location, and then finally tap on the EXPORT button to start the processing.
● Key Takeaways from This Episode →
●GIFs are the latest trend that is used all over social media and other online sites.
●Several software and tools can help in creating the desired GIF.
●Adobe Photoshop is one of the widely used software that can create a GIF using videos as well as images, but the process is quite complicated.
●For a simpler and quicker process of creating a GIF, we suggest using Wondershare Filmora.
The use of GIFs has increased over time and not only on social media platforms, these interesting animations are used for various purposes like marketing, blogging, WhatsApp chats, and much more.
Though there are several online sites from where you can download the desired GIF, there is also an option to create a customized one using videos of images. So, if you too are keen to create a customized GIF, the article will look after your concerns. Learn how to make video to GIF Photoshop and using other tools. Keep reading!!
In this article
01 [Simple Alternative to Photoshop for creating a GIF from Videos- Wondershare Filmora](#Part 1)
02 [Simple Alternative to Photoshop for creating a GIF from Videos- Wondershare Filmora](#Part 2)
Part 1 Creating GIFs from videos using Photoshop
When it comes to any type of video editing task, the first software that comes to mind is Photoshop. Developed by Adobe, this is an excellent editing tool available for Windows and Mac. The software comes loaded with a wide range of functions that help you create desired graphics including GIFs.
Though the interface and the use of the software are a little complicated, once you get a hang of it, professional-looking files can be created in no time.
Steps to convert video to GIF Photoshop
Step 1. Launch the Photoshop software on your system and select File > Import. Next tap on the “Video Frames to Layers” option. Choose the desired video (compatible format) and tap on Load.
Step 2. Next, you need to select the Range to Import. For a few frames, choose the “Selected Frames Only” option.
Step 3. You now need to cut the frames that are not needed by going to Window and then selecting the Animation. If needed, new frames can also be added here.
Step 4. To make your animation loop forever, select Forever from the bottom left side of the animation frames.
Step 5. Next, at the upper-left corner, go to the Rectangle marquee tool and choose the section you wish to focus on
Step 6. Select the image size of the video that will make your GIF look appealing.
Step 7. Next, go to File > Save for Web & Devices for optimizing the image.
Step 8. Now select GIF at the preset section and check if the animation created is right by clicking on the Preview button.
Step 9. Finally, when all is done, click on the Save button and give a desired name to the file.
With the above steps you can make gif from video Photoshop.
Part 2 Simple Alternative to Photoshop for creating a GIF from Videos- Wondershare Filmora
The learning curve of Photoshop is quite steep and to create a GIF from videos using the tool is a complicated process involving multiple steps and especially if you are a beginner and have no prior experience of working with Photoshop software.
So, if you are looking for an alternative that is simple and fast, we suggest Wondershare Filmora Video Editor as the best option.
Wondershare Filmora
Get started easily with Filmora’s powerful performance, intuitive interface, and countless effects!
Try It Free Try It Free Try It Free Learn More >
Using the software videos and images in all key formats can be added to the interface for creating GIF animations. An array of editing options is available like cropping, splitting, rotating, cutting, and more. You can even add text, sound, effects, and other elements for further customization.
In a few simple steps, the software will let you create GIFs of high quality that can be used on several social media and other online platforms.
Steps to create GIF using Wondershare Filmora
Step 1. Download, install, and launch the Wondershare Filmora software on your system and then browse to import the media files from which you want to create a GIF.
Step 2. After the files are added to the interface, move them to the timeline at the bottom by dragging and dropping.
Step 3. Using the editing options you can trim, crop, rotate, and perform other functions.
Step 4. You can even add text, effects, and other elements for further customization.
Step 5. Next, choose to save the created file as GIF under the Local tab. Choose the file name and the location, and then finally tap on the EXPORT button to start the processing.
● Key Takeaways from This Episode →
●GIFs are the latest trend that is used all over social media and other online sites.
●Several software and tools can help in creating the desired GIF.
●Adobe Photoshop is one of the widely used software that can create a GIF using videos as well as images, but the process is quite complicated.
●For a simpler and quicker process of creating a GIF, we suggest using Wondershare Filmora.
How to Analyze an Editorial Cartoon
How to Analyze an Editorial Cartoon
An easy yet powerful editor
Numerous effects to choose from
Detailed tutorials provided by the official channel
We all remember opening our daily newspaper and seeing a graphical representation of some new scoop or story that gives you a gist of what is happening, usually involving humor or sarcasm. That is what one would call and editorial cartoon and they are quite popular amongst newspapers, internet blogs and most recently, Social Media.
Some would even say that ‘Memes’ are an evolved form of editorial cartoons. They are funny, entertaining and can even portray some type of story. Editorial cartoons, in layman terms are a graphical approach to reflect the creator’s ideas. These are usually drawn on a tight deadline; hence feature simple caricatures and whimsical characters.
Cartoonists and hobbyists around the world can save on time using online tools to bring their ideas to life. Today, with some help from the right technology, anybody can try their hands in drawing amazing characters, combining both visual and verbal languages.
If you are someone who feels they have an amazing idea for a cartoon but lacks the skills to draw one can choose from a plethora of tools like Powtown, Photoshop or AI Artist to create amazing sketches and drawing, in half the time.
In this article
01 [Always Be Timely — Editorial Cartoons in a Snap](#Part 1)
02 [The 8 Best Apps to Turn Photos Into Cartoons and Sketches](#Part 2)
03 [How to Make 3D Cartoon From a Photo](#Part 3)
Part 1 Always Be Timely — Editorial Cartoons in a Snap
When a new idea pops into your head, we are usually overwhelmed or excited by its prospects of it that we forget to analyze its features before proceeding to turn it into a cartoon. Here are some tips to help you look into the details of your cartoon.
● Make a note of all the characters in your cartoon strip, what actions are they involved in and the dialogues that are being uttered.
● From which angle or whose angle the story is being told.
● Divide the cartoon design into four quadrants; Top Right & Left, Bottom Right & Left.
● Pay attention to key elements such as use of furniture, tools, technology or signs.
● Define traits like time of day, time of the year or time in history where the context is set.
● Keep in mind the audience you are reaching out to. You can ensure reliability the subtle use of intellect and humour.
Now that you have a clearer picture of what you are trying to depict it is best not to delay the idea and start cracking your creative eggs.
Beginners can use an easy tool like Powtoon, and its simple drag and drop interface to start making cartoons in just three simple steps. You can save up on a lot of time and get your cartoon ready for uploading to your new blog post.
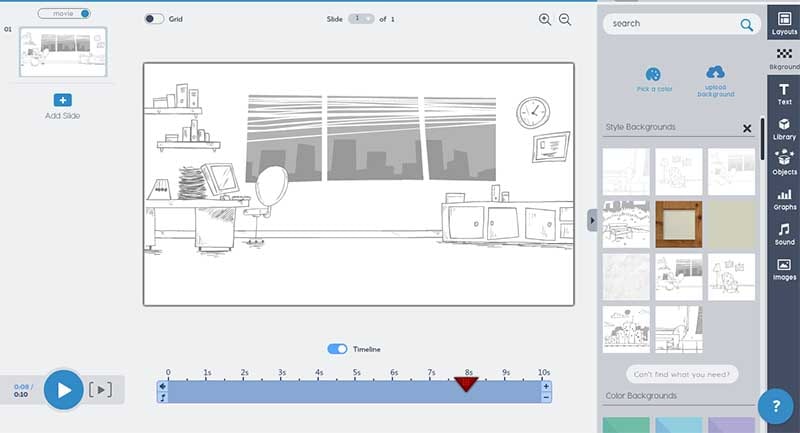
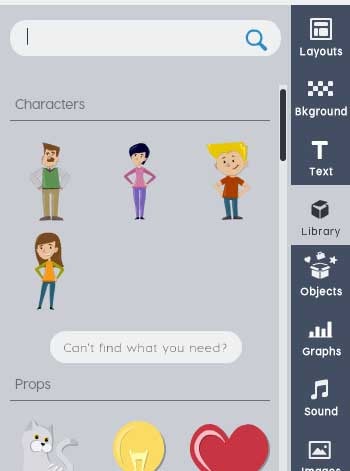
Step 1: Set a Background for your Cartoon
Open the Powtoon Studio on your system and click on ‘Backgrounds’ located on the panel to your right. It will open up a vast library filled with ready to use backgrounds.
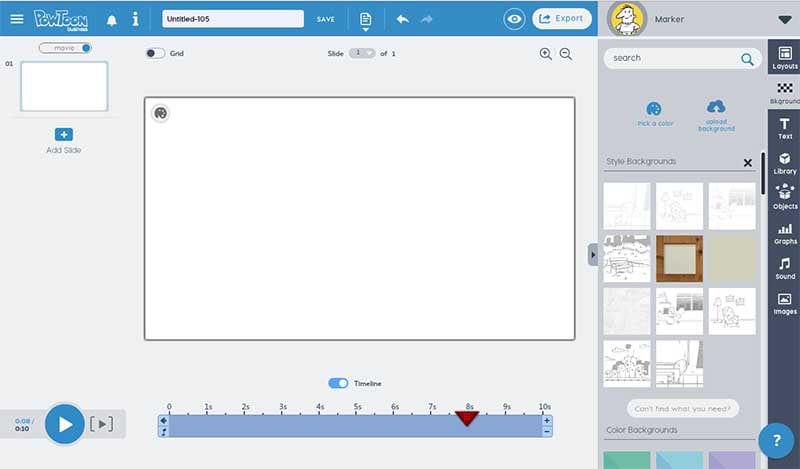
Select any you like to get started. It will intently appear on the board.
Step 2: Select the Characters for your Cartoon
Well, you have a setting and now it is time to place your characters in it. Click on the ‘Animated Character’ from the panel. Choose any template for your characters.
Step 3: Add the Text
There are various ways you can add dialogues, messages or texts to your cartoon. You can click on ‘Text’ and add a Quote Box or Dialogue Box. You can edit your text by simply clicking on the box.
Part 2 The 8 Best Apps to Turn Photos Into Cartoons and Sketches
01Photo Lab Picture Editor
Photolab is a great choice for turning your photos into a painting, sketch or a watercolor image. Along with filters you will get montages, borders and frames to make your art work more realistic. You will find all presets in the effects category. It also features filters like digital rain and jigsaw puzzle. Photolab can also be used as a photo editor as it is capable to perform color adjustment, rotate and crop.
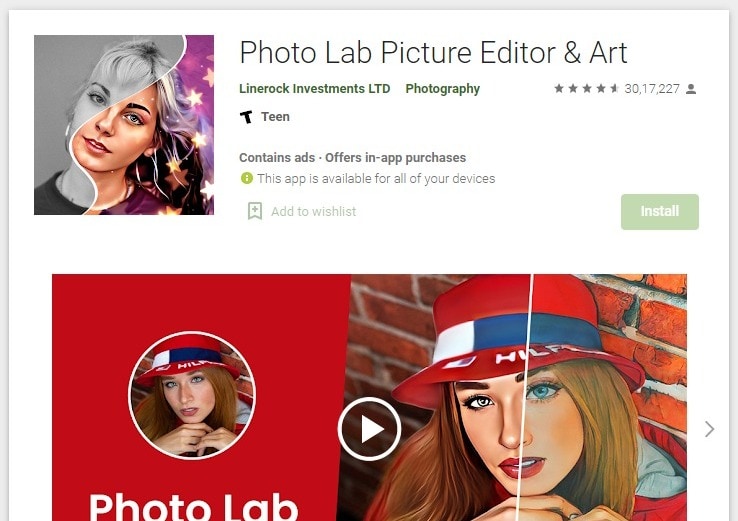
Key Features:
● 800+ effects.
● E-card templates for special occasions.
● You can choose a photo from gallery or click one using the camera app.
02Prisma Photo Editor
Prisma has the magical ability to turn your photo or sketch into a Van Gogh or Picasso style painting. Wondering how? It has filters that are inspired by the eminent artist around the world. Choose a photo from your gallery and choose from exciting filters. Prisma also have cool editing tools that help you adjust the intensity of the filters applied if you want to.
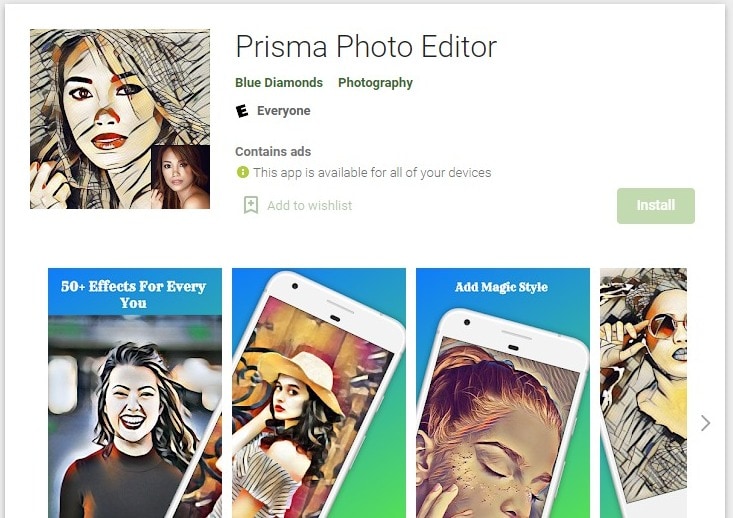
Key Features
● Online App community.
● Similar to Instagram
● artistic filters.
03Paint Lab – Photo Cartoon
Paintlab features an easy to use interface and wide range of filters. With it you can turn any photos into a cartoon or a drawing just in few seconds. Once you are done editing you can share your final work on any social media platform directly from paintlab. It is compatible only with androids.
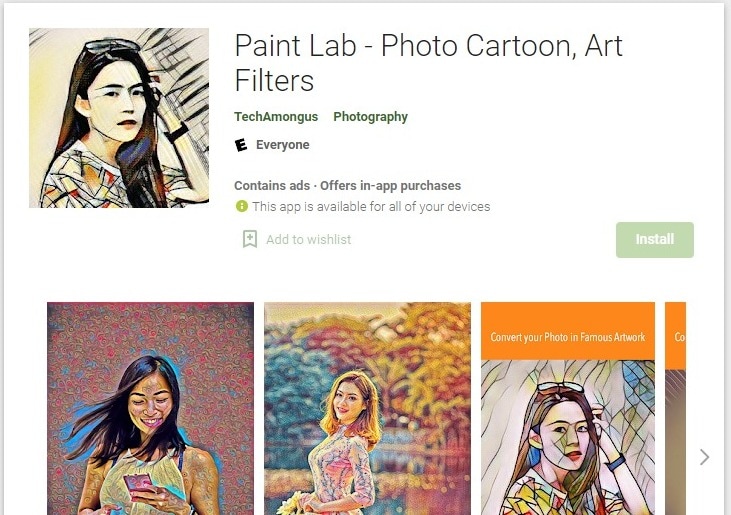
Key Fetaures
● Fast editing
● Perfect or beginners.
● Includes beautification and imperfection correction tools and effects.
04Cartoon Photo PRO
Using Cartoon Photo Pro alongside your photos you can also turn your videos into cartoon. Effects are artistic and customizable. Only downside it doesn’t come for free. It also has great ratings in Playstore.

Key Features
● User friendly interface
● Animates videos.
05Brushstroke
Brushstroke is ideal for editing and printing high resolution photos. The app comes with a paint directly option. It is not android compatible. The best feature is apart from filters and painting styles you can also pick the color palette and canvas surface.
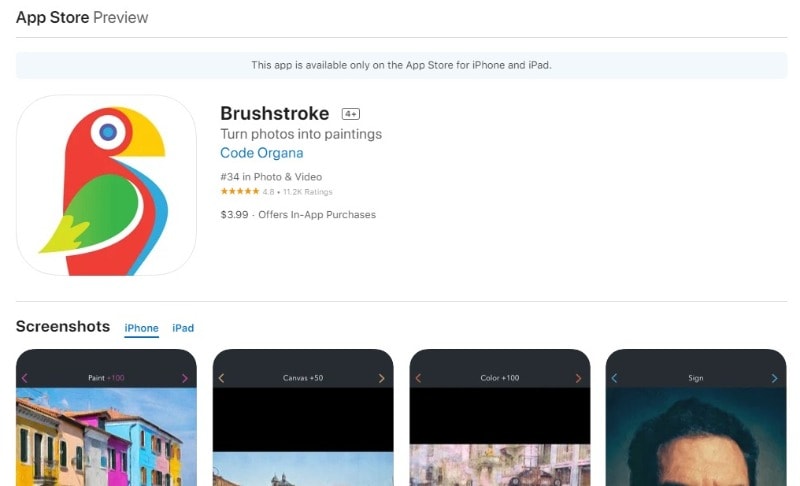
Key Features
● You can sign your photos before printing
● Wide range of styles and sub-styles.
06Clip2Comic
If you like having fun and playing around we bet you would love an photo editing app that turn your close ones’ photo into caricatures. One tap can give you comic-book style drawing and sketches. This is one of best sketch and animation apps suggested for iPhone users. User friendly interface is an added bonus.
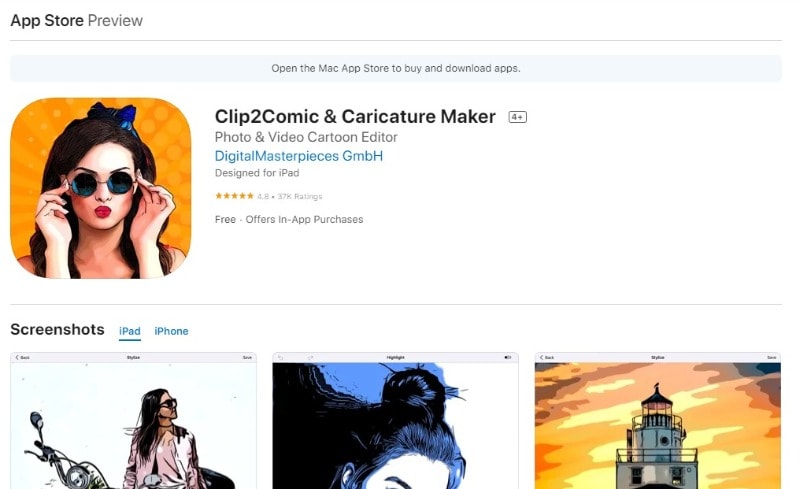
Key Features
● Live preview animation camera option.
● Carton-style photo effects.
07PhotoMania
PhotoMania is fun to use, if you want to try out different effects then you are at the right app. It has 400 presets in total including vintage looks and effects for sketches. PhotoMania has a collection of cool and exciting frames that you can add to your photos to make them more interesting. If you are someone who likes to send e-cards here you will get dozens of options. You can also utilize PhotoMania as a photo editor as it features the best exposure settings. And we know how important masking tool is, it helps you create neat photos, the app also has this amazing feature.
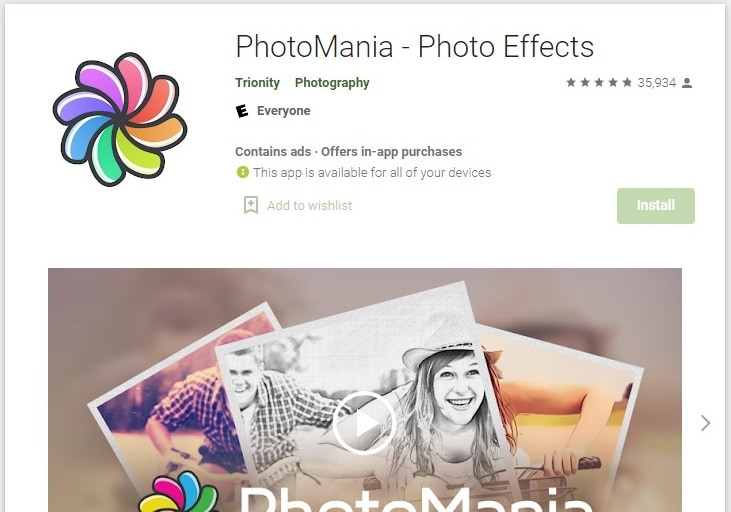
Key Features:
● Advanced photo editing tools and presets, for instance HDR and LOMO.
● It can also make your photo a painting.
● Adds textures and offers holiday templates.
08Toonme
Toonme has similar photo editing features like Clip2Comic. Only it is better. It has AI assistance that helps you create realistic effects. You can choose from the variety of styles and even tweak them to get a personalized style. Toonme is free to download but if you want use pro features you can subscribe to their monthly affordable package. Also, it is compatible with both iOS and Android devices.
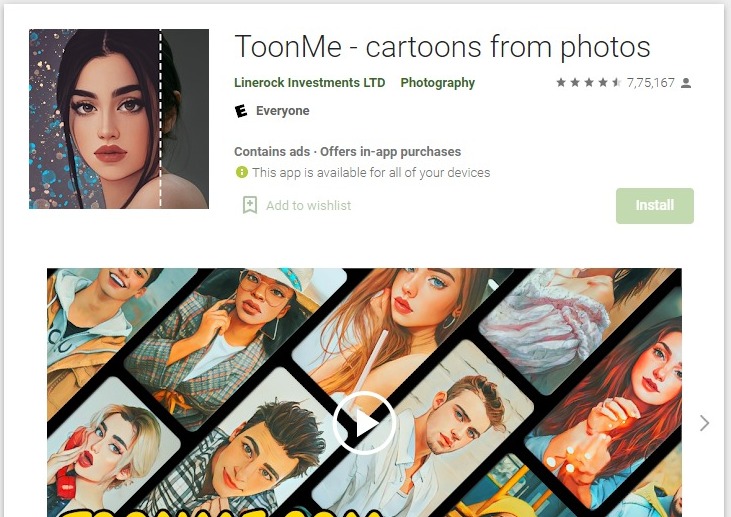
Key Features:
● Offers hand-drawn effects.
● Offers numerous layouts that goes well with profile pictures even instagram stories.
● You can share your work with other Toonme Users.
Part 3 How to Make 3D Cartoon From a Photo
Do you know that animators used to hand sketch every frame and every detail that too with continuation? Thanks to our modern day technology we can take a snap of any object or person and turn that into a cartoon within few seconds. With the right amount of help and creativity you can create characters that are entertaining and engaging at the same time. Wondershare Filmora Video Editor can be used to create animated videos. Amazing features and filters save editing time while making the entire process flexible. Though we have already mentioned eight apps for sketching, animating and caricaturing your photos, Filmora is a complete package. Motion tracking, easy zoom in and out, masking, panning and color correction are some of the best features offered by this editing software. It can run on both PC and Mac. User friendly interface suits both professionals as well as beginner.
For Win 7 or later (64-bit)
For macOS 10.12 or later
● Ending Thoughts →
● Creating an animated video that stands as an exception is now simple and hassle-free.
● Never be afraid to experiment and explore amazing ways of story-telling.
● Things discussed so far will help you analyze and understand cartoons and animation.
We all remember opening our daily newspaper and seeing a graphical representation of some new scoop or story that gives you a gist of what is happening, usually involving humor or sarcasm. That is what one would call and editorial cartoon and they are quite popular amongst newspapers, internet blogs and most recently, Social Media.
Some would even say that ‘Memes’ are an evolved form of editorial cartoons. They are funny, entertaining and can even portray some type of story. Editorial cartoons, in layman terms are a graphical approach to reflect the creator’s ideas. These are usually drawn on a tight deadline; hence feature simple caricatures and whimsical characters.
Cartoonists and hobbyists around the world can save on time using online tools to bring their ideas to life. Today, with some help from the right technology, anybody can try their hands in drawing amazing characters, combining both visual and verbal languages.
If you are someone who feels they have an amazing idea for a cartoon but lacks the skills to draw one can choose from a plethora of tools like Powtown, Photoshop or AI Artist to create amazing sketches and drawing, in half the time.
In this article
01 [Always Be Timely — Editorial Cartoons in a Snap](#Part 1)
02 [The 8 Best Apps to Turn Photos Into Cartoons and Sketches](#Part 2)
03 [How to Make 3D Cartoon From a Photo](#Part 3)
Part 1 Always Be Timely — Editorial Cartoons in a Snap
When a new idea pops into your head, we are usually overwhelmed or excited by its prospects of it that we forget to analyze its features before proceeding to turn it into a cartoon. Here are some tips to help you look into the details of your cartoon.
● Make a note of all the characters in your cartoon strip, what actions are they involved in and the dialogues that are being uttered.
● From which angle or whose angle the story is being told.
● Divide the cartoon design into four quadrants; Top Right & Left, Bottom Right & Left.
● Pay attention to key elements such as use of furniture, tools, technology or signs.
● Define traits like time of day, time of the year or time in history where the context is set.
● Keep in mind the audience you are reaching out to. You can ensure reliability the subtle use of intellect and humour.
Now that you have a clearer picture of what you are trying to depict it is best not to delay the idea and start cracking your creative eggs.
Beginners can use an easy tool like Powtoon, and its simple drag and drop interface to start making cartoons in just three simple steps. You can save up on a lot of time and get your cartoon ready for uploading to your new blog post.
Step 1: Set a Background for your Cartoon
Open the Powtoon Studio on your system and click on ‘Backgrounds’ located on the panel to your right. It will open up a vast library filled with ready to use backgrounds.
Select any you like to get started. It will intently appear on the board.
Step 2: Select the Characters for your Cartoon
Well, you have a setting and now it is time to place your characters in it. Click on the ‘Animated Character’ from the panel. Choose any template for your characters.
Step 3: Add the Text
There are various ways you can add dialogues, messages or texts to your cartoon. You can click on ‘Text’ and add a Quote Box or Dialogue Box. You can edit your text by simply clicking on the box.
Part 2 The 8 Best Apps to Turn Photos Into Cartoons and Sketches
01Photo Lab Picture Editor
Photolab is a great choice for turning your photos into a painting, sketch or a watercolor image. Along with filters you will get montages, borders and frames to make your art work more realistic. You will find all presets in the effects category. It also features filters like digital rain and jigsaw puzzle. Photolab can also be used as a photo editor as it is capable to perform color adjustment, rotate and crop.
Key Features:
● 800+ effects.
● E-card templates for special occasions.
● You can choose a photo from gallery or click one using the camera app.
02Prisma Photo Editor
Prisma has the magical ability to turn your photo or sketch into a Van Gogh or Picasso style painting. Wondering how? It has filters that are inspired by the eminent artist around the world. Choose a photo from your gallery and choose from exciting filters. Prisma also have cool editing tools that help you adjust the intensity of the filters applied if you want to.
Key Features
● Online App community.
● Similar to Instagram
● artistic filters.
03Paint Lab – Photo Cartoon
Paintlab features an easy to use interface and wide range of filters. With it you can turn any photos into a cartoon or a drawing just in few seconds. Once you are done editing you can share your final work on any social media platform directly from paintlab. It is compatible only with androids.
Key Fetaures
● Fast editing
● Perfect or beginners.
● Includes beautification and imperfection correction tools and effects.
04Cartoon Photo PRO
Using Cartoon Photo Pro alongside your photos you can also turn your videos into cartoon. Effects are artistic and customizable. Only downside it doesn’t come for free. It also has great ratings in Playstore.
Key Features
● User friendly interface
● Animates videos.
05Brushstroke
Brushstroke is ideal for editing and printing high resolution photos. The app comes with a paint directly option. It is not android compatible. The best feature is apart from filters and painting styles you can also pick the color palette and canvas surface.
Key Features
● You can sign your photos before printing
● Wide range of styles and sub-styles.
06Clip2Comic
If you like having fun and playing around we bet you would love an photo editing app that turn your close ones’ photo into caricatures. One tap can give you comic-book style drawing and sketches. This is one of best sketch and animation apps suggested for iPhone users. User friendly interface is an added bonus.
Key Features
● Live preview animation camera option.
● Carton-style photo effects.
07PhotoMania
PhotoMania is fun to use, if you want to try out different effects then you are at the right app. It has 400 presets in total including vintage looks and effects for sketches. PhotoMania has a collection of cool and exciting frames that you can add to your photos to make them more interesting. If you are someone who likes to send e-cards here you will get dozens of options. You can also utilize PhotoMania as a photo editor as it features the best exposure settings. And we know how important masking tool is, it helps you create neat photos, the app also has this amazing feature.
Key Features:
● Advanced photo editing tools and presets, for instance HDR and LOMO.
● It can also make your photo a painting.
● Adds textures and offers holiday templates.
08Toonme
Toonme has similar photo editing features like Clip2Comic. Only it is better. It has AI assistance that helps you create realistic effects. You can choose from the variety of styles and even tweak them to get a personalized style. Toonme is free to download but if you want use pro features you can subscribe to their monthly affordable package. Also, it is compatible with both iOS and Android devices.
Key Features:
● Offers hand-drawn effects.
● Offers numerous layouts that goes well with profile pictures even instagram stories.
● You can share your work with other Toonme Users.
Part 3 How to Make 3D Cartoon From a Photo
Do you know that animators used to hand sketch every frame and every detail that too with continuation? Thanks to our modern day technology we can take a snap of any object or person and turn that into a cartoon within few seconds. With the right amount of help and creativity you can create characters that are entertaining and engaging at the same time. Wondershare Filmora Video Editor can be used to create animated videos. Amazing features and filters save editing time while making the entire process flexible. Though we have already mentioned eight apps for sketching, animating and caricaturing your photos, Filmora is a complete package. Motion tracking, easy zoom in and out, masking, panning and color correction are some of the best features offered by this editing software. It can run on both PC and Mac. User friendly interface suits both professionals as well as beginner.
For Win 7 or later (64-bit)
For macOS 10.12 or later
● Ending Thoughts →
● Creating an animated video that stands as an exception is now simple and hassle-free.
● Never be afraid to experiment and explore amazing ways of story-telling.
● Things discussed so far will help you analyze and understand cartoons and animation.
How To Animate Graphics in Canva
Versatile Video Editor - Wondershare Filmora
An easy yet powerful editor
Numerous effects to choose from
Detailed tutorials provided by the official channel
Canva is a graphic design platform that allows users to create stunning designs for social media posts, presentations, assignments, recipe cards, birthday videos.
With the introduction of Canva’s animation feature, a whole new world of possibilities are open to the public. Also, with pre-designed templates from professional designers, content creation has never been easier than Canva.
Animations themselves have the option of being individually customized element by element. Canva animated graphics makes it easy to unleash your creative potential.
This article will explore how to animate graphics in Canva that can suit every occasion.
In this article
01 [Animate Your Graphic In Canva](#Part 1)
02 [Make A Moving Graphic In Canva](#Part 2)
03 [Pricing for Canva You Should Know](#Part 3)
Part 1 Animate Your Graphic In Canva
People can create animations in Canva in one of two ways. You can select an animation from one of the pre-existing animated templates. This is a time-saving option as it lets you customize ready-made templates to suit your needs
With the pre-set animation templates, you have the option to choose from among
● Invitations
● A4 Documents
● Instagram Post
● Facebook Post
● YouTube Thumbnails
● Presentation
● Flyer/Poster
● Instagram Logo
● Infographic
These options generate the ability to be presented in both portrait and landscape mode. The multitude of options makes it an ideal medium for you to create your animation. The animation options at Canva also come with the opportunity to animate an existing image.

You can choose to animate an existing design. With a few minor edits, you can have a polished and sophisticated post that’s bound to draw viewer attention and earn you kudos.
If this is the case, then you benefit from saving time and the expertise of a professional design team through Canva.
The second option is creating an animation by yourself. Creating your own animation offers you greater flexibility in executing your vision for the design. Without further ado, let’s look at how we can help this happen in the how to make a moving graphic in the Canva section.
Part 2 Make A Moving Graphic In Canva
Making a moving graphic in Canva is easy. Canva offers an “Animation” button that allows users to animate each element in the content. There are four areas that the graphic can touch upon for content. These areas are text, image, audio, and video.
Here’s how you can animate individual elements in Canva.
2.1 How to animate text in Canva?
With text, Canva offers three options. You can choose to create either a title text, a sub-heading text, or regular text for use. Play with different styles and fonts to find one that suits your design. You can also add details like stickers or illustrations to customize the design.
You are now ready to animate once you’re happy with the design. Text animations will help your text jump out from the background. Then choose the “Animate” option in the sidebar after clicking on the selected text.

Allow your font to move around your design with motion. Thanks to “animate,” you can choose between subtle, smooth movement and jagged and sudden motion. You can even mix and match animations for each word.
In Wondershare Filmora, a premier video editing software, the texts are available according to use. For instance, opening and ending credit texts as a template. With options for choosing subtitles, lower 3rds, and call-out templates.
Additionally, users can also save a particular setting as a “preset’. Which makes it easy to reuse the settings in future projects. You can also adjust the duration of the individual text display. It also has an animation option that allows animation of the text according to given presets.
2.2 How do you animate a picture in Canva?
Users have the ability to choose to animate just the image or animate other elements of the picture. They can also make use of options to edit the image using background remover. This allows seamless integration into the presentation.

Users can simply upload their photos. Choose a stock image or upload an image through your photo gallery to use in your design. You can also choose to use “frames,” which are available under the “Elements” tab in Canva.
Make your photo come alive by animating it. Choose from a variety of innovative animation possibilities by selecting the Animation tool. The duration of the animation can be changed using the stopwatch animation icon. It uses a slider to help in setting the duration of each animation. You can also adjust this manually.
2.3 How do you add music to animation in Canva?
Users can find a section dedicated to “Uploads,” allowing creators to use their audio content. The users can use a soundtrack from one of Canva’s audio libraries. This gives users control over their animation’s impact.
One difference between Canva and Wondershare Filmora is that Canva users can only use one audio per presentation. Filmora allows users to overlay multiple soundtracks to their timeline.
Users can also make use of the Audio Effects feature to create audio for “Echo,” “large room,” “small room,” “lobby,” and “phone.” The preview function can help users experience it live before applying the effect.
Filmora Pro’s Auto-Normalization of audio allows intelligent audio analysis and volume adjustment.
2.4 How do you animate video in Canva?
Canva offers presentations that are similar to the explainer-style videos on Youtube. With more modifications, you can convert the presentation to a video format. You can edit individual elements in the presentation to reflect the project details and outcomes.
You can also introduce transition effects to make the presentation a smooth video. Incorporating the three other elements will be a breeze to make a video with animation.

Another noteworthy thing in Canva is that users can upload their videos or use videos provided in the video library. You can also embed videos within a frame from the “Elements” section in Canva. You can trim the video input on the slide for time. It can be presented as a “loop” video.
Filmora offers all the essential video editing tools in addition to AI-powered features called Auto-Highlight and Auro-Reframe. Auto Highlight is a feature that extracts the highlights from a video clip autonomously.
This will save you time while cutting your movie. It also makes it easier to extract the best moments from the video.
Auto Reframe recognizes as well as crops the focal point of your footage, constantly retaining it in the frame. Your film’s primary action or object will never be out of focus within that technique.
Part 3 Pricing for Canva You Should Know
Canva can be used among a multitude of users and companies. The range of access is from a single person use to teams of fifty. It also allows for a custom selection of a number of people.
Canva can be used as free graphic design software. It does display all available options with a few possibilities marked off for Canva Pro users only.
Canva Pro allows up to 5 users per team. A subscription to Canva Pro costs US $119.99 per annum or US $12.99 per month. Pro users have access to unlimited content and newly released tools.
The only difference between Canva Pro and Canva Enterprise is that Canva Pro is for smaller teams. Canva Enterprise allows collaboration between larger teams and franchises.
Canva also offers free Canva Pro subscriptions to non-profit organizations. Students and teachers are offered a special discount for those in educational programs.
Wondershare Filmora
Get started easily with Filmora’s powerful performance, intuitive interface, and countless effects!
Try It Free Try It Free Try It Free Learn More >
AI Portrait – The best feature of Wondershare Filmora for gameplay editing
The AI Portrait is a new add-on in Wondershare Filmora. It can easily remove video backgrounds without using a green screen or chroma key, allowing you to add borders, glitch effects, pixelated, noise, or segmentation video effects.

Final Words
We’ve covered how to animate graphics in Canva. You can animate individual elements in Canva or automate it on the whole. Canva’s animate button is an automatic tool that revolutionizes the way traditional animation works.
Wondershare’s Filmora is the video editing tool that is easy to use and offer various animation options.
Canva is a graphic design platform that allows users to create stunning designs for social media posts, presentations, assignments, recipe cards, birthday videos.
With the introduction of Canva’s animation feature, a whole new world of possibilities are open to the public. Also, with pre-designed templates from professional designers, content creation has never been easier than Canva.
Animations themselves have the option of being individually customized element by element. Canva animated graphics makes it easy to unleash your creative potential.
This article will explore how to animate graphics in Canva that can suit every occasion.
In this article
01 [Animate Your Graphic In Canva](#Part 1)
02 [Make A Moving Graphic In Canva](#Part 2)
03 [Pricing for Canva You Should Know](#Part 3)
Part 1 Animate Your Graphic In Canva
People can create animations in Canva in one of two ways. You can select an animation from one of the pre-existing animated templates. This is a time-saving option as it lets you customize ready-made templates to suit your needs
With the pre-set animation templates, you have the option to choose from among
● Invitations
● A4 Documents
● Instagram Post
● Facebook Post
● YouTube Thumbnails
● Presentation
● Flyer/Poster
● Instagram Logo
● Infographic
These options generate the ability to be presented in both portrait and landscape mode. The multitude of options makes it an ideal medium for you to create your animation. The animation options at Canva also come with the opportunity to animate an existing image.
You can choose to animate an existing design. With a few minor edits, you can have a polished and sophisticated post that’s bound to draw viewer attention and earn you kudos.
If this is the case, then you benefit from saving time and the expertise of a professional design team through Canva.
The second option is creating an animation by yourself. Creating your own animation offers you greater flexibility in executing your vision for the design. Without further ado, let’s look at how we can help this happen in the how to make a moving graphic in the Canva section.
Part 2 Make A Moving Graphic In Canva
Making a moving graphic in Canva is easy. Canva offers an “Animation” button that allows users to animate each element in the content. There are four areas that the graphic can touch upon for content. These areas are text, image, audio, and video.
Here’s how you can animate individual elements in Canva.
2.1 How to animate text in Canva?
With text, Canva offers three options. You can choose to create either a title text, a sub-heading text, or regular text for use. Play with different styles and fonts to find one that suits your design. You can also add details like stickers or illustrations to customize the design.
You are now ready to animate once you’re happy with the design. Text animations will help your text jump out from the background. Then choose the “Animate” option in the sidebar after clicking on the selected text.
Allow your font to move around your design with motion. Thanks to “animate,” you can choose between subtle, smooth movement and jagged and sudden motion. You can even mix and match animations for each word.
In Wondershare Filmora, a premier video editing software, the texts are available according to use. For instance, opening and ending credit texts as a template. With options for choosing subtitles, lower 3rds, and call-out templates.
Additionally, users can also save a particular setting as a “preset’. Which makes it easy to reuse the settings in future projects. You can also adjust the duration of the individual text display. It also has an animation option that allows animation of the text according to given presets.
2.2 How do you animate a picture in Canva?
Users have the ability to choose to animate just the image or animate other elements of the picture. They can also make use of options to edit the image using background remover. This allows seamless integration into the presentation.
Users can simply upload their photos. Choose a stock image or upload an image through your photo gallery to use in your design. You can also choose to use “frames,” which are available under the “Elements” tab in Canva.
Make your photo come alive by animating it. Choose from a variety of innovative animation possibilities by selecting the Animation tool. The duration of the animation can be changed using the stopwatch animation icon. It uses a slider to help in setting the duration of each animation. You can also adjust this manually.
2.3 How do you add music to animation in Canva?
Users can find a section dedicated to “Uploads,” allowing creators to use their audio content. The users can use a soundtrack from one of Canva’s audio libraries. This gives users control over their animation’s impact.
One difference between Canva and Wondershare Filmora is that Canva users can only use one audio per presentation. Filmora allows users to overlay multiple soundtracks to their timeline.
Users can also make use of the Audio Effects feature to create audio for “Echo,” “large room,” “small room,” “lobby,” and “phone.” The preview function can help users experience it live before applying the effect.
Filmora Pro’s Auto-Normalization of audio allows intelligent audio analysis and volume adjustment.
2.4 How do you animate video in Canva?
Canva offers presentations that are similar to the explainer-style videos on Youtube. With more modifications, you can convert the presentation to a video format. You can edit individual elements in the presentation to reflect the project details and outcomes.
You can also introduce transition effects to make the presentation a smooth video. Incorporating the three other elements will be a breeze to make a video with animation.
Another noteworthy thing in Canva is that users can upload their videos or use videos provided in the video library. You can also embed videos within a frame from the “Elements” section in Canva. You can trim the video input on the slide for time. It can be presented as a “loop” video.
Filmora offers all the essential video editing tools in addition to AI-powered features called Auto-Highlight and Auro-Reframe. Auto Highlight is a feature that extracts the highlights from a video clip autonomously.
This will save you time while cutting your movie. It also makes it easier to extract the best moments from the video.
Auto Reframe recognizes as well as crops the focal point of your footage, constantly retaining it in the frame. Your film’s primary action or object will never be out of focus within that technique.
Part 3 Pricing for Canva You Should Know
Canva can be used among a multitude of users and companies. The range of access is from a single person use to teams of fifty. It also allows for a custom selection of a number of people.
Canva can be used as free graphic design software. It does display all available options with a few possibilities marked off for Canva Pro users only.
Canva Pro allows up to 5 users per team. A subscription to Canva Pro costs US $119.99 per annum or US $12.99 per month. Pro users have access to unlimited content and newly released tools.
The only difference between Canva Pro and Canva Enterprise is that Canva Pro is for smaller teams. Canva Enterprise allows collaboration between larger teams and franchises.
Canva also offers free Canva Pro subscriptions to non-profit organizations. Students and teachers are offered a special discount for those in educational programs.
Wondershare Filmora
Get started easily with Filmora’s powerful performance, intuitive interface, and countless effects!
Try It Free Try It Free Try It Free Learn More >
AI Portrait – The best feature of Wondershare Filmora for gameplay editing
The AI Portrait is a new add-on in Wondershare Filmora. It can easily remove video backgrounds without using a green screen or chroma key, allowing you to add borders, glitch effects, pixelated, noise, or segmentation video effects.
Final Words
We’ve covered how to animate graphics in Canva. You can animate individual elements in Canva or automate it on the whole. Canva’s animate button is an automatic tool that revolutionizes the way traditional animation works.
Wondershare’s Filmora is the video editing tool that is easy to use and offer various animation options.
Create Animated Video on Canva
Canva is a simple way—without any graphic design experience—to make professional graphics for social media, newsletters, presentations, business cards, gift certificates, brochures, and more. Flexible design templates offer the ideal layout for your target destination, letting you aim over the design, not the file formatting or the size.
So, can you make an animated video on Canva?
Yes, because Canva lives on the cloud, you can access your graphics from anywhere you can get online while using Canva on the cloud. Learn how you can play, get up, and run with Canva in this short, fun tutorial guide. We’ll discuss adding and editing images, using inbuilt design templates, and working with typography to build your next project with Canva.
In the subsequent sections, we shall learn more about Canva animated videos and how to create one easily on your PC.
In this article
01 [Create an animated video with a Canva template](#Part 1)
02 [Create Canva animated video with your video](#Part 2)
Part 1 Create an animated video with a Canva template
In this section, we’ll explore how to make animated video on Canva, which applies to both the free and pro account of Canva. However, the steps given below got created from Canva’s free account. We suppose that you’ve already created an account on Canva and logged into the platform. So, further steps will proceed as follows:
Go to the Video tab given in the top front panel of Canva and choose any template of your desire. Let’s say we’ve selected the very first template, 1920 × 1080 pixels. There are lots of options provided by Canva from where you can choose your favorites. You can also create a template with a custom size.

After you enter the editing panel, you have the choice of different templates on the left-hand panel. You can search for a template of your choice among them and can create other pages, as shown below. To preview the templates, you can click the Play button with mentioned time duration on the top right corner of the editing screen.

Now, it’s time to add creativity and explore more editing elements within the Canva. You can modify the entire template given and add something of your own.

Now, you can explore various editing Elements given on the left-hand panel, as shown below. There are multiple options available here as well.

You can add some text within the Canva template, and you can search from the left-hand panel. Given above are various options by which you can bold, italicize, and underline the text.

Now, let’s add some music to the video. So, go to the Audio tab and select any one of the options among them. There are different choices for you to explore here as well.

After you’re done, you can hit the Preview Play button on the top and see your project, as shown below.
It’s all done, and you can proceed with the next section.
Part 2 Create Canva animated video with your video
We’ll discuss how to create an animated video by uploading our video in Canva without using any template in this section. After logging in to the Canva account credentials, select the Video tab and choose the different templates offered.
We’ve selected a blank template for the purpose as follows.

Now, you need to head directly towards the Uploads tab and upload your video created over here.

By now, you have most probably got over with uploading your media. Click the uploaded video, and it will automatically enter within the editing panel of Canva, as shown below.

You’re all done now, and it’s all finished! Even though template usage is quite simple, it’s pretty straightforward when you don’t use any ready-made template. However, you can still beautify this simple video with different elements like text, music, etc.
Animation style videos influence people of all ages to whatever generation, or the kind you belong to will be one of them for sure.
Animated ones provoke diverse impacts instead of ordinary videos on the audience utilizing illustration, kinesthetic, etc. But the fact is, due to technological advancements and overexposure to social media sites, we have forgotten its significance.
Want to know some other most accessible software tools that can bring out the artist in you? Here is an alternative that is all you need.
Are you surprised to find that you can go with various animation styles to boost your business or bring out your talents? But are you confused about how to revamp your story and effectively film it? Why should you worry when the best animation maker and Canva’s alternative Wondershare Filmora is here exclusively for you to create fantastic animation videos that could stand out of the box?
Conclusion
Do you aspire to paint with bright colors to videos or want to become an animator? Then, choose animation styles that you most enjoy, find attractive today, start working on them, or create Canva animated videos as the tutorial indicates above. Lastly, don’t forget to give Filmora a chance to upscale your creation and give your animation style a life!
02 [Create Canva animated video with your video](#Part 2)
Part 1 Create an animated video with a Canva template
In this section, we’ll explore how to make animated video on Canva, which applies to both the free and pro account of Canva. However, the steps given below got created from Canva’s free account. We suppose that you’ve already created an account on Canva and logged into the platform. So, further steps will proceed as follows:
Go to the Video tab given in the top front panel of Canva and choose any template of your desire. Let’s say we’ve selected the very first template, 1920 × 1080 pixels. There are lots of options provided by Canva from where you can choose your favorites. You can also create a template with a custom size.
After you enter the editing panel, you have the choice of different templates on the left-hand panel. You can search for a template of your choice among them and can create other pages, as shown below. To preview the templates, you can click the Play button with mentioned time duration on the top right corner of the editing screen.
Now, it’s time to add creativity and explore more editing elements within the Canva. You can modify the entire template given and add something of your own.
Now, you can explore various editing Elements given on the left-hand panel, as shown below. There are multiple options available here as well.
You can add some text within the Canva template, and you can search from the left-hand panel. Given above are various options by which you can bold, italicize, and underline the text.
Now, let’s add some music to the video. So, go to the Audio tab and select any one of the options among them. There are different choices for you to explore here as well.
After you’re done, you can hit the Preview Play button on the top and see your project, as shown below.
It’s all done, and you can proceed with the next section.
Part 2 Create Canva animated video with your video
We’ll discuss how to create an animated video by uploading our video in Canva without using any template in this section. After logging in to the Canva account credentials, select the Video tab and choose the different templates offered.
We’ve selected a blank template for the purpose as follows.
Now, you need to head directly towards the Uploads tab and upload your video created over here.
By now, you have most probably got over with uploading your media. Click the uploaded video, and it will automatically enter within the editing panel of Canva, as shown below.
You’re all done now, and it’s all finished! Even though template usage is quite simple, it’s pretty straightforward when you don’t use any ready-made template. However, you can still beautify this simple video with different elements like text, music, etc.
Animation style videos influence people of all ages to whatever generation, or the kind you belong to will be one of them for sure.
Animated ones provoke diverse impacts instead of ordinary videos on the audience utilizing illustration, kinesthetic, etc. But the fact is, due to technological advancements and overexposure to social media sites, we have forgotten its significance.
Want to know some other most accessible software tools that can bring out the artist in you? Here is an alternative that is all you need.
Are you surprised to find that you can go with various animation styles to boost your business or bring out your talents? But are you confused about how to revamp your story and effectively film it? Why should you worry when the best animation maker and Canva’s alternative Wondershare Filmora is here exclusively for you to create fantastic animation videos that could stand out of the box?
Conclusion
Do you aspire to paint with bright colors to videos or want to become an animator? Then, choose animation styles that you most enjoy, find attractive today, start working on them, or create Canva animated videos as the tutorial indicates above. Lastly, don’t forget to give Filmora a chance to upscale your creation and give your animation style a life!
Also read:
- New 2024 Approved Incredible Ways to Find Suitable Animated Graphic Maker
- New In 2024, How to Make Your Characters Interactive in Unity Animation Rigging
- 4 Things You Should Know About Pinterest GIF
- Updated 2024 Approved How to Make Your Characters Interactive in Unity Animation Rigging
- Updated In 2024, Apps to Animate Still Pictures
- New 2024 Approved Whiteboard Animation Services Top 15 Animation Companies to Pick
- Updated 2024 Approved Nurturing the Spirit Through the Top 10 Intellectual Anime Websites
- Updated How to Analyze an Editorial Cartoon Easily for 2024
- Top 7 Animated GIF Text Makers
- Updated Top 10 Banned Anime Around the World and Why
- Updated 5 Foolproof Amazing Anime Text to Speech Tips for Makers
- Updated How to Turn Yourself Into WhatsApp Cartoon
- 2024 Approved How to Create Benime Whiteboard Animation on Android
- Updated Best 15 Instant Classics Animated Cartoon Movies
- Updated 2024 Approved Popular Tips on Learning Animate Rigging
- New 6 Unexpected Ways Gif Animation Maker That Affect Your Marketing for 2024
- New 2024 Approved Best 15 2D Animation Software Free That Worth to Try
- Updated Ideas of Learning How to Send WhatsApp Animated Gifs
- How to Create Your Avatar Free for 2024
- Updated 2024 Approved 15 Best Stop Motion Animation Kits to Fuel Creativity
- Best Websites to Download Animated GIFs for Free
- Updated 2024 Approved A Beginners Guide to Tell You What 3D Animation Is
- New In 2024, Little Known Techniques of Motion Graphics in Premiere Pro
- Updated In 2024, How to Create an Adobe Collage?
- Updated How to Make GIF Stickers for WhatsApp 100 The Easy Way
- Popular Female & Male Disney Cartoon Characters
- Updated Techniques on How to Make After Effects 2D Animation for 2024
- In 2024, 2D Character Animation Everything You Should Know About It
- New How I Animate Discord Profile Pictures
- New 2024 Approved How to Find 3D Animation Studio Meeting All Your Inspiring Needs
- Updated Interesting Fundamentals and Ultimate Guide to Animated Characters Drawings
- Ways You Can Master to Find 10 Best Free Animated Text Generator for 2024
- Updated 2024 Approved How to Send and Add Snapchat GIFs 100 The Easy Way
- Simple Guide to Create New and Exciting Blackboard Animation
- Updated 2024 Approved Learn Simple Blender Rigging in Only 2 Minutes
- Wondering the Best Alternative to Hola On Asus ROG Phone 7? Here Is the Answer | Dr.fone
- In 2024, The Updated Method to Bypass Nokia C22 FRP
- How to Come up With the Best Pokemon Team On Samsung Galaxy F04? | Dr.fone
- In 2024, How to Screen Mirroring OnePlus Nord CE 3 5G? | Dr.fone
- In 2024, Pokemon Go No GPS Signal? Heres Every Possible Solution On Apple iPhone SE (2022) | Dr.fone
- In 2024, How to Remove a Previously Synced Google Account from Your Realme 12 Pro 5G
- In 2024, How to Remove Apple ID from iPhone 15 Pro without Password?
- A Step-by-Step Guide on Using ADB and Fastboot to Remove FRP Lock from your Motorola Defy 2
- In 2024, Why is iPogo not working On Motorola Moto G34 5G? Fixed | Dr.fone
- In 2024, Pokemon Go Error 12 Failed to Detect Location On Lava Yuva 3? | Dr.fone
- How To Restore Missing Pictures Files from Honor 90.
- In 2024, How To Bypass the Required Apple Store Verification For iPhone 7 Plus
- How to Unlock Vivo V27 Pro Pattern Lock if Forgotten? 6 Ways
- Which is the Best Fake GPS Joystick App On Vivo V29 Pro? | Dr.fone
- Fake the Location to Get Around the MLB Blackouts on Vivo V27 Pro | Dr.fone
- In 2024, How to Transfer Data After Switching From Oppo Find X6 to Latest Samsung | Dr.fone
- Things You Dont Know About Vivo Y28 5G Reset Code | Dr.fone
- In 2024, How does the stardust trade cost In pokemon go On Honor V Purse? | Dr.fone
- Dose Life360 Notify Me When Someone Checks My Location On Meizu 21 Pro? | Dr.fone
- Can You Unlock iPhone XR After Forgetting the Passcode?
- In 2024, How Can We Unlock Our Poco M6 Pro 5G Phone Screen?
- In 2024, 8 Safe and Effective Methods to Unlock Your Apple iPhone 13 Without a Passcode
- Title: Updated That Will Make Aesthetic Cartoon Drawing More Understandable for 2024
- Author: Elon
- Created at : 2024-05-19 03:05:18
- Updated at : 2024-05-20 03:05:18
- Link: https://animation-videos.techidaily.com/updated-that-will-make-aesthetic-cartoon-drawing-more-understandable-for-2024/
- License: This work is licensed under CC BY-NC-SA 4.0.
