

Updated Top 7 Animated GIF Text Makers
Top 7 Animated GIF Text Makers
Versatile Video Editor - Wondershare Filmora
An easy yet powerful editor
Numerous effects to choose from
Detailed tutorials provided by the official channel
Arguably the hilarious moment of online communication, GIFs are a sequence of static images that throw a unique effect when strung together. They add excitement to social media posts, energy to email conversations, and even standard text, and usually create the internet (and this post) the funniest place to be.
Many people like to create GIFs on their websites, on digital platforms, or within their social media. We’ve collected a list of the best-animated GIF text makers around and reviewed them, so you don’t have to. You’ve come to the perfect article if you’re also one among them.
Top 7 Animated GIF Text Makers 2022
Without further ado, let’s jump in! Here are the five best-recommended websites or text GIF makers worth considering in 2021.
1. Bloggif
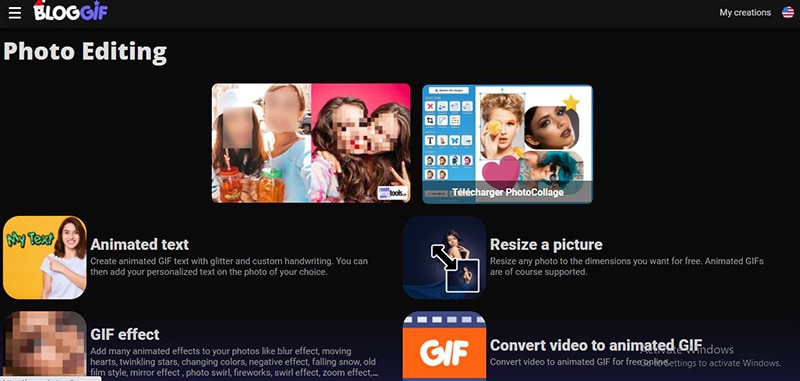
This site shows an appropriate GIF for just about anything you’re wondering. Based upon what you’re looking for, there are numerous ways to uncover a perfect match.
One way is to search among the dropdown menus on the main website’s interface. These menus allow users to surface GIFs such as animated text, resize a picture, GIF slideshow, GIF effect, and more.
2. Gfycat
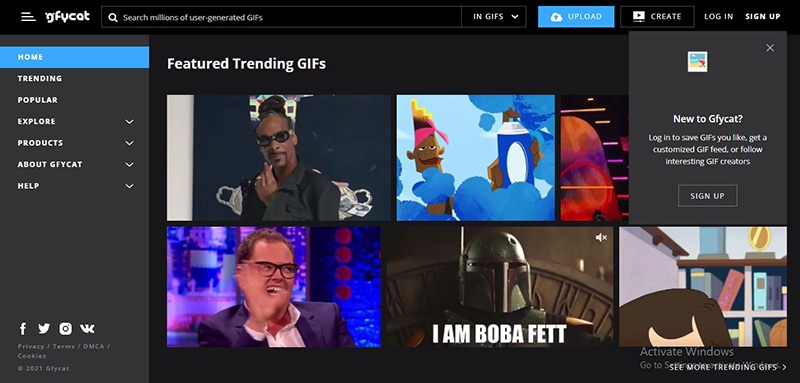
Gfycat is another online text GIF maker with millions of GIFs to dive into as a GIF text generator. Not only is it one of the highly famous GIF sites, but it has a simple animated GIF text maker to turn your favorite Vimeo, Twitter, and Twitch streams into your library of memes.
You can easily navigate its wide variety of GIFs from the search bar or left menu, select from the latest “Explore” or “Trending” section to look for multiple categories of stickers or GIFs.
3. GIPHY
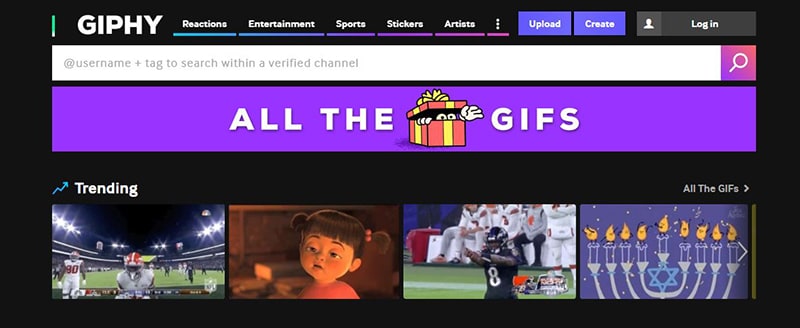
This is another go-to resource for text GIF maker hunting. Alex Chung and Jace Cooke launched it; GIPHY began as a search engine for GIFs. The platform has seen significant growth by introducing integrations, partnering with brands, and making browser extensions, and a lot more. (Check out GIPHY Labs to explore their expansion efforts.)
The best part? Looking for the database of GIFs couldn’t be easier: Users can browse categories — Music, Adjectives, Nature, Science, Nature, etc. — or seek out a specific phrase or a word using the search feature.
4. Make a GIF
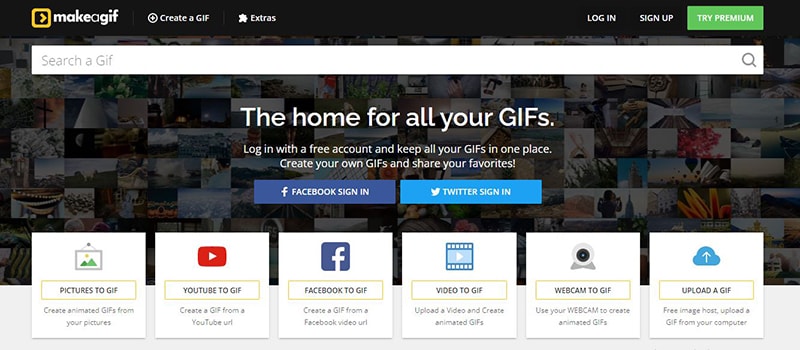
Make A GIF allows you to create a GIF from many images, a video from your computer, a Facebook or YouTube video, or directly from your webcam.
With this tool, it’s pretty simple to customize the order of the photos and rearrange them via drag-and-drop editor. You can also resize its images and create a personalized animation speed. In addition, there is a captioning tool included to add text on top of your GIF, but you can’t preview it before creating the GIF or change where the text GIF maker is displayed.
You can save the GIF to your PC and copy its URL to find it online once created. It further consists of options for making your GIF public, private, or unlisted. You can even link directly to the GIF file.
5. ImgFlip

ImgFlip displays a preview of your GIF during the creation, which is valuable. You can develop these GIFs from images, a GIF URL, a video URL, or a video you upload yourself.
Besides, you can alter animation delay, width, height, photo order, and quality for a GIF created with images. There’s also a crop option, text tool, and the ability to rotate the GIF, change the play count, reverse it, and change the background color.
You can download your GIF and share it over a few social media sites once done, or not post it online while setting it as private.
A watermark displayed on all GIFs created is here at Imgflip. Also, most of the custom settings for making a GIF from this GIF text generator are usable only if you subscribe to ImgFlip Pro.
Tip: Make animated GIF Text in video
Now you may be wandering to create your GIF. The market comes loaded with many websites, tools, and the above-mentioned animated GIF text makers.
Additionally, you can use Adobe Photoshop too or some other popular software for the purpose. If we talk about online tools, the above-mentioned animated text generator GIFs are the standard options.
It is also relatively easier to find text GIF maker online applications for smartphones or mobile devices. It is possible to develop gifs from the collection of still images or even from moving videos, and this task is much easier than anyone can perform. To execute this task with simplicity, we would like to recommend Wondershare Filmora

Wondershare Filmora - Best Video Editor for Mac/Windows
5,481,435 people have downloaded it.
Build unique custom animations without breaking a sweat.
Focus on creating epic stories and leave the details to Filmora’s auto features.
Start a creative adventure with drag & drop effects and endless possibilities.
Filmora simplifies advanced features to save you time and effort.
Filmora cuts out repetition so you can move on to your next creative breakthrough.
This recommendation is the most interactive yet simple to understand interface of this software tool. You can easily combine various stills into GIFs using Filmora or turn small videos into GIFs. The more exciting thing is that Filmora also helps in easy Gifs customization as users can add elements, overlays, text, etc., to their GIFs using this platform as the ideal animated GIF text maker.
How to make GIFs with Wondershare Filmora
Here are a few easy to execute steps to accomplish this operation:
Step 1 Upload media files
The primary task is to import some editable video files or collections of photos to the Wondershare Filmora’s timeline. This software tool is compatible with more than 150 media file formats to easily upload any of your images ranging somewhere between png, jpg, avi, mpg, wav, mkv, mp4, or WMV, etc.
For Win 7 or later (64-bit)
For macOS 10.12 or later
Step 2 Drag to timeline
Users can drag their image/video file and drop it on the timeline of Wondershare Filmora. Once your file goes there, it will be easily edited using a wide range of tools.

Step 3 Edit media files
There are unlimited editing elements and tools with numerous exciting features of Filmora.
Users can easily select among options like slow down, speed up, combine, rotate, split, crop, etc., to develop eye-catching video as per available content.
Step 4 Add text effect to GIF files
It is the right time to update text-based GIFs. There are certain small messages used that always appear suitable in GIFs.

Step 5 Save and export
Once you complete all these steps, save your file with a GIF extension and get it uploaded on social media platforms, if you wish so.

Conclusion
Thus, there are plenty of websites to choose from among animated GIF text makers when it comes to searching for some genuine yet cool GIFs. Whether you must send one to the email chain of your coworker’s birthday, or make your brother, Zayn, laugh at the dinner table, we hope this list helps narrow down your search for the perfect maker to create text GIF.
Arguably the hilarious moment of online communication, GIFs are a sequence of static images that throw a unique effect when strung together. They add excitement to social media posts, energy to email conversations, and even standard text, and usually create the internet (and this post) the funniest place to be.
Many people like to create GIFs on their websites, on digital platforms, or within their social media. We’ve collected a list of the best-animated GIF text makers around and reviewed them, so you don’t have to. You’ve come to the perfect article if you’re also one among them.
Top 7 Animated GIF Text Makers 2022
Without further ado, let’s jump in! Here are the five best-recommended websites or text GIF makers worth considering in 2021.
1. Bloggif
This site shows an appropriate GIF for just about anything you’re wondering. Based upon what you’re looking for, there are numerous ways to uncover a perfect match.
One way is to search among the dropdown menus on the main website’s interface. These menus allow users to surface GIFs such as animated text, resize a picture, GIF slideshow, GIF effect, and more.
2. Gfycat
Gfycat is another online text GIF maker with millions of GIFs to dive into as a GIF text generator. Not only is it one of the highly famous GIF sites, but it has a simple animated GIF text maker to turn your favorite Vimeo, Twitter, and Twitch streams into your library of memes.
You can easily navigate its wide variety of GIFs from the search bar or left menu, select from the latest “Explore” or “Trending” section to look for multiple categories of stickers or GIFs.
3. GIPHY
This is another go-to resource for text GIF maker hunting. Alex Chung and Jace Cooke launched it; GIPHY began as a search engine for GIFs. The platform has seen significant growth by introducing integrations, partnering with brands, and making browser extensions, and a lot more. (Check out GIPHY Labs to explore their expansion efforts.)
The best part? Looking for the database of GIFs couldn’t be easier: Users can browse categories — Music, Adjectives, Nature, Science, Nature, etc. — or seek out a specific phrase or a word using the search feature.
4. Make a GIF
Make A GIF allows you to create a GIF from many images, a video from your computer, a Facebook or YouTube video, or directly from your webcam.
With this tool, it’s pretty simple to customize the order of the photos and rearrange them via drag-and-drop editor. You can also resize its images and create a personalized animation speed. In addition, there is a captioning tool included to add text on top of your GIF, but you can’t preview it before creating the GIF or change where the text GIF maker is displayed.
You can save the GIF to your PC and copy its URL to find it online once created. It further consists of options for making your GIF public, private, or unlisted. You can even link directly to the GIF file.
5. ImgFlip
ImgFlip displays a preview of your GIF during the creation, which is valuable. You can develop these GIFs from images, a GIF URL, a video URL, or a video you upload yourself.
Besides, you can alter animation delay, width, height, photo order, and quality for a GIF created with images. There’s also a crop option, text tool, and the ability to rotate the GIF, change the play count, reverse it, and change the background color.
You can download your GIF and share it over a few social media sites once done, or not post it online while setting it as private.
A watermark displayed on all GIFs created is here at Imgflip. Also, most of the custom settings for making a GIF from this GIF text generator are usable only if you subscribe to ImgFlip Pro.
Tip: Make animated GIF Text in video
Now you may be wandering to create your GIF. The market comes loaded with many websites, tools, and the above-mentioned animated GIF text makers.
Additionally, you can use Adobe Photoshop too or some other popular software for the purpose. If we talk about online tools, the above-mentioned animated text generator GIFs are the standard options.
It is also relatively easier to find text GIF maker online applications for smartphones or mobile devices. It is possible to develop gifs from the collection of still images or even from moving videos, and this task is much easier than anyone can perform. To execute this task with simplicity, we would like to recommend Wondershare Filmora
Wondershare Filmora - Best Video Editor for Mac/Windows
5,481,435 people have downloaded it.
Build unique custom animations without breaking a sweat.
Focus on creating epic stories and leave the details to Filmora’s auto features.
Start a creative adventure with drag & drop effects and endless possibilities.
Filmora simplifies advanced features to save you time and effort.
Filmora cuts out repetition so you can move on to your next creative breakthrough.
This recommendation is the most interactive yet simple to understand interface of this software tool. You can easily combine various stills into GIFs using Filmora or turn small videos into GIFs. The more exciting thing is that Filmora also helps in easy Gifs customization as users can add elements, overlays, text, etc., to their GIFs using this platform as the ideal animated GIF text maker.
How to make GIFs with Wondershare Filmora
Here are a few easy to execute steps to accomplish this operation:
Step 1 Upload media files
The primary task is to import some editable video files or collections of photos to the Wondershare Filmora’s timeline. This software tool is compatible with more than 150 media file formats to easily upload any of your images ranging somewhere between png, jpg, avi, mpg, wav, mkv, mp4, or WMV, etc.
For Win 7 or later (64-bit)
For macOS 10.12 or later
Step 2 Drag to timeline
Users can drag their image/video file and drop it on the timeline of Wondershare Filmora. Once your file goes there, it will be easily edited using a wide range of tools.
Step 3 Edit media files
There are unlimited editing elements and tools with numerous exciting features of Filmora.
Users can easily select among options like slow down, speed up, combine, rotate, split, crop, etc., to develop eye-catching video as per available content.
Step 4 Add text effect to GIF files
It is the right time to update text-based GIFs. There are certain small messages used that always appear suitable in GIFs.
Step 5 Save and export
Once you complete all these steps, save your file with a GIF extension and get it uploaded on social media platforms, if you wish so.
Conclusion
Thus, there are plenty of websites to choose from among animated GIF text makers when it comes to searching for some genuine yet cool GIFs. Whether you must send one to the email chain of your coworker’s birthday, or make your brother, Zayn, laugh at the dinner table, we hope this list helps narrow down your search for the perfect maker to create text GIF.
5 Best Adobe Animate Courses & Classes | Beginners Complete Tutorial
5 Best Adobe Animate Courses & Classes | Beginners Complete Tutorial
An easy yet powerful editor
Numerous effects to choose from
Detailed tutorials provided by official channel
Professional animation is hence one of the fields that has a bright future. Willing to learn more about animation?

Don’t worry! We’ve got you covered, follow this article and find out more about the best 5 Adobe animate courses.
In this article
01 [What is Adobe Animate CC?](#Part 1)
02 [Top 8 FULL ADOBE ANIMATE COURSES | Beginners Complete Tutorial](#Part 2)
03 [How to Quickly Learn the Skills of Adobe Animate Course](#Part 3)
Part 1 What is Adobe Animate CC?
1. Who should take Adobe Animate course?
Learning is never bound. Anyone willing to learn can put in effort and time. As long as you wish to learn, and have an interest in it you can take it up. Those of you who wish to make a career in animation are highly recommended to take up this course. The Adobe animate course can help you kickstart your career as a professional animator.
2. Are there prerequisites to Adobe Animate course?
Animation is one such field that does not require a lot of prerequisites. In fact, even a beginner who has absolutely no idea about animation can take up the adobe animate course.
Part 2 Top 5 FULL ADOBE ANIMATE COURSES | Beginners Complete Tutorial
1. Adobe animate CC 2018- HTML5 Banner Ads
Adobe animate CC 2018- HTML5 Banner Ads is one of the most comprehensive courses on adobe animate. It teaches you several relevant skills associated with animation and marketing (one of the primary applications of animation).

Skills you will learn:
● Basics of HTML5 banner ads using adobe animate
● Understanding the importance of Adobe animate CC in web advertisements
● Through this course, you’d become an expert at publishing ad networks
● The course will help you explore tools and techniques related to banner advertising
Udemy: Udemy Duration: About 5 hours
Pros
The course is beginner-friendly; it helps you advance your career in animation from scratch.
The course covers even complex concepts.
You receive a course completion certificate
Cons
The course is paid and you need to pay a nominal fee in order to access the lecture videos.
The course is monotonous i.e. there is no live teaching.
2. 2D animation for beginners with adobe animate, Walt Wonderwolk
If you’re looking for a well-designed course that covers almost all the necessary concepts, then this course is just the right one for you. Through this course, you can learn all about Adobe animate. All the primary concepts are explained in detail in this course.

Skills you will learn:
● All the primary concepts of computer-generated animations using Adobe animate.
● You will learn important concepts such as eases, symbols, vector drawings, tweens, and key frames.
● You will also learn how to add sound to your animation
● You will gain hands-on knowledge about drawing, composition, and animation of characters.
Udemy: skillshare
Pros
The course is great for beginners to start learning about Adobe animate
The course covers fundamental concepts of animation
Cons
You need a skillshare membership in order to access the lecture videos.
You need to pay in order to get a skillshare membership
You do not get a course completion certificate
3. Rigging and animating in Adobe animate
Looking for a quick crash course about Adobe animate? Well, this course is perfect for you. As the name suggests, in this course you shall learn all about rigging and animating 2d characters.

Skills you will learn:
● rigging and animating adobe animate
● Through this course, you will know how to efficiently animate any character
● Discover the utilization of vectors and images for rigging
● You will get a clear understanding of important concepts such as layer parenting, motion tweening, and symbols.
Udemy: Udemy Duration: around 4 hours
Pros
You will learn the major concepts of animation.
You will learn about rigging in detail, one of the core concepts of animation.
The course is available on Udemy, one of the most accessible platforms.
Cons
The course is not free, you need to pay a nominal amount to access the course.
It is not a renowned course.
The course is not Beginner friendly, it needs you to have some understanding of animation.
4. Learning Adobe Animate CC: Animation, LinkedIn learning
LinkedIn’s new platform, LinkedIn learning has several professional courses. Learning Adobe animate CC is one of the courses available on LinkedIn learning. It teaches you all about digital transformations. By the end of this course, you will be able to create a handy bit of animation.

Skills you will learn:
● Fundamentals of digital animation on Adobe animate CC
● Understanding and implementation of concepts such as keyframes, symbols, tweening, and drawing tools.
● Understand about the creation of natural effects and shape tweens.
● Adding music and sound effects to your animation.
Udemy: LinkedIn learning Duration: Around 3 hours
Pros
The course duration is considerably shorter.
All the primary concepts of animation are given importance in this course.
You get additional quizzes and study material along with the lecture videos
Cons
You need to have an active LinkedIn learning membership.
You need to pay for the LinkedIn learning membership.
The course is fast-paced, you need to grasp the concepts quickly.
5. Animate a walk cycle frame by frame in Adobe animate
This hands-on course is perfect for those who prefer experimenting as they watch the lecture videos. The course teaches you how to animate 2D and 3D characters smoothly. As you near the end of this course, you will have a clear understanding of how animation works and how to animate a hand-drawn character from scratch.

Skills you will learn:
● You will learn how to animate a hand-drawn character from scratch.
● You shall learn how to set up a working canvas and design a character.
● You will learn about the essential features of designing such as color fills, overlapping actions, shadows, and cleanup strokes.
Udemy: skillshare
Pros
The course focuses on the design aspect of animated characters.
The course gives you a hands-on experience with animation tools.
The course helps you learn how to create creative hand drawn characters.
Cons
You need an active skillshare membership to access the lecture videos
Skillshare membership is a paid one.
There are courses from more popular counterparts such as Udemy.
Part 3 How to Quickly Learn the Skills of Adobe Animate Course
Now that you’ve decided to get your hands dirty by dwelling into animation, you must give Wondershare Filmora Pro a try. What’s Wondershare Filmora ?
It’s essentially a one-stop shop for all your video editing needs. From video editing to rigging Wwondershare Filmora Pro has got it all. Using this platform, even a beginner can create exquisite animated videos.
The platform offers you several tools that are easy to use.
Even a neophyte could easily create beautiful animations by using Wondershare Filmora Pro. Using Wondershare Filmora Pro, you can not only animate characters but also define their motion, add sound effects, and edit videos. Filmora Pro offers you animation tools that are easier to operate and resultantly help you make amazing animated videos.
Wondershare Filmora
Get started easily with Filmora’s powerful performance, intuitive interface, and countless effects!
Try It Free Try It Free Try It Free Learn More >
Key Takeaways from This Episode
● As we see, today we’ve taken a look at a few of the best Adobe animate courses.
● Each of the courses can help you learn the basics of animation.
● Animation is indeed one of the budding fields, and with these fruitful courses, you can learn all about animation and possibly begin your journey as a freelancer or a professional in animation.
● Through these courses, you can create animated advertisement videos with ease. Wondershare Filmora Pro however can make your job easier by offering you amazing tools for generating animated videos!<
● Well, on this note we shall take leave! Wishing you good luck on your journey as an animator!
Professional animation is hence one of the fields that has a bright future. Willing to learn more about animation?
Don’t worry! We’ve got you covered, follow this article and find out more about the best 5 Adobe animate courses.
In this article
01 [What is Adobe Animate CC?](#Part 1)
02 [Top 8 FULL ADOBE ANIMATE COURSES | Beginners Complete Tutorial](#Part 2)
03 [How to Quickly Learn the Skills of Adobe Animate Course](#Part 3)
Part 1 What is Adobe Animate CC?
1. Who should take Adobe Animate course?
Learning is never bound. Anyone willing to learn can put in effort and time. As long as you wish to learn, and have an interest in it you can take it up. Those of you who wish to make a career in animation are highly recommended to take up this course. The Adobe animate course can help you kickstart your career as a professional animator.
2. Are there prerequisites to Adobe Animate course?
Animation is one such field that does not require a lot of prerequisites. In fact, even a beginner who has absolutely no idea about animation can take up the adobe animate course.
Part 2 Top 5 FULL ADOBE ANIMATE COURSES | Beginners Complete Tutorial
1. Adobe animate CC 2018- HTML5 Banner Ads
Adobe animate CC 2018- HTML5 Banner Ads is one of the most comprehensive courses on adobe animate. It teaches you several relevant skills associated with animation and marketing (one of the primary applications of animation).
Skills you will learn:
● Basics of HTML5 banner ads using adobe animate
● Understanding the importance of Adobe animate CC in web advertisements
● Through this course, you’d become an expert at publishing ad networks
● The course will help you explore tools and techniques related to banner advertising
Udemy: Udemy Duration: About 5 hours
Pros
The course is beginner-friendly; it helps you advance your career in animation from scratch.
The course covers even complex concepts.
You receive a course completion certificate
Cons
The course is paid and you need to pay a nominal fee in order to access the lecture videos.
The course is monotonous i.e. there is no live teaching.
2. 2D animation for beginners with adobe animate, Walt Wonderwolk
If you’re looking for a well-designed course that covers almost all the necessary concepts, then this course is just the right one for you. Through this course, you can learn all about Adobe animate. All the primary concepts are explained in detail in this course.
Skills you will learn:
● All the primary concepts of computer-generated animations using Adobe animate.
● You will learn important concepts such as eases, symbols, vector drawings, tweens, and key frames.
● You will also learn how to add sound to your animation
● You will gain hands-on knowledge about drawing, composition, and animation of characters.
Udemy: skillshare
Pros
The course is great for beginners to start learning about Adobe animate
The course covers fundamental concepts of animation
Cons
You need a skillshare membership in order to access the lecture videos.
You need to pay in order to get a skillshare membership
You do not get a course completion certificate
3. Rigging and animating in Adobe animate
Looking for a quick crash course about Adobe animate? Well, this course is perfect for you. As the name suggests, in this course you shall learn all about rigging and animating 2d characters.
Skills you will learn:
● rigging and animating adobe animate
● Through this course, you will know how to efficiently animate any character
● Discover the utilization of vectors and images for rigging
● You will get a clear understanding of important concepts such as layer parenting, motion tweening, and symbols.
Udemy: Udemy Duration: around 4 hours
Pros
You will learn the major concepts of animation.
You will learn about rigging in detail, one of the core concepts of animation.
The course is available on Udemy, one of the most accessible platforms.
Cons
The course is not free, you need to pay a nominal amount to access the course.
It is not a renowned course.
The course is not Beginner friendly, it needs you to have some understanding of animation.
4. Learning Adobe Animate CC: Animation, LinkedIn learning
LinkedIn’s new platform, LinkedIn learning has several professional courses. Learning Adobe animate CC is one of the courses available on LinkedIn learning. It teaches you all about digital transformations. By the end of this course, you will be able to create a handy bit of animation.
Skills you will learn:
● Fundamentals of digital animation on Adobe animate CC
● Understanding and implementation of concepts such as keyframes, symbols, tweening, and drawing tools.
● Understand about the creation of natural effects and shape tweens.
● Adding music and sound effects to your animation.
Udemy: LinkedIn learning Duration: Around 3 hours
Pros
The course duration is considerably shorter.
All the primary concepts of animation are given importance in this course.
You get additional quizzes and study material along with the lecture videos
Cons
You need to have an active LinkedIn learning membership.
You need to pay for the LinkedIn learning membership.
The course is fast-paced, you need to grasp the concepts quickly.
5. Animate a walk cycle frame by frame in Adobe animate
This hands-on course is perfect for those who prefer experimenting as they watch the lecture videos. The course teaches you how to animate 2D and 3D characters smoothly. As you near the end of this course, you will have a clear understanding of how animation works and how to animate a hand-drawn character from scratch.
Skills you will learn:
● You will learn how to animate a hand-drawn character from scratch.
● You shall learn how to set up a working canvas and design a character.
● You will learn about the essential features of designing such as color fills, overlapping actions, shadows, and cleanup strokes.
Udemy: skillshare
Pros
The course focuses on the design aspect of animated characters.
The course gives you a hands-on experience with animation tools.
The course helps you learn how to create creative hand drawn characters.
Cons
You need an active skillshare membership to access the lecture videos
Skillshare membership is a paid one.
There are courses from more popular counterparts such as Udemy.
Part 3 How to Quickly Learn the Skills of Adobe Animate Course
Now that you’ve decided to get your hands dirty by dwelling into animation, you must give Wondershare Filmora Pro a try. What’s Wondershare Filmora ?
It’s essentially a one-stop shop for all your video editing needs. From video editing to rigging Wwondershare Filmora Pro has got it all. Using this platform, even a beginner can create exquisite animated videos.
The platform offers you several tools that are easy to use.
Even a neophyte could easily create beautiful animations by using Wondershare Filmora Pro. Using Wondershare Filmora Pro, you can not only animate characters but also define their motion, add sound effects, and edit videos. Filmora Pro offers you animation tools that are easier to operate and resultantly help you make amazing animated videos.
Wondershare Filmora
Get started easily with Filmora’s powerful performance, intuitive interface, and countless effects!
Try It Free Try It Free Try It Free Learn More >
Key Takeaways from This Episode
● As we see, today we’ve taken a look at a few of the best Adobe animate courses.
● Each of the courses can help you learn the basics of animation.
● Animation is indeed one of the budding fields, and with these fruitful courses, you can learn all about animation and possibly begin your journey as a freelancer or a professional in animation.
● Through these courses, you can create animated advertisement videos with ease. Wondershare Filmora Pro however can make your job easier by offering you amazing tools for generating animated videos!<
● Well, on this note we shall take leave! Wishing you good luck on your journey as an animator!
How to Animate Picture Online Without Learning From Scratch
How to Animate Picture Online Without Learning from Scratch
An easy yet powerful editor
Numerous effects to choose from
Detailed tutorials provided by the official channel
The Internet is flooded with thousands of tools that aim to provide the best-animated video. But trusting all of them every time is not a go-to thing for everyone.

If you also fall into the same category of people who are looking to add animation to designs but are not able to find the best tools, you are on the right page.
In this article
01 [Ready to Add Animation to Your Designs?](#Part 1)
02 [The Secret of Animating Pictures Online](#Part 2)
Part 1 Ready to Add Animation to Your Designs?
Here we are discussing the top three Animated picture maker that is used for creating different videos with differnt types of online picture tools. These are as follows:
1. Powtoon
Powtoon is an interactive yet simple tool available to add animation to designs. It has all the basic functions available for motion graphics that are useful for presentation. It has a variety of characters and animations available, along with simple textual animation. A user can easily prepare the video with full animation.
(This video indicates how to use the Powtoon tool for creating the best-animated videos, along with an example.)
1. Animaker
Animaker is one of the wonderful animation programs to add animation to designs in an interactive yet simple manner. It has all the best features integrated into it, which let a user create the video of their choice. It is safe to use and, being a web-based program, offers all the options.
(This video indicates how to use the Animaker tool for creating the best-animated videos, along with an example.)
3. Moovly
Moovly is also one of the best animation tools available to add animation to the content. On the main page, the “add content” option is available from where a user can simply update the video and add animation to it.
(This video indicates how to use the Moovly tool for creating the best-animated videos, along with an example.)
Note: These tools are among those that even a layman can use. But some users are still not happy with the interface of these animate picture online tools and feel like they are lacking features. For all those out there, we have some other options too.
Part 2 The Secret of Animating Pictures Online
The secret behind animating pictures online is to save time and effort. With the help of online tools, one can get the outcome with the help of inbuilt templates. There will be no need to install any application or plugin when they wish to add any particular animation to the content. Some tools you can consider using to add animation to designs are as follows:
1. Pixtellar
Pixtellar is a great tool that helps in creating animated videos and images too. Along with creating animated videos and images, one can easily create posters, logos, photo collages, and so on.
However, before using it, be sure to do the registration, as without it, using it is impossible. After registering, the steps you need to follow to use it are as follows:
Step 1Create from Scratch
Choose the template of your choice or click on “Create from Scratch”. Here we are choosing the templates.

Step 2Choose social media
It will be redirected to the next page where you will find out templates according to the selected category. (Here we choose social media).

Step 3Click on “Animate”
Choose any of them based on your preferences. You will head to the next page where you can do the editing as per your needs by clicking on “Animate”.

Step 4Save the image
After making the changes and adding the animations, you are all set to save the image. The “Save” button is right at the top of the page!

2. Adobe Spark
Adobe Spark is a tool that has pre-built templates available for adding animations to the designs. From adding animations to editing the image and video, all the options are featured in this. It also gives users an idea of how they can simply create the video and images with the help of animations and other effects.
However, when you are using it, registration is a must. After performing the registration, you are all set to use it. The steps you need to follow to use this tool are as follows:
Step 1Start editing
After completing the registration, you will reach the main page where you can choose the option of your choice and start editing. Here we have chosen the template option.

Step 2Create From This Template
It asks you to be sure and click on “Create From This Template.”

Step 3Do the editing
It takes a few seconds to present the same in front of you. On this page, you are all set to do the editing as per your needs.

Step 4Save the image
After doing all the editing, you are all set to save the image. The “Save” button is right there at the top. Click on it and save the image!

3. Crello or VistaCreate
Crello, which turns out to be VistaCreate, is one of the most famous tools for adding motion to images. It has almost 8,000+ animated designs and motion graphics available, which are helpful in creating eye-catching videos.
When you are using this feature, registration or sign-up is important. On the main page, the signup option is available, helping users do it. After that, the steps are as follows:
Step 1Click on the “Template”
On the home page, you can either create your own or click on the “Template” option available. (We chose the template option here).

Step 2Select the template
Now select the template of your choice. Here we have selected the Happy New Year one.

Step 3Do the editing as required
Now you are all set to do the editing as required. Here all the options are available, which help in adding all the basic to advanced details to the image. You can use it.

Step 4Download the image
After doing the editing, you are all set to download the image. The downloading button is right there at the top.

Key Takeaways from This Episode
● Animated videos are eye-catching, and tools are helpful in making them more enhanced.
● Animation tools are very easy to use and precisely make the video.
● Editing options are available in the tools, which are helpful in adding extra effects to the image.
● The tools are free to use with all the in-built templates and other features.
The Internet is flooded with thousands of tools that aim to provide the best-animated video. But trusting all of them every time is not a go-to thing for everyone.
If you also fall into the same category of people who are looking to add animation to designs but are not able to find the best tools, you are on the right page.
In this article
01 [Ready to Add Animation to Your Designs?](#Part 1)
02 [The Secret of Animating Pictures Online](#Part 2)
Part 1 Ready to Add Animation to Your Designs?
Here we are discussing the top three Animated picture maker that is used for creating different videos with differnt types of online picture tools. These are as follows:
1. Powtoon
Powtoon is an interactive yet simple tool available to add animation to designs. It has all the basic functions available for motion graphics that are useful for presentation. It has a variety of characters and animations available, along with simple textual animation. A user can easily prepare the video with full animation.
(This video indicates how to use the Powtoon tool for creating the best-animated videos, along with an example.)
1. Animaker
Animaker is one of the wonderful animation programs to add animation to designs in an interactive yet simple manner. It has all the best features integrated into it, which let a user create the video of their choice. It is safe to use and, being a web-based program, offers all the options.
(This video indicates how to use the Animaker tool for creating the best-animated videos, along with an example.)
3. Moovly
Moovly is also one of the best animation tools available to add animation to the content. On the main page, the “add content” option is available from where a user can simply update the video and add animation to it.
(This video indicates how to use the Moovly tool for creating the best-animated videos, along with an example.)
Note: These tools are among those that even a layman can use. But some users are still not happy with the interface of these animate picture online tools and feel like they are lacking features. For all those out there, we have some other options too.
Part 2 The Secret of Animating Pictures Online
The secret behind animating pictures online is to save time and effort. With the help of online tools, one can get the outcome with the help of inbuilt templates. There will be no need to install any application or plugin when they wish to add any particular animation to the content. Some tools you can consider using to add animation to designs are as follows:
1. Pixtellar
Pixtellar is a great tool that helps in creating animated videos and images too. Along with creating animated videos and images, one can easily create posters, logos, photo collages, and so on.
However, before using it, be sure to do the registration, as without it, using it is impossible. After registering, the steps you need to follow to use it are as follows:
Step 1Create from Scratch
Choose the template of your choice or click on “Create from Scratch”. Here we are choosing the templates.
Step 2Choose social media
It will be redirected to the next page where you will find out templates according to the selected category. (Here we choose social media).
Step 3Click on “Animate”
Choose any of them based on your preferences. You will head to the next page where you can do the editing as per your needs by clicking on “Animate”.
Step 4Save the image
After making the changes and adding the animations, you are all set to save the image. The “Save” button is right at the top of the page!
2. Adobe Spark
Adobe Spark is a tool that has pre-built templates available for adding animations to the designs. From adding animations to editing the image and video, all the options are featured in this. It also gives users an idea of how they can simply create the video and images with the help of animations and other effects.
However, when you are using it, registration is a must. After performing the registration, you are all set to use it. The steps you need to follow to use this tool are as follows:
Step 1Start editing
After completing the registration, you will reach the main page where you can choose the option of your choice and start editing. Here we have chosen the template option.
Step 2Create From This Template
It asks you to be sure and click on “Create From This Template.”
Step 3Do the editing
It takes a few seconds to present the same in front of you. On this page, you are all set to do the editing as per your needs.
Step 4Save the image
After doing all the editing, you are all set to save the image. The “Save” button is right there at the top. Click on it and save the image!
3. Crello or VistaCreate
Crello, which turns out to be VistaCreate, is one of the most famous tools for adding motion to images. It has almost 8,000+ animated designs and motion graphics available, which are helpful in creating eye-catching videos.
When you are using this feature, registration or sign-up is important. On the main page, the signup option is available, helping users do it. After that, the steps are as follows:
Step 1Click on the “Template”
On the home page, you can either create your own or click on the “Template” option available. (We chose the template option here).
Step 2Select the template
Now select the template of your choice. Here we have selected the Happy New Year one.
Step 3Do the editing as required
Now you are all set to do the editing as required. Here all the options are available, which help in adding all the basic to advanced details to the image. You can use it.
Step 4Download the image
After doing the editing, you are all set to download the image. The downloading button is right there at the top.
Key Takeaways from This Episode
● Animated videos are eye-catching, and tools are helpful in making them more enhanced.
● Animation tools are very easy to use and precisely make the video.
● Editing options are available in the tools, which are helpful in adding extra effects to the image.
● The tools are free to use with all the in-built templates and other features.
Easy Shortcut to Convert Videos to Gifs on iPhone
Simple Shortcut to Convert Videos to Gifs on iPhone
An easy yet powerful editor
Numerous effects to choose from
Detailed tutorials provided by the official channel
To create iPhone video to GIF there are several third-party apps available. You can even choose the online sites for the task, but the editing and other options will be limited. The GIFs on your iPhone can be created using videos as well as Live photos.

One of the best ways to create a GIF is using the Shortcuts app that comes pre-installed on devices running on iOS 13 and later versions of the OS. The app has shortcuts to accomplish several tasks on your iPhone including GIF creation. Learn about using Shortcuts and other tools for creating a GIF on iPhone.
In this article
01 [How to make GIF from Video on iPhone using Shortcut App](#Part 1)
02 [How to save Live Photos as GIF on iPhone](#Part 2)
03 [How to save Live Photos as GIF on iPhone](#Part 3)
04 [How to save videos as live photos on your iPhone?](#Part 4)
05 [Best tool for creating GIFs and video editing on your Windows and Mac- Wondershare Filmora](#Part 5)
Part 1 How to make GIF from Video on iPhone using Shortcut App
One of the easiest ways to convert video GIF iPhone is by using the Shortcuts app. If you have deleted the app, you can reinstall it from the app store. Once the app is installed, you would next need to allow the untrusted shortcuts and for this go to Settings > Shortcuts> toggle Add Untrusted Shortcuts to add the shortcuts created by the user. The further steps for converting video to GIF iPhone are as follows.
Step 1. On your iPhone, download the Video to GIF shortcut. You can download it using iCloud or RoutineHub. Find the shortcut and click on Get Shortcut will let you check the action of the shortcut.
Move down and click on the red Add Untrusted Shortcut button that will add the shortcut for the library.

Step 2. Go to the My Shortcuts tab and click on the Video to GIF section. If you are using it for the first time, you need to grant permission to use the videos and photos. Click on the OK button and continue.

Step 3. Next, browse and add the video from which you wish to create the GIF. Since GIF animations are short, it is always recommended to use short videos.
Step 4. Video processing will start and during this, the Video to GIF shortcut will be greyed out.

Step 5. Once done, the preview of the GIF will appear on the screen. Finally, you can save the GIF to your Photos app on iPhone or can also share it through email, AirDrop, iMessage, and other third-party services as needed.

Part 2 How to save Live Photos as GIF on iPhone
Live Photo is an interesting feature of the iPhone where an image is captured in an animated form for a couple of seconds. These Live Photos can be easily converted to GIFs using the steps below.
Step 1. On your iPhone Photo app, open the Live Photo that you want to save as GIF.
Step 2. Darg the selected photo upwards and will see multiple effects options along with other image details.
Step 3 To save the selected image as GIF, choose Loop or Bounce animation. Once done, share the image on mail and other services listed or save it to the device.

Part 3 How to save Live Photo as video on iPhone
You can also convert your live photos to videos and then use them for making GIFs and for other uses. The steps for iPhone live photo to video are as follows.
Step 1. On your iPhone, open the Photos app and choose the Live Photo that you want to convert.
Step 2. Next, click on the share button at the bottom of the screen and multiple options will be seen.
Step 3. Scroll down and choose Save as Video option and with this, the live photo will be saved as a Video.
Additionally, you can also convert the LivePhotos to videos using the shortcut app.

Part 4 How to save videos as live photos on your iPhone?
If you need to convert your videos to live photos on iPhone, there are several third-party tools available and one of the widely used is IntoLive. Using this app, videos, as well as GIFs, can be converted into live photos.
Steps on how to turn a video into a live photo iPhone
Step 1. Download, install and launch the IntoLive app from the app store.
Step 2. Next, browse and add the desired video.
Step 3. If needed, the added video can be customized using several supported features.
Step 4. Next, click on the Make option at the top-right corner and then choose the repeats you want for a Live Photo.
Step 5. Finally, click on the Live Photo and your Live Photo will be saved to the device.

Part 5 Best tool for creating GIFs and video editing on your Windows and Mac- Wondershare Filmora
Above we have listed several ways to create GIFs on your iPhone and also to convert videos to LivePhotos and vice-versa. Installing different tools for different tasks is a hassle and also a time-consuming task. So, if you are looking for an all-in-one tool that allows you to create GIFs, and professionally edit your media files, Wondershare Filmora Video Editor is the best tool to consider. Available for quick download on your Windows and Mac system, this feature-packed software has an intuitive and user-friendly interface.
Wondershare Filmora
Get started easily with Filmora’s powerful performance, intuitive interface, and countless effects!
Try It Free Try It Free Try It Free Learn More >
Media files in all key formats are supported by the tool and there are multiple options for editing and video creation like splitting, rotating, cutting, adding effects, sounds, text, and other elements. In a few simple steps, your customized GIF and other professional-looking media files will be ready.
Steps to create GIF using Wondershare Filmora
Step 1. Launch the installed software on your system and add the video or images from the system.
Step 2. The added media files next need to be dragged and dropped to the timeline at the bottom of the interface.
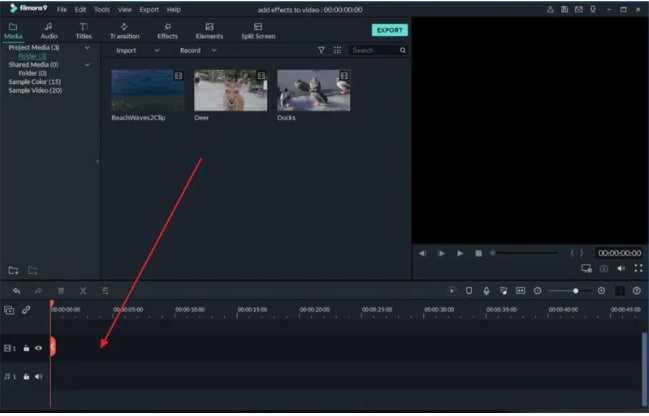
Step 3. After the files are moved, you can customize them using several editing tools like rotate, crop, cut, and more.
Step 4. Next, add text, effects, sound, and other elements as needed.

Step 5. Finally choose to export the file and then from the Local tab, select the GIF option. Choose a file name and location and then finally click on the EXPORT button.

● Key Takeaways from This Episode →
●There are several ways to turn video into GIF iPhone.
●Using shortcuts is one of the most straightforward methods for creating GIFs using videos.
●You can also convert videos to LivePhoto and vice versa on your iPhone using third-party apps.
●Wondershare Filmora is an excellent software to make GIFs and professionally edit media files.
To create iPhone video to GIF there are several third-party apps available. You can even choose the online sites for the task, but the editing and other options will be limited. The GIFs on your iPhone can be created using videos as well as Live photos.
One of the best ways to create a GIF is using the Shortcuts app that comes pre-installed on devices running on iOS 13 and later versions of the OS. The app has shortcuts to accomplish several tasks on your iPhone including GIF creation. Learn about using Shortcuts and other tools for creating a GIF on iPhone.
In this article
01 [How to make GIF from Video on iPhone using Shortcut App](#Part 1)
02 [How to save Live Photos as GIF on iPhone](#Part 2)
03 [How to save Live Photos as GIF on iPhone](#Part 3)
04 [How to save videos as live photos on your iPhone?](#Part 4)
05 [Best tool for creating GIFs and video editing on your Windows and Mac- Wondershare Filmora](#Part 5)
Part 1 How to make GIF from Video on iPhone using Shortcut App
One of the easiest ways to convert video GIF iPhone is by using the Shortcuts app. If you have deleted the app, you can reinstall it from the app store. Once the app is installed, you would next need to allow the untrusted shortcuts and for this go to Settings > Shortcuts> toggle Add Untrusted Shortcuts to add the shortcuts created by the user. The further steps for converting video to GIF iPhone are as follows.
Step 1. On your iPhone, download the Video to GIF shortcut. You can download it using iCloud or RoutineHub. Find the shortcut and click on Get Shortcut will let you check the action of the shortcut.
Move down and click on the red Add Untrusted Shortcut button that will add the shortcut for the library.
Step 2. Go to the My Shortcuts tab and click on the Video to GIF section. If you are using it for the first time, you need to grant permission to use the videos and photos. Click on the OK button and continue.
Step 3. Next, browse and add the video from which you wish to create the GIF. Since GIF animations are short, it is always recommended to use short videos.
Step 4. Video processing will start and during this, the Video to GIF shortcut will be greyed out.
Step 5. Once done, the preview of the GIF will appear on the screen. Finally, you can save the GIF to your Photos app on iPhone or can also share it through email, AirDrop, iMessage, and other third-party services as needed.
Part 2 How to save Live Photos as GIF on iPhone
Live Photo is an interesting feature of the iPhone where an image is captured in an animated form for a couple of seconds. These Live Photos can be easily converted to GIFs using the steps below.
Step 1. On your iPhone Photo app, open the Live Photo that you want to save as GIF.
Step 2. Darg the selected photo upwards and will see multiple effects options along with other image details.
Step 3 To save the selected image as GIF, choose Loop or Bounce animation. Once done, share the image on mail and other services listed or save it to the device.
Part 3 How to save Live Photo as video on iPhone
You can also convert your live photos to videos and then use them for making GIFs and for other uses. The steps for iPhone live photo to video are as follows.
Step 1. On your iPhone, open the Photos app and choose the Live Photo that you want to convert.
Step 2. Next, click on the share button at the bottom of the screen and multiple options will be seen.
Step 3. Scroll down and choose Save as Video option and with this, the live photo will be saved as a Video.
Additionally, you can also convert the LivePhotos to videos using the shortcut app.
Part 4 How to save videos as live photos on your iPhone?
If you need to convert your videos to live photos on iPhone, there are several third-party tools available and one of the widely used is IntoLive. Using this app, videos, as well as GIFs, can be converted into live photos.
Steps on how to turn a video into a live photo iPhone
Step 1. Download, install and launch the IntoLive app from the app store.
Step 2. Next, browse and add the desired video.
Step 3. If needed, the added video can be customized using several supported features.
Step 4. Next, click on the Make option at the top-right corner and then choose the repeats you want for a Live Photo.
Step 5. Finally, click on the Live Photo and your Live Photo will be saved to the device.
Part 5 Best tool for creating GIFs and video editing on your Windows and Mac- Wondershare Filmora
Above we have listed several ways to create GIFs on your iPhone and also to convert videos to LivePhotos and vice-versa. Installing different tools for different tasks is a hassle and also a time-consuming task. So, if you are looking for an all-in-one tool that allows you to create GIFs, and professionally edit your media files, Wondershare Filmora Video Editor is the best tool to consider. Available for quick download on your Windows and Mac system, this feature-packed software has an intuitive and user-friendly interface.
Wondershare Filmora
Get started easily with Filmora’s powerful performance, intuitive interface, and countless effects!
Try It Free Try It Free Try It Free Learn More >
Media files in all key formats are supported by the tool and there are multiple options for editing and video creation like splitting, rotating, cutting, adding effects, sounds, text, and other elements. In a few simple steps, your customized GIF and other professional-looking media files will be ready.
Steps to create GIF using Wondershare Filmora
Step 1. Launch the installed software on your system and add the video or images from the system.
Step 2. The added media files next need to be dragged and dropped to the timeline at the bottom of the interface.
Step 3. After the files are moved, you can customize them using several editing tools like rotate, crop, cut, and more.
Step 4. Next, add text, effects, sound, and other elements as needed.
Step 5. Finally choose to export the file and then from the Local tab, select the GIF option. Choose a file name and location and then finally click on the EXPORT button.
● Key Takeaways from This Episode →
●There are several ways to turn video into GIF iPhone.
●Using shortcuts is one of the most straightforward methods for creating GIFs using videos.
●You can also convert videos to LivePhoto and vice versa on your iPhone using third-party apps.
●Wondershare Filmora is an excellent software to make GIFs and professionally edit media files.
How to Make a GIF in Photoshop
How to Make a GIF in Photoshop

Shanoon Cox
Mar 27, 2024• Proven solutions
We all love GIFs and their impressive style of delivering stories. They not only contain set of frames rather they wrap inside lots of emotions and thoughts of creators. You can easily find numbers of eye catching GIF collections over social media sites.
If you love these animated images then probably you might have initiated a search over internet about how to create GIFs. And search engine must have shown you a path to unlimited GIF creator tools . That’s common. But here we are going to talk about one professional recommendation for GIF creation. Yeah, it is Photoshop and it can instantly generate appealing animated Gifs for you.
Below you will be able to learn strategies to create GIF images with latest version of Photoshop:
How to make a GIF in Photoshop
Method 1: Make a GIF from Video in Photoshop
Step 1: Launch your software
Once you have downloaded your Photoshop software tool on your device then simply run it. Note that CS6 versions of Photoshop provide full support to animated files.
Step 2: Get your video clip imported
As your software timeline is available on screen, now you have to import your desired video file to this platform. Simple go to File option from top left corner of toolbar and then from drop down menu select import. Further select, video frames to layers. Choose your video file and soon all its frames will appear on screen. Photoshop also allows users to work on clipped versions of video files; in that case you can use slider to limit the frames at the time of uploading process.
Step 3: Adjust file Import Settings
You will be glad to know that Photoshop offers creative editing features where you can also make color balance adjustments. When you are done with the frame adjustments then go to File and now choose Save for Web from drop down menu.
It will immediately open one new window containing all advanced settings that can assist in better customization of your GIF image. As users need small file size for web uploading needs so you can adjust all these parameters below to get best results:
Colors: Colors are most important descriptive elements for any video so their selection must be done wisely. As more colors can ensure better view but for reducing file size at the same time you can prefer to drop this selection up to 128.
Dither: The dithering process is used to scatter so many colour rich pixels into image so that even a limited colour package can develop intermediate colours over it. If you pick higher number of colours then definitely the image will look finer but at the cost of higher file size.
Lossy: If you want to add some internal drop in the quality of image then this setting is useful. But try to keep it lower because higher range may destroy actual information from image whereas smaller value is good if you want to just reduce the file size.
Size: Users can prefer to change overall dimensions of their GIF that ultimately leads to huge impact on file size.
Step 4: Time to Save your GIF file
When you are done with the editing process and want to save the newly created GIF image then simply move to the File menu available on top left corner of software window and from drop down menu choose “Save for Web” option. It will further ask you to adjust the output file parameters ahead, make changes as per need of your project and finally get it saved to your device.
Check this video to know more:
Method 2: Make a GIF from Still Photos in Photoshop
It is also possible to develop animated GIF images from collection of still images in Photoshop. In this method, users simply need to maintain layers of each frame and then they are sequenced using timeline tool or Photoshop’s animation based editing. Here are few simple to follow steps to get best results:
1. Step 1
First of all, user is advised to bring all desired still images into a single folder in his computer. Then go to the software window, move to Files option and further choose Scripts. It will provide you an option for Load Files into Stack. Now hit browse button and choose your images from desktop folder that you further want to use for development of GIF image. Hit OK. It will immediately open a new composition on screen and all these stills will appear like individual layers of a new single image.
Users can reorder or rearrange these frames as per their desired GIF animation but note that the frame that you want to place at first position in your final GIF must appear at bottom layer and others must follow the same sequence upwards.
All these GIF layers can also be created individually by user using Photoshop tools. To do this, simply run your Photoshop and then use File > New option to start working with a new project. Hit Ok. It is time to unlock the background layer; you can do this by simply double clicking on the lock icon available on screen. Now in order to create a new layer over it, move to Layer option and press New button. You can design all your new layers with this process. As soon as all your images get created then arrange them in bottom to top order same as the previous method.
Note that, this process becomes effective only if you are working on the older version of software and it does not have “Load Files into Stack” feature. You can simply load all your desired stills on Photoshop platform and then drag them to new project window. The free transform tool of Photoshop can help you to resize all the added layers as per need. Use shortcut keys: Ctrl+T to make changes faster.
2. Step 2
Now as your entire GIF image layers have been arranged so next task is to start sequencing. If you are working on CS5 or lower version of Photoshop then you van move to animation window by using Window plus Animation option. On the other side, CS6 or CC users need to click over Window + Timeline option.
As soon as sequencing tool appears on your screen, you will find a small right facing arrow on upper right corner of your screen. Hit this arrow and then choose “Make Frames from Layer” option. The eye icon can be used to hide all unwanted layers. From bottom menu, you can choose looping sequence for your image.
3. Step 3
Finally your animated GIF image is ready and now you can export it to your computer. Hit File option and then Chose Save for Web from drop down menu. But note that for web uploading a file size less then 1MB is acceptable. You can alter it by changing, loss, dither, color and size settings. At last hit Save button and now you can upload your GIF.
Read More to Get : the ultimate guide on How to Convert GIF to Video on your laptop or phone.
Conclusion
If you feel like Photoshop is difficult to learn, Filmora meme maker is your ultimate solution. It helps you make image, GIF and video memes directly without watermark. It is totally FREE to use and no sign up. You can change text size, color and position to create caption when you are editing. You can also put text inside or outside in GIF. Just with a few clicks, your GIF is done . Try it now!
Shanoon Cox
Shanoon Cox is a writer and a lover of all things video.
Follow @Shanoon Cox
Shanoon Cox
Mar 27, 2024• Proven solutions
We all love GIFs and their impressive style of delivering stories. They not only contain set of frames rather they wrap inside lots of emotions and thoughts of creators. You can easily find numbers of eye catching GIF collections over social media sites.
If you love these animated images then probably you might have initiated a search over internet about how to create GIFs. And search engine must have shown you a path to unlimited GIF creator tools . That’s common. But here we are going to talk about one professional recommendation for GIF creation. Yeah, it is Photoshop and it can instantly generate appealing animated Gifs for you.
Below you will be able to learn strategies to create GIF images with latest version of Photoshop:
How to make a GIF in Photoshop
Method 1: Make a GIF from Video in Photoshop
Step 1: Launch your software
Once you have downloaded your Photoshop software tool on your device then simply run it. Note that CS6 versions of Photoshop provide full support to animated files.
Step 2: Get your video clip imported
As your software timeline is available on screen, now you have to import your desired video file to this platform. Simple go to File option from top left corner of toolbar and then from drop down menu select import. Further select, video frames to layers. Choose your video file and soon all its frames will appear on screen. Photoshop also allows users to work on clipped versions of video files; in that case you can use slider to limit the frames at the time of uploading process.
Step 3: Adjust file Import Settings
You will be glad to know that Photoshop offers creative editing features where you can also make color balance adjustments. When you are done with the frame adjustments then go to File and now choose Save for Web from drop down menu.
It will immediately open one new window containing all advanced settings that can assist in better customization of your GIF image. As users need small file size for web uploading needs so you can adjust all these parameters below to get best results:
Colors: Colors are most important descriptive elements for any video so their selection must be done wisely. As more colors can ensure better view but for reducing file size at the same time you can prefer to drop this selection up to 128.
Dither: The dithering process is used to scatter so many colour rich pixels into image so that even a limited colour package can develop intermediate colours over it. If you pick higher number of colours then definitely the image will look finer but at the cost of higher file size.
Lossy: If you want to add some internal drop in the quality of image then this setting is useful. But try to keep it lower because higher range may destroy actual information from image whereas smaller value is good if you want to just reduce the file size.
Size: Users can prefer to change overall dimensions of their GIF that ultimately leads to huge impact on file size.
Step 4: Time to Save your GIF file
When you are done with the editing process and want to save the newly created GIF image then simply move to the File menu available on top left corner of software window and from drop down menu choose “Save for Web” option. It will further ask you to adjust the output file parameters ahead, make changes as per need of your project and finally get it saved to your device.
Check this video to know more:
Method 2: Make a GIF from Still Photos in Photoshop
It is also possible to develop animated GIF images from collection of still images in Photoshop. In this method, users simply need to maintain layers of each frame and then they are sequenced using timeline tool or Photoshop’s animation based editing. Here are few simple to follow steps to get best results:
1. Step 1
First of all, user is advised to bring all desired still images into a single folder in his computer. Then go to the software window, move to Files option and further choose Scripts. It will provide you an option for Load Files into Stack. Now hit browse button and choose your images from desktop folder that you further want to use for development of GIF image. Hit OK. It will immediately open a new composition on screen and all these stills will appear like individual layers of a new single image.
Users can reorder or rearrange these frames as per their desired GIF animation but note that the frame that you want to place at first position in your final GIF must appear at bottom layer and others must follow the same sequence upwards.
All these GIF layers can also be created individually by user using Photoshop tools. To do this, simply run your Photoshop and then use File > New option to start working with a new project. Hit Ok. It is time to unlock the background layer; you can do this by simply double clicking on the lock icon available on screen. Now in order to create a new layer over it, move to Layer option and press New button. You can design all your new layers with this process. As soon as all your images get created then arrange them in bottom to top order same as the previous method.
Note that, this process becomes effective only if you are working on the older version of software and it does not have “Load Files into Stack” feature. You can simply load all your desired stills on Photoshop platform and then drag them to new project window. The free transform tool of Photoshop can help you to resize all the added layers as per need. Use shortcut keys: Ctrl+T to make changes faster.
2. Step 2
Now as your entire GIF image layers have been arranged so next task is to start sequencing. If you are working on CS5 or lower version of Photoshop then you van move to animation window by using Window plus Animation option. On the other side, CS6 or CC users need to click over Window + Timeline option.
As soon as sequencing tool appears on your screen, you will find a small right facing arrow on upper right corner of your screen. Hit this arrow and then choose “Make Frames from Layer” option. The eye icon can be used to hide all unwanted layers. From bottom menu, you can choose looping sequence for your image.
3. Step 3
Finally your animated GIF image is ready and now you can export it to your computer. Hit File option and then Chose Save for Web from drop down menu. But note that for web uploading a file size less then 1MB is acceptable. You can alter it by changing, loss, dither, color and size settings. At last hit Save button and now you can upload your GIF.
Read More to Get : the ultimate guide on How to Convert GIF to Video on your laptop or phone.
Conclusion
If you feel like Photoshop is difficult to learn, Filmora meme maker is your ultimate solution. It helps you make image, GIF and video memes directly without watermark. It is totally FREE to use and no sign up. You can change text size, color and position to create caption when you are editing. You can also put text inside or outside in GIF. Just with a few clicks, your GIF is done . Try it now!
Shanoon Cox
Shanoon Cox is a writer and a lover of all things video.
Follow @Shanoon Cox
Little Known Techniques of Motion Graphics in Premiere Pro
Little Known Techniques of Motion Graphics in Premiere Pro
An easy yet powerful editor
Numerous effects to choose from
Detailed tutorials provided by the official channel
Video editing has recently gained momentum in content design, and with Motion Graphics Premiere Pro editing templates, it has all the fun in the house.
In this article
01 [5 Editing Motion Graphics Techniques in Adobe Premiere Pro](#Part 1)
02 [10 Free Motion Graphics Templates for Premiere Pro](#Part 2)
03 [How to Use Motion Graphics Templates in Premiere Pro](#Part 3)
Part 1 5 Editing Motion Graphics Techniques in Adobe Premiere Pro
A variety of editing techniques of motion graphics for Premiere Pro are ready to give a classy touch to your videos. Let’s brush up through the best you can have.
01Cropping Clips
Cropping your videos allows you to fit them into your required size frames. To remove any unwanted portions of your edits, crop them in adobe Premiere Pro with your desired aspect ratio to give that ‘just perfect’ look to your edits.
Start from importing and adding your footage to your project panel, followed by creating a fresh composition. Now, choose ‘Crop’ from the Effects panel to add it to your clip, either by double-clicking or dragging and dropping.
02Trimming Clips
If you want to adjust the ‘In and Out’ play back sequence of your edited clips, you can go for trimming them. You can trim your clips in the Source and Program monitors, or even in the Premiere Pro timeline. You can choose from the standard cut, jump cut, B-roll cut etc, to suit your editing needs and styles.
All you need to do is open the clip, mark the In and Out points, adjust their sequence with previous or next edits in your cue and that’s it. You can also use keyboard shortcuts for this purpose. However, you need to preset these shortcuts before you begin editing your clips.
03Adding Text
You can try adding simple and formatted texts to enhance your video outlook. This comes handy when you are aiming to deliver specific messages to your audience. You can add normal write-ups, callout quotations and customize your text in a number of exciting styles. Just go to the Type tool, format your text in the Text Box and you’re done!
04Audio Level Adjustment
Want to add spark to your clips with a synchronized audio visual effect? After you finish trimming and cropping, consider opting for an in-line audio adjustment. This will definitely enhance your video and take your craft to the next level.
All you need to do is select an audio clip, click on ‘Audio Gain’ in the drop down menu, set desired Decibel count in the Audio Gain Box and select ‘OK’.
05Exporting Videos
Once you are done with your video craft, you should certainly look forward to making it available for social exposure. To do this, select appropriate sequence constraints in the Export window, choose the export platform, format and Codec, make fine tuning and bit rate adjustments and finish export either in Premiere Pro or Media Encoder. You may also save these settings for your next exports.
Part 2 Free Motion Graphics Templates for Premiere Pro
Let’s have a look into your best choices of free motion graphic templates for Premiere Pro:
0114 Premiere Pro Lumetri Looks
Want to enhance your video creativity with that amazing Hollywood feel? You can undoubtedly opt for the Premiere Lumetri Looks template that gives you the liberty to provide a Hollywood oriented color scheme to your videos, just like those incredible color patterns one would see in Dr. Strangelove, The Martian and many more famous Hollywood flicks.

0215 Animated Lower Thirds
This template comes handy when you need to add lower thirds to your videos, either to introduce different content varieties or to objectify your video components. You can use this template with ease in your personal as well as commercial videos to give them that explicit professional touch.

03Horror Trailer Titles
If horror videos turn you on, use this template in video creations to customize them with that intense and scary feel! This template helps you add scary title slates that are just enough to add a terrifying quotient to your videos. From personal to professional, this template can add intensity to any video type.
04Instagram Stories Premiere Pro Template
This template is a definite catch for those Instagram lovers who constantly experiment to post engaging stories on the platform. If you want your IG stories to grab the talk, go for this animation template to customize photos and text so that they get the buzz among your followers.

05Dust Overlays
Comprising of studio-like effects, this template allows you to enhance your films with high quality dynamic animation in appealing texture variations. Use this template to create videos with those attractive misty backgrounds with cohesive variations in lighting with adjustable power effects.
06Travel Stories Premiere Pro Template
If you are into travel blogging and trying to add spunk to your stories and videos, this template is there to help you out with its catchy text animations and flowy transitions. Available in an upgraded configuration, this template is everything you need to make your travel blogs hover the trending charts.

07Digital Slideshow
Go for this template to add spark to your graphic presentations. Designed primarily for professional usage, it is equally effective in personal projects also. Developed by Evanto Elements, the company offers unlimited access on subscription.

08Free Quotes Premiere Pro Template
If you want to add animated quotes to your video creations, this template is a must try for you. Providing 6 quoting options and a ‘click to change’ text and color interface with convenient customizability keeps it among the top choices for hastle free motion editing.

09Cinematic Title Style Library
If you are bored with those conventional Premiere Pro titles but don’t want to invest time in creating styles of your own, you can use the modernized title styles from this library to enhance your creations with that intense cinematic feel. You can use them comfortably for personal and commercial purposes.

10Space Background Elements
This set of background templates is designed to provide realistic settings to video creators who work on science fiction and space oriented themes. Loaded with different real-time effects, this template provides the ultimate feel of a space travel in 4K.

Part 2 Alternatives to Premiere Pro: Filmora
If not Premiere Pro, you can go for Filmora as a dependable alternative. It’s an exquisite set of amazing and top-notch tools for creating g and editing videos. Wondershare introduced Filmora as an effective, easy-to-use editing software that’s equally caters to the editing pace of beginners as well as experts. You can use Filmora with Windows and macOS.
Packed with a range of appealing customization choices, Filmora comes to you in four principal versions:
● Wondershare Filmora Video Editor
Suitable for beginners, this is the basic and the simplest version having inbuilt editing templates. It’s desktop compatible software.
For Win 7 or later (64-bit)
For macOS 10.12 or later
● Filmora
Android and iOS compatibility in this version of Filmora brought video editing from PCs and laptops into smartphones.

● FilmoraScrn
This version allows you to record your editing screen if you’re a working on Windows.

Part 4 How to Use Motion Graphics Templates in Premiere Pro
After getting familiar with Premiere Pro editing and templates, let’s get into using these adobe premiere motion graphics templates for an exemplary video creating experience. Take up the following steps to get started.
● Go to Premiere Pro Essential Graphics Panel
In the Premiere Pro startup page, select ‘Window’ from the toolbar and select ‘Essential Graphics’ from the drop down menu.
● Add Motion Graphics Templates to Library
Click the ‘Import’ button present at the bottom in the right side of the Essential Graphics Panel. Go to and choose your downloaded motion graphics template file and select ‘Open’. Your file is added to the Essential Graphics Library.
● Drag-Drop the MOGRT to Timeline
‘Drag’ your motion graphics template from the library and ‘Drop’ it on your Timeline.
● Customize Your Template
Go to the ‘Edit’ option in the Essential Graphics Panel to look for customization choices available for your selected motion graphics adobe template.
● Key Takeaways from This Episode →
● Adobe Premiere Pro is an amazing video creation and editing tool that ensures to give a professional class to your edits. Be it personal creativity or professional expertise, this software is all set to give you a wholesome editing experience you will never forget.
● Loaded with an extensive variety of editing templates, available for free and on subscription, adobe premiere pro is a one stop access to all your editing concerns. Its customizable effects will certainly make your creations stand out in the league.
● Video editing is a high in demand craft of excellence. With advancements in software developments, the creative market offers you a pool of over the top editing software that is ready to give that classy spunk to your videos. So just your own from the pool and go on a spree of creating trend setting videos that never miss out on grabbing the attention of everyone around!
Video editing has recently gained momentum in content design, and with Motion Graphics Premiere Pro editing templates, it has all the fun in the house.
In this article
01 [5 Editing Motion Graphics Techniques in Adobe Premiere Pro](#Part 1)
02 [10 Free Motion Graphics Templates for Premiere Pro](#Part 2)
03 [How to Use Motion Graphics Templates in Premiere Pro](#Part 3)
Part 1 5 Editing Motion Graphics Techniques in Adobe Premiere Pro
A variety of editing techniques of motion graphics for Premiere Pro are ready to give a classy touch to your videos. Let’s brush up through the best you can have.
01Cropping Clips
Cropping your videos allows you to fit them into your required size frames. To remove any unwanted portions of your edits, crop them in adobe Premiere Pro with your desired aspect ratio to give that ‘just perfect’ look to your edits.
Start from importing and adding your footage to your project panel, followed by creating a fresh composition. Now, choose ‘Crop’ from the Effects panel to add it to your clip, either by double-clicking or dragging and dropping.
02Trimming Clips
If you want to adjust the ‘In and Out’ play back sequence of your edited clips, you can go for trimming them. You can trim your clips in the Source and Program monitors, or even in the Premiere Pro timeline. You can choose from the standard cut, jump cut, B-roll cut etc, to suit your editing needs and styles.
All you need to do is open the clip, mark the In and Out points, adjust their sequence with previous or next edits in your cue and that’s it. You can also use keyboard shortcuts for this purpose. However, you need to preset these shortcuts before you begin editing your clips.
03Adding Text
You can try adding simple and formatted texts to enhance your video outlook. This comes handy when you are aiming to deliver specific messages to your audience. You can add normal write-ups, callout quotations and customize your text in a number of exciting styles. Just go to the Type tool, format your text in the Text Box and you’re done!
04Audio Level Adjustment
Want to add spark to your clips with a synchronized audio visual effect? After you finish trimming and cropping, consider opting for an in-line audio adjustment. This will definitely enhance your video and take your craft to the next level.
All you need to do is select an audio clip, click on ‘Audio Gain’ in the drop down menu, set desired Decibel count in the Audio Gain Box and select ‘OK’.
05Exporting Videos
Once you are done with your video craft, you should certainly look forward to making it available for social exposure. To do this, select appropriate sequence constraints in the Export window, choose the export platform, format and Codec, make fine tuning and bit rate adjustments and finish export either in Premiere Pro or Media Encoder. You may also save these settings for your next exports.
Part 2 Free Motion Graphics Templates for Premiere Pro
Let’s have a look into your best choices of free motion graphic templates for Premiere Pro:
0114 Premiere Pro Lumetri Looks
Want to enhance your video creativity with that amazing Hollywood feel? You can undoubtedly opt for the Premiere Lumetri Looks template that gives you the liberty to provide a Hollywood oriented color scheme to your videos, just like those incredible color patterns one would see in Dr. Strangelove, The Martian and many more famous Hollywood flicks.
0215 Animated Lower Thirds
This template comes handy when you need to add lower thirds to your videos, either to introduce different content varieties or to objectify your video components. You can use this template with ease in your personal as well as commercial videos to give them that explicit professional touch.
03Horror Trailer Titles
If horror videos turn you on, use this template in video creations to customize them with that intense and scary feel! This template helps you add scary title slates that are just enough to add a terrifying quotient to your videos. From personal to professional, this template can add intensity to any video type.
04Instagram Stories Premiere Pro Template
This template is a definite catch for those Instagram lovers who constantly experiment to post engaging stories on the platform. If you want your IG stories to grab the talk, go for this animation template to customize photos and text so that they get the buzz among your followers.
05Dust Overlays
Comprising of studio-like effects, this template allows you to enhance your films with high quality dynamic animation in appealing texture variations. Use this template to create videos with those attractive misty backgrounds with cohesive variations in lighting with adjustable power effects.
06Travel Stories Premiere Pro Template
If you are into travel blogging and trying to add spunk to your stories and videos, this template is there to help you out with its catchy text animations and flowy transitions. Available in an upgraded configuration, this template is everything you need to make your travel blogs hover the trending charts.
07Digital Slideshow
Go for this template to add spark to your graphic presentations. Designed primarily for professional usage, it is equally effective in personal projects also. Developed by Evanto Elements, the company offers unlimited access on subscription.
08Free Quotes Premiere Pro Template
If you want to add animated quotes to your video creations, this template is a must try for you. Providing 6 quoting options and a ‘click to change’ text and color interface with convenient customizability keeps it among the top choices for hastle free motion editing.
09Cinematic Title Style Library
If you are bored with those conventional Premiere Pro titles but don’t want to invest time in creating styles of your own, you can use the modernized title styles from this library to enhance your creations with that intense cinematic feel. You can use them comfortably for personal and commercial purposes.
10Space Background Elements
This set of background templates is designed to provide realistic settings to video creators who work on science fiction and space oriented themes. Loaded with different real-time effects, this template provides the ultimate feel of a space travel in 4K.
Part 2 Alternatives to Premiere Pro: Filmora
If not Premiere Pro, you can go for Filmora as a dependable alternative. It’s an exquisite set of amazing and top-notch tools for creating g and editing videos. Wondershare introduced Filmora as an effective, easy-to-use editing software that’s equally caters to the editing pace of beginners as well as experts. You can use Filmora with Windows and macOS.
Packed with a range of appealing customization choices, Filmora comes to you in four principal versions:
● Wondershare Filmora Video Editor
Suitable for beginners, this is the basic and the simplest version having inbuilt editing templates. It’s desktop compatible software.
For Win 7 or later (64-bit)
For macOS 10.12 or later
● Filmora
Android and iOS compatibility in this version of Filmora brought video editing from PCs and laptops into smartphones.
● FilmoraScrn
This version allows you to record your editing screen if you’re a working on Windows.
Part 4 How to Use Motion Graphics Templates in Premiere Pro
After getting familiar with Premiere Pro editing and templates, let’s get into using these adobe premiere motion graphics templates for an exemplary video creating experience. Take up the following steps to get started.
● Go to Premiere Pro Essential Graphics Panel
In the Premiere Pro startup page, select ‘Window’ from the toolbar and select ‘Essential Graphics’ from the drop down menu.
● Add Motion Graphics Templates to Library
Click the ‘Import’ button present at the bottom in the right side of the Essential Graphics Panel. Go to and choose your downloaded motion graphics template file and select ‘Open’. Your file is added to the Essential Graphics Library.
● Drag-Drop the MOGRT to Timeline
‘Drag’ your motion graphics template from the library and ‘Drop’ it on your Timeline.
● Customize Your Template
Go to the ‘Edit’ option in the Essential Graphics Panel to look for customization choices available for your selected motion graphics adobe template.
● Key Takeaways from This Episode →
● Adobe Premiere Pro is an amazing video creation and editing tool that ensures to give a professional class to your edits. Be it personal creativity or professional expertise, this software is all set to give you a wholesome editing experience you will never forget.
● Loaded with an extensive variety of editing templates, available for free and on subscription, adobe premiere pro is a one stop access to all your editing concerns. Its customizable effects will certainly make your creations stand out in the league.
● Video editing is a high in demand craft of excellence. With advancements in software developments, the creative market offers you a pool of over the top editing software that is ready to give that classy spunk to your videos. So just your own from the pool and go on a spree of creating trend setting videos that never miss out on grabbing the attention of everyone around!
Top 10 Video to GIF Converters: Top Picks
Best 10 Video to GIF Converters: Top Picks
An easy yet powerful editor
Numerous effects to choose from
Detailed tutorials provided by the official channel
Having trouble converting your videos to GIF? Browse the top 10 converters to sort this out!
In this article
01 [Why GIFs are Widely Used and Popular?](#Part 1)
02 [Top 10 Ways to Turn Video into GIF](#Part 2)
Part 1 Why GIFs are Widely Used and Popular?
If you take a poll on the watch preference of GIF versus videos, most of votes you get would be in favor of watching GIFs. There are obvious reasons to the fact that anyone would prefer watching a GIF over a video, irrespective of its length. Some major ones that make it quite annoying to watch videos include the following:
● To begin with, you need to turn the video on and off, depending on your choice of watching a video or surfing through stories and feeds, failing which you get to hear additional sounds through your feed from the already running video. You further need to stop the music or go for a volume control in case you are not interested to watch the video.
● Most of the videos you run turn up to be irrelevant or uninteresting through the middle, but you don’t have a choice to make bit adjustments. If however possible, the method is not quite convenient. You may need to visit a different site in case you run a video that is not integrated with webpage of your searched content, wait for the portal’s interface to load or watch an advertisement.
● GIFs, on the other hand, do not require pausing or turning off, and run automatically. You also don’t need to mute any sounds. These ensure to-the-point message delivery and don’t divert your attention from the primary content you visit the webpage for.
Owing to the above, most of us are now much interested to convert videos to GIFs for an exact, impactful and to the point content creation and sharing. See through the next sections of this article to learn about the best video to GIF conversion tools and software.
Part 1 Top 10 Ways to Turn Video into GIF
Considering the credibility of GIFs, you may often require to convert your long videos into short and content specific GIFs. Given below are the 10 best methods to cater to the need of video to GIF conversion:
01Filmora
Wondershare Filmora Video Editor is one among the most popular and easy methods to convert videos to GIFs. It is compatible with almost all common video formats and is loaded with a plethora of exciting effects and editing tools. Take the following steps to create GIFs from videos using this application:
Wondershare Filmora
Get started easily with Filmora’s powerful performance, intuitive interface, and countless effects!
Try It Free Try It Free Try It Free Learn More >

Step 1: Import Your Video
Launch Filmora and import your desired video in the app’s welcome window. To do this, click on ‘New Project’ followed by ‘Import’ option from the drop down menu to add your video to the Filmora.

Step 2: Timeline Dragging
Add your video to the app’s timeline using the ‘Drag and Drop’ method. You can also extract video frames by taking screenshots and merge these images into your GIF from the media library.

Step 3: Explore Your Editing Skills
You can now edit the imported video in the timeline using a range of interesting effects. Crop, trim, split or make speed adjustments to give your video a catchy look.

Step 4: Include Messages
Try adding texts and supplementary elements to deliver impactful messages through your creation.

Step 5: It’s Time to Share!
Click ‘Export’ to save your GIF to your device. You are now ready to post your work in your social communities to get the most deserved attention of your peers!

02YouTube to GIF
This one is a simple and user-friendly video to GIF converter. You can convert videos to GIFs from your PC or other online platforms with this converter. The converter allows you to play with a variety of editing effects to make your creation more interesting. All you need to do is the following:
● In the video URL bar, type ‘gif’ after ‘www.’ and you will be redirected to converter’s working window. Set the GIF time interval or apply specific effects using the tools from the panel in the left of the working window.


● To set the video time frame, highlight it in the video timeline. Set the desired interval using the ‘Start Time’ and ‘End Time’ options.

● To add a new visual effect, select it from the menu. Below the video timeline, a row of parameters will get displayed. Set the effect parameters to make desired changes.
● Click ‘Create GIF’. In the ‘Settings’ menu, you can rename and add tags to your creation and even make it private.

● That’s it! You can download your GIF now. You may get a converter purchase offer for enabling advanced features. While most users prefer sticking to the free version, it is up to you whether to decline or accept the purchase offer.
● The ‘Download’ feature is exclusive to registered users. However, if you don’t prefer creating an account, just open the GIF download link in a separate tab’s ‘Direct Link’ row. Alternatively, you can replace ‘gif’ with ‘conv’ in the video URL bar and choose ‘Convert to GIF’. However, this process may take some extra minutes.

03Giphy GIF Maker
This is an editing tool that you can use to convert video to GIF online. This one is a reliable converter tool with a user-cohesive interface. It is a simple video editor that is available to you for free. All you need to do is mentioned below:
Step 1: Load your Video
Go to the official app website and paste your desired video link in the search bar. Your video gets uploaded to the app’s editor screen. Specify the time frame and check out your GIF’s preview.

Step 2: Let’s Go Editing!
Select ‘Continue to Decorate’ to edit your GIF with texts, effects, frames and filters. You can even go for a straight upload if your video doesn’t require customization.

Step 3: Time to Share!
Select ‘Continue to Upload’ and add required tags. Tap ‘Upload to Giphy’ to make a social media post or add it to the app’s website through a specific share code.
04Wondershare TunesGo
This is an effective video to GIF creator tool, loaded with extensive features. You can use this application to convert videos, live photos and multiple snaps into interesting GIFs. TunesGo gives you the freedom to edit your work in your own style with a variety of effects. Here’s what you need to do:

Step 1: Launch TunesGo
Download, install and launch the app into your PC. You may be asked for a device connection setup, but you can skip that in case GIF creation is your only requirement.

Step 2: Upload your Video
In the app’s welcome screen, navigate to ‘Toolbox’ at the top. From the drop down interface, choose ‘GIF Maker’. In the new window that pops-up next, click on ‘Add’ to upload the desired video to the app from your PC.

Step 3: Let’s Create!
Set the required time frame for your GIF in the app’s timeline and tap the ‘Create GIF’ button to start the conversion process. On completion, your work gets automatically saved in the ‘Pictures’ folder in your PC. You can also customize your target location.

05Vimeo
Vimeo is also a quick, 3-stepvideo to GIF converter. However, you need to have a Vimeo account to take up the conversion process. This is an easy and hassle free GIF creator, that adheres to your creation needs within minutes. Here’s what you need to do:
Step 1: Upload Your Video
Log in to your Vimeo account. In the opening window, select ’Upload’ from the toolbar at the top. ‘Drag and Drop’ or click ‘Choose Files’ to upload the desired video from your device.

Step 2: Create Your GIF
After you are done uploading the video, select ‘Create a GIF’ from the sidebar at the left. You will be directed to the GIF Editor window. Select a loop section from the video and set a time frame of maximum 6 seconds in the video timeline. Now click ‘Create GIF’.


Step 3: Export Your Creation
Your GIF is ready to download and share. You can also embed your GIF by generating embed codes for specific platforms.
06 Adobe Photoshop
This one is one f the most popular editing applications you can use to make GIF out of video. It’s simple and user-friendly interface does not require you to possess a Photoshop mastery for the conversion purpose. Here’s what you need to follow:
Step 1: Search Your Video
Find a video of your choice from a desired platform. In case you want a YouTube video, add ‘ss’ prior to the video’s service name in YouTube’s URL bar.
STEP 2: Edit Your Video
Use any preferable video splitters and editors to crop, trim and add interesting effects to your video and set a maximum time frame of 3 seconds.
Step 3: Create GIF
Open your edited video in Adobe Photoshop and tap ‘File Import-Video frames into layers’.

Step 4: Adjust Settings
Make required setting adjustments and click on ‘File-Save for Web’. Try adjusting image resolution and color range if your file size exceeds 10 MB.

Step 5: Save Your Work
In the ’Files’ tab at the top, select ‘Save’ and choose the ‘.gif’ extension in the ‘File Type’ dialog box to save your creation to your PC.
07Convertio
This converter provides a simple, 3-step process to create GIF from video. Either use it as a browser extension or download it from Google Chrome Webstore. Take the following steps to convert videos to GIF online.
● Upload your desired video to the service timeline. You can either choose files directly or ‘Drag and Drop’ them from your device.
● Select ‘Convert’ to make GIF from your uploaded video.
● Tap ‘Download’ to save your creation.

You can use this service to make different format conversions. However, this converter does not allow you to edit or add effects your GIF.
08MakeAGif
You can use this tool as a GIF video maker online to create, exchange and share GIFs on different platforms. Additionally, you also get the flexibility to use already saved images in your device to add them to your GIF. The app’s basic version allows you to create GIFs without watermarks. To add watermarks, you will need an account on the app. To convert videos to GIFs using this tool, you should take the following steps:
Step 1: Upload Your Video
In the app’s welcome screen, click on ‘Video to GIF’ and upload a desired video in the editor timeline. Add effects and make speed and time frame adjustments. When satisfied, tap ‘Continue to Publishing’.

Step 2: Add Names and Tags
In the publishing window, give a suitable name and add required tags to your edited video to make it easily identifiable. When you are done, click on ‘Create a GIF’ from the bottom right.

Step 3: Ready to Share!
You can now share your created GIF across social media platforms.

09Adobe Premiere
Similar to Adobe Photoshop, Adobe Premiere too is quite a preferred application for creating GIFs from videos. This is a simple, quick and free application that converts your videos to GIFs in a span of few minutes. Here’s what you need to do to go about the process:

Step 1: Edit your Video
Add a video of your choice in the Adobe Premiere timeline and play with your editing creativity to add desired effects and filters to it. Make sure to set requisite time frames to your edit.

Step 2: Prepare an Export
Click into the app’s video timeline, and prepare a file export using the following path:
File> Export> Media

Step 3: Settings Adjustments
In the Media Export window, navigate to the ‘Format’ tab. From the drop down menu, choose ‘Animated GIF’. Here, you can add your gif file, select its target destination and adjust the required settings.

Step 4: Export Your Work
Click ‘Export’ to share your creation on social media or click on ‘Queue’ to send your GIF to a specific media encoder.

1010. Movavi Video Converter
This is one of the latest video converter software you can rely on to make GIF from video files. This software allows you to create top quality animated GIFs and is compatible with a variety of video formats. Using this converter, you can create amazing GIFs in 5 quick steps: here’s what you need to follow:
Step 1: Download and Install the Software
To begin, download the converter software from its official site and adhere to the user instructions to install the same in your system.
Step 2: Upload Your Video
In the software’s opening window, click on ‘Add Media’ followed by ‘Add Video’ and select a desired video from your system to upload on the Movavi video timeline.

Step 3: Trim Your Video
Select ‘Edit’ from the right of your video file. In the editing window, specify the initial cut of the video by displacing the marker to the desired point. Click on ‘Scissors’ to add multiple cut points to your video. You can even drag the cut points around the editor timeline. Choose the unvented sections and click ‘Trash Can’. When the result satisfies you, click ‘Done’.

Step 4: Choose a Conversion Format
Navigate to the ‘Images’ tab and select ‘GIF’ and set an adequate size for the GIF. Here, you can adjust quality, frame size and rate and resize method using the ‘Cogwheel’ tool.

Step 5: Let’s Get Converting!
Tap ‘Convert’ and wait for the conversion to finish. You will be automatically directed to the folder where your converted files get saved.

● Key Takeaways from This Episode →
● GIFs are short, to the point and convenient to access, providing exact and impactful message delivery.
● The software market is flooded with a variety of editing tools to convert your dull videos to catchy GIFs.
● Filmora is a quick and smart editing tool that envisages your GIF creating experience with a range of exciting features.
Having trouble converting your videos to GIF? Browse the top 10 converters to sort this out!
In this article
01 [Why GIFs are Widely Used and Popular?](#Part 1)
02 [Top 10 Ways to Turn Video into GIF](#Part 2)
Part 1 Why GIFs are Widely Used and Popular?
If you take a poll on the watch preference of GIF versus videos, most of votes you get would be in favor of watching GIFs. There are obvious reasons to the fact that anyone would prefer watching a GIF over a video, irrespective of its length. Some major ones that make it quite annoying to watch videos include the following:
● To begin with, you need to turn the video on and off, depending on your choice of watching a video or surfing through stories and feeds, failing which you get to hear additional sounds through your feed from the already running video. You further need to stop the music or go for a volume control in case you are not interested to watch the video.
● Most of the videos you run turn up to be irrelevant or uninteresting through the middle, but you don’t have a choice to make bit adjustments. If however possible, the method is not quite convenient. You may need to visit a different site in case you run a video that is not integrated with webpage of your searched content, wait for the portal’s interface to load or watch an advertisement.
● GIFs, on the other hand, do not require pausing or turning off, and run automatically. You also don’t need to mute any sounds. These ensure to-the-point message delivery and don’t divert your attention from the primary content you visit the webpage for.
Owing to the above, most of us are now much interested to convert videos to GIFs for an exact, impactful and to the point content creation and sharing. See through the next sections of this article to learn about the best video to GIF conversion tools and software.
Part 1 Top 10 Ways to Turn Video into GIF
Considering the credibility of GIFs, you may often require to convert your long videos into short and content specific GIFs. Given below are the 10 best methods to cater to the need of video to GIF conversion:
01Filmora
Wondershare Filmora Video Editor is one among the most popular and easy methods to convert videos to GIFs. It is compatible with almost all common video formats and is loaded with a plethora of exciting effects and editing tools. Take the following steps to create GIFs from videos using this application:
Wondershare Filmora
Get started easily with Filmora’s powerful performance, intuitive interface, and countless effects!
Try It Free Try It Free Try It Free Learn More >
Step 1: Import Your Video
Launch Filmora and import your desired video in the app’s welcome window. To do this, click on ‘New Project’ followed by ‘Import’ option from the drop down menu to add your video to the Filmora.
Step 2: Timeline Dragging
Add your video to the app’s timeline using the ‘Drag and Drop’ method. You can also extract video frames by taking screenshots and merge these images into your GIF from the media library.
Step 3: Explore Your Editing Skills
You can now edit the imported video in the timeline using a range of interesting effects. Crop, trim, split or make speed adjustments to give your video a catchy look.
Step 4: Include Messages
Try adding texts and supplementary elements to deliver impactful messages through your creation.
Step 5: It’s Time to Share!
Click ‘Export’ to save your GIF to your device. You are now ready to post your work in your social communities to get the most deserved attention of your peers!
02YouTube to GIF
This one is a simple and user-friendly video to GIF converter. You can convert videos to GIFs from your PC or other online platforms with this converter. The converter allows you to play with a variety of editing effects to make your creation more interesting. All you need to do is the following:
● In the video URL bar, type ‘gif’ after ‘www.’ and you will be redirected to converter’s working window. Set the GIF time interval or apply specific effects using the tools from the panel in the left of the working window.
● To set the video time frame, highlight it in the video timeline. Set the desired interval using the ‘Start Time’ and ‘End Time’ options.
● To add a new visual effect, select it from the menu. Below the video timeline, a row of parameters will get displayed. Set the effect parameters to make desired changes.
● Click ‘Create GIF’. In the ‘Settings’ menu, you can rename and add tags to your creation and even make it private.
● That’s it! You can download your GIF now. You may get a converter purchase offer for enabling advanced features. While most users prefer sticking to the free version, it is up to you whether to decline or accept the purchase offer.
● The ‘Download’ feature is exclusive to registered users. However, if you don’t prefer creating an account, just open the GIF download link in a separate tab’s ‘Direct Link’ row. Alternatively, you can replace ‘gif’ with ‘conv’ in the video URL bar and choose ‘Convert to GIF’. However, this process may take some extra minutes.
03Giphy GIF Maker
This is an editing tool that you can use to convert video to GIF online. This one is a reliable converter tool with a user-cohesive interface. It is a simple video editor that is available to you for free. All you need to do is mentioned below:
Step 1: Load your Video
Go to the official app website and paste your desired video link in the search bar. Your video gets uploaded to the app’s editor screen. Specify the time frame and check out your GIF’s preview.
Step 2: Let’s Go Editing!
Select ‘Continue to Decorate’ to edit your GIF with texts, effects, frames and filters. You can even go for a straight upload if your video doesn’t require customization.
Step 3: Time to Share!
Select ‘Continue to Upload’ and add required tags. Tap ‘Upload to Giphy’ to make a social media post or add it to the app’s website through a specific share code.
04Wondershare TunesGo
This is an effective video to GIF creator tool, loaded with extensive features. You can use this application to convert videos, live photos and multiple snaps into interesting GIFs. TunesGo gives you the freedom to edit your work in your own style with a variety of effects. Here’s what you need to do:
Step 1: Launch TunesGo
Download, install and launch the app into your PC. You may be asked for a device connection setup, but you can skip that in case GIF creation is your only requirement.
Step 2: Upload your Video
In the app’s welcome screen, navigate to ‘Toolbox’ at the top. From the drop down interface, choose ‘GIF Maker’. In the new window that pops-up next, click on ‘Add’ to upload the desired video to the app from your PC.
Step 3: Let’s Create!
Set the required time frame for your GIF in the app’s timeline and tap the ‘Create GIF’ button to start the conversion process. On completion, your work gets automatically saved in the ‘Pictures’ folder in your PC. You can also customize your target location.
05Vimeo
Vimeo is also a quick, 3-stepvideo to GIF converter. However, you need to have a Vimeo account to take up the conversion process. This is an easy and hassle free GIF creator, that adheres to your creation needs within minutes. Here’s what you need to do:
Step 1: Upload Your Video
Log in to your Vimeo account. In the opening window, select ’Upload’ from the toolbar at the top. ‘Drag and Drop’ or click ‘Choose Files’ to upload the desired video from your device.
Step 2: Create Your GIF
After you are done uploading the video, select ‘Create a GIF’ from the sidebar at the left. You will be directed to the GIF Editor window. Select a loop section from the video and set a time frame of maximum 6 seconds in the video timeline. Now click ‘Create GIF’.
Step 3: Export Your Creation
Your GIF is ready to download and share. You can also embed your GIF by generating embed codes for specific platforms.
06 Adobe Photoshop
This one is one f the most popular editing applications you can use to make GIF out of video. It’s simple and user-friendly interface does not require you to possess a Photoshop mastery for the conversion purpose. Here’s what you need to follow:
Step 1: Search Your Video
Find a video of your choice from a desired platform. In case you want a YouTube video, add ‘ss’ prior to the video’s service name in YouTube’s URL bar.
STEP 2: Edit Your Video
Use any preferable video splitters and editors to crop, trim and add interesting effects to your video and set a maximum time frame of 3 seconds.
Step 3: Create GIF
Open your edited video in Adobe Photoshop and tap ‘File Import-Video frames into layers’.
Step 4: Adjust Settings
Make required setting adjustments and click on ‘File-Save for Web’. Try adjusting image resolution and color range if your file size exceeds 10 MB.
Step 5: Save Your Work
In the ’Files’ tab at the top, select ‘Save’ and choose the ‘.gif’ extension in the ‘File Type’ dialog box to save your creation to your PC.
07Convertio
This converter provides a simple, 3-step process to create GIF from video. Either use it as a browser extension or download it from Google Chrome Webstore. Take the following steps to convert videos to GIF online.
● Upload your desired video to the service timeline. You can either choose files directly or ‘Drag and Drop’ them from your device.
● Select ‘Convert’ to make GIF from your uploaded video.
● Tap ‘Download’ to save your creation.
You can use this service to make different format conversions. However, this converter does not allow you to edit or add effects your GIF.
08MakeAGif
You can use this tool as a GIF video maker online to create, exchange and share GIFs on different platforms. Additionally, you also get the flexibility to use already saved images in your device to add them to your GIF. The app’s basic version allows you to create GIFs without watermarks. To add watermarks, you will need an account on the app. To convert videos to GIFs using this tool, you should take the following steps:
Step 1: Upload Your Video
In the app’s welcome screen, click on ‘Video to GIF’ and upload a desired video in the editor timeline. Add effects and make speed and time frame adjustments. When satisfied, tap ‘Continue to Publishing’.
Step 2: Add Names and Tags
In the publishing window, give a suitable name and add required tags to your edited video to make it easily identifiable. When you are done, click on ‘Create a GIF’ from the bottom right.
Step 3: Ready to Share!
You can now share your created GIF across social media platforms.
09Adobe Premiere
Similar to Adobe Photoshop, Adobe Premiere too is quite a preferred application for creating GIFs from videos. This is a simple, quick and free application that converts your videos to GIFs in a span of few minutes. Here’s what you need to do to go about the process:
Step 1: Edit your Video
Add a video of your choice in the Adobe Premiere timeline and play with your editing creativity to add desired effects and filters to it. Make sure to set requisite time frames to your edit.
Step 2: Prepare an Export
Click into the app’s video timeline, and prepare a file export using the following path:
File> Export> Media
Step 3: Settings Adjustments
In the Media Export window, navigate to the ‘Format’ tab. From the drop down menu, choose ‘Animated GIF’. Here, you can add your gif file, select its target destination and adjust the required settings.
Step 4: Export Your Work
Click ‘Export’ to share your creation on social media or click on ‘Queue’ to send your GIF to a specific media encoder.
1010. Movavi Video Converter
This is one of the latest video converter software you can rely on to make GIF from video files. This software allows you to create top quality animated GIFs and is compatible with a variety of video formats. Using this converter, you can create amazing GIFs in 5 quick steps: here’s what you need to follow:
Step 1: Download and Install the Software
To begin, download the converter software from its official site and adhere to the user instructions to install the same in your system.
Step 2: Upload Your Video
In the software’s opening window, click on ‘Add Media’ followed by ‘Add Video’ and select a desired video from your system to upload on the Movavi video timeline.
Step 3: Trim Your Video
Select ‘Edit’ from the right of your video file. In the editing window, specify the initial cut of the video by displacing the marker to the desired point. Click on ‘Scissors’ to add multiple cut points to your video. You can even drag the cut points around the editor timeline. Choose the unvented sections and click ‘Trash Can’. When the result satisfies you, click ‘Done’.
Step 4: Choose a Conversion Format
Navigate to the ‘Images’ tab and select ‘GIF’ and set an adequate size for the GIF. Here, you can adjust quality, frame size and rate and resize method using the ‘Cogwheel’ tool.
Step 5: Let’s Get Converting!
Tap ‘Convert’ and wait for the conversion to finish. You will be automatically directed to the folder where your converted files get saved.
● Key Takeaways from This Episode →
● GIFs are short, to the point and convenient to access, providing exact and impactful message delivery.
● The software market is flooded with a variety of editing tools to convert your dull videos to catchy GIFs.
● Filmora is a quick and smart editing tool that envisages your GIF creating experience with a range of exciting features.
Also read:
- New 6 Unexpected Ways Gif Animation Maker That Affect Your Marketing for 2024
- Updated 2024 Approved Learn How to Create Adobe 3D Animation
- Updated In 2024, How to Create Benime Whiteboard Animation on Android
- Updated Ways to Create Animated Clipart in PowerPoint
- Updated How to Make Whiteboard Animation Videos
- Updated What Is A GIF
- Nurturing the Spirit Through the Top 10 Intellectual Anime Websites
- Updated Amazing Ideas About Creating Personalised WhatsApp GIF Sticker
- 2024 Approved How to Create Free Photo Collage Frame in Minutes?
- New In 2024, Create Animated Video on Canva
- Updated How to Make Animation Characters with the Best Character Creators for 2024
- New Animated Business Logos and Tools to Create for 2024
- In 2024, Create Animated Video on Canva
- New Have You Seen the Facebook Cartoon App Everyones Using Recently
- In 2024, Best 12 Video to GIF Converters High Quality to Check Out
- Updated Secret Shortcut to Adobe Animate Character Tutorial
- New Something About Types of Motion Graphics for 2024
- New Top 12 2D Animation Studios All Should Check Out for 2024
- 2024 Approved Top Claymation Shows That Make Your Memories Unforgettable
- How to Convert Animated GIF From Video for 2024
- New 2024 Approved 10 Cartoon Photo Converters You Couldnt Do Without
- 2024 Approved 15 Best Pics Collage Apps Top Picks
- Learn Easy Blender Rigging in Only 2 Minutes
- Updated 15 Best Pics Collage Apps Top Picks for 2024
- New 2024 Approved The Secret Sauce for Making GIF Instagram Story More Aesthetic
- Updated In 2024, 5 Websites with Animated Logos That Catch Your Eyes
- Updated 5 Best Adobe Animate Courses & Classes | Beginners Complete Tutorial
- 2024 Approved Best 10 Anime Websites to Watch Dubbed Anime Free
- Updated 10 Photoshop Cartoon Effects For Creatives for 2024
- Updated In 2024, 10 Trendy Free Logo Animation Templates
- How To Create Animated Clipart in PowerPoint for 2024
- New How to Liven Up Your Animate Website on Scroll for 2024
- 10 Caricature Makers to Turn Photo to Caricature Effects for 2024
- All About 3D Medical Animation And Its Uses
- Updated 5 Foolproof Amazing Anime Text to Speech Tips for 2024
- In 2024, Latest Guide on iPad 2/3 and iPhone 15 iCloud Activation Lock Bypass
- How to Transfer Text Messages from Vivo S17t to New Phone | Dr.fone
- In 2024, Complete Tutorial to Use GPS Joystick to Fake GPS Location On Nokia G42 5G | Dr.fone
- 9 Best Phone Monitoring Apps for Tecno Camon 20 Pro 5G | Dr.fone
- How to Fix when Apple Account Locked From iPhone 12 Pro?
- How to Come up With the Best Pokemon Team On Vivo V30? | Dr.fone
- In 2024, Here are Some of the Best Pokemon Discord Servers to Join On Samsung Galaxy S24+ | Dr.fone
- How to Transfer Music from Realme 10T 5G to iPod | Dr.fone
- In 2024, How to Unlock iPhone 8 Plus with a Mask On | Dr.fone
- How to Screen Mirroring Xiaomi Redmi A2 to PC? | Dr.fone
- In 2024, Fix Apple iPhone 13 Pro Max Stuck on Data Transfer Verified Solution! | Dr.fone
- Fixing Foneazy MockGo Not Working On Xiaomi Mix Fold 3 | Dr.fone
- Fix the Error of Unfortunately the Process.com.android.phone Has Stopped on Tecno Spark 20C | Dr.fone
- In 2024, How to Change Netflix Location to Get More Country Version On Apple iPhone 7 | Dr.fone
- Fixing Foneazy MockGo Not Working On OnePlus Open | Dr.fone
- Title: Updated Top 7 Animated GIF Text Makers
- Author: Elon
- Created at : 2024-06-15 11:22:30
- Updated at : 2024-06-16 11:22:30
- Link: https://animation-videos.techidaily.com/updated-top-7-animated-gif-text-makers/
- License: This work is licensed under CC BY-NC-SA 4.0.
