
:max_bytes(150000):strip_icc():format(webp)/GettyImages-1437209125-b47ae60035f248e2b01b781f50f919c1.jpg)
Ways to Stop Animation From Looping in Unity for 2024
Ways to Stop Animation From Looping in Unity
How to Stop Animation from Looping in Unity
An easy yet powerful editor
Numerous effects to choose from
Detailed tutorials provided by the official channel
Unity is an IDE interface all designed exclusively for game developers. However, you can do much more with Unity than game development. But, our main concern here is something else than this subject. You’re looking for easy tutorials on Unity stop animation!

And luckily, we’ve got you covered as we’ve briefly explained how to perform Unity stop animation from looping and the steps to make a smooth animation.
In this article
01 [What is Unity Used for?](#Part 1)
02 [How to Stop Animation Playing in Loop in Unity?](#Part 2)
03 [How to Smooth an Animation in Unity?](#Part 3)
Part 1 What is Unity Used for?
Unity is a software tool friendly to all the game developers out there. This tool is used by the large community of game developers to power and create their game development projects. And, the software is more of a professional means and not a simple pared-down ‘game builder .’Unity also offers one of the most significant inbuilt features like rendering, physics, and collision detection. Thus, one of the powerful aspects of Unity is that game developers need not go out of the box and create everything from scratch. Instead, they are available with the physics engine required to develop games quickly. Another robust feature of Unity is that it includes an excellent ‘Asset Store’ where developers can upload their creations and showcase them to the whole community. So, that’s Unity and its uses in a broader scope!
Before we take you through the next section, it’s important to mention that Unity is also known as cross-platform IDE, where IDE stands for ‘integrated development environment.’ So, it can be called more of an interface with access to all the tools and resources required to develop games.
Apart from the game development, Unity is known for other excellent usage purposes as:
● Simulations
● Animation
● Architectural Visualization
● Previsualization for Film
● Interactive Experiences
Among these features only, we’ll describe Unity stop animation from looping in detail.
Part 2 How to Stop Animation Playing in Loop in Unity?
As we said, we’ll describe to you the most accessible definition of how to stop Animation in Unity. Thus, there are simple steps that we’d like to define firsthand before explaining the whole procedure with an image-centric step-by-step guide.
So, those simple steps to stop motion animation in After Effects in the loop also go like below:
Step 1 Go to the Project tab and select Animation.
Step 2 Open the Inspector tab.
Step 3 Uncheck the checkbox Loop Time, and you’re good to go!
We’ll describe the same, i.e., Unity stop animation from looping through the step guide below.
In this guide, we’ll explain right from applying the Animation so that you’d understand better. So, let’s begin without any further ado!
01Step 1 Delete animation folder
We have already created an animation folder in the folder named as own Animation, so click that folder, click the animation folder, and then another folder along with as shown below. Hold the Shift key and click another folder. Then, right-click the Delete tab as depicted below.
Similarly, you can also delete the Animation if you wish.

02Step 2 Create an animation for the subject
Now, you may have different subjects. We’re creating Animation on Mobile Joystick for reference, as shown below.

Now, hit the Create tab on the Unity panel below. Then, proceed to save your Animation in the folder you’ve already created for the same.

03Step 3 Give positions to the animation
Firstly, hit the red-icon button used for recording, as shown below.

Give the position on the left side after you click the button. And, then, clicking almost near to 3you can give the position to the right-hand side as shown below.

Now, the animation has been set. You can see the animation from left to right if you click the Play button. So, here, you can see the results of infinite loop animation, which won’t stop.

You can follow two ways to stop this Animation in Unity from looping, and we’ll describe both methods below.
04Step 4 Stop animation Unity Way 1
Go to the animation folder where you’ve created the animation and click the New Animation icon as shown below.

Now, you have to uncheck the Loop Time tab on the top-right corner of the Unity panel.

05Step 5 Stop animation Unity Way 2
Alternatively, you can click the Animator tab on the top of the Unity panel and double-tap the New Animation button. Then, it will also delete or uncheck the loop time, as shown below.

These were all the steps to stop animation Unity.
Part 3 How to Smooth an Animation in Unity?
After done with Unity stop animation, it’s time to smooth your Unity animation. Again, we will describe it simply if you’re used to the Unity platform and then with a step guide with respective screenshots.
So, stay tuned until the end to reveal the easy steps of smoothing an animation in Unity.
Select the Dopesheet at the bottom of the animation window. Then, you need to switch to the ‘Curves’ view once you create your Animation in the Dopesheet. These animation curves help you accelerate and decelerate animations so that the movement and other things can stop and start smoothly.
So, let’s begin with the step guide tutorial on the same as follows:
For reference, take an example of a metronome object imported from Blender to Unity. Here, we’ve grouped all the pendulum objects under one rotation so that when we move the pendulum, it pivots to the correct point, as shown below.

01Add the animator
So, the first step begins with adding the Animator component to the parent object. You can do this by clicking the Add Component tab on the Unity panel’s left side, searching for Animator, and clicking the Animator.
You will also need a controller to control the animations. Go to your animation folder, right-click, and select Create> Animator Controller tab.

Let’s call or give it a name metronome animator as shown below.
Then, you need to drag this into your animator component. Again, you need to go to your animations folder, right-click, select Create> Animations tab.
Now, give this a name pendulum full swing.
02Open the animator tab
Now, open the animator tab, drag this pendulum swing animation to that panel, and double-tap the yellow-colored New Animation button.

03Create an animation
With the game object selected, the animated metronome pendulum, in this case, we’d like to animate the X component of the rotation. So, you need to click Add Property> Transform> Rotation tab and click the + sign on its right, as shown below.
Now, click the plus sign automatically to set two keyframes, one at the beginning and one at the end. Now, click on end select all, and then delete for now.

04Add keyframes to rotate the pendulum
With the first set of keyframes and the pendulum all way to the right, go halfway and change the rotation to the left on the left panel of Unity. Then, add another keyframe.

05Slow down the animation
As you can observe, the Animation of this pendulum is in a straight line and feels unnatural to the eyes. Thus, we’re required to smooth this Animation now! For this purpose, go to the Curves; you can see the pink properties of rotation as going from one side to another.

Now, you need to adjust these pink curves. Start by adding a key to one of its sides, as shown below. After that, it is all on you how slow or fasts you want these values to be.
Here, you’re all done smoothing the animation in Unity after learning the stop-animation Unity tutorial.
You can even stop motion animation on Photoshop with the above tutorial.
06Bonus Tip:
We want to introduce an excellent video editor software called Filmora Video Editor . It is from the house of Wondershare, a well-known software company worldwide.

Wondershare Filmora - Best Video Editor for Mac/Windows
5,481,435 people have downloaded it.
Build unique custom animations without breaking a sweat.
Focus on creating epic stories and leave the details to Filmora’s auto features.
Start a creative adventure with drag & drop effects and endless possibilities.
Filmora simplifies advanced features to save you time and effort.
Filmora cuts out repetition so you can move on to your next creative breakthrough.
With Filmora, you can easily add Animation and edit your videos to make them look world-class. The latest version and new updates are eye-candy and quick fix for beginner video editors.
So, please pay a visit to the Filmora website and check out its Mac and Windows version for free today.
● Key Takeaways from This Episode →
● Learning the concept and usage of Unity
● A tutorial on how to stop animation in Unity from looping
● A tutorial on how to smooth animation in Unity
● Introduction to Filmora, the top-most video editor software for beginners.
Unity is an IDE interface all designed exclusively for game developers. However, you can do much more with Unity than game development. But, our main concern here is something else than this subject. You’re looking for easy tutorials on Unity stop animation!
And luckily, we’ve got you covered as we’ve briefly explained how to perform Unity stop animation from looping and the steps to make a smooth animation.
In this article
01 [What is Unity Used for?](#Part 1)
02 [How to Stop Animation Playing in Loop in Unity?](#Part 2)
03 [How to Smooth an Animation in Unity?](#Part 3)
Part 1 What is Unity Used for?
Unity is a software tool friendly to all the game developers out there. This tool is used by the large community of game developers to power and create their game development projects. And, the software is more of a professional means and not a simple pared-down ‘game builder .’Unity also offers one of the most significant inbuilt features like rendering, physics, and collision detection. Thus, one of the powerful aspects of Unity is that game developers need not go out of the box and create everything from scratch. Instead, they are available with the physics engine required to develop games quickly. Another robust feature of Unity is that it includes an excellent ‘Asset Store’ where developers can upload their creations and showcase them to the whole community. So, that’s Unity and its uses in a broader scope!
Before we take you through the next section, it’s important to mention that Unity is also known as cross-platform IDE, where IDE stands for ‘integrated development environment.’ So, it can be called more of an interface with access to all the tools and resources required to develop games.
Apart from the game development, Unity is known for other excellent usage purposes as:
● Simulations
● Animation
● Architectural Visualization
● Previsualization for Film
● Interactive Experiences
Among these features only, we’ll describe Unity stop animation from looping in detail.
Part 2 How to Stop Animation Playing in Loop in Unity?
As we said, we’ll describe to you the most accessible definition of how to stop Animation in Unity. Thus, there are simple steps that we’d like to define firsthand before explaining the whole procedure with an image-centric step-by-step guide.
So, those simple steps to stop motion animation in After Effects in the loop also go like below:
Step 1 Go to the Project tab and select Animation.
Step 2 Open the Inspector tab.
Step 3 Uncheck the checkbox Loop Time, and you’re good to go!
We’ll describe the same, i.e., Unity stop animation from looping through the step guide below.
In this guide, we’ll explain right from applying the Animation so that you’d understand better. So, let’s begin without any further ado!
01Step 1 Delete animation folder
We have already created an animation folder in the folder named as own Animation, so click that folder, click the animation folder, and then another folder along with as shown below. Hold the Shift key and click another folder. Then, right-click the Delete tab as depicted below.
Similarly, you can also delete the Animation if you wish.
02Step 2 Create an animation for the subject
Now, you may have different subjects. We’re creating Animation on Mobile Joystick for reference, as shown below.
Now, hit the Create tab on the Unity panel below. Then, proceed to save your Animation in the folder you’ve already created for the same.
03Step 3 Give positions to the animation
Firstly, hit the red-icon button used for recording, as shown below.
Give the position on the left side after you click the button. And, then, clicking almost near to 3you can give the position to the right-hand side as shown below.
Now, the animation has been set. You can see the animation from left to right if you click the Play button. So, here, you can see the results of infinite loop animation, which won’t stop.
You can follow two ways to stop this Animation in Unity from looping, and we’ll describe both methods below.
04Step 4 Stop animation Unity Way 1
Go to the animation folder where you’ve created the animation and click the New Animation icon as shown below.
Now, you have to uncheck the Loop Time tab on the top-right corner of the Unity panel.
05Step 5 Stop animation Unity Way 2
Alternatively, you can click the Animator tab on the top of the Unity panel and double-tap the New Animation button. Then, it will also delete or uncheck the loop time, as shown below.
These were all the steps to stop animation Unity.
Part 3 How to Smooth an Animation in Unity?
After done with Unity stop animation, it’s time to smooth your Unity animation. Again, we will describe it simply if you’re used to the Unity platform and then with a step guide with respective screenshots.
So, stay tuned until the end to reveal the easy steps of smoothing an animation in Unity.
Select the Dopesheet at the bottom of the animation window. Then, you need to switch to the ‘Curves’ view once you create your Animation in the Dopesheet. These animation curves help you accelerate and decelerate animations so that the movement and other things can stop and start smoothly.
So, let’s begin with the step guide tutorial on the same as follows:
For reference, take an example of a metronome object imported from Blender to Unity. Here, we’ve grouped all the pendulum objects under one rotation so that when we move the pendulum, it pivots to the correct point, as shown below.
01Add the animator
So, the first step begins with adding the Animator component to the parent object. You can do this by clicking the Add Component tab on the Unity panel’s left side, searching for Animator, and clicking the Animator.
You will also need a controller to control the animations. Go to your animation folder, right-click, and select Create> Animator Controller tab.
Let’s call or give it a name metronome animator as shown below.
Then, you need to drag this into your animator component. Again, you need to go to your animations folder, right-click, select Create> Animations tab.
Now, give this a name pendulum full swing.
02Open the animator tab
Now, open the animator tab, drag this pendulum swing animation to that panel, and double-tap the yellow-colored New Animation button.
03Create an animation
With the game object selected, the animated metronome pendulum, in this case, we’d like to animate the X component of the rotation. So, you need to click Add Property> Transform> Rotation tab and click the + sign on its right, as shown below.
Now, click the plus sign automatically to set two keyframes, one at the beginning and one at the end. Now, click on end select all, and then delete for now.
04Add keyframes to rotate the pendulum
With the first set of keyframes and the pendulum all way to the right, go halfway and change the rotation to the left on the left panel of Unity. Then, add another keyframe.
05Slow down the animation
As you can observe, the Animation of this pendulum is in a straight line and feels unnatural to the eyes. Thus, we’re required to smooth this Animation now! For this purpose, go to the Curves; you can see the pink properties of rotation as going from one side to another.
Now, you need to adjust these pink curves. Start by adding a key to one of its sides, as shown below. After that, it is all on you how slow or fasts you want these values to be.
Here, you’re all done smoothing the animation in Unity after learning the stop-animation Unity tutorial.
You can even stop motion animation on Photoshop with the above tutorial.
06Bonus Tip:
We want to introduce an excellent video editor software called Filmora Video Editor . It is from the house of Wondershare, a well-known software company worldwide.
Wondershare Filmora - Best Video Editor for Mac/Windows
5,481,435 people have downloaded it.
Build unique custom animations without breaking a sweat.
Focus on creating epic stories and leave the details to Filmora’s auto features.
Start a creative adventure with drag & drop effects and endless possibilities.
Filmora simplifies advanced features to save you time and effort.
Filmora cuts out repetition so you can move on to your next creative breakthrough.
With Filmora, you can easily add Animation and edit your videos to make them look world-class. The latest version and new updates are eye-candy and quick fix for beginner video editors.
So, please pay a visit to the Filmora website and check out its Mac and Windows version for free today.
● Key Takeaways from This Episode →
● Learning the concept and usage of Unity
● A tutorial on how to stop animation in Unity from looping
● A tutorial on how to smooth animation in Unity
● Introduction to Filmora, the top-most video editor software for beginners.
Ways to Create Animated Clipart in PowerPoint
How To Create Animated Clipart in PowerPoint
An easy yet powerful editor
Numerous effects to choose from
Detailed tutorials provided by the official channel
Clipart is a special type of graphic art. There are pre-made images that are used to illustrate all sorts of things.

The use of animated clipart is increasing day by day. Here, we will discuss the steps of creating animated clipart for PowerPoint.
In this article
01 [What is Moving Clipart Called?](#Part 1)
02 [Where Can I Find Free Animated Clipart?](#Part 2)
03 [How Do You Add an Animated Clipart to a Slide?](#Part 3)
Part 1 What is Moving Clipart Called?
The moving clipart is basically called animated clipart or Animated Gifs. These are easy and quick ways to present contents that are dynamic, especially on Web pages. The sizes of these files are small compared to the other alternatives for creating dynamic content like Flash and Java. If you would like to learn more about video animation , you can watch this tutorial:
For Win 7 or later (64-bit)
For macOS 10.12 or later
These are several images that are encoded in GIF or Graphic interchange format. This contains a number of frames or images within a single file and can be described by the graphic control extension of its own.

Part 2 Where Can I Find Free Animated Clipart?
We all love to use different types of images to express ourselves. However, the process of finding out better quality, copyright > free and also high > resolution free images a really tough task. To make sure that you can find the right one for you, you can go through some really amazing image resources.
These image resources have a huge collection of CCO or Creative Commons licensed and high > quality pictures to meet your different types of needs. Also, keep in mind to check on to the page that is licensed before using any clipart or animated clip art for copyright infringement.
01 Upsplash

Unsplash is a special site that was launched in the year 2013. This site posts ten photos that are handpicked every ten days. These photos are free of charge. As categorized under CCO, this site offers high > quality resolution images that can add beauty as well as credibility to your work.
02 Pixabay

Pixabay was launched in the year 2016 and has 550,000 free illustrations, photos, and vectors. It is equipped with a search engine that is versatile and can easily customize and broaden the search. Thus, this can offer you accurate results regarding your searches.
If you wish to use high > quality public domain pictures or animated clip art, this site can be your perfect option.
03 Public Domain

This website known as Public Domain has a collection of various high > quality pictures, images, and vectors that you can easily use for your animated videos. Especially, vectors are available here in a big number.
04 Openclipart

Though there are many websites where you can get clip arts, very few of them can provide clip arts of excellent quality. This website known as Openclipart is a reliable source of 11,000 designed clip arts that you can easily use in your animation videos.
05 Bing

Bing is no doubt an extensive search engine that can work similarly to Google. Bing has a special filter that has a large number of superior quality public domain images, vectors, clip arts, and illustrations to amaze you.
06 Photopin

As Photopin has millions of free images, many bloggers prefer to use this for their blog posts. However, Photopin does not come under the CCO license. So, you can use their images but you need to add a link to their website.
07 Pond5 creative

Pond5 is the largest online marketplace of the world for royalty–free stock music has now released the creative common category for media with the target to make it easily accessible to their users.
This site offers not only some superior quality free images, but you can also find some special characters, effects, vectors, sounds, animated clip art, 3D models, and many more. You just have to use the filter showing “Public domain only” to get those free licensed images.
08 Clker.com

Clker is mainly used for clip arts. You can easily get numerous clip arts of different sizes without any charges. This is an amazing source of free graphics, vectors, illustrations, etc. Moreover, this site is also licensed under CCO.
Part 3 How Do You Add an Animated Clipart to a Slide?

You can easily add animated clip art or GIF into the Google slides, to make your creation more visually attractive. To do this task you can choose multiple methods, but the easiest of them is using a GIF URL.
Here is the complete process of how to add a GIF to Google slides using a URL.
01 How to add a GIF to Google Slides using a URL

Step 1Open Your Presentation
Firstly, you need to go to slides.google.com and then open your presentation, or you can also create a new one.
Step 2Choose GIF That You Want to Insert
Click the slide that you want to insert the GIF onto in the sidebar located on the left side.
Step 3Image
In the top toolbar, just select “Insert”, then the “Image” option. After that, select “By URL”.
Step 4Paste URL
Just paste the URL into that box.
Step 5Insert
After that, the GIF will pop up, at that time just click on “Insert”.
02 Can you animate objects in PowerPoint?

How to add animations to the pictures, shapes, texts in a PowerPoint presentation?
Step 1Select the Text
First of all, you have to select the text or object that you wish to animate.
Step 2Select “Animations”
Next, Select “Animations” and choose an animation.
Step 3Choose “Effect Options”
Just choose “Effect Options” and select an effect.
How to manage effects and animations?
● With Previous
You can play an animation simultaneously as the previous animation in you the sequence.
● After previous
You can start an animation right after the previous ones starts.
● On click
You can start an animation or move the animated clip art while you click a slide.
● Delay
You may add time before an effect starts to run.
● Duration
You can also shorten or lengthen an effect.
How to change the order of animations?
● Move the option you desire Later
You can make an animation happen later in the sequence.
● Move the option you desire earlier
You can make an animation appear earlier in the sequence.
How to add animation to the grouped objects?
● Step 1
You need to press “Ctrl” and select the objects you want.
● Step 2
Select “Format> Group> Group” to group those objects or texts.
● Step 3
Select “Animations” and choose an animation.
03 How to Add Animated Clipart in Powerpoint?

Here is the detailed process for you.
Step 1Choose a Clip art image
You need to select the desired image. You can either select an image from the default option in PowerPoint showing Office clipart or you can search for images online or insert your own collection of photos.
Step 2Select an animation effect
You have to go to the “Animation “ tab and click on the option that shows “Add Animation”. From that drop-down menu, you will get several animation effects to animate your static image and create your animated clipart for PowerPoint.
Step 3Choose among different effects
PowerPoint offers animation effects of different types, like motion paths, entrance effects, entrance effects and emphasis effects.
Step 4Bringing transition effects
After creating animated clipart, you can also choose a transition effect to offer a special look to your presentation. In this case, when the slide is revealed this transition effect can easily complement your animation.
04 How Do I Make an Animated Video in Powerpoint?
When you wish to create an animated video for PowerPoint, you can do this easily. The steps are:
Step 1Insert the video into a slide
Insert the video into a slide and then click on “Insert “and select the option “Video”.
Click on the video and align it to the right position and size. Open “Animation Pane”.
Step 2Create a speech bubble
It is not necessary to interrupt your video while inserting an animation. So, it’s important to create a speech bubble.
Click “Shapes” and choose between different arrows, shapes, flow charts, that you can insert into the video.
Step 3Select “Animation Pane”
Click on the speech bubble. Go to “Animations” and select “Animation Pane”.
The animations can be inserted from the “Entrance” area.
Step 4Choose “Inbox”
Click on the speech bubble and choose “Inbox” and then “Fly-In”. The effects will appear in the area of the animation.
By moving the animation on this you can select the time when the animation will appear in the video.
Step 5Play the video
Right-click on “Start With Previous” to allow the animation to start and move.
The speech bubble will appear in the video after just 30 seconds, so move the animation until 30 sec. If you wish to stop the video in just 30 sec, click on the video and add “Play”.
Step 6Move the animation
Click right and choose the “Start With Previous” option. Move the animation to 0 seconds. Add “Pause”.
Click on “Add Animation” and then “Pause”. Then click right and choose “Start With Previous Again”. Move the animation to 30 sec as you need to stop the video from there. You can change the length by inserting the animation “Pause” again.
Step 7Run the video
Click right and select “Start With Previous”. While the continuation of the video, if you want the speech bubble to disappear, click on the bubble and on “Add Animation” and then “Exit” and choose “Fly Out”.
Click right and choose “Start With Previous “again. Move the animation to 60 seconds, as the video will start to run there.
Clipart is a special type of graphic art. There are pre-made images that are used to illustrate all sorts of things.
The use of animated clipart is increasing day by day. Here, we will discuss the steps of creating animated clipart for PowerPoint.
In this article
01 [What is Moving Clipart Called?](#Part 1)
02 [Where Can I Find Free Animated Clipart?](#Part 2)
03 [How Do You Add an Animated Clipart to a Slide?](#Part 3)
Part 1 What is Moving Clipart Called?
The moving clipart is basically called animated clipart or Animated Gifs. These are easy and quick ways to present contents that are dynamic, especially on Web pages. The sizes of these files are small compared to the other alternatives for creating dynamic content like Flash and Java. If you would like to learn more about video animation , you can watch this tutorial:
For Win 7 or later (64-bit)
For macOS 10.12 or later
These are several images that are encoded in GIF or Graphic interchange format. This contains a number of frames or images within a single file and can be described by the graphic control extension of its own.
Part 2 Where Can I Find Free Animated Clipart?
We all love to use different types of images to express ourselves. However, the process of finding out better quality, copyright > free and also high > resolution free images a really tough task. To make sure that you can find the right one for you, you can go through some really amazing image resources.
These image resources have a huge collection of CCO or Creative Commons licensed and high > quality pictures to meet your different types of needs. Also, keep in mind to check on to the page that is licensed before using any clipart or animated clip art for copyright infringement.
01 Upsplash
Unsplash is a special site that was launched in the year 2013. This site posts ten photos that are handpicked every ten days. These photos are free of charge. As categorized under CCO, this site offers high > quality resolution images that can add beauty as well as credibility to your work.
02 Pixabay
Pixabay was launched in the year 2016 and has 550,000 free illustrations, photos, and vectors. It is equipped with a search engine that is versatile and can easily customize and broaden the search. Thus, this can offer you accurate results regarding your searches.
If you wish to use high > quality public domain pictures or animated clip art, this site can be your perfect option.
03 Public Domain
This website known as Public Domain has a collection of various high > quality pictures, images, and vectors that you can easily use for your animated videos. Especially, vectors are available here in a big number.
04 Openclipart
Though there are many websites where you can get clip arts, very few of them can provide clip arts of excellent quality. This website known as Openclipart is a reliable source of 11,000 designed clip arts that you can easily use in your animation videos.
05 Bing
Bing is no doubt an extensive search engine that can work similarly to Google. Bing has a special filter that has a large number of superior quality public domain images, vectors, clip arts, and illustrations to amaze you.
06 Photopin
As Photopin has millions of free images, many bloggers prefer to use this for their blog posts. However, Photopin does not come under the CCO license. So, you can use their images but you need to add a link to their website.
07 Pond5 creative
Pond5 is the largest online marketplace of the world for royalty–free stock music has now released the creative common category for media with the target to make it easily accessible to their users.
This site offers not only some superior quality free images, but you can also find some special characters, effects, vectors, sounds, animated clip art, 3D models, and many more. You just have to use the filter showing “Public domain only” to get those free licensed images.
08 Clker.com
Clker is mainly used for clip arts. You can easily get numerous clip arts of different sizes without any charges. This is an amazing source of free graphics, vectors, illustrations, etc. Moreover, this site is also licensed under CCO.
Part 3 How Do You Add an Animated Clipart to a Slide?
You can easily add animated clip art or GIF into the Google slides, to make your creation more visually attractive. To do this task you can choose multiple methods, but the easiest of them is using a GIF URL.
Here is the complete process of how to add a GIF to Google slides using a URL.
01 How to add a GIF to Google Slides using a URL
Step 1Open Your Presentation
Firstly, you need to go to slides.google.com and then open your presentation, or you can also create a new one.
Step 2Choose GIF That You Want to Insert
Click the slide that you want to insert the GIF onto in the sidebar located on the left side.
Step 3Image
In the top toolbar, just select “Insert”, then the “Image” option. After that, select “By URL”.
Step 4Paste URL
Just paste the URL into that box.
Step 5Insert
After that, the GIF will pop up, at that time just click on “Insert”.
02 Can you animate objects in PowerPoint?
How to add animations to the pictures, shapes, texts in a PowerPoint presentation?
Step 1Select the Text
First of all, you have to select the text or object that you wish to animate.
Step 2Select “Animations”
Next, Select “Animations” and choose an animation.
Step 3Choose “Effect Options”
Just choose “Effect Options” and select an effect.
How to manage effects and animations?
● With Previous
You can play an animation simultaneously as the previous animation in you the sequence.
● After previous
You can start an animation right after the previous ones starts.
● On click
You can start an animation or move the animated clip art while you click a slide.
● Delay
You may add time before an effect starts to run.
● Duration
You can also shorten or lengthen an effect.
How to change the order of animations?
● Move the option you desire Later
You can make an animation happen later in the sequence.
● Move the option you desire earlier
You can make an animation appear earlier in the sequence.
How to add animation to the grouped objects?
● Step 1
You need to press “Ctrl” and select the objects you want.
● Step 2
Select “Format> Group> Group” to group those objects or texts.
● Step 3
Select “Animations” and choose an animation.
03 How to Add Animated Clipart in Powerpoint?
Here is the detailed process for you.
Step 1Choose a Clip art image
You need to select the desired image. You can either select an image from the default option in PowerPoint showing Office clipart or you can search for images online or insert your own collection of photos.
Step 2Select an animation effect
You have to go to the “Animation “ tab and click on the option that shows “Add Animation”. From that drop-down menu, you will get several animation effects to animate your static image and create your animated clipart for PowerPoint.
Step 3Choose among different effects
PowerPoint offers animation effects of different types, like motion paths, entrance effects, entrance effects and emphasis effects.
Step 4Bringing transition effects
After creating animated clipart, you can also choose a transition effect to offer a special look to your presentation. In this case, when the slide is revealed this transition effect can easily complement your animation.
04 How Do I Make an Animated Video in Powerpoint?
When you wish to create an animated video for PowerPoint, you can do this easily. The steps are:
Step 1Insert the video into a slide
Insert the video into a slide and then click on “Insert “and select the option “Video”.
Click on the video and align it to the right position and size. Open “Animation Pane”.
Step 2Create a speech bubble
It is not necessary to interrupt your video while inserting an animation. So, it’s important to create a speech bubble.
Click “Shapes” and choose between different arrows, shapes, flow charts, that you can insert into the video.
Step 3Select “Animation Pane”
Click on the speech bubble. Go to “Animations” and select “Animation Pane”.
The animations can be inserted from the “Entrance” area.
Step 4Choose “Inbox”
Click on the speech bubble and choose “Inbox” and then “Fly-In”. The effects will appear in the area of the animation.
By moving the animation on this you can select the time when the animation will appear in the video.
Step 5Play the video
Right-click on “Start With Previous” to allow the animation to start and move.
The speech bubble will appear in the video after just 30 seconds, so move the animation until 30 sec. If you wish to stop the video in just 30 sec, click on the video and add “Play”.
Step 6Move the animation
Click right and choose the “Start With Previous” option. Move the animation to 0 seconds. Add “Pause”.
Click on “Add Animation” and then “Pause”. Then click right and choose “Start With Previous Again”. Move the animation to 30 sec as you need to stop the video from there. You can change the length by inserting the animation “Pause” again.
Step 7Run the video
Click right and select “Start With Previous”. While the continuation of the video, if you want the speech bubble to disappear, click on the bubble and on “Add Animation” and then “Exit” and choose “Fly Out”.
Click right and choose “Start With Previous “again. Move the animation to 60 seconds, as the video will start to run there.
How to Make 3D Cartoon of Yourself
How to Make a 3D Cartoon of Yourself
An easy yet powerful editor
Numerous effects to choose from
Detailed tutorials provided by the official channel
From among the several trends that emerged on Social Media, making a 3D cartoon of yourself is probably the most popular.
Learning how to make 3D cartoons may just be in the height of demand in the near future.
In this article
01 [What is AI Artist? Plus how to cartoon yourself with it ](#Part 1)
02 [How to Create a 3D Cartoon of Yourself for Meta ](#Part 2)
03 [How to make 3D Cartoon From a Photo ](#Part 3)
04 [Five 3D cartoon Disney-Fied yourself apps ](#Part 4)
05 [More New Useful Tools to Upgrade Your Animation/Cartoon](#Part 5)
Part 1 What is AI Artist? Plus how to cartoon yourself with it
We all remember the Cartoon filter challenge on Facebook, right? Everyone was excited to transform themselves into a cartoon. The options of making personalized cartoon representations of yourself was pretty limited back then. With the Voila AI artist app you can choose at least 3 different cartoon variations of yourself.

The Voila AI artist app can be downloaded from the Apple App store and Android Play Store. You can use the app for free but for faster editing and an ad free experience, you will need to upgrade to the paid version. Other than just creating a cartoon of yourself, you can also create renaissance portraits and caricatures.
● Step 1: Download the Voila AI artist App for your device, and complete the installation process. Allow the app to access your Phone’s Camera rolling permission.
● Step 2: Select the style option you want to use. What we are using here is 3D cartoon (other options: 2D Cartoon, Caricature & and the rest). Touch the arrow and start.
● Step 3: Now, with your camera roll open, click a new one or choose from your gallery. You can also find a celebrities option where you can search for celebrities. This generates a four-grid choice. If you are using the free version, then be prepared to encounter one or two ads. After a few seconds, you can exit out and get back to your images.
● Step 4: You will receive a composite grid of four options; your original image, plus three cartoon representations (Royalty 3D, Baby 3D & Cartoon 3D). Here, you can select the option you like the most and start editing. Locate the up arrow button to immediately share on your preferred social media or simply save a copy in your device.
If the AI artist app has any paid and premium version, upon subscribing you will get ad free & watermark free animated representations.
Part 2 How to Create a 3D Cartoon of Yourself for Meta
Facebook only recently rebranded themselves as Meta. This has now started the rush to create a live virtual interaction space, and big companies like Microsoft and Nvidia are now competing with each other to bridge the gap.
Soon, activities like convening meetings, attending live events or even dating online would take place in virtual environments. So best be prepared for the future by creating a 3D avatar for yourself.
Your virtual avatar would be able to interact with the real world through a virtual platform by using VR headsets and other tech. Sensing your virtual presence would be almost the same as the real world for your peers and colleagues. You can attend a meeting without ever having to travel.
The process behind creating a 3D cartoon of yourself for Meta platforms starts by establishing a facial rig which is like a framework for the cartoon animations to sit on. These days, most apps come with automatic FACS facial rigging which is why certain Instagram filters like the Puppy nose filter was possible.
Presently, creating a complete 3D virtual model of yourself is a bit complicated to do on your own but soon this service will be automated in an app for you.
Part 3 How to make 3D Cartoon From a Photo
Photoshop is no doubt one of the most influential digital assets that allow you to do virtually anything with your photos. Of course, this includes turning your photos into 3D cartoon.
There are advanced techniques and tools you can use to retouch your image to achieve an animated like look for your portraits.
Of course, you can find multiple Photoshop hacks online but the following guide can give you an easy to follow idea of how to go about creating your own 3D cartoon out of an image.

Note; These steps are to be perceived as a simplified overview of your objectives when editing on Photoshop;
● To start out on turning your image into a 3D character, you need to learn how to create layers and then stack them on each other.
● You can then ‘liquify’ these layers to form a mould for your image.
● Apply skin softening techniques to take away the realistic features of the photo before working on turning it into a cartoon.
● Now you can start focus on applying the details to features like eyes, hair, nose and facial lines on your cartoon image.
● You can also change the colour of any individual features on your image. This method is applicable in making caricatures of your photo as well.
Part 4 Five 3D cartoon Disney-Fied yourself apps
Vibrant colours, gorgeous large eyes and shiny hair – pretty much sums up every Disney character you have ever seen. Now, everyone is obsessed with making their own Disney avatar and for good reason. You can use it as filter or upload it on your profile. Here are some of the most in-trend AI powered 3D Disneyfied apps you can use;
01Voila AI Artist

The Voila AI Artist app was released back in March of 2021 and has been the rage among Disneyfied apps. To clarify, the app has nothing to do with the Disney animation company but is perceived by users as the most successful app for disneyfication. Its on-board AI can create 3D and 2D renderings for your image along with hand drawn caricatures. You can download the app on App Store and Google Play.
02ToonMe

The next best app on our Disneyfied list is ToonMe. It also uses AI to turn photos into Disney Characters. The app keeps updating new cartoonish filters which you can use over your images. There are various other features which you can try as well like recreating your photos into classic vectors. The results are of extraordinary quality and can be uploaded on Instagram. You can download the app for free from Play store and App store.
03Snapchat

Snapchat has been around for some time now so you might already have it on your phone. Snapchat offers a vast range of filters and effects that of course includes Disneyfied filters and 3D cartoon images. You can look for them on the Snapchat search bar. New filters keep popping up every day which you can apply over your own images.
04Prisma

Prisma is a notoriously well know pop photo editor – which means it makes your photos ‘pop’. You can use it to edit photos on both Android and iPhone. It also comes with its own range of filters for turning your photos into cartoon images. There are hundreds of variations to choose from so you will definitely be spoilt for choices.
05Clip2Comic Cartoon

This app is only available on the App stores and is well known among iPhone users for turning photos into cartoons and caricatures. It is not exactly a Disneyfied app but it has a plethora of filters and a combination of editing tools to help personalize your 3D photos and comics. You can also directly upload these photos to your Social Media Accounts.
Key Takeaways from This Episode
● With the help of AI and other amazing features, you can use your everyday pictures to make a 3D cartoon of yourself.
● The Metaverse is her and soon we all will be interacting in a virtual space. So best learn how to rig your face with an animation filter.
● Apps like Voila AI artist, you can disneyfy your images quite easily. Explore dozens of such filters and effects with Disneyfied apps.
From among the several trends that emerged on Social Media, making a 3D cartoon of yourself is probably the most popular.
Learning how to make 3D cartoons may just be in the height of demand in the near future.
In this article
01 [What is AI Artist? Plus how to cartoon yourself with it ](#Part 1)
02 [How to Create a 3D Cartoon of Yourself for Meta ](#Part 2)
03 [How to make 3D Cartoon From a Photo ](#Part 3)
04 [Five 3D cartoon Disney-Fied yourself apps ](#Part 4)
05 [More New Useful Tools to Upgrade Your Animation/Cartoon](#Part 5)
Part 1 What is AI Artist? Plus how to cartoon yourself with it
We all remember the Cartoon filter challenge on Facebook, right? Everyone was excited to transform themselves into a cartoon. The options of making personalized cartoon representations of yourself was pretty limited back then. With the Voila AI artist app you can choose at least 3 different cartoon variations of yourself.
The Voila AI artist app can be downloaded from the Apple App store and Android Play Store. You can use the app for free but for faster editing and an ad free experience, you will need to upgrade to the paid version. Other than just creating a cartoon of yourself, you can also create renaissance portraits and caricatures.
● Step 1: Download the Voila AI artist App for your device, and complete the installation process. Allow the app to access your Phone’s Camera rolling permission.
● Step 2: Select the style option you want to use. What we are using here is 3D cartoon (other options: 2D Cartoon, Caricature & and the rest). Touch the arrow and start.
● Step 3: Now, with your camera roll open, click a new one or choose from your gallery. You can also find a celebrities option where you can search for celebrities. This generates a four-grid choice. If you are using the free version, then be prepared to encounter one or two ads. After a few seconds, you can exit out and get back to your images.
● Step 4: You will receive a composite grid of four options; your original image, plus three cartoon representations (Royalty 3D, Baby 3D & Cartoon 3D). Here, you can select the option you like the most and start editing. Locate the up arrow button to immediately share on your preferred social media or simply save a copy in your device.
If the AI artist app has any paid and premium version, upon subscribing you will get ad free & watermark free animated representations.
Part 2 How to Create a 3D Cartoon of Yourself for Meta
Facebook only recently rebranded themselves as Meta. This has now started the rush to create a live virtual interaction space, and big companies like Microsoft and Nvidia are now competing with each other to bridge the gap.
Soon, activities like convening meetings, attending live events or even dating online would take place in virtual environments. So best be prepared for the future by creating a 3D avatar for yourself.
Your virtual avatar would be able to interact with the real world through a virtual platform by using VR headsets and other tech. Sensing your virtual presence would be almost the same as the real world for your peers and colleagues. You can attend a meeting without ever having to travel.
The process behind creating a 3D cartoon of yourself for Meta platforms starts by establishing a facial rig which is like a framework for the cartoon animations to sit on. These days, most apps come with automatic FACS facial rigging which is why certain Instagram filters like the Puppy nose filter was possible.
Presently, creating a complete 3D virtual model of yourself is a bit complicated to do on your own but soon this service will be automated in an app for you.
Part 3 How to make 3D Cartoon From a Photo
Photoshop is no doubt one of the most influential digital assets that allow you to do virtually anything with your photos. Of course, this includes turning your photos into 3D cartoon.
There are advanced techniques and tools you can use to retouch your image to achieve an animated like look for your portraits.
Of course, you can find multiple Photoshop hacks online but the following guide can give you an easy to follow idea of how to go about creating your own 3D cartoon out of an image.
Note; These steps are to be perceived as a simplified overview of your objectives when editing on Photoshop;
● To start out on turning your image into a 3D character, you need to learn how to create layers and then stack them on each other.
● You can then ‘liquify’ these layers to form a mould for your image.
● Apply skin softening techniques to take away the realistic features of the photo before working on turning it into a cartoon.
● Now you can start focus on applying the details to features like eyes, hair, nose and facial lines on your cartoon image.
● You can also change the colour of any individual features on your image. This method is applicable in making caricatures of your photo as well.
Part 4 Five 3D cartoon Disney-Fied yourself apps
Vibrant colours, gorgeous large eyes and shiny hair – pretty much sums up every Disney character you have ever seen. Now, everyone is obsessed with making their own Disney avatar and for good reason. You can use it as filter or upload it on your profile. Here are some of the most in-trend AI powered 3D Disneyfied apps you can use;
01Voila AI Artist
The Voila AI Artist app was released back in March of 2021 and has been the rage among Disneyfied apps. To clarify, the app has nothing to do with the Disney animation company but is perceived by users as the most successful app for disneyfication. Its on-board AI can create 3D and 2D renderings for your image along with hand drawn caricatures. You can download the app on App Store and Google Play.
02ToonMe
The next best app on our Disneyfied list is ToonMe. It also uses AI to turn photos into Disney Characters. The app keeps updating new cartoonish filters which you can use over your images. There are various other features which you can try as well like recreating your photos into classic vectors. The results are of extraordinary quality and can be uploaded on Instagram. You can download the app for free from Play store and App store.
03Snapchat
Snapchat has been around for some time now so you might already have it on your phone. Snapchat offers a vast range of filters and effects that of course includes Disneyfied filters and 3D cartoon images. You can look for them on the Snapchat search bar. New filters keep popping up every day which you can apply over your own images.
04Prisma
Prisma is a notoriously well know pop photo editor – which means it makes your photos ‘pop’. You can use it to edit photos on both Android and iPhone. It also comes with its own range of filters for turning your photos into cartoon images. There are hundreds of variations to choose from so you will definitely be spoilt for choices.
05Clip2Comic Cartoon
This app is only available on the App stores and is well known among iPhone users for turning photos into cartoons and caricatures. It is not exactly a Disneyfied app but it has a plethora of filters and a combination of editing tools to help personalize your 3D photos and comics. You can also directly upload these photos to your Social Media Accounts.
Key Takeaways from This Episode
● With the help of AI and other amazing features, you can use your everyday pictures to make a 3D cartoon of yourself.
● The Metaverse is her and soon we all will be interacting in a virtual space. So best learn how to rig your face with an animation filter.
● Apps like Voila AI artist, you can disneyfy your images quite easily. Explore dozens of such filters and effects with Disneyfied apps.
How to Create a Whiteboard Animation Video
Whiteboard animation simply refers to the process of story telling using pictures and drawn resources on a whiteboard or a plane white surface. Its simply the creation of conventional story telling procedure where text, images, diagrams, figures, etc are drawn onto a white surface.
Whiteboard animation video usually work with audio, visual and most times a combination of both audio and visual to sell a particular information to the audience. Another name it has gotten over time which you may come across while surfing the internet is doodle videos.

In creating this type of videos, script writes are usually employed because of the dynamics involved in creating them. The major users of whiteboard animation video are business owners and people in the education fields. Other people make use of it but these two groups are the major users.
Whiteboard animation is important because it helps viewers remember the contents of what they watched better than looking at an image that contains a lot of information that may not always be organized.
Over time, whiteboard videos have become a more compelling and innovative method of dissemination information. They work so well because it’s a more relatable and fun way of making videos. It goes outside the conventional video making techniques and employs the animation standards which is fun to watch, engaging and still maintains the ability to effective pass the required information to the viewers.
Also, it uses a unique style to mix text, animations, and colors to drive the point home. Viewers are usually glued to their screen while watching it. The usual white background equally makes the information being displayed to effective contrast with each other. However, there is a recent movement from the usual white background to any color of choice while still maintaining the contrasting quality of the videos.
Finally, people tend to remember events or information if they are told as stories. This is one of the major objectives of whiteboard animation videos. They use graphics and animations to tell stories, sell products and services while maintaining the fun in it.
Whiteboard animation video usually takes time to create. Its not always as easy as it may seem. It takes dedication and patience before you perfect the video. if you’re new to this, its ok to not have that perfect video immediately. What matters is your will to grow and get better.
Below is an example of a whiteboard animation video created using Animaker. We’ll still look at the various software applications used for creating whiteboard animation videos.
How to Create Your Video
Step1 The first step to creating your whiteboard animation video is to know your topic of choice. Determining your choice topic is based on the purpose of the video. You have to know the reason why the video is being created in the first place to enable you decide the contents, the outlook, the font style and size and the colors to use.
Step2 The next step after you’ve getting your topic is execution of the idea. This involves having a script which usually involves the step-by-step procedure you are to follow to achieve your goal. Writing the script is arguable the most difficult process. However, once you get it right, all the other processes become relatively easy to execute. You might need to employ a professional script writer depending on your budget for the project.
Step3 After that, the next thing is to deicide whether or not to use your own voice or computer voice. This is also called a voice over. Most software provides a text to speech voice over option which usually comes with various alternatives. There is also another option of using your own voice to finish the project.
Step4 Add text, graphics and animation. This step is usually easier when you are working with the script already provided. You include the text, animations, figures, etc. sometimes you might need to import additional resources to complete this task. However, not all software provides for this.
Step5 Organize your work. In organizing your work, you must ensure that you voice over matches properly with what is on display. Check your spellings, grammar, composition and other ‘little’ details that may give your work a bad look.
Step6 Save your work and export. Once your done with your work, you have to save it on your local disk. This also means downloading the work from the website or software onto a local disk. You can now share the video on any social media of your choice. The most popular place to share it is on YouTube which is the most widely used video watching application.
Top 3 Whiteboard Animation Software
When considering which software is best for whiteboard animation creation needs, the most important factor to have at the back of your mind is flexibility and cost. Some software are really flexible to use but cost more than many people can afford. Others are cheap to purchase but do not have all the necessary resources needed to make a great video.
We’ll be looking at various software that combines cost effectiveness and flexibility. Note however that this list is not exhaustive of the software that combines these two features but are worthy of mention for the purpose of this article.
Filmora
At the top of our list is Filmora . This does not make them the best. However, they are relatively easy to use and have a combination of the two features mentioned above. Finally on our list is Filmora. This software offers much more than just whiteboard animation. It’s your go-to software for your video creation and video editing needs. One of the best parts of this software is that it supports 2D and 3D animation.

Free Download For Win 7 or later(64-bit)
Free Download For macOS 10.14 or later
Animaker
It has a lot of free resources which are made available to users after creating and account with them and verifying your email. However, like most other software, the juicy parts of it are locked and can be unlocked with a monthly or yearly subscription. They are 3 packages; Basic which cost $10 per month and $120 per year, starter package which cost $19 per month and $228 per year and the pro package which costs $49 per month and $588 per year.

This software is at the top of our list because the free resources it provides is adequate to make a decent whiteboard animation. Note that it comes with their watermark which cannot be removed without a paid subscription.
Doodly
Doodly is one of the most popular software applications for creating whiteboard videos. Its popularity comes from the fact that no prior skills is needed to use the software other than basic computer and internet usage. A lot of processes are already automated for users. If you’re a user that is concerned about quick responses from their customer care/support, doodly covers you. They have a record time response to issues from their users. Visit https://www.doodly.com/pricing/ to view their pricing.

Conclusion
If you’re wondering why you should chose whiteboard animation over the conventional video creating technique, then you should probably try it out. Animation easily captures the interest of viewers and the slide-by-slide transitioning equally makes it better. You can always try out other software applications to know the one that fits you best.
How to Create Your Video
Step1 The first step to creating your whiteboard animation video is to know your topic of choice. Determining your choice topic is based on the purpose of the video. You have to know the reason why the video is being created in the first place to enable you decide the contents, the outlook, the font style and size and the colors to use.
Step2 The next step after you’ve getting your topic is execution of the idea. This involves having a script which usually involves the step-by-step procedure you are to follow to achieve your goal. Writing the script is arguable the most difficult process. However, once you get it right, all the other processes become relatively easy to execute. You might need to employ a professional script writer depending on your budget for the project.
Step3 After that, the next thing is to deicide whether or not to use your own voice or computer voice. This is also called a voice over. Most software provides a text to speech voice over option which usually comes with various alternatives. There is also another option of using your own voice to finish the project.
Step4 Add text, graphics and animation. This step is usually easier when you are working with the script already provided. You include the text, animations, figures, etc. sometimes you might need to import additional resources to complete this task. However, not all software provides for this.
Step5 Organize your work. In organizing your work, you must ensure that you voice over matches properly with what is on display. Check your spellings, grammar, composition and other ‘little’ details that may give your work a bad look.
Step6 Save your work and export. Once your done with your work, you have to save it on your local disk. This also means downloading the work from the website or software onto a local disk. You can now share the video on any social media of your choice. The most popular place to share it is on YouTube which is the most widely used video watching application.
Top 3 Whiteboard Animation Software
When considering which software is best for whiteboard animation creation needs, the most important factor to have at the back of your mind is flexibility and cost. Some software are really flexible to use but cost more than many people can afford. Others are cheap to purchase but do not have all the necessary resources needed to make a great video.
We’ll be looking at various software that combines cost effectiveness and flexibility. Note however that this list is not exhaustive of the software that combines these two features but are worthy of mention for the purpose of this article.
Filmora
At the top of our list is Filmora . This does not make them the best. However, they are relatively easy to use and have a combination of the two features mentioned above. Finally on our list is Filmora. This software offers much more than just whiteboard animation. It’s your go-to software for your video creation and video editing needs. One of the best parts of this software is that it supports 2D and 3D animation.
Free Download For Win 7 or later(64-bit)
Free Download For macOS 10.14 or later
Animaker
It has a lot of free resources which are made available to users after creating and account with them and verifying your email. However, like most other software, the juicy parts of it are locked and can be unlocked with a monthly or yearly subscription. They are 3 packages; Basic which cost $10 per month and $120 per year, starter package which cost $19 per month and $228 per year and the pro package which costs $49 per month and $588 per year.
This software is at the top of our list because the free resources it provides is adequate to make a decent whiteboard animation. Note that it comes with their watermark which cannot be removed without a paid subscription.
Doodly
Doodly is one of the most popular software applications for creating whiteboard videos. Its popularity comes from the fact that no prior skills is needed to use the software other than basic computer and internet usage. A lot of processes are already automated for users. If you’re a user that is concerned about quick responses from their customer care/support, doodly covers you. They have a record time response to issues from their users. Visit https://www.doodly.com/pricing/ to view their pricing.
Conclusion
If you’re wondering why you should chose whiteboard animation over the conventional video creating technique, then you should probably try it out. Animation easily captures the interest of viewers and the slide-by-slide transitioning equally makes it better. You can always try out other software applications to know the one that fits you best.
How to Make an Animation With 7 Steps
How to Make an Animation With 7 Steps

Shanoon Cox
Mar 27, 2024• Proven solutions
Did you see a cool flash animation on YouTube and wished if you could use it for your site as well? Does the very thought of making such professional animation that can cost you a bomb, pulls you back from your thoughts? Just forget all your worries because now you can do it yourself and it is a matter of just some time.
With the development of technology, almost anyone can learn how to create animation even with free animation software and create animated clipart in powerpoint if they follow the right instructions. So, in this article, let’s learn how to make an animation in just 7 easy steps on your computer.


Part 1: Preparation
1. Script is the Essence
If you wish to understand the nuances of how to make an animation, the first step you should know is scripting.
Playing with the words in your mind and weaving them on paper makes a big difference. So, penning a story helps you to recognize the loopholes, the pace, and the character development in your story.
The script gives a person an idea of where your story is based, how does it look or at which time of the day are you talking about, who is talking to whom, and most importantly, the dialogues, what are your story characters say to one another. The script is the essence of creating animation and without it, you cannot resume the process of animation.

2. Storyboarding
What is storyboarding? It is a sequence of images or pre-visualization of movie shots to understand how exactly the story will unveil, the feel, the look, the camera angles, everything is described like a flowchart.
Storyboarding can be of various types. It may be colorful, it may just an outline, or black and white or something with complete detail. A storyboard must give a complete and close image of what the movie would look like.
The images must be captioned, the movement of the camera must be shown with arrows, and the object and characters must be differentiated from the background with colors.

3. Voiceover
If you want to make your animation more vivid and interesting, remember to add voiceover. Would you like to see an animated movie without a voice? It is a vital part of any movie recording.
When you ask how to make an animation, you also need to know how to record a voiceover. The animation is influenced by voice performance for focus and timing of a scene. The animated scene and the voiceover must be in sync perfectly in order to retain the attention of the viewers.
In the earlier days, a recording studio used to be rented and a sound engineer and voiceover artist was hired for it. But, today the auditions for VO are done online and the best one with professional recording tools is hired.
![]()
Part 2:Production
4. Animation
Once the preparation stages are over with script, storyboard, and voiceover in place, the animation part can be started. The length of the VO and the story are the deciding factors for the time required for animation. So, pick up a 2D animation software to animate your characters. The process includes importing images, adding it to the timelines.

5. Audio Mix
In this step, it is important to select and assemble the recorded sounds and start preparing the final mix of the sound in order to ensure proper lip sync and other sound effects needed for the final animation film.
Any heavy unwanted sounds are removed and significant spot sounds are added while mixing the pre-determined soundtrack.

Part 3: Edit and Export
6. Final Editing
Often the scenes for the animation film are randomly shot. There are a number of scenes that are shot just as a back up so that later while editing it can be checked and the best shot from many can be picked to include in the movie. All such things are finally checked in the final editing. It is the process of rearranging the clips so that the end product is flawless. Other editing task includes the addition of effects in the clips or text used in titling, etc.
7. Export
Exporting the animated movie is the last step in creating an animation. How to make an animation is no more a big reason for headache. If you want, you may also share it directly on the social media platforms with your friends and viewers.
Conclusion
Now, as you know how to make an animation and the steps involved in it, you must also be aware of one of the best software for editing.
Here we recommend using Filmora . You can use it to make animation video by adding keyframes, so the animation will be smooth and natural. You just need to build a white plane to easily start making animation. Besides, color correction and audio mixer will raise up your animation video to a new level. Download it to have a try (Free)!
Shanoon Cox
Shanoon Cox is a writer and a lover of all things video.
Follow @Shanoon Cox
Shanoon Cox
Mar 27, 2024• Proven solutions
Did you see a cool flash animation on YouTube and wished if you could use it for your site as well? Does the very thought of making such professional animation that can cost you a bomb, pulls you back from your thoughts? Just forget all your worries because now you can do it yourself and it is a matter of just some time.
With the development of technology, almost anyone can learn how to create animation even with free animation software and create animated clipart in powerpoint if they follow the right instructions. So, in this article, let’s learn how to make an animation in just 7 easy steps on your computer.
Part 1: Preparation
1. Script is the Essence
If you wish to understand the nuances of how to make an animation, the first step you should know is scripting.
Playing with the words in your mind and weaving them on paper makes a big difference. So, penning a story helps you to recognize the loopholes, the pace, and the character development in your story.
The script gives a person an idea of where your story is based, how does it look or at which time of the day are you talking about, who is talking to whom, and most importantly, the dialogues, what are your story characters say to one another. The script is the essence of creating animation and without it, you cannot resume the process of animation.
2. Storyboarding
What is storyboarding? It is a sequence of images or pre-visualization of movie shots to understand how exactly the story will unveil, the feel, the look, the camera angles, everything is described like a flowchart.
Storyboarding can be of various types. It may be colorful, it may just an outline, or black and white or something with complete detail. A storyboard must give a complete and close image of what the movie would look like.
The images must be captioned, the movement of the camera must be shown with arrows, and the object and characters must be differentiated from the background with colors.
3. Voiceover
If you want to make your animation more vivid and interesting, remember to add voiceover. Would you like to see an animated movie without a voice? It is a vital part of any movie recording.
When you ask how to make an animation, you also need to know how to record a voiceover. The animation is influenced by voice performance for focus and timing of a scene. The animated scene and the voiceover must be in sync perfectly in order to retain the attention of the viewers.
In the earlier days, a recording studio used to be rented and a sound engineer and voiceover artist was hired for it. But, today the auditions for VO are done online and the best one with professional recording tools is hired.
![]()
Part 2:Production
4. Animation
Once the preparation stages are over with script, storyboard, and voiceover in place, the animation part can be started. The length of the VO and the story are the deciding factors for the time required for animation. So, pick up a 2D animation software to animate your characters. The process includes importing images, adding it to the timelines.
5. Audio Mix
In this step, it is important to select and assemble the recorded sounds and start preparing the final mix of the sound in order to ensure proper lip sync and other sound effects needed for the final animation film.
Any heavy unwanted sounds are removed and significant spot sounds are added while mixing the pre-determined soundtrack.
Part 3: Edit and Export
6. Final Editing
Often the scenes for the animation film are randomly shot. There are a number of scenes that are shot just as a back up so that later while editing it can be checked and the best shot from many can be picked to include in the movie. All such things are finally checked in the final editing. It is the process of rearranging the clips so that the end product is flawless. Other editing task includes the addition of effects in the clips or text used in titling, etc.
7. Export
Exporting the animated movie is the last step in creating an animation. How to make an animation is no more a big reason for headache. If you want, you may also share it directly on the social media platforms with your friends and viewers.
Conclusion
Now, as you know how to make an animation and the steps involved in it, you must also be aware of one of the best software for editing.
Here we recommend using Filmora . You can use it to make animation video by adding keyframes, so the animation will be smooth and natural. You just need to build a white plane to easily start making animation. Besides, color correction and audio mixer will raise up your animation video to a new level. Download it to have a try (Free)!
Shanoon Cox
Shanoon Cox is a writer and a lover of all things video.
Follow @Shanoon Cox
Are You Head Over Heels With 3D Animation Design
Are You Head Over Heels With 3D Animation Design?
An easy yet powerful editor
Numerous effects to choose from
Detailed tutorials provided by the official channel
3D animation design is an acronym for three-dimensional animation, meaning that the backgrounds and characters in this project are in a three-dimensional space. 3D animation artist makes use of computer graphics to make the object looks like they’re moving in a three-dimensional space.
Today, 3D animation design and animation are trendy, helpful, and in high demand to both the designer and the animator. Animation tools are beneficial to create a background, storyboards, models, and after-effects and can also be used to animate characters from movies, commercials, and televisions.
In this article
01 [What is a Bachelor of 3D Design and Animation?](#Part 1)
02 [Best 3D Animation and Design Software for Beginners and Professionals](#Part 2)
Part 1 What is a Bachelor of 3D Design and Animation?
It is a fact that anything that has to do with computer-generated graphics like 3D animation is a growing field and required in high demand due to the advancement of ICT around the world, and it is an advanced form of design. If you’re aspiring to be a professional interior designer, you should consider adding the value of 3D animation interior designing skills to your resume.
The bachelor of 3D designs and animation provides you with skills, knowledge, and experience in rigging, animation, lighting, texturing, compositing, and modeling. The course will help you get your practical skill in 3D designs, animation, and interactivity in the game industry, and the study of professional practice in 3D animation and character design workplaces. There are also several reasons why learning 3D makes sense which include:
● Graphic design with 3D animation saves time. It gives you more detail quality and brings imagination to reality.
● It opens you up to more professional opportunities.
● It keeps you in line with the modern world.
● 3D animation character design allows you to challenge yourself by expanding your skill and growing your portfolio to stay abreast and improve yourself.
● The 3D animation design allows you to create a more detailed and realistic concept for better design evaluation.
● It allows you to make a new creative workflow.
● The production of a wide range of 3D software makes it easier to create 3D designs.
● There are plenty online resources to learn 3D designs.
● 3D animation interior design opens new career opportunities and increases the marketability of your skill as a designer.
Part 2 Best 3D Animation and Design Software for Beginners and Professionals
3D modeling has improved the way we design. It is vital to use decent software to produce the best output because it improves your Design accuracy and efficiency and helps the designer and end-user visualize space requirements. There is excellent graphic design possibility with 3D animation software for creating a perfect design used by beginners and professionals, and this software includes:
01Best 3D Animation and Design Software for Beginners
● Adobe’s Creative Cloud
Adobe’s Creative Cloud is a straightforward 3D animation house design tool for beginners. It is a subscription-based service that provides over 20 desktop and mobile designing apps for UX, web, video, photography, etc. If you need a medium to showcase your work, you are at the right place as it does not just display your work but also gives ideas on characters design, colors, photographs, videos, icons, etc.
● ****Wondershare Filmora Video Editor **
For Win 7 or later (64-bit)
For macOS 10.12 or later
Filmora is one of the most accessible 3D animation design software for beginners. This software allows you to create various shapes of your choice, add a keyframe in for the movement, fine-tuning to make it smooth, and also allows you to add visual text, color, and effects before exporting it.
● Seamless3d
Seamless3d Is 100-percent free, open-source 3D software that you can download and helps you create specialized 3D design and animation videos images or 3D characters. It also supports FFmpeg video formats such as AVI, MP4, etc.
● Stykz
Stykz is an easy-to-use and straightforward animation program for beginners. It is entirely free and easy to customize without a watermark.
● Maya
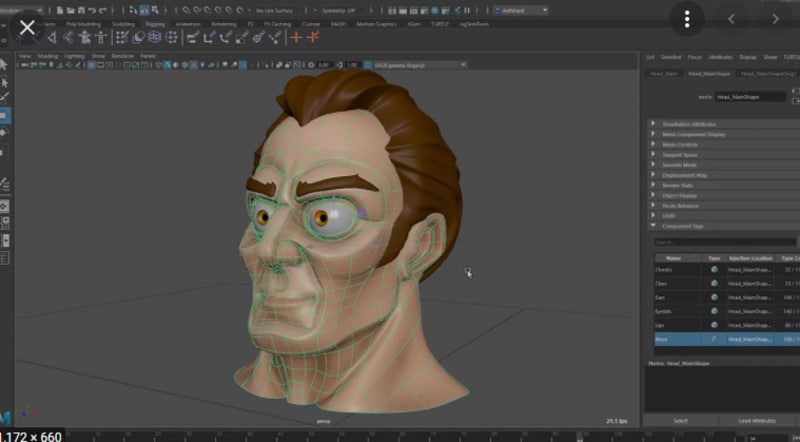
Maya is a user-friendly beginner software for 3D animation character design, wearable technology, and motion graphics. This software has various 3D rendering and shading features that impact GPU, which helps speed up the workflow.
02Best 3D Animation and Design Software for Professionals
● SketchUp Pro
SketchUp Pro is the best 3D animation design software most companies and designers use to automatically transform 3D models into 2D design. It gives your 3D animation home design a personalized touch with the help of its customized features.
● iclone 7
iclone 7 is one of the fastest 3D animation design tools professionals use to create animation movies, content creation, video games education, and art. It is a paid to that is packed with many features to help your design.
● Arnold
Arnold is a paid 3D software that allows you to render 3D images in high quality quickly. It also interactively produces immediate results and leaves more iteration time with an intuitive and straightforward UI control.
● Akeytsu
Akeytsu is a 3D design software for animation well known for its creativity and crafts. It makes designing 3D animation house design much more accessible with its cycle of animation tools.
● Blender
Blender is a good alternative for 3D design and animation open-source software professionals. It is a multi-functional platform that works on Windows MacBook and Linux computers and ensures that you have a smooth experience in 3D designs.
● Key Takeaways from This Episode →
● Understanding what is a Bachelor of 3D design and animation?
● Best 3D animation and character design Software for Beginners and Professionals
● Finding out why 3D animation makes sense.
3D animation design is an acronym for three-dimensional animation, meaning that the backgrounds and characters in this project are in a three-dimensional space. 3D animation artist makes use of computer graphics to make the object looks like they’re moving in a three-dimensional space.
Today, 3D animation design and animation are trendy, helpful, and in high demand to both the designer and the animator. Animation tools are beneficial to create a background, storyboards, models, and after-effects and can also be used to animate characters from movies, commercials, and televisions.
In this article
01 [What is a Bachelor of 3D Design and Animation?](#Part 1)
02 [Best 3D Animation and Design Software for Beginners and Professionals](#Part 2)
Part 1 What is a Bachelor of 3D Design and Animation?
It is a fact that anything that has to do with computer-generated graphics like 3D animation is a growing field and required in high demand due to the advancement of ICT around the world, and it is an advanced form of design. If you’re aspiring to be a professional interior designer, you should consider adding the value of 3D animation interior designing skills to your resume.
The bachelor of 3D designs and animation provides you with skills, knowledge, and experience in rigging, animation, lighting, texturing, compositing, and modeling. The course will help you get your practical skill in 3D designs, animation, and interactivity in the game industry, and the study of professional practice in 3D animation and character design workplaces. There are also several reasons why learning 3D makes sense which include:
● Graphic design with 3D animation saves time. It gives you more detail quality and brings imagination to reality.
● It opens you up to more professional opportunities.
● It keeps you in line with the modern world.
● 3D animation character design allows you to challenge yourself by expanding your skill and growing your portfolio to stay abreast and improve yourself.
● The 3D animation design allows you to create a more detailed and realistic concept for better design evaluation.
● It allows you to make a new creative workflow.
● The production of a wide range of 3D software makes it easier to create 3D designs.
● There are plenty online resources to learn 3D designs.
● 3D animation interior design opens new career opportunities and increases the marketability of your skill as a designer.
Part 2 Best 3D Animation and Design Software for Beginners and Professionals
3D modeling has improved the way we design. It is vital to use decent software to produce the best output because it improves your Design accuracy and efficiency and helps the designer and end-user visualize space requirements. There is excellent graphic design possibility with 3D animation software for creating a perfect design used by beginners and professionals, and this software includes:
01Best 3D Animation and Design Software for Beginners
● Adobe’s Creative Cloud
Adobe’s Creative Cloud is a straightforward 3D animation house design tool for beginners. It is a subscription-based service that provides over 20 desktop and mobile designing apps for UX, web, video, photography, etc. If you need a medium to showcase your work, you are at the right place as it does not just display your work but also gives ideas on characters design, colors, photographs, videos, icons, etc.
● ****Wondershare Filmora Video Editor **
For Win 7 or later (64-bit)
For macOS 10.12 or later
Filmora is one of the most accessible 3D animation design software for beginners. This software allows you to create various shapes of your choice, add a keyframe in for the movement, fine-tuning to make it smooth, and also allows you to add visual text, color, and effects before exporting it.
● Seamless3d
Seamless3d Is 100-percent free, open-source 3D software that you can download and helps you create specialized 3D design and animation videos images or 3D characters. It also supports FFmpeg video formats such as AVI, MP4, etc.
● Stykz
Stykz is an easy-to-use and straightforward animation program for beginners. It is entirely free and easy to customize without a watermark.
● Maya
Maya is a user-friendly beginner software for 3D animation character design, wearable technology, and motion graphics. This software has various 3D rendering and shading features that impact GPU, which helps speed up the workflow.
02Best 3D Animation and Design Software for Professionals
● SketchUp Pro
SketchUp Pro is the best 3D animation design software most companies and designers use to automatically transform 3D models into 2D design. It gives your 3D animation home design a personalized touch with the help of its customized features.
● iclone 7
iclone 7 is one of the fastest 3D animation design tools professionals use to create animation movies, content creation, video games education, and art. It is a paid to that is packed with many features to help your design.
● Arnold
Arnold is a paid 3D software that allows you to render 3D images in high quality quickly. It also interactively produces immediate results and leaves more iteration time with an intuitive and straightforward UI control.
● Akeytsu
Akeytsu is a 3D design software for animation well known for its creativity and crafts. It makes designing 3D animation house design much more accessible with its cycle of animation tools.
● Blender
Blender is a good alternative for 3D design and animation open-source software professionals. It is a multi-functional platform that works on Windows MacBook and Linux computers and ensures that you have a smooth experience in 3D designs.
● Key Takeaways from This Episode →
● Understanding what is a Bachelor of 3D design and animation?
● Best 3D animation and character design Software for Beginners and Professionals
● Finding out why 3D animation makes sense.
How to Create an Adobe Collage?
How to Create an Adobe Collage?
An easy yet powerful editor
Numerous effects to choose from
Detailed tutorials provided by the official channel
All of you might know that an adobe collage was created first of all by Ewelina Karpowiak in the working field of Adobe Photoshop. Here these professionals have the need to mix different shapes and types of textures.
They can also create illustrations that appear well like 3D looking pictures.
In this article
01 [What Are Collage Portrait?](#Part 1)
02 [How to Create a Photo Collage in Adobe Spark?](#Part 2)
03 [Where to Find More Photo Collage Resources](#Part 3)
Part 1 What Are Collage Portrait?
A collage portrait is the perfect technique with which you can easily make a picture by gathering other pieces of photos. Here you have to use the most perfect graphical pieces. In this way you can make a composite photo with the help of this technology. When you make use of an adobe spark collage then you will get more benefit with this kind of technique in the long way. In brief you can conclude that a collage portrait is a nice and good way to make a photo with as many portrait pictures. Here you can also make and create a good looking family pictures with such kind of pieces of photos. You can also give publicity to these kinds of photos in the long way.
Part 2 How to Create a Photo Collage in Adobe Spark?
When you take help of spark adobe collage then you can know how to create a photo collage in Adobe Spark. Just see the steps below with which you can genuine success in this task and motive:-
● You will need to choose and select your favorite collage photos.
● Just open the chosen photos in Photoshop.
● Just make a new file for your collage Photoshop.
● Add or upload images at the same time.
● Make proper arrangements of your chosen photos.
● Create proper spaces and merge all the graphic layers with one another.
Part 3 Where to Find More Photo Collage Resources
With the help of a collage adobe spark you can get help to get more photo collage resources. Just collect accessories like magazine photos, fancy papers and photographs. You can make all these kinds steps when you feel interested in creating collages. In this way you can gather these things to commence the process of adobe collage and its essential resources.
Wondershare Filmora
Get started easily with Filmora’s powerful performance, intuitive interface, and countless effects!
Try It Free Try It Free Try It Free Learn More >

Wondershare Filmora Video Editor ‘s stock media is now being very much high in the market of Adobe and photography. It is a very much non-stop stock media with media that is made with stock images. When you choose stock images then your photos will not get banned and spammed when you upload on the internet.
01The attraction of Filmora stock images and photos
When you chooseFilmora V11’s stock media then you can also easily add special video effects so that your Photoshop work will appear glittering in the long way. When you combine the technology of Adobe Collage with the above mentioned stock images related to Filmora then you will not have to pay any kind of royalty fee in the long way.
Here you can also customize the video effects with the greatest ease. Just choose the option of stock footage so that nobody will charge you of stealing photos from other websites on the internet. When you make videos related to the technique of collage adobe then you will see that you can give special video effects and music lyrics to enhance the attraction of such kind of these videos. You can even easily download all such useful resources from Filmora as well as software like Adobe. Just have completed access to such video making software like Adobe and merge it well with the stock images concerned with Filmora. Today most creators of collage adobe can make marvelous videos with applying these attractive video and pictorial effects.
Image Name- how-to-create-an-adobe-collage5
Alt tag- Filmora stock images and photos
01The final summary
● When you talk more about any adobe collage then you will see that it was created first of all by Ewelina Karpowiak. She was working as a Adobe Photoshop developer. You can see as well as realize that you can create a collage adobe by mixing as many pieces of portraits into a single picture in the long way. These pictures will appear well like good 3D looking pictures. You can give good publicity to these pictures in many ways.
● You can get the best support from a spark adobe collage when you need to make a good photo collage from the technique of Adobe Spark. When you do this then you will have to choose the best photos for your collage. You will need to open those photos that you will see in Photoshop. You might even upload and add the needed images at the same time duration. Even you have to make a new file for the sake of your collage Photoshop. You might even add and upload images at the same duration of time. You have to make proper arrangements for the photos that you have selected. You will also need to make proper spaces for sake of arranging your selected images.
● When you make active use of collage adobe spark then you will find more resources of photo collage. Here you can get accessories like fancy papers and magazine photos as well as good looking photographs. When you are in a mood to create more good appearing collages then you can have all these resources. You might even see that Filmora V11’s stock media has attained a very high popularity in the market of photos. When you use these techniques then you will get free stock photos that you can use and add anywhere. After you make your mind to make an adobe collage then you can also make very much attractive media. When you are in a mood to do Filmora stock photography then you can use stock images to make images as well as attractive videos. Here you can also make use of special video effects and good hearing music tunes. You can easily download these effective resources from Filmora stock photos. Their software is such with which you can make excellent videos and even here collage adobe will help you well in the long run. Just make these attractive videos with marvelous pictorial and image related effects.
01Some more things to know
● Today even adobe collage is being used in making and creating love portrait photography. Here you can take a fresh start when you want to create a nice picture or photo with the pieces of colorful portraits. Here you can also make dynamic photos with combined pieces of portraits. This task can be done quickly in a very simple way. Thus this kind of technology can be used to make good looking and colored posters, images of social media and covers of commercial and personal magazines. Here you might also see that adobe Photoshop is also being utilized to make such portraits that are made with collage technology. Here you can also make attractive designs. You have to also test and judge the effects of color effects. Just also take the help of incorporating textures to make a professional looking poster and collage adobe.
● You can also use an adobe spark collage to make anarchic newspapers. Here you have to use the cutting style to make the collage portraits with the best editorial design. Here you can get more beneficial results by mixing colorful images and media technology with one another. As far as fashion concerning portraits is concerned you can get the benefits of having an edgy twist with them. You can also make changes and blending of these images with some elements like patterns that look like bionomical images.
● The spark adobe collage is very much essential as here you can make or create as many colorful images with this unique technology. With it you can also make a brand new portrait by combining the pieces of a colorful picture. Just combine as many images to create a brand new print. This could be the best example to make a high quality designed picture. All the collage portraits require an image that works on the technique of anchoring. Never forget that such an image needs high resolution pixels that can be mapped at anytime.
● Key Takeaways from This Episode →
● Finally we want to say that the technology of adobe collage is the best way to make good looking colorful pictures with the pieces of portraits.
● Here you will see that when you are in need of making high quality colorful images then you can make use of stock images that are available free on the web or internet.
● When you make use of these photos then no one will charge you of stealing the photo images of others on the web.
All of you might know that an adobe collage was created first of all by Ewelina Karpowiak in the working field of Adobe Photoshop. Here these professionals have the need to mix different shapes and types of textures.
They can also create illustrations that appear well like 3D looking pictures.
In this article
01 [What Are Collage Portrait?](#Part 1)
02 [How to Create a Photo Collage in Adobe Spark?](#Part 2)
03 [Where to Find More Photo Collage Resources](#Part 3)
Part 1 What Are Collage Portrait?
A collage portrait is the perfect technique with which you can easily make a picture by gathering other pieces of photos. Here you have to use the most perfect graphical pieces. In this way you can make a composite photo with the help of this technology. When you make use of an adobe spark collage then you will get more benefit with this kind of technique in the long way. In brief you can conclude that a collage portrait is a nice and good way to make a photo with as many portrait pictures. Here you can also make and create a good looking family pictures with such kind of pieces of photos. You can also give publicity to these kinds of photos in the long way.
Part 2 How to Create a Photo Collage in Adobe Spark?
When you take help of spark adobe collage then you can know how to create a photo collage in Adobe Spark. Just see the steps below with which you can genuine success in this task and motive:-
● You will need to choose and select your favorite collage photos.
● Just open the chosen photos in Photoshop.
● Just make a new file for your collage Photoshop.
● Add or upload images at the same time.
● Make proper arrangements of your chosen photos.
● Create proper spaces and merge all the graphic layers with one another.
Part 3 Where to Find More Photo Collage Resources
With the help of a collage adobe spark you can get help to get more photo collage resources. Just collect accessories like magazine photos, fancy papers and photographs. You can make all these kinds steps when you feel interested in creating collages. In this way you can gather these things to commence the process of adobe collage and its essential resources.
Wondershare Filmora
Get started easily with Filmora’s powerful performance, intuitive interface, and countless effects!
Try It Free Try It Free Try It Free Learn More >
Wondershare Filmora Video Editor ‘s stock media is now being very much high in the market of Adobe and photography. It is a very much non-stop stock media with media that is made with stock images. When you choose stock images then your photos will not get banned and spammed when you upload on the internet.
01The attraction of Filmora stock images and photos
When you chooseFilmora V11’s stock media then you can also easily add special video effects so that your Photoshop work will appear glittering in the long way. When you combine the technology of Adobe Collage with the above mentioned stock images related to Filmora then you will not have to pay any kind of royalty fee in the long way.
Here you can also customize the video effects with the greatest ease. Just choose the option of stock footage so that nobody will charge you of stealing photos from other websites on the internet. When you make videos related to the technique of collage adobe then you will see that you can give special video effects and music lyrics to enhance the attraction of such kind of these videos. You can even easily download all such useful resources from Filmora as well as software like Adobe. Just have completed access to such video making software like Adobe and merge it well with the stock images concerned with Filmora. Today most creators of collage adobe can make marvelous videos with applying these attractive video and pictorial effects.
Image Name- how-to-create-an-adobe-collage5
Alt tag- Filmora stock images and photos
01The final summary
● When you talk more about any adobe collage then you will see that it was created first of all by Ewelina Karpowiak. She was working as a Adobe Photoshop developer. You can see as well as realize that you can create a collage adobe by mixing as many pieces of portraits into a single picture in the long way. These pictures will appear well like good 3D looking pictures. You can give good publicity to these pictures in many ways.
● You can get the best support from a spark adobe collage when you need to make a good photo collage from the technique of Adobe Spark. When you do this then you will have to choose the best photos for your collage. You will need to open those photos that you will see in Photoshop. You might even upload and add the needed images at the same time duration. Even you have to make a new file for the sake of your collage Photoshop. You might even add and upload images at the same duration of time. You have to make proper arrangements for the photos that you have selected. You will also need to make proper spaces for sake of arranging your selected images.
● When you make active use of collage adobe spark then you will find more resources of photo collage. Here you can get accessories like fancy papers and magazine photos as well as good looking photographs. When you are in a mood to create more good appearing collages then you can have all these resources. You might even see that Filmora V11’s stock media has attained a very high popularity in the market of photos. When you use these techniques then you will get free stock photos that you can use and add anywhere. After you make your mind to make an adobe collage then you can also make very much attractive media. When you are in a mood to do Filmora stock photography then you can use stock images to make images as well as attractive videos. Here you can also make use of special video effects and good hearing music tunes. You can easily download these effective resources from Filmora stock photos. Their software is such with which you can make excellent videos and even here collage adobe will help you well in the long run. Just make these attractive videos with marvelous pictorial and image related effects.
01Some more things to know
● Today even adobe collage is being used in making and creating love portrait photography. Here you can take a fresh start when you want to create a nice picture or photo with the pieces of colorful portraits. Here you can also make dynamic photos with combined pieces of portraits. This task can be done quickly in a very simple way. Thus this kind of technology can be used to make good looking and colored posters, images of social media and covers of commercial and personal magazines. Here you might also see that adobe Photoshop is also being utilized to make such portraits that are made with collage technology. Here you can also make attractive designs. You have to also test and judge the effects of color effects. Just also take the help of incorporating textures to make a professional looking poster and collage adobe.
● You can also use an adobe spark collage to make anarchic newspapers. Here you have to use the cutting style to make the collage portraits with the best editorial design. Here you can get more beneficial results by mixing colorful images and media technology with one another. As far as fashion concerning portraits is concerned you can get the benefits of having an edgy twist with them. You can also make changes and blending of these images with some elements like patterns that look like bionomical images.
● The spark adobe collage is very much essential as here you can make or create as many colorful images with this unique technology. With it you can also make a brand new portrait by combining the pieces of a colorful picture. Just combine as many images to create a brand new print. This could be the best example to make a high quality designed picture. All the collage portraits require an image that works on the technique of anchoring. Never forget that such an image needs high resolution pixels that can be mapped at anytime.
● Key Takeaways from This Episode →
● Finally we want to say that the technology of adobe collage is the best way to make good looking colorful pictures with the pieces of portraits.
● Here you will see that when you are in need of making high quality colorful images then you can make use of stock images that are available free on the web or internet.
● When you make use of these photos then no one will charge you of stealing the photo images of others on the web.
Also read:
- Updated How to Make Well Done Animated GIF By Yourself?
- How to Send and Add Snapchat GIFs 100 in Easy Way for 2024
- New 2024 Approved 15 Best Sites to Watch Cartoons Online Free And So Can You
- New 5 Foolproof Amazing Anime Text to Speech Tips for 2024
- Updated Best Websites to Download Animated GIFs for Free-Free GIF Download
- New Top 10 Banned Anime Around the World and Why for 2024
- New In 2024, 10 Amazing Wallpaper Collage Ideas and Photos
- 2024 Approved 15 Top Video to GIF App on iPhone and Android
- New 2024 Approved 10 Cartoon Canvas Painting Ideas for Total Beginners
- New 10 Creative Wallpaper Collage Ideas and Photos for 2024
- Updated 2024 Approved Tips for Learning Graphics Animation
- 2024 Approved Best Canva 10 Animated Templates
- Updated 2024 Approved 15 Types of Cartoon Drawing Styles Examples
- Updated How to Get Started in Stop Motion Claymation for 2024
- A Roster of 15 Top Disney Channel Cartoons for 2024
- Updated 2024 Approved How You Can Turn Yourself Into Anime Character Using Anime Filter
- In 2024, The Secret Sauce for Making GIF Instagram Story More Stunning
- New In 2024, Tips for Animated Collage Maker
- 15 Types of Cartoon Drawing Styles Examples
- Updated 2024 Approved
- New 2024 Approved Is It That Easy to Make My Own Animated Character?
- Updated In 2024, How To Create Pinterest Slideshow in Simple Ways
- Updated 6 Unexpected Ways Gif Animation Maker That Affect Your Marketing
- Updated Learn All About Lip-Syncing in Animation for 2024
- In 2024, 21 Top Free Anime Websites to Watch Anime Online-Anime
- Easy Shortcut to Convert Videos to Gifs on iPhone
- New How To Animate Graphics in Canva for 2024
- 10 Amazing Whiteboard Animation Video Examples You Need to Bookmark for 2024
- New 2024 Approved How to Liven Up Your Animate Website on Scroll
- New How You Can Turn Yourself Into Anime Character Using Anime Filter
- Beginner Tutorial on Making Unity 2D Animation
- Updated In 2024, Top 20+ Best Free GIF Makers Online to Quickly Edit GIF
- Updated Convert Animated GIF From Video
- Whiteboard Animation Services Top 15 Animation Companies to Pick
- Updated 2024 Approved Best GIF to Video Converters
- New 2024 Approved Top 10 Popular Cartoons You Forgot Existed
- Updated 2024 Approved Animated Collage Maker Tips
- 15 Forgotten Cartoon Characters of All Time for 2024
- New In 2024, The Best 20 Motion Graphics Companies & Studios
- Updated In 2024, The Ultimate Cheatsheet to 15 Adobe Animate Alternatives
- Updated What Wikipedia Wont Tell You Specifically About Character Rigging for 2024
- Updated 15 Top Pics Collage Apps
- 2024 Approved How to Find 3D Animation Studio
- Updated Techniques on How to Make After Effects 2D Animation
- In 2024, Most Popular Tips on Learning Animate Rigging
- Updated Adobe Animate Text Effects Skills That You Need to Know
- New In 2024, How-To Guide Make Animation Characters with the Best Animated Character Creators
- Make Creative Animation Videos
- New How to Animate Picture Online Without Learning From Scratch for 2024
- New 2024 Approved The Only Guide Youll Need to Learn About GIF Video Downloader
- In 2024, All You Need To Know About Mega Greninja For Honor X9a | Dr.fone
- In 2024, Refurbished Apple iPhone 14 Plus Everything You Need to Know | Dr.fone
- Here are Some Pro Tips for Pokemon Go PvP Battles On Realme 12 Pro 5G | Dr.fone
- In 2024, Hassle-Free Ways to Remove FRP Lock on Nokia C12with/without a PC
- Which is the Best Fake GPS Joystick App On Oppo A2? | Dr.fone
- How To Change Your SIM PIN Code on Your Oppo A1 5G Phone
- What To Do if Your ZTE Axon 40 Lite Auto Does Not Work | Dr.fone
- Full Guide to Bypass Nokia 105 Classic FRP
- How To Change Your SIM PIN Code on Your Samsung Galaxy M54 5G Phone
- Top 4 Ways to Trace Vivo T2x 5G Location | Dr.fone
- How To Upgrade or Downgrade iPhone 13 Pro? | Dr.fone
- Latest Guide How To Bypass Tecno Spark Go (2024) FRP Without Computer
- How to get the dragon scale and evolution-enabled pokemon On Motorola Edge+ (2023)? | Dr.fone
- Easily Unlock Your Xiaomi Mix Fold 3 Device SIM
- Three Solutions to Hard Reset Samsung Galaxy M14 5G? | Dr.fone
- Everything You Need to Know about Lock Screen Settings on your Nokia XR21
- How To Transfer WhatsApp From Apple iPhone 6s to other iPhone 12 devices? | Dr.fone
- New Easy Steps To Create Talking Memoji on iPhone Free
- Catch or Beat Sleeping Snorlax on Pokemon Go For Samsung Galaxy A14 4G | Dr.fone
- Xiaomi Redmi Note 12 Pro 4G won't play MOV videos, how to fix ?
- Solutions to Spy on Lava Blaze 2 Pro with and without jailbreak | Dr.fone
- 3 Ways to Track Vivo Y200 without Them Knowing | Dr.fone
- How to Check Distance and Radius on Google Maps For your Oppo A78 5G | Dr.fone
- 4 Solutions to Fix Unfortunately Your App Has Stopped Error on Xiaomi Redmi A2 | Dr.fone
- How to Change Lock Screen Wallpaper on Vivo X Fold 2
- How to Copy Contacts from Apple iPhone 11 Pro to SIM? | Dr.fone
- In 2024, Additional Tips About Sinnoh Stone For Samsung Galaxy F34 5G | Dr.fone
- Ultimate Guide on Apple iPhone 13 iCloud Activation Lock Bypass
- Fix Unfortunately Settings Has Stopped on Asus ROG Phone 8 Pro Quickly | Dr.fone
- In 2024, Tutorial to Change Lava Blaze Pro 5G IMEI without Root A Comprehensive Guide
- Three methods to recover lost data on Lava Storm 5G
- How Do I SIM Unlock My Apple iPhone 6s Plus?
- In 2024, A Working Guide For Pachirisu Pokemon Go Map On Vivo S17t | Dr.fone
- Title: Ways to Stop Animation From Looping in Unity for 2024
- Author: Elon
- Created at : 2024-05-19 03:05:06
- Updated at : 2024-05-20 03:05:06
- Link: https://animation-videos.techidaily.com/ways-to-stop-animation-from-looping-in-unity-for-2024/
- License: This work is licensed under CC BY-NC-SA 4.0.
