
:max_bytes(150000):strip_icc():format(webp)/GettyImages-1135364530-dec5678c0c2c427ba18ae21452ff6326.jpg)
What Is A GIF for 2024
What Is A GIF
What Is A GIF

Shanoon Cox
Mar 27, 2024• Proven solutions
GIF stands for Graphic Interchange Format and this animated graphic image can be usually found on web pages. They appear like a twirling icon or a banner or just have few letters that go larger like a magic. Note that animated GIF file is actually specified as a GIF89a and this single file use to contain so many images inside a particular folder. The fact is that this group of images use to follow an endless loop on screen and it creates a feel like document never ends and frames keep on arriving on screen. In few cases, it may follow one or two looped sequences and then animation stops automatically. These animated GIF files are commonly used on social media platform as well as for web ad banners.

What is a GIF?
As we already discussed, GIF stands for Graphic Interchange Format. It is a useful file extension for an animated raster file and is second most popular image file format throughout the world. You might be aware that JPEG is on first ranking at World Wide Web.
In technical terms, GIF makes sue of LZW compression algorithm whose owner is Unisys. Note that, Unisys follows particular licensing statements so users need to have license before using GIF images. But in regular practices, most of the web developers or file downloader’s keep on ignoring this licensing term and they are using it freely. Hence GIF’s have proposed a patent free kind of replacement via PNG.
If you want to make GIF online, Filmora meme maker is your ultimate solution. It helps you make image, GIF and video memes directly without watermark. It is totally FREE to use and no sign up. You can change text size, color and position to create caption when you are editing. You can also put text inside or outside in GIF. Try it now!
Application of GIF
You may easily find numerous GIF files on social media. These day’s people are using them commonly to entertain audience on their pages or channels. They are also being used for active conversations in comments or replies. Many people are utilizing GIFs just to convey unique reactions on internet at different channels. They are commonly used for illustrations and one of the most prominent applications is in the business world for marketing needs. It can help to explain your business products with entertainment and increased user engagement. The artistic world of GIFs can easily boost your customers online.
Many big brands these days are using GIF files to add a breathtaking moment to internet for their targeted audience and these small sized files are definitely do miracles. Actually popularity of GIF’s and their ability to deliver content interactively has revolutionized the world. That is why GIFs these days use to define Lexicon of internet and Oxford dictionary has recently decided to add this GIF to their list of words. In the world of art, GIF images have received great attention and most of art galleries or popular institutions are making use of GIFs to showcase incredible art work of their talented graphic artists.
How to make a GIF?
Now you might be interested to create your own GIF. Actually market is loaded with so many tools to do so. You can make use of Adobe Photoshop too or some other popular software are KickmyGraphics, Photoscape, Microsoft GIF Animator etc. If we talk about online tools then gifmaker.me, Ezgif.com and Giphy are the common options. It is also much easier to find GIF creator applications for smartphones, the list of some popular applications include: Gif Studio, Gif Me Camera air GIFBOOM for Android users whereas iPhone users can download GIFX, Daycap, MyFace When, Giffer etc.
It is possible to develop gifs from collection of still images or even from moving videos and this task is much easier that anyone can perform. In order to execute this task with ease, we would like to recommend Wondershare Filmora for you. The reason behind this recommendation is the simple and most interactive interface of this software tool. Using Filmora, you can easily combine number of stills into GIFs or turn small videos into GIFs. The more interesting thing is that Filmora also allows easy customization of Gifs as users can add overlays, elements and text etc to their GIFs using Filmora platform.


How to make GIFs with Wondershare Filmora
Here are few simple to execute steps to accomplish this task:
1. Import media files
The very first task for users is to import some editable video file or collection of photos to timeline of Wondershare Filmora. This software tool extends support to more than 150 media file formats so you can easily upload any of your image ranging somewhere between png, jpg, avi, mpeg, wav, mkv, mp4 or wmv etc.
2. Drag to timeline
Users can simply drag their video/image file and drop it on Filmora timeline. Once your file reaches there then it can be edited using wide range of tools.

3. Edit media files
There are unlimited editing options with so many interesting features of Filmora. Users can easily pick anything like slow down, speed up, combine, rotate, split, crop etc. to develop eye catching video as per available content.
4. Add text effect to GIF files
It is right time to update text based information to your GIFs. Few small messages always appear good in GIFs.

5. Save and export
Once you are done with all these steps then simply save your file with GIF extension and it is now ready to get uploaded on social media platforms.

Check this video tutorial to know more details:
Download Mac Version ](https://tools.techidaily.com/wondershare/filmora/download/ )
Shanoon Cox
Shanoon Cox is a writer and a lover of all things video.
Follow @Shanoon Cox
Shanoon Cox
Mar 27, 2024• Proven solutions
GIF stands for Graphic Interchange Format and this animated graphic image can be usually found on web pages. They appear like a twirling icon or a banner or just have few letters that go larger like a magic. Note that animated GIF file is actually specified as a GIF89a and this single file use to contain so many images inside a particular folder. The fact is that this group of images use to follow an endless loop on screen and it creates a feel like document never ends and frames keep on arriving on screen. In few cases, it may follow one or two looped sequences and then animation stops automatically. These animated GIF files are commonly used on social media platform as well as for web ad banners.
What is a GIF?
As we already discussed, GIF stands for Graphic Interchange Format. It is a useful file extension for an animated raster file and is second most popular image file format throughout the world. You might be aware that JPEG is on first ranking at World Wide Web.
In technical terms, GIF makes sue of LZW compression algorithm whose owner is Unisys. Note that, Unisys follows particular licensing statements so users need to have license before using GIF images. But in regular practices, most of the web developers or file downloader’s keep on ignoring this licensing term and they are using it freely. Hence GIF’s have proposed a patent free kind of replacement via PNG.
If you want to make GIF online, Filmora meme maker is your ultimate solution. It helps you make image, GIF and video memes directly without watermark. It is totally FREE to use and no sign up. You can change text size, color and position to create caption when you are editing. You can also put text inside or outside in GIF. Try it now!
Application of GIF
You may easily find numerous GIF files on social media. These day’s people are using them commonly to entertain audience on their pages or channels. They are also being used for active conversations in comments or replies. Many people are utilizing GIFs just to convey unique reactions on internet at different channels. They are commonly used for illustrations and one of the most prominent applications is in the business world for marketing needs. It can help to explain your business products with entertainment and increased user engagement. The artistic world of GIFs can easily boost your customers online.
Many big brands these days are using GIF files to add a breathtaking moment to internet for their targeted audience and these small sized files are definitely do miracles. Actually popularity of GIF’s and their ability to deliver content interactively has revolutionized the world. That is why GIFs these days use to define Lexicon of internet and Oxford dictionary has recently decided to add this GIF to their list of words. In the world of art, GIF images have received great attention and most of art galleries or popular institutions are making use of GIFs to showcase incredible art work of their talented graphic artists.
How to make a GIF?
Now you might be interested to create your own GIF. Actually market is loaded with so many tools to do so. You can make use of Adobe Photoshop too or some other popular software are KickmyGraphics, Photoscape, Microsoft GIF Animator etc. If we talk about online tools then gifmaker.me, Ezgif.com and Giphy are the common options. It is also much easier to find GIF creator applications for smartphones, the list of some popular applications include: Gif Studio, Gif Me Camera air GIFBOOM for Android users whereas iPhone users can download GIFX, Daycap, MyFace When, Giffer etc.
It is possible to develop gifs from collection of still images or even from moving videos and this task is much easier that anyone can perform. In order to execute this task with ease, we would like to recommend Wondershare Filmora for you. The reason behind this recommendation is the simple and most interactive interface of this software tool. Using Filmora, you can easily combine number of stills into GIFs or turn small videos into GIFs. The more interesting thing is that Filmora also allows easy customization of Gifs as users can add overlays, elements and text etc to their GIFs using Filmora platform.
How to make GIFs with Wondershare Filmora
Here are few simple to execute steps to accomplish this task:
1. Import media files
The very first task for users is to import some editable video file or collection of photos to timeline of Wondershare Filmora. This software tool extends support to more than 150 media file formats so you can easily upload any of your image ranging somewhere between png, jpg, avi, mpeg, wav, mkv, mp4 or wmv etc.
2. Drag to timeline
Users can simply drag their video/image file and drop it on Filmora timeline. Once your file reaches there then it can be edited using wide range of tools.
3. Edit media files
There are unlimited editing options with so many interesting features of Filmora. Users can easily pick anything like slow down, speed up, combine, rotate, split, crop etc. to develop eye catching video as per available content.
4. Add text effect to GIF files
It is right time to update text based information to your GIFs. Few small messages always appear good in GIFs.
5. Save and export
Once you are done with all these steps then simply save your file with GIF extension and it is now ready to get uploaded on social media platforms.
Check this video tutorial to know more details:
Download Mac Version ](https://tools.techidaily.com/wondershare/filmora/download/ )
Shanoon Cox
Shanoon Cox is a writer and a lover of all things video.
Follow @Shanoon Cox
Adobe Animate Rigging’s Tutorial for You
Adobe Animate Rigging’s PROPER Tutorial for You
An easy yet powerful editor
Numerous effects to choose from
Detailed tutorials provided by the official channel
Character rigging involves some easy steps. And the best way for it is Adobe animate rigging. We have laid down the following discussion to help you learn the easiest method of character rigging. And along with it, we will also help you understand both 2D and 3D character designing most effortlessly.
Lastly, and most importantly, it is vital to opt for the simplest yet feature-loaded tool for any animation work. Thus, we will also mention the best tool for animation and video editing. So, without any further wait, let us start our discussion.
In this article
01 [How to Rig a Simple Character | Adobe Animate Tutorial](#Part 1)
02 [Step by Step to Help You Understand 2D/3D Character Design](#Part 2)
Part 1 How to Rig a Simple Character | Adobe Animate Tutorial
Character rigging in Adobe is effortless and straightforward. There are a few steps for rigging in adobe animate, and we will be discussing and explaining the different steps that will help you learn rigging characters for your animation works.
The following are the steps to help you create a rig in Adobe animate.
Step 1: The first step involves selecting the shape for rigging. Otherwise, you can also use bitmap on stage for it.
**Step 2:**Look for the “Asset warp tool” present in the tool panel. This tool will help you in the process of rigging.

Step 3: Create the first joint using the “Asset warp tool” by clicking on the image or the bitmap with the tool. You will see that a triangular mesh-like structure has been formed on your image or bitmap. And the part where you clicked on the image or the bitmap with the “Asset warp tool” forms the first joint.

Step 4: The next step involves making more joints on the image and instilling bones between the joints. For that, go to the “Warp Options” and choose the “Tools” tab. There you will see the option of “Create bones”. Ensure to enable the “Create bones” option; otherwise, you will not create bones between the different joints.

Step 5: Complete the rig formation by joining all the joints correctly with each other with the help of the bones.

The above steps would help you create the rig for the image or bitmap you want to animate. And now, the following steps will help you learn the steps for modifying the rig as well as tweening.
The first process for it is deformation. So, the following are the steps that help you perform the process of deformation in animation.
Step 6: You need to deform the mesh, and you can do so by holding and dragging the joint with the help of the “Asset warp tool”.

**Step 7:**You can also rotate a bone by clicking and dragging the bone you want to rotate when you drag a joint, the size of the joint changes, which is not the case when you drag a bone. Its size remains constant.

Now, we will help you learn to work with the different keyframes. The keyframes enable the image or the bitmap to acquire different poses, vital for animation. The “Edit Multiple Frames” mode helps you work with different keyframes.
You can readily create new keyframes and deform the image through joints or bones. Each keyframe retains its own set, and you can integrate different transforms after setting one pose for the image in the keyframe.

Part 2 Step by Step to Help You Understand 2D/Character Design
Animation is immensely enjoyable and takes the best of our creativity. And as we know, there are two major and most renowned types of it. One is the 2-dimensional animation, which we know as the animation. And the other one is 3-dimensional, better known as animation.
Now, there are different aspects that are essential for anyone aspiring to animate, whether in or 3D, to know. One of the aspects is designing characters for animation. And we have ideally put forth a discussion about the different factors you need to know about character designing in and animation.
01Animate Character Design
There are some steps involved in the designing a character for animation. And those steps are pretty diverse. So, we have enlisted all the required steps and factors to help you learn and understand character designing for animation. The list is as follows.
02Understanding your audience
To create the best character design, it is essential that you understand your target audience. If your target audience includes the kids and the children, your character design will primarily be based on cartoons.
Ensure which genre of animation does your audience prefer? If it is funny or mythological or any other genre, you design your characters accordingly.

03Understand the type of characters or animation you are going to create
There are different types of animation or characters in animation. Different types serve different purposes and genres. So, let us know about the different types of animations, and this will help you understand which one would suit your requirements.
● Pop-style Characters
The characters you see in the comics and superhero animation movies are pop-style characters. They are highly expressive, become the centre of attraction and always are dominant on the screen. They tend to deliver an energy that reaches the audience impeccably.

● Iconic design
These characters are less fancy but highly expressive. They usually have a block face yet connect to an audience of all types. They are generally best for the corporate videos and those with some messages to be delivered.

● Editorial Style Characters
These characters are highly elegant and bold. These are characters that we see in different publications. They consist of great style, realisticity and cleanliness. They are mainly used to express the quality of presence.

● Sketch and experiment
Now that you know about the different character types, it will help you understand which one would match the genre of animation you prefer to work on. So, start sketching your imagination in a draft.
Decide on the different poses your character might have. Track them down in a draft. It helps you become organised and put down your plan and creativity collectively.
Trial and error are one of the best ways to achieve perfection. So, it is crucial to sketch and then take feedback. If they do not appear praiseworthy, continue sketching and then get feedback again.
● Animate and execute
Lastly, it would be best to execute all your drafts and imaginations. Try using the animation tools that suit your skill capacity and genre of animation the best.
04Animate Character Design
There are five simple steps that will help you animate a character design in 3D. The steps are as follows.
● Contrivance the ideas
Try to include such characters that include several layers. It helps in better animation and also makes your creativity sphere widen.

● Designing the character
Your main character has a large to play. So, use all the necessary tools, starting from photoshop to all the other significant factors, to make your character attain all the features necessary for standing out. It also ensures that you can readily apply all the animation techniques and give your creativity shape.

● Modelling the environment
Adding props to the background is an option. You may choose not to include any props as well. You can add the required props and accessories to your main characters. It includes clothes, scars and the like.

● Animation
It is the main step. Use the best tool for animation and instill all the necessary animation processes. Use the different layers in your main character. Set up the primary constraints and animate the background and the props. Ensure proper light settings and set the handheld camera movements as well.

● Playblast settings
Here you choose the appropriate size of your animation video. It is also an important step, which completes your animation of the character in animation.

Now that we know about the different essential aspects of and animation and character design knowing which tool can help us in the most effortless yet best quality video editing. So, as promised before, we will now discuss the best video editing tool, Wondershare Filmora Video Editor !
Here are the best features of Filmora that can ideally help you in video editing.
● Professional quality video editing tools include video stabilization, noise removal, colour tuning, audio mixer, advanced text editor, editing support, scene detection, and an audio equalizer.
● Although it is ideal for professional use, the tool is simple and effortless ot use. You face no difficulties in understating the features of the tool.
● There are over 8effects available that you can use in your videos.
● You can download it for free!
● You can readily opt for its free trial that enables you to be sure of what you are using before buying it!

For Win 7 or later (64-bit)
For macOS 10.12 or later
● Key Takeaways from This Episode →
● A piece of general information about character rigging in animation and how it is beneficial.
● A simple tutorial for character designing in and animation
● The features of the best video editing tool- Filmora.
Character rigging involves some easy steps. And the best way for it is Adobe animate rigging. We have laid down the following discussion to help you learn the easiest method of character rigging. And along with it, we will also help you understand both 2D and 3D character designing most effortlessly.
Lastly, and most importantly, it is vital to opt for the simplest yet feature-loaded tool for any animation work. Thus, we will also mention the best tool for animation and video editing. So, without any further wait, let us start our discussion.
In this article
01 [How to Rig a Simple Character | Adobe Animate Tutorial](#Part 1)
02 [Step by Step to Help You Understand 2D/3D Character Design](#Part 2)
Part 1 How to Rig a Simple Character | Adobe Animate Tutorial
Character rigging in Adobe is effortless and straightforward. There are a few steps for rigging in adobe animate, and we will be discussing and explaining the different steps that will help you learn rigging characters for your animation works.
The following are the steps to help you create a rig in Adobe animate.
Step 1: The first step involves selecting the shape for rigging. Otherwise, you can also use bitmap on stage for it.
**Step 2:**Look for the “Asset warp tool” present in the tool panel. This tool will help you in the process of rigging.
Step 3: Create the first joint using the “Asset warp tool” by clicking on the image or the bitmap with the tool. You will see that a triangular mesh-like structure has been formed on your image or bitmap. And the part where you clicked on the image or the bitmap with the “Asset warp tool” forms the first joint.
Step 4: The next step involves making more joints on the image and instilling bones between the joints. For that, go to the “Warp Options” and choose the “Tools” tab. There you will see the option of “Create bones”. Ensure to enable the “Create bones” option; otherwise, you will not create bones between the different joints.
Step 5: Complete the rig formation by joining all the joints correctly with each other with the help of the bones.
The above steps would help you create the rig for the image or bitmap you want to animate. And now, the following steps will help you learn the steps for modifying the rig as well as tweening.
The first process for it is deformation. So, the following are the steps that help you perform the process of deformation in animation.
Step 6: You need to deform the mesh, and you can do so by holding and dragging the joint with the help of the “Asset warp tool”.
**Step 7:**You can also rotate a bone by clicking and dragging the bone you want to rotate when you drag a joint, the size of the joint changes, which is not the case when you drag a bone. Its size remains constant.
Now, we will help you learn to work with the different keyframes. The keyframes enable the image or the bitmap to acquire different poses, vital for animation. The “Edit Multiple Frames” mode helps you work with different keyframes.
You can readily create new keyframes and deform the image through joints or bones. Each keyframe retains its own set, and you can integrate different transforms after setting one pose for the image in the keyframe.
Part 2 Step by Step to Help You Understand 2D/Character Design
Animation is immensely enjoyable and takes the best of our creativity. And as we know, there are two major and most renowned types of it. One is the 2-dimensional animation, which we know as the animation. And the other one is 3-dimensional, better known as animation.
Now, there are different aspects that are essential for anyone aspiring to animate, whether in or 3D, to know. One of the aspects is designing characters for animation. And we have ideally put forth a discussion about the different factors you need to know about character designing in and animation.
01Animate Character Design
There are some steps involved in the designing a character for animation. And those steps are pretty diverse. So, we have enlisted all the required steps and factors to help you learn and understand character designing for animation. The list is as follows.
02Understanding your audience
To create the best character design, it is essential that you understand your target audience. If your target audience includes the kids and the children, your character design will primarily be based on cartoons.
Ensure which genre of animation does your audience prefer? If it is funny or mythological or any other genre, you design your characters accordingly.
03Understand the type of characters or animation you are going to create
There are different types of animation or characters in animation. Different types serve different purposes and genres. So, let us know about the different types of animations, and this will help you understand which one would suit your requirements.
● Pop-style Characters
The characters you see in the comics and superhero animation movies are pop-style characters. They are highly expressive, become the centre of attraction and always are dominant on the screen. They tend to deliver an energy that reaches the audience impeccably.
● Iconic design
These characters are less fancy but highly expressive. They usually have a block face yet connect to an audience of all types. They are generally best for the corporate videos and those with some messages to be delivered.
● Editorial Style Characters
These characters are highly elegant and bold. These are characters that we see in different publications. They consist of great style, realisticity and cleanliness. They are mainly used to express the quality of presence.
● Sketch and experiment
Now that you know about the different character types, it will help you understand which one would match the genre of animation you prefer to work on. So, start sketching your imagination in a draft.
Decide on the different poses your character might have. Track them down in a draft. It helps you become organised and put down your plan and creativity collectively.
Trial and error are one of the best ways to achieve perfection. So, it is crucial to sketch and then take feedback. If they do not appear praiseworthy, continue sketching and then get feedback again.
● Animate and execute
Lastly, it would be best to execute all your drafts and imaginations. Try using the animation tools that suit your skill capacity and genre of animation the best.
04Animate Character Design
There are five simple steps that will help you animate a character design in 3D. The steps are as follows.
● Contrivance the ideas
Try to include such characters that include several layers. It helps in better animation and also makes your creativity sphere widen.
● Designing the character
Your main character has a large to play. So, use all the necessary tools, starting from photoshop to all the other significant factors, to make your character attain all the features necessary for standing out. It also ensures that you can readily apply all the animation techniques and give your creativity shape.
● Modelling the environment
Adding props to the background is an option. You may choose not to include any props as well. You can add the required props and accessories to your main characters. It includes clothes, scars and the like.
● Animation
It is the main step. Use the best tool for animation and instill all the necessary animation processes. Use the different layers in your main character. Set up the primary constraints and animate the background and the props. Ensure proper light settings and set the handheld camera movements as well.
● Playblast settings
Here you choose the appropriate size of your animation video. It is also an important step, which completes your animation of the character in animation.
Now that we know about the different essential aspects of and animation and character design knowing which tool can help us in the most effortless yet best quality video editing. So, as promised before, we will now discuss the best video editing tool, Wondershare Filmora Video Editor !
Here are the best features of Filmora that can ideally help you in video editing.
● Professional quality video editing tools include video stabilization, noise removal, colour tuning, audio mixer, advanced text editor, editing support, scene detection, and an audio equalizer.
● Although it is ideal for professional use, the tool is simple and effortless ot use. You face no difficulties in understating the features of the tool.
● There are over 8effects available that you can use in your videos.
● You can download it for free!
● You can readily opt for its free trial that enables you to be sure of what you are using before buying it!
For Win 7 or later (64-bit)
For macOS 10.12 or later
● Key Takeaways from This Episode →
● A piece of general information about character rigging in animation and how it is beneficial.
● A simple tutorial for character designing in and animation
● The features of the best video editing tool- Filmora.
What Is the Best Collage Photo Grid Maker - Experts Choice
What is the Best Collage Photo Grid Maker - Experts Choice
An easy yet powerful editor
Numerous effects to choose from
Detailed tutorials provided by the official channel
Whether it is an Instagram collage grid, other social media sites, an online platform, a greeting card, or even a wall of your room, collages are everywhere. It is a great way to assemble multiple pictures into a single frame. Depending on your purpose, theme, and other factors, there are several different styles of collages that can be created like photo grid, shaped collage, polaroid collage, and more. One of the most classic and traditional styles is a photo grid collage. Taking the help of a dedicated collage-making app or a tool can help you create an amazing and eye-catchy collage in no time. Keep reading to learn more about collage photo grid and the best tools to create them.

In this article
01 [What is a photo grid?](#Part 1)
02 [Need for using special tools and apps to create a photo grid collage](#Part 2)
03 [Top 5 tools to create photo grid](#Part 3)
04 [Use stock images to enhance your photo grid](#Part 4)
Part 1 What is a photo grid?
When a special grid frame having a specific number of rows and columns is used for arranging photos, the created collage is known as a photo grid collage. These multiple added images will make them look like a single picture in a frame. A photo grid is one of the most classic styles of creating a collage that is also the most widely used one. You can never go wrong with a collage while arranging the pictures in a photo grid.
Part 2 Need for using special tools and apps to create a photo grid collage
Though creating a photo grid may look like a simple process which it is also, there are a lot of elements that go into creating an impressive and attractive collage. Adding the images of the correct size and orientation, adjusting the borders, customizing the frames, adding filters, adding text, are some of the many factors that help in creating a wonderful collage, and for this good collage-making tool or an app is required.
These special photo grid collage maker tools have built-in templates, designs, and support other features that help you create an interesting photo grid of your choice. Moreover, some of these programs also come with high-quality stock images that can be used in the grid to further enhance their overall looks.
Part 3 Top 5 tools to create photo grid
We have selected the top 5 grid collage maker tools that can be used to create a customized photo grid.
01Fotor
This is one of the best tools available for creating a photo grid using one of the several templates available. It is the Classic Collage style of this app that will let you create a customized grid where you can add the desired number of images and then edit the background, borders, and other elements. You can even add text, stickers, effects, and other interesting filters. Fotor is a free online tool that can be used from your browser and you just need to free sign-up using your Google, Facebook, or Apple account.

02FotoJet
This is another free-to-use browser-based tool that can be used for creating a photo grid. The interface of the tool is simple and there are multiple grid options to choose from depending on the number of images to be added. The spacing between the grids as well as the roundness of the margins can also be adjusted as desired. The tool also gives you the option to choose the added image file resolution. Text, clipart, and background to the collage can also be added and there is also a library of images that can be used. The created collage can be saved or can also be shared directly to Twitter, Pinterest, and Tumblr.

03Adobe Spark
This is one of the top collages making tools that can be used to design the desired collage in different styles including photo grid. Unlike other Adobe tools, the collage-making program is simple and quick to use and does not require advanced technical know-how. You simply need to create a free account for Adobe Creative Cloud and the collage-making features can be easily used. There are pre-set designs and templates available to match your theme and requirements. You can further make customization to other collage elements as needed.

04Photo Collage
This free-to-use online tool requires no software download or installation and allows creating a grid quickly and easily. The interface of the tool is user-friendly where you just need to browse and add the images or can simply drag and drop them as well. You can choose from multiple template options available and can also add text, effects, and stickers to the collage. Multiple image editing options are also supported like zoom, flip, transparency, and more.

05Canva
Free and simple to use, this is one of the most widely used collage-making tools that is available as a browser-based program as well as Android and iOS app. Several photo-grid templates in different styles are available at the site that lets you create the desired collage in no time. You can customize the selected templates by adding filters, texts, effects, and more elements available. A paid version of the tool with advanced features is also available.

Part 4 Use stock images to enhance your photo grid
Adding high-quality and interesting images to your photo grid will level up its overall look and make it eye-catchy. If you are running short of such interesting and bright images, no need to worry as several sites have a good collection of images that can be used. One such program that we recommend here to check the stock images is Wondershare Filmora. Though Filmora is an advanced Windows and Mac-based video editing software, there are multiple additional features supported one of them is a collection of images in an array of categories.
Depending on the theme of your photo grid, you can select the desired images and other media from Wondershare Filmora Video Editor . Additionally, the split-screen feature of the software will let you add and play multiple videos in a single frame that makes it look like a video collage.

Wondershare Filmora - Best Video Editor for Mac/Windows
5,481,435 people have downloaded it.
Build unique custom animations without breaking a sweat.
Focus on creating epic stories and leave the details to Filmora’s auto features.
Start a creative adventure with drag & drop effects and endless possibilities.
Filmora simplifies advanced features to save you time and effort.
Filmora cuts out repetition so you can move on to your next creative breakthrough.
● Key Takeaways from This Episode →
● A photo grid is a classic and traditional style of creating a collage.
● There are several online tools, software, and mobile apps available for creating interesting photo grids.
● Wondershare Filmora is a great site to get stock of images in different categories and for all types of video editing requirements.
Whether it is an Instagram collage grid, other social media sites, an online platform, a greeting card, or even a wall of your room, collages are everywhere. It is a great way to assemble multiple pictures into a single frame. Depending on your purpose, theme, and other factors, there are several different styles of collages that can be created like photo grid, shaped collage, polaroid collage, and more. One of the most classic and traditional styles is a photo grid collage. Taking the help of a dedicated collage-making app or a tool can help you create an amazing and eye-catchy collage in no time. Keep reading to learn more about collage photo grid and the best tools to create them.
In this article
01 [What is a photo grid?](#Part 1)
02 [Need for using special tools and apps to create a photo grid collage](#Part 2)
03 [Top 5 tools to create photo grid](#Part 3)
04 [Use stock images to enhance your photo grid](#Part 4)
Part 1 What is a photo grid?
When a special grid frame having a specific number of rows and columns is used for arranging photos, the created collage is known as a photo grid collage. These multiple added images will make them look like a single picture in a frame. A photo grid is one of the most classic styles of creating a collage that is also the most widely used one. You can never go wrong with a collage while arranging the pictures in a photo grid.
Part 2 Need for using special tools and apps to create a photo grid collage
Though creating a photo grid may look like a simple process which it is also, there are a lot of elements that go into creating an impressive and attractive collage. Adding the images of the correct size and orientation, adjusting the borders, customizing the frames, adding filters, adding text, are some of the many factors that help in creating a wonderful collage, and for this good collage-making tool or an app is required.
These special photo grid collage maker tools have built-in templates, designs, and support other features that help you create an interesting photo grid of your choice. Moreover, some of these programs also come with high-quality stock images that can be used in the grid to further enhance their overall looks.
Part 3 Top 5 tools to create photo grid
We have selected the top 5 grid collage maker tools that can be used to create a customized photo grid.
01Fotor
This is one of the best tools available for creating a photo grid using one of the several templates available. It is the Classic Collage style of this app that will let you create a customized grid where you can add the desired number of images and then edit the background, borders, and other elements. You can even add text, stickers, effects, and other interesting filters. Fotor is a free online tool that can be used from your browser and you just need to free sign-up using your Google, Facebook, or Apple account.
02FotoJet
This is another free-to-use browser-based tool that can be used for creating a photo grid. The interface of the tool is simple and there are multiple grid options to choose from depending on the number of images to be added. The spacing between the grids as well as the roundness of the margins can also be adjusted as desired. The tool also gives you the option to choose the added image file resolution. Text, clipart, and background to the collage can also be added and there is also a library of images that can be used. The created collage can be saved or can also be shared directly to Twitter, Pinterest, and Tumblr.
03Adobe Spark
This is one of the top collages making tools that can be used to design the desired collage in different styles including photo grid. Unlike other Adobe tools, the collage-making program is simple and quick to use and does not require advanced technical know-how. You simply need to create a free account for Adobe Creative Cloud and the collage-making features can be easily used. There are pre-set designs and templates available to match your theme and requirements. You can further make customization to other collage elements as needed.
04Photo Collage
This free-to-use online tool requires no software download or installation and allows creating a grid quickly and easily. The interface of the tool is user-friendly where you just need to browse and add the images or can simply drag and drop them as well. You can choose from multiple template options available and can also add text, effects, and stickers to the collage. Multiple image editing options are also supported like zoom, flip, transparency, and more.
05Canva
Free and simple to use, this is one of the most widely used collage-making tools that is available as a browser-based program as well as Android and iOS app. Several photo-grid templates in different styles are available at the site that lets you create the desired collage in no time. You can customize the selected templates by adding filters, texts, effects, and more elements available. A paid version of the tool with advanced features is also available.
Part 4 Use stock images to enhance your photo grid
Adding high-quality and interesting images to your photo grid will level up its overall look and make it eye-catchy. If you are running short of such interesting and bright images, no need to worry as several sites have a good collection of images that can be used. One such program that we recommend here to check the stock images is Wondershare Filmora. Though Filmora is an advanced Windows and Mac-based video editing software, there are multiple additional features supported one of them is a collection of images in an array of categories.
Depending on the theme of your photo grid, you can select the desired images and other media from Wondershare Filmora Video Editor . Additionally, the split-screen feature of the software will let you add and play multiple videos in a single frame that makes it look like a video collage.
Wondershare Filmora - Best Video Editor for Mac/Windows
5,481,435 people have downloaded it.
Build unique custom animations without breaking a sweat.
Focus on creating epic stories and leave the details to Filmora’s auto features.
Start a creative adventure with drag & drop effects and endless possibilities.
Filmora simplifies advanced features to save you time and effort.
Filmora cuts out repetition so you can move on to your next creative breakthrough.
● Key Takeaways from This Episode →
● A photo grid is a classic and traditional style of creating a collage.
● There are several online tools, software, and mobile apps available for creating interesting photo grids.
● Wondershare Filmora is a great site to get stock of images in different categories and for all types of video editing requirements.
The Best Free 12 GIF Meme Maker at a Glance
The Best Free 12 GIF Meme Maker at a Glance
An easy yet powerful editor
Numerous effects to choose from
Detailed tutorials provided by the official channel
Do you want to make a meme out of a photo? You can do so with the aid of GIF meme maker, which provides an extensive range of templates, including popular ones and meme fonts and a dedicated interface. Let’s look at some of the excellent meme GIF generators for Android, iPhone, online tools, and desktop computers.
In this article
01 [What Is the Meme GIF Maker?](#Part 1)
02 [How Do You Make a GIF Meme on iPhone?](#Part 2)
03 [12 Meme Generators to Create Your Memes](#Part 3)
Part 1 What Is the Meme GIF Maker?
GIF meme maker allows users to make GIFs from the ground up by collecting or submitting videos or photographs. These GIF caption meme-makers enable users to add different creative effects like emojis, photos, text, filters, and backdrops for added customization. They can also export files, and some of them integrate directly with social networking networks to make uploading more convenient.
Each tool here has its own set of features, so read the entire article before determining which GIF meme generator is ideal for your personal or professional needs.
Part 2 How Do You Make a GIF Meme on iPhone?
Make a unique GIF meme on your iPhone following these few steps:
Step 1: Download and install a GIF maker
On your iPhone, install the GIF meme maker. Not only can you use this meme GIF generator to locate animated GIFs, but you can also use it to make your GIF memes from the start. Go to the Apple store, type GIF maker of your choice into the search field. Now select Get or Install from the drop-down menu.

Step 2: Create an account.
Create an account or log in. Fill in the text boxes with your email address, username, and password. Then press the Sign Up button.
Tap Log In, enter your email address with password if you already have an account.

Step 3: Select a photo or video to use for your GIF
Now it’s your turn to get inventive: Simply tap any of the effects tiles at the bottom of the screen to Construct a meme of a stupid selfie or photo with effects, then swipe left/right to navigate between effects. Press and hold the Shutter option to start a movie, or tap once to snap a shot.
p Create. This is locatedht corner.[1]

Step 4: Add text to meme
Put your meme text here. It’s critical to add your content to the meme because that’s what makes it a meme! To access the text tool, tap the Aa icon and type some text for the meme. Tap Done when you’re finished.
Resize and move your text. After you’ve tapped “Done” and are happy with your text, you can tap, hold, and drag it about your GIF. To alter the size, pinch two fingers together.


Step 5: Save and share
When you complete, tap the purple arrow. Tap this button in the bottom right corner once you’re happy with your meme GIF.
Select the Share GIF from the drop-down menu. If you wish to save the GIF to your camera roll, tap Save GIF.


Part 3 Meme Generators to Create Your Memes
Here are 12 meme generators that you can try out
01IMGFlip (Web)

Features:
• It has many meme templates
• You can easily build memes with your photographs.
• You can make changes to your memes
• It includes over 1000 meme templates.
• Allows you to find the meme template you want quickly.
Pros
• Many templates
• Fonts that you can customize.
• Memes on video
Cons
• Adds a watermark to the image
To make a meme with IMGFlip, follow these steps:
Step 1: Begin by making something.
Go to the website and click the “Create” button to get started. From the menu, select “Make a meme.”
Step 2: Pick a design template
To select the proper template for your meme, use the Search box. Alternatively, you can add your image to the app by clicking “Upload new template.”
Step 3: Insert text
Fill in the blanks with the meme text.
Next, click the options toggle to change the text next to each field. Save the image.
02DrMemes (Web)

Features
• You can easily produce memes for free.
• Create memes without a watermark.
• Change fonts easily
• Add emojis and stickers easily to memes.
• You can turn your photos into a GIF meme.
Pros
• User-friendly interface
• Personalization of fonts
• There is no watermark.
Cons
• A smaller number of templates
Follow these simple steps to make a meme using this website:
Step 1: Select a template
Open drmemes.com and select “Choose meme template” or “Upload picture,” depending on how you want to Construct a meme.
Step 2: Type in your text
Add Text from the side boxes. To change the font, use the settings toggle.
03ILoveIMG (Web)

Features
• Provides a variety of templates
• Allows you to alter the size and style of the font
• It generates memes that are free of watermarks.
• You may also choose whether you want the text to be forced into the image.
Pros
• An extensive library of free templates
• There is no watermark.
• Simple to use
• Can compress, resize, crop, and perform other image-editing activities.
Cons
• You can’t change the font.
Follow these steps to make memes using ILoveIMG:
Step 1: Go to the website.
In a browser, go to the website.
Step 2: Pick a design template
“Select meme template” or “Upload image” are the options.
Step 3: Type in your text
Fill in the blanks with your text.
04Meme Generator (Android/iOS)

Features:
● Over 500 high-quality memes and caption examples included.
● You can change size and color.
● There are a variety of fonts to pick from.
● Use the search or filter options to discover the memes you’re looking for quickly.
● There are no watermarks.
Pros
• Many templates
• Crop, rotate and flip images
• Personalize it with a custom image, font style, and sticker.
image
• There is no watermark.
Cons
• Lots of ads
Follow these simple steps to create a meme using the Meme Generator
Step 1: Add Image
Tap “Custom meme Gallery” to add an image from the gallery or select a meme template in the app.
Step 2: Crop Meme
Using the choices at the top of the app, you can crop the meme or rotate/flip the images.
Step 3: Customize font and Save
Change the font style, color, and alignment by tapping on it. You can also decorate it with a sticker.
When done, tap on “Save” to download the meme or hit “Share” to send it to social media apps.
05Meme Creator (Android)

Features
● A large collection of stock pictures and memes
● Add your quotes to the close captions.
● You can add your watermark.
● There are some fantastic stickers available.
● Simple to use
Pros
● No watermark
● Meme categories
● Custom fonts
Cons
● Occasional ads
Here is a simple step guide:
Step 1: Add Image
The program begins with a gallery of meme template categories, including animals, celebrities, cartoons, and more.
To add your original image, tap on one of these templates or hit the “Gallery” icon at the top.
Step 2: Change font size
Fill in the “Top” and “Bottom” text areas with the meme content. Using the options icon next to the text, change the font style.
Step 3: Save and Share
Use the “Save” or “Share” button at the bottom to download or send memes.
06Video & GIF Memes (Android)

Features
● It enables you to make memes from movies, GIFs and photos.
● No watermarks
● Easy to use
● Compatible on device
● Several stickers for users to leverage on
Pros
● There is no watermark.
● Tenor GIF database access
● You can video cut.
Cons
● Too many ads
There are no image memes.
Here are a few steps to follow:
Step 1: Select file
To begin, open the app and select the source file type.
Step 2: Customize text
When asked, trim the video, and add customizable meme text.
Save the video or GIF joke after changing video characteristics such as frame rate, speed, and quality.
07GIF Maker – Meme GIF Creator (iOS)

Features:
● Make as many GIFs as you like from your videos.
● Make an unlimited number of GIFs from your photos.
● Make an infinite number of memes.
● Filters, Stickers, and Fonts of the highest quality.
● Easy to use
Pros
● There is no watermark.
● User-friendly interphase.
● There are some fantastic stickers available.
Cons
● As others, ads.
Follow these simple steps to make use of this amazing tool:
Step 1: Choose the desired video
After running the app, select “Video to GIF” from the menu and select your video.
If necessary, trim it.
Step 2: Add text
To add amusing meme text to your video, tap “Add text.”
Step 3: Download and Share
To download the video or share it directly with social networking apps, click the Share icon.
08Memeto – Meme Maker & Creator (iOS)

Features:
● Create memes with your picture templates, blank memes, and popular templates.
● Customize options available
● Several different meme text styles to choose from.
● 1000+ stickers.
● Choose your photo from your Photo Gallery to be used as background
Pros
● There is no watermark.
● Various types of memes
Cons
● It lacks a search function.
Step 1: Choose a template
Select a meme template in the app, select the meme, and then hit the “Text” option to add and style meme text.
Step 2: Save and Share
Tap the Share button when you finish to save it to your device.
09Meme Generator Suite (Windows)

Features:
● Thousands of memes are available online
● Make memes out of your photos.
● Make posters with the phrase “KEEP CALM” and Jo Baka memes.
● You can move text, resized, and colored.
● There’s also an Offline Collection with over 300 memes that’s always ready to go!
Pros
• Many memes
• Effective search
• Collection in the offline mode
• There is no watermark.
Cons
• Advertisements
Follow these simple are guide:
Step 1: Select template or photo
Start using a pre-loaded meme template from the app or upload your image by selecting “From gallery.”
Step 2: Download and Save
Change the text settings and click the Save icon to download the image.
You can also immediately submit the image to IMGur or social networking apps.
10Meme Generator

Features:
● Get over 500 high-quality memes and caption examples.
● Size and color are changeable.
● There are a variety of fonts to pick from.
● Search or filter options to discover the memes you’re looking for.
● There are no watermarks.
Pros
• Examples of memes
• There is no watermark.
Cons
• Cannot share straight to social networking apps
Step 1: Click on Meme
To begin editing a meme, click on it.
Step 2: Change font
Change the font color and style of the meme text on the meme editing screen.
1111. Deal With It - GIF Maker

Features :
● This online GIF creator is simple to use.
● No third-party software is required to use this GIF maker.
● This website will complete the GIF conversion promptly.
● This GIF generator website is beneficial to new users.
Pros
● The website’s design is simplistic, making this GIF banner maker too simple to manage and utilize.
● It also intensifies the GIF maker, significantly improving the overall effect of the GIF in question.
Cons
● Because the pace of GIF makers is too slow, users sometimes opt to download installable GIF makers.
● GIF makers cannot create animated GIFs, so it is impossible to utilize this tool.
How to Use this Online GIF Maker
Visit the GIF maker’s official homepage.
Step 1: Choose an image
Because it can also be helpful to create GIFs from photos, you may use the Load Image option to upload an image from your computer.
Step 2: Editing
After that, you may add a phrase and glasses to the loaded image.
12LunaPic

Features:
● This online animated GIF creator has a very user-friendly design.
● No other third-party programs are required to use this online animated GIF creator.
● This website can also be valuable to creating GIF banners.
● You may create animated GIFs from several photographs with this website.
Pros
● With the aid of this program, the user can experience the GIF maker mobile feature; hence it is highly recommended.
● Because the tool is so simple, this banner GIF maker gets the job done in style and according to the user’s specifications.
Cons
● Like the GIF icon maker, this application lacks critical features like speed and accuracy necessary for GIF creation.
● Because this program can’t edit GIFs, it doesn’t have any of the GIF edit maker’s features.
How to use LunaPic
Step 1: Upload Image
To get started, go to LunaPic’s official website. To submit photographs from your computer to this online animated GIF maker, click the Upload button.
Step 2: Enhance the image
With this online GIF creator, you can now alter the images.
Step 3: Save the animated GIF
To save the produced GIF, select GIF as the output and click the Save button at the bottom.
Creating your animated GIF from any video or photo is a fascinating and entertaining undertaking. A video scene can be brutal to manage to owe to its vast size, but GIF forms are ideal for profile posts and sharing with friends in the form of simple jokes.
If you want to generate a GIF online, though, Wondershare Filmora Video Editor ‘s online meme maker is the best option. It allows you to create a watermark-free picture, GIF, and video memes. It is entirely free to use and requires no registration. When creating a caption, you can edit the text size, color, and position to make a caption while you are editing. You can also add text inside or outside in GIF. Just with some clicks, your GIF will be complete. Try it now!
Wondershare Filmora - Best Video Editor for Mac/Windows
5,481,435 people have downloaded it.
Build unique custom animations without breaking a sweat.
Focus on creating epic stories and leave the details to Filmora’s auto features.
Start a creative adventure with drag & drop effects and endless possibilities.
Filmora simplifies advanced features to save you time and effort.
Filmora cuts out repetition so you can move on to your next creative breakthrough.
● Key Takeaways from This Episode →
● Now that you know about the 12 best GIF meme generators and how to use them to make a unique and customized GIF with the simple step guide, you can now try your hands on new things.
● However, Wondershare Filmora is your sure best GIF caption meme maker to help you achieve excellent results as a GIF meme creator. So go for it!
Do you want to make a meme out of a photo? You can do so with the aid of GIF meme maker, which provides an extensive range of templates, including popular ones and meme fonts and a dedicated interface. Let’s look at some of the excellent meme GIF generators for Android, iPhone, online tools, and desktop computers.
In this article
01 [What Is the Meme GIF Maker?](#Part 1)
02 [How Do You Make a GIF Meme on iPhone?](#Part 2)
03 [12 Meme Generators to Create Your Memes](#Part 3)
Part 1 What Is the Meme GIF Maker?
GIF meme maker allows users to make GIFs from the ground up by collecting or submitting videos or photographs. These GIF caption meme-makers enable users to add different creative effects like emojis, photos, text, filters, and backdrops for added customization. They can also export files, and some of them integrate directly with social networking networks to make uploading more convenient.
Each tool here has its own set of features, so read the entire article before determining which GIF meme generator is ideal for your personal or professional needs.
Part 2 How Do You Make a GIF Meme on iPhone?
Make a unique GIF meme on your iPhone following these few steps:
Step 1: Download and install a GIF maker
On your iPhone, install the GIF meme maker. Not only can you use this meme GIF generator to locate animated GIFs, but you can also use it to make your GIF memes from the start. Go to the Apple store, type GIF maker of your choice into the search field. Now select Get or Install from the drop-down menu.
Step 2: Create an account.
Create an account or log in. Fill in the text boxes with your email address, username, and password. Then press the Sign Up button.
Tap Log In, enter your email address with password if you already have an account.
Step 3: Select a photo or video to use for your GIF
Now it’s your turn to get inventive: Simply tap any of the effects tiles at the bottom of the screen to Construct a meme of a stupid selfie or photo with effects, then swipe left/right to navigate between effects. Press and hold the Shutter option to start a movie, or tap once to snap a shot.
p Create. This is locatedht corner.[1]
Step 4: Add text to meme
Put your meme text here. It’s critical to add your content to the meme because that’s what makes it a meme! To access the text tool, tap the Aa icon and type some text for the meme. Tap Done when you’re finished.
Resize and move your text. After you’ve tapped “Done” and are happy with your text, you can tap, hold, and drag it about your GIF. To alter the size, pinch two fingers together.
Step 5: Save and share
When you complete, tap the purple arrow. Tap this button in the bottom right corner once you’re happy with your meme GIF.
Select the Share GIF from the drop-down menu. If you wish to save the GIF to your camera roll, tap Save GIF.
Part 3 Meme Generators to Create Your Memes
Here are 12 meme generators that you can try out
01IMGFlip (Web)
Features:
• It has many meme templates
• You can easily build memes with your photographs.
• You can make changes to your memes
• It includes over 1000 meme templates.
• Allows you to find the meme template you want quickly.
Pros
• Many templates
• Fonts that you can customize.
• Memes on video
Cons
• Adds a watermark to the image
To make a meme with IMGFlip, follow these steps:
Step 1: Begin by making something.
Go to the website and click the “Create” button to get started. From the menu, select “Make a meme.”
Step 2: Pick a design template
To select the proper template for your meme, use the Search box. Alternatively, you can add your image to the app by clicking “Upload new template.”
Step 3: Insert text
Fill in the blanks with the meme text.
Next, click the options toggle to change the text next to each field. Save the image.
02DrMemes (Web)
Features
• You can easily produce memes for free.
• Create memes without a watermark.
• Change fonts easily
• Add emojis and stickers easily to memes.
• You can turn your photos into a GIF meme.
Pros
• User-friendly interface
• Personalization of fonts
• There is no watermark.
Cons
• A smaller number of templates
Follow these simple steps to make a meme using this website:
Step 1: Select a template
Open drmemes.com and select “Choose meme template” or “Upload picture,” depending on how you want to Construct a meme.
Step 2: Type in your text
Add Text from the side boxes. To change the font, use the settings toggle.
03ILoveIMG (Web)
Features
• Provides a variety of templates
• Allows you to alter the size and style of the font
• It generates memes that are free of watermarks.
• You may also choose whether you want the text to be forced into the image.
Pros
• An extensive library of free templates
• There is no watermark.
• Simple to use
• Can compress, resize, crop, and perform other image-editing activities.
Cons
• You can’t change the font.
Follow these steps to make memes using ILoveIMG:
Step 1: Go to the website.
In a browser, go to the website.
Step 2: Pick a design template
“Select meme template” or “Upload image” are the options.
Step 3: Type in your text
Fill in the blanks with your text.
04Meme Generator (Android/iOS)
Features:
● Over 500 high-quality memes and caption examples included.
● You can change size and color.
● There are a variety of fonts to pick from.
● Use the search or filter options to discover the memes you’re looking for quickly.
● There are no watermarks.
Pros
• Many templates
• Crop, rotate and flip images
• Personalize it with a custom image, font style, and sticker.
image
• There is no watermark.
Cons
• Lots of ads
Follow these simple steps to create a meme using the Meme Generator
Step 1: Add Image
Tap “Custom meme Gallery” to add an image from the gallery or select a meme template in the app.
Step 2: Crop Meme
Using the choices at the top of the app, you can crop the meme or rotate/flip the images.
Step 3: Customize font and Save
Change the font style, color, and alignment by tapping on it. You can also decorate it with a sticker.
When done, tap on “Save” to download the meme or hit “Share” to send it to social media apps.
05Meme Creator (Android)
Features
● A large collection of stock pictures and memes
● Add your quotes to the close captions.
● You can add your watermark.
● There are some fantastic stickers available.
● Simple to use
Pros
● No watermark
● Meme categories
● Custom fonts
Cons
● Occasional ads
Here is a simple step guide:
Step 1: Add Image
The program begins with a gallery of meme template categories, including animals, celebrities, cartoons, and more.
To add your original image, tap on one of these templates or hit the “Gallery” icon at the top.
Step 2: Change font size
Fill in the “Top” and “Bottom” text areas with the meme content. Using the options icon next to the text, change the font style.
Step 3: Save and Share
Use the “Save” or “Share” button at the bottom to download or send memes.
06Video & GIF Memes (Android)
Features
● It enables you to make memes from movies, GIFs and photos.
● No watermarks
● Easy to use
● Compatible on device
● Several stickers for users to leverage on
Pros
● There is no watermark.
● Tenor GIF database access
● You can video cut.
Cons
● Too many ads
There are no image memes.
Here are a few steps to follow:
Step 1: Select file
To begin, open the app and select the source file type.
Step 2: Customize text
When asked, trim the video, and add customizable meme text.
Save the video or GIF joke after changing video characteristics such as frame rate, speed, and quality.
07GIF Maker – Meme GIF Creator (iOS)
Features:
● Make as many GIFs as you like from your videos.
● Make an unlimited number of GIFs from your photos.
● Make an infinite number of memes.
● Filters, Stickers, and Fonts of the highest quality.
● Easy to use
Pros
● There is no watermark.
● User-friendly interphase.
● There are some fantastic stickers available.
Cons
● As others, ads.
Follow these simple steps to make use of this amazing tool:
Step 1: Choose the desired video
After running the app, select “Video to GIF” from the menu and select your video.
If necessary, trim it.
Step 2: Add text
To add amusing meme text to your video, tap “Add text.”
Step 3: Download and Share
To download the video or share it directly with social networking apps, click the Share icon.
08Memeto – Meme Maker & Creator (iOS)
Features:
● Create memes with your picture templates, blank memes, and popular templates.
● Customize options available
● Several different meme text styles to choose from.
● 1000+ stickers.
● Choose your photo from your Photo Gallery to be used as background
Pros
● There is no watermark.
● Various types of memes
Cons
● It lacks a search function.
Step 1: Choose a template
Select a meme template in the app, select the meme, and then hit the “Text” option to add and style meme text.
Step 2: Save and Share
Tap the Share button when you finish to save it to your device.
09Meme Generator Suite (Windows)
Features:
● Thousands of memes are available online
● Make memes out of your photos.
● Make posters with the phrase “KEEP CALM” and Jo Baka memes.
● You can move text, resized, and colored.
● There’s also an Offline Collection with over 300 memes that’s always ready to go!
Pros
• Many memes
• Effective search
• Collection in the offline mode
• There is no watermark.
Cons
• Advertisements
Follow these simple are guide:
Step 1: Select template or photo
Start using a pre-loaded meme template from the app or upload your image by selecting “From gallery.”
Step 2: Download and Save
Change the text settings and click the Save icon to download the image.
You can also immediately submit the image to IMGur or social networking apps.
10Meme Generator
Features:
● Get over 500 high-quality memes and caption examples.
● Size and color are changeable.
● There are a variety of fonts to pick from.
● Search or filter options to discover the memes you’re looking for.
● There are no watermarks.
Pros
• Examples of memes
• There is no watermark.
Cons
• Cannot share straight to social networking apps
Step 1: Click on Meme
To begin editing a meme, click on it.
Step 2: Change font
Change the font color and style of the meme text on the meme editing screen.
1111. Deal With It - GIF Maker
Features :
● This online GIF creator is simple to use.
● No third-party software is required to use this GIF maker.
● This website will complete the GIF conversion promptly.
● This GIF generator website is beneficial to new users.
Pros
● The website’s design is simplistic, making this GIF banner maker too simple to manage and utilize.
● It also intensifies the GIF maker, significantly improving the overall effect of the GIF in question.
Cons
● Because the pace of GIF makers is too slow, users sometimes opt to download installable GIF makers.
● GIF makers cannot create animated GIFs, so it is impossible to utilize this tool.
How to Use this Online GIF Maker
Visit the GIF maker’s official homepage.
Step 1: Choose an image
Because it can also be helpful to create GIFs from photos, you may use the Load Image option to upload an image from your computer.
Step 2: Editing
After that, you may add a phrase and glasses to the loaded image.
12LunaPic
Features:
● This online animated GIF creator has a very user-friendly design.
● No other third-party programs are required to use this online animated GIF creator.
● This website can also be valuable to creating GIF banners.
● You may create animated GIFs from several photographs with this website.
Pros
● With the aid of this program, the user can experience the GIF maker mobile feature; hence it is highly recommended.
● Because the tool is so simple, this banner GIF maker gets the job done in style and according to the user’s specifications.
Cons
● Like the GIF icon maker, this application lacks critical features like speed and accuracy necessary for GIF creation.
● Because this program can’t edit GIFs, it doesn’t have any of the GIF edit maker’s features.
How to use LunaPic
Step 1: Upload Image
To get started, go to LunaPic’s official website. To submit photographs from your computer to this online animated GIF maker, click the Upload button.
Step 2: Enhance the image
With this online GIF creator, you can now alter the images.
Step 3: Save the animated GIF
To save the produced GIF, select GIF as the output and click the Save button at the bottom.
Creating your animated GIF from any video or photo is a fascinating and entertaining undertaking. A video scene can be brutal to manage to owe to its vast size, but GIF forms are ideal for profile posts and sharing with friends in the form of simple jokes.
If you want to generate a GIF online, though, Wondershare Filmora Video Editor ‘s online meme maker is the best option. It allows you to create a watermark-free picture, GIF, and video memes. It is entirely free to use and requires no registration. When creating a caption, you can edit the text size, color, and position to make a caption while you are editing. You can also add text inside or outside in GIF. Just with some clicks, your GIF will be complete. Try it now!
Wondershare Filmora - Best Video Editor for Mac/Windows
5,481,435 people have downloaded it.
Build unique custom animations without breaking a sweat.
Focus on creating epic stories and leave the details to Filmora’s auto features.
Start a creative adventure with drag & drop effects and endless possibilities.
Filmora simplifies advanced features to save you time and effort.
Filmora cuts out repetition so you can move on to your next creative breakthrough.
● Key Takeaways from This Episode →
● Now that you know about the 12 best GIF meme generators and how to use them to make a unique and customized GIF with the simple step guide, you can now try your hands on new things.
● However, Wondershare Filmora is your sure best GIF caption meme maker to help you achieve excellent results as a GIF meme creator. So go for it!
Top 3 Ways to Create Gif with Great 3D Gif Maker
Top 3 Ways to Create Gif Images with Great 3D Gif Maker
An easy yet powerful editor
Numerous effects to choose from
Detailed tutorials provided by the official channel
If what you’re searching for is a 3D GIF Maker, then we’ve got your back. Below, we’ve not only listed the three best ways to create 3D animated GIFs, but we’ve also included a brief tutorial that you can reference when creating your very own GIF images.
In this article
01 [Best 3 Ways to Create 3D Animated GIFs](#Part 1)
02 [Create 3D animated GIFs online with Filmora](#Part 2)
Part 1 Best 3 Ways to Create 3D Animated GIFs
First off, as promised, we have a brief list of some 3D GIF Maker tools that you can try. We’ve made sure to pick a unique set of 3D GIF Maker tools and 3D GIF Generator tools in order to give you a variety to choose from. It won’t be the most comprehensive list, but it should help you on your way to understanding how these 3D GIF makers usually work and how you can use them in order to create GIF images that you can share with your friends, family, and colleagues.
01 Wondershare Filmora Video Editor
The first 3D GIF Maker on our list is Filmora. It’s probably not the first one that you’d naturally think of as a 3D GIF Maker, seeing as it was developed to be more than that. But, it doesn’t discount the fact that it can be used in order to create and edit your own GIFs.
Wondershare Filmora is available for both Windows and Mac users. It allows you to create a GIF with images or video easily and even gives you the tools needed to edit and perfect it before you export it for use (a process that we’ll be showing off in more detail in the tutorial section below if you’re interested in learning more.)
For Win 7 or later (64-bit)
For macOS 10.12 or later
022. Adobe Photoshop
Adobe Photoshop, much like Filmora, is probably not, first and foremost, considered a mere 3D GIF Maker. However, it doesn’t erase its 3D GIF Creator functions. This tool, if used correctly, can make just about anything you want.
The process of using it, of course, is a little fussier than other alternatives (you’ll probably want to look up a more detailed explanation on the subject), but the fussiness does also mean that you can control every detail of your project and get it to look exactly how you want it to look.
03EaseUS Video Editor
Similar to Filmora, EaseUS Video Editor is an advanced video editing tool that you can use as a 3D GIF Creator quite easily. It comes built-in with templates, filters, design elements, transition effects, music, and so much more — allowing you to freely design your GIF images so that they can be ready for publishing right off the bat.
The beauty of it, of course, is that, much like with all the other options that we introduced today, you can use the program for more than just 3D GIF creation after the fact — opening yourself up for different and more complex projects in the future (be they image, audio, or video-related.)
Part 2 Create 3D Animated Gifs Online With Wondershare Filmora Video Editor
Now, as promised, we’ve also included a tutorial that you can follow along with to create your own 3D Animated GIFs with the tool, Wondershare Filmora Video Editor . With this tool, we’ll be showing you the basic way to do it (by using a premade video that you can edit and then convert into GIF format). But, feel free to explore the tool and use it as you wish (i.e., as a 3D spinning GIF creator, 3D rotating text GIF maker, 3D cube GIF maker, and so on.)
01Step 1: Launch Filmora Video Editor
First things first, launch the 3D GIF maker that you intend to use. In our case, that is Filmora (a screenshot has been provided below for your edification and reference. We’ll be using Filmora as our example.)
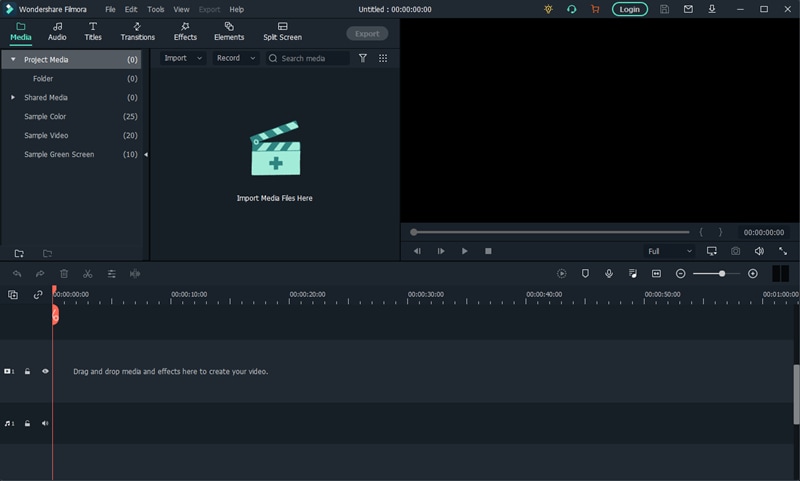
02Step 2: Upload File(s)
Next, upload the file or files that you want to turn into a GIF.
As mentioned in the introduction, we’ll be using a pre-made video, but you can use whatever you wish (i.e., images). In order to upload, we clicked the File tab (pointed out in the image below) and selected Import Media > Import Media File. However, you can also drag and drop your file(s) on the designated area of the UI..
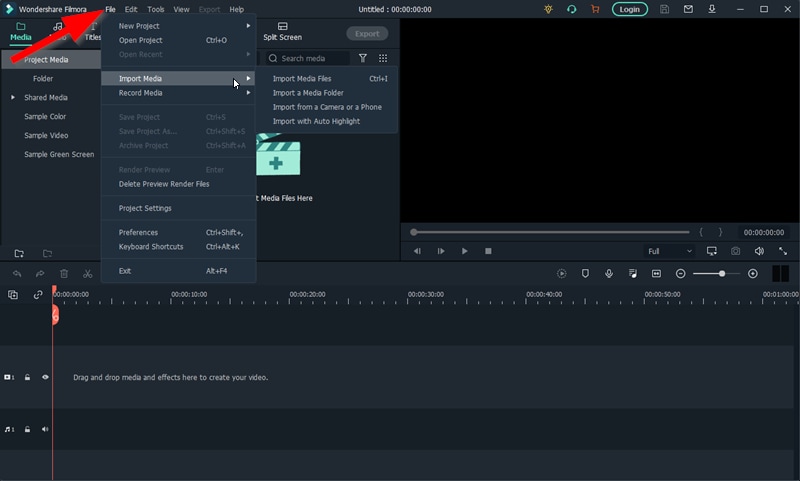
03Step 3: Drag Uploaded Media to Timeline
To create a GIF withFilmora , you’ll need to first create a video. Don’t worry, this is simple. Just drag and drop the media that you want to use onto the timeline.
Note: Any uploaded media will be in the media folder (marked [1] in the image below). Drag media from there onto the timeline (marked [2] in the image below) in order to create a video.
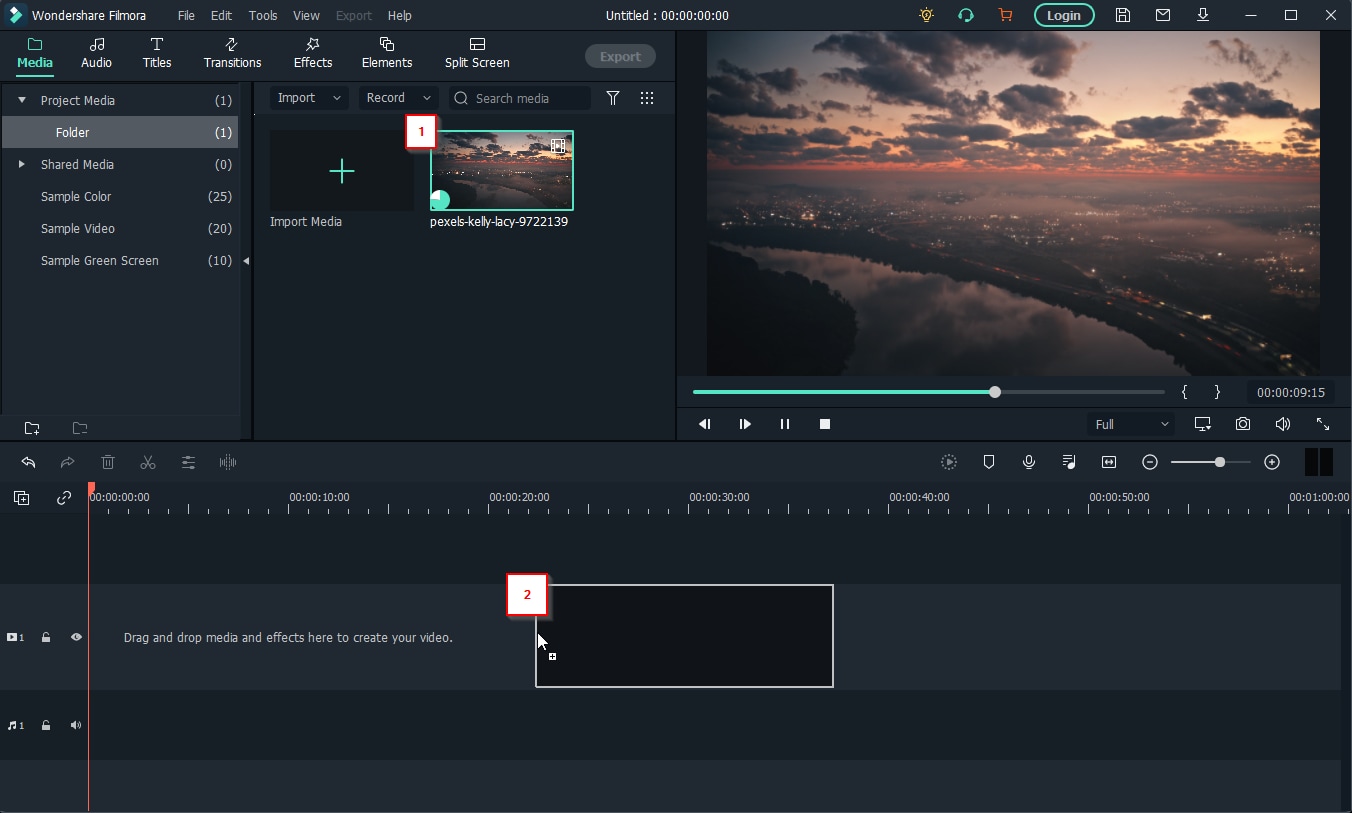
04Step 4: (Optional) Edit Video
If you want, take this opportunity to work on your video some more before converting it into a GIF. Filmora is set up to help you with this. Providing all the following features:
●Trim or Cut features to trim down the video.
●Add Text or audio to video.
●Use templates, filters, or other elements to design videos.
●Add transitions for better video flow.
And then some. In our case, we used the ‘Trim’ feature to cut down our video for a cleaner look.
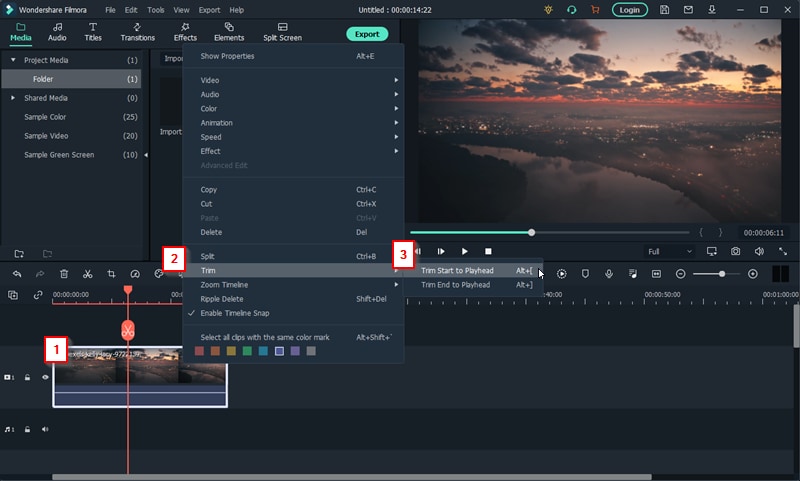
05Step 5: Create Video > GIF
Once you’re done editing your video, you can now convert it to a GIF.
This is easy enough to do. Just click the ‘Export’ tab and select the ‘Create Video’ option. That will allow you to choose to convert your finished video into a GIF file that you can share with your friends.
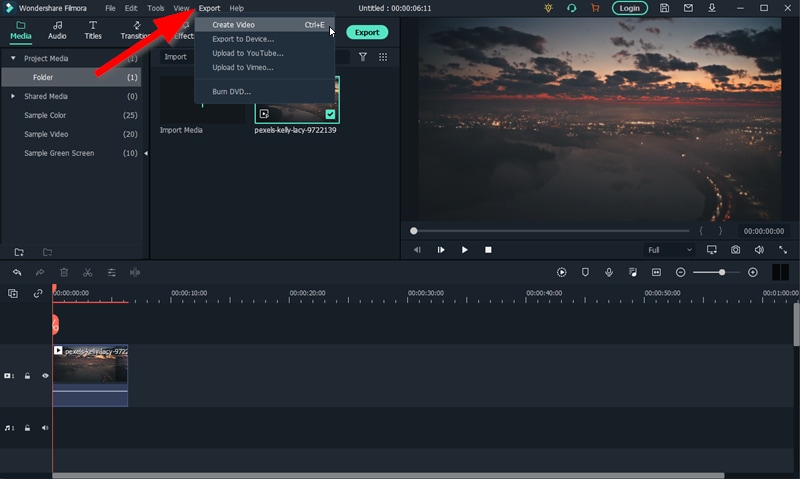
● Key Takeaways from This Episode →
● GIFs are a great way of sharing fun moments with friends and family. And, these days, it’s easier than ever to create them.
● There are 3D GIF Makers available everywhere online. Each one is a little different, of course. But capable of allowing you to create GIFs with images and videos that you can eventually share.
● One such example is the 3D GIF Maker, Filmora. It was the first one that we introduced on our list of the best 3D GIf Makers.
● We also included a tutorial on how you can use Filmora as a 3D GIF Generator for your reference. You can try out the program today if you like. Wondershare offers a FREE trial that you can use in order to explore the many functions of the software before you commit to buying out the perpetual license or signing up for one of their subscription packages.
If what you’re searching for is a 3D GIF Maker, then we’ve got your back. Below, we’ve not only listed the three best ways to create 3D animated GIFs, but we’ve also included a brief tutorial that you can reference when creating your very own GIF images.
In this article
01 [Best 3 Ways to Create 3D Animated GIFs](#Part 1)
02 [Create 3D animated GIFs online with Filmora](#Part 2)
Part 1 Best 3 Ways to Create 3D Animated GIFs
First off, as promised, we have a brief list of some 3D GIF Maker tools that you can try. We’ve made sure to pick a unique set of 3D GIF Maker tools and 3D GIF Generator tools in order to give you a variety to choose from. It won’t be the most comprehensive list, but it should help you on your way to understanding how these 3D GIF makers usually work and how you can use them in order to create GIF images that you can share with your friends, family, and colleagues.
01 Wondershare Filmora Video Editor
The first 3D GIF Maker on our list is Filmora. It’s probably not the first one that you’d naturally think of as a 3D GIF Maker, seeing as it was developed to be more than that. But, it doesn’t discount the fact that it can be used in order to create and edit your own GIFs.
Wondershare Filmora is available for both Windows and Mac users. It allows you to create a GIF with images or video easily and even gives you the tools needed to edit and perfect it before you export it for use (a process that we’ll be showing off in more detail in the tutorial section below if you’re interested in learning more.)
For Win 7 or later (64-bit)
For macOS 10.12 or later
022. Adobe Photoshop
Adobe Photoshop, much like Filmora, is probably not, first and foremost, considered a mere 3D GIF Maker. However, it doesn’t erase its 3D GIF Creator functions. This tool, if used correctly, can make just about anything you want.
The process of using it, of course, is a little fussier than other alternatives (you’ll probably want to look up a more detailed explanation on the subject), but the fussiness does also mean that you can control every detail of your project and get it to look exactly how you want it to look.
03EaseUS Video Editor
Similar to Filmora, EaseUS Video Editor is an advanced video editing tool that you can use as a 3D GIF Creator quite easily. It comes built-in with templates, filters, design elements, transition effects, music, and so much more — allowing you to freely design your GIF images so that they can be ready for publishing right off the bat.
The beauty of it, of course, is that, much like with all the other options that we introduced today, you can use the program for more than just 3D GIF creation after the fact — opening yourself up for different and more complex projects in the future (be they image, audio, or video-related.)
Part 2 Create 3D Animated Gifs Online With Wondershare Filmora Video Editor
Now, as promised, we’ve also included a tutorial that you can follow along with to create your own 3D Animated GIFs with the tool, Wondershare Filmora Video Editor . With this tool, we’ll be showing you the basic way to do it (by using a premade video that you can edit and then convert into GIF format). But, feel free to explore the tool and use it as you wish (i.e., as a 3D spinning GIF creator, 3D rotating text GIF maker, 3D cube GIF maker, and so on.)
01Step 1: Launch Filmora Video Editor
First things first, launch the 3D GIF maker that you intend to use. In our case, that is Filmora (a screenshot has been provided below for your edification and reference. We’ll be using Filmora as our example.)
02Step 2: Upload File(s)
Next, upload the file or files that you want to turn into a GIF.
As mentioned in the introduction, we’ll be using a pre-made video, but you can use whatever you wish (i.e., images). In order to upload, we clicked the File tab (pointed out in the image below) and selected Import Media > Import Media File. However, you can also drag and drop your file(s) on the designated area of the UI..
03Step 3: Drag Uploaded Media to Timeline
To create a GIF withFilmora , you’ll need to first create a video. Don’t worry, this is simple. Just drag and drop the media that you want to use onto the timeline.
Note: Any uploaded media will be in the media folder (marked [1] in the image below). Drag media from there onto the timeline (marked [2] in the image below) in order to create a video.
04Step 4: (Optional) Edit Video
If you want, take this opportunity to work on your video some more before converting it into a GIF. Filmora is set up to help you with this. Providing all the following features:
●Trim or Cut features to trim down the video.
●Add Text or audio to video.
●Use templates, filters, or other elements to design videos.
●Add transitions for better video flow.
And then some. In our case, we used the ‘Trim’ feature to cut down our video for a cleaner look.
05Step 5: Create Video > GIF
Once you’re done editing your video, you can now convert it to a GIF.
This is easy enough to do. Just click the ‘Export’ tab and select the ‘Create Video’ option. That will allow you to choose to convert your finished video into a GIF file that you can share with your friends.
● Key Takeaways from This Episode →
● GIFs are a great way of sharing fun moments with friends and family. And, these days, it’s easier than ever to create them.
● There are 3D GIF Makers available everywhere online. Each one is a little different, of course. But capable of allowing you to create GIFs with images and videos that you can eventually share.
● One such example is the 3D GIF Maker, Filmora. It was the first one that we introduced on our list of the best 3D GIf Makers.
● We also included a tutorial on how you can use Filmora as a 3D GIF Generator for your reference. You can try out the program today if you like. Wondershare offers a FREE trial that you can use in order to explore the many functions of the software before you commit to buying out the perpetual license or signing up for one of their subscription packages.
Simple Guide to Create New and Exciting Blackboard Animation
Dead Simple Guide to Create New and Exciting Blackboard Animation
An easy yet powerful editor
Numerous effects to choose from
Detailed tutorials provided by the official channel
Yes, it is definitely possible In fact, it couldn’t be easier. A lot of the ‘whiteboard animation’ generators also work as blackboard animation generators.
In this guide, we hope to shed some light on the subject so that everyone can have an easier time approaching the matter of creating a blackboard project on their own.
In this article
01 [Is Blackboard Animation Outdated?](#Part 1)
02 [How to Combine Modern Needs with Blackboard Animation?](#Part 2)
03 [How to Create a Blackboard Animation in ONE DAY?](#Part 3)
Part 1 Is Blackboard Animation Outdated?
Blackboard animation some may say is as outdated as the concept of ‘blackboards’ themselves. After all, nowadays, whiteboards are the standard for presenting information in a school setting — with many preferring the ease of using dry-erase markers over the more unwieldy chalk.
However, unlike the inconveniences of using an actual chalkboard, chalkboard animation is not so different from whiteboard animation In fact, it’s just given a different look. One that may be exactly what you’re looking for — especially if you’re looking to get in touch with the older generation (who would no doubt be more familiar with the concept.)

Part 2 How to Combine Modern Needs with Blackboard Animation?
But alright, so how do you make it so that your blackboard animation is just as suited for the modern generation as it is for the older generation?? Well, that’s easy really. You’ll need images Or, rather, you’ll need visuals outside of just the plain text that is usually associated with chalkboard animation.
With the right kind of visuals to go along with your informational text, you can boost the effectiveness of your chalkboard animation video and make it more palatable. Perfectly in line with the modern needs of the era.

Part 3 How to Create a Blackboard Animation in ONE DAY?
Alright, so onto actually talking about how you can go about creating a chalkboard animation video Take note, this is going to be an ‘overview’ kind of tutorial. We’ve also decided to choose a more ‘custom’ method, rather than using one of the premium blackboard animation generators (which usually require you to pay a steep price in order to gain access to a media library.)
01Step 1. Pick Your Software
The first step in creating chalkboard animation is to pick the software that you want to use This can be something more ‘animation-specific’, like After Effects. Or something more ‘video-editing-specific’ like Filmora.
Again, because this is meant to be more of a ‘general’ tutorial, we won’t be showing you exactly how to use whatever editing software you decide to use in order to create your blackboard animation videos. But, as a general kind of advice, it would be best that you pick a video editor like Wondershare Filmora Video Editor that offers a Timeline feature that will allow you to quickly put together a project

02Step 2. Create a Storyboard
Next, to make the actual blackboard animation creation process go smoother, it’s important that you create a storyboard that will outline the video that you want to create
The more detailed this storyboard is, the better Although, of course, you don’t necessarily have to draw every single frame of your chalkboard animation beforehand. Just sketch out the general idea. It will help make sure that you won’t have to rush about making all sorts of corrections in the future

03Step 3. Draw Characters
For this step, we say ‘characters’ and use the word ‘draw.’ But really, this is a very open kind of step where we encourage you to put together all media that you will need to make your project into a reality This is where the storyboard really helps. After all, with that, you have an idea of exactly what kind of characters, settings, music, audio, etc. you’ll need for each scene (if not each frame)
If you’re not the ‘drawing’ type, by the way, there are both FREE and premium media libraries that you can take advantage of to use for your project It might be difficult to find matching art styles at first. But, if you’re really particular about that, then you can always find a freelance digital artist to design with a specific style in mind

04Step 4. Put Together Project
Last of all, of course, is the process of putting everything together. Do you have your software? Great Launch it and create a new project Do you have your storyboard? That’s also great Now you have an idea where each character and setting will go
In the image below, we’re only showing the start of a potential project. We’ve only added one image to the timeline But, as you can see, with the use of Filmora, even this one image can be turned into a video

● Key Takeaways from This Episode →
● Blackboards are naturally associated with learning This makes blackboard animation videos a great method of sharing information with an audience. Whether you’re doing it to promote your services/goods or just genuinely looking to impart knowledge to another
● Some may think that blackboards are outdated — for the mere fact that blackboards themselves are considered outdated when compared to whiteboards — but that doesn’t make them any less effective at getting a message across so long as you include the right kind of visuals
● In our brief ‘overview’ tutorial, we expand on the subject of blackboard animation some more. Be warned, it’s not the kind of project you should go into if you’re not prepared for the work Longer projects, especially, will require quite a bit of elbow grease to get done.
● Still, there’s something satisfying about a well-done chalkboard animation video that will not only be a joy to create but also, hopefully, catch the attention of your audience as well.
Yes, it is definitely possible In fact, it couldn’t be easier. A lot of the ‘whiteboard animation’ generators also work as blackboard animation generators.
In this guide, we hope to shed some light on the subject so that everyone can have an easier time approaching the matter of creating a blackboard project on their own.
In this article
01 [Is Blackboard Animation Outdated?](#Part 1)
02 [How to Combine Modern Needs with Blackboard Animation?](#Part 2)
03 [How to Create a Blackboard Animation in ONE DAY?](#Part 3)
Part 1 Is Blackboard Animation Outdated?
Blackboard animation some may say is as outdated as the concept of ‘blackboards’ themselves. After all, nowadays, whiteboards are the standard for presenting information in a school setting — with many preferring the ease of using dry-erase markers over the more unwieldy chalk.
However, unlike the inconveniences of using an actual chalkboard, chalkboard animation is not so different from whiteboard animation In fact, it’s just given a different look. One that may be exactly what you’re looking for — especially if you’re looking to get in touch with the older generation (who would no doubt be more familiar with the concept.)
Part 2 How to Combine Modern Needs with Blackboard Animation?
But alright, so how do you make it so that your blackboard animation is just as suited for the modern generation as it is for the older generation?? Well, that’s easy really. You’ll need images Or, rather, you’ll need visuals outside of just the plain text that is usually associated with chalkboard animation.
With the right kind of visuals to go along with your informational text, you can boost the effectiveness of your chalkboard animation video and make it more palatable. Perfectly in line with the modern needs of the era.
Part 3 How to Create a Blackboard Animation in ONE DAY?
Alright, so onto actually talking about how you can go about creating a chalkboard animation video Take note, this is going to be an ‘overview’ kind of tutorial. We’ve also decided to choose a more ‘custom’ method, rather than using one of the premium blackboard animation generators (which usually require you to pay a steep price in order to gain access to a media library.)
01Step 1. Pick Your Software
The first step in creating chalkboard animation is to pick the software that you want to use This can be something more ‘animation-specific’, like After Effects. Or something more ‘video-editing-specific’ like Filmora.
Again, because this is meant to be more of a ‘general’ tutorial, we won’t be showing you exactly how to use whatever editing software you decide to use in order to create your blackboard animation videos. But, as a general kind of advice, it would be best that you pick a video editor like Wondershare Filmora Video Editor that offers a Timeline feature that will allow you to quickly put together a project
02Step 2. Create a Storyboard
Next, to make the actual blackboard animation creation process go smoother, it’s important that you create a storyboard that will outline the video that you want to create
The more detailed this storyboard is, the better Although, of course, you don’t necessarily have to draw every single frame of your chalkboard animation beforehand. Just sketch out the general idea. It will help make sure that you won’t have to rush about making all sorts of corrections in the future
03Step 3. Draw Characters
For this step, we say ‘characters’ and use the word ‘draw.’ But really, this is a very open kind of step where we encourage you to put together all media that you will need to make your project into a reality This is where the storyboard really helps. After all, with that, you have an idea of exactly what kind of characters, settings, music, audio, etc. you’ll need for each scene (if not each frame)
If you’re not the ‘drawing’ type, by the way, there are both FREE and premium media libraries that you can take advantage of to use for your project It might be difficult to find matching art styles at first. But, if you’re really particular about that, then you can always find a freelance digital artist to design with a specific style in mind
04Step 4. Put Together Project
Last of all, of course, is the process of putting everything together. Do you have your software? Great Launch it and create a new project Do you have your storyboard? That’s also great Now you have an idea where each character and setting will go
In the image below, we’re only showing the start of a potential project. We’ve only added one image to the timeline But, as you can see, with the use of Filmora, even this one image can be turned into a video
● Key Takeaways from This Episode →
● Blackboards are naturally associated with learning This makes blackboard animation videos a great method of sharing information with an audience. Whether you’re doing it to promote your services/goods or just genuinely looking to impart knowledge to another
● Some may think that blackboards are outdated — for the mere fact that blackboards themselves are considered outdated when compared to whiteboards — but that doesn’t make them any less effective at getting a message across so long as you include the right kind of visuals
● In our brief ‘overview’ tutorial, we expand on the subject of blackboard animation some more. Be warned, it’s not the kind of project you should go into if you’re not prepared for the work Longer projects, especially, will require quite a bit of elbow grease to get done.
● Still, there’s something satisfying about a well-done chalkboard animation video that will not only be a joy to create but also, hopefully, catch the attention of your audience as well.
The Best 10 Sketch Animation Video Makers
The Best 10 Sketch Animation Video Makers
An easy yet powerful editor
Numerous effects to choose from
Detailed tutorials provided by the official channel
Sketch animation has been in style for a very long time, and there is no doubt that it is a time-consuming process. But the sketch animation maker available these days helps us a lot. Are you aware of all these? Do you know how these are helping us currently?
Don’t worry if you are unaware because here we are discussing the same in detail and will help you to get the best tool for the same too. Let’s get started!
In this article
01 [What is a Sketch Animation?](#Part 1)
02 [How to Create Sketch Animation Videos with 10 Best Software](#Part 2)
03 [How to Make Sketch Animations](#Part 3)
Part 1 What is a Sketch Animation?
A sketch animation is a series of sketches that bring an idea to life. The drawings are usually rough and not perfect, but they are enough to tell a story. Sketch animations are used for many purposes, from advertising to product design. They can be used as a way to show a process or a product design in an easy-to-understand way.
Sketch animations can also be used for marketing purposes, such as explaining the features of a new product or promoting it with humour or through storytelling.
But to be someone who knows how to create the best sketches or videos, one needs to try their hands on the best sketch animation video maker too. One cannot achieve the desired results unless and until they are aware of a tool.
Part 2 How to Create Sketch Animation Videos with Best Software
In this section, we are discussing the best software to help you with Sketchup animation easily. All this software will cater to your needs for creating the best animations seamlessly. These are as follows:
01Animaker
Animaker is the most famous name in the list of software when you are looking for a whiteboard sketch animation maker. It features a drag and drop animation option, helping you to create the content easily. It is a suitable tool for professionals and beginners alike. It also offers thousands of templates that can be customised as per the needs of the user. You can simply utilise the stock videos and photos for better results.

Pros:
● Easy to use.
● The results are delivered quickly.
● It is suitable for professionals and beginners alike.
Cons:
● Some users complain about its interface.
● Sometimes video creation takes a lot of time.
02Renderforest video maker
Renderforest video maker is the best platform for all those who are looking to create sketch animation and other videos. It provides a free plan, and the same is available limitlessly for users. It features thousands of stock clips and a library of music tracks for creating the content seamlessly.

Pros:
● Easy to use.
● Different features are integrated.
● Impressive interface.
Cons:
● complaint about the content’s quality
03Powtoon
Powtoon is among the best visual communication platforms available, helping in creating short videos with animation. It features professionally designed templates along with some additional tools, including clips, audio, characters, and so on, which a user can utilize while creating the animation video. It comes up with paid and free options, and users can utilize any of them.

Pros:
● Easy to use.
● Templates are innovative.
● It makes engaging content.
Cons:
● Some find it difficult to use.
04Vyond
Vyond is among the best sketch animation makers and offers a free trial to all users. This is especially true for professionals with all the skills. Some pre-built templates are also there to help users create the content seamlessly. It features royalty-free music along with some stock characters that can be utilised in the content.

Pros:
● Good video creation tool.
● Many functions are integrated.
● One can upload content directly and get the animation.
Cons:
● Not for beginners,
05Keyshot
Keyshot is the best sketch animation software available these days. It features file formats along with some photorealistic rendering. The outcome created with it appears to be a real animation, and users can also add on some interactive visual studio. It also comes with a free trial, so users can use it and analyse whether they want to go for the paid version or not.

Pros:
● Innovative interface
● Support for two different extensions of models.
● A library of materials and textures is available.
Cons:
● Utilizing all the features seems to be difficult.
063ds Max Design
3ds Max design is the best sketch animation software for users when they are looking to create sketch animations. The best part is that it offers realistic animation behaviour along with all the sophisticated particle effects. There are certain third-party extensions that are available that a user can integrate for better results.

Pros:
● Third-party extensions are available.
● Realistic animation behaviour
● Procedural tools are available.
Cons:
● Beginners find it difficult to use.
07Moovly
Moovly is a cloud-based software with a drag and drop interface. Whenever you are looking to create sketch animations, this tool will help you out with it. It also has millions of free stock images and other content available, helping in creating the content as a user requires.

Pros:
● Simple to use
● Innovative interface
● Limitless features
Cons:
● The interface appears to be buggy sometimes.
08Harmony
Harmony is also among the best reproduction animation software available, which is helpful in creating the content with special lighting, shading, and special effects. There are certain options and features available to help in creating the content with the texture and sound management options. It comes in free and paid versions, and the free trial version will help users analyse whether they want to go for it or not.

Pros:
● Easy to use.
● Clean interface.
● Bugs free.
Cons:
● Beginners find it difficult to use.
09Modo
Modo is the best modeling, rendering, texturing, and sketch animation software available. Whenever you are looking for a sketch animation maker, this tool will definitely hit the top. The navigation through the software is really very easy, and users can get the outcome immediately as they want.

Pros:
● Navigation throughout is easy.
● The interface is innovative.
● by 7 community is available to help in case of issues
Cons:
● Outcome delivered bit lately.
10Cinema 4D
Cinema is among the software available for sketch animation that has an innovative interface along with some additional features. It comes with object tracking and some cartoon styling features that help users get the outcome they want. A free trial option is also integrated for convenience.

Pros:
● Easy to use.
● Additional layouts are integrated.
● Mouse shortcuts are easy to use.
Cons:
● Beginners find it difficult to use.
Part 3 How to Make Sketch Animations
Well, when it comes to making sketch animations, users are confused about the steps that they need to follow for the same. Well, do know that the steps are very simple to follow and one can easily complete the task with a few steps. The steps needed to be followed are:
01Step 1 Write and record the script
Writing and recording the script is the primary step a user needs to follow. It is helpful in analyzing where to start and how they want the animation sketch to come out. Get the organizational structures available and then integrate them according to the recorded script.
02Step 2 Create a storyboard
Get the storyboard or, say, the sketch animation maker like Filmora, available and start keeping the recorded stuff over the same in the best manner possible. After implementing the changes, test the same.
03Step 3 Draw it out
After managing all the things, it is integral to sketch the same. The tools are integrated into the software like Filmora, helping you to put things accordingly. You can also do the customizations required if required.
04Step 4 Scanning and editing
Now you need to scan the complete content and do any editing required. This part is among the most crucial ones because, after finalizing the outcome, you will not be able to do the editing. However, if you want to do the editing, you need to repeat the entire process. Check things out mindfully.
05Step 5 Play Filmora once more
When you are done editing the images and creating the sketch animation, put them on Filmora for the final results.
Wondershare Filmora Video Editor is one of the efficient tools available for users to create sketch animated videos easily. This tool has all the advanced features integrated, making the task easy to achieve. Also, it features a customization option, helping users to add on or extract things or effects easily and rapidly.
Wondershare Filmora
Get started easily with Filmora’s powerful performance, intuitive interface, and countless effects!
Try It Free Try It Free Try It Free Learn More >

● Key Takeaways from This Episode →
● Sketch animation is a new art form used for many purposes.
● Filmora is one of the best sketch animation video makers.
● Sketch animsation tools are best for us for creating the desired outcome.
Sketch animation has been in style for a very long time, and there is no doubt that it is a time-consuming process. But the sketch animation maker available these days helps us a lot. Are you aware of all these? Do you know how these are helping us currently?
Don’t worry if you are unaware because here we are discussing the same in detail and will help you to get the best tool for the same too. Let’s get started!
In this article
01 [What is a Sketch Animation?](#Part 1)
02 [How to Create Sketch Animation Videos with 10 Best Software](#Part 2)
03 [How to Make Sketch Animations](#Part 3)
Part 1 What is a Sketch Animation?
A sketch animation is a series of sketches that bring an idea to life. The drawings are usually rough and not perfect, but they are enough to tell a story. Sketch animations are used for many purposes, from advertising to product design. They can be used as a way to show a process or a product design in an easy-to-understand way.
Sketch animations can also be used for marketing purposes, such as explaining the features of a new product or promoting it with humour or through storytelling.
But to be someone who knows how to create the best sketches or videos, one needs to try their hands on the best sketch animation video maker too. One cannot achieve the desired results unless and until they are aware of a tool.
Part 2 How to Create Sketch Animation Videos with Best Software
In this section, we are discussing the best software to help you with Sketchup animation easily. All this software will cater to your needs for creating the best animations seamlessly. These are as follows:
01Animaker
Animaker is the most famous name in the list of software when you are looking for a whiteboard sketch animation maker. It features a drag and drop animation option, helping you to create the content easily. It is a suitable tool for professionals and beginners alike. It also offers thousands of templates that can be customised as per the needs of the user. You can simply utilise the stock videos and photos for better results.
Pros:
● Easy to use.
● The results are delivered quickly.
● It is suitable for professionals and beginners alike.
Cons:
● Some users complain about its interface.
● Sometimes video creation takes a lot of time.
02Renderforest video maker
Renderforest video maker is the best platform for all those who are looking to create sketch animation and other videos. It provides a free plan, and the same is available limitlessly for users. It features thousands of stock clips and a library of music tracks for creating the content seamlessly.
Pros:
● Easy to use.
● Different features are integrated.
● Impressive interface.
Cons:
● complaint about the content’s quality
03Powtoon
Powtoon is among the best visual communication platforms available, helping in creating short videos with animation. It features professionally designed templates along with some additional tools, including clips, audio, characters, and so on, which a user can utilize while creating the animation video. It comes up with paid and free options, and users can utilize any of them.
Pros:
● Easy to use.
● Templates are innovative.
● It makes engaging content.
Cons:
● Some find it difficult to use.
04Vyond
Vyond is among the best sketch animation makers and offers a free trial to all users. This is especially true for professionals with all the skills. Some pre-built templates are also there to help users create the content seamlessly. It features royalty-free music along with some stock characters that can be utilised in the content.
Pros:
● Good video creation tool.
● Many functions are integrated.
● One can upload content directly and get the animation.
Cons:
● Not for beginners,
05Keyshot
Keyshot is the best sketch animation software available these days. It features file formats along with some photorealistic rendering. The outcome created with it appears to be a real animation, and users can also add on some interactive visual studio. It also comes with a free trial, so users can use it and analyse whether they want to go for the paid version or not.
Pros:
● Innovative interface
● Support for two different extensions of models.
● A library of materials and textures is available.
Cons:
● Utilizing all the features seems to be difficult.
063ds Max Design
3ds Max design is the best sketch animation software for users when they are looking to create sketch animations. The best part is that it offers realistic animation behaviour along with all the sophisticated particle effects. There are certain third-party extensions that are available that a user can integrate for better results.
Pros:
● Third-party extensions are available.
● Realistic animation behaviour
● Procedural tools are available.
Cons:
● Beginners find it difficult to use.
07Moovly
Moovly is a cloud-based software with a drag and drop interface. Whenever you are looking to create sketch animations, this tool will help you out with it. It also has millions of free stock images and other content available, helping in creating the content as a user requires.
Pros:
● Simple to use
● Innovative interface
● Limitless features
Cons:
● The interface appears to be buggy sometimes.
08Harmony
Harmony is also among the best reproduction animation software available, which is helpful in creating the content with special lighting, shading, and special effects. There are certain options and features available to help in creating the content with the texture and sound management options. It comes in free and paid versions, and the free trial version will help users analyse whether they want to go for it or not.
Pros:
● Easy to use.
● Clean interface.
● Bugs free.
Cons:
● Beginners find it difficult to use.
09Modo
Modo is the best modeling, rendering, texturing, and sketch animation software available. Whenever you are looking for a sketch animation maker, this tool will definitely hit the top. The navigation through the software is really very easy, and users can get the outcome immediately as they want.
Pros:
● Navigation throughout is easy.
● The interface is innovative.
● by 7 community is available to help in case of issues
Cons:
● Outcome delivered bit lately.
10Cinema 4D
Cinema is among the software available for sketch animation that has an innovative interface along with some additional features. It comes with object tracking and some cartoon styling features that help users get the outcome they want. A free trial option is also integrated for convenience.
Pros:
● Easy to use.
● Additional layouts are integrated.
● Mouse shortcuts are easy to use.
Cons:
● Beginners find it difficult to use.
Part 3 How to Make Sketch Animations
Well, when it comes to making sketch animations, users are confused about the steps that they need to follow for the same. Well, do know that the steps are very simple to follow and one can easily complete the task with a few steps. The steps needed to be followed are:
01Step 1 Write and record the script
Writing and recording the script is the primary step a user needs to follow. It is helpful in analyzing where to start and how they want the animation sketch to come out. Get the organizational structures available and then integrate them according to the recorded script.
02Step 2 Create a storyboard
Get the storyboard or, say, the sketch animation maker like Filmora, available and start keeping the recorded stuff over the same in the best manner possible. After implementing the changes, test the same.
03Step 3 Draw it out
After managing all the things, it is integral to sketch the same. The tools are integrated into the software like Filmora, helping you to put things accordingly. You can also do the customizations required if required.
04Step 4 Scanning and editing
Now you need to scan the complete content and do any editing required. This part is among the most crucial ones because, after finalizing the outcome, you will not be able to do the editing. However, if you want to do the editing, you need to repeat the entire process. Check things out mindfully.
05Step 5 Play Filmora once more
When you are done editing the images and creating the sketch animation, put them on Filmora for the final results.
Wondershare Filmora Video Editor is one of the efficient tools available for users to create sketch animated videos easily. This tool has all the advanced features integrated, making the task easy to achieve. Also, it features a customization option, helping users to add on or extract things or effects easily and rapidly.
Wondershare Filmora
Get started easily with Filmora’s powerful performance, intuitive interface, and countless effects!
Try It Free Try It Free Try It Free Learn More >
● Key Takeaways from This Episode →
● Sketch animation is a new art form used for many purposes.
● Filmora is one of the best sketch animation video makers.
● Sketch animsation tools are best for us for creating the desired outcome.
Also read:
- New 15 Top Pics Collage Apps for 2024
- Updated Christmas Is Coming! How to Find & Make Animated Christmas GIFs?
- In 2024, Tutorials for Animating Picture Online Without Learning From Scratch
- Updated In 2024, How You Can Turn Yourself Into Anime Character Using Anime Filter
- Updated Whats the Best 10 Photo Animator Templates That Bring Your Images to Life?
- New 2024 Approved How To Learn Cartoon Sketch Drawing— Pencil Sketch for Beginners
- 2024 Approved How to Make a Photoshop Collage in Simple Steps
- New 2024 Approved 10 Caricature Makers to Turn Photo to Caricature Effects
- Updated Guide on How to Create GIF in WhatsApp iPhone for 2024
- Updated How to Make an Animation With 7 Steps
- New In 2024, 10 Best Animation Makers for Kids to Have Fun
- Updated Best 12 Illusion Gifs Top Picks for 2024
- Updated In 2024, How to Create a YouTube Intro Animation Like a Pro
- New Some Must-Know Useful Lego Animation Ideas
- New 2024 Approved Top 10 3D Text Animation Templates
- New In 2024, Whiteboard Animation Services Top 15 Animation Companies to Pick
- New Easy Cartoon Characters Drawing Tutorials for You Who Are Learning to Draw
- How To Fix iPhone SE Could Not Be Activated/Reached Issue
- In 2024, Ultimate guide to get the meltan box pokemon go For Apple iPhone 14 Pro | Dr.fone
- Sign Word 2000 Online for Free
- How To Unlink Apple ID From iPhone 12 Pro
- Easy Guide to Oppo K11 5G FRP Bypass With Best Methods
- Fake Android Location without Rooting For Your Tecno Phantom V Flip | Dr.fone
- How to Use Google Assistant on Your Lock Screen Of Poco X6 Pro Phone
- In 2024, How to Reset your Vivo Y27 5G Lock Screen Password
- 7 Solutions to Fix Error Code 963 on Google Play Of Oppo Reno 11 5G | Dr.fone
- In 2024, The Updated Method to Bypass Vivo Y100 FRP
- Bypass Activation Lock From iPhone 6 - 4 Easy Ways
- 9 Best Phone Monitoring Apps for Samsung Galaxy S24 Ultra | Dr.fone
- Complete guide for recovering contacts files on Motorola .
- In 2024, 5 Easy Ways to Copy Contacts from Meizu 21 Pro to iPhone 14 and 15 | Dr.fone
- How to Fix It Vivo S18e Wont Turn On | Dr.fone
- Title: What Is A GIF for 2024
- Author: Elon
- Created at : 2024-05-19 03:05:08
- Updated at : 2024-05-20 03:05:08
- Link: https://animation-videos.techidaily.com/what-is-a-gif-for-2024/
- License: This work is licensed under CC BY-NC-SA 4.0.
