
:max_bytes(150000):strip_icc():format(webp)/tablets-vs-laptops-832333-93961eb085ff44d99d3836a0d0fa486a.png)
A Beginners Guide to Tell You What 3D Animation Is
A Beginner’s Guide to Tell You What 3D Animation Is
A Beginner’s Guide to Explain What 3D Animation Is
An easy yet powerful editor
Numerous effects to choose from
Detailed tutorials provided by the official channel
With present-day technology, 3D animation has reached all spheres be it entertainment, advertising, architecture, education, and much more. With the increasing use of 3D animation, there is a rise in the tools and programs used for creating such animations.
So, to help you get all the details about 3D animation, 3D modelling and animation process, best tools, tips, and tricks, keep reading the following parts.
In this article
01 [What Does 3D Animation Mean?](#Part 1)
02 [What is the Process of 3D Animation?](#Part 2)
03 [Types of 3D Animations](#Part 3)
04 [Top 5 3D Animation Software](#Part 4)
05 [Top Animation Tips and Tricks](#Part 5)
Part 1 What does 3D animation mean?
In simplest terms, animation is a process of manipulating the images so that they appear to be moving, and when this manipulation is done in three-dimensional space, it is called 3D animation. The objects and the models used for 3D animation can be rotated or moved like the real ones. Some tools can be used to scan real-life objects which can be then used as blueprints for creating animation 3D models.
The characters and the objects in 3D animations have to be moved to make them as realistic as possible. No matter, how interesting or perfect character you may create, if it does not move in an even manner, the overall effect will be ruined. The latest techniques and tools these days are capable of creating lifelike scenes.

Part 2 What is the process of 3D Animation?
Creating a 3D animation is a complex process involving several phases. Below listed are the main 3 phases for creating an animation.
01Modeling
The main thing for any 3D animation is its objects, models, or characters and this phase involves creating these objects. Since the objects are based on 3D computer models, the process is termed 3D modeling. A model by a computer appears like a mesh of geometric shapes including curves, points, lines, and more. These shapes do not look anywhere like real objects and only after when the textures and colors are added to them, they appear like real things.
02Layout and animation
The next step is layout and animation where characters are placed in the scenes and the animation of their movements is done using 3D animation tools. Initially, keyframes are created which are the start and the end pose of any animation, and then later other details like the effects, lighting, camerawork, and more are added to get the desired animation that appears on the screen.
03Rendering
The final step in the 3D creation process is rendering where the created animation is finalized as well as exported. To make sure that the final animation plays seamlessly and looks absolutely perfect, it is essential to check all the minute details.
After the production of 3D animation is done, next comes the post-production which is the phase where effects, music, and voiceovers are added and combined to make the entire animation look complete.

Part 3 Types of 3D animations
Now when we know what is a 3D animation and its process, we also need to know that different types of 3D animations are there. Some of the key ones are as below.
● 3D videos and movies
● 3D Virtual Reality
● Interactive 3D
● Digital 3D
● Clay Motion also termed Stop motion animation
● Pixilation
● Cell-shaded animation
● Paint-on-glass
● Pinscreen
Part 4 Top 5 3D Animation software
When it comes to 3D animation tools, the choices can be overwhelming and the list of promises claimed by the tools can be large. He, you need to shortlist the tools that best match your requirements as well as your skill sets. Below we have narrowed down the top 5 software of the category.
01Autodesk Maya
This is a top-rated animation, modeling, simulation, and rendering tool. Using this versatile tool, complex characters and animated videos can be created with all the needed effects.
Key features:
● Versatile 3D animation tool with support to a wide range of features.
● Available for download on Windows, Mac, and Linux systems.
● Allows creating complex characters, adding realistic effects, custom graphics, and more.
● Arnold’s feature of the tool allows switching between CPU and GPU.
● Animation features like fast-playback, time editing, graph editing, ghost editing, multiple modeling options, and others are supported.

02Blender
This is free and open-source software that can be used for creating 3D animations, motion graphics, computer games, and more. Since the tool has been in use for a long time, several artists keep adding to the tool.
Key features
● Free and open-source animation tool.
● Support to multiple platforms including Windows, Mac, and Linux.
● OpenGL interface which makes the functioning smooth.
● Comprehensive and robust set of tools for creating versatile animations. Some of these include automatic skilling, unwrapping texturing, envelope, skeleton, B-spline interpolated bones, sound synchronization, and more.
● Support input from motion-capture tools.

03Houdini
Used by reputed VFX companies like Pixar, Sony, Disney, and others, this is an excellent software that can be used for creating 3D animations, games, and others. With multi-platform support, it is a paid tool that also comes with a free learning edition.
Key features
● Feature-packed animation tool used by industry pioneers.
● Use node-based workflow for creating animations.
● Create biped and quadruped 3D objects using rigging tools.
● Comes with multiple plans to choose from as per budget and requirements.
● Offers a high level of flexibility and creativity.

04Cinema 4D
This professional animation creation software is known for its features and stability. With the availability of multiple tutorials and guides, learning the tool and its functions is easy.
Key features of the software
● Known to be an excellent tool for motion graphics, illustrations, and visualizations.
● Easy learning curve owing to the availability of tutorials, guides, and training materials. Access to free membership of Cineversity which is a training site.
● Comes with a 14-day free trial version along with a free education version for the teachers and students.
● Functions of the software are tested by QA and Beta testers that offer high stability.
● Support features like automatic keyframing, tag and expressions, effectors, and more.

05**Wondershare Filmora Video Editor **
If you are looking for software that is simple and easy to use but supports all advanced features this is one of the best choices. Available for Windows and Mac the tool also works as an excellent video editing tool.
Key features
● This easy 3D animation tool Allows creating sharp and lively animations using features like keyframing, motion-tracking, and others.
● Allows to add the preset motions or even customize your own animations.
● The speed, as well as the duration of the animation, can be changed using the ease-in and ease-out options.
● Make your videos lively with features like warp, distorting, masking, lights & flares, text& titles, and more.
● High-quality presets are available with features like auto-correction, color wheels, scopes, and more.
● Audio features supported like automatic audio sync, audio compression, audio transitions, and noise correction.
For Win 7 or later (64-bit)
For macOS 10.12 or later
Part 5 Top Animation Tips And Tricks
Though 3D animation requires a lot of technical know-how of the process, there are several tips and tricks that can make your task quicker, easier, and smoother. We have gathered a few such tips below.
01Make realistic objects by observing real life
The more you will observe real-life the more you will be able to imitate it into your animations for giving life to your objects, models, and characters. Having some knowledge about real-life, gravity, and similar topics will help you work on your animations more interactively.
02Evolve with latest techniques and technology
The tools, programs, and technology are progressing every day and to make the best use of the same, you need to evolve with the technology. To use the features and functions of the software you need to keep learning and growing.
03Go with the basic first
While working with the animations, it is very easy to get carried away with the process and get into the trap of looking for details. This will eventually move you away from your main track and will lead to a waste of time and effort. Thus, it is always advisable to go with the basics first and then move towards the detailing.
04Learn about the human emotions
Facial expressions are an important element of any 3D animation that brings life to characters. A good animation will portray good and complex emotions and thus it is important to study these emotions in detail so that they can be incorporated into your objects, models, and characters.

● Key Takeaways from This Episode →
● Animations created in 3-dimensional space are termed 3D animations.
● 3D animations involve pre-production, post-production, and several steps.
● For the smooth creation of 3D animations, several tips and tricks can be considered.
● A wide range of tools for creating 3D animations are available and one of the best tools in the category is Wondershare Filmora Video Editor that is effective and easy to use.
With present-day technology, 3D animation has reached all spheres be it entertainment, advertising, architecture, education, and much more. With the increasing use of 3D animation, there is a rise in the tools and programs used for creating such animations.
So, to help you get all the details about 3D animation, 3D modelling and animation process, best tools, tips, and tricks, keep reading the following parts.
In this article
01 [What Does 3D Animation Mean?](#Part 1)
02 [What is the Process of 3D Animation?](#Part 2)
03 [Types of 3D Animations](#Part 3)
04 [Top 5 3D Animation Software](#Part 4)
05 [Top Animation Tips and Tricks](#Part 5)
Part 1 What does 3D animation mean?
In simplest terms, animation is a process of manipulating the images so that they appear to be moving, and when this manipulation is done in three-dimensional space, it is called 3D animation. The objects and the models used for 3D animation can be rotated or moved like the real ones. Some tools can be used to scan real-life objects which can be then used as blueprints for creating animation 3D models.
The characters and the objects in 3D animations have to be moved to make them as realistic as possible. No matter, how interesting or perfect character you may create, if it does not move in an even manner, the overall effect will be ruined. The latest techniques and tools these days are capable of creating lifelike scenes.
Part 2 What is the process of 3D Animation?
Creating a 3D animation is a complex process involving several phases. Below listed are the main 3 phases for creating an animation.
01Modeling
The main thing for any 3D animation is its objects, models, or characters and this phase involves creating these objects. Since the objects are based on 3D computer models, the process is termed 3D modeling. A model by a computer appears like a mesh of geometric shapes including curves, points, lines, and more. These shapes do not look anywhere like real objects and only after when the textures and colors are added to them, they appear like real things.
02Layout and animation
The next step is layout and animation where characters are placed in the scenes and the animation of their movements is done using 3D animation tools. Initially, keyframes are created which are the start and the end pose of any animation, and then later other details like the effects, lighting, camerawork, and more are added to get the desired animation that appears on the screen.
03Rendering
The final step in the 3D creation process is rendering where the created animation is finalized as well as exported. To make sure that the final animation plays seamlessly and looks absolutely perfect, it is essential to check all the minute details.
After the production of 3D animation is done, next comes the post-production which is the phase where effects, music, and voiceovers are added and combined to make the entire animation look complete.
Part 3 Types of 3D animations
Now when we know what is a 3D animation and its process, we also need to know that different types of 3D animations are there. Some of the key ones are as below.
● 3D videos and movies
● 3D Virtual Reality
● Interactive 3D
● Digital 3D
● Clay Motion also termed Stop motion animation
● Pixilation
● Cell-shaded animation
● Paint-on-glass
● Pinscreen
Part 4 Top 5 3D Animation software
When it comes to 3D animation tools, the choices can be overwhelming and the list of promises claimed by the tools can be large. He, you need to shortlist the tools that best match your requirements as well as your skill sets. Below we have narrowed down the top 5 software of the category.
01Autodesk Maya
This is a top-rated animation, modeling, simulation, and rendering tool. Using this versatile tool, complex characters and animated videos can be created with all the needed effects.
Key features:
● Versatile 3D animation tool with support to a wide range of features.
● Available for download on Windows, Mac, and Linux systems.
● Allows creating complex characters, adding realistic effects, custom graphics, and more.
● Arnold’s feature of the tool allows switching between CPU and GPU.
● Animation features like fast-playback, time editing, graph editing, ghost editing, multiple modeling options, and others are supported.
02Blender
This is free and open-source software that can be used for creating 3D animations, motion graphics, computer games, and more. Since the tool has been in use for a long time, several artists keep adding to the tool.
Key features
● Free and open-source animation tool.
● Support to multiple platforms including Windows, Mac, and Linux.
● OpenGL interface which makes the functioning smooth.
● Comprehensive and robust set of tools for creating versatile animations. Some of these include automatic skilling, unwrapping texturing, envelope, skeleton, B-spline interpolated bones, sound synchronization, and more.
● Support input from motion-capture tools.
03Houdini
Used by reputed VFX companies like Pixar, Sony, Disney, and others, this is an excellent software that can be used for creating 3D animations, games, and others. With multi-platform support, it is a paid tool that also comes with a free learning edition.
Key features
● Feature-packed animation tool used by industry pioneers.
● Use node-based workflow for creating animations.
● Create biped and quadruped 3D objects using rigging tools.
● Comes with multiple plans to choose from as per budget and requirements.
● Offers a high level of flexibility and creativity.
04Cinema 4D
This professional animation creation software is known for its features and stability. With the availability of multiple tutorials and guides, learning the tool and its functions is easy.
Key features of the software
● Known to be an excellent tool for motion graphics, illustrations, and visualizations.
● Easy learning curve owing to the availability of tutorials, guides, and training materials. Access to free membership of Cineversity which is a training site.
● Comes with a 14-day free trial version along with a free education version for the teachers and students.
● Functions of the software are tested by QA and Beta testers that offer high stability.
● Support features like automatic keyframing, tag and expressions, effectors, and more.
05**Wondershare Filmora Video Editor **
If you are looking for software that is simple and easy to use but supports all advanced features this is one of the best choices. Available for Windows and Mac the tool also works as an excellent video editing tool.
Key features
● This easy 3D animation tool Allows creating sharp and lively animations using features like keyframing, motion-tracking, and others.
● Allows to add the preset motions or even customize your own animations.
● The speed, as well as the duration of the animation, can be changed using the ease-in and ease-out options.
● Make your videos lively with features like warp, distorting, masking, lights & flares, text& titles, and more.
● High-quality presets are available with features like auto-correction, color wheels, scopes, and more.
● Audio features supported like automatic audio sync, audio compression, audio transitions, and noise correction.
For Win 7 or later (64-bit)
For macOS 10.12 or later
Part 5 Top Animation Tips And Tricks
Though 3D animation requires a lot of technical know-how of the process, there are several tips and tricks that can make your task quicker, easier, and smoother. We have gathered a few such tips below.
01Make realistic objects by observing real life
The more you will observe real-life the more you will be able to imitate it into your animations for giving life to your objects, models, and characters. Having some knowledge about real-life, gravity, and similar topics will help you work on your animations more interactively.
02Evolve with latest techniques and technology
The tools, programs, and technology are progressing every day and to make the best use of the same, you need to evolve with the technology. To use the features and functions of the software you need to keep learning and growing.
03Go with the basic first
While working with the animations, it is very easy to get carried away with the process and get into the trap of looking for details. This will eventually move you away from your main track and will lead to a waste of time and effort. Thus, it is always advisable to go with the basics first and then move towards the detailing.
04Learn about the human emotions
Facial expressions are an important element of any 3D animation that brings life to characters. A good animation will portray good and complex emotions and thus it is important to study these emotions in detail so that they can be incorporated into your objects, models, and characters.
● Key Takeaways from This Episode →
● Animations created in 3-dimensional space are termed 3D animations.
● 3D animations involve pre-production, post-production, and several steps.
● For the smooth creation of 3D animations, several tips and tricks can be considered.
● A wide range of tools for creating 3D animations are available and one of the best tools in the category is Wondershare Filmora Video Editor that is effective and easy to use.
Guide on Creating GIF in WhatsApp iPhone
2024 Guide on How to Create GIF in WhatsApp iPhone
An easy yet powerful editor
Numerous effects to choose from
Detailed tutorials provided by the official channel
Standing for Graphics Interchange Format, GIF is short animated images that you can see all over social media sites and other online platforms. These interesting animations can also be shared during your conversations on WhatsApp.

So, if you too are looking for ways to create as well as send GIFs on WhatsApp iPhone, you are on the right page. Keep reading to know all the possible ways to send WhatsApp GIFs on iPhone.
In this article
01 [How to send WhatsApp GIF from the integrated library on iPhone](#Part 1)
02 [How to send Live Photos as WhatsApp GIF on iPhone](#Part 2)
03 [How to create WhatsApp GIF using videos on iPhone](#Part 3)
04 [How to create excellent GIF effortlessly using Wondershare Filmora- All in One video editing software](#Part 4)
Part 1 How to send WhatsApp GIF from the integrated library on iPhone
If you have the latest version of WhatsApp installed on your phone, you can easily and quickly send the GIF from the integrated library having a collection of GIFs in several categories. The steps to send GIF in WhatsApp iPhone are as below.
Step 1. On your iPhone, launch WhatsApp and open the contact or a group to which you wish to send the GIF.
Step 2. Click on the Stickers icon at the typing section and then choose the GIF option at the bottom.
Step 3. Multiple GIFs in different categories will appear. You can further search for the desired GIF using a keyword at the search icon at the bottom-left corner. The list of the Recents and the Favorites can also be searched using their respective icons.
Note: To save any particular GIF in the favorites list, tap and hold the GIF and then click on Add To Favorites option.
StepTap on the selected GIF and then click on the Send icon at the bottom-right corner. Your WhatsApp GIF iPhone will be sent.

Part 2 How to send Live Photos as WhatsApp GIF on iPhone
Live Photos on your iPhone can also be sent as GIFs in WhatsApp conversations and the steps for the same are as below.
Note: The feature is available for users having iPhone 6 or later versions.
Step 1.Open the WhatsApp contact on your iPhone to whom you wish to send the GIF. Click on the + icon and then choose the option of Photo & Video Library.
Step 2. Search for the Live photo in your gallery and then press it. When the image pops out, slide upwards and then click on the Select as GIF option.
Step 3. Tap on the Send icon to share the selected Live photo as GIF.

Part 3 How to create WhatsApp GIF using videos on iPhone
In addition to the integrated library, you can also convert the videos on your iPhone to GIF and share them on WhatsApp. To be used as GIF, the length of the videos cannot be more than 6 seconds. Thus, for a larger video, you need to trim it to be under 6 seconds. Steps to get the task done are as follows.
Step 1.Launch WhatsApp on your iPhone and select the contact to which you want to share the GIF. Next, click on + sign and then choose Photo & Video Library option.
Step 2.Select the desired video from your phone gallery.
Step 3.After the video is added, an editing screen will open. Here you can trim the video to make it under 6 seconds using the slider at the top. Further changes can be made like adding a sticker, text, or making a freehand drawing.
Step 4.After all customizations are done, click on the GIF button.
Step 5.Finally, tap on the Send icon at the bottom-right corner to send the edited video as GIF.

Part 4 How to create excellent GIF effortlessly using Wondershare Filmora- All in One video editing software
WhatsApp in your iPhone has a built-in option to create GIFs using the videos on the device. Though the process is simple, the option for editing and customizations are limited. So, if you want to create GIFs using videos online and with advanced editing tools, we suggest using Wondershare Filmora Video Editor .
This all-in-one video editing software will let you edit and customize your files in several ways and in a few simple steps, your desired GIF will be ready.
Wondershare Filmora
Get started easily with Filmora’s powerful performance, intuitive interface, and countless effects!
Try It Free Try It Free Try It Free Learn More >

Key features of the software
● Add media files in all ley formats like MP4, MOV, MKV, PNG, and others to create GIFs.
● Simple and quick steps for creating the desired animation.
● Allows to customize the GIF using functions like slow-down, crop, rotate, and many more.
● Allows adding text, voice, and other elements.
● Option to share the created GIF to Vimeo, and YouTube directly.
● Software support to all latest Windows and Mac systems.
Steps to create WhatsApp GIF using Wondershare Filmora.
Step 1.Open the installed software on your system and import the desired images and videos from your system.
Step 2.Drag and drop the added videos and images to the timeline.

Step 3.Edit the file using features like crop, rotate, split, and others.
Step 4.Add text and other elements as needed.

Step 5.At the Local tab, save the customized media as GIF. Select the file name and the destination and then finally, click on the EXPORT button to start processing.
● Key Takeaways from This Episode →
●Gifs for WhatsApp iPhone can be added from the integrated library.
●Live Photos, as well as videos, can also be used to create and share them as GIF.
●For creating interesting and funny GIF in a hassle-free manner, Wondershare Filmora works as the best software.
Standing for Graphics Interchange Format, GIF is short animated images that you can see all over social media sites and other online platforms. These interesting animations can also be shared during your conversations on WhatsApp.
So, if you too are looking for ways to create as well as send GIFs on WhatsApp iPhone, you are on the right page. Keep reading to know all the possible ways to send WhatsApp GIFs on iPhone.
In this article
01 [How to send WhatsApp GIF from the integrated library on iPhone](#Part 1)
02 [How to send Live Photos as WhatsApp GIF on iPhone](#Part 2)
03 [How to create WhatsApp GIF using videos on iPhone](#Part 3)
04 [How to create excellent GIF effortlessly using Wondershare Filmora- All in One video editing software](#Part 4)
Part 1 How to send WhatsApp GIF from the integrated library on iPhone
If you have the latest version of WhatsApp installed on your phone, you can easily and quickly send the GIF from the integrated library having a collection of GIFs in several categories. The steps to send GIF in WhatsApp iPhone are as below.
Step 1. On your iPhone, launch WhatsApp and open the contact or a group to which you wish to send the GIF.
Step 2. Click on the Stickers icon at the typing section and then choose the GIF option at the bottom.
Step 3. Multiple GIFs in different categories will appear. You can further search for the desired GIF using a keyword at the search icon at the bottom-left corner. The list of the Recents and the Favorites can also be searched using their respective icons.
Note: To save any particular GIF in the favorites list, tap and hold the GIF and then click on Add To Favorites option.
StepTap on the selected GIF and then click on the Send icon at the bottom-right corner. Your WhatsApp GIF iPhone will be sent.
Part 2 How to send Live Photos as WhatsApp GIF on iPhone
Live Photos on your iPhone can also be sent as GIFs in WhatsApp conversations and the steps for the same are as below.
Note: The feature is available for users having iPhone 6 or later versions.
Step 1.Open the WhatsApp contact on your iPhone to whom you wish to send the GIF. Click on the + icon and then choose the option of Photo & Video Library.
Step 2. Search for the Live photo in your gallery and then press it. When the image pops out, slide upwards and then click on the Select as GIF option.
Step 3. Tap on the Send icon to share the selected Live photo as GIF.
Part 3 How to create WhatsApp GIF using videos on iPhone
In addition to the integrated library, you can also convert the videos on your iPhone to GIF and share them on WhatsApp. To be used as GIF, the length of the videos cannot be more than 6 seconds. Thus, for a larger video, you need to trim it to be under 6 seconds. Steps to get the task done are as follows.
Step 1.Launch WhatsApp on your iPhone and select the contact to which you want to share the GIF. Next, click on + sign and then choose Photo & Video Library option.
Step 2.Select the desired video from your phone gallery.
Step 3.After the video is added, an editing screen will open. Here you can trim the video to make it under 6 seconds using the slider at the top. Further changes can be made like adding a sticker, text, or making a freehand drawing.
Step 4.After all customizations are done, click on the GIF button.
Step 5.Finally, tap on the Send icon at the bottom-right corner to send the edited video as GIF.
Part 4 How to create excellent GIF effortlessly using Wondershare Filmora- All in One video editing software
WhatsApp in your iPhone has a built-in option to create GIFs using the videos on the device. Though the process is simple, the option for editing and customizations are limited. So, if you want to create GIFs using videos online and with advanced editing tools, we suggest using Wondershare Filmora Video Editor .
This all-in-one video editing software will let you edit and customize your files in several ways and in a few simple steps, your desired GIF will be ready.
Wondershare Filmora
Get started easily with Filmora’s powerful performance, intuitive interface, and countless effects!
Try It Free Try It Free Try It Free Learn More >
Key features of the software
● Add media files in all ley formats like MP4, MOV, MKV, PNG, and others to create GIFs.
● Simple and quick steps for creating the desired animation.
● Allows to customize the GIF using functions like slow-down, crop, rotate, and many more.
● Allows adding text, voice, and other elements.
● Option to share the created GIF to Vimeo, and YouTube directly.
● Software support to all latest Windows and Mac systems.
Steps to create WhatsApp GIF using Wondershare Filmora.
Step 1.Open the installed software on your system and import the desired images and videos from your system.
Step 2.Drag and drop the added videos and images to the timeline.
Step 3.Edit the file using features like crop, rotate, split, and others.
Step 4.Add text and other elements as needed.
Step 5.At the Local tab, save the customized media as GIF. Select the file name and the destination and then finally, click on the EXPORT button to start processing.
● Key Takeaways from This Episode →
●Gifs for WhatsApp iPhone can be added from the integrated library.
●Live Photos, as well as videos, can also be used to create and share them as GIF.
●For creating interesting and funny GIF in a hassle-free manner, Wondershare Filmora works as the best software.
Best 15 Female Anime Characters-Who Is Your Favorite?
Best 15 Female Anime Characters-Who Is Your Favorite?

Shanoon Cox
Mar 27, 2024• Proven solutions
With some powerful themes and ideas of loyalty, honor, and sacrifice, anime culture is not ending anytime soon. And being an anime fan, we are glad.
Since the early 1900’s, cool male and female anime characters have been inspiring fans worldwide; you will find plenty of anime girl characters who are ferocious, smartass, or simply princesses with blue, red, or blonde hair and personalities so engaging and influencing. This article includes tons of strong anime ladies you can look up to, from incredibly intellectual Motoko Kusanagi to an agile warrior Saber. We will talk about their intriguing stories, abilities, and powers that steal our hearts away.
Best 15 Female Anime Characters of All Time
Here we have the best 15 female anime characters found on TV and in films which are always one thing – popular. However, note that all these girl characters have earned their place in our list in no particular order. Let’s check them out!
- 1. Erza Scarlet- Fairy Tail
- 2. Kushina Uzumaki-Naruto
- 3. Asuna- Sword Art Online
- 4. Saber- Fate/Stay Night
- 5. Rias Gremory- High School DxD
- 6. Karma Akabane – Assassination Classroom
- 7. Mikasa Ackerman-Attack on Titan
- 8. Motoko Kusanagi-Ghost in the Shell
- 9. Touka Kirishima-Tokyo Ghoul
- 10. Tsukuyo-Gintama
- 11. Lucy Heartfilia- Fairy Tail
- 12. Yui Komori- Diabolik Lovers
- 13. Revy-Black Lagoon
- 14. Shoko Nishimiya- A Silent Voice
- 15.Esdeath- Akame ga Kill!
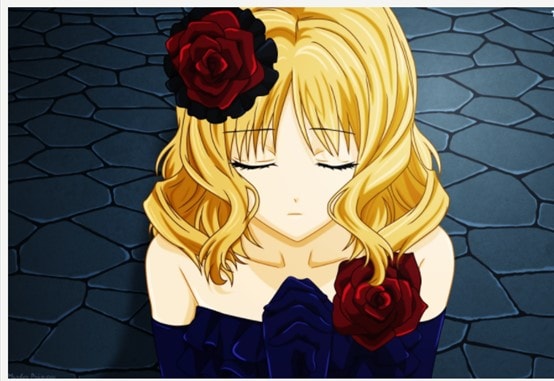
1. Erza Scarlet- Fairy Tail

Tall, beautiful, and a bit scary, Erza Scarlet is an S-class mage of the Fairy Tail Guild. As one of the leading female protagonists in Team Natsu, Erza feels great pride and shows dedication to the guild. She’s often seen in her custom-made armored suit, a blue skirt, and black boots with a blue Fairy Tail stamp on her upper left arm. But, changing her attire at any given time is never a problem for her, thanks to her Requip magic powers.
Anime fans love Erza for her strict yet clumsy personality. Her fighting and leadership skills in the war against Phantom Lord Guild have had fans in admiration.
2. Kushina Uzumaki-Naruto
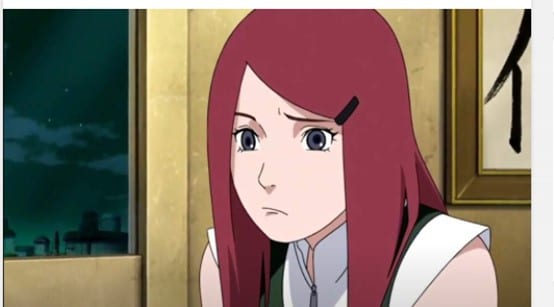
We love the nickname “Red hot-blooded Habanero,” Kushina earned when she attacked a bunch of kids who teased and laughed at her. Born inUzushiogakure Uzumaki clan, Kushina was a beautiful woman in her early 20s with a slender figure. She is the wife of Minato Namikaze and the mother of Naruto Uzumaki in the top-rated Naruto series. Despite a short temper and violent outbursts, Kushina possesses a soft and caring side most people love her for.
3. Asuna- Sword Art Online
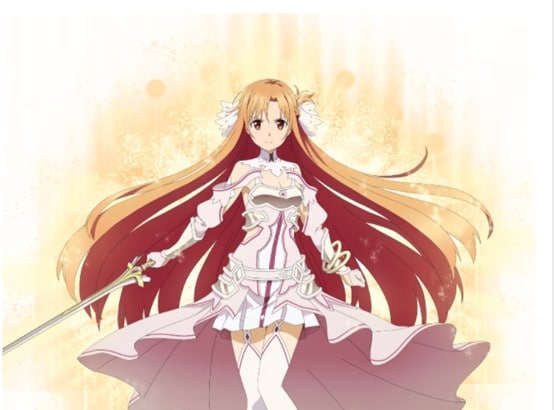
Asuna Yuuki is one of the popular anime girl characters of our favorite Sword Art Online novel, manga, anime franchise. She is the deuteragonist and former Vice-commander of the Knights of the Blood Oath in Sword Art Online. Early on, Asuna was shown to be a strong fighter who did not care about dying until she met Kirito. However, Asuna is a bit overly serious, and as the SAO series progresses, she is shown nothing but the wife of Kirito.
4. Saber- Fate/Stay Night
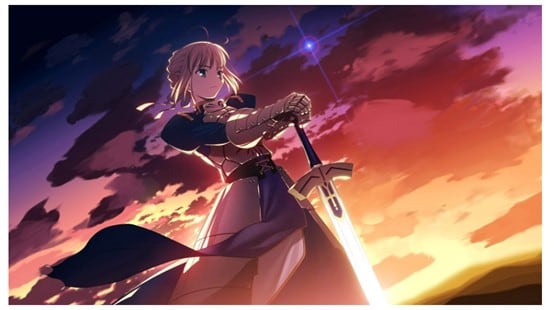
Fate/Stay Night’s Saber is the saber class servant of Kiritsugu Emiya in the Fourth Holy Grail War and Shirou Emiya in the Fifth Holy Grail War.. Serving her master with loyalty and devotion, Saber is a courageous and strong-willed female anime character. Fans around the world acknowledge her as a supremely skilled warrior with a kind heart, caring about the ones she loves. Her stats
5. Rias Gremory- High School DxD
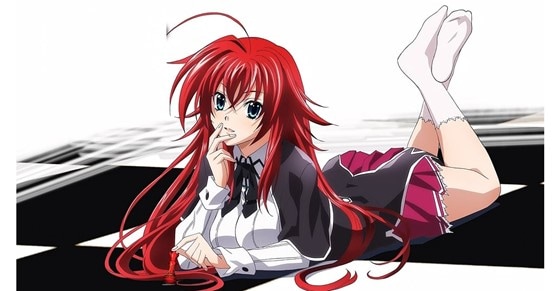
School’s number one beauty, the red-haired Rias Gremory, deserves a spot on our list. She is the only daughter of Zeoticus Venelana Gremory and the next head of the Gremory clan. We love when she is called the Crimson-haired Ruin Princess. While she has charming features, she is very kind and compassionate even to her servants – something which makes her a fan favorite,
6. Nobara Kugisaki- Jujutsu Kaisen

Out of the many unique anime characters in Jujutsu Kaisen, Nobara Kugosaki is a tough girl most anime fans are drawn to. She is one of the Jujutsu manga’s three primary protagonists who moved to Tokyo. Nobara isn’t your typical strong lady; she is confident and outspoken about her appearance and herself as a person.
As a rebellious fighter, she has shown superhuman pain tolerance while fighting foes even larger than herself. Nobara fans love her proficiency with various curse-infused weaponry, such as the hammer and nail, straw dolls, and the rubber mallet.
7. Mikasa Ackerman-Attack on Titan

As the favorite of many anime fans, Mikasa Ackerman had to make it to our list of the best anime girl characters. The lead female of Attack on Titan, Mikasa, is portrayed as one of the strongest characters, both physically and mentally.
Once a cheerful, outgoing, and innocent child living with her parents, Mikasa grows up to be quite stoic and dangerous at times. Despite the trauma of witnessing the carnage during the Survey Corps and her biological parent’s brutal murder, Mikasa Ackerman retains humanity in her kind heart. But with a reserved, emotionally withdrawn personality who rarely speaks or losses her cool. Her character in the Attack on Titan series causes us to question our endurance.
8. Motoko Kusanagi-Ghost in the Shell
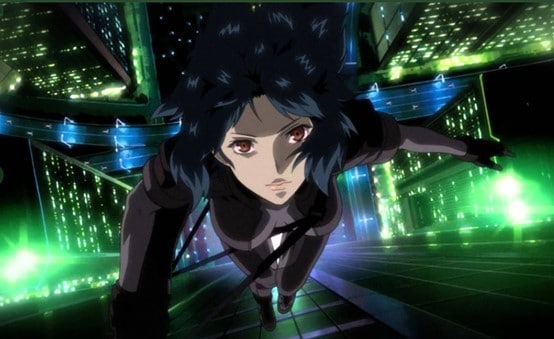
Who doesn’t know this quick-witted girl from the very popular Ghost in the shell manga-anime franchise, with a characteristic cyborg body? Motoko Kusanagi is employed as an officer for Public Security Section 9, a Japanese National Public Safety Commission division. After the airplane accident in her childhood, Motoko was comatose until her consciousness was put into a prosthetic body. Since then, she has been an excellent hacker with incredible intelligence and combat skills respected among her colleagues. Motoko connects with the audience on a greater level, for she is strong, cool, intellectual, and artificial at the same time.
9. Touka Kirishima-Tokyo Ghoul
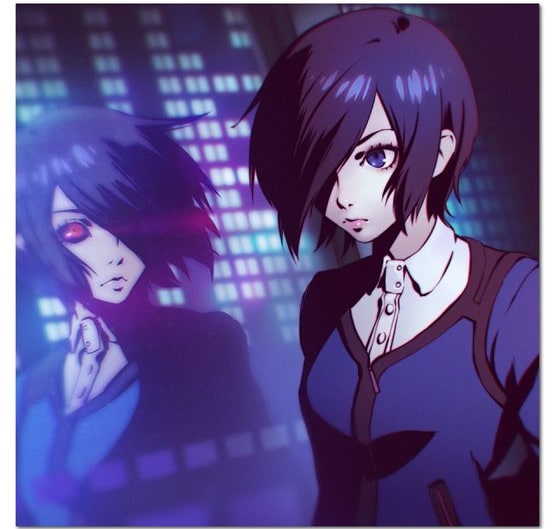
Here comes a ferocious ghoul; one of the most talked-about female protagonists from the Tokyo Ghoul series is Touka Kirishima, aka Rabbit. While she tries not to resort to violence most of the time, sometimes she hunts with a Rabbit mask on, hence the alias.
In the past, she was a waitress at the famous coffee shop in Anteiku. With the progression of the series, Touka becomes the manager two years after the Owl Suppression Operation. And as humans and ghouls come to peace, she marries Ken Kaneki and gives birth to their first daughter Ichika Kaneki. Being a rugged, know-it-all kind of girl but with a touch of kindness, people adore Touka Kirishima.
10. Tsukuyo-Gintama
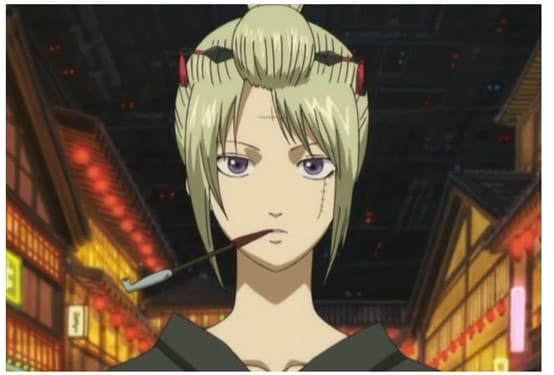
Tsukuyo from Gintama anime and manga is a fan-favorite, often known as “Courtesan of Death.” She is a blondie with a scar over her forehead that tells the tales of her loyalty to her master when he asked her to reject her identity as a woman. Orphaned as a child, Tsukuyo was raised and trained by a ruthless and deadly assassin, Jiraia. And so, she grows to be a competent, highly skilled ninja currently serving as a leader of an all-female law enforcement squad—no wonder all feminist anime fans look up to her interesting personality and powerful character.
11. Lucy Heartfilia- Fairy Tail
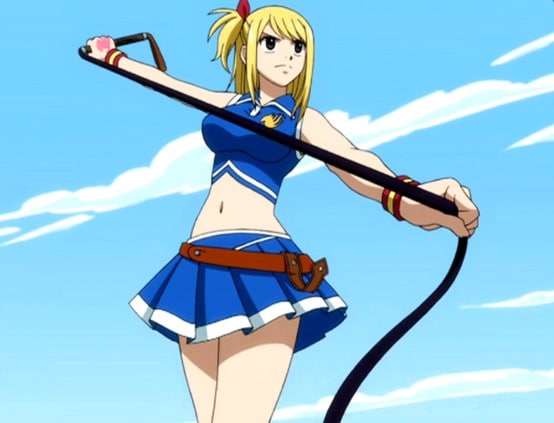
Lucy Heartfilia, an iconic anime girl from the Fairy Tail manga series, has the best character growth from the first episode to the last. When we first see her, she is a happy, innocent little girl who grows up to be a divine spirit mage and mother to seven children.
There are so many likable qualities about Lucy – she is fair and beautiful, responsible, with impressive magic skills, and a desire to become a world-famous author. Lucy Heartfilia leaves her home after her mother’s death with an ambition for independence, something admired by the fandom.
12. Yui Komori- Diabolik Lovers
Yui is living with Cordelia’s heart in her. When Cordelia was dying, she asked Richter to cut out and implant her heart into another human body, so he did it in the abandoned kid Yui. Later, she was adopted by a priest and vampire hunter, Seiji, and is forced to live with six vampire brothers.
When it comes to lovely vampire anime ladies, it’s not a surprise that Diabolik Lover’s Yui Komori is everyone’s favorite. Her wavy platinum blonde hair and glistering sherbet pink color eyes have caught the attention of the viewers. Not to mention the pretty pink flower hair clip on the left side of her hair adds to her beauty. But there’s more than just beauty about Yui Komori – she is still-willed and brave, with an optimistic personality. She is seen to keep a cool head about threats and not mind any mean comments from the other vampires.
13. Revy-Black Lagoon

No, we did not forget the heroine, Revy, or as you may call her Rebecca Lee from the Black Lagoon anime series. Everything about Revy is ferocious. In her mid to late twenties, Revy is a Chinese-American tan-skinned woman with a wild temperament. In the old days, she is shown as a thief and murderer who shot an unknown man as her first murder. You can’t really relate to this complex female anime character until you dive deeper into her intriguing story and understand the verbal and physical trauma she has faced over the years. Though she is a little rude, sarcastic, and troubled, her forgetful and humorous side touches our hearts once in a while.
14. Shoko Nishimiya- A Silent Voice
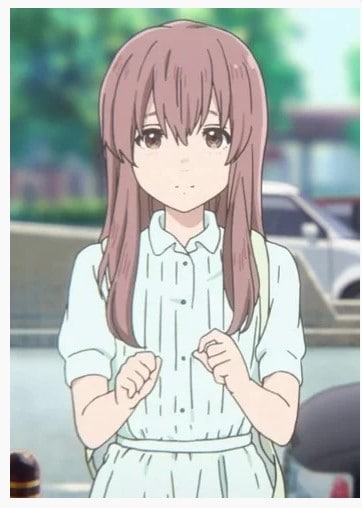
This entry has had a long-lasting impression on most anime fans because of her sweet and forgiving nature, who fakes smiles even when it’s hard to. Her character is one of a kind being clinically deaf but still the leading protagonist of the A Silent Voice series. Unfortunately, she has always been an easy target for bullies, especially her classmate Shoya, who later becomes her friend due to her forgiving nature. Despite the bullies, the pain, Shoko Nishimiya is a strong girl who cares about her family and friends but cries in silence when she is hurt.
15. Esdeath- Akame ga Kill
Without a doubt, Esdeath is the best dark character in the history of the darkest anime series or films. If you are an action lover like us, Esdeath’s spectacular fight skills will wow you. As a high-ranking general of the Empire, her attire consists of a General’s apparel with long sleeves, a blue scarf around the neck, and high-heeled boots. Soon, the Prime Minister appoints her as the leader of the Jaegers since she is stronger (emotionally and physically) than most characters. Now a manipulative and sadistic woman, Esdeath did not always lack empathy. Sadly, it was her father’s death in her own arms that hardened her heart to a point she humiliated and tortured anyone she finds weaker than her.
What Makes a Female Anime Character Stand out?
A bunch of unique and exciting anime characters is released every year. While some of these turn out lovable gems, others prove long-forgotten failures. But what is it about an anime character that makes it stand out?
Everything shapes the perfect leading anime character, from their personalities to their clothes and styling to the character development. Memorable anime girl characters are rare, well-written protagonists with profound nature, exciting stories, and emotions that relate to anime fans.
So, which female anime character is your favorite?
Shanoon Cox
Shanoon Cox is a writer and a lover of all things video.
Follow @Shanoon Cox
Shanoon Cox
Mar 27, 2024• Proven solutions
With some powerful themes and ideas of loyalty, honor, and sacrifice, anime culture is not ending anytime soon. And being an anime fan, we are glad.
Since the early 1900’s, cool male and female anime characters have been inspiring fans worldwide; you will find plenty of anime girl characters who are ferocious, smartass, or simply princesses with blue, red, or blonde hair and personalities so engaging and influencing. This article includes tons of strong anime ladies you can look up to, from incredibly intellectual Motoko Kusanagi to an agile warrior Saber. We will talk about their intriguing stories, abilities, and powers that steal our hearts away.
Best 15 Female Anime Characters of All Time
Here we have the best 15 female anime characters found on TV and in films which are always one thing – popular. However, note that all these girl characters have earned their place in our list in no particular order. Let’s check them out!
- 1. Erza Scarlet- Fairy Tail
- 2. Kushina Uzumaki-Naruto
- 3. Asuna- Sword Art Online
- 4. Saber- Fate/Stay Night
- 5. Rias Gremory- High School DxD
- 6. Karma Akabane – Assassination Classroom
- 7. Mikasa Ackerman-Attack on Titan
- 8. Motoko Kusanagi-Ghost in the Shell
- 9. Touka Kirishima-Tokyo Ghoul
- 10. Tsukuyo-Gintama
- 11. Lucy Heartfilia- Fairy Tail
- 12. Yui Komori- Diabolik Lovers
- 13. Revy-Black Lagoon
- 14. Shoko Nishimiya- A Silent Voice
- 15.Esdeath- Akame ga Kill!
1. Erza Scarlet- Fairy Tail
Tall, beautiful, and a bit scary, Erza Scarlet is an S-class mage of the Fairy Tail Guild. As one of the leading female protagonists in Team Natsu, Erza feels great pride and shows dedication to the guild. She’s often seen in her custom-made armored suit, a blue skirt, and black boots with a blue Fairy Tail stamp on her upper left arm. But, changing her attire at any given time is never a problem for her, thanks to her Requip magic powers.
Anime fans love Erza for her strict yet clumsy personality. Her fighting and leadership skills in the war against Phantom Lord Guild have had fans in admiration.
2. Kushina Uzumaki-Naruto
We love the nickname “Red hot-blooded Habanero,” Kushina earned when she attacked a bunch of kids who teased and laughed at her. Born inUzushiogakure Uzumaki clan, Kushina was a beautiful woman in her early 20s with a slender figure. She is the wife of Minato Namikaze and the mother of Naruto Uzumaki in the top-rated Naruto series. Despite a short temper and violent outbursts, Kushina possesses a soft and caring side most people love her for.
3. Asuna- Sword Art Online
Asuna Yuuki is one of the popular anime girl characters of our favorite Sword Art Online novel, manga, anime franchise. She is the deuteragonist and former Vice-commander of the Knights of the Blood Oath in Sword Art Online. Early on, Asuna was shown to be a strong fighter who did not care about dying until she met Kirito. However, Asuna is a bit overly serious, and as the SAO series progresses, she is shown nothing but the wife of Kirito.
4. Saber- Fate/Stay Night
Fate/Stay Night’s Saber is the saber class servant of Kiritsugu Emiya in the Fourth Holy Grail War and Shirou Emiya in the Fifth Holy Grail War.. Serving her master with loyalty and devotion, Saber is a courageous and strong-willed female anime character. Fans around the world acknowledge her as a supremely skilled warrior with a kind heart, caring about the ones she loves. Her stats
5. Rias Gremory- High School DxD
School’s number one beauty, the red-haired Rias Gremory, deserves a spot on our list. She is the only daughter of Zeoticus Venelana Gremory and the next head of the Gremory clan. We love when she is called the Crimson-haired Ruin Princess. While she has charming features, she is very kind and compassionate even to her servants – something which makes her a fan favorite,
6. Nobara Kugisaki- Jujutsu Kaisen
Out of the many unique anime characters in Jujutsu Kaisen, Nobara Kugosaki is a tough girl most anime fans are drawn to. She is one of the Jujutsu manga’s three primary protagonists who moved to Tokyo. Nobara isn’t your typical strong lady; she is confident and outspoken about her appearance and herself as a person.
As a rebellious fighter, she has shown superhuman pain tolerance while fighting foes even larger than herself. Nobara fans love her proficiency with various curse-infused weaponry, such as the hammer and nail, straw dolls, and the rubber mallet.
7. Mikasa Ackerman-Attack on Titan
As the favorite of many anime fans, Mikasa Ackerman had to make it to our list of the best anime girl characters. The lead female of Attack on Titan, Mikasa, is portrayed as one of the strongest characters, both physically and mentally.
Once a cheerful, outgoing, and innocent child living with her parents, Mikasa grows up to be quite stoic and dangerous at times. Despite the trauma of witnessing the carnage during the Survey Corps and her biological parent’s brutal murder, Mikasa Ackerman retains humanity in her kind heart. But with a reserved, emotionally withdrawn personality who rarely speaks or losses her cool. Her character in the Attack on Titan series causes us to question our endurance.
8. Motoko Kusanagi-Ghost in the Shell
Who doesn’t know this quick-witted girl from the very popular Ghost in the shell manga-anime franchise, with a characteristic cyborg body? Motoko Kusanagi is employed as an officer for Public Security Section 9, a Japanese National Public Safety Commission division. After the airplane accident in her childhood, Motoko was comatose until her consciousness was put into a prosthetic body. Since then, she has been an excellent hacker with incredible intelligence and combat skills respected among her colleagues. Motoko connects with the audience on a greater level, for she is strong, cool, intellectual, and artificial at the same time.
9. Touka Kirishima-Tokyo Ghoul
Here comes a ferocious ghoul; one of the most talked-about female protagonists from the Tokyo Ghoul series is Touka Kirishima, aka Rabbit. While she tries not to resort to violence most of the time, sometimes she hunts with a Rabbit mask on, hence the alias.
In the past, she was a waitress at the famous coffee shop in Anteiku. With the progression of the series, Touka becomes the manager two years after the Owl Suppression Operation. And as humans and ghouls come to peace, she marries Ken Kaneki and gives birth to their first daughter Ichika Kaneki. Being a rugged, know-it-all kind of girl but with a touch of kindness, people adore Touka Kirishima.
10. Tsukuyo-Gintama
Tsukuyo from Gintama anime and manga is a fan-favorite, often known as “Courtesan of Death.” She is a blondie with a scar over her forehead that tells the tales of her loyalty to her master when he asked her to reject her identity as a woman. Orphaned as a child, Tsukuyo was raised and trained by a ruthless and deadly assassin, Jiraia. And so, she grows to be a competent, highly skilled ninja currently serving as a leader of an all-female law enforcement squad—no wonder all feminist anime fans look up to her interesting personality and powerful character.
11. Lucy Heartfilia- Fairy Tail
Lucy Heartfilia, an iconic anime girl from the Fairy Tail manga series, has the best character growth from the first episode to the last. When we first see her, she is a happy, innocent little girl who grows up to be a divine spirit mage and mother to seven children.
There are so many likable qualities about Lucy – she is fair and beautiful, responsible, with impressive magic skills, and a desire to become a world-famous author. Lucy Heartfilia leaves her home after her mother’s death with an ambition for independence, something admired by the fandom.
12. Yui Komori- Diabolik Lovers
Yui is living with Cordelia’s heart in her. When Cordelia was dying, she asked Richter to cut out and implant her heart into another human body, so he did it in the abandoned kid Yui. Later, she was adopted by a priest and vampire hunter, Seiji, and is forced to live with six vampire brothers.
When it comes to lovely vampire anime ladies, it’s not a surprise that Diabolik Lover’s Yui Komori is everyone’s favorite. Her wavy platinum blonde hair and glistering sherbet pink color eyes have caught the attention of the viewers. Not to mention the pretty pink flower hair clip on the left side of her hair adds to her beauty. But there’s more than just beauty about Yui Komori – she is still-willed and brave, with an optimistic personality. She is seen to keep a cool head about threats and not mind any mean comments from the other vampires.
13. Revy-Black Lagoon
No, we did not forget the heroine, Revy, or as you may call her Rebecca Lee from the Black Lagoon anime series. Everything about Revy is ferocious. In her mid to late twenties, Revy is a Chinese-American tan-skinned woman with a wild temperament. In the old days, she is shown as a thief and murderer who shot an unknown man as her first murder. You can’t really relate to this complex female anime character until you dive deeper into her intriguing story and understand the verbal and physical trauma she has faced over the years. Though she is a little rude, sarcastic, and troubled, her forgetful and humorous side touches our hearts once in a while.
14. Shoko Nishimiya- A Silent Voice
This entry has had a long-lasting impression on most anime fans because of her sweet and forgiving nature, who fakes smiles even when it’s hard to. Her character is one of a kind being clinically deaf but still the leading protagonist of the A Silent Voice series. Unfortunately, she has always been an easy target for bullies, especially her classmate Shoya, who later becomes her friend due to her forgiving nature. Despite the bullies, the pain, Shoko Nishimiya is a strong girl who cares about her family and friends but cries in silence when she is hurt.
15. Esdeath- Akame ga Kill
Without a doubt, Esdeath is the best dark character in the history of the darkest anime series or films. If you are an action lover like us, Esdeath’s spectacular fight skills will wow you. As a high-ranking general of the Empire, her attire consists of a General’s apparel with long sleeves, a blue scarf around the neck, and high-heeled boots. Soon, the Prime Minister appoints her as the leader of the Jaegers since she is stronger (emotionally and physically) than most characters. Now a manipulative and sadistic woman, Esdeath did not always lack empathy. Sadly, it was her father’s death in her own arms that hardened her heart to a point she humiliated and tortured anyone she finds weaker than her.
What Makes a Female Anime Character Stand out?
A bunch of unique and exciting anime characters is released every year. While some of these turn out lovable gems, others prove long-forgotten failures. But what is it about an anime character that makes it stand out?
Everything shapes the perfect leading anime character, from their personalities to their clothes and styling to the character development. Memorable anime girl characters are rare, well-written protagonists with profound nature, exciting stories, and emotions that relate to anime fans.
So, which female anime character is your favorite?
Shanoon Cox
Shanoon Cox is a writer and a lover of all things video.
Follow @Shanoon Cox
12 Animated Slideshow PowerPoint Templates
Animated Slideshow Powerpoint Templates and Tool to Make Them
An easy yet powerful editor
Numerous effects to choose from
Detailed tutorials provided by the official channel
If you are passionate about uplifting your graphic design skills with stunning animated slideshow creation, read here about the best PowerPoint templates!
In this article
01 [12 Cool Animated Slideshow PowerPoint Templates](#Part 1)
02 [5 Tools to Make Stunning Animated Slideshow PowerPoint](#Part 2)
Part 1 12 Cool Animated Slideshow PowerPoint Templates
Slideshows are an already appealing media of content presentation, which when supplemented with animated backgrounds, are bound to captivate attention. Considering the underlying reason, it should be noted that animated slideshows offer a more vivid and lively presentation of information, as compared to their static counterparts. Animated slideshows have the additional advantage of presenting the content in the exact and accurate tone that suits the grasping capability of the audience.
Talking of feasible solutions for creating high end animated slide show presentations, the software market has a diverse range of alternatives to choose from. However, Microsoft PowerPoint is a graphic presentation tool that almost everyone is familiar with. Limiting our discussion to the same, there are a diversity of animated slideshow PowerPoint templates, like that of Evanto Elements and GraphicRiver to design professionally outstanding animated slideshows.
If you are keen on trying hands at adding that extra spunk your ordinarily boring static presentations, spare time to read the following section of this article, which incorporates the features, utilities and merits of the top 12 design templates in GraphicRiver for creating animated slideshows in PowerPoint with utmost ease and within a quick time span:
01Parallax Ultimate PowerPoint Animated Template
Choosing this animated presentation template to design your slideshow projects will supplement tour creations with the most amazing parallax effect, including an additional list of tempting and trendy editing features, like, limitless color choices, high definition video resolution, master slide presentations, modern, elegant, fully animated, company oriented slides, with object animations and parallax transitions, 16:9 wide screen aspect ratio, handmade infographics and much more.

02Splash Animated PPT
This one is an excellent animated template to create elegant animated slideshow presentations that will make your design creativity stand out of the crowd. Working with the template entitles you of a matchless, professional quality slideshow animation PowerPoint project on account some exclusive features, like those of high definition screen resolution and widescreen image aspect ratio, light and dark presentation backgrounds etc.
Mentioning some additional credibility of using the template for creating animated slideshows, you get to access as many as 500 selected slides, vector line and social media icons, uniquely styled image masks, calendars and vector maps.
03Social Media Animated PowerPoint Templates
If your working constraints require an extensive use of social media information, consider using tis interactive PowerPoint template for designing social media compatible, premium quality, professional slideshows with animated graphics. Working with the template, you will get a complementary access to a pool of exciting slideshow features.
Talking of the specific utilities of the animated slideshow maker template, you can choose from over 50 slide layouts, light and dark backgrounds themes, enjoy a seamless, drag and drop workflow and easily edit grouped elements, along with modifying infographic elements in Excel sheets.
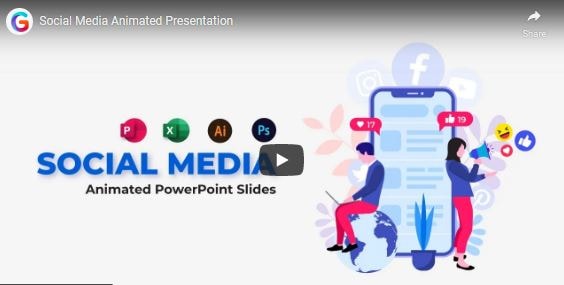
04Animated Slides Bundle for PowerPoint Presentation
This one is an interactive GraphicRiver PowerPoint animation slideshow maker template, which you can work with for a delivery of high end and illustrative animated slideshow presentations. The template facilitates its users with a diversity of graphic customization features, like that of visual transitions, custom reveals and objectified motions to your presentation slides, points and images.
The template promises you of a stunning, high quality and compelling slideshow output with an elegant presentation outlook. The template has a variety of inbuilt slide layouts, is easy to use and comes to you absolutely free of cost.
05Proposal PowerPoint Animated
If you are about to deliver a dynamic business presentation, consider working with this graphic tool to create your animoto slideshow in PowerPoint. Proposal PowerPoint Animated is an interactive animation template, designed exclusively for adhering to the concern of business centered content delivery.
You can create captivating motion stories with the conveniently editable slides and high end animated graphics of this PowerPoint template, thus ensuring a high pitched information conveyance to your target audience.
06DIY Animated PPT Promo Kit
Looking for the most feasible PowerPoint animated slideshow templates for slideshow creation generally refers to a time consuming web search. If you are a creativity freak and want to escape the aforesaid hustle, try hands at working with the DIY Animated PPT Promo Kit to create a customized animated slideshow template of your own.
Talking about the utilities, this interactive slideshow presentation kit is packed with a lot of professional features that are sufficient to give a hype to your normal quality slideshows and allows you to work with over 100 entirely customizable slides in 2 variable color schemes.
07Pitch Deck Animated Bundle
Using a pitch deck strategy is a common way of attracting fund credibility for your business for an appreciable revenue growth, which is often put to the additional use of addressing potential workers of the company on the latter’s crucial success factors. When working towards either of the purposes, using the aforesaid software bundle is a smart choice to showcase the exact content concerning your overall business concept to the target audience.
This one is preferably the best pitch deck template you could ever get. Though there is an appealing set of market choices, it is always an impressive decision to select the cream from the curd for ensuring high end results.
08Massive X Presentation Template for PowerPoint
When having a desire to access the credibility of slideshow templates though user reviews, this animated PowerPoint template is sure winner. Packed with an extensive library of over 960 exceptional slides in dark and light background themes, along with 20 preset color schemes, this graphic template is an absolute favorite of creative designers across the globe.
Choosing the template for catering to your animation centered slideshow creation needs opens a diversity of audio-visual customization features with an entirely free access and an easy to use working interface.

09Imperial Multipurpose PowerPoint Template
Living up to its name, this one is a multi-functional, free animated slideshow template that allows you to choose the perfect color scheme for your brand from more than 100 shade varieties, thus ensuring a high end transition flexibility. Prefer using this template to add a visual highlight to your slideshow presentations with a diversity of icons and customized animations.
If you have invested enough time looking for the best PowerPoint animation slideshow creator utility, end your search with the Imperial Multipurpose template that is available to you without asking for a penny from your pocket and welcomes you with the most interactive working environment.
10Minimal PowerPoint
The aforesaid slideshow template for creating animated presentations is a fundamental and clean graphic creation utility that comes with a wide range of more than 500 different sides and convenient to use drag and drop placeholders for seamless content inclusion. Additional features of the template consist of inbuilt calendars, charts, graphs and customized illustration components, suitable for a diverse set of industries.
This one is an interactive style PowerPoint animoto slideshow maker template that works best to infuse data and animation graphics together. You can use this graphic design tool without a second thought for delivering quality content with a cohesive slideshow presentation, of course without having to worry about any cost constraints.
11PowerPoint Animated Pro Pack- With Animated Slides
Using this animation slideshow template for your business presentations facilitates you with a series of interactive graphic modules within professionally compatible slides. You can use this high end template package to supplement your presentations with high quality animated motion diagrams.
Other appealing features of the package include a huge set of conveniently editable slides, with an extensive variety of PowerPoint compatible motion transitions, animations and many more surplus features to add the right amount of spark to your professional animated slideshow presentations.
12Wow Slides for PowerPoint
If you are yet to reach to the perfect animated slideshow creator solution, consider sparing a thought about this wonderful PowerPoint template to cater to your animation design concerns. Available to you with a decent set of over 24 inbuilt color themes, this one is a perfect choice for working on webinar slides, business presentations and pitch decks.
Apart from elegantly beautiful collection of animations, you will find this slideshow template package to be a storehouse of elusive and explanatory charts, graphs, maps and icon packs, which you can use to add relevant statistical content to your presentations or give an enhanced and organized look to your slideshow project.
Part 2 5 Tools to Make Stunning Animated Slideshow PowerPoint
Having discussed about the most amazing animation slideshow templates for PowerPoint, let us now extend our talk to learn about some of the most preferred graphic tools to create high end and professionally expressive and stunning animation centered slideshow presentations in PowerPoint, considering the fact that such presentations are an important part of the ongoing business trends, which you should be aware of.
The following section presents a detailed discussion on the features, best application utilities, market reviews and usage guidelines of the top 5 animated slideshow creator tools:
01**Wondershare Filmora Video Editor **
For Win 7 or later (64-bit)
For macOS 10.12 or later
This one is possibly the best and an all in one software package that promises to address almost all of your graphic editing needs in the most affordable manner. Talking of the specific utility of creating animated slideshow presentations, Wondershare Filmora is dedicated towards delivering high end motion graphic slideshows of matchless professional excellence.
The tool is best in making audio infused, animated photo slideshows that are apt for comprehensive graphic proposals for top rated business projects. About the software’s pricing requirements, you can avail a free usage of the tool for free in its trial version for 7 days, following which, working with the tool will demand paid monthly and annual subscriptions of $9.99 and $19.99 respectively.
Pros
● Working with the tool, you are entitled to use a plethora of audio-visual effects and filters to enhance your presentations.
● The tool’s feature rich library has everything to design animated slideshows with high resolution output quality.
● The tool is known to support almost all popular audio, video and image file formats.
Cons
● The tool has a limited variety of fine-tuned utilities for effect tweaking.
● The features of chapter authoring and DVD menu are absent.
● Working with the tool, you may encounter occasional software crashes.
User’s Guide to Create Animated Slideshows in Wondershare Filmora
Having understood the basic functionalities and exceptional features of Filmora’s Animated Slideshow creator tool, let us see through the following section to get familiar to the knowhow of using the same for designing animation top rated slideshow presentations in a stepwise procedure:
Step 1: Download and Install the Software
Before getting though with the creation process, initiate a download of the slideshow creator program from the latter’s official website to any of your preferred Windows or iOS compatible devices.
Step 2: Add Your Images and Videos
Creating a slideshow presentation may require a set of multiple image and video files to the program’s graphic creator timeline. It is recommended to add your selections of the aforesaid files to a single folder before launching the software in your system.
Once you have finished making your selections, launch the program to reach its welcome interface, were you need to navigate and click on the ‘Media’ tab in the top toolbar. From the task options that appear, click on ‘Import a Media’. Next, you will be asked to browse through your device locations and choose the folder that contains your previously selected files to be used in the presentation you are about to create.
When you have found the required folder, tap on ‘OK’ to import the same to the new slideshow project in the Filmora timeline. All your selected files will be visible here after a successful import.
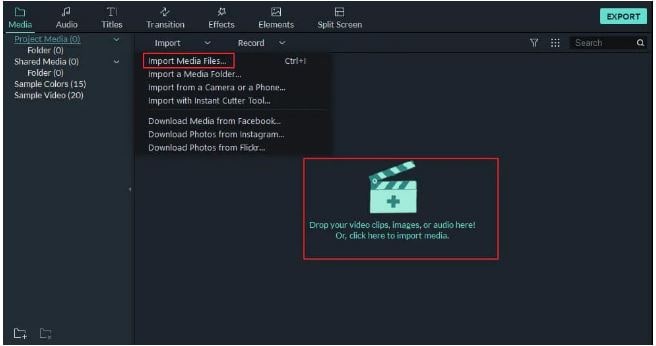
Step 3: Timeline Positioning of Media Files
Before working on the task of positioning the imported media files on the app’s timeline, navigate to the ‘File’ menu and choose the ‘Preferences’ option. As soon as the respective window pops up, reach to the ‘Editing’ tab at the top and select ‘Photo Placement’ from the drop down menu that follows.
In case your selected images do not have a matching aspect ratio with the program’s preset values, choose the ‘Crop to Fit’ option for removing the additional black bars from the selected images. For the requirement of adding camera pan and zoom movements to your images, select the ‘Pan & Zoom’ option in the ‘Preferences’ settings.
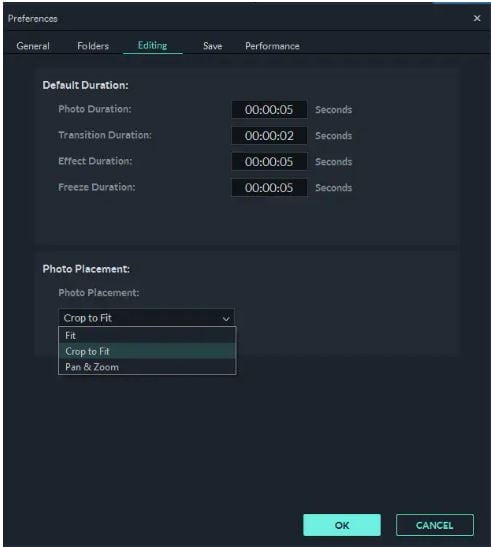
You can proceed to change the preset play durations of images, effects and transitions in the ‘Editing’ window itself. As an alternative you can adhere to the same task in the program’s timeline by dragging any one end of the media files in an outward or inward direction. The ‘Crop to Fit’ option may not give an affordable size in some cases where the images are set in a vertical 9:16 aspect ratio. Choose the ‘Fit’ option to set this issue straight.
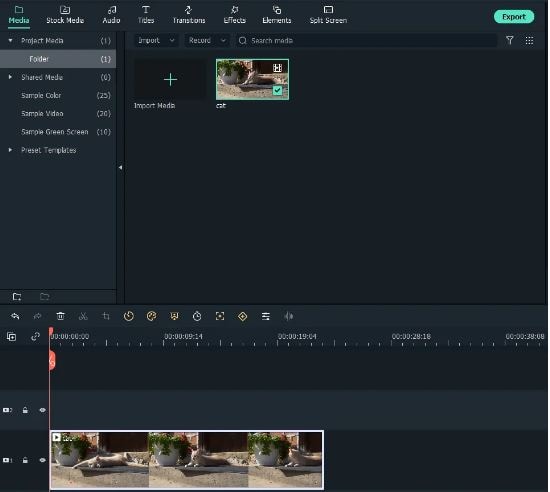
When you have finished making all the aforesaid adjustments, navigate to the Media panel again for adding the selected image files to the software’s timeline. Proceed with selecting a file and dragging and dropping the same at the desired position within the timeline. Continue repeating the process till all the images have been placed at their respective locations, and in the exact order of appearance in the slideshow. This should be followed by adjusting the image play durations using any one of the previously described methods.
Step 4: Escape Hard Cuts With Image Transitions
Hard cuts among different slides of a presentation break the flow of the slideshow. To escape this cringe, consider using a smooth transition effect within the slides of your project. To do this, navigate to the ‘Transitions’ tab in the top toolbar of Filmora’s project window and select a desired one from over 100 choices of customizable transitions.
You can now drop these transitions in the timeline at the exact intersection point of two image files. Avoid using the same transition for every hard cut to escape monotony. You can instead choose different transitions for each slide while observing its appearance in the clip.
After you are done with applying transitions to each slide, double click on a particular transition to open its ‘Transition Setting Window’ either for presetting the transition play duration or to choose a desired transition mode. You can also prefer a direct customization of the transition duration in the project timeline through a right or left dragging of any of its ends.
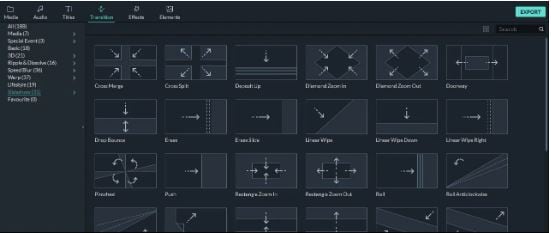
Step 5: Uplift Your Slideshow Colors With Overlays and Filters
Navigate to the top toolbar and hit the ‘Effects’ tab to choose from a diversity of visual effects that can be added to the slideshow images to supplement them with an increased vibrancy through color desaturation. These effects in the program’s library are categorized into classes of Overlays and Filters, with further subcategories of Sepia Tone, Light Leaks and Lomography and many more.
To apply these effects, just select and add them into a timeline track above the clip you wish to add the overlay or filter to. When you have applied the effects, observe the overall clip appearance in the ‘Preview Panel’. Double click on a particular effect to fine-tune the latter’s settings.
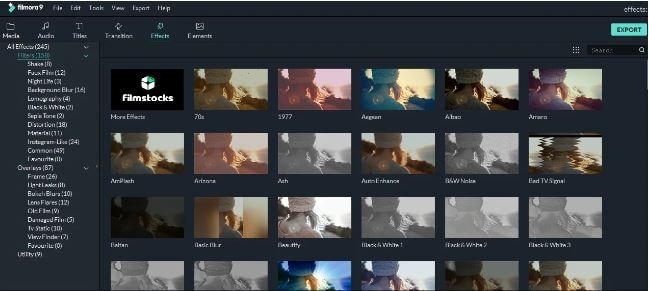
Step 6: Supplement Your Slides With Motion Graphic Elements
While motion graphics will undoubtedly enhance your animated slideshows, adding them to your presentation is purely optional, since most professional projects do not need a motion graphic element to escalate their presentation outlook. If, however, you choose to work on making these a part of your animated slideshow, Filmora lets you do that in its ‘Elements’ tab.
There is a plethora of motion graphic templates that you can select and add to the project timeline for a quick and vibrant upgrade of your presentation slides, but, at the same time, it becomes important to take care of the visual outlook and the underlying reason of creating the slideshow before you decide on adding these elements to your project.
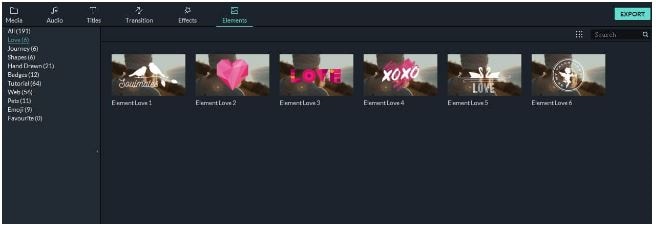
Step 7: Create Voiceovers and Record Soundtracks for Your Slideshow
Narration is a smart way to captivate the target audience within your slideshow, whether though a self-delivery or a recorded voiceover. If you decide on the second option, you can conveniently use the Filmora Slideshow Creator program to add voiceovers and soundtracks to your presentation.
To adhere to the purpose, navigate to the top toolbar and click on the ‘Media’ tab. From the options that appear, tap on the ‘Record’ menu that drops down, followed by selecting the ‘Record Voiceover’ option. As soon as the ‘Record Audio’ prompt pops up, select your desired microphone to be used in the recording process and click on the ‘Record’ button.
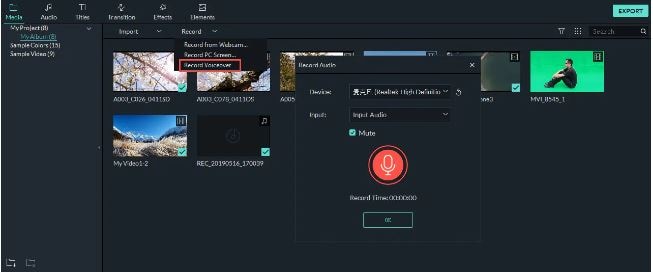
The recording that you have just created will appear in the ‘Media’ tab beside your all other imported audio-visual and image files, and you can add the same to any desired file with utmost ease. The Filmora library further allows you with a free access to its huge inventory of sound and audio effects. To apply these effects to your project, navigate to the ‘Audio’ tab and browse through impressive music categories, like, Young & Bright, Rock, Electronic, etc., to select the best matching audio for your slideshow.
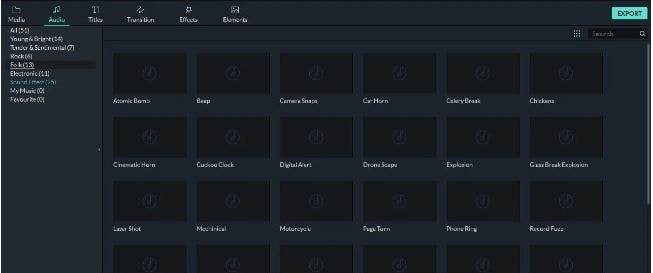
When you have made your selections, add all of them to the slideshow’s audio track in the project timeline and make suitable adjustments to their play durations.
Step 8: Export Your Creation
When your satisfied with your efforts till here, you have indeed created a wonderful animated slideshow presentation that should be exported to relevant platforms. Navigate to the ‘Export’ tab at the top right corner of the project timeline and click on the same. As soon as the utility window appears, choose a preferred file format, set a desired output resolution and fame rate for your presentation, followed by making a direct export of the same to your Vimeo or YouTube accounts.
The slideshow rendering time on different platforms may vary in cohesion with the specific presentation lengths, with larger file requiring a considerably longer time to get rendered than the smaller ones. It is advisable to limit the output file size within 500 MB for a quick rendering process.
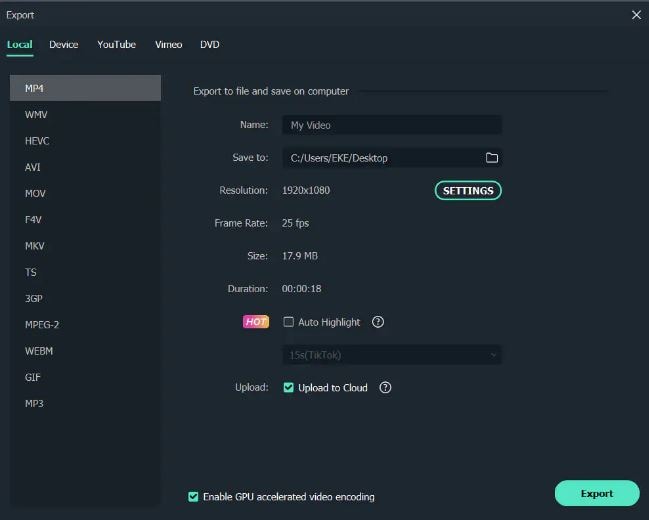
02Canva
This one is an online animation slideshow creation tool that could certainly be your best choice to design high end professional presentations. Facilitating you with over 100 different slide design layouts, the tool additionally grants you the liberty to add your own images to the presentation being created, or even select suitable alternatives from Canva’s extensive image stack that has over 1 million apposite images to choose from.
You can make the best use of Canva to create promotional presentations to add extra emphasis on the brand of your company and product brand, which a compatible to a diverse variety of professional platforms for information sharing.
As far as the cost constraints of the tool are concerned, you get to access a free version of the tool for working on slideshow presentations for individual or small business units, while the graphics design needs of large scale professional corporations are suitably addressed by the utility’s Canva for Work version, which is equipped with high end team coordinated features with a 30-day free trial, along with monthly and annual subscription of $ 12.95 and $ 119.4 respectively.
Pros
● The tool allows you to add elusive texts, filters, fonts and images to the animated slides of your business presentation.
● Working with the tool, you can drag and drop an extensive variety of elements within your slideshow.
● Canva further allows you to create, upload and save the logo of your brand.
Cons
● The tool’s customer support is not quite welcoming.
● You need to add your phone number within the tool’s customer support interface for getting the required help.
● The tool’s working interface is somewhat confusing.
User’s Guide to Create Animated Slideshows in Canva
Let us see browse through the detailed, step by step process to quickly create amazing animated slideshow presentations using the Canva graphic design tool in the following section:
Step 1: Download and Install Canva
Visit the official site of the tool for a free download of the Canva slideshow creator software in any suitable iOS or Windows compatible desktops, laptops and PC systems.
Step 2: Choose Your Task
Undertake a launch of the downloaded program to reach the latter’s welcome page. Here, you need to navigate to the search bar at the top and type a keyword to select your task. For creating slideshow presentations, enter ‘Slideshow’ in the search tab.
In the drop down menu that follows, a list of the closest matching alternatives of your keyword will appear. Select ‘Slideshow Videos’ from the same.
Step 3: Select a Template
The completion of Step 2 will take you to the program’s template library, where you can either work with creating a presentation of your own by clicking on the ‘Create a Blank Sideshow Video’ option, or choose any one from the finest collection of in built slideshow templates from the Canva library.
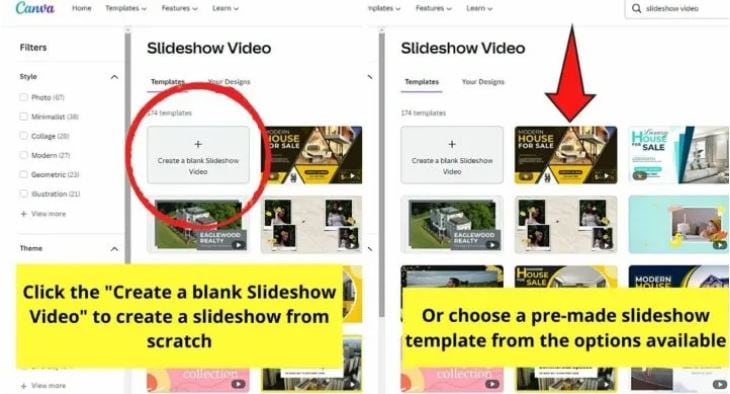
Step 4: Customize Your Template
After selecting the template, you will reach Canva’s slideshow editor page. Here you can customize your slideshow as per your preferences. To begin with, replace the preset images in the template with your selected ones.
You can either choose a set of images from the program’s inbuilt photo gallery or select the same from your device. Navigate to the ‘Tools Panel’ in the left and click on ‘Photos’ to work with the first method, or tap ‘Uploads’ in that very panel to apply the second.
When you have made your choice, click on ‘Upload Media’ to bring your selections to the tool’s editor timeline. This should be followed by dragging and dropping the images at appropriate places within the template.

Step 5: Crop the Images
Double click on any image and drag it sideways to crop the same within your preferred aspect ratio. When you are happy with the changes, click on ‘Done’ to apply them. You can additionally, customize the images with a variety of available effects at this stage.
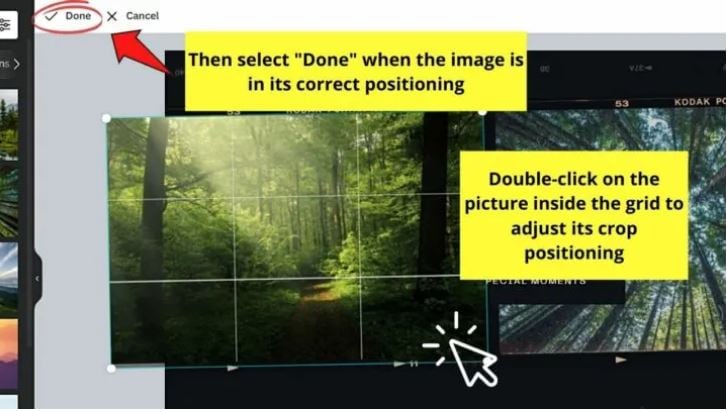
To proceed with the aforesaid process, choose the image you want to customize and select ‘Edit Image’ from the dropdown that appears. You will be directed to the ‘Edit Image Gallery’, where you can select the effect you want to complement your image with.
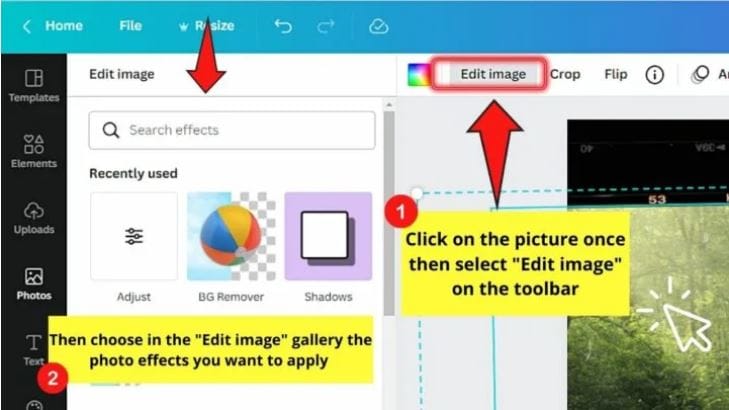
Step 6: Add Other Design Elements
Tap on ‘Elements’ in the ‘Tools Panel’ at the left to select a suitable component from a range of stickers, icons, illustrations and charts to add to your slideshow according to its creation theme.
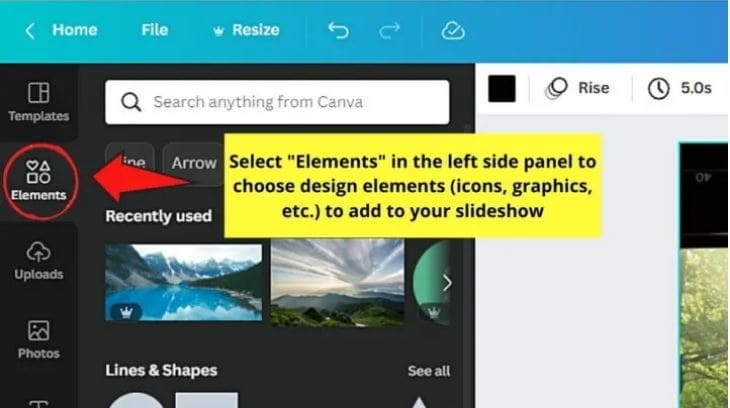
Step 7: Customize the Text
The template has some pre-written text, which you can change by double clicking inside the text boxes to highlight the already written text and edit the same as per your requirement. Press ‘T’ on your system’s keyboard for adding extra text boxes. You can also visit the ‘Editor Toolbar’ work with a variety of text formatting options, like, font size, style and color.
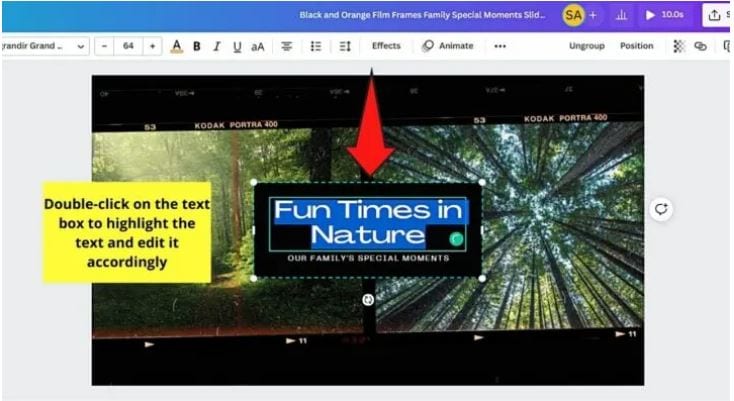
Step 8: Include Suitable Animations
To supplement your slideshow with stunning animations, select the image, element or text you wish to animate, followed by pressing the ‘Animate’ button. You will reach the ‘Animations Gallery’ for a selection of the desired text or page animation you want to add.
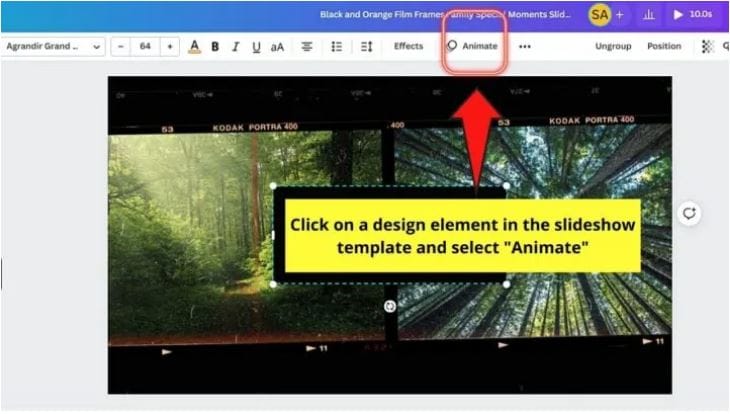
Once you have finalized your choice, click outside the gallery to apply your selected animation.
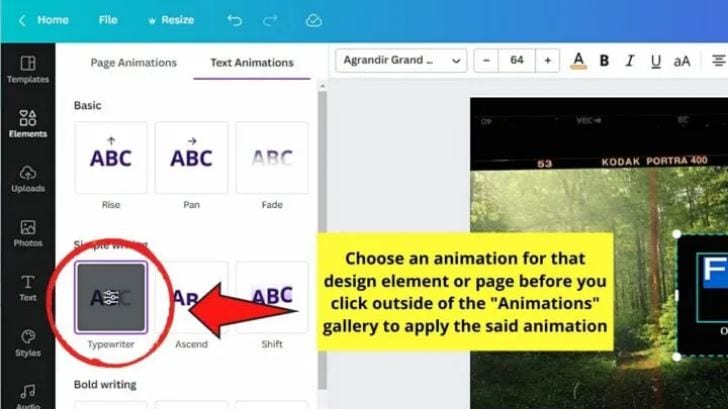
Step 9: Add the Perfect Sound
To uplift your presentation with an appealing music, navigate to the ‘Tools Panel’ at the left of the editor window and tap on ‘Audio’. A gallery of music clips will get displayed. Choose the one that best suits the theme of your animated presentation.
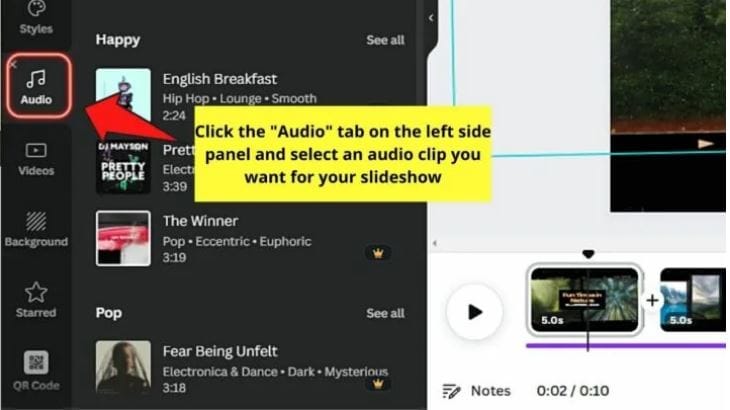
Step 10: Preview Your Creation
When you are done with creating the presentation, watch how it looks by navigating to the ‘Menu Bar’ at the top and clicking on the ‘Play’ button. When you have finished, click on ‘Close’ to reach the editor window.

Step 11: Set the Play Duration
To adjust the play duration of any slide, select it and navigate to the toolbar at the top left corner.
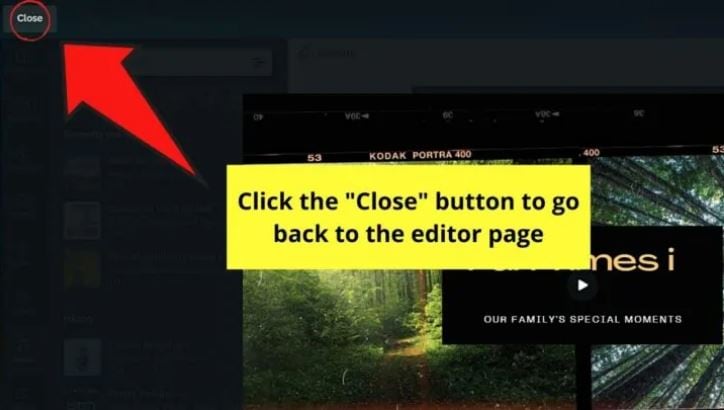
Click on ‘Edit Timing’ in the same and make suitable adjustments either by encoding the required number of seconds or dragging the duration slider.
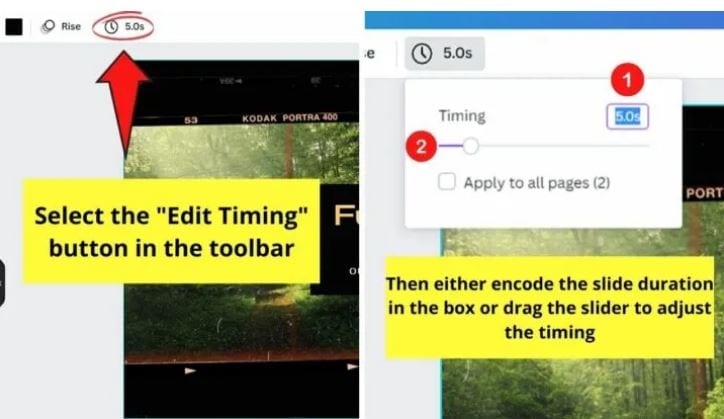
Step 12: Time to Download and Share!
Prefer previewing the slides one again to take a final look at your presentation. If you are happy with your work, navigate to and tap ‘Download’, followed by selecting the file type to save your creation locally to your device.
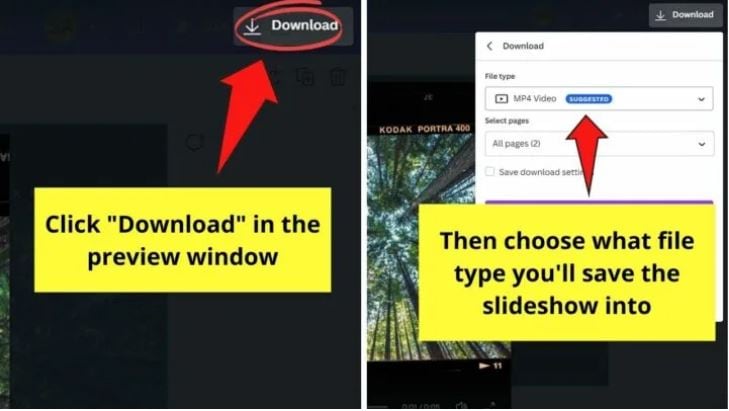
It is recommended to choose the ‘MP4 Video’ file format for saving audio enabled presentations. In case you want the background music to be included, either choose the ‘GIF’ format or download the slideshow as a PowerPoint presentation.
For a direct share of the animated slideshow, navigate to the ‘Menu Bar’ at the top and click on ‘Share’, followed by ‘All Options’ and lastly, tap ‘Present’.
03Keynote
This one is affordably the most convenient presentation tools if you are a user of iOS devices, and is a world class utility to create animated slideshow presentations. You can work with this tool to add an extra element of practicality to the otherwise customary business oriented animation slideshows with a diversity of effects, filters and transitions. The software is an ultimate best in adhering to real-time and remote event collaboration concerns of employees.
Concerning the pricing requirements, you can work with this slideshow creator tool for free if your usage concerns are restricted to a personal need. In an otherwise case, you can prefer buying the latter for a monthly investment of $ 99 and $ 299, respectively for business and enterprise based concerns.
Pros
● The Keynote program allows you a real-time, remote and revised access to the slideshow presentation.
● The program’s creator library is a storehouse of the most elegant and expressive slideshow templates and themes.
● The application greets you with a responsive and non-messy interface, with a decluttered toolbar.
Cons
● The program offers you a limited number of options to export your creations.
● You cannot work with the application on a Windows compatible device.
● If you are a regular PowerPoint user, working with the tool will require you a comprehensive learning of the usage pattern.
User’s Guide to Create Animated Slideshows in Keynote
Moving ahead with the discussion, let us understand the process of creating an animated slideshow presentation in Keynote though a step by step guide in the following section:
Step 1: Download the Keynote Slideshow Creator Tool
Start with initiating a free download of the tool from the official Apple website through your login credentials and proceed to install the same in your iOS device.
Step 2: Select a Presentation Theme
To start working on your slideshow presentation, you will require to choose a suitable theme. To do this, open the tool by clicking on its icon in the Launchpad, Applications folder or the Dock. The ‘Theme Chooser’ window pops up. In case this doesn’t happen, navigate to the bottom left corner of the screen and tap ‘New Document’.
In the ‘Theme Chooser’, you can either see through different categories or tap ‘All Themes’ to select the one you like. When you have found your preferred theme, open it by double clicking on the same.
You may either use the preset slide layout of the selected theme or use a different one by navigating to and clicking on ‘Format’ tab at the right side of the screen. You can now add your specific content in the presentation through adding new slides, text and images.
Click on the ‘+’ symbol in the theme toolbar to add a new slide followed by choosing its layout, double click inside the placeholder text to edit the same or drag and drop an image from your device gallery or the internet to replace the preset one in the template.
Step 3: Supplement Your Presentation With Objects
Proceed to add different slideshow objects in your creation by navigating to the ‘Object Toolbar’ at the top and selecting tables, charts, shapes, text boxes, comments, etc., that you wish to add in your presentation.
You can further make changes in the color, shadow and border of the object to improvise its appearance, or prefer applying a preset object style to enhance the overall object look to bring it in line with the slideshow theme. To do this, select the object and you will see its formatting options in the sidebar at the right. Click on the ‘Format Toolbar’ if the sidebar does not appear.
You can additionally, add layers to the slide objects, change their size or nest them within a shape or text box and link objects to switch to a new slide, open a related web page or email message.
Step 4: Add Audio-Visual Elements
Try adding suitable media elements to your creation by dragging a video or music file from your system either to a media placeholder or just anywhere within the slide. You can alternatively tap on the ‘Media’ icon in the top toolbar and choose ‘Music’ or ‘Movies’ from the dropdown that appears, followed by dragging the file with the previously explained method.
To add a soundtrack to the presentation, click on the ‘Soundtrack’ icon in the toolbar at the top, followed by clicking on the ‘Audio’ tab in the sidebar that appears. Next, tap the ‘+’ icon to select specific songs or playlists you want to add in the soundtrack.
Step 5: Add Stunning Animations
Start with selecting a slide to add the animation effect in the ‘Slide Navigator’. The ‘Animate’ sidebar appears, where you need to select the ‘Add an Effect’ option. Scroll down to view and choose a desired transition.
You can see a preview of the selected transition being played, with the slide navigator displaying a blue mark at the right corner of the slide to indicate the addition of a transition.
To change a previously selected transition, navigate to the sidebar at the top and tap ‘Change’ to select a new one. You can further, use the sidebar options to set the direction and transition play duration.
Step 6: Playing Your Slideshow
When satisfied with your effort, you can prefer playing the presentation, either in full screen or in a single window. If you choose to play in full screen, navigate to the ‘Play’ menu, click on the same and select ‘Full Screen’, followed by choosing the desired slide from where you wish the presentation to start in the slide navigator.
If you want to play the slideshow in a window, select a preferred slide in the slide navigator, go to the ‘Play’ menu at the top, click on the ‘Play’ tab, followed by choosing the ‘In Window’ option. The presentation will now start with the selected slide being played in one window and the presenter in the other.
In either of the above slideshow playing modes, press ‘Esc’ from your system’s keyboard to end the presentation playing process.
Step 7: Collaborating With Others
Working with the Keynote Slideshow Creator, you can collaborate with others to invite people to view and edit your presentation. To give a presentation access, you can either share a web link for a public access, or invite certain people having registered Apple credentials to view your creation. You can even give editing permissions to selected viewers or allow them to invite other people to collaborate.
04Powtoon
This one is a useful tool to create interactive business presentations for brand promotion and company recognition. Talking about the specific features of the tool, you can work with the utility to design an attractive logo for your company, import data and charts to your presentation, make adjustments in the color schemes of the slideshow, initiate infographic building and organize your slideshow into several sections.
The tool works best towards educating potential customers and clients about your company’s mainstream work profile and business. Sticking to the terms of utility pricing, you can begin with taking a free demo of the tool to access its credibility in cohesion with your specific needs. Following this, you can avail a monthly paid subscription of Powtoon, which has a price range of $ 19 to $ 59, according to the type and extent of features you choose to avail.
Pros
● You can add the details of your brand in the most expressive and appealing manner with the tool’s manifold design features.
● You can work with hundreds of preset slide designs to quickly create professionally sound animated slideshows.
● The tool is excellent in catering to your diverse slideshow design needs, when working for a large scale organizational setup.
Cons
● The tool is not a smart choice for individual or small scale business setups.
● The extensive variety of features results in a bit confusing and messy working interface.
● You can add a limited number of users to the monthly subscription plan of the tool.
User’s Guide to Create Animated Slideshows in Powtoon
For a better insight on how to create animated slideshows in Powtoon, let us go through the stepwise tutorial of the process in the following section:
Step 1: Launch the Online Tool
Visit the Powtoon official website to open the slideshow designer tool in any of your favorite internet browsers.
Powtoon Official Site Link: https://www.powtoon.com/index/
Step 2: Script Your Presentation
Start with creating a preset content for every slide of your presentation, based on the reason behind creating the slideshow, type and style of content presentation and so on.
Step 2: Add a Cohesive Background Music
You can complement your presentation with the perfect background music from the Powtoon library, from the web or even create your own voiceover recording through any preferred online text-to-voice recorder tool to voice the contents of your presentation. When you are done, upload your recording to the Powtoon editor to proceed with adding visual content to the presentation.
Step 3: Divide Your Presentation Slides
You can now add images, text and animations to your project in line with your presentation script. Choose suitable images from your device or from the web, add short, impactful texts and stunning animations from the Powtoon’s library to level up the appearance of your slideshow.
Step 4: Include Design Elements
Try adding additional elements like, graphics, background themes, animation styles, props, color schemes and other relevant characteristics to the slides.
Step 5: Time Your Presentation
In the last step, use the Powtoon timeline to set the sequence and time of appearance of different elements in each of your presentation slides. You can also hear the voiceover in the slideshow background to ensure the synchronization between the audio play and visual content appearance within the presentation.
05Visme
This one is a top grade cloud based professional tool for creating animated slideshow presentations with an affordably high visual credibility. Equipped with a drag and drop design workflow, the tool works effectively towards delivering intuitive and engaging animated slideshows for effective communication of business ideas and top rated brand promotion strategies.
The best usage of the tool lies in the creation of business presentations that are aimed at ensuring company oriented image collection and brand consistency. Talking of the tool’s pricing constraints, a single user subscription of the utility would cost you $ 20 on a monthly basis, which increases to $ 60 per month for a 3-user package.
It is a smart choice to take a free live demonstration of the tool to get a comprehensive understanding of the latter’s working technology.
Pros
● Extensive variety of colors, images and logos to complement your business presentations with elusive design elements.
● Promotes a viable consistency among multiple employee presentations
● The tool comes with an in built analytic system that keeps a track of the viewers of your slideshow presentations.
Cons
● The tool lacks some essential elements of slideshow design.
● The design features are mostly generic and do not cater to intense creation needs.
● The tool lacks a free trial facility.
User’s Guide to Create Animated Slideshows in Visme
In the following section is presented a stepwise procedure to create stunning animated slideshows in Visme with high end professional excellence and in the quickest time span:
Step 1: Download and Install the Program
Navigate to the official website of the Visme Slideshow Creator program to download and install the same in any of your preferred MacOs or Windows supported devices.
Visme Official Download Link: https://visme.co/blog/
Step 2: Start a New Project
You will need to create a Visme account to start working on the slideshow creation process. When you have created one, navigate to and click the ‘Create New Visme’ option in the tool’s opening screen to open a new project and assign a suitable name to it.
Step 3: Choose a Template
in the new project window that appears, click on ‘Presentations’ option at the top to see a library of slideshow templates being displayed. You can either, select a template from the library to edit or start an entirely new creation of your own.
Step 4: Make Color Schemes and Background Selections
To proceed with the selection of slide backgrounds and color schemes, you can either choose an exact color by entering its RGB code in the ‘Edit Colors’ option, or choose one from Google web pages using the ‘Chrome Eye Dropper’ tool.
Step 5: Add Shapes and Icons
You can supplement your slideshow with suitable design elements, like icons and shapes. All you need to do is navigate to the ‘Tools Panel’ in the left, click on the ‘All Shapes’ symbol and type a related keyword in the search bar to get a list of matching shapes to choose from.
Step 6: Insert and Format Text
You can now proceed with adding suitable text, titles and subtitles to the presentation slides. Again, visit the ‘Tools Panel’, tap the ‘T’ icon and click on ‘Add a Title’. A text box will be created within the slide, where you can add the required text. You can also format the same from the ‘Format Toolbar’ that gets displayed above the inserted text box.
Step 7: Add Photographic Slides
To include image slides, start with inserting a new slide in the presentation, flowed by once again navigating to the ‘Tools Panel’ in the left and clicking on the ‘Background’ icon. Choose a suitable color scheme and again, click on the ‘Images’ symbol in the ‘Tools Panel’. Here you can select any suitable image from the library that gets displayed.
Step 8: Link Your Slides
Link the sequential slides of your presentation with any suitable indicator, such as an arrow, so that clicking on the same takes the viewer to the successive slide. You can alternatively create ‘Hotspots’ to link the slides together.
Step 9: Publish and Share Your Presentation
When the final result makes you happy, navigate to the ‘Publish’ tab just above your slide window to open the presentation publishing interface. Here, you can choose from the options of a direct share, a site or blog embed or a local download of the presentation to your device.
● Ending Thoughts →
● Animated slideshow presentations land among the most trending ways to ensure a precise and engaging content delivery.
● The software market is packed with a diverse range of impressive slideshow creator tools with the most amazing features.
● When making your choice of the perfect animated slideshow designer tools, the Wondershare Filmora Slideshow Creator program is indeed a smart pick.
If you are passionate about uplifting your graphic design skills with stunning animated slideshow creation, read here about the best PowerPoint templates!
In this article
01 [12 Cool Animated Slideshow PowerPoint Templates](#Part 1)
02 [5 Tools to Make Stunning Animated Slideshow PowerPoint](#Part 2)
Part 1 12 Cool Animated Slideshow PowerPoint Templates
Slideshows are an already appealing media of content presentation, which when supplemented with animated backgrounds, are bound to captivate attention. Considering the underlying reason, it should be noted that animated slideshows offer a more vivid and lively presentation of information, as compared to their static counterparts. Animated slideshows have the additional advantage of presenting the content in the exact and accurate tone that suits the grasping capability of the audience.
Talking of feasible solutions for creating high end animated slide show presentations, the software market has a diverse range of alternatives to choose from. However, Microsoft PowerPoint is a graphic presentation tool that almost everyone is familiar with. Limiting our discussion to the same, there are a diversity of animated slideshow PowerPoint templates, like that of Evanto Elements and GraphicRiver to design professionally outstanding animated slideshows.
If you are keen on trying hands at adding that extra spunk your ordinarily boring static presentations, spare time to read the following section of this article, which incorporates the features, utilities and merits of the top 12 design templates in GraphicRiver for creating animated slideshows in PowerPoint with utmost ease and within a quick time span:
01Parallax Ultimate PowerPoint Animated Template
Choosing this animated presentation template to design your slideshow projects will supplement tour creations with the most amazing parallax effect, including an additional list of tempting and trendy editing features, like, limitless color choices, high definition video resolution, master slide presentations, modern, elegant, fully animated, company oriented slides, with object animations and parallax transitions, 16:9 wide screen aspect ratio, handmade infographics and much more.
02Splash Animated PPT
This one is an excellent animated template to create elegant animated slideshow presentations that will make your design creativity stand out of the crowd. Working with the template entitles you of a matchless, professional quality slideshow animation PowerPoint project on account some exclusive features, like those of high definition screen resolution and widescreen image aspect ratio, light and dark presentation backgrounds etc.
Mentioning some additional credibility of using the template for creating animated slideshows, you get to access as many as 500 selected slides, vector line and social media icons, uniquely styled image masks, calendars and vector maps.
03Social Media Animated PowerPoint Templates
If your working constraints require an extensive use of social media information, consider using tis interactive PowerPoint template for designing social media compatible, premium quality, professional slideshows with animated graphics. Working with the template, you will get a complementary access to a pool of exciting slideshow features.
Talking of the specific utilities of the animated slideshow maker template, you can choose from over 50 slide layouts, light and dark backgrounds themes, enjoy a seamless, drag and drop workflow and easily edit grouped elements, along with modifying infographic elements in Excel sheets.
04Animated Slides Bundle for PowerPoint Presentation
This one is an interactive GraphicRiver PowerPoint animation slideshow maker template, which you can work with for a delivery of high end and illustrative animated slideshow presentations. The template facilitates its users with a diversity of graphic customization features, like that of visual transitions, custom reveals and objectified motions to your presentation slides, points and images.
The template promises you of a stunning, high quality and compelling slideshow output with an elegant presentation outlook. The template has a variety of inbuilt slide layouts, is easy to use and comes to you absolutely free of cost.
05Proposal PowerPoint Animated
If you are about to deliver a dynamic business presentation, consider working with this graphic tool to create your animoto slideshow in PowerPoint. Proposal PowerPoint Animated is an interactive animation template, designed exclusively for adhering to the concern of business centered content delivery.
You can create captivating motion stories with the conveniently editable slides and high end animated graphics of this PowerPoint template, thus ensuring a high pitched information conveyance to your target audience.
06DIY Animated PPT Promo Kit
Looking for the most feasible PowerPoint animated slideshow templates for slideshow creation generally refers to a time consuming web search. If you are a creativity freak and want to escape the aforesaid hustle, try hands at working with the DIY Animated PPT Promo Kit to create a customized animated slideshow template of your own.
Talking about the utilities, this interactive slideshow presentation kit is packed with a lot of professional features that are sufficient to give a hype to your normal quality slideshows and allows you to work with over 100 entirely customizable slides in 2 variable color schemes.
07Pitch Deck Animated Bundle
Using a pitch deck strategy is a common way of attracting fund credibility for your business for an appreciable revenue growth, which is often put to the additional use of addressing potential workers of the company on the latter’s crucial success factors. When working towards either of the purposes, using the aforesaid software bundle is a smart choice to showcase the exact content concerning your overall business concept to the target audience.
This one is preferably the best pitch deck template you could ever get. Though there is an appealing set of market choices, it is always an impressive decision to select the cream from the curd for ensuring high end results.
08Massive X Presentation Template for PowerPoint
When having a desire to access the credibility of slideshow templates though user reviews, this animated PowerPoint template is sure winner. Packed with an extensive library of over 960 exceptional slides in dark and light background themes, along with 20 preset color schemes, this graphic template is an absolute favorite of creative designers across the globe.
Choosing the template for catering to your animation centered slideshow creation needs opens a diversity of audio-visual customization features with an entirely free access and an easy to use working interface.
09Imperial Multipurpose PowerPoint Template
Living up to its name, this one is a multi-functional, free animated slideshow template that allows you to choose the perfect color scheme for your brand from more than 100 shade varieties, thus ensuring a high end transition flexibility. Prefer using this template to add a visual highlight to your slideshow presentations with a diversity of icons and customized animations.
If you have invested enough time looking for the best PowerPoint animation slideshow creator utility, end your search with the Imperial Multipurpose template that is available to you without asking for a penny from your pocket and welcomes you with the most interactive working environment.
10Minimal PowerPoint
The aforesaid slideshow template for creating animated presentations is a fundamental and clean graphic creation utility that comes with a wide range of more than 500 different sides and convenient to use drag and drop placeholders for seamless content inclusion. Additional features of the template consist of inbuilt calendars, charts, graphs and customized illustration components, suitable for a diverse set of industries.
This one is an interactive style PowerPoint animoto slideshow maker template that works best to infuse data and animation graphics together. You can use this graphic design tool without a second thought for delivering quality content with a cohesive slideshow presentation, of course without having to worry about any cost constraints.
11PowerPoint Animated Pro Pack- With Animated Slides
Using this animation slideshow template for your business presentations facilitates you with a series of interactive graphic modules within professionally compatible slides. You can use this high end template package to supplement your presentations with high quality animated motion diagrams.
Other appealing features of the package include a huge set of conveniently editable slides, with an extensive variety of PowerPoint compatible motion transitions, animations and many more surplus features to add the right amount of spark to your professional animated slideshow presentations.
12Wow Slides for PowerPoint
If you are yet to reach to the perfect animated slideshow creator solution, consider sparing a thought about this wonderful PowerPoint template to cater to your animation design concerns. Available to you with a decent set of over 24 inbuilt color themes, this one is a perfect choice for working on webinar slides, business presentations and pitch decks.
Apart from elegantly beautiful collection of animations, you will find this slideshow template package to be a storehouse of elusive and explanatory charts, graphs, maps and icon packs, which you can use to add relevant statistical content to your presentations or give an enhanced and organized look to your slideshow project.
Part 2 5 Tools to Make Stunning Animated Slideshow PowerPoint
Having discussed about the most amazing animation slideshow templates for PowerPoint, let us now extend our talk to learn about some of the most preferred graphic tools to create high end and professionally expressive and stunning animation centered slideshow presentations in PowerPoint, considering the fact that such presentations are an important part of the ongoing business trends, which you should be aware of.
The following section presents a detailed discussion on the features, best application utilities, market reviews and usage guidelines of the top 5 animated slideshow creator tools:
01**Wondershare Filmora Video Editor **
For Win 7 or later (64-bit)
For macOS 10.12 or later
This one is possibly the best and an all in one software package that promises to address almost all of your graphic editing needs in the most affordable manner. Talking of the specific utility of creating animated slideshow presentations, Wondershare Filmora is dedicated towards delivering high end motion graphic slideshows of matchless professional excellence.
The tool is best in making audio infused, animated photo slideshows that are apt for comprehensive graphic proposals for top rated business projects. About the software’s pricing requirements, you can avail a free usage of the tool for free in its trial version for 7 days, following which, working with the tool will demand paid monthly and annual subscriptions of $9.99 and $19.99 respectively.
Pros
● Working with the tool, you are entitled to use a plethora of audio-visual effects and filters to enhance your presentations.
● The tool’s feature rich library has everything to design animated slideshows with high resolution output quality.
● The tool is known to support almost all popular audio, video and image file formats.
Cons
● The tool has a limited variety of fine-tuned utilities for effect tweaking.
● The features of chapter authoring and DVD menu are absent.
● Working with the tool, you may encounter occasional software crashes.
User’s Guide to Create Animated Slideshows in Wondershare Filmora
Having understood the basic functionalities and exceptional features of Filmora’s Animated Slideshow creator tool, let us see through the following section to get familiar to the knowhow of using the same for designing animation top rated slideshow presentations in a stepwise procedure:
Step 1: Download and Install the Software
Before getting though with the creation process, initiate a download of the slideshow creator program from the latter’s official website to any of your preferred Windows or iOS compatible devices.
Step 2: Add Your Images and Videos
Creating a slideshow presentation may require a set of multiple image and video files to the program’s graphic creator timeline. It is recommended to add your selections of the aforesaid files to a single folder before launching the software in your system.
Once you have finished making your selections, launch the program to reach its welcome interface, were you need to navigate and click on the ‘Media’ tab in the top toolbar. From the task options that appear, click on ‘Import a Media’. Next, you will be asked to browse through your device locations and choose the folder that contains your previously selected files to be used in the presentation you are about to create.
When you have found the required folder, tap on ‘OK’ to import the same to the new slideshow project in the Filmora timeline. All your selected files will be visible here after a successful import.
Step 3: Timeline Positioning of Media Files
Before working on the task of positioning the imported media files on the app’s timeline, navigate to the ‘File’ menu and choose the ‘Preferences’ option. As soon as the respective window pops up, reach to the ‘Editing’ tab at the top and select ‘Photo Placement’ from the drop down menu that follows.
In case your selected images do not have a matching aspect ratio with the program’s preset values, choose the ‘Crop to Fit’ option for removing the additional black bars from the selected images. For the requirement of adding camera pan and zoom movements to your images, select the ‘Pan & Zoom’ option in the ‘Preferences’ settings.
You can proceed to change the preset play durations of images, effects and transitions in the ‘Editing’ window itself. As an alternative you can adhere to the same task in the program’s timeline by dragging any one end of the media files in an outward or inward direction. The ‘Crop to Fit’ option may not give an affordable size in some cases where the images are set in a vertical 9:16 aspect ratio. Choose the ‘Fit’ option to set this issue straight.
When you have finished making all the aforesaid adjustments, navigate to the Media panel again for adding the selected image files to the software’s timeline. Proceed with selecting a file and dragging and dropping the same at the desired position within the timeline. Continue repeating the process till all the images have been placed at their respective locations, and in the exact order of appearance in the slideshow. This should be followed by adjusting the image play durations using any one of the previously described methods.
Step 4: Escape Hard Cuts With Image Transitions
Hard cuts among different slides of a presentation break the flow of the slideshow. To escape this cringe, consider using a smooth transition effect within the slides of your project. To do this, navigate to the ‘Transitions’ tab in the top toolbar of Filmora’s project window and select a desired one from over 100 choices of customizable transitions.
You can now drop these transitions in the timeline at the exact intersection point of two image files. Avoid using the same transition for every hard cut to escape monotony. You can instead choose different transitions for each slide while observing its appearance in the clip.
After you are done with applying transitions to each slide, double click on a particular transition to open its ‘Transition Setting Window’ either for presetting the transition play duration or to choose a desired transition mode. You can also prefer a direct customization of the transition duration in the project timeline through a right or left dragging of any of its ends.
Step 5: Uplift Your Slideshow Colors With Overlays and Filters
Navigate to the top toolbar and hit the ‘Effects’ tab to choose from a diversity of visual effects that can be added to the slideshow images to supplement them with an increased vibrancy through color desaturation. These effects in the program’s library are categorized into classes of Overlays and Filters, with further subcategories of Sepia Tone, Light Leaks and Lomography and many more.
To apply these effects, just select and add them into a timeline track above the clip you wish to add the overlay or filter to. When you have applied the effects, observe the overall clip appearance in the ‘Preview Panel’. Double click on a particular effect to fine-tune the latter’s settings.
Step 6: Supplement Your Slides With Motion Graphic Elements
While motion graphics will undoubtedly enhance your animated slideshows, adding them to your presentation is purely optional, since most professional projects do not need a motion graphic element to escalate their presentation outlook. If, however, you choose to work on making these a part of your animated slideshow, Filmora lets you do that in its ‘Elements’ tab.
There is a plethora of motion graphic templates that you can select and add to the project timeline for a quick and vibrant upgrade of your presentation slides, but, at the same time, it becomes important to take care of the visual outlook and the underlying reason of creating the slideshow before you decide on adding these elements to your project.
Step 7: Create Voiceovers and Record Soundtracks for Your Slideshow
Narration is a smart way to captivate the target audience within your slideshow, whether though a self-delivery or a recorded voiceover. If you decide on the second option, you can conveniently use the Filmora Slideshow Creator program to add voiceovers and soundtracks to your presentation.
To adhere to the purpose, navigate to the top toolbar and click on the ‘Media’ tab. From the options that appear, tap on the ‘Record’ menu that drops down, followed by selecting the ‘Record Voiceover’ option. As soon as the ‘Record Audio’ prompt pops up, select your desired microphone to be used in the recording process and click on the ‘Record’ button.
The recording that you have just created will appear in the ‘Media’ tab beside your all other imported audio-visual and image files, and you can add the same to any desired file with utmost ease. The Filmora library further allows you with a free access to its huge inventory of sound and audio effects. To apply these effects to your project, navigate to the ‘Audio’ tab and browse through impressive music categories, like, Young & Bright, Rock, Electronic, etc., to select the best matching audio for your slideshow.
When you have made your selections, add all of them to the slideshow’s audio track in the project timeline and make suitable adjustments to their play durations.
Step 8: Export Your Creation
When your satisfied with your efforts till here, you have indeed created a wonderful animated slideshow presentation that should be exported to relevant platforms. Navigate to the ‘Export’ tab at the top right corner of the project timeline and click on the same. As soon as the utility window appears, choose a preferred file format, set a desired output resolution and fame rate for your presentation, followed by making a direct export of the same to your Vimeo or YouTube accounts.
The slideshow rendering time on different platforms may vary in cohesion with the specific presentation lengths, with larger file requiring a considerably longer time to get rendered than the smaller ones. It is advisable to limit the output file size within 500 MB for a quick rendering process.
02Canva
This one is an online animation slideshow creation tool that could certainly be your best choice to design high end professional presentations. Facilitating you with over 100 different slide design layouts, the tool additionally grants you the liberty to add your own images to the presentation being created, or even select suitable alternatives from Canva’s extensive image stack that has over 1 million apposite images to choose from.
You can make the best use of Canva to create promotional presentations to add extra emphasis on the brand of your company and product brand, which a compatible to a diverse variety of professional platforms for information sharing.
As far as the cost constraints of the tool are concerned, you get to access a free version of the tool for working on slideshow presentations for individual or small business units, while the graphics design needs of large scale professional corporations are suitably addressed by the utility’s Canva for Work version, which is equipped with high end team coordinated features with a 30-day free trial, along with monthly and annual subscription of $ 12.95 and $ 119.4 respectively.
Pros
● The tool allows you to add elusive texts, filters, fonts and images to the animated slides of your business presentation.
● Working with the tool, you can drag and drop an extensive variety of elements within your slideshow.
● Canva further allows you to create, upload and save the logo of your brand.
Cons
● The tool’s customer support is not quite welcoming.
● You need to add your phone number within the tool’s customer support interface for getting the required help.
● The tool’s working interface is somewhat confusing.
User’s Guide to Create Animated Slideshows in Canva
Let us see browse through the detailed, step by step process to quickly create amazing animated slideshow presentations using the Canva graphic design tool in the following section:
Step 1: Download and Install Canva
Visit the official site of the tool for a free download of the Canva slideshow creator software in any suitable iOS or Windows compatible desktops, laptops and PC systems.
Step 2: Choose Your Task
Undertake a launch of the downloaded program to reach the latter’s welcome page. Here, you need to navigate to the search bar at the top and type a keyword to select your task. For creating slideshow presentations, enter ‘Slideshow’ in the search tab.
In the drop down menu that follows, a list of the closest matching alternatives of your keyword will appear. Select ‘Slideshow Videos’ from the same.
Step 3: Select a Template
The completion of Step 2 will take you to the program’s template library, where you can either work with creating a presentation of your own by clicking on the ‘Create a Blank Sideshow Video’ option, or choose any one from the finest collection of in built slideshow templates from the Canva library.
Step 4: Customize Your Template
After selecting the template, you will reach Canva’s slideshow editor page. Here you can customize your slideshow as per your preferences. To begin with, replace the preset images in the template with your selected ones.
You can either choose a set of images from the program’s inbuilt photo gallery or select the same from your device. Navigate to the ‘Tools Panel’ in the left and click on ‘Photos’ to work with the first method, or tap ‘Uploads’ in that very panel to apply the second.
When you have made your choice, click on ‘Upload Media’ to bring your selections to the tool’s editor timeline. This should be followed by dragging and dropping the images at appropriate places within the template.
Step 5: Crop the Images
Double click on any image and drag it sideways to crop the same within your preferred aspect ratio. When you are happy with the changes, click on ‘Done’ to apply them. You can additionally, customize the images with a variety of available effects at this stage.
To proceed with the aforesaid process, choose the image you want to customize and select ‘Edit Image’ from the dropdown that appears. You will be directed to the ‘Edit Image Gallery’, where you can select the effect you want to complement your image with.
Step 6: Add Other Design Elements
Tap on ‘Elements’ in the ‘Tools Panel’ at the left to select a suitable component from a range of stickers, icons, illustrations and charts to add to your slideshow according to its creation theme.
Step 7: Customize the Text
The template has some pre-written text, which you can change by double clicking inside the text boxes to highlight the already written text and edit the same as per your requirement. Press ‘T’ on your system’s keyboard for adding extra text boxes. You can also visit the ‘Editor Toolbar’ work with a variety of text formatting options, like, font size, style and color.
Step 8: Include Suitable Animations
To supplement your slideshow with stunning animations, select the image, element or text you wish to animate, followed by pressing the ‘Animate’ button. You will reach the ‘Animations Gallery’ for a selection of the desired text or page animation you want to add.
Once you have finalized your choice, click outside the gallery to apply your selected animation.
Step 9: Add the Perfect Sound
To uplift your presentation with an appealing music, navigate to the ‘Tools Panel’ at the left of the editor window and tap on ‘Audio’. A gallery of music clips will get displayed. Choose the one that best suits the theme of your animated presentation.
Step 10: Preview Your Creation
When you are done with creating the presentation, watch how it looks by navigating to the ‘Menu Bar’ at the top and clicking on the ‘Play’ button. When you have finished, click on ‘Close’ to reach the editor window.
Step 11: Set the Play Duration
To adjust the play duration of any slide, select it and navigate to the toolbar at the top left corner.
Click on ‘Edit Timing’ in the same and make suitable adjustments either by encoding the required number of seconds or dragging the duration slider.
Step 12: Time to Download and Share!
Prefer previewing the slides one again to take a final look at your presentation. If you are happy with your work, navigate to and tap ‘Download’, followed by selecting the file type to save your creation locally to your device.
It is recommended to choose the ‘MP4 Video’ file format for saving audio enabled presentations. In case you want the background music to be included, either choose the ‘GIF’ format or download the slideshow as a PowerPoint presentation.
For a direct share of the animated slideshow, navigate to the ‘Menu Bar’ at the top and click on ‘Share’, followed by ‘All Options’ and lastly, tap ‘Present’.
03Keynote
This one is affordably the most convenient presentation tools if you are a user of iOS devices, and is a world class utility to create animated slideshow presentations. You can work with this tool to add an extra element of practicality to the otherwise customary business oriented animation slideshows with a diversity of effects, filters and transitions. The software is an ultimate best in adhering to real-time and remote event collaboration concerns of employees.
Concerning the pricing requirements, you can work with this slideshow creator tool for free if your usage concerns are restricted to a personal need. In an otherwise case, you can prefer buying the latter for a monthly investment of $ 99 and $ 299, respectively for business and enterprise based concerns.
Pros
● The Keynote program allows you a real-time, remote and revised access to the slideshow presentation.
● The program’s creator library is a storehouse of the most elegant and expressive slideshow templates and themes.
● The application greets you with a responsive and non-messy interface, with a decluttered toolbar.
Cons
● The program offers you a limited number of options to export your creations.
● You cannot work with the application on a Windows compatible device.
● If you are a regular PowerPoint user, working with the tool will require you a comprehensive learning of the usage pattern.
User’s Guide to Create Animated Slideshows in Keynote
Moving ahead with the discussion, let us understand the process of creating an animated slideshow presentation in Keynote though a step by step guide in the following section:
Step 1: Download the Keynote Slideshow Creator Tool
Start with initiating a free download of the tool from the official Apple website through your login credentials and proceed to install the same in your iOS device.
Step 2: Select a Presentation Theme
To start working on your slideshow presentation, you will require to choose a suitable theme. To do this, open the tool by clicking on its icon in the Launchpad, Applications folder or the Dock. The ‘Theme Chooser’ window pops up. In case this doesn’t happen, navigate to the bottom left corner of the screen and tap ‘New Document’.
In the ‘Theme Chooser’, you can either see through different categories or tap ‘All Themes’ to select the one you like. When you have found your preferred theme, open it by double clicking on the same.
You may either use the preset slide layout of the selected theme or use a different one by navigating to and clicking on ‘Format’ tab at the right side of the screen. You can now add your specific content in the presentation through adding new slides, text and images.
Click on the ‘+’ symbol in the theme toolbar to add a new slide followed by choosing its layout, double click inside the placeholder text to edit the same or drag and drop an image from your device gallery or the internet to replace the preset one in the template.
Step 3: Supplement Your Presentation With Objects
Proceed to add different slideshow objects in your creation by navigating to the ‘Object Toolbar’ at the top and selecting tables, charts, shapes, text boxes, comments, etc., that you wish to add in your presentation.
You can further make changes in the color, shadow and border of the object to improvise its appearance, or prefer applying a preset object style to enhance the overall object look to bring it in line with the slideshow theme. To do this, select the object and you will see its formatting options in the sidebar at the right. Click on the ‘Format Toolbar’ if the sidebar does not appear.
You can additionally, add layers to the slide objects, change their size or nest them within a shape or text box and link objects to switch to a new slide, open a related web page or email message.
Step 4: Add Audio-Visual Elements
Try adding suitable media elements to your creation by dragging a video or music file from your system either to a media placeholder or just anywhere within the slide. You can alternatively tap on the ‘Media’ icon in the top toolbar and choose ‘Music’ or ‘Movies’ from the dropdown that appears, followed by dragging the file with the previously explained method.
To add a soundtrack to the presentation, click on the ‘Soundtrack’ icon in the toolbar at the top, followed by clicking on the ‘Audio’ tab in the sidebar that appears. Next, tap the ‘+’ icon to select specific songs or playlists you want to add in the soundtrack.
Step 5: Add Stunning Animations
Start with selecting a slide to add the animation effect in the ‘Slide Navigator’. The ‘Animate’ sidebar appears, where you need to select the ‘Add an Effect’ option. Scroll down to view and choose a desired transition.
You can see a preview of the selected transition being played, with the slide navigator displaying a blue mark at the right corner of the slide to indicate the addition of a transition.
To change a previously selected transition, navigate to the sidebar at the top and tap ‘Change’ to select a new one. You can further, use the sidebar options to set the direction and transition play duration.
Step 6: Playing Your Slideshow
When satisfied with your effort, you can prefer playing the presentation, either in full screen or in a single window. If you choose to play in full screen, navigate to the ‘Play’ menu, click on the same and select ‘Full Screen’, followed by choosing the desired slide from where you wish the presentation to start in the slide navigator.
If you want to play the slideshow in a window, select a preferred slide in the slide navigator, go to the ‘Play’ menu at the top, click on the ‘Play’ tab, followed by choosing the ‘In Window’ option. The presentation will now start with the selected slide being played in one window and the presenter in the other.
In either of the above slideshow playing modes, press ‘Esc’ from your system’s keyboard to end the presentation playing process.
Step 7: Collaborating With Others
Working with the Keynote Slideshow Creator, you can collaborate with others to invite people to view and edit your presentation. To give a presentation access, you can either share a web link for a public access, or invite certain people having registered Apple credentials to view your creation. You can even give editing permissions to selected viewers or allow them to invite other people to collaborate.
04Powtoon
This one is a useful tool to create interactive business presentations for brand promotion and company recognition. Talking about the specific features of the tool, you can work with the utility to design an attractive logo for your company, import data and charts to your presentation, make adjustments in the color schemes of the slideshow, initiate infographic building and organize your slideshow into several sections.
The tool works best towards educating potential customers and clients about your company’s mainstream work profile and business. Sticking to the terms of utility pricing, you can begin with taking a free demo of the tool to access its credibility in cohesion with your specific needs. Following this, you can avail a monthly paid subscription of Powtoon, which has a price range of $ 19 to $ 59, according to the type and extent of features you choose to avail.
Pros
● You can add the details of your brand in the most expressive and appealing manner with the tool’s manifold design features.
● You can work with hundreds of preset slide designs to quickly create professionally sound animated slideshows.
● The tool is excellent in catering to your diverse slideshow design needs, when working for a large scale organizational setup.
Cons
● The tool is not a smart choice for individual or small scale business setups.
● The extensive variety of features results in a bit confusing and messy working interface.
● You can add a limited number of users to the monthly subscription plan of the tool.
User’s Guide to Create Animated Slideshows in Powtoon
For a better insight on how to create animated slideshows in Powtoon, let us go through the stepwise tutorial of the process in the following section:
Step 1: Launch the Online Tool
Visit the Powtoon official website to open the slideshow designer tool in any of your favorite internet browsers.
Powtoon Official Site Link: https://www.powtoon.com/index/
Step 2: Script Your Presentation
Start with creating a preset content for every slide of your presentation, based on the reason behind creating the slideshow, type and style of content presentation and so on.
Step 2: Add a Cohesive Background Music
You can complement your presentation with the perfect background music from the Powtoon library, from the web or even create your own voiceover recording through any preferred online text-to-voice recorder tool to voice the contents of your presentation. When you are done, upload your recording to the Powtoon editor to proceed with adding visual content to the presentation.
Step 3: Divide Your Presentation Slides
You can now add images, text and animations to your project in line with your presentation script. Choose suitable images from your device or from the web, add short, impactful texts and stunning animations from the Powtoon’s library to level up the appearance of your slideshow.
Step 4: Include Design Elements
Try adding additional elements like, graphics, background themes, animation styles, props, color schemes and other relevant characteristics to the slides.
Step 5: Time Your Presentation
In the last step, use the Powtoon timeline to set the sequence and time of appearance of different elements in each of your presentation slides. You can also hear the voiceover in the slideshow background to ensure the synchronization between the audio play and visual content appearance within the presentation.
05Visme
This one is a top grade cloud based professional tool for creating animated slideshow presentations with an affordably high visual credibility. Equipped with a drag and drop design workflow, the tool works effectively towards delivering intuitive and engaging animated slideshows for effective communication of business ideas and top rated brand promotion strategies.
The best usage of the tool lies in the creation of business presentations that are aimed at ensuring company oriented image collection and brand consistency. Talking of the tool’s pricing constraints, a single user subscription of the utility would cost you $ 20 on a monthly basis, which increases to $ 60 per month for a 3-user package.
It is a smart choice to take a free live demonstration of the tool to get a comprehensive understanding of the latter’s working technology.
Pros
● Extensive variety of colors, images and logos to complement your business presentations with elusive design elements.
● Promotes a viable consistency among multiple employee presentations
● The tool comes with an in built analytic system that keeps a track of the viewers of your slideshow presentations.
Cons
● The tool lacks some essential elements of slideshow design.
● The design features are mostly generic and do not cater to intense creation needs.
● The tool lacks a free trial facility.
User’s Guide to Create Animated Slideshows in Visme
In the following section is presented a stepwise procedure to create stunning animated slideshows in Visme with high end professional excellence and in the quickest time span:
Step 1: Download and Install the Program
Navigate to the official website of the Visme Slideshow Creator program to download and install the same in any of your preferred MacOs or Windows supported devices.
Visme Official Download Link: https://visme.co/blog/
Step 2: Start a New Project
You will need to create a Visme account to start working on the slideshow creation process. When you have created one, navigate to and click the ‘Create New Visme’ option in the tool’s opening screen to open a new project and assign a suitable name to it.
Step 3: Choose a Template
in the new project window that appears, click on ‘Presentations’ option at the top to see a library of slideshow templates being displayed. You can either, select a template from the library to edit or start an entirely new creation of your own.
Step 4: Make Color Schemes and Background Selections
To proceed with the selection of slide backgrounds and color schemes, you can either choose an exact color by entering its RGB code in the ‘Edit Colors’ option, or choose one from Google web pages using the ‘Chrome Eye Dropper’ tool.
Step 5: Add Shapes and Icons
You can supplement your slideshow with suitable design elements, like icons and shapes. All you need to do is navigate to the ‘Tools Panel’ in the left, click on the ‘All Shapes’ symbol and type a related keyword in the search bar to get a list of matching shapes to choose from.
Step 6: Insert and Format Text
You can now proceed with adding suitable text, titles and subtitles to the presentation slides. Again, visit the ‘Tools Panel’, tap the ‘T’ icon and click on ‘Add a Title’. A text box will be created within the slide, where you can add the required text. You can also format the same from the ‘Format Toolbar’ that gets displayed above the inserted text box.
Step 7: Add Photographic Slides
To include image slides, start with inserting a new slide in the presentation, flowed by once again navigating to the ‘Tools Panel’ in the left and clicking on the ‘Background’ icon. Choose a suitable color scheme and again, click on the ‘Images’ symbol in the ‘Tools Panel’. Here you can select any suitable image from the library that gets displayed.
Step 8: Link Your Slides
Link the sequential slides of your presentation with any suitable indicator, such as an arrow, so that clicking on the same takes the viewer to the successive slide. You can alternatively create ‘Hotspots’ to link the slides together.
Step 9: Publish and Share Your Presentation
When the final result makes you happy, navigate to the ‘Publish’ tab just above your slide window to open the presentation publishing interface. Here, you can choose from the options of a direct share, a site or blog embed or a local download of the presentation to your device.
● Ending Thoughts →
● Animated slideshow presentations land among the most trending ways to ensure a precise and engaging content delivery.
● The software market is packed with a diverse range of impressive slideshow creator tools with the most amazing features.
● When making your choice of the perfect animated slideshow designer tools, the Wondershare Filmora Slideshow Creator program is indeed a smart pick.
Ways to Make Sure You Get the Most up to Date Cartoon Character Design Tips
Ways to Make Sure You Get the Most up to Date Cartoon Character Design Tips
An easy yet powerful editor
Numerous effects to choose from
Detailed tutorials provided by the official channel
Making an overall excellent and unique character design cartoon art style is sometimes hard. The truth is that everyone has a favorite cartoon character, but the question is, how does this character come to life? While you are about to start copying other well-known cartoon or comic characters, you will eventually branch out and come with your own. In addition, there are several ways to come up with ideas for cartoon characters’ concept art to draw. Any of these ways can get you started on populating your world of cartoons.
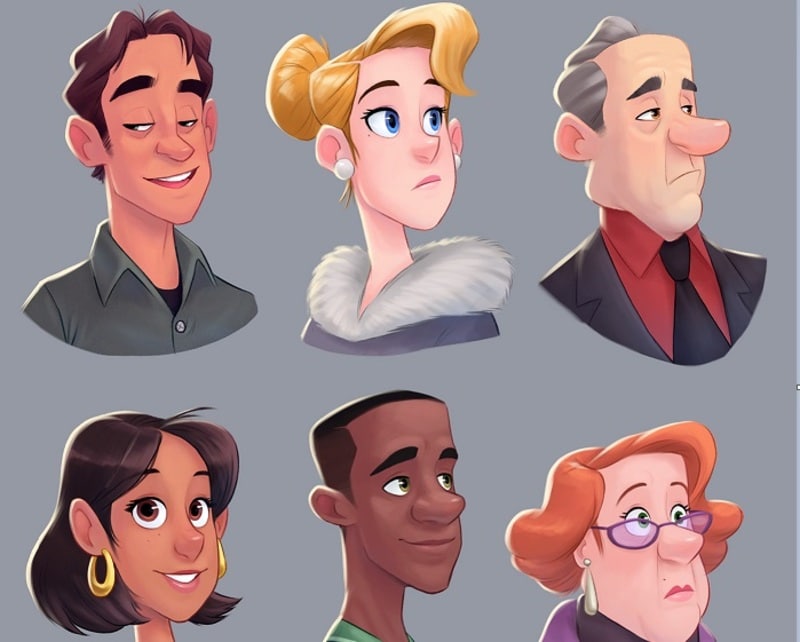
More so, the process of tackling your character design is often full of hurdles. This process requires a lot of creative thinking to create one’s character from the beginning, although many well-known characters from films, advertising, and cartoons look straightforward. But need to exert a vast amount of skill and effort to make them effective.
In this article
01 [10 Tips for Brilliant Cartoon Character Design](#Part 1)
02 [How to Apply Cartoon Character Design to Filmora Video Editing?](#Part 2)
Part 1 Tips for Brilliant Cartoon Character Design
As a cartoon character designer, here are 10 tips you need to put in place to make a brilliant cartoon character design. They are;
● Do not lose the magic
Make sure you try not to polish all the charm from your characters. Many character designers usually begin their project with a sketch and agree that this is often where the essence of the character gets captured. Therefore, when you start working up a design, make sure you do not lose that magic.
The first thing is to decide what you are trying to communicate and then create loose sketches with flow, acting, and movement. As soon as you tighten up the drawing, some of the dynamics will automatically loosen, so it is crucial to have as much life in the early stages as possible. In addition, movement is all but impossible to add later. Thus, you need to ensure that it is in the initial sketch.
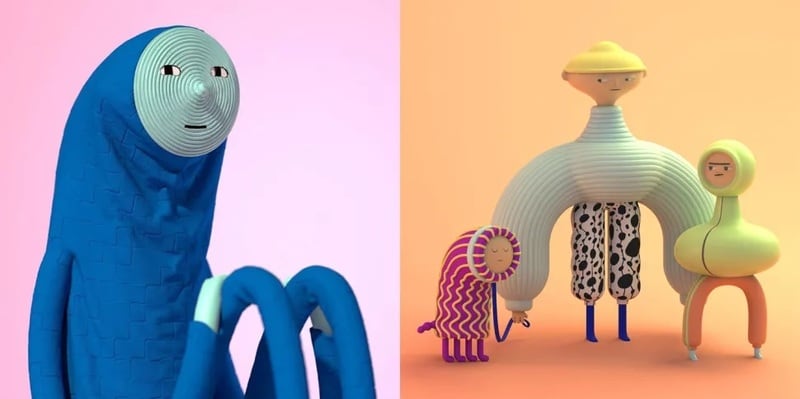
● Avoid reference material
Although inspiration needs to come from somewhere, the aim is to create something original, and you shouldn’t have the reference material right in front of you as you work.
Also, if you take a look at something and when you try and hazily remember it in your mind, that is when you can end up making something new, rather than making a pastiche of something.
● Make research on other characters
For guidance purposes, it can be much help when you try to deconstruct why certain character designs work and why some do not work. Also, there is no shortage of research material to be found, as illustrated characters are appearing everywhere like stickers on fruit, TV commercials, shop signs, cereal boxes, animations on mobile phones, etc. Make sure you study these character designs and think about what makes some successful and the particular thing you like about them.
● Also, take a look elsewhere
It is also a great idea to look beyond some character designs when hunting for inspiration because most times, when you begin a project, you might start with the feeling to evoke. The process usually starts with the designer taking a video of himself as a reference and capturing something of the character’s posture or idea’s movement.
● Try not to lose sight of the original idea
It is elementary to allow your favorite designs to influence you subconsciously. Sometimes when you look back at your initial artworks, it will bring back the feeling you had when you were creating them, and the project you are trying to develop will shift back on track.
● Exaggerate
When you exaggerate the defining features of your character design, it will help it appear larger than real life. Also, exaggerated features help viewers identify the characters’ essential qualities. Exaggeration is key in cartoon caricatures and also helps emphasize certain personality traits. In addition, if your character is strong, try not to give it normal-sized bulging arms, but soup them up so that they are five times as big as they should be. Note that the technique of exaggeration can also apply to characteristics.
● Decide the aim of your character design
When creating a character design, consider your audience as character designs mainly aim at young children, typically designed around bright colors and basic shapes. Also, commissioned character designs are no less creative but are usually more restrictive. Most clients usually have specific needs but want you to do your ‘thing.’ Usually, you need to break down the core features and personality. For example, if the eyes are essential, you will focus the whole design around the face, making this the key element that stands out.
● Make your character distinctive
Whether you are creating a monkey, monster, or robot, you can guarantee that there will be a hundred other similar creations out there. Therefore, your character design is required to be exciting and robust in a visual sense to captivate people’s attention.
● Create clear silhouettes
A silhouette is required to help you understand the character’s gesture which is another good way to differentiate your character and improve its pose. This lets you see how the character ‘reads’ and requires you to make the gesture clearer. It answers the question of; can things be simplified? Do you have a basic understanding of character, emotions, and how the line of action works? In addition, try not to overlap everything and keep the limbs separately.
● Consider line quality
Finally, curved and straight curved lines read by your eyes are at different speeds. The lines drawn are from which your character design is composed can go some way to describing it. Soft, thick, round, and even lines may suggest acute and approachable character, whereas sharp, uneven, scratchy lines may indicate an erratic and uneasy character.
Part 3 How to Apply Cartoon Character Design to Filmora Video Editing?
You can cartoon your character background design in your Video Editing turn a video into a cartoon depending on your device. If you are working on your mobile phone, then you can convert any number of your social media accounts that include film or photos to some degree. The detail or performance level will not be great most of the time.
But if you wish to do it professionally using your PC, then the best video to the cartoon software program for both Windows and Mac is Filmora. Filmora is the best software to convert video to a Cartoon background easily. It will enable you the requisite tools that will act as the right approach to create cartoon characters with appropriate locations and video.
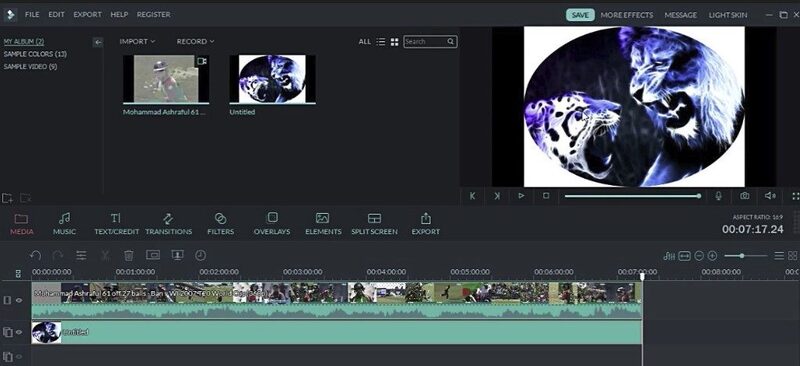
The Wondershare Filmora Video Editor professional video editing software allows you to turn your videos into cartoons easily. The process by which videos get converted into cartoon style on Filmora is straightforward.
Step 1: Import the videos into Filmora
From the official website of Filmora, you will get the link to download, install and launch. Then from the main interface, import your video to it.
Step 2: Add the Cartoon effect under Stylize
You can add different effects or use the Stylize animation effects to your cartoon character.
Step 3: Adjust the cartoon settings and do some basic color corrections to perfect the cartoon result.
Go through different settings to provide the exemplary cartoon character, its background, and full-fledged video edited with Filmora.
For Win 7 or later (64-bit)
For macOS 10.12 or later
● Ending Thoughts →
● This article explained all you require to get the most up-to-date cartoon character design tips. A section of the report gave a list of the information you need to put in place to achieve this. Another area recommended the best video to cartoon editing tools used by cartoon character designers to get the most out of their character design.
● Also, Filmora acts as the right tool to cover up all the necessary editing you might need to create your cartoon character with related background and artistic pieces of equipment.
Making an overall excellent and unique character design cartoon art style is sometimes hard. The truth is that everyone has a favorite cartoon character, but the question is, how does this character come to life? While you are about to start copying other well-known cartoon or comic characters, you will eventually branch out and come with your own. In addition, there are several ways to come up with ideas for cartoon characters’ concept art to draw. Any of these ways can get you started on populating your world of cartoons.
More so, the process of tackling your character design is often full of hurdles. This process requires a lot of creative thinking to create one’s character from the beginning, although many well-known characters from films, advertising, and cartoons look straightforward. But need to exert a vast amount of skill and effort to make them effective.
In this article
01 [10 Tips for Brilliant Cartoon Character Design](#Part 1)
02 [How to Apply Cartoon Character Design to Filmora Video Editing?](#Part 2)
Part 1 Tips for Brilliant Cartoon Character Design
As a cartoon character designer, here are 10 tips you need to put in place to make a brilliant cartoon character design. They are;
● Do not lose the magic
Make sure you try not to polish all the charm from your characters. Many character designers usually begin their project with a sketch and agree that this is often where the essence of the character gets captured. Therefore, when you start working up a design, make sure you do not lose that magic.
The first thing is to decide what you are trying to communicate and then create loose sketches with flow, acting, and movement. As soon as you tighten up the drawing, some of the dynamics will automatically loosen, so it is crucial to have as much life in the early stages as possible. In addition, movement is all but impossible to add later. Thus, you need to ensure that it is in the initial sketch.
● Avoid reference material
Although inspiration needs to come from somewhere, the aim is to create something original, and you shouldn’t have the reference material right in front of you as you work.
Also, if you take a look at something and when you try and hazily remember it in your mind, that is when you can end up making something new, rather than making a pastiche of something.
● Make research on other characters
For guidance purposes, it can be much help when you try to deconstruct why certain character designs work and why some do not work. Also, there is no shortage of research material to be found, as illustrated characters are appearing everywhere like stickers on fruit, TV commercials, shop signs, cereal boxes, animations on mobile phones, etc. Make sure you study these character designs and think about what makes some successful and the particular thing you like about them.
● Also, take a look elsewhere
It is also a great idea to look beyond some character designs when hunting for inspiration because most times, when you begin a project, you might start with the feeling to evoke. The process usually starts with the designer taking a video of himself as a reference and capturing something of the character’s posture or idea’s movement.
● Try not to lose sight of the original idea
It is elementary to allow your favorite designs to influence you subconsciously. Sometimes when you look back at your initial artworks, it will bring back the feeling you had when you were creating them, and the project you are trying to develop will shift back on track.
● Exaggerate
When you exaggerate the defining features of your character design, it will help it appear larger than real life. Also, exaggerated features help viewers identify the characters’ essential qualities. Exaggeration is key in cartoon caricatures and also helps emphasize certain personality traits. In addition, if your character is strong, try not to give it normal-sized bulging arms, but soup them up so that they are five times as big as they should be. Note that the technique of exaggeration can also apply to characteristics.
● Decide the aim of your character design
When creating a character design, consider your audience as character designs mainly aim at young children, typically designed around bright colors and basic shapes. Also, commissioned character designs are no less creative but are usually more restrictive. Most clients usually have specific needs but want you to do your ‘thing.’ Usually, you need to break down the core features and personality. For example, if the eyes are essential, you will focus the whole design around the face, making this the key element that stands out.
● Make your character distinctive
Whether you are creating a monkey, monster, or robot, you can guarantee that there will be a hundred other similar creations out there. Therefore, your character design is required to be exciting and robust in a visual sense to captivate people’s attention.
● Create clear silhouettes
A silhouette is required to help you understand the character’s gesture which is another good way to differentiate your character and improve its pose. This lets you see how the character ‘reads’ and requires you to make the gesture clearer. It answers the question of; can things be simplified? Do you have a basic understanding of character, emotions, and how the line of action works? In addition, try not to overlap everything and keep the limbs separately.
● Consider line quality
Finally, curved and straight curved lines read by your eyes are at different speeds. The lines drawn are from which your character design is composed can go some way to describing it. Soft, thick, round, and even lines may suggest acute and approachable character, whereas sharp, uneven, scratchy lines may indicate an erratic and uneasy character.
Part 3 How to Apply Cartoon Character Design to Filmora Video Editing?
You can cartoon your character background design in your Video Editing turn a video into a cartoon depending on your device. If you are working on your mobile phone, then you can convert any number of your social media accounts that include film or photos to some degree. The detail or performance level will not be great most of the time.
But if you wish to do it professionally using your PC, then the best video to the cartoon software program for both Windows and Mac is Filmora. Filmora is the best software to convert video to a Cartoon background easily. It will enable you the requisite tools that will act as the right approach to create cartoon characters with appropriate locations and video.
The Wondershare Filmora Video Editor professional video editing software allows you to turn your videos into cartoons easily. The process by which videos get converted into cartoon style on Filmora is straightforward.
Step 1: Import the videos into Filmora
From the official website of Filmora, you will get the link to download, install and launch. Then from the main interface, import your video to it.
Step 2: Add the Cartoon effect under Stylize
You can add different effects or use the Stylize animation effects to your cartoon character.
Step 3: Adjust the cartoon settings and do some basic color corrections to perfect the cartoon result.
Go through different settings to provide the exemplary cartoon character, its background, and full-fledged video edited with Filmora.
For Win 7 or later (64-bit)
For macOS 10.12 or later
● Ending Thoughts →
● This article explained all you require to get the most up-to-date cartoon character design tips. A section of the report gave a list of the information you need to put in place to achieve this. Another area recommended the best video to cartoon editing tools used by cartoon character designers to get the most out of their character design.
● Also, Filmora acts as the right tool to cover up all the necessary editing you might need to create your cartoon character with related background and artistic pieces of equipment.
Top 10 Animated Photo Collage Apps You Should Know
Versatile Video Editor - Wondershare Filmora
An easy yet powerful editor
Numerous effects to choose from
Detailed tutorials provided by the official channel
What if you wish to animate images, adding movement to stationary objects in time? Well, there are apps for these purposes!
Videos and GIFs are a mainstay of social media. These days it’s rare to see a still photo online. The simplicity with which you can add filter and movement effects to your images has identified a proliferation of these online animated photos.
So what if you wish to apply animation to a still image? There are many apps for such purposes. Given below is a selection of the best apps you can use to animate images on both Android and iPhone devices with the help of animated photo collage apps.
In this article
01 [Top 10 Animated Photo Collage Apps ](#Part 1)
02 [Wondershare Filmora: The Advanced Editing App of 2022!](#Part 2)
Part 1 Top 10 Animated Photo Collage Apps
We’ve compiled an index of the top 10 animated collage apps compatible with photo enthusiasts and photographers at every level of expertise. Most of these amazing apps are available for both iOS and Android, so there are numerous options no matter what device you’re using.
Before showcasing your collage-making skills, gather the perfect images from your last photography project.
1. GIPHY
The GIPHY is the mega search engine for all things related to GIFs.
Here, you can easily upload and find reaction memes for anything under the sun; GIPHY is also available with a mobile app. It also helps you to frame your GIFs and animate photos. Then, you can upload them by using the inbuilt animation tools on the platform.
It consists of a sticker maker (available for iPhone X and later), and you can also add captions to your animated images or shoot your short videos.
2. Motionleap
Motionleap is also an ideal animated photo collage app, and for a good reason. This app is highly reviewed, with 250,000 plus ratings of five stars in the Play Store.
Motionleap is a free animated photo collage app, although there’s a subscription and Pro version, too. Also, it doesn’t put a watermark over your image when you download it to your phone.
The app’s primary goal is animating still images and converting them into short, concise, and looping videos. Programming directional cues can easily do it into your image by dragging your thumb across the screen.
You can also freeze certain image sections and apply filters on top of your picture to frame an atmosphere within your image.
Unluckily, Motionleap saves your animated still photos in video format unless you’ve paid for a Pro account.
3. Movepic

Movepic is almost similar to Motionleap in that it animates images, but you can make a massive chunk of this animation with its inbuilt filters and overlays.
The only limitation is that you wouldn’t be able to remove the watermark without updating it to a VIP account. Movepic also saves your pictures automatically as a movie file than within a GIFformat.
4. ImgPlay
ImgPlay is another ideal animated collage maker app you can use to animate images. It creates ready-to-use animated images for the web and consists of easy-to-understand yet advanced controls. Unfortunately, it also adds a watermark on your image—one that you can’t remove unless you update to a complete account.
The process of making animated images online and GIFs can be in a couple of different ways within ImgPlay itself. You can use still photographs side-by-side, use burst images, or even videos.
5. Zoetropic
If you wish to animate your photo within a few minutes only, Zoetropic is for you. Though its functions aren’t as extensive as other apps we’ve mentioned, it does the job pretty well.
To get started, you choose your images and then select motion points. Next, you mask or stabilize the areas you want to keep still. Finally, you choose your overlays and animations. You can also change colors and add tags.
On the downside, it has limited the number of effects you can access on a free account. However, you might find what you’re considering if you are looking for a prompt manner to animate a photo online.
6. StoryZ
Despite its unattractive user interface, StoryZ is one of the useful apps on this list. It works excellent with still photographs to animate them effectively via various programmed paths of movements, overlays, and color filters—a lot of which are free and unique. It also automatically saves your files as GIFs.
One of the most incredible things about StoryZ is cutting the watermark from your image if you preview a quick ad before saving the file.
7. Lumyer
Lumyer is one of the useful animated photo collage apps on our list, which lets you add hundreds and thousands of effects to your pictures to animate them. So whether you wish to include sparkle or subtle weather effects, seasonal animations for Christmas and Halloween, or all-out scene transformations like appearing on a rollercoaster, Lumyer can do it.
If you’re okay with the watermark, Lumyer is a good choice, but otherwise, you may prefer one of our other recommended photo animation college apps.
8. VIMAGE 3D
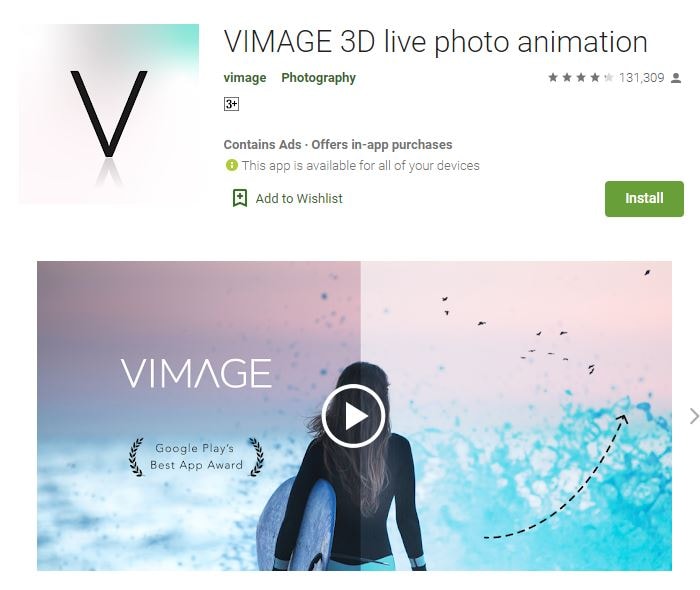
VIMAGE got recognized with Google Play award in 2018. It can make some pretty good-looking animated photos in just a few clicks. There’s a wide variety of animations, filters, and sounds to select among a bundle of options.
You don’t even need to select the object because VIMAGE detects and replaces it for you quite automatically.
Similar to these apps, you do need to pay to remove the watermark, get access to the full effects library, and you can export your photos online in up to 2560p resolution.
9. Photo Bender
Photo Bender is an Android-specific animated photo collage app that helps you warp to animate photos digitally by coloring your image by stretching it, bending it, and using brushes. You can then export your transformed images as GIFs, JPEGs, MP4s, and PNGs.
While this app doesn’t contain ratings like others on this list, it is highly rated, so it’s still worth a look.
10. Werble
The primary purpose of Werble is to animate your images, and while the basic account is free, in-app purchases are also available. Most of Werble’s animations come through different filter effects that you can add on top of your images.
A downside to Werble is that it saves these images entirely automatically as GIFs, so they’re ready to use online. The limitation? However, you need to pay to cut the watermark that they place on your image. That watermark is huge enough to be disturbing.
Part 2 Wondershare Filmora: The Advanced Editing App of 2022
If you are tired of considering various animated photo collage apps, here is a section to introduce you to the best alternative with a reliable yet powerful video editor.
Filmora : This platform comes entirely loaded with advanced social integration options and editing functions. You can enjoy premium preloaded video editing services on your mobile devices with this tool. For video customization requirements, you can imply multiple caption options, title editing facilities, and advanced animation effects.
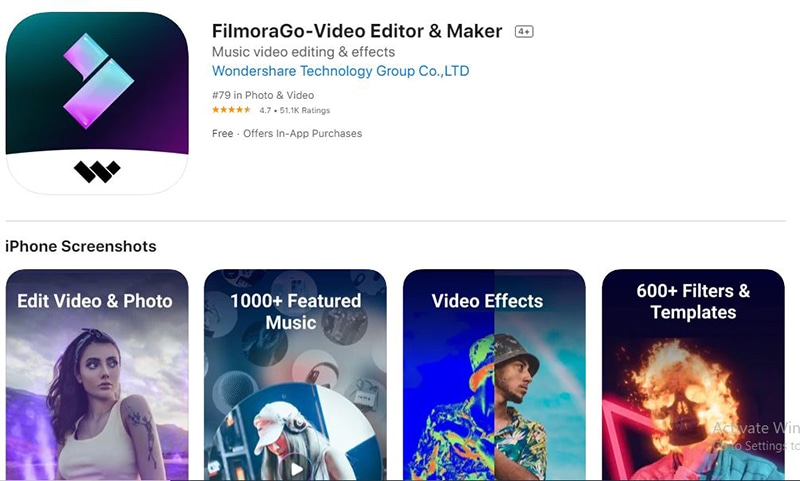
Filmora Features
- Filmora is available for both Android as well as iOS devices without any login.
- Filmora assists users in importing camera roll, Instagram, Google Plus, and Facebook collections with simplicity.
- This software tool contains different advanced features and highlights the missing components of the above-listed animated collage maker apps.
- You can add watermarks to all created videos.
- Above all, now share videos directly shared via Instagram, Facebook, WhatsApp, Email, Vimeo, YouTube, etc.
This advanced editing tool, Wondershare Filmora, can efficiently serve all your requirements. The good part is that it syncs well with iOS and Android devices so that you can access it anywhere with simplicity.
Also, Filmora provides is compatible with 4K videos, which is the most outstanding merit for developing informative video sessions and tutorials. Its ability to work offline with principal functions will simplify your editing tasks even when the internet connection is still an issue.
Wondershare Filmora
Get started easily with Filmora’s powerful performance, intuitive interface, and countless effects!
Try It Free Try It Free Try It Free Learn More >
AI Portrait – The best feature of Wondershare Filmora for gameplay editing
The AI Portrait is a new add-on in Wondershare Filmora. It can easily remove video backgrounds without using a green screen or chroma key, allowing you to add borders, glitch effects, pixelated, noise, or segmentation video effects.

Conclusion
Now that we’ve run through some great animated photo collage apps that can enliven your images, you can choose the ones you’re wandering to try out. They all follow roughly a similar concept, so you should select the ones you think will work best for such needs.
Gone are the days when you had to necessarily use a robust desktop computer to edit your videos and images. You can go forward to efficiently perform the same operation all from your smartphone with significant effects by using the Wondershare Filmora.
What if you wish to animate images, adding movement to stationary objects in time? Well, there are apps for these purposes!
Videos and GIFs are a mainstay of social media. These days it’s rare to see a still photo online. The simplicity with which you can add filter and movement effects to your images has identified a proliferation of these online animated photos.
So what if you wish to apply animation to a still image? There are many apps for such purposes. Given below is a selection of the best apps you can use to animate images on both Android and iPhone devices with the help of animated photo collage apps.
In this article
01 [Top 10 Animated Photo Collage Apps ](#Part 1)
02 [Wondershare Filmora: The Advanced Editing App of 2022!](#Part 2)
Part 1 Top 10 Animated Photo Collage Apps
We’ve compiled an index of the top 10 animated collage apps compatible with photo enthusiasts and photographers at every level of expertise. Most of these amazing apps are available for both iOS and Android, so there are numerous options no matter what device you’re using.
Before showcasing your collage-making skills, gather the perfect images from your last photography project.
1. GIPHY
The GIPHY is the mega search engine for all things related to GIFs.
Here, you can easily upload and find reaction memes for anything under the sun; GIPHY is also available with a mobile app. It also helps you to frame your GIFs and animate photos. Then, you can upload them by using the inbuilt animation tools on the platform.
It consists of a sticker maker (available for iPhone X and later), and you can also add captions to your animated images or shoot your short videos.
2. Motionleap
Motionleap is also an ideal animated photo collage app, and for a good reason. This app is highly reviewed, with 250,000 plus ratings of five stars in the Play Store.
Motionleap is a free animated photo collage app, although there’s a subscription and Pro version, too. Also, it doesn’t put a watermark over your image when you download it to your phone.
The app’s primary goal is animating still images and converting them into short, concise, and looping videos. Programming directional cues can easily do it into your image by dragging your thumb across the screen.
You can also freeze certain image sections and apply filters on top of your picture to frame an atmosphere within your image.
Unluckily, Motionleap saves your animated still photos in video format unless you’ve paid for a Pro account.
3. Movepic
Movepic is almost similar to Motionleap in that it animates images, but you can make a massive chunk of this animation with its inbuilt filters and overlays.
The only limitation is that you wouldn’t be able to remove the watermark without updating it to a VIP account. Movepic also saves your pictures automatically as a movie file than within a GIFformat.
4. ImgPlay
ImgPlay is another ideal animated collage maker app you can use to animate images. It creates ready-to-use animated images for the web and consists of easy-to-understand yet advanced controls. Unfortunately, it also adds a watermark on your image—one that you can’t remove unless you update to a complete account.
The process of making animated images online and GIFs can be in a couple of different ways within ImgPlay itself. You can use still photographs side-by-side, use burst images, or even videos.
5. Zoetropic
If you wish to animate your photo within a few minutes only, Zoetropic is for you. Though its functions aren’t as extensive as other apps we’ve mentioned, it does the job pretty well.
To get started, you choose your images and then select motion points. Next, you mask or stabilize the areas you want to keep still. Finally, you choose your overlays and animations. You can also change colors and add tags.
On the downside, it has limited the number of effects you can access on a free account. However, you might find what you’re considering if you are looking for a prompt manner to animate a photo online.
6. StoryZ
Despite its unattractive user interface, StoryZ is one of the useful apps on this list. It works excellent with still photographs to animate them effectively via various programmed paths of movements, overlays, and color filters—a lot of which are free and unique. It also automatically saves your files as GIFs.
One of the most incredible things about StoryZ is cutting the watermark from your image if you preview a quick ad before saving the file.
7. Lumyer
Lumyer is one of the useful animated photo collage apps on our list, which lets you add hundreds and thousands of effects to your pictures to animate them. So whether you wish to include sparkle or subtle weather effects, seasonal animations for Christmas and Halloween, or all-out scene transformations like appearing on a rollercoaster, Lumyer can do it.
If you’re okay with the watermark, Lumyer is a good choice, but otherwise, you may prefer one of our other recommended photo animation college apps.
8. VIMAGE 3D
VIMAGE got recognized with Google Play award in 2018. It can make some pretty good-looking animated photos in just a few clicks. There’s a wide variety of animations, filters, and sounds to select among a bundle of options.
You don’t even need to select the object because VIMAGE detects and replaces it for you quite automatically.
Similar to these apps, you do need to pay to remove the watermark, get access to the full effects library, and you can export your photos online in up to 2560p resolution.
9. Photo Bender
Photo Bender is an Android-specific animated photo collage app that helps you warp to animate photos digitally by coloring your image by stretching it, bending it, and using brushes. You can then export your transformed images as GIFs, JPEGs, MP4s, and PNGs.
While this app doesn’t contain ratings like others on this list, it is highly rated, so it’s still worth a look.
10. Werble
The primary purpose of Werble is to animate your images, and while the basic account is free, in-app purchases are also available. Most of Werble’s animations come through different filter effects that you can add on top of your images.
A downside to Werble is that it saves these images entirely automatically as GIFs, so they’re ready to use online. The limitation? However, you need to pay to cut the watermark that they place on your image. That watermark is huge enough to be disturbing.
Part 2 Wondershare Filmora: The Advanced Editing App of 2022
If you are tired of considering various animated photo collage apps, here is a section to introduce you to the best alternative with a reliable yet powerful video editor.
Filmora : This platform comes entirely loaded with advanced social integration options and editing functions. You can enjoy premium preloaded video editing services on your mobile devices with this tool. For video customization requirements, you can imply multiple caption options, title editing facilities, and advanced animation effects.
Filmora Features
- Filmora is available for both Android as well as iOS devices without any login.
- Filmora assists users in importing camera roll, Instagram, Google Plus, and Facebook collections with simplicity.
- This software tool contains different advanced features and highlights the missing components of the above-listed animated collage maker apps.
- You can add watermarks to all created videos.
- Above all, now share videos directly shared via Instagram, Facebook, WhatsApp, Email, Vimeo, YouTube, etc.
This advanced editing tool, Wondershare Filmora, can efficiently serve all your requirements. The good part is that it syncs well with iOS and Android devices so that you can access it anywhere with simplicity.
Also, Filmora provides is compatible with 4K videos, which is the most outstanding merit for developing informative video sessions and tutorials. Its ability to work offline with principal functions will simplify your editing tasks even when the internet connection is still an issue.
Wondershare Filmora
Get started easily with Filmora’s powerful performance, intuitive interface, and countless effects!
Try It Free Try It Free Try It Free Learn More >
AI Portrait – The best feature of Wondershare Filmora for gameplay editing
The AI Portrait is a new add-on in Wondershare Filmora. It can easily remove video backgrounds without using a green screen or chroma key, allowing you to add borders, glitch effects, pixelated, noise, or segmentation video effects.
Conclusion
Now that we’ve run through some great animated photo collage apps that can enliven your images, you can choose the ones you’re wandering to try out. They all follow roughly a similar concept, so you should select the ones you think will work best for such needs.
Gone are the days when you had to necessarily use a robust desktop computer to edit your videos and images. You can go forward to efficiently perform the same operation all from your smartphone with significant effects by using the Wondershare Filmora.
Best Practices on Online 3D Avatar Creator
Best Practices on Online 3D Avatar Creator
An easy yet powerful editor
Numerous effects to choose from
Detailed tutorials provided by the official channel
Avatar will match your personality to your social media profiles, YouTube videos, Snapchat, and many others. With 3D Avatar makers online, designing an Avatar is about customizing the color, layout, typography, and other designs and instantly sharing your Avatar to the social media digital platform as easy as choosing a template, customizing, and sharing.
The new software involved in AR and VR technologies uses these realistically customized Avatars. The accurate representation of virtual reality will give a feeling of being in an absolute sense. Users will love to create an avatar representing themselves in the virtual spaces. Making an avatar does not mean you lock your personality; you can change it anytime. This Avatar is created by capturing a webcam, ensuring it is perfect. We will discuss many free 3D Avatar creators online.
In this article
01 [What is a 3D Avatar?](#Part 1)
02 [Best 10 Practices on How to Create an Avatar for Spatial](#Part 2)
03 [How to Create a Gallery in Spatial for Your Art (NFT and Non-NFT)](#Part 3)
04 [How to Build Your Own 3D Avatar Accurately?](#Part 4)
Part 1 What is a 3D Avatar?
In Computer graphics, Avatar is the virtual representation of the user. This can be in the 2D illustration used as a profile picture and 3D representation used in games, VR, and AR technologies. Lately, termed as “Picons,” which means personal icons, but not used now. The use of these avatars was first coined by Neal Stephenson in 1992, which is a stepping stone for the vast Metaverse Universe. A graphic representation by which users wish to represent themselves. It is a caricature of a person, not precisely a photography of that person, is a simple fancy cartoon and bizarre structure; however, the images of natural objects identify the shape and design.
They are widely in online games and websites. They are an integral part of online chat, messaging systems, blogs, and artificial intelligence, especially VR. There are many Online 3D Avatar Creators available, and we shall you get the right match.
01What is Avatar Social Media?
These days’ social media play an integral part in our lives personally and professionally. We can connect with friends and customers easily sitting at the desk. An Avatar can be a profile picture on social media such as Bitmoji. Most users use their photos, sometimes supplemented by digital frames. There are various definitions to represent Avatar-like on social media it is a tiny cartoon picture representing us or our business in social media. Even if it is small, it can significantly impact the people who visit our profile to contact us, so we need to make sure it accurately represents who we are by utilizing an avatar. Keeping a profile picture is very important in social media, which creates a great impression to the followers than visiting a default profile picture set by the applications. There are many free 3D Avatar creators online from which you can create a free 3D avatar and directly share it on your social media.
02Why Do You Need a 3d Avatar?
These 3D avatars show a sense of seriousness and trust. Customers and people who communicate with them directly using avatars feel as if they are physically present in front of them, which makes them joyful, confident, and satisfied. Intelligent technologies like IoT and Machine learning have converted their way of working with 3D avatars having the central part. This is the beginning of the Metaverse universe, where we will have 3D Avatars in malls as salespersons and waiters in restaurants, and many more.
Part 2 Best 10 Practices On How To Create An Avatar For Spatial
Avatars being the most exciting topic for us today, let us get into creating the best Avatar and 3D avatar creator online for free. Besides, we shall see the software and unique features available in it.
01What Are the Best Avatar Creator?
Creating an Avatar can be seen to be complicated, but it is not. You need not even use complex software to create avatars. Let us discuss some Best Avatar Creators in the market to date.
❶ Face Your Manga
Face Your Manga is a 3D Avatar creator Online. We have truly outstanding and most generally utilized Avatar creators getting going our list. Face Your Manga allows you to make a graphical cartoon version of yourself, and it offers a ton of customization features like skin tone, structure, and shape.
There are some default formats, yet you can change them if you feel more innovative. The site is simple to use and free, so you have nothing to lose to create a free 3D Avatar.
![]()
❷ Bitmoji
Bitmoji is the most popular and well-known option on this list, and it’s also the best option for having Animoji on Android! It’s the most popular application in the Play Store, with around 100 million downloads.
With Bitmoji, you can undoubtedly make a ton of stickers and emojis with your face, which means you’ll have the option to effectively and completely put yourself out there. It incorporates a face-like, laughing, crying face, and that’s just the beginning. This is a free 3D avatar creator online that you can get from the Play Store.
![]()
❸ BeFuncky
BeFuncky is a 3D Avatar creator online to edit your photo creatively. This is extraordinary for the people who need to make an Avatar taking motivation from an image without the expectation of making it too cartoony.
You can blow up colors, including a few genuinely fascinating impacts, or essentially change the contrast. Regardless, the site creates a free 3D Avatar loaded with choices!
![]()
❹ PickaFace
A genuinely excellent site we can suggest you use is PickaFace, as it is a 3D avatar creator online. It has a creative drawing style, extraordinary for the people after something more careful than most applications and sites offer.
Considering all the things it offers, including a ton of customization choices, we can say, PickaFace creates a free 3D avatar like no other subscription software.
![]()
❺ Doppelme
We have Doppelme among the best 3D Avatar maker online to finalize the list. The site is similar to other choices we’ve discussed, with numerous customization choices.
The figures and cartoons you create can be changed in any way you choose, whether for your symbol or your friends.
![]()
02Top 8 Practices On How To Create An Avatar For Spatial
To begin creating avatars in spatial, you only need to submit a single photo of yourself. Spatial believes that avatars will have a significant impact on the internet.
●Start by creating a Spatial Account for you using Google, Microsoft, or Slack accounts. The best practice in Spatial is to add good light and color to the Avatar.
●After this, you have to create an avatar with the first step with your webcam, make sure the photo is clear and has perfect light on it.
●Later in your profile, you will have an edit menu to edit your Avatar anytime.
Light is an essential feature in avatar creation. That will create a better light than artificial lightning.
●Spatial will begin to generate a 3D avatar of you once it has a good photo of you.
●You may modify the shirt, skin tone, and color. After you’ve used all of your ingenuity, click “Looks Good,” and you’re done.
●Next, you can customize your Avatar. There is the customization of body, shape for men, woman. Users love to make the Avatar look like themselves. You can make a hand body effect while using VR headsets if you are a hand talker. If joined from the web, you will have different movements with keyboards like dancing.
●Make changes to spatial VR avatar anytime and update. You can change the skin tone, color of the shirt, and your name. The realistic effects create a real presence in VR meetings.
❶ Spatial – Collaborate From Anywhere In Ar.
This is the launch film of Spatial, “A short real-time in Spatial,” a better way to build and work together, a way that brought us to sit next to each other face to face.
●Spatial is a collaborative computing environment that combines all the creativity and visualizes it in the room.
●All of your digital devices are seamlessly tied together into an infinite workspace.
●With a click, you can expand the world’s information with all the power.
●Using AR, infinite canvas pixels become tactile, letting you manipulate them like clay.
●You can sketch a drawing on paper and have them in front of you as a visual.
❷ Spatial Passthrough Prototype
●With this passthrough, you will feel a completely immersive experience.
●To avoid this, Facebook has partnered with spatial and Logitech for the K830 keyboard, which will help users prevent mixed sensations and provide a complete VR experience.
●Facebook says this will provide an infinite office experience.
●There are multiple customizable screens and multiple monitor setups.
●Companies have already collaborated with spatial to bring up infinite offices.
❸ Microsoft Build Keynote collaboration with Spatial
Microsoft and Teams have worked with Spatial.
●A Spatial option on the team’s channel allows you to enter a 2D meeting with avatars.
●To turn something into 3D, scan the QR code and put on the VR or AR Hololens glasses.
●Through Hololens, they can access data with Microsoft productivity apps.
●They can also adjust the position of the robot.
●The eye-tracking is good, which enables the avatars to convey user emoticon.
❹ Qualcomm Snapdragon Summit Keynote
The stage where the digital world is changing, where virtually everyone and everything is connected. We are moving into the world of VR, which is the next noble platform.
●We are all going to wear glasses for effective and interactive communication.
●Spatial tools are already used in companies like Purina to bring the teams together.
●Spatial allows all people on Oculus, Hololens, and even AR-capable smartphones to engage in one virtual environment.
●These are used in games like Pokémon.
●There will be a vast development in technology with these features.
❺ Hololens 2 Launch Keynote
●Hololens is very comfortable and fits like a hat.
●And it signs in as we put on the device.
●After recognizing your Hololens, recognize your hands and then the world.
●You can touch the holo, move it and even resize it.
●Hololens collaborated with Spatial with many more features involved in connecting people, playing games, etc.
❻ Spatial In the Wall Street Journal
●With Virtual reality headsets like Hololens and Oculus Quest with virtual reality platforms like Spatial, you can meet up and collaborate with colleagues and friends.
●You can switch to any world you choose using VR Headsets within a second.
●Before this pandemic, VR used in the market was forecasted at about 829 million in 2018.
●If you wear a holographic headset, you can feel like someone is there with you in the room, and it feels natural.
●Connecting through Spatial is very simple. You need to need to sign in through a Spatial account.
❼ Spatial on TED
This is a video of the Co-founder talking about the improvement of technologies and the transformative nature of Holographic Telepresence.
●The technology improvement from wired telephones to phones and now zoom meetings to VR and AR meetings.
●The troubles in ordinary meetings end through these VR technologies.
●TED has collaborated with Spatial to increase its market.
●TED is an online broadcast that focuses on the target audience with scripted logic.
●The seized extend how to use most of the Spatial features.
❼ AR Insider – A Publication about Spatial Computing
●AR insider profiles as the most significant innovation in VR technologies.
●This is the most crucial feature in Spatial Computing producing the best VR experiences.
●This is like a launchpad to update daily insights of Spatial computing.
●They collect data from top sources.
●It is also seen as a business angle because it has fun games in AR and VR and technical.
Part 3 How To Create A Gallery In Spatial For Your Art (Nft And Non-Nft)
Many artists and creators have been working in Spatial to show their talents on social platforms.
Provide the 3D models the stage they deserve.
You can directly drag/drop your files into Spatial directly.
NFT artists and collectors can import directly from the collections via the Metamask integration.
You can use the gorgeous environment in the library or use your 3D model of yours to set a unique customer environment.
The technologies will be helpful to create an Avatar and Digital Twins to humanize the remote work as companies move to the hybrid work methods.
The future of the world will look like a science fiction movie.
The AR and VR promise to revolutionize the workplace.
The digital twins will be the following way to show ourselves to the digital environment in a decade.
VR headsets are getting cost-efficient, and people are starting to use them. It has to be still improved to be more efficient and lighter.
Part 4 How to Build Your Own 3D Avatar Accurately?
Turning into an Avatar or Disney character is now accessible using AI software like Wondershare Wondershare Filmora Video Editor . Among the various trends in social media, creating an Avatar is getting trendy nowadays. Let us discuss the steps to create a 3D Avatar creator online.
For Win 7 or later (64-bit)
For macOS 10.12 or later
Step 1: To start learning to create a 3D avatar, you need to know how to make layers and stack them on each other.
Step 2: Later, you can “Liquify” the layers to form a mold for your Avatar.
Step 3: Before turning it into a cartoon, apply the skin smoothening effects to create a more realistic image.
Step 4: Now, you can apply details like eyes, nose, hairs, dress, and facial lines to your Avatars.
Step 5: You can change the color of any particular feature.
Compared to all other 3D Avatar creators online free, Wondershare Filmora Video Editor is the most user-friendly and efficient software.
● Key Takeaways from This Episode →
● Learned about multiple applications available for creating 3D Avatars
● Looked into the future world through Spatial
● Discussed the steps involved in making a 3D Avatar maker online using Wondershare Filmora Video Editor
Also read:
- 8 Blender 3D Animation Tutorials for Beginners for 2024
- In 2024, 8 Top Motion Graphics Online Tools for Your Inspiration
- In 2024, 5 Photoshop Alternatives to Animate Your Logo
- Updated In 2024, How to Draw Cartoons Step by Step with This Guide
- New Best 10 Anime Websites to Watch Dubbed Anime Free
- In 2024, The Only Guide Youll Ever Need to Learn About GIF Video Downloader
- Updated In 2024, Ways You Can Master to Find 10 Best Free Animated Text Generator
- 5 Foolproof Amazing Anime Text to Speech Tips
- Updated 2024 Approved Best 10 Apps to Enhance Your Instagram Story Slideshow
- Updated Best GIF Croppers How to Crop an Animated GIF for 2024
- Updated In 2024, Learn How to Make Architecture Animation
- Updated 2024 Approved In-Depth Study of Cartoon Painting Starts
- New Great Guide for Beginners on 2D Animation Making
- New Best 8 Tools Tell You How to Make Slideshows for Instagram
- New 2024 Approved Best Canva 10 Animated Templates
- Want to Make a Meme GIF for 2024
- New Tips for Animated Collage Maker for 2024
- 2024 Approved Apps to Animate Still Pictures
- How to Make 3D Cartoon of Yourself
- New Best 10 Animoji Apps You Can Use to Edit Animoji for 2024
- Best 15 2D Animation Software Free That Worth to Try
- New Finding The Best Animated Profile Picture Maker for 2024
- New 2024 Approved 15 Forgotten Cartoon Characters of All Time
- Updated Animate Your Photo Online with These Awesome Tools
- New 2024 Approved How to Stop Animation From Looping in Unity
- In 2024, Easy Steps on How To Create a New Apple ID Account On Apple iPhone 14 Pro
- All About Factory Reset, What Is It and What It Does to Your Vivo S17e? | Dr.fone
- How to Mirror Your Oppo Reno 11 5G Screen to PC with Chromecast | Dr.fone
- In 2024, 3 Ways to Unlock Apple iPhone 12 without Passcode or Face ID | Dr.fone
- In 2024, 3 Ways to Export Contacts from Apple iPhone 15 Plus to Excel CSV & vCard Easily | Dr.fone
- How to Unlock Disabled Apple iPhone 7/iPad Without Computer
- Full Guide to Hard Reset Your Motorola Moto E13 | Dr.fone
- 10 Easy-to-Use FRP Bypass Tools for Unlocking Google Accounts On Xiaomi Redmi Note 12 Pro 4G
- In 2024, Pattern Locks Are Unsafe Secure Your Xiaomi Civi 3 Phone Now with These Tips
- 10 Easy-to-Use FRP Bypass Tools for Unlocking Google Accounts On Tecno Camon 20 Pro 5G
- How to Stop Google Chrome from Tracking Your Location On Tecno Spark 20C? | Dr.fone
- Proven Ways in How To Hide Location on Life360 For Vivo Y100 | Dr.fone
- Samsung Galaxy A05 Screen Unresponsive? Heres How to Fix It | Dr.fone
- In 2024, PassFab iPhone 11 Pro Max Backup Unlocker Top 4 Alternatives | Dr.fone
- In 2024, iSpoofer is not working On Google Pixel Fold? Fixed | Dr.fone
- Apple ID is Greyed Out On iPhone 15 How to Bypass?
- In 2024, Where Is the Best Place to Catch Dratini On Oppo Reno 9A | Dr.fone
- In 2024, 8 Ways to Transfer Photos from Honor X8b to iPhone Easily | Dr.fone
- A Detailed VPNa Fake GPS Location Free Review On Samsung Galaxy F14 5G | Dr.fone
- How to use Pokemon Go Joystick on Realme GT Neo 5 SE? | Dr.fone
- In 2024, Is GSM Flasher ADB Legit? Full Review To Bypass Your Honor 70 Lite 5GFRP Lock
- In 2024, What Legendaries Are In Pokemon Platinum On Samsung Galaxy A14 4G? | Dr.fone
- In 2024, Top 5 Car Locator Apps for Realme GT Neo 5 SE | Dr.fone
- How to Track WhatsApp Messages on Huawei Nova Y71 Without Them Knowing? | Dr.fone
- Title: A Beginners Guide to Tell You What 3D Animation Is
- Author: Elon
- Created at : 2024-05-19 03:04:20
- Updated at : 2024-05-20 03:04:20
- Link: https://animation-videos.techidaily.com/a-beginners-guide-to-tell-you-what-3d-animation-is/
- License: This work is licensed under CC BY-NC-SA 4.0.
