
:max_bytes(150000):strip_icc():format(webp)/GettyImages-104288650-cd3f369f8ead449f94d1a1ce6f55c9de.jpg)
New 2024 Approved 5 Photoshop Alternatives to Animate Logo
5 Photoshop Alternatives to Animate Logo
5 Photoshop Alternatives to Animate Logo
An easy yet powerful editor
Numerous effects to choose from
Detailed tutorials provided by the official channel
Photoshop offers everything that you can use to create a high-quality animated logo and use it to maximize your brand visibility.
![]()
How can you animate your logo in Photoshop? For people who are not familiar with the photo editing tool, it’s always a bit challenging to get started with logo animation.
In this article
01 [Why Do You Need a Gif Logo](#Part 1)
02 [A Step-by-step Guide to Logo Animation in Photoshop](#Part 2)
03 [Most Effective Tactics to Animate Logo with These 5 Photoshop Alternatives](#Part 3)
Part 1 Why Do You Need a Gif Logo
Now, before we start with the guide to animate your logo in Photoshop, let’s first understand how an animation logo can help your brand. The truth is an animated logo has the desired uniqueness factor that’ll help your brand establish a strong digital presence. An animated logo will also set you apart in the crowd, considering other companies will be using simple one-dimensional logos.
Not to mention, you can also use an animated logo in your promotional videos and apply visual effects to enhance the overall production quality of the videos. In a nutshell, there are endless possibilities of using animated logos - all you have to do is unleash your creativity and animate a logo without any hassle.
Part 2 A Step-by-step Guide to Logo Animation in Photoshop
So, now that you know the top reasons why it’s important to use an animated logo, let’s start with the step-by-step guide to animate your logo in Photoshop. It’s worth understanding that animating a logo in Photoshop is not a challenging process. However, it may take a few minutes for you to get the job done because the process is quite time-consuming.
Step 1Open Adobe Photoshop
Open Adobe Photoshop on your computer. Click “File > Scripts” and then tap “Load Files into Stack”.
![]()
Step 2Browse
On the next screen, click “Browse” and load all the JPEG files that you want to use to animate the logo.
![]()
Step 3Timeline
Wait for pictures to load into Photoshop’s timeline. Then, click “Windows” and select “Timeline” from the drop-down menu.
![]()
Step 4Make Frames from Layers
Select all the layers and tap the little “Animation” icon. Click “Make Frames from Layers” to proceed further.
![]()
Step 5Adjust the time span
Select all the frames to adjust the time span for the animation.
Step 6Select looping options
Click on “Select Looping Options” and specify the number of times you want the animation to play itself in the loop.
![]()
Step 7Final export
Your GIF animation is ready for the final export. Simply click “File>Save for Web” and then choose the final output format to export the logo in GIF format.
Part 3 Most Effective Tactics to Animate Logo with These 4 Photoshop Alternatives
Even though Photoshop is a great software to create animated logos, it’s no secret that its complex UI might seem overwhelming for some users. If that’s the case, you can look for Photoshop alternatives and use them to animate your logo online. Here we have shared five of the best alternatives to Photoshop that offer all the essential tools to animate a logo with fewer complications. All these tools have an intuitive interface and allow users to create animated logos within a few minutes.
These Photoshop alternatives include:
01 Figma
![]()
Figma is undoubtedly one of the best editing tools that you can use to animate your logos for free. Even though the tool isn’t as feature-loaded as Photoshop, it’s still one of the best Photoshop alternatives you can use to create animated logos. The tool offers a user-friendly interface where everything you need is right on your screen. Since there aren’t too many hidden menus, you’ll find it quite easier to animate your logos in Figma. There are pre-installed animation templates and transitions that you can customize to meet your business requirements and accelerate the entire designing process.
Key Features:
● Intuitive User Interface
● Support for Team Collaboration
● Can be used for UX/UI designing too
Pros
Dedicated free version for one-time users
Perfect for Novice Designers
Can be used within a professional organization for advanced editing
Cons
You will not get all the features with the free model
If you are looking to design animated logos with keyframes, Figma may not be the right choice for the job
02 Canva
![]()
Canva is another popular online editing tool that’s designed to help users fulfill different editing needs right on their browsers. Whether you want to create a banner for an event or an animated logo for your website, Canva will help you get the job done in every situation.
Being a web-based tool, Canva supports cross-platform compatibility, which means you can access it on any device you want. There are even dedicated iOS and Android apps for Canva that’ll allow you to edit logos right on your smartphone. Basically, if you want to animate your logos online free, Canva is the most suitable solution. You can also use Canva if you are looking for a long-term logo maker.
Key Features:
●Cross-Platform Compatibility
●Thousands of built-in templates with customization support
●The media library gets updated regularly
Pros
All the basic features are available in the free version
One-account to access Canva on any device you want
Ideal for one-time use as well
Cons
When it comes to customization, Canva has limited features
You won’t find advanced editing options like Photoshop
03 Luminar
![]()
Luminar is a paid editing tool that comes with built-in AI support for high-quality editing. Basically, its AI feature can automatically analyze the pictures and suggest you with the best animation templates accordingly. While many users are skeptical about the AI-support, stay assured that it’ll prove to be helpful in 80% of the situations. And, even if you don’t like the suggested templates, you can always go back to the media library and pick a template by yourself.
With AI coming into the picture, Luminar instantly speeds up the entire editing process. You won’t have to spend several hours browsing through the template options. Simply select one of the suggested templates and you’ll be able to initiate the editing process instantly.
Key Features:
●An extensive built-in media library
●Dedicated AI support for precise editing
●Edit your RAW images and add logos easily
Pros
Luminar is an ideal choice for long-time users
Available for both Windows and macOS
Apply templates to multiple images with one click
Cons
With $99 price tag, Luminar is certainly expensive
In the beginning, you may find the user interface a bit overwhelming
04 Fotor
![]()
Fotor is also an online editing tool that can be used to animate your logos online for free. Being a simple online editor, you can’t expect Fotor to offer advanced editing features like some of the other tools we have mentioned in the list.
However, stay assured that when it comes to animating logos, Fotor has everything you’ll need to get the job done. The web-based tool offers 100,000 templates that are designed for different industries. You can choose any of these templates, customize them, and create bespoke animated logos for your brand.
Key Features:
● Different templates to choose from
● Easy drag-&-drop compatibility
● Ideal for first-time as well as professional users
Pros
Available for free
Perfect for social media managers
Customizable templates
Cons
Lacks advanced editing support
The premium version doesn’t have too many useful features
Key Takeaways from This Episode
● Animate your logo in Photoshop and make it visually appealing with 5-easy steps
● If you want to integrate your animated logo into a video, you can use Wondershare Filmora Pro to get the job done within a few minutes
● If you are a beginner, you can also use web-based editing tools to animate your logo online for free.
How to Make a Photoshop Collage in Simple Steps
How to Make a Photoshop Collage in EASY Steps
An easy yet powerful editor
Numerous effects to choose from
Detailed tutorials provided by the official channel
Photographs are a way of capturing and stopping the time in a small frame. They hold millions of memories that we want to cherish forever in our lives. And sometimes, we want to make a cluster of all the happy memories by making a collage of the photos.

Also, what can be a better gift to someone than presenting them a collection of all the cherishable memories you have with them in photographs? And that can be made possible through various photoshop collage ideas.
In this article
01 [Does Photoshop Have Collage Templates?](#Part 1)
02 [How to Make Your Own Collage with Photoshop Templates](#Part 2)
03 [How to Custom a Photoshop Collage in 9 Simple Steps](#Part 3)
Part 1 Does Photoshop Have Collage Templates?
There is numerous photo collage template in photoshop, and you even access and use some of them for free. Additionally, you can also create your template in Photoshop and use them in making your collage. If you want to make your template in Photoshop, here is how.
Step 1: Make a new layer and fill it up with your choice of colour.
Step 2: Resize and duplicate the layer to create the pattern you want for your collage.
Step 3: Integrate a “Clipping Mask.”
Step 4: For every image, create new clipping masks.
Step 5: Your collage template is ready so, export it to use!
Part 2 How to Make Your Own Collage with Photoshop Templates
Now that we know that you can access numerous incredible photoshop templates for free, you might want to create a collage for yourself in Photoshop. So, this is how you can use the photoshop collage template to make your collage with Photoshop Templates.
First, you need to select the images you want to create a collage with. Then you will have to import them. You can either “select and import” them one at a time or even batch import all of them together. Then, you can readily choose the template you want to use, or you can also create one for yourself.
Then you can resize or edit the images in the way you want and place them in the desired order. After you are done arranging and creating the collage perfectly, save the file in JPEG format and then export it to access it whenever you want!
Part 3 How to Custom a Photoshop Collage in 9 Simple Steps
If you do not know the answer to the question: how to make a collage in photoshop, there is absolutely nothing to worry about. Because the answer to this question is simple and includes not more than nine steps.
So now, we will be discussing the nine simple steps that will help you make a custom photo collage in photoshop. Here is the list of steps that will help you in doing so.
● Step 1: Selecting your favorite photos
The first step to making a collage in photoshop is to select all the photos you would like your collage to have. Now, it will be best for you to choose your photos wisely. We understand that each photograph is equally sweet and cherishable. But, when you select the images for your collage in a thoughtful manner, the collage turns out much better than expected.
You can use different collage ideas for photoshop, such as following a particular storyline, where you collage the photos so that it recreates the memory or the moments in sequence. Another way to select your photos is by sticking to a particular theme, and it can be vintage or on one specific color or the like. It will help your collage turn out in the best and the most thoughtful way.
● Step 2: Opening the photos you have selected, in collage maker photoshop
Now that you have selected which images you would want your collage to have, the next step will require you to open those images in the collage maker Photoshop. For this, you will have to select the option “File”. There, you will find the option “Open”. Then you will open the images you have chosen in Photoshop.
Also, you can simply press the “ctrl” and the “O” keys on your keyboard and it will automatically help you open the images you have selected for the photo collage on photoshop.

Another way to open the pages you have selected for your collage is through the “Drag and Drop” function. It is more effortless to choose the images and open them in Photoshop. After you have opened the photos in Photoshop, it will open in a different tab and look like in the following picture.

● Step 3: Make a new file for your collage on photoshop
The third step requires you to make a new file for your photo collage in photoshop. For this, you need to select or click on the “File” option on Photoshop. Then, click on the “New” option. It will help you make a new file for your collage. You can also select the “ctrl” and “N” together.
As you click on the “New” option, you will be given options to choose from. Choose the one that matches your preference.
When you are working on photoshop to make a collage, the images will need a collage background because it is on this background that the photos will assemble. If you have made a collage before on photoshop, you can use the old collage photoshop template. Otherwise, you need to create a new document for the collage.

● Step 4: Add the selected images one-by-one
Adding the images can be done in many ways. One way to do so is by opening the photo and clicking on it. Another way of doing so is to use the “Marquee Tool” of Photoshop.

Another way of doing so is by pressing the “ctrl” and “A” keys on your keyboard together. You will find the matching ants border around the image when you do this.

Then, go to the “Edit” option and choose “Copy” there. Or, you can also select the “ctrl” and “C” keys on your keywords together. Then go to your new document and select the option of “Paste” from the “Edit” option, or you can also press the “ctrl” and “V” keys together to do so.
The photo will be added in its own layer on the new document.

● Step 5: Arrange the images
Now, arrange the images in the way you want. If you have chosen to tell a story through your collage creator in photoshop, then arrange the photos accordingly. You can do so with the help of the “Move” tool or simply tap V. You can also use the “Free Transform” tool to edit and transform the images in the way you want. You can resize, rotate and edit the photos in many other ways through the “Free Transform” tool.
Step 6: Integrate image space
To create a collage in photoshop in a better and more spaced-out manner, you need to add some spacing between the images you have in your collage. There are two ways to add spacing between the pictures; one way is by creating a thin, white border around each image.
And the second method is by accessing and using the “Layers” feature in Photoshop.

● Step 7: Merge all the Layers
This step is necessary when you have used the “Layer” feature to create the spacing among the images present in your collage. You will be able to do so from the “Layer” option. So, go to the “Layer” option and select the “Merge Invisible” option present there.

● Step 8: cropping the final picture
Before the final step, it is important that you crop the final picture. And to do so, you can opt for the “Crop tool”. You will be able to access it easily, or you can also simply tap C to use the “Crop tool.”

● Step 9: Save the final collage and export
After you have done all the necessary changes and are satisfied with the final collage, then, save the file. To do so, go to the “File” option and select the “Save as” option.

Then choose the file type to be “JPEG”. Type the name you would want the collage to be saved as. This completes the process of saving the file. Then choose the image quality you would want the collage to be exported in.

● Key Takeaways from This Episode →
● In this discussion, we have covered the following topics.
● We discussed whether Photoshop has collage templates.
● Then we proceeded with discussing how we can create a collage in photoshop using the templates in it.
● Lastly, we wrapped up our discussion with the nine-step tutorial about customizing a collage in Photoshop.
Photographs are a way of capturing and stopping the time in a small frame. They hold millions of memories that we want to cherish forever in our lives. And sometimes, we want to make a cluster of all the happy memories by making a collage of the photos.
Also, what can be a better gift to someone than presenting them a collection of all the cherishable memories you have with them in photographs? And that can be made possible through various photoshop collage ideas.
In this article
01 [Does Photoshop Have Collage Templates?](#Part 1)
02 [How to Make Your Own Collage with Photoshop Templates](#Part 2)
03 [How to Custom a Photoshop Collage in 9 Simple Steps](#Part 3)
Part 1 Does Photoshop Have Collage Templates?
There is numerous photo collage template in photoshop, and you even access and use some of them for free. Additionally, you can also create your template in Photoshop and use them in making your collage. If you want to make your template in Photoshop, here is how.
Step 1: Make a new layer and fill it up with your choice of colour.
Step 2: Resize and duplicate the layer to create the pattern you want for your collage.
Step 3: Integrate a “Clipping Mask.”
Step 4: For every image, create new clipping masks.
Step 5: Your collage template is ready so, export it to use!
Part 2 How to Make Your Own Collage with Photoshop Templates
Now that we know that you can access numerous incredible photoshop templates for free, you might want to create a collage for yourself in Photoshop. So, this is how you can use the photoshop collage template to make your collage with Photoshop Templates.
First, you need to select the images you want to create a collage with. Then you will have to import them. You can either “select and import” them one at a time or even batch import all of them together. Then, you can readily choose the template you want to use, or you can also create one for yourself.
Then you can resize or edit the images in the way you want and place them in the desired order. After you are done arranging and creating the collage perfectly, save the file in JPEG format and then export it to access it whenever you want!
Part 3 How to Custom a Photoshop Collage in 9 Simple Steps
If you do not know the answer to the question: how to make a collage in photoshop, there is absolutely nothing to worry about. Because the answer to this question is simple and includes not more than nine steps.
So now, we will be discussing the nine simple steps that will help you make a custom photo collage in photoshop. Here is the list of steps that will help you in doing so.
● Step 1: Selecting your favorite photos
The first step to making a collage in photoshop is to select all the photos you would like your collage to have. Now, it will be best for you to choose your photos wisely. We understand that each photograph is equally sweet and cherishable. But, when you select the images for your collage in a thoughtful manner, the collage turns out much better than expected.
You can use different collage ideas for photoshop, such as following a particular storyline, where you collage the photos so that it recreates the memory or the moments in sequence. Another way to select your photos is by sticking to a particular theme, and it can be vintage or on one specific color or the like. It will help your collage turn out in the best and the most thoughtful way.
● Step 2: Opening the photos you have selected, in collage maker photoshop
Now that you have selected which images you would want your collage to have, the next step will require you to open those images in the collage maker Photoshop. For this, you will have to select the option “File”. There, you will find the option “Open”. Then you will open the images you have chosen in Photoshop.
Also, you can simply press the “ctrl” and the “O” keys on your keyboard and it will automatically help you open the images you have selected for the photo collage on photoshop.
Another way to open the pages you have selected for your collage is through the “Drag and Drop” function. It is more effortless to choose the images and open them in Photoshop. After you have opened the photos in Photoshop, it will open in a different tab and look like in the following picture.
● Step 3: Make a new file for your collage on photoshop
The third step requires you to make a new file for your photo collage in photoshop. For this, you need to select or click on the “File” option on Photoshop. Then, click on the “New” option. It will help you make a new file for your collage. You can also select the “ctrl” and “N” together.
As you click on the “New” option, you will be given options to choose from. Choose the one that matches your preference.
When you are working on photoshop to make a collage, the images will need a collage background because it is on this background that the photos will assemble. If you have made a collage before on photoshop, you can use the old collage photoshop template. Otherwise, you need to create a new document for the collage.
● Step 4: Add the selected images one-by-one
Adding the images can be done in many ways. One way to do so is by opening the photo and clicking on it. Another way of doing so is to use the “Marquee Tool” of Photoshop.
Another way of doing so is by pressing the “ctrl” and “A” keys on your keyboard together. You will find the matching ants border around the image when you do this.
Then, go to the “Edit” option and choose “Copy” there. Or, you can also select the “ctrl” and “C” keys on your keywords together. Then go to your new document and select the option of “Paste” from the “Edit” option, or you can also press the “ctrl” and “V” keys together to do so.
The photo will be added in its own layer on the new document.
● Step 5: Arrange the images
Now, arrange the images in the way you want. If you have chosen to tell a story through your collage creator in photoshop, then arrange the photos accordingly. You can do so with the help of the “Move” tool or simply tap V. You can also use the “Free Transform” tool to edit and transform the images in the way you want. You can resize, rotate and edit the photos in many other ways through the “Free Transform” tool.
Step 6: Integrate image space
To create a collage in photoshop in a better and more spaced-out manner, you need to add some spacing between the images you have in your collage. There are two ways to add spacing between the pictures; one way is by creating a thin, white border around each image.
And the second method is by accessing and using the “Layers” feature in Photoshop.
● Step 7: Merge all the Layers
This step is necessary when you have used the “Layer” feature to create the spacing among the images present in your collage. You will be able to do so from the “Layer” option. So, go to the “Layer” option and select the “Merge Invisible” option present there.
● Step 8: cropping the final picture
Before the final step, it is important that you crop the final picture. And to do so, you can opt for the “Crop tool”. You will be able to access it easily, or you can also simply tap C to use the “Crop tool.”
● Step 9: Save the final collage and export
After you have done all the necessary changes and are satisfied with the final collage, then, save the file. To do so, go to the “File” option and select the “Save as” option.
Then choose the file type to be “JPEG”. Type the name you would want the collage to be saved as. This completes the process of saving the file. Then choose the image quality you would want the collage to be exported in.
● Key Takeaways from This Episode →
● In this discussion, we have covered the following topics.
● We discussed whether Photoshop has collage templates.
● Then we proceeded with discussing how we can create a collage in photoshop using the templates in it.
● Lastly, we wrapped up our discussion with the nine-step tutorial about customizing a collage in Photoshop.
The Most Efficient Techniques for You to Make 3D Animation Character
The Most Efficient Techniques for You to Make 3D Animation Character
An easy yet powerful editor
Numerous effects to choose from
Detailed tutorials provided by the official channel
Character development can be referred to as the stages from making the concept to animation. Over the years, as the process becomes more accessible, the detail that the character artist can show on their characters becomes higher.
The person who designs the animation 3D character is usually the first person on a production to visualize the characters from the description given to them in a story.
In this article
01 [What is 3D Character Animation?](#Part 1)
02 [How to Create Your Animated Character in 3D](#Part 2)
03 [How to Create Attractive 3D Character Animation Video?](#Part 3)
Part 1 What is 3D Character Animation?
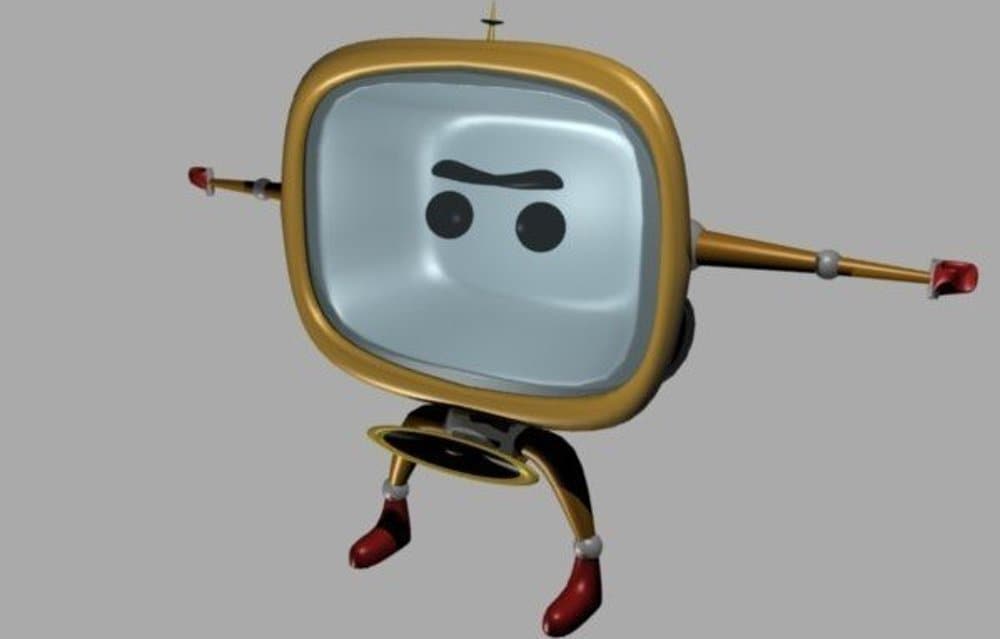
3D character animation creates three-dimensional images in a moving state. To develop character animation, you must involve your thoughts, emotions, and personalities.
A 3D character animation can function in a product video or external videos to explain a product or concept. You can also use animation modeling AutoDesk to animate your character with the addition of keyframes or by applying motion capture to your model. There are lots of websites or places to find 3D character Model and such sites include but are not limited to:
01TurboSquid
TurboSquid is a great website to look for easy 3D character animation models and offers you the ability to filter for television and movie characters or game characters and helps narrow down your search.
Quality: beginner to professional
Price: ranging from free to $100 for model collection
02CadNav
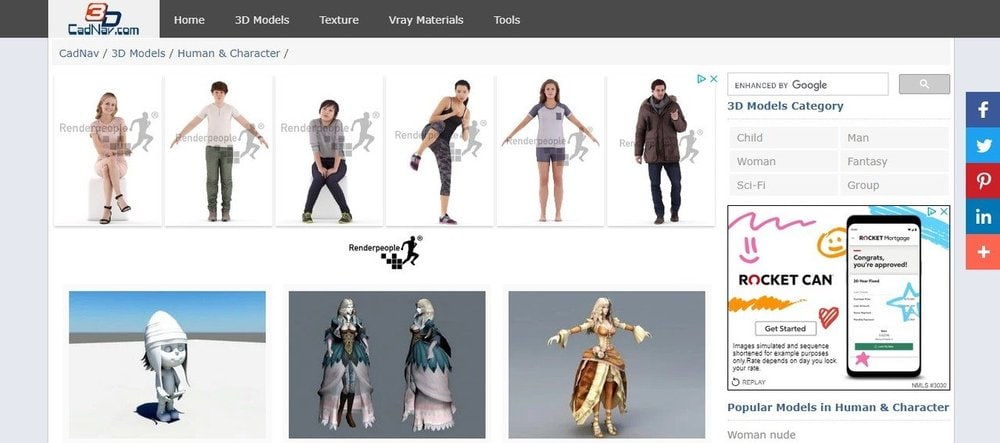
CadNav is a well-known site with lots of excellent models. But unfortunately, the side does not have proper search functionality, and the models are in a long list that you can filter by large crowd categories like the main character.
Quality: beginner to mid-range
Price: free
03CGTrader

CGTrader is a modeling site with numerous lists of 3D max-character animation models. The selection from this site is pretty expensive and of good quality.
Quality: beginner to professional
Price: ranging from free to $100 and $200 for model collection
044. DeviantArt
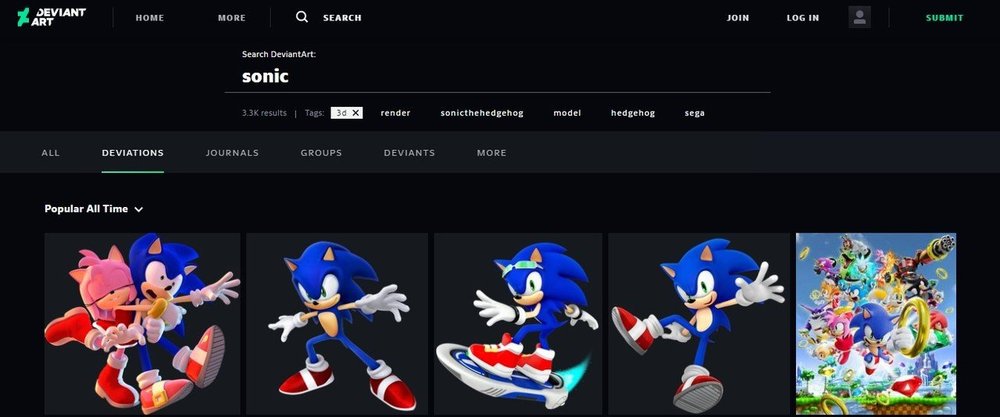
DeviantArt is a unique item mainly for artists to post the artwork in various mediums. The quality and prices of the models vary significantly since the platform is for artists to display their work and get public interest.
Quality: Varies
Price: Varies
05Steam
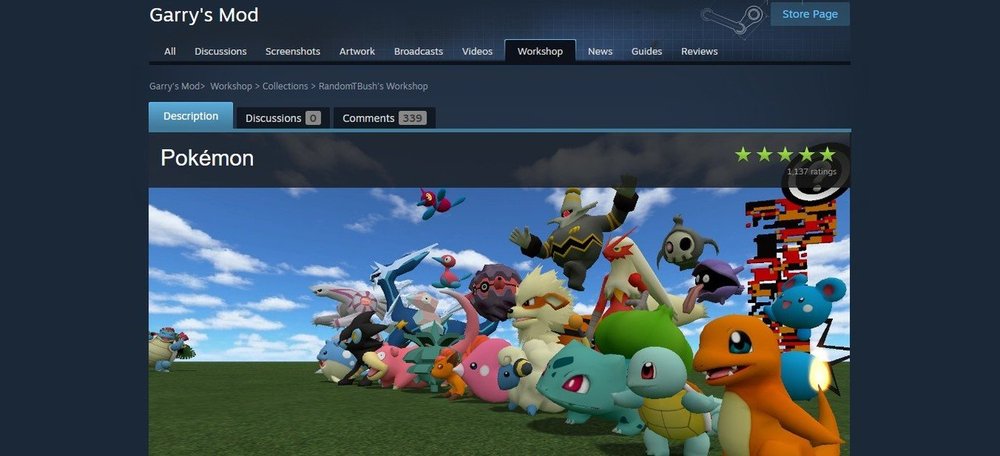
Steam has a good range of 3Ds max 3D animation character animation modeling Autodesk that is very useful. Although they tend not to much the extensive selection of some of the other sites listed, they have an animation and modeling section, which is helpful if you are looking for relevant software.
Quality: fairly high
Price: free
Part 2 How to Create Your Animated Character in 3D
3D is one of the ways to grab your visitor’s attention and convert them to lead, and 3D character designs add life to the characters.
Below are steps on how to create your 3D animation character:
01Step1: Make a Story
Brainstorm and work on the storyboard. Make sure you don’t forget to translate your ideas into visuals by creating a perfect story after brainstorming the idea for the animated topic.
02Step 2: Draw your Character
It’s time for you to design the characters, known as modeling. In these steps, you can draw and model the characters differently using the excellent animation software mentioned in this article. During designing, make sure you don’t rush the design texturing. Texture can be according to art’s concept, which you can assign to the model.
03Step 3: Process your Models
Once over with texturing, it is time for you to process with rigging and skinning. All the 3D rigged characters for animation can move from animators, while 3D models combine with a rigged skeleton in skinning. This step is because it controls the rig, which can easily change the 3D model. Animates the model, which is one of the most critical and time-consuming tasks which involves you adding life to your 3D character. More so, this affects you using a 3D application to ensure that the objects or models adjust according to your need.
04Step 4: Export and Share your 3D Character
Rendering the final output is the last in the 3D animation character. Once everything is complete, all information is translated into a file to combine all shots in a single frame. Then, the animated characters are exported and shared.
Part 3 How to Create Attractive 3D Character Animation Video?
To create a perfect 3D character animation video has been a very challenging aspect of 3D animation based on the highly competitive industry Filmora has proven to be one of the best tools in creating an easy 3D character animation video following the steps below:
01Step 1: Prepare a Script and Practice Storyboarding
Write a script of the animation video you want to make. The script gives you an insight into the base story, how it looks, who is talking to who, the dialogue, and at what time of the day it took place, most importantly, what your story characters are saying to one another.
Practice storyboarding, a sequence of images or movie shoes that helps you understand how exactly the story will feel on will look the camera angles and a flowchart of how everything looks. A storyboard can be of various types. It may be an outline, colorful, black and white, or something with complete details.
02Step 2: Add Voice and Start Animating
Creating an animated video without a voice might not be interesting, so always remember to add a voice-over to your animated movie.
You can start animating your video. The story determines the length of the video, and the process includes importing images and adding them to the timeline.
03Step 3: Prepare Final Mix and Export
This step requires you to assemble the voice records and prepare the final mix to add them to your animated video.
After the final editing, review it and export it to produce a 3D max character animation that you can then share on a social media platform for viewers.
Key Takeaways from This Episode
● Understanding what 3D Animation Character is
● Knowing How to Create Easy 3D Character Animation
● Learning How to Create Attractive 3D Rigged Character Animation
Character development can be referred to as the stages from making the concept to animation. Over the years, as the process becomes more accessible, the detail that the character artist can show on their characters becomes higher.
The person who designs the animation 3D character is usually the first person on a production to visualize the characters from the description given to them in a story.
In this article
01 [What is 3D Character Animation?](#Part 1)
02 [How to Create Your Animated Character in 3D](#Part 2)
03 [How to Create Attractive 3D Character Animation Video?](#Part 3)
Part 1 What is 3D Character Animation?
3D character animation creates three-dimensional images in a moving state. To develop character animation, you must involve your thoughts, emotions, and personalities.
A 3D character animation can function in a product video or external videos to explain a product or concept. You can also use animation modeling AutoDesk to animate your character with the addition of keyframes or by applying motion capture to your model. There are lots of websites or places to find 3D character Model and such sites include but are not limited to:
01TurboSquid
TurboSquid is a great website to look for easy 3D character animation models and offers you the ability to filter for television and movie characters or game characters and helps narrow down your search.
Quality: beginner to professional
Price: ranging from free to $100 for model collection
02CadNav
CadNav is a well-known site with lots of excellent models. But unfortunately, the side does not have proper search functionality, and the models are in a long list that you can filter by large crowd categories like the main character.
Quality: beginner to mid-range
Price: free
03CGTrader
CGTrader is a modeling site with numerous lists of 3D max-character animation models. The selection from this site is pretty expensive and of good quality.
Quality: beginner to professional
Price: ranging from free to $100 and $200 for model collection
044. DeviantArt
DeviantArt is a unique item mainly for artists to post the artwork in various mediums. The quality and prices of the models vary significantly since the platform is for artists to display their work and get public interest.
Quality: Varies
Price: Varies
05Steam
Steam has a good range of 3Ds max 3D animation character animation modeling Autodesk that is very useful. Although they tend not to much the extensive selection of some of the other sites listed, they have an animation and modeling section, which is helpful if you are looking for relevant software.
Quality: fairly high
Price: free
Part 2 How to Create Your Animated Character in 3D
3D is one of the ways to grab your visitor’s attention and convert them to lead, and 3D character designs add life to the characters.
Below are steps on how to create your 3D animation character:
01Step1: Make a Story
Brainstorm and work on the storyboard. Make sure you don’t forget to translate your ideas into visuals by creating a perfect story after brainstorming the idea for the animated topic.
02Step 2: Draw your Character
It’s time for you to design the characters, known as modeling. In these steps, you can draw and model the characters differently using the excellent animation software mentioned in this article. During designing, make sure you don’t rush the design texturing. Texture can be according to art’s concept, which you can assign to the model.
03Step 3: Process your Models
Once over with texturing, it is time for you to process with rigging and skinning. All the 3D rigged characters for animation can move from animators, while 3D models combine with a rigged skeleton in skinning. This step is because it controls the rig, which can easily change the 3D model. Animates the model, which is one of the most critical and time-consuming tasks which involves you adding life to your 3D character. More so, this affects you using a 3D application to ensure that the objects or models adjust according to your need.
04Step 4: Export and Share your 3D Character
Rendering the final output is the last in the 3D animation character. Once everything is complete, all information is translated into a file to combine all shots in a single frame. Then, the animated characters are exported and shared.
Part 3 How to Create Attractive 3D Character Animation Video?
To create a perfect 3D character animation video has been a very challenging aspect of 3D animation based on the highly competitive industry Filmora has proven to be one of the best tools in creating an easy 3D character animation video following the steps below:
01Step 1: Prepare a Script and Practice Storyboarding
Write a script of the animation video you want to make. The script gives you an insight into the base story, how it looks, who is talking to who, the dialogue, and at what time of the day it took place, most importantly, what your story characters are saying to one another.
Practice storyboarding, a sequence of images or movie shoes that helps you understand how exactly the story will feel on will look the camera angles and a flowchart of how everything looks. A storyboard can be of various types. It may be an outline, colorful, black and white, or something with complete details.
02Step 2: Add Voice and Start Animating
Creating an animated video without a voice might not be interesting, so always remember to add a voice-over to your animated movie.
You can start animating your video. The story determines the length of the video, and the process includes importing images and adding them to the timeline.
03Step 3: Prepare Final Mix and Export
This step requires you to assemble the voice records and prepare the final mix to add them to your animated video.
After the final editing, review it and export it to produce a 3D max character animation that you can then share on a social media platform for viewers.
Key Takeaways from This Episode
● Understanding what 3D Animation Character is
● Knowing How to Create Easy 3D Character Animation
● Learning How to Create Attractive 3D Rigged Character Animation
Before You Learn 3D Animation: Some Things You Should Know
Before You Learn 3D Animation: Some Things You Should Know
An easy yet powerful editor
Numerous effects to choose from
Detailed tutorials provided by the official channel
Before you delve into the profession of creating 3d cartoon filters, you need to understand or decide if creating animated characters is something you would like to do. It’s not going to be smooth as you will get frustrated at some point, you will get confused, and it will be challenging, but in the end, it is rewarding because it is an expression of your mind coming to life. You are the one to breathe life into your characters who represent your imaginations. You will also have to infuse a great deal of your creativity to create beautiful and exciting characters for others to enjoy. Meanwhile, let’s first understand what 3d animations mean.
Becoming a 3d animator is not a feat you can achieve in a short time. It is not days, weeks, months, or even years. Like any other profession, a professional 3d animator must have put in a great deal of work, mixed with a lot of passion and love for what he is doing. To become successful as a 3d animator, you must love what you are doing or be ready to put in the work.
This article will expose what you should learn to create beautiful 3d animation cartoons, including what to expect as a 3d animator.
In this article
01 [What are 3d animation and the process of 3d animation?](#Part 1)
02 [Differences between 2d animation and 3d animation](#Part 2)
03 [A roaster of 8 best 3d animation software.](#Part 3)
04 [Top 3 3d animation making mistakes to avoid](#Part 4)
Part 1 What Is 3D Animation And The Process of 3D Animation?
animation is a term that describes the art of creating 3-dimensional images and placing them in a digital environment. It is a process that uses motion to bring objects, characters, etc., to life.
It is also known as computer-generated imagery, and it is currently the most common animation type for feature films.
Various software and programs are designed specifically for 3d animations and allow the animators to bring the objects to life.
The process of 3d animation happens in three(3) stages;
● Modeling
● Layout and animation
● Rendering
Modeling in 3d animation involves generating the objects or characters either by using a modeling tool or using a real thing. The real object is scanned directly into the computer, where other processes follow. You have total control over your character and how you want them to appear by modeling. You decide the weight, specifications, feel, etc. However, scanning objects save a lot of time. You must add texture before modeling your character or reviewing it before moving to the following layout and animation.
Layout and animation stage: A layout is determined when the generated objects move to this stage. It involves creating a set/scene where the objects can position. Layout first happens before animation does. After adding the objects and characters, they get animated using animation variables. After this, you use motion capture or keyframing to give life to the models in the scenes.
Rendering: Rendering is using software or programs. It is not something to do using just your computer. These tools can generate the scenes into the finished image according to the client’s requirements or set goals.
Creating cartoon background images or any other form of animations is a process that requires a lot of planning and work, which sums up a lot of time. To learn 3d animation, you must be ready to give in ample time as it is a profession that requires some time to handle.
The process listed above also shows the creativity requirement required to succeed in the 3d animation industry. To think that you must create the scenes, which is the layout stage, means you have to be creative in your imagination. If you then decide to model your character from scratch using modeling tools. That also requires another job of thinking and extracting a lot of your creative juices.
Part 2 What is the difference between 2d animation and 3d animation?
Anyone can decide to learn animation with no plan in mind or understanding of what the profession involves. animation is different from 2d animation, and if you want to learn animation, you need to understand the distinction between these two.
animation can have a lot of creative possibilities, whereas 3d animation has a lot of natural abilities. The visual style of both types of animation is explicitly different.
3d animation is a more intensive technical process than the various stages mentioned earlier. It would most likely involve different specialists to handle them to get a more professional output. However, 2d animation consists of drawing the characters frame by frame.
animated cartoons are in The Simpsons, Pinocchio, the Lion king, etc.

animations are like the ones Dreamworks, Pixar, produce. They include the avengers, the bad guys, etc.


Part 3 A Roaster Of 8 Best 3D Animation Software

Several 3D animation software exists in the market, both free and paid. If you are a animation creator or love animation for fun, you can use the free software to make your videos, cartoon photos, 3d cartoon faces, etc.
With many animation software available in the market, you can only fully trust a few.
Here’s a roaster of 8 best 3D animation software you could use to create the cartoon monsters you’ve always been curious about;
● Filmora
● Blender
● Maya
● Wings 3d
● Adobe Animate
● Cinema 4d
● K-3D
● Milcamo
Filmora Video animation tool: This is a highly recommended 3D animation tool with many features and pros. It has a wide range of keyframes, about six of which make your cartoon background images smooth and natural.
| Software | Features | OS | Pro |
|---|---|---|---|
| Wondershare Filmora Video Editor | It has an auto-color correction It has smooth keyframes | Windows, Mac | You can apply light flare effects You can apply an audio mixer |
| Blender | It has textured brushes and masking for 3d painting. It has add-ons and customised tools with high python scripting. | Windows, Linux, Mac computers | It has Virtual reality rendering, Strong camera restoration. It had both manual and automatic tracking. |
| Maya | Free trial of 30 days. Can create complex technical effects | Windows, Max | Good Control and perfect accuracy. Can collect motion capture data. |
| Wings 3d | Auto UV mapping system It has support for light and material effects. | Windows, Linux, and Mac OS | Advanced 3d and 2d modeling tools. It is free to use |
| Adobe animate | Virtual camera functionality gives a realistic view. Adoptive animation effects, zooming, panning etc. | Windows, Mac | Effective audio syncing technology. Customizable font, styling etc. |
| Cinema 4d | Concepts develop without time modeling Large library of preset scenes. | Windows, Mac | Customised with a huge asset range It is a faster tool than Maya Dissect complete scene and is faster than Maya. |
| K-3D | It has property adjustment capabilities with handy strong features. I5 is made up of basic tools for animation, curves, patches. | Mac OS X, Linux, FreeBSD, windows platforms | It is very flexible for either complex or basic workflows. It has a wide selection of plugins. |
| Mixamo | Streamlined user experience It has a faster search function that is accurate | Windows, Mac | It has fast character and animation browsing. Download multiple animations at a go |
For Win 7 or later (64-bit)
For macOS 10.12 or later
Part 4 Top Three (3) 3d Animation Making Mistakes To Avoid

As we initially mentioned, 3d animation requires an intensive technical process. It is a skill that you need to hone over the years by paying attention to detail, being highly creative, and daring to succeed.
Here are 3 mistakes you must avoid during the animation process;
● Forgetting the ‘why’ factor
● Over-animating a scene
● Not giving your viewers time to take it in
Forgetting the why: In a animation cartoon, every move, walking step, and smile is essential. Every character represented in your cartoon background is there for a specific reason.
You would be making a mistake that will affect the result if you lose focus on this reason. Your viewers won’t find your cartoon believable if the moves and acting don’t add up.
Your characters don’t just move because they want to move. Something must have spurred the motion or reaction. It could be for what happened to them, what they heard, or saw another character did in the scene. Do not neglect the why of the act.
While animating, focus on why and keep revisiting until all your characters and objects are knitted closely together.
Over-animating a scene: This is another mistake animators should avoid. If you animate your characters, everything may be a mess if you animate the background and foreground. Simplicity is how to get this thing, keep it simple and focused.
Do not have much going on in each scene but only where you need the attention of your viewers. Animators that do this end up confusing their viewers with no direction.
You can use camera effects such as depth of field to make your audience focus on the point you are trying to make in the particular scene.
Not giving your viewers time to take it in: This is another 3d animation making a mistake you should be careful of. Not giving your viewers time to process the happenings on the scene before the next.
This can be avoided by timing and measuring cuts such that any animation at the start of a new scene is timed to enable the viewers to take it in. You can ask for third-party criticism on your work to find out how your animation is received and see pointers to mistakes such as this. The third party could be your colleague or friend.
Note: You can easily avoid any error or mistake or modify your 3D animation with the help of the Wondershare Filmora video editor. That will provide a solid base for featuring 3D animation.
● Ending Thoughts →
● 3D animation refers to using motion to breathe life into inanimate objects, and they can create animated videos and animation cartoons.
● 3D animation is highly technical, unlike 2d animation
● You can avoid the above 3d mistakes if you remain objective and open, and ready to accept constructive criticism.
● Becoming an animator is a fun thing to do, and it allows you to be free to express your creativity while entertaining other people entirely.
● Before you start learning 3d animation and create cartoon photos, ensure that you have read through all that we have explained here to have good information about what you are going into.
Before you delve into the profession of creating 3d cartoon filters, you need to understand or decide if creating animated characters is something you would like to do. It’s not going to be smooth as you will get frustrated at some point, you will get confused, and it will be challenging, but in the end, it is rewarding because it is an expression of your mind coming to life. You are the one to breathe life into your characters who represent your imaginations. You will also have to infuse a great deal of your creativity to create beautiful and exciting characters for others to enjoy. Meanwhile, let’s first understand what 3d animations mean.
Becoming a 3d animator is not a feat you can achieve in a short time. It is not days, weeks, months, or even years. Like any other profession, a professional 3d animator must have put in a great deal of work, mixed with a lot of passion and love for what he is doing. To become successful as a 3d animator, you must love what you are doing or be ready to put in the work.
This article will expose what you should learn to create beautiful 3d animation cartoons, including what to expect as a 3d animator.
In this article
01 [What are 3d animation and the process of 3d animation?](#Part 1)
02 [Differences between 2d animation and 3d animation](#Part 2)
03 [A roaster of 8 best 3d animation software.](#Part 3)
04 [Top 3 3d animation making mistakes to avoid](#Part 4)
Part 1 What Is 3D Animation And The Process of 3D Animation?
animation is a term that describes the art of creating 3-dimensional images and placing them in a digital environment. It is a process that uses motion to bring objects, characters, etc., to life.
It is also known as computer-generated imagery, and it is currently the most common animation type for feature films.
Various software and programs are designed specifically for 3d animations and allow the animators to bring the objects to life.
The process of 3d animation happens in three(3) stages;
● Modeling
● Layout and animation
● Rendering
Modeling in 3d animation involves generating the objects or characters either by using a modeling tool or using a real thing. The real object is scanned directly into the computer, where other processes follow. You have total control over your character and how you want them to appear by modeling. You decide the weight, specifications, feel, etc. However, scanning objects save a lot of time. You must add texture before modeling your character or reviewing it before moving to the following layout and animation.
Layout and animation stage: A layout is determined when the generated objects move to this stage. It involves creating a set/scene where the objects can position. Layout first happens before animation does. After adding the objects and characters, they get animated using animation variables. After this, you use motion capture or keyframing to give life to the models in the scenes.
Rendering: Rendering is using software or programs. It is not something to do using just your computer. These tools can generate the scenes into the finished image according to the client’s requirements or set goals.
Creating cartoon background images or any other form of animations is a process that requires a lot of planning and work, which sums up a lot of time. To learn 3d animation, you must be ready to give in ample time as it is a profession that requires some time to handle.
The process listed above also shows the creativity requirement required to succeed in the 3d animation industry. To think that you must create the scenes, which is the layout stage, means you have to be creative in your imagination. If you then decide to model your character from scratch using modeling tools. That also requires another job of thinking and extracting a lot of your creative juices.
Part 2 What is the difference between 2d animation and 3d animation?
Anyone can decide to learn animation with no plan in mind or understanding of what the profession involves. animation is different from 2d animation, and if you want to learn animation, you need to understand the distinction between these two.
animation can have a lot of creative possibilities, whereas 3d animation has a lot of natural abilities. The visual style of both types of animation is explicitly different.
3d animation is a more intensive technical process than the various stages mentioned earlier. It would most likely involve different specialists to handle them to get a more professional output. However, 2d animation consists of drawing the characters frame by frame.
animated cartoons are in The Simpsons, Pinocchio, the Lion king, etc.
animations are like the ones Dreamworks, Pixar, produce. They include the avengers, the bad guys, etc.
Part 3 A Roaster Of 8 Best 3D Animation Software
Several 3D animation software exists in the market, both free and paid. If you are a animation creator or love animation for fun, you can use the free software to make your videos, cartoon photos, 3d cartoon faces, etc.
With many animation software available in the market, you can only fully trust a few.
Here’s a roaster of 8 best 3D animation software you could use to create the cartoon monsters you’ve always been curious about;
● Filmora
● Blender
● Maya
● Wings 3d
● Adobe Animate
● Cinema 4d
● K-3D
● Milcamo
Filmora Video animation tool: This is a highly recommended 3D animation tool with many features and pros. It has a wide range of keyframes, about six of which make your cartoon background images smooth and natural.
| Software | Features | OS | Pro |
|---|---|---|---|
| Wondershare Filmora Video Editor | It has an auto-color correction It has smooth keyframes | Windows, Mac | You can apply light flare effects You can apply an audio mixer |
| Blender | It has textured brushes and masking for 3d painting. It has add-ons and customised tools with high python scripting. | Windows, Linux, Mac computers | It has Virtual reality rendering, Strong camera restoration. It had both manual and automatic tracking. |
| Maya | Free trial of 30 days. Can create complex technical effects | Windows, Max | Good Control and perfect accuracy. Can collect motion capture data. |
| Wings 3d | Auto UV mapping system It has support for light and material effects. | Windows, Linux, and Mac OS | Advanced 3d and 2d modeling tools. It is free to use |
| Adobe animate | Virtual camera functionality gives a realistic view. Adoptive animation effects, zooming, panning etc. | Windows, Mac | Effective audio syncing technology. Customizable font, styling etc. |
| Cinema 4d | Concepts develop without time modeling Large library of preset scenes. | Windows, Mac | Customised with a huge asset range It is a faster tool than Maya Dissect complete scene and is faster than Maya. |
| K-3D | It has property adjustment capabilities with handy strong features. I5 is made up of basic tools for animation, curves, patches. | Mac OS X, Linux, FreeBSD, windows platforms | It is very flexible for either complex or basic workflows. It has a wide selection of plugins. |
| Mixamo | Streamlined user experience It has a faster search function that is accurate | Windows, Mac | It has fast character and animation browsing. Download multiple animations at a go |
For Win 7 or later (64-bit)
For macOS 10.12 or later
Part 4 Top Three (3) 3d Animation Making Mistakes To Avoid
As we initially mentioned, 3d animation requires an intensive technical process. It is a skill that you need to hone over the years by paying attention to detail, being highly creative, and daring to succeed.
Here are 3 mistakes you must avoid during the animation process;
● Forgetting the ‘why’ factor
● Over-animating a scene
● Not giving your viewers time to take it in
Forgetting the why: In a animation cartoon, every move, walking step, and smile is essential. Every character represented in your cartoon background is there for a specific reason.
You would be making a mistake that will affect the result if you lose focus on this reason. Your viewers won’t find your cartoon believable if the moves and acting don’t add up.
Your characters don’t just move because they want to move. Something must have spurred the motion or reaction. It could be for what happened to them, what they heard, or saw another character did in the scene. Do not neglect the why of the act.
While animating, focus on why and keep revisiting until all your characters and objects are knitted closely together.
Over-animating a scene: This is another mistake animators should avoid. If you animate your characters, everything may be a mess if you animate the background and foreground. Simplicity is how to get this thing, keep it simple and focused.
Do not have much going on in each scene but only where you need the attention of your viewers. Animators that do this end up confusing their viewers with no direction.
You can use camera effects such as depth of field to make your audience focus on the point you are trying to make in the particular scene.
Not giving your viewers time to take it in: This is another 3d animation making a mistake you should be careful of. Not giving your viewers time to process the happenings on the scene before the next.
This can be avoided by timing and measuring cuts such that any animation at the start of a new scene is timed to enable the viewers to take it in. You can ask for third-party criticism on your work to find out how your animation is received and see pointers to mistakes such as this. The third party could be your colleague or friend.
Note: You can easily avoid any error or mistake or modify your 3D animation with the help of the Wondershare Filmora video editor. That will provide a solid base for featuring 3D animation.
● Ending Thoughts →
● 3D animation refers to using motion to breathe life into inanimate objects, and they can create animated videos and animation cartoons.
● 3D animation is highly technical, unlike 2d animation
● You can avoid the above 3d mistakes if you remain objective and open, and ready to accept constructive criticism.
● Becoming an animator is a fun thing to do, and it allows you to be free to express your creativity while entertaining other people entirely.
● Before you start learning 3d animation and create cartoon photos, ensure that you have read through all that we have explained here to have good information about what you are going into.
Tutorial on Making Unity 2D Animation
Beginner Tutorial on Making Unity 2D Animation
An easy yet powerful editor
Numerous effects to choose from
Detailed tutorials provided by the official channel
Now, ideally, Unity is considered to be a suitable tool for 3D games that have too many animated elements. But, this doesn’t mean that you cannot design 2D animations with Unity.
In this guide, we are going to show you how to get started with 2D animations in Unity and incorporate them into your games to enhance the overall gameplay.
In this article
01 [Can Unity Be Used for 2D Animation?](#Part 1)
02 [How Do You Make a 2D Animation in Unity?](#Part 2)
Part 1 Can Unity Be Used for 2D Animation?
First, things first; can Unity be used for 2D animations. The answer is Yes! Being a full-scale gaming engine, developers/designers can use Unity to create stunning Unity 2D animations for their games. The tool has dedicated 2D animation packages that contain all the elements you’ll need to create high-quality 2D animations for your games.
Keep in mind that for each object, you’ll have to create a separate 2D sprite sheet and use it to configure the 2D animation. However, there are other 2D animation packages that you can install, using sprite sheets is the most common method to get the job done. The latest versions of Unity also offer a dedicated Stripe library where you can add multiple Stripe Sheets and it becomes relatively easier to manage them.
With the Sprite library, 2D animations with Unity becomes a hassle-free job. Designers can even manage dozens of 2D animations without any hassle. The Sprite editor will also let you control the overall movement of different moving objects in your animation and make it look more sleek. In general, if you are planning to create 2D animations for your videos or even a dedicated mobile game, Unity can be a suitable software for the job.
Part 2 How Do You Make a 2D Animation in Unity?
To create a 2D animation with Unity, the first step would be to create a dedicated Sprite sheet. Now, you can use a wide variety of third-party programs to create the desired Sprite sheet. In general, it depends on the project requirements and the personal preferences of the designer himself. However, whichever tool you use to create the Stripe sheets, make sure that the final image is a transparent PNG file as it’ll make your job much easier while animating objects in Unity.
After you have successfully designed the stripe (a transparent image file) in an external application, the next step would be to import it to Unity. When you import the Stripe file, make sure to create a separate Sprite folder so that you can easily manage all these files in one place. Also, a dedicated Stripe folder will allow you to keep a check on each Stripe file in a hassle-free manner.

While importing 2D animations into Unity, you can also configure its settings to ensure that it matches the overall game design. Ideally, we recommend keeping the Pixels Per Unit to the same size as all your visual components. This will allow you to maintain the desired consistency throughout the project and make it visually enticing.
Now, before proceeding any further, make sure to switch to the “Stripe Editor” window. With the “Stripe Editor”, you’ll be able to control the overall settings of each animation individually and control the movement to make it look crisper. In the Stripe window, you can also adjust the slice settings and save your work to avoid any potential data loss.
At this point, you can move towards creating the 2D animation with Unity. To do this, you’ll have to bring both the Animation and the Animator tabs to UnityParts editing panel. You can make them visible by tapping the “Windows” option on your screen.

That’s it; a timeline-based editing panel will appear on your screen. From here onwards, you can get started with animating the object. Each animation will depend on your specific game requirements. So, feel free to unleash your creativity and use different elements of Unity to bring your 2D animations to life.
Part 3 Part 3 Creating 2D Animations for Your Videos - An Effective Solution for Video Editors
Now, when it comes to creating 2D animations for videos, you may not want to use a tool like Unity to get the job done. Why? Because Unity is more suitable for animating objects for games. Not to mention, Unity has a steep learning curve and if you are not an experienced Unity developer, you may fail to create a 2D animation properly.
So, if you only need a 2D animation for videos, we have a better alternative for the job. Instead of Unity, you can use Wondershare Filmora Video Editor for the job. It’s a full-scale video editing software that’s specifically designed to edit high-quality videos. Whether you are a YouTube or simply edit videos for your clients, using Wondershare Filmora will help you showcase your creativity more effectively.

Filmora has a built-in media library that offers a plethora of ready-to-use animation templates as well as video effects. You can import these animations into your video with a single click and enhance the overall quality of the video to drive better engagement. These animations are also customizable, which means you can tweak their appearance to match the overall theme of your video itself. The media player also offers audio effects that’ll make your videos more dramatic.
And, finally, you’ll also find a wide variety of advanced editing options such as keyframing, motion detection, and green screen editing. All these features will allow you to uplift the production quality of your videos and engage potential viewers more effectively.
For Win 7 or later (64-bit)
For macOS 10.12 or later
A few key features of Filmora that make it the most reliable video editing software include:
● Thousands of ready-to-use animation templates and video effects
● Easy-to-use timeline-based editing panel
● Dedicated audio editor to control the sound quality
● Cross-platform compatibility
So, if you are also planning to launch a high-scale video for YouTube or any other platform by adding
Key Takeaways from This Episode
● Creating 2D animations with Unity is possible, however, you must be an expert game developer with extensive experience in Unity game development
● To create Unity 2D animations, you’ll have to use Sprite Sheets and then import them into Unity to turn them into animation.
● Now, if you are a regular video editor and only want to create 2D animations for videos, you can also use full-scale software such as Wondershare Filmora Pro.
Now, ideally, Unity is considered to be a suitable tool for 3D games that have too many animated elements. But, this doesn’t mean that you cannot design 2D animations with Unity.
In this guide, we are going to show you how to get started with 2D animations in Unity and incorporate them into your games to enhance the overall gameplay.
In this article
01 [Can Unity Be Used for 2D Animation?](#Part 1)
02 [How Do You Make a 2D Animation in Unity?](#Part 2)
Part 1 Can Unity Be Used for 2D Animation?
First, things first; can Unity be used for 2D animations. The answer is Yes! Being a full-scale gaming engine, developers/designers can use Unity to create stunning Unity 2D animations for their games. The tool has dedicated 2D animation packages that contain all the elements you’ll need to create high-quality 2D animations for your games.
Keep in mind that for each object, you’ll have to create a separate 2D sprite sheet and use it to configure the 2D animation. However, there are other 2D animation packages that you can install, using sprite sheets is the most common method to get the job done. The latest versions of Unity also offer a dedicated Stripe library where you can add multiple Stripe Sheets and it becomes relatively easier to manage them.
With the Sprite library, 2D animations with Unity becomes a hassle-free job. Designers can even manage dozens of 2D animations without any hassle. The Sprite editor will also let you control the overall movement of different moving objects in your animation and make it look more sleek. In general, if you are planning to create 2D animations for your videos or even a dedicated mobile game, Unity can be a suitable software for the job.
Part 2 How Do You Make a 2D Animation in Unity?
To create a 2D animation with Unity, the first step would be to create a dedicated Sprite sheet. Now, you can use a wide variety of third-party programs to create the desired Sprite sheet. In general, it depends on the project requirements and the personal preferences of the designer himself. However, whichever tool you use to create the Stripe sheets, make sure that the final image is a transparent PNG file as it’ll make your job much easier while animating objects in Unity.
After you have successfully designed the stripe (a transparent image file) in an external application, the next step would be to import it to Unity. When you import the Stripe file, make sure to create a separate Sprite folder so that you can easily manage all these files in one place. Also, a dedicated Stripe folder will allow you to keep a check on each Stripe file in a hassle-free manner.
While importing 2D animations into Unity, you can also configure its settings to ensure that it matches the overall game design. Ideally, we recommend keeping the Pixels Per Unit to the same size as all your visual components. This will allow you to maintain the desired consistency throughout the project and make it visually enticing.
Now, before proceeding any further, make sure to switch to the “Stripe Editor” window. With the “Stripe Editor”, you’ll be able to control the overall settings of each animation individually and control the movement to make it look crisper. In the Stripe window, you can also adjust the slice settings and save your work to avoid any potential data loss.
At this point, you can move towards creating the 2D animation with Unity. To do this, you’ll have to bring both the Animation and the Animator tabs to UnityParts editing panel. You can make them visible by tapping the “Windows” option on your screen.
That’s it; a timeline-based editing panel will appear on your screen. From here onwards, you can get started with animating the object. Each animation will depend on your specific game requirements. So, feel free to unleash your creativity and use different elements of Unity to bring your 2D animations to life.
Part 3 Part 3 Creating 2D Animations for Your Videos - An Effective Solution for Video Editors
Now, when it comes to creating 2D animations for videos, you may not want to use a tool like Unity to get the job done. Why? Because Unity is more suitable for animating objects for games. Not to mention, Unity has a steep learning curve and if you are not an experienced Unity developer, you may fail to create a 2D animation properly.
So, if you only need a 2D animation for videos, we have a better alternative for the job. Instead of Unity, you can use Wondershare Filmora Video Editor for the job. It’s a full-scale video editing software that’s specifically designed to edit high-quality videos. Whether you are a YouTube or simply edit videos for your clients, using Wondershare Filmora will help you showcase your creativity more effectively.
Filmora has a built-in media library that offers a plethora of ready-to-use animation templates as well as video effects. You can import these animations into your video with a single click and enhance the overall quality of the video to drive better engagement. These animations are also customizable, which means you can tweak their appearance to match the overall theme of your video itself. The media player also offers audio effects that’ll make your videos more dramatic.
And, finally, you’ll also find a wide variety of advanced editing options such as keyframing, motion detection, and green screen editing. All these features will allow you to uplift the production quality of your videos and engage potential viewers more effectively.
For Win 7 or later (64-bit)
For macOS 10.12 or later
A few key features of Filmora that make it the most reliable video editing software include:
● Thousands of ready-to-use animation templates and video effects
● Easy-to-use timeline-based editing panel
● Dedicated audio editor to control the sound quality
● Cross-platform compatibility
So, if you are also planning to launch a high-scale video for YouTube or any other platform by adding
Key Takeaways from This Episode
● Creating 2D animations with Unity is possible, however, you must be an expert game developer with extensive experience in Unity game development
● To create Unity 2D animations, you’ll have to use Sprite Sheets and then import them into Unity to turn them into animation.
● Now, if you are a regular video editor and only want to create 2D animations for videos, you can also use full-scale software such as Wondershare Filmora Pro.
Ultimate Guide to Animated Characters Drawings
Interesting Fundamentals and Ultimate Guide to Animated Characters Drawings
An easy yet powerful editor
Numerous effects to choose from
Detailed tutorials provided by the official channel
Cartoon character have stamped their faces in our hearts from childhood. A cartoon artist represents a cartoon or a natural person’s unique features with simple shapes accurately to recognize the person with the drawing and does not require a lot of patience to do this. The goal of the cartoon is to attract, and the child should get attracted when they see a cartoon image as well as adults. Though the sparkle may appear a little dull, it remains unaltered.
Let us grab a chance to recreate our cartoon characters with easy tutorials about animated characters to draw. In addition to that, you will learn about basic drawing exercises to lead into cool animated characters to draw through this guide in a step-by-step manner.
In this article
01 [What Do I Need to Start Learning Animated Characters Drawings? ](#Part 1)
02 [6 Cartoon Characters that Anyone Can Draw (Provided with Free Video Tutorials)](#Part 2)
03 [4 Best Drawing Exercises for Creating Cartoon Characters](#Part 3)
Part 1 What Do I Need to Start Learning Animated Characters Drawings?
There are many software’s available, and anyone can create an animated character drawing, but still, the art of creating a perfect character needs a master. You don’t have to be a Disney-grade animator to make it; start with simple minor characters. Animation is the art of bringing a 3D illustrated cartoon into life. It is created by projecting a sequence of images one after the other immediately. Let us discuss the essential things you need to note before animating characters.
●Timeline is the most important for animation. Depending on the software, you have various options to change the duration and add effects.
●Animation is generally preferable in 24 frames per second, which means the total number of people in the frame for one second.
●There are two types of working they are one’s and two’s. 2D Animation is usually done in two’s, whereas 3D Animation is in one’s.
●In hand-drawn animations, keyframes are more critical to maintain. The keyframe is the position for the cartoon as per animator has decided.
●Breakdowns combine one or two keyframes, which decide the motion in between the keys.
●In-betweens are all the frames that come between to smooth the motion—automatically generated by the computer to move from key to key.
●Composting is creating or joining two or more images to create a single cartoon frame.
Part 2 6 Cartoon Characters that Anyone can Draw (With free Video Tutorials)
We will discuss animated characters to draw in hand. There are many cartoon characters, but we will look into six cartoon character drawings with their tutorial videos.
01 Smurfette
Smurfette stands out as the lone female Smurf in the entire bunch of blue critters around the village area. One of the rare designs with long hair and a dress is hers. Her design is a lot of fun to sketch.
So, in general, it’s best to work through the lesson as is, then turn it into Brainy, Papa, Joker, or even Smurf.
01Angelica Pickles
Angelica Pickles is one of the most challenging characters to depict from The Rugrats. But her design is so intricate that getting it proper will give you a true sense of accomplishment. Her pigtails, like her leggings, might be challenging to master, so keep practicing.
03Yogi Bear
Yogi Bear is a cartoon character on the sweeter side of the comic animal variety. Yogi Bear is a beloved character from Jellystone Park. As long as you get his tie and collar just right, this guy is a breeze to draw.
04Magilla Gorilla
Magilla Gorilla is another bizarre creature from Hanna-catalog. Barbera’s Because he comes with a bow tie, a little cap, and suspenders, this design is a little more complicated. Not to mention his enormous clown shoes. These small details can be a pain to draw, but Magilla is a very charming gorilla.
05Top Cat
Even further back in time, in the 1960s, there was the ever-popular Top Cat. He’s wearing a cap and a button-down vest, and he’s making some reasonably fancy dances. Give Top Cat a shot if you like The Flintstones’ basic Hanna-Barbera art style.
<
06Helga. G. Pataki
Helga is another character with some wacky hair. There’s a lot that’s bizarre about her. And half the fun of drawing her is figuring out how to do it. Just keep an eye on her head since getting it correct, especially with her rectangle hairdo, can be a little odd.
These are some of the cool animated characters to draw.
Part 3 4 Best Drawing Exercise for Creating Cartoon Characters
You’ll learn how to create cartoon characters individually, including their faces, hair, and facial expressions.
01How to Draw Cartoon Characters
We’ll go through the fundamentals of human perception before getting into cartoon face drawing. Humans have a unique ability to synthesize the details that make up a structure or object in highly complicated ways into fundamental and simple ones. We can express everything with a few curves and geometric forms in this way. In cartoon face, we need to identify the character just by looking like looking at the below picture a girl and a boy.
02Here, you will learn How to Draw a Cartoon Face
Let us begin with a sketch of a cartoon face. A circle is a basic cartoon shape. All you need is a circle. As seen in the image below, draw a vertical and horizontal line intersecting at the center.
Let us have a look at how to make cartoon eyeballs. Draw an oval shape with a slight lean to the side at the top for the eyes. Repeat on the other side.
Slightly thicken the characteristic to represent our character eyelashes at the top of the circle, place the brows above the eyelashes to create a shocking appearance, draw both pupils to the center in the same direction.
When creating a nose from the front, it’s typical to leave off many details. Even if you merely sketch its tip, it will likely provide a convincing impact. Drawing only one side of the nose is also quite frequent. Children’s mouths are extremely simple in cartoon style, regardless of gender.
The ears are viewed from the front; therefore, the internal holes are not visible. The circle has already established the shape of our head.
03Let’s learn about How to Draw a Cartoon Hair
Keep in mind that our characters’ hair is essential for identifying their personalities, and it can also indicate their age. So, all we need is an effortless and playful haircut to bring our boy to life. Because there is no particular method for drawing hair, you’ll have to experiment until you find the perfect look. Look for photo references on the internet! Take a look at a magazine shoot or a Google search.
03How to Draw Characters with different Facial Expressions
By simply following the instructions below, you’ll notice that you can completely transform his expression: Lowering one brow and raising the other, eyelashes are used to cut the eyes in half, putting a smile on the face one side is higher.
To stay under the eyelashes, move the eye pupils up. That’s all there is to it! With just a few tweaks, we achieved the desired result. The circular form of the eyes, hair, ears, nose, chin and the circular shape of the ears are all the same! It’s that simple!
While working in cartooning or video making, Wondershare Wondershare Filmora Video Editor comes out with pros in mind, which can effortlessly convert conventional films into cartoon videos. If you want greater control over your cartoon video, you may also use keyframing to create it. You can fine-tune the parameters in Effects to achieve the best results. You can even change the Animation color after it has been created. It also allows you to use different text themes to showcase your videos.
We propose Wondershare Filmora Video Editor , in this case, to create animation videos by adding keyframes, resulting in a smooth and natural animation. To get started with Animation, all you need is a white plane. Aside from that, color correction and an audio mixer will take your animation video to the next level.
For Win 7 or later (64-bit)
For macOS 10.12 or later
● Key Takeaways from This Episode →
● Learn what are the key elements to make animation videos using software
● Tutorial on how to draw a cartoon character accurately
● In comparison, Wondershare Wondershare Filmora Video Editor is superior in making animation videos.
Have You Seen the Facebook Cartoon App Everyone’s Using Lately
Have You Seen the Facebook Cartoon App Everyone’s Using Lately
An easy yet powerful editor
Numerous effects to choose from
Detailed tutorials provided by the official channel
Facebook cartooning has lately gained momentum in the realm of social media entertainment. Level up your graphic skills with the most recent cartoon app for Facebook!
In this article
01 [How to Make a Facebook Avatar](#Part 1)
02 [Facebook: How to Do the Cartoon Filter Challenge](#Part 2)
Part 1 How to Make a Facebook Avatar
Cartooning and caricature drawing has earned an ultimate preference of graphic designers since times as old as the retro cartoon strips to the modern day digitally created caricaturized avatars, which have by now imbibed usage credibility within almost any and every sector, regardless of the central theme of pr productivity.
Owing to their highly expressive avatars and the inherent ability to transmit information via a characteristic fun element, these have become potential sources of information sharing and entertainment. When it comes to social media, these graphic masterpieces become more vibrant and exportable. Talking of the current trends, caricature avatars on the Facebook cartoon app have created a buzz among the users of the app.
This one is a recently launched feature of Facebook that allows you to cartoonize your real time image with a diversity of customization options. Diving into the creation pool, see through the following section to learn the knowhow of creating amazing caricature avatars using the Facebook app:
User’s Guide to Create a Facebook Avatar
Step 1: You Need the Facebook Application
As the first step, you will need to download and launch the Facebook app in your preferred Android, Windows or MacOs device.
Step 2: Setting Up the Utility
After a successful launch of the app in your device, navigate to the bottom right corner of Facebook’s welcome interface and tap the ‘Three Lines’ icon.

Step 3: Choosing Your Avatar
As you tap on the icon mentioned in Step 2, a drop down menu appears. Click on the ‘See More’ option in the menu and tap ‘Avatars’ in the list of options that follows.

Step 4: Do as Directed
Once you have selected the ‘Avatar’ feature, a number of prompts will appear sin series, asking you to make selections of your hair style, skin tone and related features for customization. In case you are not able to locate all the options, tap the bar at the top of each option and also below your progressing avatar.


Step 5: Adding Further Details
You can additionally explore your editing creativity by customizing the eye, nose and body shape, eyebrows and outfit of your avatar.


Step 6: Almost There!
When you are satisfied with the look of your avatar, navigate to upper right corner of the app screen and click on the ‘Checkmark’ to finalize your changes. Go for a comparison of the created avatar with your real time photo by clicking on the ‘Selfie’ button beneath your avatar.

Step 7: Share Your Work
The created avatars get automatically saved locally in your device; from you can share and export them to any media sharing platforms, like amplifying your chat comments or sending stickers in different apps with utmost convenience using the ‘Share’ button.


Part 2 Facebook: How to Do the Cartoon Filter Challenge
Now that you are accustomed to the fun and excitement of creating cartoonized avatars on the cartoon app on Facebook, it would be an absolute merry to try hands on taking up the trending Facebook Cartoon Filter Challenge, which is the current buzz on social media. Let us enter into the challenge with the quick and easy process discussed in the following section:
Steps to Take Up the Cartoon Filter Challenge
Step 1: Download the Required Application
Begin with downloading the Voila AI Artist Cartoon Photo application to your system by visiting the latter’s official website.
Step 2: Launch the Application
Post a successful installation, launch the app in your system and tap ‘3D Cartoon’ in the latter’s opening interface.
Step 3: Grant App Permissions
You will now be asked to grant certain access permissions by the app to use your device media. Grant the same by tapping the ‘Allow Access’ option, followed by clicking on ‘Select Photos’.
Step 4: Make Your Selection
Browse your device gallery to choose a desired photo for cartoonizing.
Step 5: View the Transformation
When you are done with selecting and uploading the photo, tap on the same to let the app transform your selection to a caricature image grid.
Step 6: Save Your Avatar
Once the conversion process is over, navigate to the ’Arrow’ in the right corner of the screen to save your caricature image in your device gallery.
Step 7: Ready to Export
Saving your work permits you to export and share your creation on Facebook.
Filmora Cartoon Creator
Creating cartoonized images is already an absolute fun, which gets further leveled up when you pick the Wondershare Filmora Video Editor Cartoon Creator to work on caricature avatars. This one is an excellent choice to adhere to the purpose of making and customizing cartoonized versions of real time photos. Launched by Wondershare, the Filmora app is known to not only create, but also texturise and beautify your cartoon avatars with its extensive effects library in almost no time.
For Win 7 or later (64-bit)
For macOS 10.12 or later
● Ending Thoughts →
● Facebook has recently introduced a new cartoon avatar feature that creates cartoonized versions of your real-time photos.
● You can take part in the Cartoon Filter Challenge on Facebook to create and share amazing cartoon images.
● You can alternatively depend on the Filmora Cartoon Creator app to create and customize cartoon avatars within a blink.
Facebook cartooning has lately gained momentum in the realm of social media entertainment. Level up your graphic skills with the most recent cartoon app for Facebook!
In this article
01 [How to Make a Facebook Avatar](#Part 1)
02 [Facebook: How to Do the Cartoon Filter Challenge](#Part 2)
Part 1 How to Make a Facebook Avatar
Cartooning and caricature drawing has earned an ultimate preference of graphic designers since times as old as the retro cartoon strips to the modern day digitally created caricaturized avatars, which have by now imbibed usage credibility within almost any and every sector, regardless of the central theme of pr productivity.
Owing to their highly expressive avatars and the inherent ability to transmit information via a characteristic fun element, these have become potential sources of information sharing and entertainment. When it comes to social media, these graphic masterpieces become more vibrant and exportable. Talking of the current trends, caricature avatars on the Facebook cartoon app have created a buzz among the users of the app.
This one is a recently launched feature of Facebook that allows you to cartoonize your real time image with a diversity of customization options. Diving into the creation pool, see through the following section to learn the knowhow of creating amazing caricature avatars using the Facebook app:
User’s Guide to Create a Facebook Avatar
Step 1: You Need the Facebook Application
As the first step, you will need to download and launch the Facebook app in your preferred Android, Windows or MacOs device.
Step 2: Setting Up the Utility
After a successful launch of the app in your device, navigate to the bottom right corner of Facebook’s welcome interface and tap the ‘Three Lines’ icon.
Step 3: Choosing Your Avatar
As you tap on the icon mentioned in Step 2, a drop down menu appears. Click on the ‘See More’ option in the menu and tap ‘Avatars’ in the list of options that follows.
Step 4: Do as Directed
Once you have selected the ‘Avatar’ feature, a number of prompts will appear sin series, asking you to make selections of your hair style, skin tone and related features for customization. In case you are not able to locate all the options, tap the bar at the top of each option and also below your progressing avatar.
Step 5: Adding Further Details
You can additionally explore your editing creativity by customizing the eye, nose and body shape, eyebrows and outfit of your avatar.
Step 6: Almost There!
When you are satisfied with the look of your avatar, navigate to upper right corner of the app screen and click on the ‘Checkmark’ to finalize your changes. Go for a comparison of the created avatar with your real time photo by clicking on the ‘Selfie’ button beneath your avatar.
Step 7: Share Your Work
The created avatars get automatically saved locally in your device; from you can share and export them to any media sharing platforms, like amplifying your chat comments or sending stickers in different apps with utmost convenience using the ‘Share’ button.
Part 2 Facebook: How to Do the Cartoon Filter Challenge
Now that you are accustomed to the fun and excitement of creating cartoonized avatars on the cartoon app on Facebook, it would be an absolute merry to try hands on taking up the trending Facebook Cartoon Filter Challenge, which is the current buzz on social media. Let us enter into the challenge with the quick and easy process discussed in the following section:
Steps to Take Up the Cartoon Filter Challenge
Step 1: Download the Required Application
Begin with downloading the Voila AI Artist Cartoon Photo application to your system by visiting the latter’s official website.
Step 2: Launch the Application
Post a successful installation, launch the app in your system and tap ‘3D Cartoon’ in the latter’s opening interface.
Step 3: Grant App Permissions
You will now be asked to grant certain access permissions by the app to use your device media. Grant the same by tapping the ‘Allow Access’ option, followed by clicking on ‘Select Photos’.
Step 4: Make Your Selection
Browse your device gallery to choose a desired photo for cartoonizing.
Step 5: View the Transformation
When you are done with selecting and uploading the photo, tap on the same to let the app transform your selection to a caricature image grid.
Step 6: Save Your Avatar
Once the conversion process is over, navigate to the ’Arrow’ in the right corner of the screen to save your caricature image in your device gallery.
Step 7: Ready to Export
Saving your work permits you to export and share your creation on Facebook.
Filmora Cartoon Creator
Creating cartoonized images is already an absolute fun, which gets further leveled up when you pick the Wondershare Filmora Video Editor Cartoon Creator to work on caricature avatars. This one is an excellent choice to adhere to the purpose of making and customizing cartoonized versions of real time photos. Launched by Wondershare, the Filmora app is known to not only create, but also texturise and beautify your cartoon avatars with its extensive effects library in almost no time.
For Win 7 or later (64-bit)
For macOS 10.12 or later
● Ending Thoughts →
● Facebook has recently introduced a new cartoon avatar feature that creates cartoonized versions of your real-time photos.
● You can take part in the Cartoon Filter Challenge on Facebook to create and share amazing cartoon images.
● You can alternatively depend on the Filmora Cartoon Creator app to create and customize cartoon avatars within a blink.
Also read:
- Thousands Already Found 15 Best Sites to Watch Cartoons Online Free And So Can You for 2024
- Updated 2024 Approved Top 10 Popular Cartoons You Forgot Existed
- 2024 Approved Top Tips for Effortless Unity 3D Animation
- Updated What Wikipedia Cant Tell You About the 10 Batman Cartoons for 2024
- New Adobe Auto Rigger Is AWESOME
- Adobe Animate Riggings Tutorial for You for 2024
- Updated In 2024, 10 Best Animation Makers for Kids to Have Fun
- New 2024 Approved How to Animate - Adobe Animate Tutorias
- New In 2024, How to Make Photo 3D Cartoon Online
- Updated In 2024, 10 Amazing Whiteboard Animation Video Examples You Need to Bookmark
- Updated 2024 Approved Top 10 Best Photo to Animation Converters That Give You an Advantage
- In 2024, Top 10 Websites to Download Anime Subtitles for Free
- Updated Top 7 Best Free GIF Apps for Android for 2024
- New 2024 Approved Top 10 Best Photo to Animation Converters
- 2024 Approved Tutorial Guide to Animate Pictures in Canva
- Updated In 2024, Best 15 2D Animation Software Free That Worth to Try
- Updated Top 10 Online Animated Logo Makers Everyone Should Know
- New Tutorials for Animating Picture Online Without Learning From Scratch for 2024
- New The 15 Most Efficient Photo to Cartoon Software for Android
- Methods to Make Photo Motion Effect Online, In 2024
- New 2024 Approved 26 Cool Anime Girl Names and Their Meanings
- Updated 2024 Approved 10 Caricature Makers to Turn Photo to Caricature Effects
- How to Make Creative Animation Videos
- New 2024 Approved Samples of Cartoon Character Face
- What Is the Best Collage Photo Grid Maker - Experts Choice
- New 10 Great MP4 to GIF Converters to Get Perfect-Made GIF
- Updated Techniques for Creating Animated Logo That Few People Know About for 2024
- Updated The Coolest Anime Characters Ever| List of Top Favorites for 2024
- Updated In 2024, How to Make 3D Cartoon of Yourself
- New 2024 Approved Top 10 Websites to Download Anime Subtitles for Free
- New 2024 Approved 10 Awesome Moving Animation PowerPoint Techniques
- 10 Trendy Free Logo Animation Templates for 2024
- Updated Convert Animated GIF From Video
- Updated How to Make a Video a Live Photo 2023
- 2024 Approved How to Get Started in Stop Motion Claymation
- Best 3 Xiaomi 14 Emulator for Mac to Run Your Wanted Android Apps | Dr.fone
- How to Quickly Fix Bluetooth Not Working on Lava Blaze Curve 5G | Dr.fone
- Top 11 Free Apps to Check IMEI on OnePlus 11 5G Phones
- How To Bypass Activation Lock On Apple Watch Or Apple iPhone 7 Plus?
- How to Track WhatsApp Messages on Xiaomi Redmi 13C Without Them Knowing? | Dr.fone
- Full Guide to Catch 100 IV Pokémon Using a Map On Nokia C12 Plus | Dr.fone
- List of Pokémon Go Joysticks On Oppo Find X6 Pro | Dr.fone
- How Can I Use a Fake GPS Without Mock Location On Apple iPhone SE (2020)? | Dr.fone
- 5 Hassle-Free Solutions to Fake Location on Find My Friends Of Honor Magic 5 Lite | Dr.fone
- In 2024, 4 Most-Known Ways to Find Someone on Tinder For Nokia C22 by Name | Dr.fone
- Easy steps to recover deleted call history from S23+
- In 2024, How Can I Catch the Regional Pokémon without Traveling On Poco M6 Pro 4G | Dr.fone
- Full Guide to Fix iToolab AnyGO Not Working On OnePlus Nord N30 5G | Dr.fone
- In 2024, The Best iSpoofer Alternative to Try On Asus ROG Phone 7 Ultimate | Dr.fone
- How to Stop My Spouse from Spying on My Oppo Reno 10 5G | Dr.fone
- Updated In 2024, Top 10 AI Avatar Video Generators
- How to Come up With the Best Pokemon Team On Lava Yuva 3 Pro? | Dr.fone
- Gmail Not Working on Tecno Phantom V Flip 7 Common Problems & Fixes | Dr.fone
- In 2024, Pokémon Go Cooldown Chart On Samsung Galaxy A15 5G | Dr.fone
- In 2024, How to Change your Oppo Find N3 Flip Location on Twitter | Dr.fone
- In 2024, How to Bypass iCloud Lock from iPhone SE
- Easy steps to recover deleted pictures from Oppo A78.
- In 2024, How to Track Oppo F23 5G by Phone Number | Dr.fone
- Nokia C32 ADB Format Tool for PC vs. Other Unlocking Tools Which One is the Best?
- In 2024, How to Bypass FRP from Oppo A58 4G?
- Hassle-Free Ways to Remove FRP Lock on Oppo A79 5Gwith/without a PC
- In 2024, Catch or Beat Sleeping Snorlax on Pokemon Go For Vivo X Fold 2 | Dr.fone
- 4 Most-Known Ways to Find Someone on Tinder For Oppo K11x by Name | Dr.fone
- Ultimate Guide to Catch the Regional-Located Pokemon For Poco F5 5G | Dr.fone
- The Ultimate Guide How to Bypass Swipe Screen to Unlock on Infinix Zero 30 5G Device
- How to Mirror Apple iPhone XS Max to Other iPhone? | Dr.fone
- How to Delete iCloud Account On Apple iPhone 6 Plus without Password?
- Title: New 2024 Approved 5 Photoshop Alternatives to Animate Logo
- Author: Elon
- Created at : 2024-05-19 03:05:16
- Updated at : 2024-05-20 03:05:16
- Link: https://animation-videos.techidaily.com/new-2024-approved-5-photoshop-alternatives-to-animate-logo/
- License: This work is licensed under CC BY-NC-SA 4.0.
