

New How to Learn Cartoon Characters Sketch Quickly
How to Learn Cartoon Characters Sketch Quickly
Cartoon Fundamentals: How to Learn Cartoon Characters Sketch Quickly
An easy yet powerful editor
Numerous effects to choose from
Detailed tutorials provided by the official channel
Whether your favourite Cartoon character Bugs-bunny comes from space or beyond your imagination, whether nostalgic Tom and Jerry are young, eternal or old, knowing the process to draw cute, funny, adorable cartoon-characters is a kind of special feeling always & looks essential incase you desire to become quality professional artist. Cartoon Characters are more challenging to draw while taking care of their weird postures, body-parts like legs, hands.Cartoons characters are the easiest ones to draw as it involved simplistic shapes and doesn’t needed a hard core practice.
In this article, you will be able to get access to drawing amazing characters with a wide range of characters featuring ordinary people, fictional-characters, creatures, monsters, or your favourite cute little ones in easy way.
In this article
01 [Basics of Cartoon Characters Sketch](#Part 1)
02 [Cartoon Characters Sketch Anyone Can Draw (With Free Video Tutorials)](#Part 2)
Part 1 Basics of Cartoon Characters Sketch
Before going ahead with the process of learning step by step how to draw cartoon characters, you need to understand the methodology behind sketching. It is easy to draw multiple cartoon characters but at the same time, you need to figure out sketching techniques involved in making that happen. If you want to extract few details of your central character, you need to represent cartoon characters sketch with the help of shapes. The main goal here is to recognize drawing & let it be attractive as children are the main audience and cartoon characters like Disney, Chuck Jones, Walter-Lantz and others have truly enchanted this world with eternal character & their magical appearance.
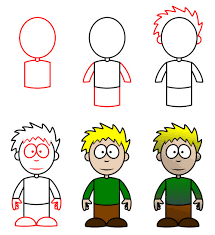
01Concentrating on circle
One of the most basic and interesting shape for any cartoon sketch is circle. All you need is to clearly define basic proportion of your character and that can be happened with desired character’s head. Later on you can trace its charm with face axis.
02Draw Cartoon Eyes
In order to make eyes, one needs to take care of oval shape sketch with slight tilt to side at top position. You have to note that, it is always important to leave good gap between each one of them of approximately similar size as the eye.
03Drawing Cartoon Hair
There is nothing to fear when it comes to draw cartoon hair. You don’t need stylist or a fashion designer in order to make them look perfect. With ideal haircut and matching personality of the desired character, you can do this thing pretty awesome. Hair can represent age, conservatism, rebellion etc. and comes in incredible features.
One of the most accurate & a faster way to do that is by taking references from a fashion magazine, Google Search or cartoon magazine. Once you are done with your findings of ideal styling, you can later on simplify your hair version.
04Sketching for Older Character
Sometimes older characters can be pretty easy to draw as it all begins with their eyes, facial expressions, addition of wrinkles, eyebrows, eye pupils etc. You just need to expand eyebrow a little bit. The older characters have thicker-eyebrows, large forehead space etc.
05Drawing a female character
It’s simple, just focus around delicacy in facial structures, like:-
● Thin eyebrows
● Larger & expressive eyelashes
● Thinner-chin
● Small-nose under fewer-details
● Long hair or depends on your choice
That’s it. Also, you need to give comfort feeling to your character, the more you draw the more realistic it will look.
● Filmora for learning new drawing skills
For Win 7 or later (64-bit)
For macOS 10.12 or later
If you want to showcase your talent to this world without any extravagant apps or software then FIlmora is the best choice that you can consider for drawing some amazing cartoon at your own. This app has its own fun loving designing features and you can add varieties of stickers, images and text to your drawings.
What exactly Filmora can do your drawings:
● For your Pencil sketch of cartoon characters, this app has a lot of text, images and fun loving stickers to showcase more highlighting features of your cartoon character.
● You can share your cartoon with your friends and other community over the web through Twitter, Facebook, and WhatsApp etc.
● This will let you access video editing and image editing features also, to give your cartoon a life.
Part 2 Cartoon Characters Sketch Anyone Can Draw (With Free Video Tutorials)
Now, it’s time to move on with thinking about which cartoon characters to put in your papers with emotions, facial expressions and other features. We are now moving towards the process to include more and more emotions to the same.
Let’s begin drawing 8 amazing characters that are not only famous but also living in heart of children.
01Bugs Bunny
Who doesn’t live Bugs Bunny? Well, it is among the list of most iconic characters that you can imagine and it is certainly the most funnies and interesting character to draw. Right from drawing its big feet to attractive teeth just made for cutting carrots, a lot of things are included in Bugs bunny.
Let’s Draw it:-
● Draw a circle & a “noodle” shaped object as per the imagination. The circle will be its head & pear shape will be its body. You need to make bottom pear fatter as compared to upper portion and also upper-part has to overlap head circle only a little.
● Include perspective guidelines at around the head as this thing can correctly position eyes as well as nose of your bunny.
● You need to draw the eyes at Horizontal guideline and nose where guidelines crosses.
● Draw cheeks and include ears, arms. At the time of drawing arms, you have to give natural curve to arms.
● The arm curves together with the legs-curves might look little difficult, therefore you have to make use of your pencil tenderly without pushing it harder.
● Draw inner lines in ear & iris ellipse at inner portion of eyes.
● Add nose & draw mouth, teeth.
● Your Bunny starts taking its shape and here you can add colors as per your choice
Your cartoon Bugs-Bunny is now ready.
02Popeye
One of the most famous cartoon character of Disney Popeye also appeared on the cinema screens and this belongs to the list of famous classic cartoon-characters.
Let’s draw this amazing character:-
● First Sketch few basic shapes like head, chest, belly.
● It’s a comic character so give it a grotesque-look
● Slightly include other body-parts with shapes like ellipses, noodles in the form of contours.
● Draw one centre-line across the head with well-balanced facial features.
● Draw nose, mouth, ears for the face to form.
● Sketch contours of Popeye’s fists, and arms.
● You can begin giving colors to this shape with flat layers of colorings
03Barney Rubble
As a next door friend and neighbor of Flintstone-house, Barney is kind of a quirky character. This contains features like ears & big feet in the form of angles.
Here is an amazing video tutorial for your Barnet Rubble Cartoon Character:-
04Scrooge McDuck
This cartoon character has wealthy features with fun-loving designs to draw in the form of top-hat, a-cane, as well as few small reading glasses. When it comes to drawing this cartoon characters sketch you need to come up with funny and slightly challenging features.
05Drawing a Ninja For Amazing Action
● Step 1
Work on the head first with nice & precise circle in order to illustrate head portion. Inside this, you can add two more tiny circles for eyes. Once you are done with the eyes, you need to add large & thin rectangle that represents headband. At one portion of headband draw tiny circle with small triangles in numbers 2.
● Step 2
Left arm of our ninja can be sketched through a long & thin rectangle. In order to showcase right arm, draw two rectangles and later on both hands has to be represented in terms of circles.
● Step 3
Two Legs are also need to draw in terms of unusual position. So total of 5 rectangles has to be drawn for both legs & feet.
● Step 4
Add accessories like sabre with basic shapes like circle or rectangle for the same.
● Step 5
Now refine it with an outline and work upon head to make sure both eyes will be clear & visible and also keep the head round & tight.
● Step 6
For upper portion, use nice curved lines and illustrate chest & arms. For showing a discipline make use of good contour likes that highlights posture & gesture.
● Step 7
Repeat the process for the lower portion of your Action ninja.
● Step 8
Now throw some colors’ either black, brown & red to finish the masterpiece!
06Morty Smith
Morty is a lot easy and occupies t-shirt & jeans in its overall appearance and it is much smaller & way more natural than you usually think.
07Helga G. Pataki
If you want to add some crazy cartoon characters in your list then Helga is a good choice. While drawing its cartoon, you need to pay close attention to head as this thing can be little strange with her rectangle hairdo.
08Kim Possible
The design of Kim Possible looks easy at first appearance but when you actually begin with the process of draw its shape, you may get confused. You need to add varieties of features in her face with crazy parachute pants right from the 1980s.
09Shaggy Rogers
The companion of Scooby Shaggy also love its treats & also like to run-away from the monsters at first sight. He can solve mysteries and fun to watch.
● Ending Thoughts →
● Well, drawing cartoons is always a fun loving thing to do. You can pick any one cartoon for drawing some favorite designs.
● You can make use of professional apps to give proper background to your poster or sketch making.
● For Fictional creatures, you can illustrate their styling features, fun facts and lot more to make it much more interesting.
Whether your favourite Cartoon character Bugs-bunny comes from space or beyond your imagination, whether nostalgic Tom and Jerry are young, eternal or old, knowing the process to draw cute, funny, adorable cartoon-characters is a kind of special feeling always & looks essential incase you desire to become quality professional artist. Cartoon Characters are more challenging to draw while taking care of their weird postures, body-parts like legs, hands.Cartoons characters are the easiest ones to draw as it involved simplistic shapes and doesn’t needed a hard core practice.
In this article, you will be able to get access to drawing amazing characters with a wide range of characters featuring ordinary people, fictional-characters, creatures, monsters, or your favourite cute little ones in easy way.
In this article
01 [Basics of Cartoon Characters Sketch](#Part 1)
02 [Cartoon Characters Sketch Anyone Can Draw (With Free Video Tutorials)](#Part 2)
Part 1 Basics of Cartoon Characters Sketch
Before going ahead with the process of learning step by step how to draw cartoon characters, you need to understand the methodology behind sketching. It is easy to draw multiple cartoon characters but at the same time, you need to figure out sketching techniques involved in making that happen. If you want to extract few details of your central character, you need to represent cartoon characters sketch with the help of shapes. The main goal here is to recognize drawing & let it be attractive as children are the main audience and cartoon characters like Disney, Chuck Jones, Walter-Lantz and others have truly enchanted this world with eternal character & their magical appearance.
01Concentrating on circle
One of the most basic and interesting shape for any cartoon sketch is circle. All you need is to clearly define basic proportion of your character and that can be happened with desired character’s head. Later on you can trace its charm with face axis.
02Draw Cartoon Eyes
In order to make eyes, one needs to take care of oval shape sketch with slight tilt to side at top position. You have to note that, it is always important to leave good gap between each one of them of approximately similar size as the eye.
03Drawing Cartoon Hair
There is nothing to fear when it comes to draw cartoon hair. You don’t need stylist or a fashion designer in order to make them look perfect. With ideal haircut and matching personality of the desired character, you can do this thing pretty awesome. Hair can represent age, conservatism, rebellion etc. and comes in incredible features.
One of the most accurate & a faster way to do that is by taking references from a fashion magazine, Google Search or cartoon magazine. Once you are done with your findings of ideal styling, you can later on simplify your hair version.
04Sketching for Older Character
Sometimes older characters can be pretty easy to draw as it all begins with their eyes, facial expressions, addition of wrinkles, eyebrows, eye pupils etc. You just need to expand eyebrow a little bit. The older characters have thicker-eyebrows, large forehead space etc.
05Drawing a female character
It’s simple, just focus around delicacy in facial structures, like:-
● Thin eyebrows
● Larger & expressive eyelashes
● Thinner-chin
● Small-nose under fewer-details
● Long hair or depends on your choice
That’s it. Also, you need to give comfort feeling to your character, the more you draw the more realistic it will look.
● Filmora for learning new drawing skills
For Win 7 or later (64-bit)
For macOS 10.12 or later
If you want to showcase your talent to this world without any extravagant apps or software then FIlmora is the best choice that you can consider for drawing some amazing cartoon at your own. This app has its own fun loving designing features and you can add varieties of stickers, images and text to your drawings.
What exactly Filmora can do your drawings:
● For your Pencil sketch of cartoon characters, this app has a lot of text, images and fun loving stickers to showcase more highlighting features of your cartoon character.
● You can share your cartoon with your friends and other community over the web through Twitter, Facebook, and WhatsApp etc.
● This will let you access video editing and image editing features also, to give your cartoon a life.
Part 2 Cartoon Characters Sketch Anyone Can Draw (With Free Video Tutorials)
Now, it’s time to move on with thinking about which cartoon characters to put in your papers with emotions, facial expressions and other features. We are now moving towards the process to include more and more emotions to the same.
Let’s begin drawing 8 amazing characters that are not only famous but also living in heart of children.
01Bugs Bunny
Who doesn’t live Bugs Bunny? Well, it is among the list of most iconic characters that you can imagine and it is certainly the most funnies and interesting character to draw. Right from drawing its big feet to attractive teeth just made for cutting carrots, a lot of things are included in Bugs bunny.
Let’s Draw it:-
● Draw a circle & a “noodle” shaped object as per the imagination. The circle will be its head & pear shape will be its body. You need to make bottom pear fatter as compared to upper portion and also upper-part has to overlap head circle only a little.
● Include perspective guidelines at around the head as this thing can correctly position eyes as well as nose of your bunny.
● You need to draw the eyes at Horizontal guideline and nose where guidelines crosses.
● Draw cheeks and include ears, arms. At the time of drawing arms, you have to give natural curve to arms.
● The arm curves together with the legs-curves might look little difficult, therefore you have to make use of your pencil tenderly without pushing it harder.
● Draw inner lines in ear & iris ellipse at inner portion of eyes.
● Add nose & draw mouth, teeth.
● Your Bunny starts taking its shape and here you can add colors as per your choice
Your cartoon Bugs-Bunny is now ready.
02Popeye
One of the most famous cartoon character of Disney Popeye also appeared on the cinema screens and this belongs to the list of famous classic cartoon-characters.
Let’s draw this amazing character:-
● First Sketch few basic shapes like head, chest, belly.
● It’s a comic character so give it a grotesque-look
● Slightly include other body-parts with shapes like ellipses, noodles in the form of contours.
● Draw one centre-line across the head with well-balanced facial features.
● Draw nose, mouth, ears for the face to form.
● Sketch contours of Popeye’s fists, and arms.
● You can begin giving colors to this shape with flat layers of colorings
03Barney Rubble
As a next door friend and neighbor of Flintstone-house, Barney is kind of a quirky character. This contains features like ears & big feet in the form of angles.
Here is an amazing video tutorial for your Barnet Rubble Cartoon Character:-
04Scrooge McDuck
This cartoon character has wealthy features with fun-loving designs to draw in the form of top-hat, a-cane, as well as few small reading glasses. When it comes to drawing this cartoon characters sketch you need to come up with funny and slightly challenging features.
05Drawing a Ninja For Amazing Action
● Step 1
Work on the head first with nice & precise circle in order to illustrate head portion. Inside this, you can add two more tiny circles for eyes. Once you are done with the eyes, you need to add large & thin rectangle that represents headband. At one portion of headband draw tiny circle with small triangles in numbers 2.
● Step 2
Left arm of our ninja can be sketched through a long & thin rectangle. In order to showcase right arm, draw two rectangles and later on both hands has to be represented in terms of circles.
● Step 3
Two Legs are also need to draw in terms of unusual position. So total of 5 rectangles has to be drawn for both legs & feet.
● Step 4
Add accessories like sabre with basic shapes like circle or rectangle for the same.
● Step 5
Now refine it with an outline and work upon head to make sure both eyes will be clear & visible and also keep the head round & tight.
● Step 6
For upper portion, use nice curved lines and illustrate chest & arms. For showing a discipline make use of good contour likes that highlights posture & gesture.
● Step 7
Repeat the process for the lower portion of your Action ninja.
● Step 8
Now throw some colors’ either black, brown & red to finish the masterpiece!
06Morty Smith
Morty is a lot easy and occupies t-shirt & jeans in its overall appearance and it is much smaller & way more natural than you usually think.
07Helga G. Pataki
If you want to add some crazy cartoon characters in your list then Helga is a good choice. While drawing its cartoon, you need to pay close attention to head as this thing can be little strange with her rectangle hairdo.
08Kim Possible
The design of Kim Possible looks easy at first appearance but when you actually begin with the process of draw its shape, you may get confused. You need to add varieties of features in her face with crazy parachute pants right from the 1980s.
09Shaggy Rogers
The companion of Scooby Shaggy also love its treats & also like to run-away from the monsters at first sight. He can solve mysteries and fun to watch.
● Ending Thoughts →
● Well, drawing cartoons is always a fun loving thing to do. You can pick any one cartoon for drawing some favorite designs.
● You can make use of professional apps to give proper background to your poster or sketch making.
● For Fictional creatures, you can illustrate their styling features, fun facts and lot more to make it much more interesting.
Learn Disney Cartoon Drawing to See Disney Magic Moments
Learn Disney Cartoon Drawing to See More Disney Magic Moments
An easy yet powerful editor
Numerous effects to choose from
Detailed tutorials provided by the official channel
How to Draw a Disney Caricature

Disney-Inspired Ipad Drawing Class for Beginners
In this article
01 [How to Draw a Disney Caricature](#Part 1)
02 [Disney-Inspired Ipad Drawing Class for Beginners](#Part 2)
Part 1 How to Draw a Disney Caricature
Below is the step-by-step guide to making a Disney cartoon drawing with colors from the comfort of your home:
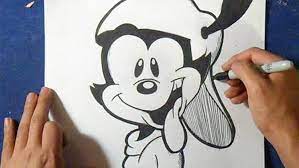
01How to Draw Mickey

Unarguably, Mickey Mouse is one of the most famous anime characters globally. This character was created in 1928 and is a famous Disney cartoon drawing by animators. Here are straightforward steps to help you draw a Mickey Mouse:
Step 1: Sketch the general but carefully observed features of Mickey Mouse, including the position of ears, body shape (reverse C shape), body proportions including eyes, limbs, and arms, length of arms, button on his pants, and angle on the hands.
Step 2: Take your pencil and paper, and using gentle and weak strokes, make a simple sketch of the head, neck, belly, and limbs.

Step 3: Draw contours of the mouth, ears, and nose.

Step 4: Specify the face features like a smiling opened mouth, tip of the nose, and eyes.

Step 5: Draw the hands carefully, observing the length of both arms and their proportion to the size of the character’s head.

Step 6: Sketch the outline contours of the shoes, the legs, and the pants.

Step 7: Sketch the final outline contour of the body, then erase excess lines where necessary. Add the two buttons on Mickey mouse pants.

Step 8: Draw his nose’s tail, tongue, and ellipse.

Step 9: First, use a 2B or 4B or any soft black color pencil to color the black parts.

Step 10: Depending on your preference, you can color with water, acrylic paints, or pastels.

02How to Draw Captain America
Follow these simple steps to make a Disney cartoon drawing of Captain America:
Step 1: Draw the head and chest
Draw the outlines of his masked face using smooth lines. Draw a curved line across his face to divide his face from his mask. Draw a large letter A and add tiny wings beside it on his forehead. Draw his mouth, eyes, and nose. Use curved lines to indicate his shoulder and chest, then draw a star on his chest.

Step 2: Draw his arm and waist
Draw a curved line on the shoulder to represent the bicep, then draw his gloved arm curled to form a fist. Draw curved lines beneath the chest to represent his muscular weight, then draw the pouches on his belt and use more curved lines to draw his waist.

Step 3: Draw his legs
Here, we shall portray Captain America in action. Use curved lines to show his extended right leg with boots. The left leg should appear more petite.

Step 4: Draw his shield
Against his right arm, carefully draw a flattened circular shape. You can achieve this by drawing concentric circles with a large star in the middle. Draw his arm poking out from behind his shield.

Step 5: Include the final details
Add some vertical lines across his waist and some details on his boots.

Step 6: Colour Captain America
Using colors of the American flag, color your drawing with red, white, and blue colors.

03How to Draw Stitch
Stitch is a bulletproof and fireproof alien from the Lilo and Stitch animations. Here’s how you can draw Stitch:
Step 1: Draw a circle that would form Stitch’s head

Step 2: Using a long curved line, draw an irregular peanut shape beneath the head to represent its body.

Step 3: To form its light underbelly, enclose a small shape parallel to the outline of Stitch’s body using a long curved line. On the chest region, draw a series of small “V” shapes to indicate the presence of fur.

Step 4: Draw Stitch’s arm using curved lines for the upper arm and another pair for the lower arm. Draw his bent hands and fingers using short lines. At the tip of its fingers, draw small pointed triangles to represent its claws.

Step 5: Erase the guidelines from Stitch’s arm

Step 6: Draw Stitch’s outstretched arm using a pair of curved lines and small “C” shaped lines to represent the fingers. Use short lines to connect the fingers. Draw small “V” shapes at the tip of the fingers for the triangular claws.

Step 7: Use a pair of curved lines to sketch each leg, then enclose the toes using C-shaped lines

Step 8: Sketch the ears using long curved lines to indicate the base and folds. Sketch the fur on top of Stitch’s head using a series of curved lines.

Step 9: Draw a big circle for the nose and use curved lines to indicate the nostrils. For the eyes, draw irregular rounded shapes, one within the other. Sketch too long curved lines to show the mouth and small blonde triangles for the teeth. Above the eyes and nose, draw curved lines.

Step 10: Use different shades of blue to colour Stitch.

Part 2 Disney-Inspired Ipad Drawing Class for Beginner
Here is a list of classes for beginners interested in drawing Disney characters.
01Dive into the world of Animation with a Disney-Inspired Ipad Drawing Course

This Disney-inspired lesson focuses on real-life scenarios that are beautiful and adorable. Create your everyday settings by sketching backgrounds and outfitting figures.
It will assist you in developing a straightforward approach to drawing cartoon characters through experimentation and time. Follow along and sketch characters, then make your new character.
02Drawing Faces: A Beginner‘s Guide

Ira Marcks, a graphic novelist, will teach you everything you need to know about drawing faces. Are you completely new when it comes to drawing? No worries; follow along with Ira’s bite-sized lectures, and you’ll be ready to delve into a class project by the end of the course.
Do you prefer to set your speed and work at it? If yes, then extend your learning beyond the classroom, download Ira’s Drawing Faces Book.
03Disney Inspired Drawings: Faces and Expressions

Learners will look at sketching a cartoon image of themselves or people they know while exploring the specific traits of Disney-style characters in this one-time live drawing lesson.
Learners will collaborate with the teacher while working on their art projects. This is a technique class, so the focus will be on the process and working towards a finished goal. Nevertheless, a piece may get completed outside of class.
This program is for students who have a basic understanding of drawing and proportion, are open to artistic growth, and are comfortable appearing on camera and sharing their work in a small group setting. All to help each other, and the classroom environment will support all students.
04Free Art Lessons By The Parks’ Imagineers
This lesson will teach how to create your theme park, design virtual landscapes, and even sketch unique costumes!
You’ll also learn how to draw characters from Frozen 2 like Anna and Elsa and classics like Mickey Mouse, Daisy Duck, Pluto, and others.
Your class experience can be enjoyable when using an easy-to-use tool like Wondershare Filmora.
Wondershare Filmora Video Editor is a robust and easy-to-use video editor for users of all skill levels, from beginner to advanced. Its advanced tools, adjustable keyframing, smoothing effects, and motion blur will considerably assist you in creating a high-quality animation video. Furthermore, the auto color correction and audio mixing will elevate your 2D animation film to new heights. Filmora is the best solution if you want more productivity, control, and customization options for your Disney cartoon drawings and animation.
For Win 7 or later (64-bit)
For macOS 10.12 or later
● Ending Thoughts →
● How to make a Disney cartoon drawing
● A step-by-step guide to drawing your favorite Disney cartoon drawing with colors
● How to use Filmora to create animations
● Different Disney-inspired beginner classes for iPad users.
How to Draw a Disney Caricature
Disney-Inspired Ipad Drawing Class for Beginners
In this article
01 [How to Draw a Disney Caricature](#Part 1)
02 [Disney-Inspired Ipad Drawing Class for Beginners](#Part 2)
Part 1 How to Draw a Disney Caricature
Below is the step-by-step guide to making a Disney cartoon drawing with colors from the comfort of your home:
01How to Draw Mickey
Unarguably, Mickey Mouse is one of the most famous anime characters globally. This character was created in 1928 and is a famous Disney cartoon drawing by animators. Here are straightforward steps to help you draw a Mickey Mouse:
Step 1: Sketch the general but carefully observed features of Mickey Mouse, including the position of ears, body shape (reverse C shape), body proportions including eyes, limbs, and arms, length of arms, button on his pants, and angle on the hands.
Step 2: Take your pencil and paper, and using gentle and weak strokes, make a simple sketch of the head, neck, belly, and limbs.
Step 3: Draw contours of the mouth, ears, and nose.
Step 4: Specify the face features like a smiling opened mouth, tip of the nose, and eyes.
Step 5: Draw the hands carefully, observing the length of both arms and their proportion to the size of the character’s head.
Step 6: Sketch the outline contours of the shoes, the legs, and the pants.
Step 7: Sketch the final outline contour of the body, then erase excess lines where necessary. Add the two buttons on Mickey mouse pants.
Step 8: Draw his nose’s tail, tongue, and ellipse.
Step 9: First, use a 2B or 4B or any soft black color pencil to color the black parts.
Step 10: Depending on your preference, you can color with water, acrylic paints, or pastels.
02How to Draw Captain America
Follow these simple steps to make a Disney cartoon drawing of Captain America:
Step 1: Draw the head and chest
Draw the outlines of his masked face using smooth lines. Draw a curved line across his face to divide his face from his mask. Draw a large letter A and add tiny wings beside it on his forehead. Draw his mouth, eyes, and nose. Use curved lines to indicate his shoulder and chest, then draw a star on his chest.
Step 2: Draw his arm and waist
Draw a curved line on the shoulder to represent the bicep, then draw his gloved arm curled to form a fist. Draw curved lines beneath the chest to represent his muscular weight, then draw the pouches on his belt and use more curved lines to draw his waist.
Step 3: Draw his legs
Here, we shall portray Captain America in action. Use curved lines to show his extended right leg with boots. The left leg should appear more petite.
Step 4: Draw his shield
Against his right arm, carefully draw a flattened circular shape. You can achieve this by drawing concentric circles with a large star in the middle. Draw his arm poking out from behind his shield.
Step 5: Include the final details
Add some vertical lines across his waist and some details on his boots.
Step 6: Colour Captain America
Using colors of the American flag, color your drawing with red, white, and blue colors.
03How to Draw Stitch
Stitch is a bulletproof and fireproof alien from the Lilo and Stitch animations. Here’s how you can draw Stitch:
Step 1: Draw a circle that would form Stitch’s head
Step 2: Using a long curved line, draw an irregular peanut shape beneath the head to represent its body.
Step 3: To form its light underbelly, enclose a small shape parallel to the outline of Stitch’s body using a long curved line. On the chest region, draw a series of small “V” shapes to indicate the presence of fur.
Step 4: Draw Stitch’s arm using curved lines for the upper arm and another pair for the lower arm. Draw his bent hands and fingers using short lines. At the tip of its fingers, draw small pointed triangles to represent its claws.
Step 5: Erase the guidelines from Stitch’s arm
Step 6: Draw Stitch’s outstretched arm using a pair of curved lines and small “C” shaped lines to represent the fingers. Use short lines to connect the fingers. Draw small “V” shapes at the tip of the fingers for the triangular claws.
Step 7: Use a pair of curved lines to sketch each leg, then enclose the toes using C-shaped lines
Step 8: Sketch the ears using long curved lines to indicate the base and folds. Sketch the fur on top of Stitch’s head using a series of curved lines.
Step 9: Draw a big circle for the nose and use curved lines to indicate the nostrils. For the eyes, draw irregular rounded shapes, one within the other. Sketch too long curved lines to show the mouth and small blonde triangles for the teeth. Above the eyes and nose, draw curved lines.
Step 10: Use different shades of blue to colour Stitch.
Part 2 Disney-Inspired Ipad Drawing Class for Beginner
Here is a list of classes for beginners interested in drawing Disney characters.
01Dive into the world of Animation with a Disney-Inspired Ipad Drawing Course
This Disney-inspired lesson focuses on real-life scenarios that are beautiful and adorable. Create your everyday settings by sketching backgrounds and outfitting figures.
It will assist you in developing a straightforward approach to drawing cartoon characters through experimentation and time. Follow along and sketch characters, then make your new character.
02Drawing Faces: A Beginner‘s Guide
Ira Marcks, a graphic novelist, will teach you everything you need to know about drawing faces. Are you completely new when it comes to drawing? No worries; follow along with Ira’s bite-sized lectures, and you’ll be ready to delve into a class project by the end of the course.
Do you prefer to set your speed and work at it? If yes, then extend your learning beyond the classroom, download Ira’s Drawing Faces Book.
03Disney Inspired Drawings: Faces and Expressions
Learners will look at sketching a cartoon image of themselves or people they know while exploring the specific traits of Disney-style characters in this one-time live drawing lesson.
Learners will collaborate with the teacher while working on their art projects. This is a technique class, so the focus will be on the process and working towards a finished goal. Nevertheless, a piece may get completed outside of class.
This program is for students who have a basic understanding of drawing and proportion, are open to artistic growth, and are comfortable appearing on camera and sharing their work in a small group setting. All to help each other, and the classroom environment will support all students.
04Free Art Lessons By The Parks’ Imagineers
This lesson will teach how to create your theme park, design virtual landscapes, and even sketch unique costumes!
You’ll also learn how to draw characters from Frozen 2 like Anna and Elsa and classics like Mickey Mouse, Daisy Duck, Pluto, and others.
Your class experience can be enjoyable when using an easy-to-use tool like Wondershare Filmora.
Wondershare Filmora Video Editor is a robust and easy-to-use video editor for users of all skill levels, from beginner to advanced. Its advanced tools, adjustable keyframing, smoothing effects, and motion blur will considerably assist you in creating a high-quality animation video. Furthermore, the auto color correction and audio mixing will elevate your 2D animation film to new heights. Filmora is the best solution if you want more productivity, control, and customization options for your Disney cartoon drawings and animation.
For Win 7 or later (64-bit)
For macOS 10.12 or later
● Ending Thoughts →
● How to make a Disney cartoon drawing
● A step-by-step guide to drawing your favorite Disney cartoon drawing with colors
● How to use Filmora to create animations
● Different Disney-inspired beginner classes for iPad users.
A Beginner’s Guide to Explain What 3D Animation Is
A Beginner’s Guide to Explain What 3D Animation Is
An easy yet powerful editor
Numerous effects to choose from
Detailed tutorials provided by the official channel
With present-day technology, 3D animation has reached all spheres be it entertainment, advertising, architecture, education, and much more. With the increasing use of 3D animation, there is a rise in the tools and programs used for creating such animations.
So, to help you get all the details about 3D animation, 3D modelling and animation process, best tools, tips, and tricks, keep reading the following parts.
In this article
01 [What Does 3D Animation Mean?](#Part 1)
02 [What is the Process of 3D Animation?](#Part 2)
03 [Types of 3D Animations](#Part 3)
04 [Top 5 3D Animation Software](#Part 4)
05 [Top Animation Tips and Tricks](#Part 5)
Part 1 What does 3D animation mean?
In simplest terms, animation is a process of manipulating the images so that they appear to be moving, and when this manipulation is done in three-dimensional space, it is called 3D animation. The objects and the models used for 3D animation can be rotated or moved like the real ones. Some tools can be used to scan real-life objects which can be then used as blueprints for creating animation 3D models.
The characters and the objects in 3D animations have to be moved to make them as realistic as possible. No matter, how interesting or perfect character you may create, if it does not move in an even manner, the overall effect will be ruined. The latest techniques and tools these days are capable of creating lifelike scenes.

Part 2 What is the process of 3D Animation?
Creating a 3D animation is a complex process involving several phases. Below listed are the main 3 phases for creating an animation.
01Modeling
The main thing for any 3D animation is its objects, models, or characters and this phase involves creating these objects. Since the objects are based on 3D computer models, the process is termed 3D modeling. A model by a computer appears like a mesh of geometric shapes including curves, points, lines, and more. These shapes do not look anywhere like real objects and only after when the textures and colors are added to them, they appear like real things.
02Layout and animation
The next step is layout and animation where characters are placed in the scenes and the animation of their movements is done using 3D animation tools. Initially, keyframes are created which are the start and the end pose of any animation, and then later other details like the effects, lighting, camerawork, and more are added to get the desired animation that appears on the screen.
03Rendering
The final step in the 3D creation process is rendering where the created animation is finalized as well as exported. To make sure that the final animation plays seamlessly and looks absolutely perfect, it is essential to check all the minute details.
After the production of 3D animation is done, next comes the post-production which is the phase where effects, music, and voiceovers are added and combined to make the entire animation look complete.

Part 3 Types of 3D animations
Now when we know what is a 3D animation and its process, we also need to know that different types of 3D animations are there. Some of the key ones are as below.
● 3D videos and movies
● 3D Virtual Reality
● Interactive 3D
● Digital 3D
● Clay Motion also termed Stop motion animation
● Pixilation
● Cell-shaded animation
● Paint-on-glass
● Pinscreen
Part 4 Top 5 3D Animation software
When it comes to 3D animation tools, the choices can be overwhelming and the list of promises claimed by the tools can be large. He, you need to shortlist the tools that best match your requirements as well as your skill sets. Below we have narrowed down the top 5 software of the category.
01Autodesk Maya
This is a top-rated animation, modeling, simulation, and rendering tool. Using this versatile tool, complex characters and animated videos can be created with all the needed effects.
Key features:
● Versatile 3D animation tool with support to a wide range of features.
● Available for download on Windows, Mac, and Linux systems.
● Allows creating complex characters, adding realistic effects, custom graphics, and more.
● Arnold’s feature of the tool allows switching between CPU and GPU.
● Animation features like fast-playback, time editing, graph editing, ghost editing, multiple modeling options, and others are supported.

02Blender
This is free and open-source software that can be used for creating 3D animations, motion graphics, computer games, and more. Since the tool has been in use for a long time, several artists keep adding to the tool.
Key features
● Free and open-source animation tool.
● Support to multiple platforms including Windows, Mac, and Linux.
● OpenGL interface which makes the functioning smooth.
● Comprehensive and robust set of tools for creating versatile animations. Some of these include automatic skilling, unwrapping texturing, envelope, skeleton, B-spline interpolated bones, sound synchronization, and more.
● Support input from motion-capture tools.

03Houdini
Used by reputed VFX companies like Pixar, Sony, Disney, and others, this is an excellent software that can be used for creating 3D animations, games, and others. With multi-platform support, it is a paid tool that also comes with a free learning edition.
Key features
● Feature-packed animation tool used by industry pioneers.
● Use node-based workflow for creating animations.
● Create biped and quadruped 3D objects using rigging tools.
● Comes with multiple plans to choose from as per budget and requirements.
● Offers a high level of flexibility and creativity.

04Cinema 4D
This professional animation creation software is known for its features and stability. With the availability of multiple tutorials and guides, learning the tool and its functions is easy.
Key features of the software
● Known to be an excellent tool for motion graphics, illustrations, and visualizations.
● Easy learning curve owing to the availability of tutorials, guides, and training materials. Access to free membership of Cineversity which is a training site.
● Comes with a 14-day free trial version along with a free education version for the teachers and students.
● Functions of the software are tested by QA and Beta testers that offer high stability.
● Support features like automatic keyframing, tag and expressions, effectors, and more.

05**Wondershare Filmora Video Editor **
If you are looking for software that is simple and easy to use but supports all advanced features this is one of the best choices. Available for Windows and Mac the tool also works as an excellent video editing tool.
Key features
● This easy 3D animation tool Allows creating sharp and lively animations using features like keyframing, motion-tracking, and others.
● Allows to add the preset motions or even customize your own animations.
● The speed, as well as the duration of the animation, can be changed using the ease-in and ease-out options.
● Make your videos lively with features like warp, distorting, masking, lights & flares, text& titles, and more.
● High-quality presets are available with features like auto-correction, color wheels, scopes, and more.
● Audio features supported like automatic audio sync, audio compression, audio transitions, and noise correction.
For Win 7 or later (64-bit)
For macOS 10.12 or later
Part 5 Top Animation Tips And Tricks
Though 3D animation requires a lot of technical know-how of the process, there are several tips and tricks that can make your task quicker, easier, and smoother. We have gathered a few such tips below.
01Make realistic objects by observing real life
The more you will observe real-life the more you will be able to imitate it into your animations for giving life to your objects, models, and characters. Having some knowledge about real-life, gravity, and similar topics will help you work on your animations more interactively.
02Evolve with latest techniques and technology
The tools, programs, and technology are progressing every day and to make the best use of the same, you need to evolve with the technology. To use the features and functions of the software you need to keep learning and growing.
03Go with the basic first
While working with the animations, it is very easy to get carried away with the process and get into the trap of looking for details. This will eventually move you away from your main track and will lead to a waste of time and effort. Thus, it is always advisable to go with the basics first and then move towards the detailing.
04Learn about the human emotions
Facial expressions are an important element of any 3D animation that brings life to characters. A good animation will portray good and complex emotions and thus it is important to study these emotions in detail so that they can be incorporated into your objects, models, and characters.

● Key Takeaways from This Episode →
● Animations created in 3-dimensional space are termed 3D animations.
● 3D animations involve pre-production, post-production, and several steps.
● For the smooth creation of 3D animations, several tips and tricks can be considered.
● A wide range of tools for creating 3D animations are available and one of the best tools in the category is Wondershare Filmora Video Editor that is effective and easy to use.
With present-day technology, 3D animation has reached all spheres be it entertainment, advertising, architecture, education, and much more. With the increasing use of 3D animation, there is a rise in the tools and programs used for creating such animations.
So, to help you get all the details about 3D animation, 3D modelling and animation process, best tools, tips, and tricks, keep reading the following parts.
In this article
01 [What Does 3D Animation Mean?](#Part 1)
02 [What is the Process of 3D Animation?](#Part 2)
03 [Types of 3D Animations](#Part 3)
04 [Top 5 3D Animation Software](#Part 4)
05 [Top Animation Tips and Tricks](#Part 5)
Part 1 What does 3D animation mean?
In simplest terms, animation is a process of manipulating the images so that they appear to be moving, and when this manipulation is done in three-dimensional space, it is called 3D animation. The objects and the models used for 3D animation can be rotated or moved like the real ones. Some tools can be used to scan real-life objects which can be then used as blueprints for creating animation 3D models.
The characters and the objects in 3D animations have to be moved to make them as realistic as possible. No matter, how interesting or perfect character you may create, if it does not move in an even manner, the overall effect will be ruined. The latest techniques and tools these days are capable of creating lifelike scenes.
Part 2 What is the process of 3D Animation?
Creating a 3D animation is a complex process involving several phases. Below listed are the main 3 phases for creating an animation.
01Modeling
The main thing for any 3D animation is its objects, models, or characters and this phase involves creating these objects. Since the objects are based on 3D computer models, the process is termed 3D modeling. A model by a computer appears like a mesh of geometric shapes including curves, points, lines, and more. These shapes do not look anywhere like real objects and only after when the textures and colors are added to them, they appear like real things.
02Layout and animation
The next step is layout and animation where characters are placed in the scenes and the animation of their movements is done using 3D animation tools. Initially, keyframes are created which are the start and the end pose of any animation, and then later other details like the effects, lighting, camerawork, and more are added to get the desired animation that appears on the screen.
03Rendering
The final step in the 3D creation process is rendering where the created animation is finalized as well as exported. To make sure that the final animation plays seamlessly and looks absolutely perfect, it is essential to check all the minute details.
After the production of 3D animation is done, next comes the post-production which is the phase where effects, music, and voiceovers are added and combined to make the entire animation look complete.
Part 3 Types of 3D animations
Now when we know what is a 3D animation and its process, we also need to know that different types of 3D animations are there. Some of the key ones are as below.
● 3D videos and movies
● 3D Virtual Reality
● Interactive 3D
● Digital 3D
● Clay Motion also termed Stop motion animation
● Pixilation
● Cell-shaded animation
● Paint-on-glass
● Pinscreen
Part 4 Top 5 3D Animation software
When it comes to 3D animation tools, the choices can be overwhelming and the list of promises claimed by the tools can be large. He, you need to shortlist the tools that best match your requirements as well as your skill sets. Below we have narrowed down the top 5 software of the category.
01Autodesk Maya
This is a top-rated animation, modeling, simulation, and rendering tool. Using this versatile tool, complex characters and animated videos can be created with all the needed effects.
Key features:
● Versatile 3D animation tool with support to a wide range of features.
● Available for download on Windows, Mac, and Linux systems.
● Allows creating complex characters, adding realistic effects, custom graphics, and more.
● Arnold’s feature of the tool allows switching between CPU and GPU.
● Animation features like fast-playback, time editing, graph editing, ghost editing, multiple modeling options, and others are supported.
02Blender
This is free and open-source software that can be used for creating 3D animations, motion graphics, computer games, and more. Since the tool has been in use for a long time, several artists keep adding to the tool.
Key features
● Free and open-source animation tool.
● Support to multiple platforms including Windows, Mac, and Linux.
● OpenGL interface which makes the functioning smooth.
● Comprehensive and robust set of tools for creating versatile animations. Some of these include automatic skilling, unwrapping texturing, envelope, skeleton, B-spline interpolated bones, sound synchronization, and more.
● Support input from motion-capture tools.
03Houdini
Used by reputed VFX companies like Pixar, Sony, Disney, and others, this is an excellent software that can be used for creating 3D animations, games, and others. With multi-platform support, it is a paid tool that also comes with a free learning edition.
Key features
● Feature-packed animation tool used by industry pioneers.
● Use node-based workflow for creating animations.
● Create biped and quadruped 3D objects using rigging tools.
● Comes with multiple plans to choose from as per budget and requirements.
● Offers a high level of flexibility and creativity.
04Cinema 4D
This professional animation creation software is known for its features and stability. With the availability of multiple tutorials and guides, learning the tool and its functions is easy.
Key features of the software
● Known to be an excellent tool for motion graphics, illustrations, and visualizations.
● Easy learning curve owing to the availability of tutorials, guides, and training materials. Access to free membership of Cineversity which is a training site.
● Comes with a 14-day free trial version along with a free education version for the teachers and students.
● Functions of the software are tested by QA and Beta testers that offer high stability.
● Support features like automatic keyframing, tag and expressions, effectors, and more.
05**Wondershare Filmora Video Editor **
If you are looking for software that is simple and easy to use but supports all advanced features this is one of the best choices. Available for Windows and Mac the tool also works as an excellent video editing tool.
Key features
● This easy 3D animation tool Allows creating sharp and lively animations using features like keyframing, motion-tracking, and others.
● Allows to add the preset motions or even customize your own animations.
● The speed, as well as the duration of the animation, can be changed using the ease-in and ease-out options.
● Make your videos lively with features like warp, distorting, masking, lights & flares, text& titles, and more.
● High-quality presets are available with features like auto-correction, color wheels, scopes, and more.
● Audio features supported like automatic audio sync, audio compression, audio transitions, and noise correction.
For Win 7 or later (64-bit)
For macOS 10.12 or later
Part 5 Top Animation Tips And Tricks
Though 3D animation requires a lot of technical know-how of the process, there are several tips and tricks that can make your task quicker, easier, and smoother. We have gathered a few such tips below.
01Make realistic objects by observing real life
The more you will observe real-life the more you will be able to imitate it into your animations for giving life to your objects, models, and characters. Having some knowledge about real-life, gravity, and similar topics will help you work on your animations more interactively.
02Evolve with latest techniques and technology
The tools, programs, and technology are progressing every day and to make the best use of the same, you need to evolve with the technology. To use the features and functions of the software you need to keep learning and growing.
03Go with the basic first
While working with the animations, it is very easy to get carried away with the process and get into the trap of looking for details. This will eventually move you away from your main track and will lead to a waste of time and effort. Thus, it is always advisable to go with the basics first and then move towards the detailing.
04Learn about the human emotions
Facial expressions are an important element of any 3D animation that brings life to characters. A good animation will portray good and complex emotions and thus it is important to study these emotions in detail so that they can be incorporated into your objects, models, and characters.
● Key Takeaways from This Episode →
● Animations created in 3-dimensional space are termed 3D animations.
● 3D animations involve pre-production, post-production, and several steps.
● For the smooth creation of 3D animations, several tips and tricks can be considered.
● A wide range of tools for creating 3D animations are available and one of the best tools in the category is Wondershare Filmora Video Editor that is effective and easy to use.
Obtain and Create Animated GIF Icons
Versatile Video Editor - Wondershare Filmora
An easy yet powerful editor
Numerous effects to choose from
Detailed tutorials provided by the official channel
Are you looking for some interesting and animated GIF icons? Then simply read this guide to discover funny GIF icons and learn how to create them on your own.
GIF, which stands for Graphics Interchange Format, has now become extremely popular among social media. From sending our reactions to something to wishing others on special occasions, GIFs can be used in so many ways. Though, there are times when we would like to use animated GIF icons in your designs to make them more appealing. Therefore, in this post, I will let you know how to create some funny GIF icons and would also share a few resources to find readily available GIF icons.
![]()
In this article
01 [Smart Ways to Create Your Own Animated GIF Icons](#Part 1)
02 [Top 3 Resources to Get Free Animated GIF Icons](#Part 2)
Part 1 Smart Ways to Create Your Own Animated GIF Icons
While there are so many ways to come up with animated GIF icons, I would recommend exploring the following options:
Method 1: Use Adobe Photoshop to Create GIF Icons
If you are looking for a professional solution to create a live GIF icon, then I would recommend using Adobe Photoshop. While the application is not that easy to use, it will be an ideal long-term solution. In nutshell, you can create animated GIF icons by loading assets, duplicating layers, and then merging them in the following way:
Step 1 Load Assets on Photoshop
At first, you can simply launch Adobe Photoshop on your system and go to its File > Scripts to load media assets into your stack.
![]()
This will let you browse and load the media assets to your projects. In case you don’t have a layer created, then you can just go to its File > Layer and create a new layer.
![]()
You can now rename your layers and can go to its File > Window > Timeline to get a timeline view of the added assets.
![]()
Step 2 Work on the Video Timeline to Create a GIF
Great! Once you have got the timeline view on the application, you can click on its dropdown menu and choose to create a frame animation.
![]()
Afterward, you can select the added media and go to its Properties menu on the sidebar. From here, you can choose to create a new layer for each frame and then make frames from each layer.
![]()
This will create multiple frames on the timeline at the bottom. You can edit each frame on the timeline and can also set up its preferred duration.
![]()
You can also right-click the frames and select how many times your loading icon GIF would be repeated.
![]()
Step 3 Preview and Export your GIF from Photoshop
Lastly, you can get a preview of your animated GIF icons and can go to its File > Export and choose to save it for the web in a compatible (GIF) format.
![]()
Method 2: Make Stunning Animated GIF Icons with Wondershare Filmora
Since Adobe Photoshop can be quite complicated to use, you can consider using Wondershare Filmora to create all kinds of animated GIF icons. It is a user-friendly media editing application that has a wide range of readily available assets and would also let you import files from your system.
Besides that, there are tons of stickers, visual elements, captions, animations, transitions, and so on that would let you create and customize funny GIF icons. Therefore, if you want to create animated GIF icons using Filmora, then you can simply follow these steps:
Step 1 Load Media Files (Images and Videos) on Filmora
To get things started, you can just launch Wondershare Filmora on your system and go to its File > Import menu to load media files to it. You can also drag and drop your media files directly to the interface of Filmora.

Step 2 Create or Edit GIFs on Wondershare Filmora
After loading your images or video clips, you can drag and drop them to the timeline at the bottom. In case you can want to get rid of any video clip, you can just hover the mouse around and use its trimming tool to meet your requirements.

Once you have edited your videos or images, you can just go to their properties from the sidebar. From here, you can scale, reposition, rotate, flip, and perform other edits on your media files.

If you want to add texts to your GIFs, then just visit the “Titles” section of Filmora from the top. This will let you explore and include any caption effect that you can later edit on Filmora.

You can also go to the “Effects” section from the sidebar to explore a wide range of transitions, filters, stickers, and more that you can add to your GIFs.

Step 3 Export your Animated GIFs from Filmora
That’s it! Once you have worked on your funny GIF icons, you can get their preview, and click on the “Export” icon from the top. Here, you can select “GIF” as a target format and simply save them to a preferred location on your system.

Method 3: Take the Assistance of Canva to Create Animated GIFs
You might already know that Canva is already a popular online application that can be used to create social media posts, marketing video ads, brochures, GIFs, and more. Since Canva offers a wide range of assets (images, GIFs, and more), you can use it to create animated GIF icons on the go.
Step 1 Select a Template of your Choice on Canvas
Whenever you want to create a loading icon GIF, you can just go to your Canva account and look for any existing template. Apart from its existing template, you can also load a blank canvas.
![]()
Step 2 Use the Existing Designing Features of Canva
Great! Once you have opened your canvas, you can explore tons of assets on the side. For instance, you can add texts, borders, objects, and so on from the sidebar to your canvas. You can also select a relevant animation style and add it to your project.
![]()
Step 3 Export the Media as a GIF from Canva
After working on the live GIF icon on Canva, you can just go to the Export option from the top and save it as a GIF on your system.
![]()
Part 2 Top 3 Resources to Get Free Animated GIF Icons
If you are running short on time and would like to get some premade animated GIF icons, then you can explore the following options.
1. Icons8
Icons8 is one of the most popular resources for free animated GIF icons. You can explore a wide range of more than 3000 animated icons (free and paid) on the website and can download them on your system in a preferred format. For your convenience, these animated icons are listed in different categories on Icons8.
![]()
2. Giphy
Giphy is one of the most popular websites that is entirely dedicated to GIFs. Therefore, if you are looking for an animated Discord server icon, a professional icon, or a personal animation – you can find it all on Giphy. While it has an extensive range of icons, they aren’t listed in different categories, and finding the right GIF can be time-consuming.
![]()
3. Cliply
Lastly, you can also go to the official website of Cliply to explore tons of animated GIF icons. There are all kinds of GIF Discord server icons, 3D icons, professional sets, and more that you can download from Cliply.
![]()
Wondershare Filmora
Get started easily with Filmora’s powerful performance, intuitive interface, and countless effects!
Try It Free Try It Free Try It Free Learn More >

AI Portrait – The best feature of Wondershare Filmora for gameplay editing
The AI Portrait is a new add-on in Wondershare Filmora. It can easily remove video backgrounds without using a green screen or chroma key, allowing you to add borders, glitch effects, pixelated, noise, or segmentation video effects.

Conclusion
There you go! I’m sure that after going through this post, you can easily find all kinds of animated GIF icons. Though, if you have specific requirements and would like to come up with some customized loading or funny GIF icons, then you can consider using tools like Canva, Photoshop, or Filmora. Out of them, Wondershare Filmora has to be the best solution to create live GIF icons as it features tons of resources and will let you come up with any video or GIF on the go.
Are you looking for some interesting and animated GIF icons? Then simply read this guide to discover funny GIF icons and learn how to create them on your own.
GIF, which stands for Graphics Interchange Format, has now become extremely popular among social media. From sending our reactions to something to wishing others on special occasions, GIFs can be used in so many ways. Though, there are times when we would like to use animated GIF icons in your designs to make them more appealing. Therefore, in this post, I will let you know how to create some funny GIF icons and would also share a few resources to find readily available GIF icons.
![]()
In this article
01 [Smart Ways to Create Your Own Animated GIF Icons](#Part 1)
02 [Top 3 Resources to Get Free Animated GIF Icons](#Part 2)
Part 1 Smart Ways to Create Your Own Animated GIF Icons
While there are so many ways to come up with animated GIF icons, I would recommend exploring the following options:
Method 1: Use Adobe Photoshop to Create GIF Icons
If you are looking for a professional solution to create a live GIF icon, then I would recommend using Adobe Photoshop. While the application is not that easy to use, it will be an ideal long-term solution. In nutshell, you can create animated GIF icons by loading assets, duplicating layers, and then merging them in the following way:
Step 1 Load Assets on Photoshop
At first, you can simply launch Adobe Photoshop on your system and go to its File > Scripts to load media assets into your stack.
![]()
This will let you browse and load the media assets to your projects. In case you don’t have a layer created, then you can just go to its File > Layer and create a new layer.
![]()
You can now rename your layers and can go to its File > Window > Timeline to get a timeline view of the added assets.
![]()
Step 2 Work on the Video Timeline to Create a GIF
Great! Once you have got the timeline view on the application, you can click on its dropdown menu and choose to create a frame animation.
![]()
Afterward, you can select the added media and go to its Properties menu on the sidebar. From here, you can choose to create a new layer for each frame and then make frames from each layer.
![]()
This will create multiple frames on the timeline at the bottom. You can edit each frame on the timeline and can also set up its preferred duration.
![]()
You can also right-click the frames and select how many times your loading icon GIF would be repeated.
![]()
Step 3 Preview and Export your GIF from Photoshop
Lastly, you can get a preview of your animated GIF icons and can go to its File > Export and choose to save it for the web in a compatible (GIF) format.
![]()
Method 2: Make Stunning Animated GIF Icons with Wondershare Filmora
Since Adobe Photoshop can be quite complicated to use, you can consider using Wondershare Filmora to create all kinds of animated GIF icons. It is a user-friendly media editing application that has a wide range of readily available assets and would also let you import files from your system.
Besides that, there are tons of stickers, visual elements, captions, animations, transitions, and so on that would let you create and customize funny GIF icons. Therefore, if you want to create animated GIF icons using Filmora, then you can simply follow these steps:
Step 1 Load Media Files (Images and Videos) on Filmora
To get things started, you can just launch Wondershare Filmora on your system and go to its File > Import menu to load media files to it. You can also drag and drop your media files directly to the interface of Filmora.
Step 2 Create or Edit GIFs on Wondershare Filmora
After loading your images or video clips, you can drag and drop them to the timeline at the bottom. In case you can want to get rid of any video clip, you can just hover the mouse around and use its trimming tool to meet your requirements.
Once you have edited your videos or images, you can just go to their properties from the sidebar. From here, you can scale, reposition, rotate, flip, and perform other edits on your media files.
If you want to add texts to your GIFs, then just visit the “Titles” section of Filmora from the top. This will let you explore and include any caption effect that you can later edit on Filmora.
You can also go to the “Effects” section from the sidebar to explore a wide range of transitions, filters, stickers, and more that you can add to your GIFs.
Step 3 Export your Animated GIFs from Filmora
That’s it! Once you have worked on your funny GIF icons, you can get their preview, and click on the “Export” icon from the top. Here, you can select “GIF” as a target format and simply save them to a preferred location on your system.
Method 3: Take the Assistance of Canva to Create Animated GIFs
You might already know that Canva is already a popular online application that can be used to create social media posts, marketing video ads, brochures, GIFs, and more. Since Canva offers a wide range of assets (images, GIFs, and more), you can use it to create animated GIF icons on the go.
Step 1 Select a Template of your Choice on Canvas
Whenever you want to create a loading icon GIF, you can just go to your Canva account and look for any existing template. Apart from its existing template, you can also load a blank canvas.
![]()
Step 2 Use the Existing Designing Features of Canva
Great! Once you have opened your canvas, you can explore tons of assets on the side. For instance, you can add texts, borders, objects, and so on from the sidebar to your canvas. You can also select a relevant animation style and add it to your project.
![]()
Step 3 Export the Media as a GIF from Canva
After working on the live GIF icon on Canva, you can just go to the Export option from the top and save it as a GIF on your system.
![]()
Part 2 Top 3 Resources to Get Free Animated GIF Icons
If you are running short on time and would like to get some premade animated GIF icons, then you can explore the following options.
1. Icons8
Icons8 is one of the most popular resources for free animated GIF icons. You can explore a wide range of more than 3000 animated icons (free and paid) on the website and can download them on your system in a preferred format. For your convenience, these animated icons are listed in different categories on Icons8.
![]()
2. Giphy
Giphy is one of the most popular websites that is entirely dedicated to GIFs. Therefore, if you are looking for an animated Discord server icon, a professional icon, or a personal animation – you can find it all on Giphy. While it has an extensive range of icons, they aren’t listed in different categories, and finding the right GIF can be time-consuming.
![]()
3. Cliply
Lastly, you can also go to the official website of Cliply to explore tons of animated GIF icons. There are all kinds of GIF Discord server icons, 3D icons, professional sets, and more that you can download from Cliply.
![]()
Wondershare Filmora
Get started easily with Filmora’s powerful performance, intuitive interface, and countless effects!
Try It Free Try It Free Try It Free Learn More >
AI Portrait – The best feature of Wondershare Filmora for gameplay editing
The AI Portrait is a new add-on in Wondershare Filmora. It can easily remove video backgrounds without using a green screen or chroma key, allowing you to add borders, glitch effects, pixelated, noise, or segmentation video effects.
Conclusion
There you go! I’m sure that after going through this post, you can easily find all kinds of animated GIF icons. Though, if you have specific requirements and would like to come up with some customized loading or funny GIF icons, then you can consider using tools like Canva, Photoshop, or Filmora. Out of them, Wondershare Filmora has to be the best solution to create live GIF icons as it features tons of resources and will let you come up with any video or GIF on the go.
All About 3D Medical Animation
All About 3D Medical Animation And Its Uses
An easy yet powerful editor
Numerous effects to choose from
Detailed tutorials provided by the official channel
You can see the use of 3D animation in all spheres of life including the medical field. More and more professionals in the field of the healthcare industry are now using 3D animations for several different tasks like education, communication, marketing, and more.

So, if you too are keen to learn about 3D medical animation videos, their uses, popular companies, and other details, you are reading on the right page.
In this article
01 [What is 3D Medical Animation?](#Part 1)
02 [Uses of 3D Medical Animations](#Part 2)
03 [Benefits of Using 3D Medical Animations](#Part 3)
04 [Top 3D Animation Companies](#Part 4)
05 [The Best Tool to Edit Your 3D Medical Animated Video – Wondershare Filmora](#Part 4)
Part 1 What is 3D Medical Animation?
A 3D medical animation can be termed as an animation that is used for different tasks in the healthcare and medical industry. These animations are used for several different tasks like explaining and detailing the concepts to the patients, compelling the investors, training professionals, marketing devices and drugs, and more. Depending on the target audience, the animations can be created by taking the help of specialized industries or using animated software.
Part 2 Uses Of 3D Medical Animations
3D animations have proved to be useful in the healthcare and medical industry in several ways. Below we have gathered some of the key benefits of the same.
01Using As A Mode Of Communication With Patients
Communication with the patients is one of the major uses of 3D animation in the healthcare field. Using animations, the communication with the patients can be enhanced in several ways. Explaining complex medical conditions and procedures to patients is difficult and here the animations help to a great extent. Going through animation will make a patient well prepared to see the doctor and learn about his/her medical condition or procedure to be performed. Patients do not have medical knowledge and these animations help them to know their condition, scenario, and procedure in a simple way that they can understand.
02Training Of Medical Professionals
Medical professionals need to keep themselves updated with the latest trends and practices and for this, they need to undergo training from time to time. 3D animations for the topics to be studied help them in better understanding the concepts and the procedures. Moreover, animations also help in e-learning.
03Educating New Professionals
For the new students using 3D animations is a great way to teach complex medical topics which otherwise explaining them orally or visually are not that effective. Animations can be used to educate about different topics like the anatomy of a human body, medical procedures, drug mechanisms, use of devices, and more.
04Used As A Marketing Tool
Since the presentation of medical information is difficult, marketing in the healthcare industry is quite a challenge. Moreover, the investors do not possess any medical know-how and the task of marketing becomes even more difficult. Thus, using 3D medical animations can be helpful here to explain the products, devices, and other things. Marketing of medicines to patients can also be done using animated mascots and characters.
05Marketing To Medical Professional
While marketing products and devices to medical professionals is not difficult in terms of knowledge or know-how as they are from the medical background. But with multiple marketing teams approaching them, time is a limitation and thus presentation needs to be short yet informative which can be achieved through the use of animations. Moreover, these animations can be sent to professionals through emails or by sharing a website link.

Part 3 Benefits Of Using 3D Medical Animations
Above we have discussed several fields and uses of 3D medical animations. Several factors make these animations useful.
●Helps in offering an in-depth and detailed explanation of complex subjects.
●Offers broad scope of explanation and especially subjects that cannot be explained easily through images or orally.
●Visual presentations offer better recall of the topic and details.
●Engagement through animations is enhanced and better.
●3D medical animations look professional and thus appear to be more reliable.
●Animations can be created to cater to a wider audience and people for different subjects.
Part 4 Top 3D Animation Companies
Creating 3D medical animation is not like creating any other 3D animation as it not only requires technical know-how but also in-depth knowledge of the medical field. Thus, for creating 3D medical animations, take help from the companies that specialize in this field to create 3D medical animation videos. Below we have shortlisted some of the popular 3D medical animation company.
●DG Medical Animations
●The SGNY Group
●Fusion Medical Animation
●TMBA Inc
●Pixeldust Studios
●Indigo Productions
●Nanobot Medical Animation Studio
●MultiVision Digital
●ICom Creative
●INVIVO
●JLab Animation
These companies offer different 3D medical animation services and depending on your requirements, you can choose the best suitable one.

Part 5 The Best Tool To Edit Your 3d Medical Animated Video – Wondershare Wondershare Filmora Video Editor
Even if you have got a 3D medical animation video created by a professional company, several times, the need may arise to edit and customize it. In such situations, you would need a professional tool that can help in editing the video without affecting the quality and other details. Wondershare Wondershare Filmora Video Editor is one such excellent software that can be used for the task. This Windows and Mac-based tool comes with a feature-packed built-in editor that can let you edit the files quickly and in a hassle-free manner. Additionally, you can also create decent animations using multiple features of the software.
The interface is simple and user-friendly that making the task of video creation and editing simple.
Key features of the software
● Allows creating dynamic and lively videos using over 100 layers of media.
● Allows complete editing and customization of the video using the editor.
● Animations using keyframing and other features can be created.
● Enhance audio using features like background noise reduction, keyframe audio editing, audio equalizer, and more.
● Support to features likes stabilization, fisheye correction, speed controlling, advanced color correction, 3D LUTs, and more.
● Support to Windows and Mac.
For Win 7 or later (64-bit)
For macOS 10.12 or later
● Key Takeaways from This Episode →
● The use of 3D medical animation in the healthcare and medical industry has increased manifold.
● The 3D medical animations are used for communication with patients, training, marketing, educations, and other uses.
● Several professional and specialized industries can help you create 3D medical animations.
● To edit the created videos and create other decent ones, Wondershare Wondershare Filmora Video Editor works as a great option.
You can see the use of 3D animation in all spheres of life including the medical field. More and more professionals in the field of the healthcare industry are now using 3D animations for several different tasks like education, communication, marketing, and more.
So, if you too are keen to learn about 3D medical animation videos, their uses, popular companies, and other details, you are reading on the right page.
In this article
01 [What is 3D Medical Animation?](#Part 1)
02 [Uses of 3D Medical Animations](#Part 2)
03 [Benefits of Using 3D Medical Animations](#Part 3)
04 [Top 3D Animation Companies](#Part 4)
05 [The Best Tool to Edit Your 3D Medical Animated Video – Wondershare Filmora](#Part 4)
Part 1 What is 3D Medical Animation?
A 3D medical animation can be termed as an animation that is used for different tasks in the healthcare and medical industry. These animations are used for several different tasks like explaining and detailing the concepts to the patients, compelling the investors, training professionals, marketing devices and drugs, and more. Depending on the target audience, the animations can be created by taking the help of specialized industries or using animated software.
Part 2 Uses Of 3D Medical Animations
3D animations have proved to be useful in the healthcare and medical industry in several ways. Below we have gathered some of the key benefits of the same.
01Using As A Mode Of Communication With Patients
Communication with the patients is one of the major uses of 3D animation in the healthcare field. Using animations, the communication with the patients can be enhanced in several ways. Explaining complex medical conditions and procedures to patients is difficult and here the animations help to a great extent. Going through animation will make a patient well prepared to see the doctor and learn about his/her medical condition or procedure to be performed. Patients do not have medical knowledge and these animations help them to know their condition, scenario, and procedure in a simple way that they can understand.
02Training Of Medical Professionals
Medical professionals need to keep themselves updated with the latest trends and practices and for this, they need to undergo training from time to time. 3D animations for the topics to be studied help them in better understanding the concepts and the procedures. Moreover, animations also help in e-learning.
03Educating New Professionals
For the new students using 3D animations is a great way to teach complex medical topics which otherwise explaining them orally or visually are not that effective. Animations can be used to educate about different topics like the anatomy of a human body, medical procedures, drug mechanisms, use of devices, and more.
04Used As A Marketing Tool
Since the presentation of medical information is difficult, marketing in the healthcare industry is quite a challenge. Moreover, the investors do not possess any medical know-how and the task of marketing becomes even more difficult. Thus, using 3D medical animations can be helpful here to explain the products, devices, and other things. Marketing of medicines to patients can also be done using animated mascots and characters.
05Marketing To Medical Professional
While marketing products and devices to medical professionals is not difficult in terms of knowledge or know-how as they are from the medical background. But with multiple marketing teams approaching them, time is a limitation and thus presentation needs to be short yet informative which can be achieved through the use of animations. Moreover, these animations can be sent to professionals through emails or by sharing a website link.
Part 3 Benefits Of Using 3D Medical Animations
Above we have discussed several fields and uses of 3D medical animations. Several factors make these animations useful.
●Helps in offering an in-depth and detailed explanation of complex subjects.
●Offers broad scope of explanation and especially subjects that cannot be explained easily through images or orally.
●Visual presentations offer better recall of the topic and details.
●Engagement through animations is enhanced and better.
●3D medical animations look professional and thus appear to be more reliable.
●Animations can be created to cater to a wider audience and people for different subjects.
Part 4 Top 3D Animation Companies
Creating 3D medical animation is not like creating any other 3D animation as it not only requires technical know-how but also in-depth knowledge of the medical field. Thus, for creating 3D medical animations, take help from the companies that specialize in this field to create 3D medical animation videos. Below we have shortlisted some of the popular 3D medical animation company.
●DG Medical Animations
●The SGNY Group
●Fusion Medical Animation
●TMBA Inc
●Pixeldust Studios
●Indigo Productions
●Nanobot Medical Animation Studio
●MultiVision Digital
●ICom Creative
●INVIVO
●JLab Animation
These companies offer different 3D medical animation services and depending on your requirements, you can choose the best suitable one.
Part 5 The Best Tool To Edit Your 3d Medical Animated Video – Wondershare Wondershare Filmora Video Editor
Even if you have got a 3D medical animation video created by a professional company, several times, the need may arise to edit and customize it. In such situations, you would need a professional tool that can help in editing the video without affecting the quality and other details. Wondershare Wondershare Filmora Video Editor is one such excellent software that can be used for the task. This Windows and Mac-based tool comes with a feature-packed built-in editor that can let you edit the files quickly and in a hassle-free manner. Additionally, you can also create decent animations using multiple features of the software.
The interface is simple and user-friendly that making the task of video creation and editing simple.
Key features of the software
● Allows creating dynamic and lively videos using over 100 layers of media.
● Allows complete editing and customization of the video using the editor.
● Animations using keyframing and other features can be created.
● Enhance audio using features like background noise reduction, keyframe audio editing, audio equalizer, and more.
● Support to features likes stabilization, fisheye correction, speed controlling, advanced color correction, 3D LUTs, and more.
● Support to Windows and Mac.
For Win 7 or later (64-bit)
For macOS 10.12 or later
● Key Takeaways from This Episode →
● The use of 3D medical animation in the healthcare and medical industry has increased manifold.
● The 3D medical animations are used for communication with patients, training, marketing, educations, and other uses.
● Several professional and specialized industries can help you create 3D medical animations.
● To edit the created videos and create other decent ones, Wondershare Wondershare Filmora Video Editor works as a great option.
10 Scary Anime Girls That Will Make You Creepy
10 Scary Anime Girls That Will Make You Creepy

Shanoon Cox
Mar 27, 2024• Proven solutions
Animes have been one of the widely enjoyed forms of entertainment by people all over the world for decades. There are certain animes that attract people due to their scariness and the characters in them.
Even though girls are usually displayed as cute and pinkish and lovely, some animes display them as creepy. And believe me, these creepy anime girls have a huge fan base and are capable of giving the audience a chill over the spine while watching them.
The creepiness of the anime girls adds to the horror of animes and people enjoy watching them. So let’s find out more about these scary anime girls and why their scary character is loved by the fans.
10 Scary Anime Girls in the Scary Animes
There are a lot of animes with different genres. But some of the animes have some characters that stand out due to their weirdness and creepiness. Let’s talk about 10 such scary anime girls that still give the audience creeps:
- 1. Ai Enma (Hell Girl)
- 2. Shion Sonozaki (Higurashi: When They Cry)
- 3. Sachiko Shinozaki (Corpse Party)
- 4. Shiro (Deadman Wonderland)
- 5. Megumi Shimizu (Shiki)
- 6. Esdeath (Akame Ga Kill!)
- 7. Himiko Toga (My Hero Academia)
- 8. Hana Midorikawa (Prison School)
- 9. Isabella (The Promised Neverland)
- 10. Lucy (Elfen Lied)
1. Ai Enma (Hell Girl)
Ai Enma is one of the cute-looking characters in Hell Girl, but do not be deceived by her looks. She was a girl who was buried alive when she was seven, by her own villagers. Enma crawled out of the ground and burned the entire village, killing every single person living there as an act of vengeance.
Later as a punishment for her horrific doings, she was cast out and sentenced to live out her afterlife as Hell Girl. Still, in her childhood, Ai was assigned the job of dragging dead souls to hell, whether they deserved it or not. The coldness in her eyes and the way she does things without a shiver is what makes her creepy.
2. Shion Sonozaki (Higurashi: When They Cry)
Shion Sonozaki from Higurashi: When They Cry is a dark character who is not exactly what she seems outside. The town she lives in is cursed and she is trying to break that dark cycle that offers only death and tragedy.
There is too much to the story, and saying more about it may reveal the suspense. The story is filled with horror and adventure, and the character of Shion absorbs some of the darkness of the town, which gives a scary impact on the audience.
3. Sachiko Shinozaki (Corpse Party)
Sachiko from Corpse Party is a friendly-looking but scary character who loves to rip out the tongues of some of her fellow characters. She tortures students in Heavenly Host Elementry School which is a living hell in the anime.
Sachiko unleashes a lot of horror in the series and she plays the part of an elementary school ghost breaking all the expectations of the audience. Torturing her fellow mates and cutting their tongues out before death is something that makes Sachiko a perfect scary anime girl.
4. Shiro (Deadman Wonderland)
Shiro, the creepy-looking girl from Deadman Wonderland is another character to be scared of. She was adopted for the only purpose of being used as a human experiment in her childhood. The experiments instilled a very scary character in her which gives a horror nature to the anime in total.
The experiments on here were very painful and multiple personalities called “The Wretched Egg” were developed by her to cope up with torture. The creepy nature and the use of her special skills to murder some characters in the anime and frame her adopted brother for it is very dark and scary.
5. Megumi Shimizu (Shiki)
Megumi Shimizu of Shiki is a young girl and the first of all to be killed by the Kirishiki family. She was the first person who died who was not Yamairi and also the first to rise as Shiki.
After becoming a Shiki Megumi became very malicious and attacked the villagers. She enjoyed attacking them and that is very creepy. She also was ready to kill Tohru Mutou and Kaori’s father due to some small reasons. Her character without a drop of sympathy or care for the people around her is very scary and makes her very unpredictable.
6. Esdeath (Akame Ga Kill!)
Esdeath in Akame Ga Kill who is also known as the ice queen of the empire is a very manipulative character and a sadist. She follows the motto, the strong survive and the weak die, and justifies killing innocents and torturing enemies because of it.
Esdeath once made a prince who lost to strip naked before her and lick her boots, before killing his which is a different level of dark. She keeps her sadistic character in check to be in power which is very scary and dangerous for someone with power. She unleashing her cruelty on defenseless people is another thing that makes her a perfect scary anime girl.

7. Himiko Toga (My Hero Academia)
Himiko is a cute-looking girl that possesses the ability to shapeshift to anything she wants. The creepy part is, in order to shapeshift she has to ingest another person’s blood.
Though Himiko appears to be a typical funny school girl, she can turn into a murderous beast in the blink of an eye. Her twister view of relationships and her trying to befriend people while trying to kill them at the same time all give us creepy chills while watching the anime.
8. Hana Midorikawa (Prison School)
Though Hana Midorikawa looks very cute and innocent she is as creepy as any girl can get. The story evolves in an underground prison school which is an explainable aspect that made Hana the sadist she is.
At first, Hana might seem to be a cute girl who does not belong at the place she currently is, but going deeper the opinion of the audience changes extremely. Hana happens to be a violent sociopath with a lot of dangerous thoughts and a urination fetish, and that is just the beginning of her creepiness.
9. Isabella (The Promised Neverland)
Isabella who is also known as Mama is one of the main characters in the Promised Land. Being a caretaker to children, though she appears to be loving and affectionate to her children, that’s not the real case.
Isabella has a twisted character and shows detachment to her tragedies. This character shows antagonism, betrayal, and a twisted nature enough for the fans to feel creepy about her.
10. Lucy (Elfen Lied)
Lucy in Elfen Lied is a character that sometimes gets sympathy and other times creeps the audience out. She has difficulty drawing a line between good and evil. She can be seen as being sadistically tormented and ruthlessly tormenting about the cruelty around her.
Her surroundings and the people are responsible for how she is and that is why despite being creepy she is loved by a lot of people.
Final thoughts
Though most animes are fun to watch, horror animes are also enjoyed by a lot of people. The main aspect of these horror animes is the scary characters that make the audience wonder.
We have listed the top 10 scary anime girls of different animes that are equally liked and hated by the audience all over the world. The way they act, their cruelty, sadism all define their scary character. These scary anime girls have created such a huge impact that a fan might forget the anime name but never the name of the scary anime girl who gives him/her chills all over the body.
Shanoon Cox
Shanoon Cox is a writer and a lover of all things video.
Follow @Shanoon Cox
Shanoon Cox
Mar 27, 2024• Proven solutions
Animes have been one of the widely enjoyed forms of entertainment by people all over the world for decades. There are certain animes that attract people due to their scariness and the characters in them.
Even though girls are usually displayed as cute and pinkish and lovely, some animes display them as creepy. And believe me, these creepy anime girls have a huge fan base and are capable of giving the audience a chill over the spine while watching them.
The creepiness of the anime girls adds to the horror of animes and people enjoy watching them. So let’s find out more about these scary anime girls and why their scary character is loved by the fans.
10 Scary Anime Girls in the Scary Animes
There are a lot of animes with different genres. But some of the animes have some characters that stand out due to their weirdness and creepiness. Let’s talk about 10 such scary anime girls that still give the audience creeps:
- 1. Ai Enma (Hell Girl)
- 2. Shion Sonozaki (Higurashi: When They Cry)
- 3. Sachiko Shinozaki (Corpse Party)
- 4. Shiro (Deadman Wonderland)
- 5. Megumi Shimizu (Shiki)
- 6. Esdeath (Akame Ga Kill!)
- 7. Himiko Toga (My Hero Academia)
- 8. Hana Midorikawa (Prison School)
- 9. Isabella (The Promised Neverland)
- 10. Lucy (Elfen Lied)
1. Ai Enma (Hell Girl)
Ai Enma is one of the cute-looking characters in Hell Girl, but do not be deceived by her looks. She was a girl who was buried alive when she was seven, by her own villagers. Enma crawled out of the ground and burned the entire village, killing every single person living there as an act of vengeance.
Later as a punishment for her horrific doings, she was cast out and sentenced to live out her afterlife as Hell Girl. Still, in her childhood, Ai was assigned the job of dragging dead souls to hell, whether they deserved it or not. The coldness in her eyes and the way she does things without a shiver is what makes her creepy.
2. Shion Sonozaki (Higurashi: When They Cry)
Shion Sonozaki from Higurashi: When They Cry is a dark character who is not exactly what she seems outside. The town she lives in is cursed and she is trying to break that dark cycle that offers only death and tragedy.
There is too much to the story, and saying more about it may reveal the suspense. The story is filled with horror and adventure, and the character of Shion absorbs some of the darkness of the town, which gives a scary impact on the audience.
3. Sachiko Shinozaki (Corpse Party)
Sachiko from Corpse Party is a friendly-looking but scary character who loves to rip out the tongues of some of her fellow characters. She tortures students in Heavenly Host Elementry School which is a living hell in the anime.
Sachiko unleashes a lot of horror in the series and she plays the part of an elementary school ghost breaking all the expectations of the audience. Torturing her fellow mates and cutting their tongues out before death is something that makes Sachiko a perfect scary anime girl.
4. Shiro (Deadman Wonderland)
Shiro, the creepy-looking girl from Deadman Wonderland is another character to be scared of. She was adopted for the only purpose of being used as a human experiment in her childhood. The experiments instilled a very scary character in her which gives a horror nature to the anime in total.
The experiments on here were very painful and multiple personalities called “The Wretched Egg” were developed by her to cope up with torture. The creepy nature and the use of her special skills to murder some characters in the anime and frame her adopted brother for it is very dark and scary.
5. Megumi Shimizu (Shiki)
Megumi Shimizu of Shiki is a young girl and the first of all to be killed by the Kirishiki family. She was the first person who died who was not Yamairi and also the first to rise as Shiki.
After becoming a Shiki Megumi became very malicious and attacked the villagers. She enjoyed attacking them and that is very creepy. She also was ready to kill Tohru Mutou and Kaori’s father due to some small reasons. Her character without a drop of sympathy or care for the people around her is very scary and makes her very unpredictable.
6. Esdeath (Akame Ga Kill!)
Esdeath in Akame Ga Kill who is also known as the ice queen of the empire is a very manipulative character and a sadist. She follows the motto, the strong survive and the weak die, and justifies killing innocents and torturing enemies because of it.
Esdeath once made a prince who lost to strip naked before her and lick her boots, before killing his which is a different level of dark. She keeps her sadistic character in check to be in power which is very scary and dangerous for someone with power. She unleashing her cruelty on defenseless people is another thing that makes her a perfect scary anime girl.
7. Himiko Toga (My Hero Academia)
Himiko is a cute-looking girl that possesses the ability to shapeshift to anything she wants. The creepy part is, in order to shapeshift she has to ingest another person’s blood.
Though Himiko appears to be a typical funny school girl, she can turn into a murderous beast in the blink of an eye. Her twister view of relationships and her trying to befriend people while trying to kill them at the same time all give us creepy chills while watching the anime.
8. Hana Midorikawa (Prison School)
Though Hana Midorikawa looks very cute and innocent she is as creepy as any girl can get. The story evolves in an underground prison school which is an explainable aspect that made Hana the sadist she is.
At first, Hana might seem to be a cute girl who does not belong at the place she currently is, but going deeper the opinion of the audience changes extremely. Hana happens to be a violent sociopath with a lot of dangerous thoughts and a urination fetish, and that is just the beginning of her creepiness.
9. Isabella (The Promised Neverland)
Isabella who is also known as Mama is one of the main characters in the Promised Land. Being a caretaker to children, though she appears to be loving and affectionate to her children, that’s not the real case.
Isabella has a twisted character and shows detachment to her tragedies. This character shows antagonism, betrayal, and a twisted nature enough for the fans to feel creepy about her.
10. Lucy (Elfen Lied)
Lucy in Elfen Lied is a character that sometimes gets sympathy and other times creeps the audience out. She has difficulty drawing a line between good and evil. She can be seen as being sadistically tormented and ruthlessly tormenting about the cruelty around her.
Her surroundings and the people are responsible for how she is and that is why despite being creepy she is loved by a lot of people.
Final thoughts
Though most animes are fun to watch, horror animes are also enjoyed by a lot of people. The main aspect of these horror animes is the scary characters that make the audience wonder.
We have listed the top 10 scary anime girls of different animes that are equally liked and hated by the audience all over the world. The way they act, their cruelty, sadism all define their scary character. These scary anime girls have created such a huge impact that a fan might forget the anime name but never the name of the scary anime girl who gives him/her chills all over the body.
Shanoon Cox
Shanoon Cox is a writer and a lover of all things video.
Follow @Shanoon Cox
Also read:
- Tips on How to Get Awesome Background for Slideshow in PowerPoint
- New In 2024, Best 10 Animoji Apps You Can Use to Edit Animoji
- Obtain and Create Animated GIF Icons
- Updated In 2024, Best 8 Tools Tell You How to Make Slideshows for Instagram
- How to Combine Multiple GIFs Into One with GIF Combiner for 2024
- 15 Animated Characters We All Had A Crush On for 2024
- New The Top Free 12 GIF Meme Maker at a Glance
- New FREE Best Anime Streaming Sites to Download Anime
- New In 2024, 10 Best Photoshop Cartoon Effects For Creatives
- Updated Methods to Make Photo Motion Effect Online, In 2024
- 2024 Approved How to Make a Video a Live Photo
- How to Make 3D Cartoon of Yourself
- New Top 20+ Best Free GIF Makers Online to Quickly Edit GIF for 2024
- New 2024 Approved Best 15 Anime Shows That Are Great to Binge Watch
- 10 Scary Anime Girls That Will Make You Creepy
- Updated How to Make My Photo 3D Cartoon Online
- Updated 2024 Approved 18 Best Tools and Services to Create Animated Videos for Your Business
- Updated Ways to Create Animated Clipart in PowerPoint for 2024
- New 2024 Approved Top 10 3D Text Animation Templates
- New In 2024, How to Make Your Characters Interactive in Unity Animation Rigging
- Updated How to Create a YouTube Intro Animation Like a Pro
- Updated Top 7 Best Free GIF Apps for Android
- New In 2024, Learn Disney Cartoon Drawing to See More Disney Magic Moments
- Updated How to Create Your Avatar Free
- The Secret Sauce for Making GIF Instagram Story More Aesthetic for 2024
- 10 Cartoon Photo Converters You Couldnt Do Without
- New Whats Rigging Animation
- New Best 12 Video to GIF Converters High Quality to Check Out for 2024
- New 2024 Approved How To Create Animated Clipart in PowerPoint
- New In 2024, 10 Stunning Stop Motion Movies That You Should Not Miss
- 2024 Approved How to Send and Add Snapchat GIFs 100 The Easy Way
- Updated 8 Blender 3D Animation Tutorials for Beginners
- Everything You Need to Know about Lock Screen Settings on your Samsung Galaxy F04
- How to use iSpoofer on OnePlus 11R? | Dr.fone
- In 2024, Top 15 Augmented Reality Games Like Pokémon GO To Play On Vivo V30 | Dr.fone
- How to restore wiped call history on Nokia 130 Music?
- In 2024, Process of Screen Sharing Oppo Find X7 Ultra to PC- Detailed Steps | Dr.fone
- In 2024, 9 Best Free Android Monitoring Apps to Monitor Phone Remotely For your Vivo X Fold 2 | Dr.fone
- 5 Best Realistic Text to Speech AI Voice Generators You May Like
- In 2024, Top IMEI Unlokers for Your Samsung Galaxy F34 5G Phone
- In 2024, iPogo will be the new iSpoofer On Poco C65? | Dr.fone
- Fix Unfortunately Settings Has Stopped on Honor Play 40C Quickly | Dr.fone
- In 2024, How to Hide/Fake Snapchat Location on Your Vivo V27 Pro | Dr.fone
- In 2024, How to Fake GPS on Android without Mock Location For your Samsung Galaxy S23 | Dr.fone
- In 2024, How to Bypass Google FRP Lock from Vivo Y17s Devices
- The Best 8 VPN Hardware Devices Reviewed On Xiaomi Redmi Note 12 Pro+ 5G | Dr.fone
- Title: New How to Learn Cartoon Characters Sketch Quickly
- Author: Elon
- Created at : 2024-06-15 11:22:36
- Updated at : 2024-06-16 11:22:36
- Link: https://animation-videos.techidaily.com/new-how-to-learn-cartoon-characters-sketch-quickly/
- License: This work is licensed under CC BY-NC-SA 4.0.
