
:max_bytes(150000):strip_icc():format(webp)/the-17-best-graphic-design-software-2024-1dd6c15b34124b25b65e4b096e4e6ba4.jpg)
Updated 2024 Approved A Beginners Guide to Explain What 3D Animation Is
A Beginner’s Guide to Explain What 3D Animation Is
A Beginner’s Guide to Explain What 3D Animation Is
An easy yet powerful editor
Numerous effects to choose from
Detailed tutorials provided by the official channel
With present-day technology, 3D animation has reached all spheres be it entertainment, advertising, architecture, education, and much more. With the increasing use of 3D animation, there is a rise in the tools and programs used for creating such animations.
So, to help you get all the details about 3D animation, 3D modelling and animation process, best tools, tips, and tricks, keep reading the following parts.
In this article
01 [What Does 3D Animation Mean?](#Part 1)
02 [What is the Process of 3D Animation?](#Part 2)
03 [Types of 3D Animations](#Part 3)
04 [Top 5 3D Animation Software](#Part 4)
05 [Top Animation Tips and Tricks](#Part 5)
Part 1 What does 3D animation mean?
In simplest terms, animation is a process of manipulating the images so that they appear to be moving, and when this manipulation is done in three-dimensional space, it is called 3D animation. The objects and the models used for 3D animation can be rotated or moved like the real ones. Some tools can be used to scan real-life objects which can be then used as blueprints for creating animation 3D models.
The characters and the objects in 3D animations have to be moved to make them as realistic as possible. No matter, how interesting or perfect character you may create, if it does not move in an even manner, the overall effect will be ruined. The latest techniques and tools these days are capable of creating lifelike scenes.

Part 2 What is the process of 3D Animation?
Creating a 3D animation is a complex process involving several phases. Below listed are the main 3 phases for creating an animation.
01Modeling
The main thing for any 3D animation is its objects, models, or characters and this phase involves creating these objects. Since the objects are based on 3D computer models, the process is termed 3D modeling. A model by a computer appears like a mesh of geometric shapes including curves, points, lines, and more. These shapes do not look anywhere like real objects and only after when the textures and colors are added to them, they appear like real things.
02Layout and animation
The next step is layout and animation where characters are placed in the scenes and the animation of their movements is done using 3D animation tools. Initially, keyframes are created which are the start and the end pose of any animation, and then later other details like the effects, lighting, camerawork, and more are added to get the desired animation that appears on the screen.
03Rendering
The final step in the 3D creation process is rendering where the created animation is finalized as well as exported. To make sure that the final animation plays seamlessly and looks absolutely perfect, it is essential to check all the minute details.
After the production of 3D animation is done, next comes the post-production which is the phase where effects, music, and voiceovers are added and combined to make the entire animation look complete.

Part 3 Types of 3D animations
Now when we know what is a 3D animation and its process, we also need to know that different types of 3D animations are there. Some of the key ones are as below.
● 3D videos and movies
● 3D Virtual Reality
● Interactive 3D
● Digital 3D
● Clay Motion also termed Stop motion animation
● Pixilation
● Cell-shaded animation
● Paint-on-glass
● Pinscreen
Part 4 Top 5 3D Animation software
When it comes to 3D animation tools, the choices can be overwhelming and the list of promises claimed by the tools can be large. He, you need to shortlist the tools that best match your requirements as well as your skill sets. Below we have narrowed down the top 5 software of the category.
01Autodesk Maya
This is a top-rated animation, modeling, simulation, and rendering tool. Using this versatile tool, complex characters and animated videos can be created with all the needed effects.
Key features:
● Versatile 3D animation tool with support to a wide range of features.
● Available for download on Windows, Mac, and Linux systems.
● Allows creating complex characters, adding realistic effects, custom graphics, and more.
● Arnold’s feature of the tool allows switching between CPU and GPU.
● Animation features like fast-playback, time editing, graph editing, ghost editing, multiple modeling options, and others are supported.

02Blender
This is free and open-source software that can be used for creating 3D animations, motion graphics, computer games, and more. Since the tool has been in use for a long time, several artists keep adding to the tool.
Key features
● Free and open-source animation tool.
● Support to multiple platforms including Windows, Mac, and Linux.
● OpenGL interface which makes the functioning smooth.
● Comprehensive and robust set of tools for creating versatile animations. Some of these include automatic skilling, unwrapping texturing, envelope, skeleton, B-spline interpolated bones, sound synchronization, and more.
● Support input from motion-capture tools.

03Houdini
Used by reputed VFX companies like Pixar, Sony, Disney, and others, this is an excellent software that can be used for creating 3D animations, games, and others. With multi-platform support, it is a paid tool that also comes with a free learning edition.
Key features
● Feature-packed animation tool used by industry pioneers.
● Use node-based workflow for creating animations.
● Create biped and quadruped 3D objects using rigging tools.
● Comes with multiple plans to choose from as per budget and requirements.
● Offers a high level of flexibility and creativity.

04Cinema 4D
This professional animation creation software is known for its features and stability. With the availability of multiple tutorials and guides, learning the tool and its functions is easy.
Key features of the software
● Known to be an excellent tool for motion graphics, illustrations, and visualizations.
● Easy learning curve owing to the availability of tutorials, guides, and training materials. Access to free membership of Cineversity which is a training site.
● Comes with a 14-day free trial version along with a free education version for the teachers and students.
● Functions of the software are tested by QA and Beta testers that offer high stability.
● Support features like automatic keyframing, tag and expressions, effectors, and more.

05**Wondershare Filmora Video Editor **
If you are looking for software that is simple and easy to use but supports all advanced features this is one of the best choices. Available for Windows and Mac the tool also works as an excellent video editing tool.
Key features
● This easy 3D animation tool Allows creating sharp and lively animations using features like keyframing, motion-tracking, and others.
● Allows to add the preset motions or even customize your own animations.
● The speed, as well as the duration of the animation, can be changed using the ease-in and ease-out options.
● Make your videos lively with features like warp, distorting, masking, lights & flares, text& titles, and more.
● High-quality presets are available with features like auto-correction, color wheels, scopes, and more.
● Audio features supported like automatic audio sync, audio compression, audio transitions, and noise correction.
For Win 7 or later (64-bit)
For macOS 10.12 or later
Part 5 Top Animation Tips And Tricks
Though 3D animation requires a lot of technical know-how of the process, there are several tips and tricks that can make your task quicker, easier, and smoother. We have gathered a few such tips below.
01Make realistic objects by observing real life
The more you will observe real-life the more you will be able to imitate it into your animations for giving life to your objects, models, and characters. Having some knowledge about real-life, gravity, and similar topics will help you work on your animations more interactively.
02Evolve with latest techniques and technology
The tools, programs, and technology are progressing every day and to make the best use of the same, you need to evolve with the technology. To use the features and functions of the software you need to keep learning and growing.
03Go with the basic first
While working with the animations, it is very easy to get carried away with the process and get into the trap of looking for details. This will eventually move you away from your main track and will lead to a waste of time and effort. Thus, it is always advisable to go with the basics first and then move towards the detailing.
04Learn about the human emotions
Facial expressions are an important element of any 3D animation that brings life to characters. A good animation will portray good and complex emotions and thus it is important to study these emotions in detail so that they can be incorporated into your objects, models, and characters.

● Key Takeaways from This Episode →
● Animations created in 3-dimensional space are termed 3D animations.
● 3D animations involve pre-production, post-production, and several steps.
● For the smooth creation of 3D animations, several tips and tricks can be considered.
● A wide range of tools for creating 3D animations are available and one of the best tools in the category is Wondershare Filmora Video Editor that is effective and easy to use.
With present-day technology, 3D animation has reached all spheres be it entertainment, advertising, architecture, education, and much more. With the increasing use of 3D animation, there is a rise in the tools and programs used for creating such animations.
So, to help you get all the details about 3D animation, 3D modelling and animation process, best tools, tips, and tricks, keep reading the following parts.
In this article
01 [What Does 3D Animation Mean?](#Part 1)
02 [What is the Process of 3D Animation?](#Part 2)
03 [Types of 3D Animations](#Part 3)
04 [Top 5 3D Animation Software](#Part 4)
05 [Top Animation Tips and Tricks](#Part 5)
Part 1 What does 3D animation mean?
In simplest terms, animation is a process of manipulating the images so that they appear to be moving, and when this manipulation is done in three-dimensional space, it is called 3D animation. The objects and the models used for 3D animation can be rotated or moved like the real ones. Some tools can be used to scan real-life objects which can be then used as blueprints for creating animation 3D models.
The characters and the objects in 3D animations have to be moved to make them as realistic as possible. No matter, how interesting or perfect character you may create, if it does not move in an even manner, the overall effect will be ruined. The latest techniques and tools these days are capable of creating lifelike scenes.
Part 2 What is the process of 3D Animation?
Creating a 3D animation is a complex process involving several phases. Below listed are the main 3 phases for creating an animation.
01Modeling
The main thing for any 3D animation is its objects, models, or characters and this phase involves creating these objects. Since the objects are based on 3D computer models, the process is termed 3D modeling. A model by a computer appears like a mesh of geometric shapes including curves, points, lines, and more. These shapes do not look anywhere like real objects and only after when the textures and colors are added to them, they appear like real things.
02Layout and animation
The next step is layout and animation where characters are placed in the scenes and the animation of their movements is done using 3D animation tools. Initially, keyframes are created which are the start and the end pose of any animation, and then later other details like the effects, lighting, camerawork, and more are added to get the desired animation that appears on the screen.
03Rendering
The final step in the 3D creation process is rendering where the created animation is finalized as well as exported. To make sure that the final animation plays seamlessly and looks absolutely perfect, it is essential to check all the minute details.
After the production of 3D animation is done, next comes the post-production which is the phase where effects, music, and voiceovers are added and combined to make the entire animation look complete.
Part 3 Types of 3D animations
Now when we know what is a 3D animation and its process, we also need to know that different types of 3D animations are there. Some of the key ones are as below.
● 3D videos and movies
● 3D Virtual Reality
● Interactive 3D
● Digital 3D
● Clay Motion also termed Stop motion animation
● Pixilation
● Cell-shaded animation
● Paint-on-glass
● Pinscreen
Part 4 Top 5 3D Animation software
When it comes to 3D animation tools, the choices can be overwhelming and the list of promises claimed by the tools can be large. He, you need to shortlist the tools that best match your requirements as well as your skill sets. Below we have narrowed down the top 5 software of the category.
01Autodesk Maya
This is a top-rated animation, modeling, simulation, and rendering tool. Using this versatile tool, complex characters and animated videos can be created with all the needed effects.
Key features:
● Versatile 3D animation tool with support to a wide range of features.
● Available for download on Windows, Mac, and Linux systems.
● Allows creating complex characters, adding realistic effects, custom graphics, and more.
● Arnold’s feature of the tool allows switching between CPU and GPU.
● Animation features like fast-playback, time editing, graph editing, ghost editing, multiple modeling options, and others are supported.
02Blender
This is free and open-source software that can be used for creating 3D animations, motion graphics, computer games, and more. Since the tool has been in use for a long time, several artists keep adding to the tool.
Key features
● Free and open-source animation tool.
● Support to multiple platforms including Windows, Mac, and Linux.
● OpenGL interface which makes the functioning smooth.
● Comprehensive and robust set of tools for creating versatile animations. Some of these include automatic skilling, unwrapping texturing, envelope, skeleton, B-spline interpolated bones, sound synchronization, and more.
● Support input from motion-capture tools.
03Houdini
Used by reputed VFX companies like Pixar, Sony, Disney, and others, this is an excellent software that can be used for creating 3D animations, games, and others. With multi-platform support, it is a paid tool that also comes with a free learning edition.
Key features
● Feature-packed animation tool used by industry pioneers.
● Use node-based workflow for creating animations.
● Create biped and quadruped 3D objects using rigging tools.
● Comes with multiple plans to choose from as per budget and requirements.
● Offers a high level of flexibility and creativity.
04Cinema 4D
This professional animation creation software is known for its features and stability. With the availability of multiple tutorials and guides, learning the tool and its functions is easy.
Key features of the software
● Known to be an excellent tool for motion graphics, illustrations, and visualizations.
● Easy learning curve owing to the availability of tutorials, guides, and training materials. Access to free membership of Cineversity which is a training site.
● Comes with a 14-day free trial version along with a free education version for the teachers and students.
● Functions of the software are tested by QA and Beta testers that offer high stability.
● Support features like automatic keyframing, tag and expressions, effectors, and more.
05**Wondershare Filmora Video Editor **
If you are looking for software that is simple and easy to use but supports all advanced features this is one of the best choices. Available for Windows and Mac the tool also works as an excellent video editing tool.
Key features
● This easy 3D animation tool Allows creating sharp and lively animations using features like keyframing, motion-tracking, and others.
● Allows to add the preset motions or even customize your own animations.
● The speed, as well as the duration of the animation, can be changed using the ease-in and ease-out options.
● Make your videos lively with features like warp, distorting, masking, lights & flares, text& titles, and more.
● High-quality presets are available with features like auto-correction, color wheels, scopes, and more.
● Audio features supported like automatic audio sync, audio compression, audio transitions, and noise correction.
For Win 7 or later (64-bit)
For macOS 10.12 or later
Part 5 Top Animation Tips And Tricks
Though 3D animation requires a lot of technical know-how of the process, there are several tips and tricks that can make your task quicker, easier, and smoother. We have gathered a few such tips below.
01Make realistic objects by observing real life
The more you will observe real-life the more you will be able to imitate it into your animations for giving life to your objects, models, and characters. Having some knowledge about real-life, gravity, and similar topics will help you work on your animations more interactively.
02Evolve with latest techniques and technology
The tools, programs, and technology are progressing every day and to make the best use of the same, you need to evolve with the technology. To use the features and functions of the software you need to keep learning and growing.
03Go with the basic first
While working with the animations, it is very easy to get carried away with the process and get into the trap of looking for details. This will eventually move you away from your main track and will lead to a waste of time and effort. Thus, it is always advisable to go with the basics first and then move towards the detailing.
04Learn about the human emotions
Facial expressions are an important element of any 3D animation that brings life to characters. A good animation will portray good and complex emotions and thus it is important to study these emotions in detail so that they can be incorporated into your objects, models, and characters.
● Key Takeaways from This Episode →
● Animations created in 3-dimensional space are termed 3D animations.
● 3D animations involve pre-production, post-production, and several steps.
● For the smooth creation of 3D animations, several tips and tricks can be considered.
● A wide range of tools for creating 3D animations are available and one of the best tools in the category is Wondershare Filmora Video Editor that is effective and easy to use.
Secret Source to Make a Stop Motion Puppet
Secret Source to Make a Stop Motion Puppetd
An easy yet powerful editor
Numerous effects to choose from
Detailed tutorials provided by the official channel
The significant difference between a stop-motion puppet and other types is that they have an armature inside. An armature is the puppet’s skeleton, a must to hold its position without sleeping for each captured frame. The stop motion puppet makeover should be precise to prevent it from breaking down or falling quickly. In addition, buying a stop-motion puppet armature might be pretty expensive, so making them by yourself is much more fun and cheaper.

To prevent any mishap during your stop-motion puppet making, your pupils should be as durable and lightweight as possible, and they must be designed based on what you will be doing and what kind of movement will be required of them. In essence, your story’s overall purpose for creating the animation will be the ultimate factor in how your character is built and designed.
In this article
01 [8 Popular Stop Motion Puppet Examples](#Part 1)
02 [How to Make a Stop Motion Puppet](#Part 2)
Part 1 8 Popular Stop Motion Puppet Examples
While wandering all through the web world, you will encounter many famous stop motion puppets. Some of them are very popular stop-motion puppets for sale, and this section of the article is about to explore eight (of them and what they stand for:
01Rudolph the Red-Nosed Reindeer

Rudolph, the Red-Nosed Reindeer, is a pleasant Christmas stop motion animated TV special in 19produced by video craft international limited. These figures starred in the perennially beloved stop motion animation Christmas special.
02Nestor the Long-Eared Christmas Donkey

The Long-Eared Christmas Donkey, Nestor is a Christmas stop motion animated TV special in 19produced by Rankin-Bass productions. The story is back in the Roman Empire days when miniature donkeys were born with very long years and kept getting into trouble. When the owner decides to throw him out of the stable, his mother sacrifices her life to save him from a blizzard.
03Santa Claus is Comin’ to Town

This is a stop-motion animation TV special in 19made by Rankin-bass productions. The story tells all about Santa Claus when he was a baby and growing up with the Kringles. The story is told and sang by a special delivery Kluger voiced by Fred Astaire.
04Negative Space
This one is one of the world’s wide appreciated and Oscar-nominated stop motion puppet animations that reflect the son and father relationship in an interactive way. It is a must to watch animation effects.

05Fantastic Mr. Fox

Fantastic Mr. Fox is a 20puppet animation movie that talks about an urban fox that cannot resist returning to his farm and must help his community survive the farmer’s retaliation.
06Coraline

Coraline is a 20Pope x animation TV series that talks about an adventurous 11-year-old girl that finds another strange world that is an idealized version of her frustrating home.
07The Nightmare before Christmas

The nightmare before Christmas is a puppet animation TV series that talks about Jack Skellington, the king of Halloween Town, and discovers Christmas town but his attempts to bring Christmas to his home result in confusion.
07Corpse bride

Corpse Bride is a puppet animated family TV series in 20talks about a shy groom practicing his wedding vow in the inadvertent presence of a deceased young woman as she rises from the grave, assuming that he has married her.
Part 2 How to Make a Stop Motion Puppet
Do you have a story, and you need some puppets to take the place of your actors, and you want to double in stop motion animation. The fact is there are different ways to create your Stop Motion Puppet, and as per your storyboard requirement, you can go with other methods. Such as, you can either use tools to build your puppet armature, otherwise can make some puppets from clothes and threads to give it a structure, else can use clay to assign a static puppet structure. It’s all your choice, so all in all what you need is:
● A Storyboard
● Puppet armature tools
● Camera setup
● Editing Software (in our case, we are going to use Wondershare Filmora Video Editor )
In this tutorial, we will be teaching you how to make stop-motion puppets in a way that is relatively cost-effective to produce durable means whose construction requires little or no time or extra equipment:

Wondershare Filmora - Best Video Editor for Mac/Windows
5,481,435 people have downloaded it.
Build unique custom animations without breaking a sweat.
Focus on creating epic stories and leave the details to Filmora’s auto features.
Start a creative adventure with drag & drop effects and endless possibilities.
Filmora simplifies advanced features to save you time and effort.
Filmora cuts out repetition so you can move on to your next creative breakthrough.
Materials:
● Ball head screws (M2.5)
● Small screws (M3)
● Ball head screws (2xand brass pipes whose diameter is less than ball head screws
● Brass plate (strips 2mm thick)
Tools:
● M3 thread tap
● M2.5 thread tap
● Screwdriver
● Pliers
● Drill press
● Drills of 2.5 mm, 2 mm, 3 mm
● Power sander
● Loctite
● File
● Bandsaw
Step
● Use the brass to mark the length of the bone
● Cut the tube according to the length
● Sandpaper or file it Square
● On both sides of the tube, use the tap to cause the tread
● Use the screws in the brass tube to screw the ball head

Step 2:
● On each sides of the brass strip, drill 2.5 mm holes
● Then, between holes of the holes you drill, drill 2.5 mm holes
● Between the other 2.5 mm holes, drill 3mm holes

Step 3:
● On the 2.5 mm holes on the sides, use the 3mm drill to create some cup
● With the 3 mm tap, cut the thread in the 2 mm holes in the middle

Step 4:
● Without damaging the holes, file the end of the strip with all the holes as close to the first 3
● From the strip, cut the parts with the first three holes
● Also, as close to the most used flyer to file the other side.
Note: Make sure you are careful while filing as this will get very hot

**Step 5:**Join all the parts together and make sure that the cup on the outer holes of the two plates is two words each other and tighten the bolts to hold the bones

Step 6: Join to strip of bras together and form a torso. Then cut the torso and form the feet

Step 7: When your puppet is the way you want it, lock teeth styles by fixing the ball head screw in place

Animation Editing:
Also, you can make a stop motion video on Filmora by considering the following factors:
● Camera Steadiness is a must for every shot you plan for Stop Motion Video. Shaking a camera is not good. Else, your video won’t be smooth.
● Ensure capture the shot under consistent light and prevent light exposure from changing on the object; otherwise, there will be inconsistency in the video.
● To make it easier, play the film in advance, as the more friends your video, the smoother the video will be.
Here are steps to make a stop motion video on Filmora:
Step 1 Place the camera steady and bring your object in the frame. Lightly move your things and capture the movement frame by frame.

Step 2 Download and start, or if you have already installed, run the Filmora program and choose a suitable frame rate in the project settings. After selecting the resolution, click on the file and go to the project setting.

Step 3 Now import the media file using the import option from the file menu and import the captured images.

Step 4 Adjust the menu’s preference or press the shortcut key Ctrl+Shift+, and a window will appear on your screen. Select the editing panel and change the photo duration between 0.2 to 0.5 seconds.

Step 5 Once done with all the settings and satisfied with the results, click on export and select your desired video format. Your video will be exported and saved in your library so you can share it with friends.

● Key Takeaways from This Episode →
● Get to know about what is stop motion puppets.
● Different examples of how dinosaur stop motion puppet or other puppet animation form works.
● The process to create your stop motion puppet and how Filmora will assist you in it.
The significant difference between a stop-motion puppet and other types is that they have an armature inside. An armature is the puppet’s skeleton, a must to hold its position without sleeping for each captured frame. The stop motion puppet makeover should be precise to prevent it from breaking down or falling quickly. In addition, buying a stop-motion puppet armature might be pretty expensive, so making them by yourself is much more fun and cheaper.
To prevent any mishap during your stop-motion puppet making, your pupils should be as durable and lightweight as possible, and they must be designed based on what you will be doing and what kind of movement will be required of them. In essence, your story’s overall purpose for creating the animation will be the ultimate factor in how your character is built and designed.
In this article
01 [8 Popular Stop Motion Puppet Examples](#Part 1)
02 [How to Make a Stop Motion Puppet](#Part 2)
Part 1 8 Popular Stop Motion Puppet Examples
While wandering all through the web world, you will encounter many famous stop motion puppets. Some of them are very popular stop-motion puppets for sale, and this section of the article is about to explore eight (of them and what they stand for:
01Rudolph the Red-Nosed Reindeer
Rudolph, the Red-Nosed Reindeer, is a pleasant Christmas stop motion animated TV special in 19produced by video craft international limited. These figures starred in the perennially beloved stop motion animation Christmas special.
02Nestor the Long-Eared Christmas Donkey
The Long-Eared Christmas Donkey, Nestor is a Christmas stop motion animated TV special in 19produced by Rankin-Bass productions. The story is back in the Roman Empire days when miniature donkeys were born with very long years and kept getting into trouble. When the owner decides to throw him out of the stable, his mother sacrifices her life to save him from a blizzard.
03Santa Claus is Comin’ to Town
This is a stop-motion animation TV special in 19made by Rankin-bass productions. The story tells all about Santa Claus when he was a baby and growing up with the Kringles. The story is told and sang by a special delivery Kluger voiced by Fred Astaire.
04Negative Space
This one is one of the world’s wide appreciated and Oscar-nominated stop motion puppet animations that reflect the son and father relationship in an interactive way. It is a must to watch animation effects.
05Fantastic Mr. Fox
Fantastic Mr. Fox is a 20puppet animation movie that talks about an urban fox that cannot resist returning to his farm and must help his community survive the farmer’s retaliation.
06Coraline
Coraline is a 20Pope x animation TV series that talks about an adventurous 11-year-old girl that finds another strange world that is an idealized version of her frustrating home.
07The Nightmare before Christmas
The nightmare before Christmas is a puppet animation TV series that talks about Jack Skellington, the king of Halloween Town, and discovers Christmas town but his attempts to bring Christmas to his home result in confusion.
07Corpse bride
Corpse Bride is a puppet animated family TV series in 20talks about a shy groom practicing his wedding vow in the inadvertent presence of a deceased young woman as she rises from the grave, assuming that he has married her.
Part 2 How to Make a Stop Motion Puppet
Do you have a story, and you need some puppets to take the place of your actors, and you want to double in stop motion animation. The fact is there are different ways to create your Stop Motion Puppet, and as per your storyboard requirement, you can go with other methods. Such as, you can either use tools to build your puppet armature, otherwise can make some puppets from clothes and threads to give it a structure, else can use clay to assign a static puppet structure. It’s all your choice, so all in all what you need is:
● A Storyboard
● Puppet armature tools
● Camera setup
● Editing Software (in our case, we are going to use Wondershare Filmora Video Editor )
In this tutorial, we will be teaching you how to make stop-motion puppets in a way that is relatively cost-effective to produce durable means whose construction requires little or no time or extra equipment:
Wondershare Filmora - Best Video Editor for Mac/Windows
5,481,435 people have downloaded it.
Build unique custom animations without breaking a sweat.
Focus on creating epic stories and leave the details to Filmora’s auto features.
Start a creative adventure with drag & drop effects and endless possibilities.
Filmora simplifies advanced features to save you time and effort.
Filmora cuts out repetition so you can move on to your next creative breakthrough.
Materials:
● Ball head screws (M2.5)
● Small screws (M3)
● Ball head screws (2xand brass pipes whose diameter is less than ball head screws
● Brass plate (strips 2mm thick)
Tools:
● M3 thread tap
● M2.5 thread tap
● Screwdriver
● Pliers
● Drill press
● Drills of 2.5 mm, 2 mm, 3 mm
● Power sander
● Loctite
● File
● Bandsaw
Step
● Use the brass to mark the length of the bone
● Cut the tube according to the length
● Sandpaper or file it Square
● On both sides of the tube, use the tap to cause the tread
● Use the screws in the brass tube to screw the ball head
Step 2:
● On each sides of the brass strip, drill 2.5 mm holes
● Then, between holes of the holes you drill, drill 2.5 mm holes
● Between the other 2.5 mm holes, drill 3mm holes
Step 3:
● On the 2.5 mm holes on the sides, use the 3mm drill to create some cup
● With the 3 mm tap, cut the thread in the 2 mm holes in the middle
Step 4:
● Without damaging the holes, file the end of the strip with all the holes as close to the first 3
● From the strip, cut the parts with the first three holes
● Also, as close to the most used flyer to file the other side.
Note: Make sure you are careful while filing as this will get very hot
**Step 5:**Join all the parts together and make sure that the cup on the outer holes of the two plates is two words each other and tighten the bolts to hold the bones
Step 6: Join to strip of bras together and form a torso. Then cut the torso and form the feet
Step 7: When your puppet is the way you want it, lock teeth styles by fixing the ball head screw in place
Animation Editing:
Also, you can make a stop motion video on Filmora by considering the following factors:
● Camera Steadiness is a must for every shot you plan for Stop Motion Video. Shaking a camera is not good. Else, your video won’t be smooth.
● Ensure capture the shot under consistent light and prevent light exposure from changing on the object; otherwise, there will be inconsistency in the video.
● To make it easier, play the film in advance, as the more friends your video, the smoother the video will be.
Here are steps to make a stop motion video on Filmora:
Step 1 Place the camera steady and bring your object in the frame. Lightly move your things and capture the movement frame by frame.
Step 2 Download and start, or if you have already installed, run the Filmora program and choose a suitable frame rate in the project settings. After selecting the resolution, click on the file and go to the project setting.
Step 3 Now import the media file using the import option from the file menu and import the captured images.
Step 4 Adjust the menu’s preference or press the shortcut key Ctrl+Shift+, and a window will appear on your screen. Select the editing panel and change the photo duration between 0.2 to 0.5 seconds.
Step 5 Once done with all the settings and satisfied with the results, click on export and select your desired video format. Your video will be exported and saved in your library so you can share it with friends.
● Key Takeaways from This Episode →
● Get to know about what is stop motion puppets.
● Different examples of how dinosaur stop motion puppet or other puppet animation form works.
● The process to create your stop motion puppet and how Filmora will assist you in it.
Adobe Animate Text Effects Skills That You Need to Know
Adobe Animate Text Effects Skills That You Need to Know
An easy yet powerful editor
Numerous effects to choose from
Detailed tutorials provided by the official channel
Adobe Animate Text Effects can be created with the use of Adobe Animate. As well as a couple of other models of Adobe.
We’ve outline a thorough explanation on the subject so that you can be prepared as you can be, so continue reading in order to learn more.
In this article
01 [What’s Text Animation?](#Part 1)
02 [What Adobe Program is Best for Text Animation?](#Part 2)
03 [5 Creative Ways to Animate Text in After Effects](#Part 3)
04 [Adobe Alternative to Make Text Animation](#Part 4)
Part 1 What’s Text Animation?
“Text Animation“ refers to moving letters, words, sentences, and even whole paragraphs. The animation, or movement, rather, can be anything. It can move from side to side, jump up and down, create a dizzying circle, recede from view, etc. Usually, said movement is placed on an endless repeat, a pattern that the text is coded to follow decided by the animator who created it!
Part 2 What Adobe Program is Best for Text Animation?
Adobe Animate is Adobe’s very own software developed for animators. Whether they be working on movies, shows, short videos for online posting, games, or text animations. As mentioned at the beginning of this article, this is the software most professionals use in order to bring life to their digital creations. It’s also the one that we’d recommend if you’re looking into advanced adobe animate text animation!
Part 3 5 Creative Ways to Animate Text in After Effects
Now, we should make it very clear, of course. That while Adobe Animate is considered the best for animation (whether it be text or character models), there are other tools that you can use in order to get the same effect. For example, there’s adobe spark animate text, adobe premiere pro animate text, and this next one, also from Adobe, called After Effects, is a VFX and motion graphics software used to create movie titles, intros, transitions, logos, and so much more.
We’ve listed some of the more creative ways you can use After Effects to create what could very well be Adobe Animate text effects below to help you along:
01METHOD 1: After Effects Animation Presets
The first, and easiest, way of animating your text with After Effects is to use presets! After Effects offers multiple animations presets that you can try in order to test out certain settings. (This is also a good way of getting to know the possibilities and limits of text animation and how you can work within those bounds.
02METHOD 2: After Effects Text Animators
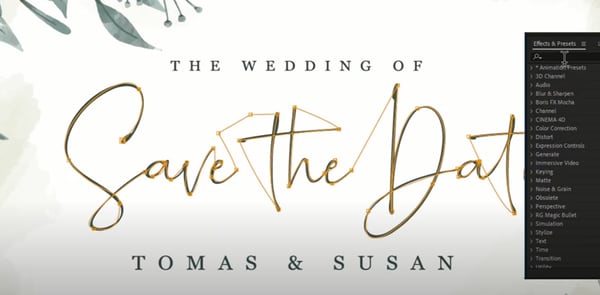
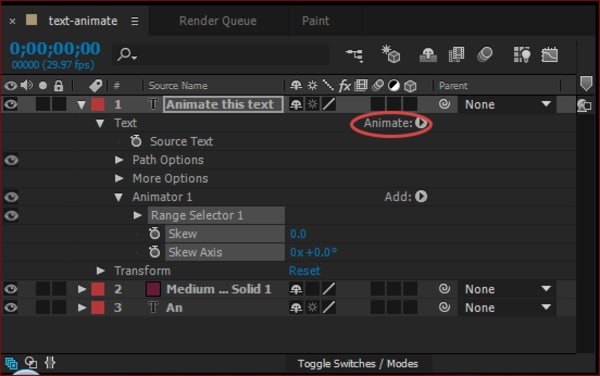
If the presets aren’t working out for you, you can also try out After Effect’s “animators” and “selectors”. To clarify, you add ‘animators’ to your text (it will mark the object(s) to be animated). And then, you use a ‘selector’ in order to specify how you want the properties to be animated. This is a great way of truly getting the exact effect that you want, although it might take some finagling to get it to work completely.
03METHOD 3: Per-Character 3D Text Properties
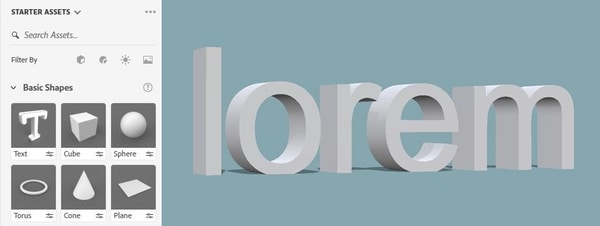
If you want to step up your game even more, you can always make your texts into 3D characters on their own! This is easier to do in Adobe Dimension, which (from the example image below) you can see has a “Text” preset that you can use in order to start creating 3D Text Properties immediately! The beauty of this method, of course, is that your text can be adjusted like any 3D character. Making the possibilities endless!
04METHOD 4: Path Animation
The next method of animating with After Effects is a little more constrained than the others we’ve introduced thus far. However, it has its uses! As you can see from the image below, you can animate your text to follow a mask (which you set over your text layer). This will make it possible for you to animate along a path.

05METHOD 5: After Effects Selectors
This next method is related to the ‘Animators’ methods we introduced second. It also works a lot like the masks we mentioned in Method 4–which, as mentioned, you can use in order to set up a foundation or limits for your animation.

Adobe Animate Text Effects can be created with the use of Adobe Animate. As well as a couple of other models of Adobe.
We’ve outline a thorough explanation on the subject so that you can be prepared as you can be, so continue reading in order to learn more.
In this article
01 [What’s Text Animation?](#Part 1)
02 [What Adobe Program is Best for Text Animation?](#Part 2)
03 [5 Creative Ways to Animate Text in After Effects](#Part 3)
04 [Adobe Alternative to Make Text Animation](#Part 4)
Part 1 What’s Text Animation?
“Text Animation“ refers to moving letters, words, sentences, and even whole paragraphs. The animation, or movement, rather, can be anything. It can move from side to side, jump up and down, create a dizzying circle, recede from view, etc. Usually, said movement is placed on an endless repeat, a pattern that the text is coded to follow decided by the animator who created it!
Part 2 What Adobe Program is Best for Text Animation?
Adobe Animate is Adobe’s very own software developed for animators. Whether they be working on movies, shows, short videos for online posting, games, or text animations. As mentioned at the beginning of this article, this is the software most professionals use in order to bring life to their digital creations. It’s also the one that we’d recommend if you’re looking into advanced adobe animate text animation!
Part 3 5 Creative Ways to Animate Text in After Effects
Now, we should make it very clear, of course. That while Adobe Animate is considered the best for animation (whether it be text or character models), there are other tools that you can use in order to get the same effect. For example, there’s adobe spark animate text, adobe premiere pro animate text, and this next one, also from Adobe, called After Effects, is a VFX and motion graphics software used to create movie titles, intros, transitions, logos, and so much more.
We’ve listed some of the more creative ways you can use After Effects to create what could very well be Adobe Animate text effects below to help you along:
01METHOD 1: After Effects Animation Presets
The first, and easiest, way of animating your text with After Effects is to use presets! After Effects offers multiple animations presets that you can try in order to test out certain settings. (This is also a good way of getting to know the possibilities and limits of text animation and how you can work within those bounds.
02METHOD 2: After Effects Text Animators
If the presets aren’t working out for you, you can also try out After Effect’s “animators” and “selectors”. To clarify, you add ‘animators’ to your text (it will mark the object(s) to be animated). And then, you use a ‘selector’ in order to specify how you want the properties to be animated. This is a great way of truly getting the exact effect that you want, although it might take some finagling to get it to work completely.
03METHOD 3: Per-Character 3D Text Properties
If you want to step up your game even more, you can always make your texts into 3D characters on their own! This is easier to do in Adobe Dimension, which (from the example image below) you can see has a “Text” preset that you can use in order to start creating 3D Text Properties immediately! The beauty of this method, of course, is that your text can be adjusted like any 3D character. Making the possibilities endless!
04METHOD 4: Path Animation
The next method of animating with After Effects is a little more constrained than the others we’ve introduced thus far. However, it has its uses! As you can see from the image below, you can animate your text to follow a mask (which you set over your text layer). This will make it possible for you to animate along a path.
05METHOD 5: After Effects Selectors
This next method is related to the ‘Animators’ methods we introduced second. It also works a lot like the masks we mentioned in Method 4–which, as mentioned, you can use in order to set up a foundation or limits for your animation.
How to Make an Animated Travel Map Video?
How to Make an Animated Travel Map Video?

Benjamin Arango
Mar 27, 2024• Proven solutions
Animated travel map videos make it easy for the viewers to follow the routes from the source to destination locations right on the single screen. While the static maps would only allow the audience to see the markers from where the journey would start and is expected to end, the animated ones show the real-time movements and therefore look more interactive when viewed.
That said, here you will learn how to create an attractive and engaging animated travel map video using one of the easiest post-production applications, Wondershare Filmora, which is widely appreciated by amateurs and professionals throughout the globe. In another section, you will also learn about an alternative program that might be of some help in case you are more into online designing.
- Method 1: Make Animated Travel Map Videos with Location Video Maker - [Video Tutorial]
- Method 2: Make Interactive Animated Travel Map with Pictramap
- Method 3: Create Animated Travel Map Using Multidev
Method 1 Make Animated Travel Map Videos with Location Video Maker
The entire process of creating an animated travel map video in Wondershare’s Filmora is categorized into two parts, wherein the first part you will collect all the ingredients that are needed to get started, and in the second part you will actually make an animated map using the tools and features present in Filmora.
Watch a video tutorial to see how to make an animated map for a video:
For Win 7 or later (64-bit)
 Secure Download
For macOS 10.14 or later
Secure Download


Part 1: Prepare the Travel Map Materials
Following are the ingredients and the methods to collect them for animated travel map preparation:
Step 1: Get the Map
The first thing that you would need to prepare an animated map is an image of a realistic map. Thanks to Google and Microsoft, these things are now pretty easy to arrange. The process is given below:
- Launch your preferred web browser
- Type google.com in the address bar or the search box and hit Enter
- Scroll to zoom out so you can see the entire world map on one screen

- Type Snipping Tool in the Cortana search box present on the left side of the Taskbar
- Launch Snipping Tool, and use it to capture the screenshot of the map
Note: Snipping Tool is a built-in app in Windows 10 and is available for free. If you are using any other operating system, or have a different program to capture the screenshots, feel free to use it according to your convenience.
- Save the screenshot you captured as a JPG file on your PC
Step 2: Mark Out the Map Path
The next step in the process of preparing an animated travel map is to mark your route on it. To do so, you can use any of your preferred photo editing tools. However, to keep this illustration simple, Microsoft Paint is used here, and the method is given below:
- Right-click the screenshot you just captured
- Go to Open with on the context menu, and then click Paint from the submenu that appears
- Pick your preferred color from the pallet of the Paint interface. It is advisable to use an eye-catchy shade such as Red
- Use the Sphere shape tool to draw a circle over the source and destination locations on the map
- Use the Line tool to draw a line from the source point to the destination. Try giving the line a few turns to make it look realistic
- Go to File > Save As, and save the marked image with a different name
Note: Once this is done, you should have two image files of the map, i.e., one without the marks and one with it
Step 3: Download Some Travel Icons
Another important ingredient in an effective travel map animation is touring icons such as location marker image, a traveling medium symbol like a helicopter, airplane, car/bike (for short distances), etc. A couple of websites that offer royalty-free stock photos at absolutely no cost are listed below:
Note: Although the websites given above allow you to download and use their stock images and icons for free, you may need to give credits to the designers/creators of the symbols while using their objects. Therefore, you are suggested to check the Terms & Conditions and norms of usage of the elements before downloading and adding them to your projects.
Part 2: Make Animated Travel Map Videos with Filmora
After you have gathered all the necessary ingredients that are required to create a travel map animation, it is now time to get to work. The following instructions would guide you through the step-by-step process of preparing a decent and realistic animated travel map in Wondershare Filmora :
For Win 7 or later (64-bit)
Secure Download
For macOS 10.14 or later
Secure Download
Step 1: Import Ingredients to Filmora and Add Them to the Timeline
Launch the video editor on your computer, click anywhere inside the Media window at the upper-left area, and import all the images and icons that you collected earlier to program. Next, drag both the images of the map, i.e., with and without the marks to the Timeline, and ensure that they are of the same duration and are placed on the same track.

Note: Be sure to put the map without the marks first, and then the one with the marks. Also note that the images have the playback duration of 5 seconds in the Timeline by default, and this tenure can be reduced or increased by dragging the side handle of the media to the left or right respectively.
Step 2: Add Transition for Illusion of Route Appearance
Go to Transition from the standard toolbar at the top, locate the Erase Slide transition effect from the available presets, and place it in between the two image files that you earlier added to the Timeline. Next, click and drag either of the side handles of the transition to the end of the media clip. Notice how the other side of the effect is expanded in equal proportion.

Step 3: Preview and Export
Press the Spacebar on the keyboard to preview the video and see if the route appears as if it is being drawn on the map. Once the animation looks acceptable, click EXPORT from the top-center, go to the Local tab on the Export window, select MP4 from the formats list in the left, and click EXPORT from the bottom-right corner to export the current animation to MP4.
Step 4: Customize the Travel Map Media
Either start a new project and import the video of the map you exported in the previous step to the app and then to the Timeline, or remove the existing media from the Timeline in the same project, and add the exported video to it for convenience.

For Win 7 or later (64-bit)
Secure Download
For macOS 10.14 or later
Secure Download
Next, position the Skimmer (Playhead) a couple of frames before the one the route line appears and starts stretching from, and click the Split icon from the editing toolbar above the Timeline itself. Repeat this process for the other side of the media, i.e., position the Skimmer a couple of frames after the route line reaches the destination location, and click the Split icon again. Then remove the separated segments from both the sides by selecting them and pressing Delete on the keyboard, leaving only the portion where the animation is visible.

Optionally, right-click the media that is left behind in the Timeline, and go to Speed and Duration from the context menu. On the Custom Speed box, drag the Speed slider to the left to decrease the playback speed resulting in the increased duration of the media. Alternatively, you can manually enter a value in the Speed box to get precise tenure. Click OK when you are done.

Step 5: Add Animations to Travel Map
Right-click the media in the Timeline, and go to Add Animation from the context menu. Make sure that the Skimmer is on the first frame, and add several keyframes as explained below:
- Click Add to add the first keyframe

- Move a couple of frames further, and click Add one more time. Now, while you are on this second keyframe, use the Scale slider to zoom in to the map so the source location remains within focus.

- Next, move the Playhead further and add another keyframe a couple of frames before the route line hits the edge of the window.
- After this, move the Playhead again and position it where the route line reaches its destination location. Add another keyframe here as well, and move the map in the Preview window so the focus is now on the destination.
- Move the Playhead a few frames further, add another keyframe, and use the Scale slider to zoom a bit more into the map to make the entire animation look realistic. Click OK to save the changes.
Step 6: Add Icons and Titles, and Export the Project
Drag the image of the traveling medium to the Timeline, and place it on the frame the route line starts from. Make sure to place the image on the track above the map, and stretch it to the end so it remains visible throughout the animation. Next, use the method explained above to add keyframes to move the medium along with the route line from the source to the destination. Optionally, add the image of the location marker at the destination point, go to Transition, and add your preferred transition effect, preferably Dissolve, to the marker track in the Timeline so it looks as if it has appeared as the medium arrived the destination.
For Win 7 or later (64-bit)
Secure Download
For macOS 10.14 or later
Secure Download
Get back to the first frame in the Timeline, go to Titles on the standard toolbar, and add a title preset somewhere near the source location. Resize the text, change the format as needed, and add your preferred caption to it such as the start time, name, etc. Reduce the duration of the track so the title appears for a few frames, preferably before the map animation starts. Click OK when done. Repeat this process for the destination point as well.
Once everything is complete, click the Play button in the Preview window to review your work. If the video looks acceptable, click EXPORT from the top-center of the interface, and use the method explained earlier to export the animated travel map in your preferred format.
![]()
Method 2 How to Make Interactive Animated Travel Map with Pictramap
If you don’t want to install a dedicated animation software on your computer due to limited hardware resources or some other reason, there is an online solution called Pictramap to create a travel map animation using a web browser. The web app offers a lucrative interface that could be easily understood and worked with to produce an animated map for free.
The process to create an animated travel map with Pictramap is given below:
Step 1: Create a Project
Launch your favorite web browser, go to https://www.pictramap.com/ , click Create yours now, it’s free, and sign up to Pictramap using your preferred method. When you are on the Dashboard, enter a name in the field available under the My Projects section, and click Create to create a new project (the animated map).

Step 2: Define the Locations and Method of Commute
On the map, right-click the location you want to start your journey from, enter the name of the location or any other significant title, and click Add. Click the location marker, click the Travel Mode icon, and select your preferred mode of traveling. Repeat this process to mark the destination location as well.

Step 3: Preview the Animation
Click the View Animation button from the upper-right corner of the page to see the animated travel map.

Downsides of Using Pictramap to Create Animated Travel Map Video
Although Pictramap allows you to create a travel map animation with ease and extremely quickly, at the time of this writing, it offers no way of downloading the animation to your PC, and therefore it couldn’t be used in your projects.
If you are using Wondershare Filmora, you can use its built-in screen recording feature to record the animation that Pictramap plays, and then save the captured footage as MP4 or any other format on your computer. This video can then be imported to your projects for further uses.
![]()
A cross-platform for making videos anywhere for all creators

Why your video editing isn’t good enough? How about some creative inspo?
- 100 Million+ Users
- 150+ Countries and Regions
- 4 Million+ Social Media Followers
- 5 Million+ Stock Media for Use
* Secure Download

Method 3 How To Make Animated Travel Map Using Multidev
Multi.dev is still a new web-based application to build awesome animated maps, but it’s good! The application helps you create presentations about all your recent and previous trips. And the interface is also hassle-free.
So, follow this step-by-step guide to making animated maps with Multi.dev.
Step 1: Open Multi.dev
Visit Multi.dev from your internet browser.

Once the tool gets open, you will see a demo video. This example clip will have animated maps of different locations. So it is up to you whether to use the same example and edit the places you have been to or are planning to visit. Or, simply create a new animated map from scratch.
Step 2: Choose Your First Location
Take your mouse cursor on the left side of the application and type the first location in the search bar. As soon as you do it, you will see that the “travel arrow” will automatically begin from there. Likewise, type and select the next location through the search bar.
Once you type the location, you will see 8 travel modes, including airplane, bus, and train. You can select the same mode for all sites or a different mode for another place. Totally up to you!

Step 3: Select Map Themes
All your chosen places will be highlighted in the software’s minimalistic map.

Step 4: Download Map on Your Computer
If you’re happy with the animated map, click the “Create Video” button to save the animated map on your computer in a few minutes.


Contrarily, you can also share the animation by choosing the “Share Animation” option.
Conclusion
An animated travel map plays an important role to add a realistic touring effect to your motion picture projects. While you can use a web app like Pictramap to create such an animation online easily and for free, the limitations it comes along with might keep you from choosing this method.
Instead, you may want to get more inclined toward a dedicated post-production software like Wondershare Filmora that gives you full control over the process, and the freedom to choose your preferred format to export the animation to for independent usage.
For Win 7 or later (64-bit)
Secure Download
For macOS 10.14 or later
Secure Download
Benjamin Arango
Benjamin Arango is a writer and a lover of all things video.
Follow @Benjamin Arango
Benjamin Arango
Mar 27, 2024• Proven solutions
Animated travel map videos make it easy for the viewers to follow the routes from the source to destination locations right on the single screen. While the static maps would only allow the audience to see the markers from where the journey would start and is expected to end, the animated ones show the real-time movements and therefore look more interactive when viewed.
That said, here you will learn how to create an attractive and engaging animated travel map video using one of the easiest post-production applications, Wondershare Filmora, which is widely appreciated by amateurs and professionals throughout the globe. In another section, you will also learn about an alternative program that might be of some help in case you are more into online designing.
- Method 1: Make Animated Travel Map Videos with Location Video Maker - [Video Tutorial]
- Method 2: Make Interactive Animated Travel Map with Pictramap
- Method 3: Create Animated Travel Map Using Multidev
Method 1 Make Animated Travel Map Videos with Location Video Maker
The entire process of creating an animated travel map video in Wondershare’s Filmora is categorized into two parts, wherein the first part you will collect all the ingredients that are needed to get started, and in the second part you will actually make an animated map using the tools and features present in Filmora.
Watch a video tutorial to see how to make an animated map for a video:
For Win 7 or later (64-bit)
Secure Download
For macOS 10.14 or later
Secure Download
Part 1: Prepare the Travel Map Materials
Following are the ingredients and the methods to collect them for animated travel map preparation:
Step 1: Get the Map
The first thing that you would need to prepare an animated map is an image of a realistic map. Thanks to Google and Microsoft, these things are now pretty easy to arrange. The process is given below:
- Launch your preferred web browser
- Type google.com in the address bar or the search box and hit Enter
- Scroll to zoom out so you can see the entire world map on one screen
- Type Snipping Tool in the Cortana search box present on the left side of the Taskbar
- Launch Snipping Tool, and use it to capture the screenshot of the map
Note: Snipping Tool is a built-in app in Windows 10 and is available for free. If you are using any other operating system, or have a different program to capture the screenshots, feel free to use it according to your convenience.
- Save the screenshot you captured as a JPG file on your PC
Step 2: Mark Out the Map Path
The next step in the process of preparing an animated travel map is to mark your route on it. To do so, you can use any of your preferred photo editing tools. However, to keep this illustration simple, Microsoft Paint is used here, and the method is given below:
- Right-click the screenshot you just captured
- Go to Open with on the context menu, and then click Paint from the submenu that appears
- Pick your preferred color from the pallet of the Paint interface. It is advisable to use an eye-catchy shade such as Red
- Use the Sphere shape tool to draw a circle over the source and destination locations on the map
- Use the Line tool to draw a line from the source point to the destination. Try giving the line a few turns to make it look realistic
- Go to File > Save As, and save the marked image with a different name
Note: Once this is done, you should have two image files of the map, i.e., one without the marks and one with it
Step 3: Download Some Travel Icons
Another important ingredient in an effective travel map animation is touring icons such as location marker image, a traveling medium symbol like a helicopter, airplane, car/bike (for short distances), etc. A couple of websites that offer royalty-free stock photos at absolutely no cost are listed below:
Note: Although the websites given above allow you to download and use their stock images and icons for free, you may need to give credits to the designers/creators of the symbols while using their objects. Therefore, you are suggested to check the Terms & Conditions and norms of usage of the elements before downloading and adding them to your projects.
Part 2: Make Animated Travel Map Videos with Filmora
After you have gathered all the necessary ingredients that are required to create a travel map animation, it is now time to get to work. The following instructions would guide you through the step-by-step process of preparing a decent and realistic animated travel map in Wondershare Filmora :
For Win 7 or later (64-bit)
Secure Download
For macOS 10.14 or later
Secure Download
Step 1: Import Ingredients to Filmora and Add Them to the Timeline
Launch the video editor on your computer, click anywhere inside the Media window at the upper-left area, and import all the images and icons that you collected earlier to program. Next, drag both the images of the map, i.e., with and without the marks to the Timeline, and ensure that they are of the same duration and are placed on the same track.
Note: Be sure to put the map without the marks first, and then the one with the marks. Also note that the images have the playback duration of 5 seconds in the Timeline by default, and this tenure can be reduced or increased by dragging the side handle of the media to the left or right respectively.
Step 2: Add Transition for Illusion of Route Appearance
Go to Transition from the standard toolbar at the top, locate the Erase Slide transition effect from the available presets, and place it in between the two image files that you earlier added to the Timeline. Next, click and drag either of the side handles of the transition to the end of the media clip. Notice how the other side of the effect is expanded in equal proportion.
Step 3: Preview and Export
Press the Spacebar on the keyboard to preview the video and see if the route appears as if it is being drawn on the map. Once the animation looks acceptable, click EXPORT from the top-center, go to the Local tab on the Export window, select MP4 from the formats list in the left, and click EXPORT from the bottom-right corner to export the current animation to MP4.
Step 4: Customize the Travel Map Media
Either start a new project and import the video of the map you exported in the previous step to the app and then to the Timeline, or remove the existing media from the Timeline in the same project, and add the exported video to it for convenience.
For Win 7 or later (64-bit)
Secure Download
For macOS 10.14 or later
Secure Download
Next, position the Skimmer (Playhead) a couple of frames before the one the route line appears and starts stretching from, and click the Split icon from the editing toolbar above the Timeline itself. Repeat this process for the other side of the media, i.e., position the Skimmer a couple of frames after the route line reaches the destination location, and click the Split icon again. Then remove the separated segments from both the sides by selecting them and pressing Delete on the keyboard, leaving only the portion where the animation is visible.
Optionally, right-click the media that is left behind in the Timeline, and go to Speed and Duration from the context menu. On the Custom Speed box, drag the Speed slider to the left to decrease the playback speed resulting in the increased duration of the media. Alternatively, you can manually enter a value in the Speed box to get precise tenure. Click OK when you are done.
Step 5: Add Animations to Travel Map
Right-click the media in the Timeline, and go to Add Animation from the context menu. Make sure that the Skimmer is on the first frame, and add several keyframes as explained below:
- Click Add to add the first keyframe
- Move a couple of frames further, and click Add one more time. Now, while you are on this second keyframe, use the Scale slider to zoom in to the map so the source location remains within focus.
- Next, move the Playhead further and add another keyframe a couple of frames before the route line hits the edge of the window.
- After this, move the Playhead again and position it where the route line reaches its destination location. Add another keyframe here as well, and move the map in the Preview window so the focus is now on the destination.
- Move the Playhead a few frames further, add another keyframe, and use the Scale slider to zoom a bit more into the map to make the entire animation look realistic. Click OK to save the changes.
Step 6: Add Icons and Titles, and Export the Project
Drag the image of the traveling medium to the Timeline, and place it on the frame the route line starts from. Make sure to place the image on the track above the map, and stretch it to the end so it remains visible throughout the animation. Next, use the method explained above to add keyframes to move the medium along with the route line from the source to the destination. Optionally, add the image of the location marker at the destination point, go to Transition, and add your preferred transition effect, preferably Dissolve, to the marker track in the Timeline so it looks as if it has appeared as the medium arrived the destination.
For Win 7 or later (64-bit)
Secure Download
For macOS 10.14 or later
Secure Download
Get back to the first frame in the Timeline, go to Titles on the standard toolbar, and add a title preset somewhere near the source location. Resize the text, change the format as needed, and add your preferred caption to it such as the start time, name, etc. Reduce the duration of the track so the title appears for a few frames, preferably before the map animation starts. Click OK when done. Repeat this process for the destination point as well.
Once everything is complete, click the Play button in the Preview window to review your work. If the video looks acceptable, click EXPORT from the top-center of the interface, and use the method explained earlier to export the animated travel map in your preferred format.
![]()
Method 2 How to Make Interactive Animated Travel Map with Pictramap
If you don’t want to install a dedicated animation software on your computer due to limited hardware resources or some other reason, there is an online solution called Pictramap to create a travel map animation using a web browser. The web app offers a lucrative interface that could be easily understood and worked with to produce an animated map for free.
The process to create an animated travel map with Pictramap is given below:
Step 1: Create a Project
Launch your favorite web browser, go to https://www.pictramap.com/ , click Create yours now, it’s free, and sign up to Pictramap using your preferred method. When you are on the Dashboard, enter a name in the field available under the My Projects section, and click Create to create a new project (the animated map).
Step 2: Define the Locations and Method of Commute
On the map, right-click the location you want to start your journey from, enter the name of the location or any other significant title, and click Add. Click the location marker, click the Travel Mode icon, and select your preferred mode of traveling. Repeat this process to mark the destination location as well.
Step 3: Preview the Animation
Click the View Animation button from the upper-right corner of the page to see the animated travel map.
Downsides of Using Pictramap to Create Animated Travel Map Video
Although Pictramap allows you to create a travel map animation with ease and extremely quickly, at the time of this writing, it offers no way of downloading the animation to your PC, and therefore it couldn’t be used in your projects.
If you are using Wondershare Filmora, you can use its built-in screen recording feature to record the animation that Pictramap plays, and then save the captured footage as MP4 or any other format on your computer. This video can then be imported to your projects for further uses.
![]()
A cross-platform for making videos anywhere for all creators
Why your video editing isn’t good enough? How about some creative inspo?
- 100 Million+ Users
- 150+ Countries and Regions
- 4 Million+ Social Media Followers
- 5 Million+ Stock Media for Use
* Secure Download
Method 3 How To Make Animated Travel Map Using Multidev
Multi.dev is still a new web-based application to build awesome animated maps, but it’s good! The application helps you create presentations about all your recent and previous trips. And the interface is also hassle-free.
So, follow this step-by-step guide to making animated maps with Multi.dev.
Step 1: Open Multi.dev
Visit Multi.dev from your internet browser.
Once the tool gets open, you will see a demo video. This example clip will have animated maps of different locations. So it is up to you whether to use the same example and edit the places you have been to or are planning to visit. Or, simply create a new animated map from scratch.
Step 2: Choose Your First Location
Take your mouse cursor on the left side of the application and type the first location in the search bar. As soon as you do it, you will see that the “travel arrow” will automatically begin from there. Likewise, type and select the next location through the search bar.
Once you type the location, you will see 8 travel modes, including airplane, bus, and train. You can select the same mode for all sites or a different mode for another place. Totally up to you!
Step 3: Select Map Themes
All your chosen places will be highlighted in the software’s minimalistic map.
Step 4: Download Map on Your Computer
If you’re happy with the animated map, click the “Create Video” button to save the animated map on your computer in a few minutes.
Contrarily, you can also share the animation by choosing the “Share Animation” option.
Conclusion
An animated travel map plays an important role to add a realistic touring effect to your motion picture projects. While you can use a web app like Pictramap to create such an animation online easily and for free, the limitations it comes along with might keep you from choosing this method.
Instead, you may want to get more inclined toward a dedicated post-production software like Wondershare Filmora that gives you full control over the process, and the freedom to choose your preferred format to export the animation to for independent usage.
For Win 7 or later (64-bit)
Secure Download
For macOS 10.14 or later
Secure Download
Benjamin Arango
Benjamin Arango is a writer and a lover of all things video.
Follow @Benjamin Arango
Want to Make a Meme GIF?
Want to Make a Meme GIF? Here’s How to Do
An easy yet powerful editor
Numerous effects to choose from
Detailed tutorials provided by the official channel
You might know that mememe gif, are very much popular in the market of graphics developing on the internet. This kind of meme culture has got well developed in our life style so that you might have not imagined before. Even this topic was not too much exclusive on the web. Thus we have begun to employ memes in our daily life style. This was the one that started as a humorous topic and now during these days it became to be much talked in the form of freedom of speech.
Take for example the cat in grumpy form, a sandwich eating kid or a successful kid all these are the best tips for making a gif meme. Even today they are being used at a very wide scale. Finally you can see that memes of gifs have become a very valuable part of our lives. When you make use of such kind of technology then you will get benefit in the tasks related to media and the internet.
In this article
01 [Can Gifs Be Memes?](#Part 1)
02 [8 Must-Visit GIF Websites to Get Stunning Memes](#Part 2)
03 [How to Make a Meme GIF](#Part 3)
04 [Tips for Inspiring Meme Gifs Ideas](#Part 4)
Part 1 Can Gifs Be Memes?

01What’s Memes?
You will see that memes is a good element of any kind of system or culture. This kind of system could be passed from one person to the other one. This task can be also done well by non genetic methods. You can say when you make meme gif, then you have to use any kind of video, photo, image and piece of any paper showing some written text. This text can be used well by persons who use internet in a very extensive way. Memes generally has a humorous nature so most internet users will have a fine experience while using it.
02What Does Meme and GIF Stand For?
When we talk of meme then you will see that it stands for Multimedia & Electronic Music Experiments. This is a way with which you can develop many customizable electronic instruments in the long way. You will see that Meme was first of all developed by Richard Dawkins in the year 1976. He did it with replicating as well as transmission of meme. When we talk about gif then we will see that stands for Graphics Interchange Format. It was first of all made in the year 1987. With this kind of system you can decrease the size of animated pictures and images.
Part 2 Must-Visit GIF Websites to Get Stunning Memes
01GIPHY
Key Features-
When you make a gif meme then you will see that this website was first of all created by Jack Cooke and Alex Chung. They did it in the form of a GIF and even a sticker keyboard that was having unique characteristics**.** Here you have to simply plug inside a keyboard and click on the button of the search bar. In this way you can create many samples of gif and upload them from the sites of social media like Facebook and Instagram.
02 Tenor
Key Features-
The interface of Tenor is very much good looking and straight forward. With it you can type the keyword concerned with the homepage to your GIF to search it with the help of hit bar. With Tenor you can also make genius ideas related to making a meme gif. When you visit the site of Tenor then you will see that it does not have any scarcity of content when you want to upload graphics interface format with it on your website.
03 GIFER
Key Features-
When you ignore the meme gif site of GIFER then you will see that your list will be incomplete without it. This is one of the best resources for getting and making gif memes on the pin point. When you want to type anything or want to get some information about any subject then click on any of the emotion icons. You may also click on the search bar.
04 Gfycat
Key Features-
The site of Gfycat is the best when you want to so like the activities of making memes. This is the best way to make a gif meme so that you will get good results in the task of making graphic interface samples. Like all the websites of GIF this site will also enable you to seek search content. Just type specific keywords or you might simply click on the left side panel.
05Imgflip
Key Features-
When you want to make a meme gif then just land on the site of Imgflip. This could be a great option. When we compare it with other kind of GIF sites then we will see that they have a simple layout. You can click on the search icon that is at the top and get information about any of your target keywords.
06Reaction GIFs
Key Features-
Here when you land on the site of Reaction GIFs. You can type your favorite keyword like make a meme gif on the right side of this search engine and hit on the search icon. You can also easily upload any kind of content even yet this procedure might take a bit more time. This kind of website is visible in a streamlined way. Here you can even make the entries related to FAQs.
07Imgur
Key Features-
When you talk of Imgur then you will see that you can make and create static images with this kind of site. This is a genuine site with which you can make a meme gif. You can make any kind of theme related to internet graphics when you choose this site.
Part 3 How to Make a Meme GIF
01How to Make a Meme GIF on Ios &Want to make an Android Gift?
When you want to make a Meme GIF on Los then you can make use of Meme maker. Here you can get started well. Just take one such page and upload a GIF on it. You may even click on the text that is seen on the top left to make addition of the needed captions. Here you can add your needed images or audio options. When you want to make an android gif then just make the following steps:-
● Just open the gallery of your desired app and press the images that depict your needed photos.
● Tape the icon that shows the 3 vertical dots.
● Choose the create option and select the GIF option.
● You can create the GIF image and review it in a better way.
02How to Make a Meme GIF on Window? Here’s How to & Mac?
When you make a meme gif on Window then you have to see and take some steps:-
● Just land on the IMGFlip website.
● You have to click on the icon of GIF icon.
● Just import an image and video to make it converted to GIF.
● You may add a text to the GIF.
● You may also customize the speed and count the times that you have played it.
● Finally you may save it in animated form.
Part 4 Tips for Inspiring Meme Gifs Ideas
When you want to add and follow tips for inspiring more ideas for making meme gif then you can see that such ideas are even being used at TV shows and movies. You can even make attractive images with them. You can easily loop these images to create the best animated clips. After you make a meme gif then you will see that even you can use a pop reference in the long way. When you do the combination of meme and gif then you can also make humorous clips that are called as meme gif. Even you can make use of the content that is concerned with Wondershare Filmora Video Editor VII so that your graphics will appear well in the long way.
Wondershare Filmora - Best Video Editor for Mac/Windows
5,481,435 people have downloaded it.
Build unique custom animations without breaking a sweat.
Focus on creating epic stories and leave the details to Filmora’s auto features.
Start a creative adventure with drag & drop effects and endless possibilities.
Filmora simplifies advanced features to save you time and effort.
Filmora cuts out repetition so you can move on to your next creative breakthrough.
Brief summary
● When you make meme gif then you will see that with this technology you can create a fine system on the internet frame as far as meme is concerned with Filmora VII. On the other hand gif stands for graphic interface formats.
● You can visit more websites for gif and meme creation on the internet and here you will get many unique websites for gif creation. You can also take help from graphics experts who will give you the best output concerned with gif and making a meme in the long way.
● You can get more tips on the web when you want to make gif samples on the platform of android and Mac. Here you will have to take and follow certain steps and with it you will reach your goal to make the best graphical interface even on all kinds of smart phones etc. Here you will also get support to make a meme gif. Taking care about what you need for meme gif
● Key Takeaways from This Episode →
● When we talk about the final conclusion of this article then we will see that meme gif will be a nice way to develop advanced methods of media and graphics interchange format. Here you will see that this could be a free method with which you can make a perfect meme.
● You can also use GIPHY on the technology platform of iPad, iPhone and Android. You can also make the task of downloading of GIPHY on your phone that might be of any model. You can make memes gif for your app store in your phone. You can do this task easily on your search bar. Most of these apps are available in black color.
You might know that mememe gif, are very much popular in the market of graphics developing on the internet. This kind of meme culture has got well developed in our life style so that you might have not imagined before. Even this topic was not too much exclusive on the web. Thus we have begun to employ memes in our daily life style. This was the one that started as a humorous topic and now during these days it became to be much talked in the form of freedom of speech.
Take for example the cat in grumpy form, a sandwich eating kid or a successful kid all these are the best tips for making a gif meme. Even today they are being used at a very wide scale. Finally you can see that memes of gifs have become a very valuable part of our lives. When you make use of such kind of technology then you will get benefit in the tasks related to media and the internet.
In this article
01 [Can Gifs Be Memes?](#Part 1)
02 [8 Must-Visit GIF Websites to Get Stunning Memes](#Part 2)
03 [How to Make a Meme GIF](#Part 3)
04 [Tips for Inspiring Meme Gifs Ideas](#Part 4)
Part 1 Can Gifs Be Memes?
01What’s Memes?
You will see that memes is a good element of any kind of system or culture. This kind of system could be passed from one person to the other one. This task can be also done well by non genetic methods. You can say when you make meme gif, then you have to use any kind of video, photo, image and piece of any paper showing some written text. This text can be used well by persons who use internet in a very extensive way. Memes generally has a humorous nature so most internet users will have a fine experience while using it.
02What Does Meme and GIF Stand For?
When we talk of meme then you will see that it stands for Multimedia & Electronic Music Experiments. This is a way with which you can develop many customizable electronic instruments in the long way. You will see that Meme was first of all developed by Richard Dawkins in the year 1976. He did it with replicating as well as transmission of meme. When we talk about gif then we will see that stands for Graphics Interchange Format. It was first of all made in the year 1987. With this kind of system you can decrease the size of animated pictures and images.
Part 2 Must-Visit GIF Websites to Get Stunning Memes
01GIPHY
Key Features-
When you make a gif meme then you will see that this website was first of all created by Jack Cooke and Alex Chung. They did it in the form of a GIF and even a sticker keyboard that was having unique characteristics**.** Here you have to simply plug inside a keyboard and click on the button of the search bar. In this way you can create many samples of gif and upload them from the sites of social media like Facebook and Instagram.
02 Tenor
Key Features-
The interface of Tenor is very much good looking and straight forward. With it you can type the keyword concerned with the homepage to your GIF to search it with the help of hit bar. With Tenor you can also make genius ideas related to making a meme gif. When you visit the site of Tenor then you will see that it does not have any scarcity of content when you want to upload graphics interface format with it on your website.
03 GIFER
Key Features-
When you ignore the meme gif site of GIFER then you will see that your list will be incomplete without it. This is one of the best resources for getting and making gif memes on the pin point. When you want to type anything or want to get some information about any subject then click on any of the emotion icons. You may also click on the search bar.
04 Gfycat
Key Features-
The site of Gfycat is the best when you want to so like the activities of making memes. This is the best way to make a gif meme so that you will get good results in the task of making graphic interface samples. Like all the websites of GIF this site will also enable you to seek search content. Just type specific keywords or you might simply click on the left side panel.
05Imgflip
Key Features-
When you want to make a meme gif then just land on the site of Imgflip. This could be a great option. When we compare it with other kind of GIF sites then we will see that they have a simple layout. You can click on the search icon that is at the top and get information about any of your target keywords.
06Reaction GIFs
Key Features-
Here when you land on the site of Reaction GIFs. You can type your favorite keyword like make a meme gif on the right side of this search engine and hit on the search icon. You can also easily upload any kind of content even yet this procedure might take a bit more time. This kind of website is visible in a streamlined way. Here you can even make the entries related to FAQs.
07Imgur
Key Features-
When you talk of Imgur then you will see that you can make and create static images with this kind of site. This is a genuine site with which you can make a meme gif. You can make any kind of theme related to internet graphics when you choose this site.
Part 3 How to Make a Meme GIF
01How to Make a Meme GIF on Ios &Want to make an Android Gift?
When you want to make a Meme GIF on Los then you can make use of Meme maker. Here you can get started well. Just take one such page and upload a GIF on it. You may even click on the text that is seen on the top left to make addition of the needed captions. Here you can add your needed images or audio options. When you want to make an android gif then just make the following steps:-
● Just open the gallery of your desired app and press the images that depict your needed photos.
● Tape the icon that shows the 3 vertical dots.
● Choose the create option and select the GIF option.
● You can create the GIF image and review it in a better way.
02How to Make a Meme GIF on Window? Here’s How to & Mac?
When you make a meme gif on Window then you have to see and take some steps:-
● Just land on the IMGFlip website.
● You have to click on the icon of GIF icon.
● Just import an image and video to make it converted to GIF.
● You may add a text to the GIF.
● You may also customize the speed and count the times that you have played it.
● Finally you may save it in animated form.
Part 4 Tips for Inspiring Meme Gifs Ideas
When you want to add and follow tips for inspiring more ideas for making meme gif then you can see that such ideas are even being used at TV shows and movies. You can even make attractive images with them. You can easily loop these images to create the best animated clips. After you make a meme gif then you will see that even you can use a pop reference in the long way. When you do the combination of meme and gif then you can also make humorous clips that are called as meme gif. Even you can make use of the content that is concerned with Wondershare Filmora Video Editor VII so that your graphics will appear well in the long way.
Wondershare Filmora - Best Video Editor for Mac/Windows
5,481,435 people have downloaded it.
Build unique custom animations without breaking a sweat.
Focus on creating epic stories and leave the details to Filmora’s auto features.
Start a creative adventure with drag & drop effects and endless possibilities.
Filmora simplifies advanced features to save you time and effort.
Filmora cuts out repetition so you can move on to your next creative breakthrough.
Brief summary
● When you make meme gif then you will see that with this technology you can create a fine system on the internet frame as far as meme is concerned with Filmora VII. On the other hand gif stands for graphic interface formats.
● You can visit more websites for gif and meme creation on the internet and here you will get many unique websites for gif creation. You can also take help from graphics experts who will give you the best output concerned with gif and making a meme in the long way.
● You can get more tips on the web when you want to make gif samples on the platform of android and Mac. Here you will have to take and follow certain steps and with it you will reach your goal to make the best graphical interface even on all kinds of smart phones etc. Here you will also get support to make a meme gif. Taking care about what you need for meme gif
● Key Takeaways from This Episode →
● When we talk about the final conclusion of this article then we will see that meme gif will be a nice way to develop advanced methods of media and graphics interchange format. Here you will see that this could be a free method with which you can make a perfect meme.
● You can also use GIPHY on the technology platform of iPad, iPhone and Android. You can also make the task of downloading of GIPHY on your phone that might be of any model. You can make memes gif for your app store in your phone. You can do this task easily on your search bar. Most of these apps are available in black color.
Can I Do Animated Logo Design Without Design Skills?
Can I Still Do Animated Logo Design Without Design Skills?
An easy yet powerful editor
Numerous effects to choose from
Detailed tutorials provided by the official channel
In the fast-moving world, you cannot afford to keep your brand design still as it doesn’t influence the audience toward your business. It is pretty essential to create an impressive and animated logo for the brand.
This article will discuss how you can create an animated logo design even if you do not have design skills.
In this article
01 [This is What a Conventional Professional Animation Designer Should Be](#Part 1)
02 [Your Number 1 Tip to Do Animated Logo Design Without Design Skills](#Part 2)
03 [This is the Smartest Tip Ever About Filmora](#Part 3)
Part 1 This is What a Conventional Professional Animation Designer Should Be
01How to Make an Animated Logo for an Animation Designer?
There are various online logo maker tools available to create an animated logo design for your brand easily. There are several online logo makers available from which you can easily create an effective animated logo for your business. We will discuss Canva online logo maker for a better understanding of making the online animated logo design for the brand. All you have to do is to follow the simple steps listed below.
Method to make the Animated Logo Design for your Business
Step 1: Initiate with Canva
Initially, you need to launch Canva and choose “Animated Logos” for the library of effectively and professionally designed templates through which you can create inspiration and further customize it accordingly.
Step 2: Choose the appropriate design as per nature of business
Now, you have to select any one of the designed templates that seem closest to the look you are looking to give to your brand. All the templates available are professionally designed and fully customizable. You can even initiate the process with the blank design template from scratch. It would help if you made sure that you were looking to create a simple or complex design for the logo.
![]()
Step 3: Customization of the animated logo
Now is the time to customize your logo. You can use a lot of creativity and skills. Think about your business and how the logo should and take help of the font styles, design colors, font size, video background, and text to bring out the best in your animated logo design. Look for what effect you want for the logo design. Apart from this, it is better to animate the text and elements separately or set the complete design into motion. After successfully editing the design of the logo, you need to proceed to the next step listed below.
![]()
Step 4: Download the file in required format
When you are satisfied with the logo animation design, you need to save it. Also, you can download it into high-resolution either in MP4 videos or GIF files as per your choice. With MP4 file, you will need to include the audio files; however, if you choose GIF files, it will provide you with brief and compressed clips with no audio.
![]()
Step 5: Include the file to your various visual branding media
Lastly, you need to recall and recognize the brand by employing an innovative animated logo in different visual media like social media accounts, websites, and various advertising and promo videos. After making a creative animated logo design, you can use it on your website or different social accounts to attract your business audience.
02How Much Does a Professional Animated Logo Cost?
The cost for the professional animated logo is not fixed, as it depends on the work you have done while making a logo for your brand. In general words, it can be said that the price for animated logo design is anywhere from $0 to $1000. However, if you have a small firm or startup looking to get a quality design, it will cost you between $300-$1300. Suppose you have a large-scale business and are looking to replace the traditional logo design with a customized animated logo. In that case, you will be required to hire a professional logo designer who will look after the design and make it creative.
Part 2 Your Number 1 Tip to Do Animated Logo Design Without Design Skills
011. 5 Tools You Need to Make an Animated Logo
When looking to create an animated logo design free for your social media account or website, you need to understand that you will require some tools to create it impressive and professional. The 5 tools or the websites used for making the animated logo design are listed below:
● Canva
● Filmora
● Designhill
● Squarespace
● Hatchful
025 Tips to Animate a Logo
● Make sure to use images that include transparent background
You need to make sure that when you upload any images or illustrations, it must include a transparent background so that you will be able to make a seamless animation logo without having pesky color and look attractive to the audience.
![]()
● Select the suitable template for the business
You will discover several template options available while using the animated logo designer; however, you need to make sure that chosen template must align with the business nature. For example, if you sell organic products, you need to choose the environment design template.
![]()
● Make use of masks appropriately
A mask is defined as the container for the photos. The logo design maker service provides interesting masks in different shapes to make a stunning and appealing animated logo after effects. You are required to use masks with photos, solid color, and shaded background.
● Keep it simple and short
Always try to make logo design short and straightforward! If you are using too many effects and colors in the logo design, it turns complex for the audience.
![]()
● Create an impact on the audience
To impact the audience, you need to make sure that the animation doesn’t last longer than 3-4 seconds. The templates collections of the different logo design makers are perfectly timed; therefore, there is no need to worry about making long animation.
Part 3 This is the Smartest Tip Ever About Filmora
01What’s Filmora?
![]()
Wondershare Filmora is video editing software available on Wondershare that facilitates you to explore creativity and make the cinematic magic regarding the professionally designed videos. This tool comprises a wide range of visual effects, video editing features, and motion graphics, making it the most preferred and ideal tool for video editing purposes. If you are looking to use the tool, all you have to do is download the Filmora software on your Windows or Mac system. After downloading the software, please install the program, run it and start using it.
Wondershare Filmora
Power Up Your Story with Filmora. Professional video editing is made easy.
Requirement
Windows- Win 8 or later (64 bit OS) and MAC- macOS X 10.13 or later.
The state-of-art feature of the tool makes it one of the most preferred tools for video editing, especially for the filmmaker and video editors.
02Is It Possible to Add a Video to the Animated Logo?
Yes, you will include video to the animated logo by selecting the “Video” tab. Along with such, add it to a text or make use of them as the background. You also need to understand that such videos are accessible to Filmora Pro members.
03Is the Music Available on the Asset Library Royalty-free?
No, if you are using royalty- free assets you are required to pay for getting the access…
04How to Make an Animated Video in a Snap?
If you are looking to create an animated video in a snap, you need to follow the below steps:
Step 1: Choose the incredible tool for making animated videos: You need to download the tool and register your account.
Step 2: Select a well-made animation template: Select the template from the library of the tool and launch your trip of creation.
Step 3: Drag and drop: Drag and drop the content to the canvas and customize every aspect of the video with complete flexibility.
Step 4: Download and share: Download your creation to the device and also remember to share it on your social media account for better reach.
Key Takeaways from This Episode
● Filmora makes the video editing experience more engaging and hassle-free. It can be easily downloaded on your Window or Mac System by visiting the Wondershare official website. It includes several editing options which help you to create an engaging animated video.
● You can make animated logo designs even if you don’t have design skills by choosing the online logo design maker over the Internet. The template will be initially provided to you; all you have to do is select the correct template following the nature of your business.
● You can easily add multimedia files like audio and video to your animated logo design by selecting the “Video” tab. Along with, such add it to a text or make use of them as the background. Therefore, it can be concluded that you can easily create an animated logo design without design skills and give your brand professional and valued recognition.
● If you have any recommendations or doubts regarding the discussion, please let us know by commenting on the box below.
Also read:
- New The 15 Best Apps to Turn Photos Into Cartoons and Sketches
- New Ways You Can Master to Make Claymation Videos
- New The Only Guide Youll Ever Need to Learn That Make 2D Rigging Clear to You for 2024
- Updated In 2024, How You Can Turn Yourself Into Anime Character Using Anime Filter
- Amazing Techniques of Motion Graphics in Premiere Pro
- New Top Claymation Shows That Make Your Memories Unforgettable
- Updated 10 Amazing Wallpaper Collage Ideas and Photos
- Updated 12 Animated Slideshow PowerPoint Templates for 2024
- Updated In 2024, Amazing Ideas About Creating Personalised WhatsApp GIF Sticker
- New 15 Horror Animes That Will Trigger a Heart Attack
- How to Make Your Own GIF on WhatsApp in Simple Ways for 2024
- 2024 Approved 10 Trendy & Stylish Free Logo Animation Templates
- New The Secret Sauce for Making GIF Instagram Story More Aesthetic
- New 2024 Approved How to Create YouTube Intro Animation Like a Pro
- New 2024 Approved Adobe Animate Text Effects Skills That You Need to Know
- New Incredible Ways to Find Suitable Animated Graphic Maker for 2024
- Updated How to Create YouTube Intro Animation Like a Pro
- New 2024 Approved Is It That Easy to Make My Animated Character
- Updated 2024 Approved Learn How to Make Architecture Animation
- Animate Photo Online with These Awesome Tools for 2024
- New Tutorials for Animating Picture Online Without Learning From Scratch
- Updated Is Blender 2D Animation As Awesome As 3D for 2024
- New In 2024, 10 Great Apps for Turning Funny Animated Images Into Comics
- 6 Unexpected Ways Gif Animation Maker That Affect Your Marketing
- Updated How to Make an Animated Travel Map Video, In 2024
- New Learn All About Lip-Syncing in Animation
- Updated 2024 Approved Formula to Animate Photos From 10 Animate Pictures App
- New How to Become a Motion Graphic Designer for 2024
- Learn How to Make Your Characters Interactive in Unity Animation Rigging
- New You Can Turn a TikTok Into a GIF Now. Heres How
- New Is It That Easy to Make My Animated Character for 2024
- 2024 Approved Types of Cartoon Styles You May Use for The Next Marketing Project
- New 2024 Approved 8 Blender 3D Animation Tutorials for Beginners
- Updated 5 Ways You Never Heard of for Converting MP4 to GIF in Photoshop
- 2024 Approved Something About Types of Motion Graphics
- New Adobe Animate Riggings Tutorial for You for 2024
- New 2024 Approved 2D Character Animation Everything You Should Know About It
- New Tips for Learning Graphics Animation
- New In 2024, How to Make Photo 3D Cartoon Online
- In 2024, Complete Tutorial to Use VPNa to Fake GPS Location On Motorola Moto G73 5G | Dr.fone
- Recommended Best Applications for Mirroring Your Infinix Note 30i Screen | Dr.fone
- In 2024, How Can I Catch the Regional Pokémon without Traveling On Vivo Y100A | Dr.fone
- In 2024, How Can You Transfer Files From Poco M6 Pro 4G To iPhone 15/14/13? | Dr.fone
- Possible solutions to restore deleted call logs from S23
- 4 Ways to Transfer Music from Xiaomi Redmi A2 to iPhone | Dr.fone
- A Working Guide For Pachirisu Pokemon Go Map On Realme Narzo N53 | Dr.fone
- How Can Nokia XR21Mirror Share to PC? | Dr.fone
- iPogo will be the new iSpoofer On Apple iPhone 13? | Dr.fone
- How to Fix Android.Process.Media Has Stopped on Honor 90 Lite | Dr.fone
- In 2024, Motorola Moto E13 ADB Format Tool for PC vs. Other Unlocking Tools Which One is the Best?
- How To Leave a Life360 Group On Realme Narzo 60 5G Without Anyone Knowing? | Dr.fone
- In 2024, Which Pokémon can Evolve with a Moon Stone For Samsung Galaxy XCover 7? | Dr.fone
- How to Use Pokémon Emerald Master Ball Cheat On Oppo A18 | Dr.fone
- Unlocking Made Easy The Best 10 Apps for Unlocking Your Itel P55T Device
- How to Change/Fake Your Samsung Galaxy A05s Location on Viber | Dr.fone
- In 2024, 5 Ways To Teach You To Transfer Files from OnePlus Nord 3 5G to Other Android Devices Easily | Dr.fone
- 3 Ways to Fake GPS Without Root On Xiaomi Redmi A2+ | Dr.fone
- In 2024, 3 Effective Methods to Fake GPS location on Android For your Google Pixel 8 Pro | Dr.fone
- In 2024, How To Do Realme C55 Screen Sharing | Dr.fone
- How to Fix Android App Not Installed Error on Nokia C22 Quickly? | Dr.fone
- Unlocking Made Easy The Best 10 Apps for Unlocking Your Vivo V27 Pro Device
- Things You Should Know When Unlocking Total Wireless Of Apple iPhone 14 Plus | Dr.fone
- How to Use Phone Clone to Migrate Your Nokia C300 Data? | Dr.fone
- 4 Methods to Turn off Life 360 On Xiaomi Redmi Note 12T Pro without Anyone Knowing | Dr.fone
- App Wont Open on Your Honor 100 Pro? Here Are All Fixes | Dr.fone
- How To Bypass Itel A60s FRP In 3 Different Ways
- In 2024, How To Track IMEI Number Of Itel P55+ Through Google Earth?
- 11 Proven Solutions to Fix Google Play Store Not Working Issue on OnePlus Nord N30 SE | Dr.fone
- Title: Updated 2024 Approved A Beginners Guide to Explain What 3D Animation Is
- Author: Elon
- Created at : 2024-05-19 03:05:16
- Updated at : 2024-05-20 03:05:16
- Link: https://animation-videos.techidaily.com/updated-2024-approved-a-beginners-guide-to-explain-what-3d-animation-is/
- License: This work is licensed under CC BY-NC-SA 4.0.
