
:max_bytes(150000):strip_icc():format(webp)/GettyImages-1305200685-e977d0ca4e9a47e2b006e5b32a9922fd.jpg)
Updated 2024 Approved The Best 8 Places for High-Quality Royalty Free Gifs
The Best 8 Places for High-Quality Royalty Free Gifs
The Best 8 Places for High-Quality Royalty Free Gifs (Paid and Free)
An easy yet powerful editor
Numerous effects to choose from
Detailed tutorials provided by the official channel
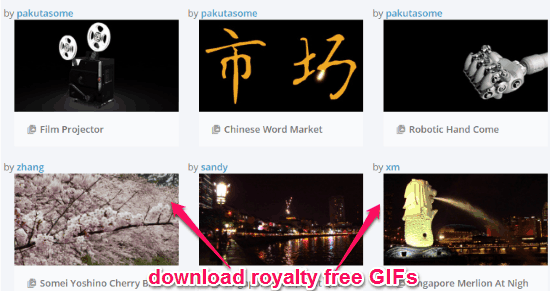
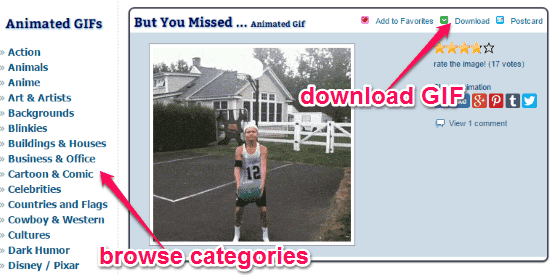
Our list of the top 8 beats places to download royalty-free GIFs. You may get a lot of GIF libraries free by visiting these websites. These websites allow animated GIFs for various purposes, including personal, educational, and commercial ones. You can use the GIFs you download on your websites, blogs, presentations, and emails, among other things. The most excellent part about most of these websites is that you don’t have to pay anything or give them credit in exchange for royalty-free GIFs. These websites include trendy and attractive GIFs, while others only have older royalty-free GIFs. The GIFs on these websites are similarly free of any watermark.
There are numerous websites to download royalty GIFs with stock sound effects and photographs. However, when it comes to copyright-free GIFs, only a few websites offer them up for download. So, after spending a much time on the internet, I’ve found five websites that can assist you in doing the same. Two of the websites, “Best Animations” and “Animate It,” only enable you to use the GIFs you download for personal use.
In this article
01 [Is GIFs Royalty Free?](#Part 1)
02 [Are GIFs on Giphy Free to Use?](#Part 2)
03 [The Best 8 Places for High-Quality Royalty Free Gifs (Paid and Free)](#Part 3)
Part 1 Is GIFs Royalty Free?
There is no legal method to licensing the usage of GIFs for business purposes. Given the preceding, commercial companies’ use of GIFs remains a bit of a grey area.
The following are some excellent general guidelines to follow for royalty-free GIFs:
● Avoid using GIFs in a way that can irritate the copyright holder. In most cases, you can determine fair use by context rather than content. A reasonable rule of thumb is to put yourself in the position of the copyright owner and ask yourself, “Would I disprove this to the point of commencing litigation?”
● Provide acknowledgment to the original owner where GIFs are “stolen” from known copyright content (e.g., Credit: Universal Studios)
● If in doubt, stay away from GIFs derived from extremely litigious sources, and search out alternatives (or develop your own!)
Part 2 Are GIFs on Giphy Free to Use?
All property rights in the Services are owned and retained by Giphy and their licensors, and hence these are not copyright-free GIFs. However, Giphy grants users a limited, non-exclusive, non-transferable, and revocable license to use Gifs on Giphy, subject to these Terms. You may find copyrighted material (such as text, graphics, pictures, images, and illustrations), trademarks, and other proprietary information and materials of Giphy and their licensors on the Services. You may not copy, modify, publish, transmit, distribute, perform, or display any content for commercial purposes or in any way violate these Terms of Service. Except for content in the public domain or the content you have permission to use in connection with the use of the Services and compliance with these Terms of Service.
Copyright laws in the United States and around the world protect their Services. Giphy has the right (but not the obligation) to remove, block, edit, or alter any content any time, without any notice, for any reason or no reason at all. Giphy, however, reserves the right to access, read, store, and disclose any information that we reasonably believe is required to comply with applicable laws or protect our, our users’ and the public’s rights, property, or safety.
Part 3 The Best 8 Places for High-Quality Royalty Free Gifs (Paid and Free)
Here are the best 8 places to get free to use GIFs for commercial use
01MOTION ELEMENT
Features:
● You can experience animation from the inside out.
● Change the GIFs Duration with a single click.
● This royalty-free GIF website allows you to change colors with a single click.
● You can also edit the backgrounds.
● The style is a simple drag-and-drop motion.
02SEVENOAKS
Features:
● Sevenoaks copyright-free GIFs are high-quality and old.
● All the GIFs are three-dimensional.
● It offers tons of GIFs scattered across 25+ categories.
● You can download GIFs free to use.
● The process can be over in a click.
03BEST ANIMATIONS
Features
● This site with GIF images free to download provides more than 20 categories for its users.
● It offers a variety of GIFs.
● However, GIFs are only useful for personal use.
● Easy-to-download gif in a few clicks.
● Directly share the GIFs via social networks.
04GIFGIFS
Features
● GIFGIFs offers hundreds of royalty-free GIFs.
● But it offers low-quality and old files.
● This GIF library for free serves various purposes.
● It also provides the direct link, HTML code, and BBCode for every GIF file.
● Change background in simple clicks.
05ANIMATE IT
Features
● More than 50 categories of GIF images are free to download.
● GIFs with both good and bad resolutions are available.
● It has a mixture of old and modern GIFs.
● GIFs with Animate are for personal use only.
● You can get your choice of free-to-use GIF with one click.
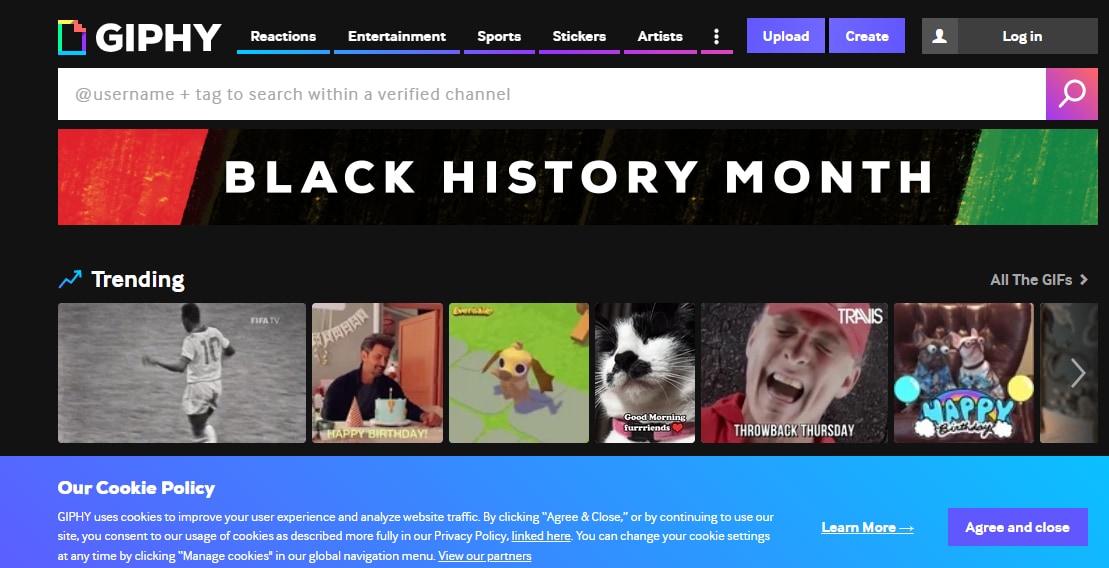
06GIPHY
Features:
● Download GIF in one click
● Varieties of GIFs to leverage on.
● Directly share to social media.
● Giphy offers some modern royalty-free GIFs.
● One of the top high quality and resolution offering GIF websites.
07PIXABAY.COM
Features:
● One of the top websites with free-to-use GIFs.
● Download in a few clicks
● High quality with the best resolution
● You get various types of GIFs for a variety of purpose
● Exclusive GIF library for free with Modern GIFs.

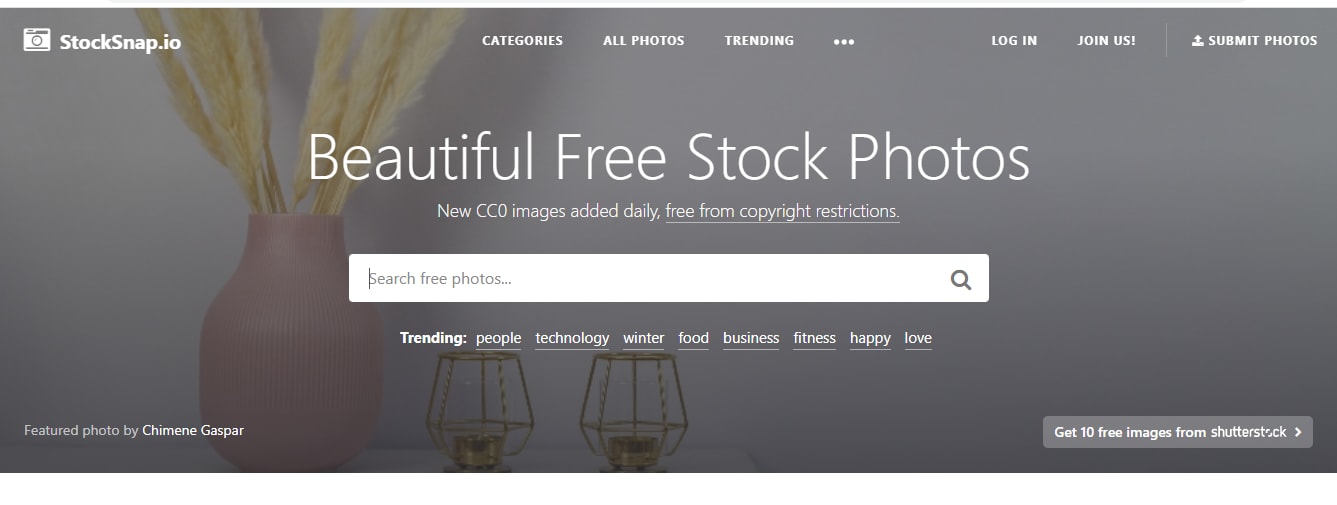
08STOCKSNAP
Features:
● Highest quality, highest resolution pictures with Stocksnap.
● All photos uploaded to the site get released under Creative Commons.
● Photos do not require attribution.
● Curate the top stock photos from around the web
● Select images from several daily submissions.
If you want to generate a GIF online, though, Filmora’s online meme maker is the best option. It is possible to create a watermark-free photo, GIF, and video memes with it. It’s completely free to use, and there’s no need to sign up. You can adjust the text size, color, and position while editing a caption. You can also add text to the inside or outside of a GIF.
GIFs may be made from a collection of still photos or even moving movies, and the procedure is straightforward enough for anyone to undertake. To do this task fast and efficiently, we recommend Wondershare Filmora Video Editor . The user-friendly and engaging interface of the software product is the basis for this recommendation. Filmora allows you to swiftly combine many still images into GIFs or convert tiny films into GIFs. Furthermore, the Filmora platform will enable users to easily customize GIFs by adding overlays, components, and text to their GIFs.
Wondershare Filmora
Get started easily with Filmora’s powerful performance, intuitive interface, and countless effects!
Try It Free Try It Free Try It Free Learn More >

● Key Takeaways from This Episode →
● Now that you’ve gathered information on the best places to get e-commerce GIFs from different websites and free GIF apps, you can now go-ahead to explore these free GIFs for commercial use and personal use.
● Notwithstanding, you can still check out a recommendable free GIF app, Filmora by Wondershare, and be sure to meet your need for a unique GIF.
Our list of the top 8 beats places to download royalty-free GIFs. You may get a lot of GIF libraries free by visiting these websites. These websites allow animated GIFs for various purposes, including personal, educational, and commercial ones. You can use the GIFs you download on your websites, blogs, presentations, and emails, among other things. The most excellent part about most of these websites is that you don’t have to pay anything or give them credit in exchange for royalty-free GIFs. These websites include trendy and attractive GIFs, while others only have older royalty-free GIFs. The GIFs on these websites are similarly free of any watermark.
There are numerous websites to download royalty GIFs with stock sound effects and photographs. However, when it comes to copyright-free GIFs, only a few websites offer them up for download. So, after spending a much time on the internet, I’ve found five websites that can assist you in doing the same. Two of the websites, “Best Animations” and “Animate It,” only enable you to use the GIFs you download for personal use.
In this article
01 [Is GIFs Royalty Free?](#Part 1)
02 [Are GIFs on Giphy Free to Use?](#Part 2)
03 [The Best 8 Places for High-Quality Royalty Free Gifs (Paid and Free)](#Part 3)
Part 1 Is GIFs Royalty Free?
There is no legal method to licensing the usage of GIFs for business purposes. Given the preceding, commercial companies’ use of GIFs remains a bit of a grey area.
The following are some excellent general guidelines to follow for royalty-free GIFs:
● Avoid using GIFs in a way that can irritate the copyright holder. In most cases, you can determine fair use by context rather than content. A reasonable rule of thumb is to put yourself in the position of the copyright owner and ask yourself, “Would I disprove this to the point of commencing litigation?”
● Provide acknowledgment to the original owner where GIFs are “stolen” from known copyright content (e.g., Credit: Universal Studios)
● If in doubt, stay away from GIFs derived from extremely litigious sources, and search out alternatives (or develop your own!)
Part 2 Are GIFs on Giphy Free to Use?
All property rights in the Services are owned and retained by Giphy and their licensors, and hence these are not copyright-free GIFs. However, Giphy grants users a limited, non-exclusive, non-transferable, and revocable license to use Gifs on Giphy, subject to these Terms. You may find copyrighted material (such as text, graphics, pictures, images, and illustrations), trademarks, and other proprietary information and materials of Giphy and their licensors on the Services. You may not copy, modify, publish, transmit, distribute, perform, or display any content for commercial purposes or in any way violate these Terms of Service. Except for content in the public domain or the content you have permission to use in connection with the use of the Services and compliance with these Terms of Service.
Copyright laws in the United States and around the world protect their Services. Giphy has the right (but not the obligation) to remove, block, edit, or alter any content any time, without any notice, for any reason or no reason at all. Giphy, however, reserves the right to access, read, store, and disclose any information that we reasonably believe is required to comply with applicable laws or protect our, our users’ and the public’s rights, property, or safety.
Part 3 The Best 8 Places for High-Quality Royalty Free Gifs (Paid and Free)
Here are the best 8 places to get free to use GIFs for commercial use
01MOTION ELEMENT
Features:
● You can experience animation from the inside out.
● Change the GIFs Duration with a single click.
● This royalty-free GIF website allows you to change colors with a single click.
● You can also edit the backgrounds.
● The style is a simple drag-and-drop motion.
02SEVENOAKS
Features:
● Sevenoaks copyright-free GIFs are high-quality and old.
● All the GIFs are three-dimensional.
● It offers tons of GIFs scattered across 25+ categories.
● You can download GIFs free to use.
● The process can be over in a click.
03BEST ANIMATIONS
Features
● This site with GIF images free to download provides more than 20 categories for its users.
● It offers a variety of GIFs.
● However, GIFs are only useful for personal use.
● Easy-to-download gif in a few clicks.
● Directly share the GIFs via social networks.
04GIFGIFS
Features
● GIFGIFs offers hundreds of royalty-free GIFs.
● But it offers low-quality and old files.
● This GIF library for free serves various purposes.
● It also provides the direct link, HTML code, and BBCode for every GIF file.
● Change background in simple clicks.
05ANIMATE IT
Features
● More than 50 categories of GIF images are free to download.
● GIFs with both good and bad resolutions are available.
● It has a mixture of old and modern GIFs.
● GIFs with Animate are for personal use only.
● You can get your choice of free-to-use GIF with one click.
06GIPHY
Features:
● Download GIF in one click
● Varieties of GIFs to leverage on.
● Directly share to social media.
● Giphy offers some modern royalty-free GIFs.
● One of the top high quality and resolution offering GIF websites.
07PIXABAY.COM
Features:
● One of the top websites with free-to-use GIFs.
● Download in a few clicks
● High quality with the best resolution
● You get various types of GIFs for a variety of purpose
● Exclusive GIF library for free with Modern GIFs.
08STOCKSNAP
Features:
● Highest quality, highest resolution pictures with Stocksnap.
● All photos uploaded to the site get released under Creative Commons.
● Photos do not require attribution.
● Curate the top stock photos from around the web
● Select images from several daily submissions.
If you want to generate a GIF online, though, Filmora’s online meme maker is the best option. It is possible to create a watermark-free photo, GIF, and video memes with it. It’s completely free to use, and there’s no need to sign up. You can adjust the text size, color, and position while editing a caption. You can also add text to the inside or outside of a GIF.
GIFs may be made from a collection of still photos or even moving movies, and the procedure is straightforward enough for anyone to undertake. To do this task fast and efficiently, we recommend Wondershare Filmora Video Editor . The user-friendly and engaging interface of the software product is the basis for this recommendation. Filmora allows you to swiftly combine many still images into GIFs or convert tiny films into GIFs. Furthermore, the Filmora platform will enable users to easily customize GIFs by adding overlays, components, and text to their GIFs.
Wondershare Filmora
Get started easily with Filmora’s powerful performance, intuitive interface, and countless effects!
Try It Free Try It Free Try It Free Learn More >
● Key Takeaways from This Episode →
● Now that you’ve gathered information on the best places to get e-commerce GIFs from different websites and free GIF apps, you can now go-ahead to explore these free GIFs for commercial use and personal use.
● Notwithstanding, you can still check out a recommendable free GIF app, Filmora by Wondershare, and be sure to meet your need for a unique GIF.
What Make Aesthetic Cartoon Drawing More Understandable
That Will Make Aesthetic Cartoon Drawing More Understandable
An easy yet powerful editor
Numerous effects to choose from
Detailed tutorials provided by the official channel
When you are trying to make an aesthetic drawings cartoon, the primary thing to focus on is the composition. Composition is the combination, arrangement, and organization of objects within the borders of drawing space. To have a great aesthetic cartoon drawing, you must focus on bringing the eyes of the viewer toward your center of interest within an aesthetically-pleasing composition. When we create illustrations, we are often concerned with putting in a lot of details that will overload the image and lose the meaning that we originally wanted it to convey.

We engage our audience and viewer more by composing a perfect aesthetic drawing. In addition, many rules define a good composition drawing, but these rules are mainly guidelines. Also pay attention to your personal preferences and instincts. In this guide, we’ll teach you how to make an excellent aesthetic cartoon painting more understandable.
In this article
01 [Canvas Aesthetic Painting Ideas](#Part 1)
02 [Blender Aesthetic Painting Ideas](#Part 2)
03 [How to Create Super-Detailed Aesthetic Cartoon Painting](#Part 3)
Part 1 Canvas Aesthetic Painting Ideas
There are times you do not need to be a famous painter or an art professional to create beautiful wall art. Canvas painting is an all-in-one application for all skill levels, from beginners to experts. It also provides you with different painting ideas ranging from beach scenes to abstract designs to create pieces that look stunning and professional.
We have compiled a list of canvas aesthetic painting ideas to help you begin your journey as an aesthetic cartoon painter. Look through the images to determine which ones match the style of painting you wish to add to your drawing and get inspiration to create your designs.
01Disney Canvas Art
These are aesthetic cartoon painting ideas relating to 2020 Disney Canvas Art. You can get ideas from this to begin your journey into the world of painting.

02Hippie Painting Canva Art
If you are also looking for other aesthetic cartoon painting ideas to choose from, you can select from this 2020 Cute Canvas Paintings “Hippie Painting” Canvas Art.

03Spongebob Painting
These painting ideas are a part of the Canvas Aesthetic Cartoon Painting ideas of 2020 called Spongebob Painting Disney Canvas Art.

04Babs Bunny Pa Et Mini Lerret
These are a painting about “Babs Bunny Pa Et Mini Lerret.” A 2020 Mini Canvas Art Hippie Painting Canvas idea that you can choose from

Part 2 Blender Aesthetic Painting Ideas
Blender is an accessible and open-source 3D creation suite that supports the entirety of the 3D pipeline modeling, rigging, animation, simulation, compositing rendering, motion tracking, video editing, and 2D animation pipeline. It is a fact that this is one of the best open-source software you can choose from to make your aesthetic cartoon drawing.
It is entirely free software, and various artists can use it to start digging in and playing with it. Here are some of the blender aesthetic cartoon painting ideas you can choose from:
01Princess Ira and Amina
This is a fictional aesthetic drawing cartoon of an African princess having gold gifted powers with her face painting inspired by Nigerian traditional face decorations. However, her crown is adorned with crosses, crystals, and chains which incorporate several elements from different cultural designs available from all over the world to portray unity.

02Survival Knife Weekly Drills 045
This was a design painting inspired based on BUCK KNIVES in pain texturing and focuses on making a practical game-ready asset.

03Radiance
This is a blender aesthetic cartoon painting idea of a graduation project made for the Concept Art specialized cursus at New3dge School.

04 The character looks dev
This blender cartoon painting’s inspiration came from Edward, the short film’s main character. It is a work in progress but a lovely painting that can inspire you.
Part 3 How to Create Super-Detailed Aesthetic Cartoon Painting
To create a super detailed aesthetic cartoon drawing, you do not need to be a trained artist, nor do you need a fancy cartoon picture maker. All you need to create a cartoon painting photo is a simple and Free picture from a cartoon editor to help you carry out the task more effectively.
However, you can also convert your cartoon paint into creative animation using Wondershare Filmora Video Editor . Filmora is a powerful all-in-one tool for editing that you can use to that can be used for free to animate your cartoon with its tons of effects, filters, and keyframing features that can help you carry this out effectively.
For Win 7 or later (64-bit)
For macOS 10.12 or later
Here is how to create a super detailed aesthetic cartoon painting:

Step 1: Open the Picsart editor on your desktop browser and click on the new project
Step 2: Next is to click on Upload to select the photo that you want to cartoon paint from the computer library of your hard drive
Step 2: Click on the toolbar, select the effect feature from the dropdown above your photo, and click on Magic to view all available one-click cartoon filters. However, almost all of the Magic effects on this editor will help you achieve an aesthetic cartoon photo effect.
Step 4: Click on Adjust and Blend above your photo workspace on the editor. This will help you manually adjust the effects (color burn, fade, saturation, brightness, etc.).
Step 5: Preview your result and once you are happy with the new cartoon photo painting, click on the Share button and download it from the top right corner of the editor to save it on your device.
● Ending Thoughts →
● This article explained creating and gave inspiration and ideas for the aesthetic cartoon painting you can choose from to make yours. In addition, the report also recommends Filmora as an influential editor if you intend to create an animation from your cartoon painting due to its tons of features.
● So, now you can start building your aesthetic drawings and cartoons!
When you are trying to make an aesthetic drawings cartoon, the primary thing to focus on is the composition. Composition is the combination, arrangement, and organization of objects within the borders of drawing space. To have a great aesthetic cartoon drawing, you must focus on bringing the eyes of the viewer toward your center of interest within an aesthetically-pleasing composition. When we create illustrations, we are often concerned with putting in a lot of details that will overload the image and lose the meaning that we originally wanted it to convey.
We engage our audience and viewer more by composing a perfect aesthetic drawing. In addition, many rules define a good composition drawing, but these rules are mainly guidelines. Also pay attention to your personal preferences and instincts. In this guide, we’ll teach you how to make an excellent aesthetic cartoon painting more understandable.
In this article
01 [Canvas Aesthetic Painting Ideas](#Part 1)
02 [Blender Aesthetic Painting Ideas](#Part 2)
03 [How to Create Super-Detailed Aesthetic Cartoon Painting](#Part 3)
Part 1 Canvas Aesthetic Painting Ideas
There are times you do not need to be a famous painter or an art professional to create beautiful wall art. Canvas painting is an all-in-one application for all skill levels, from beginners to experts. It also provides you with different painting ideas ranging from beach scenes to abstract designs to create pieces that look stunning and professional.
We have compiled a list of canvas aesthetic painting ideas to help you begin your journey as an aesthetic cartoon painter. Look through the images to determine which ones match the style of painting you wish to add to your drawing and get inspiration to create your designs.
01Disney Canvas Art
These are aesthetic cartoon painting ideas relating to 2020 Disney Canvas Art. You can get ideas from this to begin your journey into the world of painting.
02Hippie Painting Canva Art
If you are also looking for other aesthetic cartoon painting ideas to choose from, you can select from this 2020 Cute Canvas Paintings “Hippie Painting” Canvas Art.
03Spongebob Painting
These painting ideas are a part of the Canvas Aesthetic Cartoon Painting ideas of 2020 called Spongebob Painting Disney Canvas Art.
04Babs Bunny Pa Et Mini Lerret
These are a painting about “Babs Bunny Pa Et Mini Lerret.” A 2020 Mini Canvas Art Hippie Painting Canvas idea that you can choose from
Part 2 Blender Aesthetic Painting Ideas
Blender is an accessible and open-source 3D creation suite that supports the entirety of the 3D pipeline modeling, rigging, animation, simulation, compositing rendering, motion tracking, video editing, and 2D animation pipeline. It is a fact that this is one of the best open-source software you can choose from to make your aesthetic cartoon drawing.
It is entirely free software, and various artists can use it to start digging in and playing with it. Here are some of the blender aesthetic cartoon painting ideas you can choose from:
01Princess Ira and Amina
This is a fictional aesthetic drawing cartoon of an African princess having gold gifted powers with her face painting inspired by Nigerian traditional face decorations. However, her crown is adorned with crosses, crystals, and chains which incorporate several elements from different cultural designs available from all over the world to portray unity.
02Survival Knife Weekly Drills 045
This was a design painting inspired based on BUCK KNIVES in pain texturing and focuses on making a practical game-ready asset.
03Radiance
This is a blender aesthetic cartoon painting idea of a graduation project made for the Concept Art specialized cursus at New3dge School.
04 The character looks dev
This blender cartoon painting’s inspiration came from Edward, the short film’s main character. It is a work in progress but a lovely painting that can inspire you.
Part 3 How to Create Super-Detailed Aesthetic Cartoon Painting
To create a super detailed aesthetic cartoon drawing, you do not need to be a trained artist, nor do you need a fancy cartoon picture maker. All you need to create a cartoon painting photo is a simple and Free picture from a cartoon editor to help you carry out the task more effectively.
However, you can also convert your cartoon paint into creative animation using Wondershare Filmora Video Editor . Filmora is a powerful all-in-one tool for editing that you can use to that can be used for free to animate your cartoon with its tons of effects, filters, and keyframing features that can help you carry this out effectively.
For Win 7 or later (64-bit)
For macOS 10.12 or later
Here is how to create a super detailed aesthetic cartoon painting:
Step 1: Open the Picsart editor on your desktop browser and click on the new project
Step 2: Next is to click on Upload to select the photo that you want to cartoon paint from the computer library of your hard drive
Step 2: Click on the toolbar, select the effect feature from the dropdown above your photo, and click on Magic to view all available one-click cartoon filters. However, almost all of the Magic effects on this editor will help you achieve an aesthetic cartoon photo effect.
Step 4: Click on Adjust and Blend above your photo workspace on the editor. This will help you manually adjust the effects (color burn, fade, saturation, brightness, etc.).
Step 5: Preview your result and once you are happy with the new cartoon photo painting, click on the Share button and download it from the top right corner of the editor to save it on your device.
● Ending Thoughts →
● This article explained creating and gave inspiration and ideas for the aesthetic cartoon painting you can choose from to make yours. In addition, the report also recommends Filmora as an influential editor if you intend to create an animation from your cartoon painting due to its tons of features.
● So, now you can start building your aesthetic drawings and cartoons!
Tips That Show Anybody How to Get Awesome Background for Slideshow in PowerPoint
Tips That Show Anybody How to Get Awesome Background for Slideshow in Powerpoint
An easy yet powerful editor
Numerous effects to choose from
Detailed tutorials provided by the official channel
Amazing slideshow background are an absolute attention grabber in the realm of creative PowerPoint presentations. If you wish to upgrade yours with the same, be here to learn how!
In this article
01 [How to Add Video Background in PowerPoint?](#Part 1)
02 [How to Create Moving Backgrounds in Microsoft PowerPoint?](#Part 2)
03 [Some Tips for You to Get Awesome PowerPoint Backgrounds & Templates](#Part 3)
Part 1 How to Add Video Background in PowerPoint?
When the talk is about engaging means to deliver a precise information, PowerPoint slideshows are an absolute stunner. While these are already a captivating utility to present your thing, the output and audience engagement is at par with the inclusion of attractive design elements in the presentation. As is evident, there are enormous diversities of supplementary elements to complement your presentation, let us centre our discussion to the application of video background for slideshow in PowerPoint.
User’s Guide to Add Video Background in a PowerPoint Slideshow
The following section presents a detailed explanation of the steps to supplement your PowerPoint presentations with classic video backgrounds in just a few quick steps:
Step 1: Launch Your Presentation
Start with opening the desired PowerPoint presentation to which you want to add the video background, in any of your preferred devices.
Step 2: Add a Video to Your Slide
Browse through your presentation slides to locate the one you want to add the video background to. When you have made your choice, navigate to the PowerPoint toolbar at the top and hit the ‘Insert’ tab and choose the ‘Video’ option.
You will now be presented with 2 choices, either uploading a video from your device or insert one from the web by pasting its YouTube URL into the slide. If you are uploading a video from your device, proceed with selecting the desired video and tap ‘Insert’.

Step 3: Move and Resize Your Video
After uploading your video to the slide, you need to make suitable adjustments in its size and alignment to synchronize the same with the contents of the slide. To do this, drag the top left corner of the video to that of the slide to set the top alignment ratio. In the same way, move the bottom right corner of the video to be in sync with that of the slide. You will see the video occupying the entire slide at the end of the adjustment process.

Step 4: Set the Video Background
You will now need to set the video as the background of your slide, so that the latter’s contents are displayed over the video. You can do this by right clicking on the video and choosing the ‘Send to Back’ option from the dropdown that follows. This will cause the contents of your slide to get displayed over the video.

Step 5: Playback Edit and Customization Choices
Before proceeding towards making changes in the video playback and formatting, prefer taking a quick preview of your work till here. Once you are satisfied, navigate to the PowerPoint Toolbar at the top, hit the ‘Video Tools’ tab, followed by clicking on the ‘Playback’ tab.
It is recommended to introduce the following changes in your video for the most affordable slideshow output:
● Loop Your Video
Creating a video loop will facilitate you with an automatic replay of your video without the need to restart it every time with a click. You can loop your video by navigating to the ‘Video Options’ section and choose ‘Loop Until Stopped’ by clicking within the checkbox next to it. The background video will now continue to play until you switch to a different slide.
● Automatically Start Your Video
To avoid clicking on the slide amid your presentation for the video loop to begin, adjust the latter’s settings for an automatic start. Navigate to the ‘Start’ dropdown menu and select ‘Automatically’.
● Trim Your Video
You can work with some basic video editing tools in PowerPoint, like trimming and cropping your background video to a desired length. If you wish to ward off certain portions of your video, reach to and click o the ‘Trim Video’ button. Following this, drag the slider of the video to select the desired portions of the clip and exclude the rest.
You can further work with some more editing effects to create the perfect video backgrounds for your presentation slides in line with your specific preferences.

Step 6: Annotate Your Video Background
When you are done with the video editing process, take a preview of the same to ensure that everything is set in the proper order and at the proper place. Lastly, if you wish to add suitable text annotations to your video, you can do this with the ‘ClassPoint’ tool to write over the video background. All you need to do is select a preferred pen colour and start writing on your slide screen. You can further, save the annotations for a work record.

Part 2 How to Create Moving Backgrounds in Microsoft PowerPoint?
Moving PowerPoint slideshow background is another aspect of graphic creativity at its best, which can be used in a number of ways to grab considerable viewer attention. When choosing to add moving backgrounds to your presentation, the latter can aid in improving the style of content presentation, making your audience curious about how and what happens next.
Having learnt about the utility and creation process of video backgrounds in the PowerPoint presentation tool, let us extend our discussion to the method of creating a moving slide show background in the same in the following section:
User’s Guide to Create Moving Backgrounds for PowerPoint Presentations
Discussed below is an explanatory procedure for designing moving backgrounds with an awesome appearance for slideshow presentations in Microsoft PowerPoint:
Step 1: Open Your Presentation
To begin with, launch the PowerPoint tool in your preferred device and open the presentation on which you will be working to add the moving background. After the presentation gets loaded, navigate through the same and select the desired slide to proceed with the aforesaid task.
Step 2: Choose a Video Location
To add your desired video to the slide, navigate to the PowerPoint ribbon at the top and click on the ‘Insert’ tab. Select ‘Video’ from the list of options that appears, followed by choosing one of the ‘Online Video’ or ‘Video on My PC’ options from the video selection prompt. It is further recommended to select a video in the MP4 format, as the latter gives best results of moving and video backgrounds.
Step 3: Insert Your Video
Choose the second option in the selection prompt to upload a video from your device. You will now be asked to browse through your device and locate the desired video in the ‘Insert Video’ dialog box that appears. Select your video and tap the ‘Insert’ button to add your video.
To upload videos from an online source, choose the ‘Online Video’ option in the selection prompt and proceed to search the video from PowerPoint or paste its embed code to recover the video. The chosen video will begin to download and can be added to the PowerPoint presentation after the download process comes to an end.

Step 4: Playback Editing and Video Customization
Before proceeding further, consider paying your video once by clicking on the ‘Start’ button. You can also add different effects, trim and crop or add a bookmark to your video by navigating to and clicking on the ‘Video Tools’ tab, followed by selecting the ‘Format’ option. To work with the start and playback options for the video, click on ‘Playback’ in the dropdown menu of the ‘Video Tools’ tab.

Part 3 Some Tips for You to Get Awesome PowerPoint Backgrounds & Templates
Now that you have developed a comprehensive understanding of the utility of adding video and moving background for slideshow presentation, let us look through some easy tips and tricks to conveniently access the top rated and the most popular PowerPoint slideshow templates and backgrounds in the following section:
01Cool Slide Backgrounds
Slideshow presentations in PowerPoint are supplemented with a visual spark through amazing and vibrant backgrounds that are a sign of excellent graphic creativity. When working with a PowerPoint presentation of your own, do take the liberty to use some cool slide backgrounds to your creative advantage.
When the talk is about complementing your presentation with a cohesive and upbeat background, you can either select the most suitable one from a heap of pre made slideshow templates available both in the PowerPoint slideshow creator tool as well as across the web. However, if you wish to take the excitement to another level, try hands at creating an awesome and cool backgrounds for PowerPoint slides of your own!
Talking about some really cool tips and tricks to design a slideshow presentation background in PowerPoint, start with including some specific shapes and color overlays to the background capture, experiment with a polygon background, work on enhancing the background image with classic and artistic effects and apply a mix of colors, textures and patterns to give a classy look to your slideshow backgrounds.

02Professional Slideshow Backgrounds
If you are aiming at creating a PowerPoint slideshow presentation with a business centered design approach, you will need to cut down on some extra elements that you would ideally choose to include in a personal purpose based slideshow. Paying attention to the fact that business and corporate centered presentations should be simple, subtle and to the point, it would be an intelligent step to avoid adding too many expressive elements in the background.
Whether you are creating a professional slideshow background of your own or working with a pre designed template, take care to include a complementary play of a light background theme with a maximum of 2 balancing shades.
Avoid too much vibrancy and abstain from applying over the top effects and quick transitions, lest your presentation may look a bit too crowed. If your slides have lot of written content, prefer using a white color background text in a professional font style.
If you have decided on picking a pre made template, you can browse through a diversity of suggestions across the web, while keeping the aforesaid constraints in mind. Consider taking a look at the figure given below to have a more comprehensive understating of the prerequisites of selecting a professional sideshow background template:

03Happy Birthday Slide Backgrounds
Birthday parties are the most appealing synonyms of fun and entertainment. If you are into the profession of organizing events that renders smiling and happy faces, slideshow presentations could be of great help to you in discussing about services, types of social gentries and event targets with your clients.
When looking through different options to select the perfect birthday template, either for a professional event, or just to go down the memory lane of your most cherished moments, take caution to search for a vibrant alternative with colorful images, different background designs and party oriented cool themes, wide aspect ratio with high screen resolution for a mass display and conveniently editable graphics.
If you are creating a happy birthday slide background of your own, there are variety of realms to explore your graphic design creativity, owing to the fact that the subject of creation is highly expressive and multi-dimensional. While you are free to extend your creativity to the next level, do pay attention to the above constraints for a more elusive and outstanding creation output, while maintaining the fun and entertainment quotient intact.

04Wedding Slide Backgrounds
Considering the fact that wedding events are pronounced means of fun, leisure, enjoyment and beautiful memories, anything that aims to be a part of the celebrations, should be equally ecstatic and engaging. Infusing festive occasions with technology, slideshow based wedding invitations and moment captures are the top rated modern trends of celebrating this significant life event.
If you are keen on designing the perfect slideshow presentation for wedding invitations, photo albums and thank you cards, prefer to choose a wedding slide background template with aesthetic layout and flowing element inclusions, like that of floral borders and scented candles. Look though the elements of a subtle thematic setup with soothing color combinations, preferably in complementary pastel shades, like pink and white.
Talking of template customizability, the latter should have placeholders to include names of the bride and groom, the wedding date and venue, and of course the wedding photographs. The beautiful slide background template should have enough design space to include the most elusive play of text colors and fonts to suit specific preferences of creating special memories of a cherished event.

05Slideshow Backgrounds and Templates in Filmora
When looking for the most convenient lead to an extensive variety of beautiful slideshow templates and background, the template library of Wondershare Filmora Video Editor slideshow creator program can be your most affordable destination. The aforesaid software library is known to possess the best and most perfect template choices to suit the creation constraints of almost every slideshow presentation style and objective you can possibly think of.
For Win 7 or later (64-bit)
For macOS 10.12 or later
The elusive templates are further supplemented with a plethora of design flexibilities and customization features that are all set to deliver you the most appreciable creation output. Stressing a bit on the template customization choices of the software, you can work with the tool to uplift your slideshow backgrounds with artistic image effects and overlays, annotate them with beautiful text formations in a variety of colors, fonts and sizes and lots more.
Moving a bit deeper into the creative aspect, you can upgrade the visual style of your presentations with the most perfect and seamless image and video transitions and text animations. The bottom line is, working with the aforesaid slideshow creator program, you are entitled to get jaw dropping applaud from your audience, while making a confident and a content delivery through your slideshow presentation.

● Ending Thoughts →
● Using an expressive and complementing background in your slideshow presentation uplifts its visual credibility in captivating your audience.
● Browsing through the web, you get to access a vast range of amazing slideshow backgrounds and templates to make your presentation, a visual masterpiece.
● When looking for the most distributed storehouse of slideshow backgrounds and templates, the Wondershare Filmora library is your ultimate solution.
Amazing slideshow background are an absolute attention grabber in the realm of creative PowerPoint presentations. If you wish to upgrade yours with the same, be here to learn how!
In this article
01 [How to Add Video Background in PowerPoint?](#Part 1)
02 [How to Create Moving Backgrounds in Microsoft PowerPoint?](#Part 2)
03 [Some Tips for You to Get Awesome PowerPoint Backgrounds & Templates](#Part 3)
Part 1 How to Add Video Background in PowerPoint?
When the talk is about engaging means to deliver a precise information, PowerPoint slideshows are an absolute stunner. While these are already a captivating utility to present your thing, the output and audience engagement is at par with the inclusion of attractive design elements in the presentation. As is evident, there are enormous diversities of supplementary elements to complement your presentation, let us centre our discussion to the application of video background for slideshow in PowerPoint.
User’s Guide to Add Video Background in a PowerPoint Slideshow
The following section presents a detailed explanation of the steps to supplement your PowerPoint presentations with classic video backgrounds in just a few quick steps:
Step 1: Launch Your Presentation
Start with opening the desired PowerPoint presentation to which you want to add the video background, in any of your preferred devices.
Step 2: Add a Video to Your Slide
Browse through your presentation slides to locate the one you want to add the video background to. When you have made your choice, navigate to the PowerPoint toolbar at the top and hit the ‘Insert’ tab and choose the ‘Video’ option.
You will now be presented with 2 choices, either uploading a video from your device or insert one from the web by pasting its YouTube URL into the slide. If you are uploading a video from your device, proceed with selecting the desired video and tap ‘Insert’.
Step 3: Move and Resize Your Video
After uploading your video to the slide, you need to make suitable adjustments in its size and alignment to synchronize the same with the contents of the slide. To do this, drag the top left corner of the video to that of the slide to set the top alignment ratio. In the same way, move the bottom right corner of the video to be in sync with that of the slide. You will see the video occupying the entire slide at the end of the adjustment process.
Step 4: Set the Video Background
You will now need to set the video as the background of your slide, so that the latter’s contents are displayed over the video. You can do this by right clicking on the video and choosing the ‘Send to Back’ option from the dropdown that follows. This will cause the contents of your slide to get displayed over the video.
Step 5: Playback Edit and Customization Choices
Before proceeding towards making changes in the video playback and formatting, prefer taking a quick preview of your work till here. Once you are satisfied, navigate to the PowerPoint Toolbar at the top, hit the ‘Video Tools’ tab, followed by clicking on the ‘Playback’ tab.
It is recommended to introduce the following changes in your video for the most affordable slideshow output:
● Loop Your Video
Creating a video loop will facilitate you with an automatic replay of your video without the need to restart it every time with a click. You can loop your video by navigating to the ‘Video Options’ section and choose ‘Loop Until Stopped’ by clicking within the checkbox next to it. The background video will now continue to play until you switch to a different slide.
● Automatically Start Your Video
To avoid clicking on the slide amid your presentation for the video loop to begin, adjust the latter’s settings for an automatic start. Navigate to the ‘Start’ dropdown menu and select ‘Automatically’.
● Trim Your Video
You can work with some basic video editing tools in PowerPoint, like trimming and cropping your background video to a desired length. If you wish to ward off certain portions of your video, reach to and click o the ‘Trim Video’ button. Following this, drag the slider of the video to select the desired portions of the clip and exclude the rest.
You can further work with some more editing effects to create the perfect video backgrounds for your presentation slides in line with your specific preferences.
Step 6: Annotate Your Video Background
When you are done with the video editing process, take a preview of the same to ensure that everything is set in the proper order and at the proper place. Lastly, if you wish to add suitable text annotations to your video, you can do this with the ‘ClassPoint’ tool to write over the video background. All you need to do is select a preferred pen colour and start writing on your slide screen. You can further, save the annotations for a work record.
Part 2 How to Create Moving Backgrounds in Microsoft PowerPoint?
Moving PowerPoint slideshow background is another aspect of graphic creativity at its best, which can be used in a number of ways to grab considerable viewer attention. When choosing to add moving backgrounds to your presentation, the latter can aid in improving the style of content presentation, making your audience curious about how and what happens next.
Having learnt about the utility and creation process of video backgrounds in the PowerPoint presentation tool, let us extend our discussion to the method of creating a moving slide show background in the same in the following section:
User’s Guide to Create Moving Backgrounds for PowerPoint Presentations
Discussed below is an explanatory procedure for designing moving backgrounds with an awesome appearance for slideshow presentations in Microsoft PowerPoint:
Step 1: Open Your Presentation
To begin with, launch the PowerPoint tool in your preferred device and open the presentation on which you will be working to add the moving background. After the presentation gets loaded, navigate through the same and select the desired slide to proceed with the aforesaid task.
Step 2: Choose a Video Location
To add your desired video to the slide, navigate to the PowerPoint ribbon at the top and click on the ‘Insert’ tab. Select ‘Video’ from the list of options that appears, followed by choosing one of the ‘Online Video’ or ‘Video on My PC’ options from the video selection prompt. It is further recommended to select a video in the MP4 format, as the latter gives best results of moving and video backgrounds.
Step 3: Insert Your Video
Choose the second option in the selection prompt to upload a video from your device. You will now be asked to browse through your device and locate the desired video in the ‘Insert Video’ dialog box that appears. Select your video and tap the ‘Insert’ button to add your video.
To upload videos from an online source, choose the ‘Online Video’ option in the selection prompt and proceed to search the video from PowerPoint or paste its embed code to recover the video. The chosen video will begin to download and can be added to the PowerPoint presentation after the download process comes to an end.
Step 4: Playback Editing and Video Customization
Before proceeding further, consider paying your video once by clicking on the ‘Start’ button. You can also add different effects, trim and crop or add a bookmark to your video by navigating to and clicking on the ‘Video Tools’ tab, followed by selecting the ‘Format’ option. To work with the start and playback options for the video, click on ‘Playback’ in the dropdown menu of the ‘Video Tools’ tab.
Part 3 Some Tips for You to Get Awesome PowerPoint Backgrounds & Templates
Now that you have developed a comprehensive understanding of the utility of adding video and moving background for slideshow presentation, let us look through some easy tips and tricks to conveniently access the top rated and the most popular PowerPoint slideshow templates and backgrounds in the following section:
01Cool Slide Backgrounds
Slideshow presentations in PowerPoint are supplemented with a visual spark through amazing and vibrant backgrounds that are a sign of excellent graphic creativity. When working with a PowerPoint presentation of your own, do take the liberty to use some cool slide backgrounds to your creative advantage.
When the talk is about complementing your presentation with a cohesive and upbeat background, you can either select the most suitable one from a heap of pre made slideshow templates available both in the PowerPoint slideshow creator tool as well as across the web. However, if you wish to take the excitement to another level, try hands at creating an awesome and cool backgrounds for PowerPoint slides of your own!
Talking about some really cool tips and tricks to design a slideshow presentation background in PowerPoint, start with including some specific shapes and color overlays to the background capture, experiment with a polygon background, work on enhancing the background image with classic and artistic effects and apply a mix of colors, textures and patterns to give a classy look to your slideshow backgrounds.
02Professional Slideshow Backgrounds
If you are aiming at creating a PowerPoint slideshow presentation with a business centered design approach, you will need to cut down on some extra elements that you would ideally choose to include in a personal purpose based slideshow. Paying attention to the fact that business and corporate centered presentations should be simple, subtle and to the point, it would be an intelligent step to avoid adding too many expressive elements in the background.
Whether you are creating a professional slideshow background of your own or working with a pre designed template, take care to include a complementary play of a light background theme with a maximum of 2 balancing shades.
Avoid too much vibrancy and abstain from applying over the top effects and quick transitions, lest your presentation may look a bit too crowed. If your slides have lot of written content, prefer using a white color background text in a professional font style.
If you have decided on picking a pre made template, you can browse through a diversity of suggestions across the web, while keeping the aforesaid constraints in mind. Consider taking a look at the figure given below to have a more comprehensive understating of the prerequisites of selecting a professional sideshow background template:
03Happy Birthday Slide Backgrounds
Birthday parties are the most appealing synonyms of fun and entertainment. If you are into the profession of organizing events that renders smiling and happy faces, slideshow presentations could be of great help to you in discussing about services, types of social gentries and event targets with your clients.
When looking through different options to select the perfect birthday template, either for a professional event, or just to go down the memory lane of your most cherished moments, take caution to search for a vibrant alternative with colorful images, different background designs and party oriented cool themes, wide aspect ratio with high screen resolution for a mass display and conveniently editable graphics.
If you are creating a happy birthday slide background of your own, there are variety of realms to explore your graphic design creativity, owing to the fact that the subject of creation is highly expressive and multi-dimensional. While you are free to extend your creativity to the next level, do pay attention to the above constraints for a more elusive and outstanding creation output, while maintaining the fun and entertainment quotient intact.
04Wedding Slide Backgrounds
Considering the fact that wedding events are pronounced means of fun, leisure, enjoyment and beautiful memories, anything that aims to be a part of the celebrations, should be equally ecstatic and engaging. Infusing festive occasions with technology, slideshow based wedding invitations and moment captures are the top rated modern trends of celebrating this significant life event.
If you are keen on designing the perfect slideshow presentation for wedding invitations, photo albums and thank you cards, prefer to choose a wedding slide background template with aesthetic layout and flowing element inclusions, like that of floral borders and scented candles. Look though the elements of a subtle thematic setup with soothing color combinations, preferably in complementary pastel shades, like pink and white.
Talking of template customizability, the latter should have placeholders to include names of the bride and groom, the wedding date and venue, and of course the wedding photographs. The beautiful slide background template should have enough design space to include the most elusive play of text colors and fonts to suit specific preferences of creating special memories of a cherished event.
05Slideshow Backgrounds and Templates in Filmora
When looking for the most convenient lead to an extensive variety of beautiful slideshow templates and background, the template library of Wondershare Filmora Video Editor slideshow creator program can be your most affordable destination. The aforesaid software library is known to possess the best and most perfect template choices to suit the creation constraints of almost every slideshow presentation style and objective you can possibly think of.
For Win 7 or later (64-bit)
For macOS 10.12 or later
The elusive templates are further supplemented with a plethora of design flexibilities and customization features that are all set to deliver you the most appreciable creation output. Stressing a bit on the template customization choices of the software, you can work with the tool to uplift your slideshow backgrounds with artistic image effects and overlays, annotate them with beautiful text formations in a variety of colors, fonts and sizes and lots more.
Moving a bit deeper into the creative aspect, you can upgrade the visual style of your presentations with the most perfect and seamless image and video transitions and text animations. The bottom line is, working with the aforesaid slideshow creator program, you are entitled to get jaw dropping applaud from your audience, while making a confident and a content delivery through your slideshow presentation.
● Ending Thoughts →
● Using an expressive and complementing background in your slideshow presentation uplifts its visual credibility in captivating your audience.
● Browsing through the web, you get to access a vast range of amazing slideshow backgrounds and templates to make your presentation, a visual masterpiece.
● When looking for the most distributed storehouse of slideshow backgrounds and templates, the Wondershare Filmora library is your ultimate solution.
How to Make a Photoshop Collage in EASY Steps
How to Make a Photoshop Collage in EASY Steps
An easy yet powerful editor
Numerous effects to choose from
Detailed tutorials provided by the official channel
Photographs are a way of capturing and stopping the time in a small frame. They hold millions of memories that we want to cherish forever in our lives. And sometimes, we want to make a cluster of all the happy memories by making a collage of the photos.

Also, what can be a better gift to someone than presenting them a collection of all the cherishable memories you have with them in photographs? And that can be made possible through various photoshop collage ideas.
In this article
01 [Does Photoshop Have Collage Templates?](#Part 1)
02 [How to Make Your Own Collage with Photoshop Templates](#Part 2)
03 [How to Custom a Photoshop Collage in 9 Simple Steps](#Part 3)
Part 1 Does Photoshop Have Collage Templates?
There is numerous photo collage template in photoshop, and you even access and use some of them for free. Additionally, you can also create your template in Photoshop and use them in making your collage. If you want to make your template in Photoshop, here is how.
Step 1: Make a new layer and fill it up with your choice of colour.
Step 2: Resize and duplicate the layer to create the pattern you want for your collage.
Step 3: Integrate a “Clipping Mask.”
Step 4: For every image, create new clipping masks.
Step 5: Your collage template is ready so, export it to use!
Part 2 How to Make Your Own Collage with Photoshop Templates
Now that we know that you can access numerous incredible photoshop templates for free, you might want to create a collage for yourself in Photoshop. So, this is how you can use the photoshop collage template to make your collage with Photoshop Templates.
First, you need to select the images you want to create a collage with. Then you will have to import them. You can either “select and import” them one at a time or even batch import all of them together. Then, you can readily choose the template you want to use, or you can also create one for yourself.
Then you can resize or edit the images in the way you want and place them in the desired order. After you are done arranging and creating the collage perfectly, save the file in JPEG format and then export it to access it whenever you want!
Part 3 How to Custom a Photoshop Collage in 9 Simple Steps
If you do not know the answer to the question: how to make a collage in photoshop, there is absolutely nothing to worry about. Because the answer to this question is simple and includes not more than nine steps.
So now, we will be discussing the nine simple steps that will help you make a custom photo collage in photoshop. Here is the list of steps that will help you in doing so.
● Step 1: Selecting your favorite photos
The first step to making a collage in photoshop is to select all the photos you would like your collage to have. Now, it will be best for you to choose your photos wisely. We understand that each photograph is equally sweet and cherishable. But, when you select the images for your collage in a thoughtful manner, the collage turns out much better than expected.
You can use different collage ideas for photoshop, such as following a particular storyline, where you collage the photos so that it recreates the memory or the moments in sequence. Another way to select your photos is by sticking to a particular theme, and it can be vintage or on one specific color or the like. It will help your collage turn out in the best and the most thoughtful way.
● Step 2: Opening the photos you have selected, in collage maker photoshop
Now that you have selected which images you would want your collage to have, the next step will require you to open those images in the collage maker Photoshop. For this, you will have to select the option “File”. There, you will find the option “Open”. Then you will open the images you have chosen in Photoshop.
Also, you can simply press the “ctrl” and the “O” keys on your keyboard and it will automatically help you open the images you have selected for the photo collage on photoshop.

Another way to open the pages you have selected for your collage is through the “Drag and Drop” function. It is more effortless to choose the images and open them in Photoshop. After you have opened the photos in Photoshop, it will open in a different tab and look like in the following picture.

● Step 3: Make a new file for your collage on photoshop
The third step requires you to make a new file for your photo collage in photoshop. For this, you need to select or click on the “File” option on Photoshop. Then, click on the “New” option. It will help you make a new file for your collage. You can also select the “ctrl” and “N” together.
As you click on the “New” option, you will be given options to choose from. Choose the one that matches your preference.
When you are working on photoshop to make a collage, the images will need a collage background because it is on this background that the photos will assemble. If you have made a collage before on photoshop, you can use the old collage photoshop template. Otherwise, you need to create a new document for the collage.

● Step 4: Add the selected images one-by-one
Adding the images can be done in many ways. One way to do so is by opening the photo and clicking on it. Another way of doing so is to use the “Marquee Tool” of Photoshop.

Another way of doing so is by pressing the “ctrl” and “A” keys on your keyboard together. You will find the matching ants border around the image when you do this.

Then, go to the “Edit” option and choose “Copy” there. Or, you can also select the “ctrl” and “C” keys on your keywords together. Then go to your new document and select the option of “Paste” from the “Edit” option, or you can also press the “ctrl” and “V” keys together to do so.
The photo will be added in its own layer on the new document.

● Step 5: Arrange the images
Now, arrange the images in the way you want. If you have chosen to tell a story through your collage creator in photoshop, then arrange the photos accordingly. You can do so with the help of the “Move” tool or simply tap V. You can also use the “Free Transform” tool to edit and transform the images in the way you want. You can resize, rotate and edit the photos in many other ways through the “Free Transform” tool.
Step 6: Integrate image space
To create a collage in photoshop in a better and more spaced-out manner, you need to add some spacing between the images you have in your collage. There are two ways to add spacing between the pictures; one way is by creating a thin, white border around each image.
And the second method is by accessing and using the “Layers” feature in Photoshop.

● Step 7: Merge all the Layers
This step is necessary when you have used the “Layer” feature to create the spacing among the images present in your collage. You will be able to do so from the “Layer” option. So, go to the “Layer” option and select the “Merge Invisible” option present there.

● Step 8: cropping the final picture
Before the final step, it is important that you crop the final picture. And to do so, you can opt for the “Crop tool”. You will be able to access it easily, or you can also simply tap C to use the “Crop tool.”

● Step 9: Save the final collage and export
After you have done all the necessary changes and are satisfied with the final collage, then, save the file. To do so, go to the “File” option and select the “Save as” option.

Then choose the file type to be “JPEG”. Type the name you would want the collage to be saved as. This completes the process of saving the file. Then choose the image quality you would want the collage to be exported in.

● Key Takeaways from This Episode →
● In this discussion, we have covered the following topics.
● We discussed whether Photoshop has collage templates.
● Then we proceeded with discussing how we can create a collage in photoshop using the templates in it.
● Lastly, we wrapped up our discussion with the nine-step tutorial about customizing a collage in Photoshop.
Photographs are a way of capturing and stopping the time in a small frame. They hold millions of memories that we want to cherish forever in our lives. And sometimes, we want to make a cluster of all the happy memories by making a collage of the photos.
Also, what can be a better gift to someone than presenting them a collection of all the cherishable memories you have with them in photographs? And that can be made possible through various photoshop collage ideas.
In this article
01 [Does Photoshop Have Collage Templates?](#Part 1)
02 [How to Make Your Own Collage with Photoshop Templates](#Part 2)
03 [How to Custom a Photoshop Collage in 9 Simple Steps](#Part 3)
Part 1 Does Photoshop Have Collage Templates?
There is numerous photo collage template in photoshop, and you even access and use some of them for free. Additionally, you can also create your template in Photoshop and use them in making your collage. If you want to make your template in Photoshop, here is how.
Step 1: Make a new layer and fill it up with your choice of colour.
Step 2: Resize and duplicate the layer to create the pattern you want for your collage.
Step 3: Integrate a “Clipping Mask.”
Step 4: For every image, create new clipping masks.
Step 5: Your collage template is ready so, export it to use!
Part 2 How to Make Your Own Collage with Photoshop Templates
Now that we know that you can access numerous incredible photoshop templates for free, you might want to create a collage for yourself in Photoshop. So, this is how you can use the photoshop collage template to make your collage with Photoshop Templates.
First, you need to select the images you want to create a collage with. Then you will have to import them. You can either “select and import” them one at a time or even batch import all of them together. Then, you can readily choose the template you want to use, or you can also create one for yourself.
Then you can resize or edit the images in the way you want and place them in the desired order. After you are done arranging and creating the collage perfectly, save the file in JPEG format and then export it to access it whenever you want!
Part 3 How to Custom a Photoshop Collage in 9 Simple Steps
If you do not know the answer to the question: how to make a collage in photoshop, there is absolutely nothing to worry about. Because the answer to this question is simple and includes not more than nine steps.
So now, we will be discussing the nine simple steps that will help you make a custom photo collage in photoshop. Here is the list of steps that will help you in doing so.
● Step 1: Selecting your favorite photos
The first step to making a collage in photoshop is to select all the photos you would like your collage to have. Now, it will be best for you to choose your photos wisely. We understand that each photograph is equally sweet and cherishable. But, when you select the images for your collage in a thoughtful manner, the collage turns out much better than expected.
You can use different collage ideas for photoshop, such as following a particular storyline, where you collage the photos so that it recreates the memory or the moments in sequence. Another way to select your photos is by sticking to a particular theme, and it can be vintage or on one specific color or the like. It will help your collage turn out in the best and the most thoughtful way.
● Step 2: Opening the photos you have selected, in collage maker photoshop
Now that you have selected which images you would want your collage to have, the next step will require you to open those images in the collage maker Photoshop. For this, you will have to select the option “File”. There, you will find the option “Open”. Then you will open the images you have chosen in Photoshop.
Also, you can simply press the “ctrl” and the “O” keys on your keyboard and it will automatically help you open the images you have selected for the photo collage on photoshop.
Another way to open the pages you have selected for your collage is through the “Drag and Drop” function. It is more effortless to choose the images and open them in Photoshop. After you have opened the photos in Photoshop, it will open in a different tab and look like in the following picture.
● Step 3: Make a new file for your collage on photoshop
The third step requires you to make a new file for your photo collage in photoshop. For this, you need to select or click on the “File” option on Photoshop. Then, click on the “New” option. It will help you make a new file for your collage. You can also select the “ctrl” and “N” together.
As you click on the “New” option, you will be given options to choose from. Choose the one that matches your preference.
When you are working on photoshop to make a collage, the images will need a collage background because it is on this background that the photos will assemble. If you have made a collage before on photoshop, you can use the old collage photoshop template. Otherwise, you need to create a new document for the collage.
● Step 4: Add the selected images one-by-one
Adding the images can be done in many ways. One way to do so is by opening the photo and clicking on it. Another way of doing so is to use the “Marquee Tool” of Photoshop.
Another way of doing so is by pressing the “ctrl” and “A” keys on your keyboard together. You will find the matching ants border around the image when you do this.
Then, go to the “Edit” option and choose “Copy” there. Or, you can also select the “ctrl” and “C” keys on your keywords together. Then go to your new document and select the option of “Paste” from the “Edit” option, or you can also press the “ctrl” and “V” keys together to do so.
The photo will be added in its own layer on the new document.
● Step 5: Arrange the images
Now, arrange the images in the way you want. If you have chosen to tell a story through your collage creator in photoshop, then arrange the photos accordingly. You can do so with the help of the “Move” tool or simply tap V. You can also use the “Free Transform” tool to edit and transform the images in the way you want. You can resize, rotate and edit the photos in many other ways through the “Free Transform” tool.
Step 6: Integrate image space
To create a collage in photoshop in a better and more spaced-out manner, you need to add some spacing between the images you have in your collage. There are two ways to add spacing between the pictures; one way is by creating a thin, white border around each image.
And the second method is by accessing and using the “Layers” feature in Photoshop.
● Step 7: Merge all the Layers
This step is necessary when you have used the “Layer” feature to create the spacing among the images present in your collage. You will be able to do so from the “Layer” option. So, go to the “Layer” option and select the “Merge Invisible” option present there.
● Step 8: cropping the final picture
Before the final step, it is important that you crop the final picture. And to do so, you can opt for the “Crop tool”. You will be able to access it easily, or you can also simply tap C to use the “Crop tool.”
● Step 9: Save the final collage and export
After you have done all the necessary changes and are satisfied with the final collage, then, save the file. To do so, go to the “File” option and select the “Save as” option.
Then choose the file type to be “JPEG”. Type the name you would want the collage to be saved as. This completes the process of saving the file. Then choose the image quality you would want the collage to be exported in.
● Key Takeaways from This Episode →
● In this discussion, we have covered the following topics.
● We discussed whether Photoshop has collage templates.
● Then we proceeded with discussing how we can create a collage in photoshop using the templates in it.
● Lastly, we wrapped up our discussion with the nine-step tutorial about customizing a collage in Photoshop.
How to Draw A Skeleton Cartoon – A Step by Step Guide
How to Draw Skeleton Cartoon – A Step by Step Guide
An easy yet powerful editor
Numerous effects to choose from
Detailed tutorials provided by the official channel
We often see skeleton cartoons on t-shirts and phone cases. There is a famous skeleton cartoon show. Most of the shows are pretty popular, and the skeleton cartoon in the shows became quite trendy in the fashion industry. The trend of a skeleton cartoon character is very much relevant nowadays. One might think about how this skeleton cartoon is drawn.
Sometimes it is hand drawn or digitally drawn. Here is a step-by-step guide for you if you wonder how to draw a skeleton cartoon. This guide will effortlessly help you draw the most quirky and trendy skeleton cartoon.
In this article
01 [This Is What 5 Skeletons of Famous Cartoon Characters Would Look Like](#Part 1)
02 [How to Draw Cartoon Skeletons With Step by Step](#Part 2)
Part 1 This Is What 5 Skeletons of Famous Cartoon Characters Would Look Like
From our very childhood, we have come across numerous cartoons shows. But have we ever wondered how the skeleton of these cartoon characters would look? No worries if you have not given a thought to this. This article can give you a small tour of the world where you will be able to see skeletons of a few famous cartoon characters that we have known since our childhood. The skeletons of famous cartoon characters are:
01Charlie
Charlie Brown, known as Charlie, is the main character in the comic strip Peanuts. This is a widely recognized American cartoon. Many people can relate to Charlie. Charlie is shy, nervous, and lacks confidence. These characteristics make him relatable to a chunk of common people. Charlie is referred to as the “Loveable Loser.”Charlie is an overwhelmingly short and stout character physically. Have you ever imagined how Charlie’s skeleton version would look? Here is how the skeleton cartoon of Charlie would look.

02Fred Flintstone
I have known very few people who do not know about Fred Flintstone. Fred Flinstone is the protagonist of the famous American sitcom show Yabba-Dabba-Dinosaurs and the entire franchise. The Flinstone is another show that features Fred with his family. Of course, the show’s main attraction is the Flinstone family and the way this show is set. This show is set in a way that romanticizes a family living in a cave. Coming to talk about skeletons, have you ever thought that what if a skeleton cartoon show version of The Flintstone were made. How would this short, fat man with almost a square look as a skeleton? We can look up here how the skeleton version of Fred Flintstone looks:

03Bubbles
The Bubble is one of the main characters of the popular TV cartoon show Powerpuff girls. The other protagonists are Blossom and Buttercup, her sisters. The Bubble is named Bubble because she is the bubbliest and most fun-loving among the three sisters. Bubble is a sweet little girl with a round face and big round eyes and short limbs. These characteristics in this character make it look cuter. But to think, how would we imagine Bubble in a skeleton version. This is how Bubble would look like a skeleton.

04Dexter
Dexter is the protagonist in the show Dexter’s Laboratory. Dexter is one of the most outstanding kid scientists who have made great inventions in his secret laboratory. It would be more appropriate to call Dexter an anti-heroic protagonist. He works in his secret laboratory for various projects like stopping bullying worldwide. Dexter is a short young boy with curly hair. Dexter is mostly seen wearing a white lab coat and semi-circle goggles, like someone who is always working in a lab. Imagining Dexter as a skeleton can be hilarious. But this is how Dexter would look like a skeleton cartoon.

05Pikachu
Pikachu is one of the characters or one of the Pokémons in the famous animated Japanese series Pokémon. Pikachu is a small yellow furry Pokémon. It seems very sweet to the audience and the general public, but it acquires a dangerous skill to give out an electric shock. This small yellow furry creature has featured in many films with the protagonist of the famous show Pokémon Ash Ketchum. This cartoon character has a presence in the fashion industry. It has been used to fashion dresses, bags, and many more. How would it be if we sat to think of a skeleton version of this furry creature? This may not a pleasant experience for everyone. The perfect way to demonstrate pikachu as a skeleton version would be:

Part 2 How to Draw Cartoon Skeletons With Step by Step
Have you ever tried drawing a skeleton cartoon character? You can use a skeleton cartoon to add a quirky effect to your project. You can draw an animated skeleton on your favorite t-shirt and change the vibe of the t-shirt. There are many methods to draw skeleton cartoon. Here we focus mainly on one way to draw cartoon skeleton. The method might seem difficult at the beginning, but the whole process becomes easier and smooth once you start following the steps. The steps are:
Step 1: To start with the drawing of the skeleton, let’s start with the head or the skull. The head should be round, and the jaw area needs to be at some angle or angular and have smaller lines than the long rounded lines on the upper part of the skull.
Step 2: The mouth of the skull must be open, and then we need to concentrate on other features of the face like the teeth, nose, and cheekbone.

Step 3: After the head is complete, we focus on the neck and the chest area. To draw the neck, divide the neck into small sections to show the division in the neck portion, as shown in the picture.
Step 4: To start with the rib cage, we need to draw the spine. The spine can be drawn as a long thick line and should be a continuity of the neck, so the neck and the spine should be drawn in the same way and same line. It is to be drawn at the body’s center, just below the head. You can refer to the example as shown below.
Step 5: After you have drawn the spine, to draw the rib, draw circles around the spine as if the curved lines demonstrating the rib are revolving around the spine.

Step 6: After the head and the chest region is complete. Focus on the hand. You can rest the arms any way you want. Since you are a beginner, this example shows the easiest ways to rest the hands when you are drawing a cartoon skeleton.
Step 7: The left arm will rest on the hips, and the right arm needs to be shown in a way so that it looks that the skeleton body is leaning on some object.
Step 8: Since the arms have divisions, the bones must be drawn the same way shown in the example with the same divisions on the arms.
Step 9: Keep in mind that both the arms must have equal bone divisions; otherwise, the drawing may look weird.
Step 10: Now you need to draw the hand. The hand is made of small bones. To draw the hand, divide it into small sections consisting of very small bones.

Step 11: After the hands are complete, the upper part of the body is complete. Now we need to focus on the lower part of the body.
Step 12: To start with the lower part of the body, we start with the hip portion.
Step 13: Show the hips with curved lines, and draw a round-like shape inside the curve to show the holes in the hips.
Step 14: After the hip is complete, start with the upper half of the legs. Draw a long bone from the hip to demonstrate the upper part of the leg.

Step 15: Now we need to concentrate on the other half of the leg. You can position the legs any way you want. Here in the example, the left leg will be crossed over the right leg.
Step 16: After the lower half of the legs is complete, the standing posture of the skeleton is set.
Step 17: Now we need to add the feet at the end of the leg. The feet are made of tiny pieces of bones; to draw the feet, divide them into small sections, as shown in the example.
Step 18: Draw the feet in a similar way to how you have drawn the hands.

Step 19: You can color your skeleton drawing or give your shading style after your skeleton drawing is done.
You can make quirky skeleton cartoon animations and compile them to a video, adding music effects. You might think you need different apps for the video and the audio editing part. That might be the case for other apps. Here is Wondershare Filmora Video Editor ; you can edit your video, make slideshows, and edit the background sound score. Just imagine of not changing windows while editing your exciting project can be so comfortable!
For Win 7 or later (64-bit)
For macOS 10.12 or later
● Ending Thoughts →
● It might be astonishing for you to see the skeleton versions of your favorite cartoon characters from your childhood.
● It gives a quirky effect to our minds but, at the same time, leaves us wondering about the skeleton drawing cartoon.
● Now you know the methodof drawing a cartoon skeleton. You can make your version of a skeleton cartoon; you can create your style and interpretation. You can create a skeleton dog cartoon.
● You can use the method to make animations or even paint on your t-shirt or wall paintings to add a little quirkiness.
● The cartoon skeleton gives a cool vibe. You can use your animation as your wallpaper. Keep quirking!
We often see skeleton cartoons on t-shirts and phone cases. There is a famous skeleton cartoon show. Most of the shows are pretty popular, and the skeleton cartoon in the shows became quite trendy in the fashion industry. The trend of a skeleton cartoon character is very much relevant nowadays. One might think about how this skeleton cartoon is drawn.
Sometimes it is hand drawn or digitally drawn. Here is a step-by-step guide for you if you wonder how to draw a skeleton cartoon. This guide will effortlessly help you draw the most quirky and trendy skeleton cartoon.
In this article
01 [This Is What 5 Skeletons of Famous Cartoon Characters Would Look Like](#Part 1)
02 [How to Draw Cartoon Skeletons With Step by Step](#Part 2)
Part 1 This Is What 5 Skeletons of Famous Cartoon Characters Would Look Like
From our very childhood, we have come across numerous cartoons shows. But have we ever wondered how the skeleton of these cartoon characters would look? No worries if you have not given a thought to this. This article can give you a small tour of the world where you will be able to see skeletons of a few famous cartoon characters that we have known since our childhood. The skeletons of famous cartoon characters are:
01Charlie
Charlie Brown, known as Charlie, is the main character in the comic strip Peanuts. This is a widely recognized American cartoon. Many people can relate to Charlie. Charlie is shy, nervous, and lacks confidence. These characteristics make him relatable to a chunk of common people. Charlie is referred to as the “Loveable Loser.”Charlie is an overwhelmingly short and stout character physically. Have you ever imagined how Charlie’s skeleton version would look? Here is how the skeleton cartoon of Charlie would look.
02Fred Flintstone
I have known very few people who do not know about Fred Flintstone. Fred Flinstone is the protagonist of the famous American sitcom show Yabba-Dabba-Dinosaurs and the entire franchise. The Flinstone is another show that features Fred with his family. Of course, the show’s main attraction is the Flinstone family and the way this show is set. This show is set in a way that romanticizes a family living in a cave. Coming to talk about skeletons, have you ever thought that what if a skeleton cartoon show version of The Flintstone were made. How would this short, fat man with almost a square look as a skeleton? We can look up here how the skeleton version of Fred Flintstone looks:
03Bubbles
The Bubble is one of the main characters of the popular TV cartoon show Powerpuff girls. The other protagonists are Blossom and Buttercup, her sisters. The Bubble is named Bubble because she is the bubbliest and most fun-loving among the three sisters. Bubble is a sweet little girl with a round face and big round eyes and short limbs. These characteristics in this character make it look cuter. But to think, how would we imagine Bubble in a skeleton version. This is how Bubble would look like a skeleton.
04Dexter
Dexter is the protagonist in the show Dexter’s Laboratory. Dexter is one of the most outstanding kid scientists who have made great inventions in his secret laboratory. It would be more appropriate to call Dexter an anti-heroic protagonist. He works in his secret laboratory for various projects like stopping bullying worldwide. Dexter is a short young boy with curly hair. Dexter is mostly seen wearing a white lab coat and semi-circle goggles, like someone who is always working in a lab. Imagining Dexter as a skeleton can be hilarious. But this is how Dexter would look like a skeleton cartoon.
05Pikachu
Pikachu is one of the characters or one of the Pokémons in the famous animated Japanese series Pokémon. Pikachu is a small yellow furry Pokémon. It seems very sweet to the audience and the general public, but it acquires a dangerous skill to give out an electric shock. This small yellow furry creature has featured in many films with the protagonist of the famous show Pokémon Ash Ketchum. This cartoon character has a presence in the fashion industry. It has been used to fashion dresses, bags, and many more. How would it be if we sat to think of a skeleton version of this furry creature? This may not a pleasant experience for everyone. The perfect way to demonstrate pikachu as a skeleton version would be:
Part 2 How to Draw Cartoon Skeletons With Step by Step
Have you ever tried drawing a skeleton cartoon character? You can use a skeleton cartoon to add a quirky effect to your project. You can draw an animated skeleton on your favorite t-shirt and change the vibe of the t-shirt. There are many methods to draw skeleton cartoon. Here we focus mainly on one way to draw cartoon skeleton. The method might seem difficult at the beginning, but the whole process becomes easier and smooth once you start following the steps. The steps are:
Step 1: To start with the drawing of the skeleton, let’s start with the head or the skull. The head should be round, and the jaw area needs to be at some angle or angular and have smaller lines than the long rounded lines on the upper part of the skull.
Step 2: The mouth of the skull must be open, and then we need to concentrate on other features of the face like the teeth, nose, and cheekbone.
Step 3: After the head is complete, we focus on the neck and the chest area. To draw the neck, divide the neck into small sections to show the division in the neck portion, as shown in the picture.
Step 4: To start with the rib cage, we need to draw the spine. The spine can be drawn as a long thick line and should be a continuity of the neck, so the neck and the spine should be drawn in the same way and same line. It is to be drawn at the body’s center, just below the head. You can refer to the example as shown below.
Step 5: After you have drawn the spine, to draw the rib, draw circles around the spine as if the curved lines demonstrating the rib are revolving around the spine.
Step 6: After the head and the chest region is complete. Focus on the hand. You can rest the arms any way you want. Since you are a beginner, this example shows the easiest ways to rest the hands when you are drawing a cartoon skeleton.
Step 7: The left arm will rest on the hips, and the right arm needs to be shown in a way so that it looks that the skeleton body is leaning on some object.
Step 8: Since the arms have divisions, the bones must be drawn the same way shown in the example with the same divisions on the arms.
Step 9: Keep in mind that both the arms must have equal bone divisions; otherwise, the drawing may look weird.
Step 10: Now you need to draw the hand. The hand is made of small bones. To draw the hand, divide it into small sections consisting of very small bones.
Step 11: After the hands are complete, the upper part of the body is complete. Now we need to focus on the lower part of the body.
Step 12: To start with the lower part of the body, we start with the hip portion.
Step 13: Show the hips with curved lines, and draw a round-like shape inside the curve to show the holes in the hips.
Step 14: After the hip is complete, start with the upper half of the legs. Draw a long bone from the hip to demonstrate the upper part of the leg.
Step 15: Now we need to concentrate on the other half of the leg. You can position the legs any way you want. Here in the example, the left leg will be crossed over the right leg.
Step 16: After the lower half of the legs is complete, the standing posture of the skeleton is set.
Step 17: Now we need to add the feet at the end of the leg. The feet are made of tiny pieces of bones; to draw the feet, divide them into small sections, as shown in the example.
Step 18: Draw the feet in a similar way to how you have drawn the hands.
Step 19: You can color your skeleton drawing or give your shading style after your skeleton drawing is done.
You can make quirky skeleton cartoon animations and compile them to a video, adding music effects. You might think you need different apps for the video and the audio editing part. That might be the case for other apps. Here is Wondershare Filmora Video Editor ; you can edit your video, make slideshows, and edit the background sound score. Just imagine of not changing windows while editing your exciting project can be so comfortable!
For Win 7 or later (64-bit)
For macOS 10.12 or later
● Ending Thoughts →
● It might be astonishing for you to see the skeleton versions of your favorite cartoon characters from your childhood.
● It gives a quirky effect to our minds but, at the same time, leaves us wondering about the skeleton drawing cartoon.
● Now you know the methodof drawing a cartoon skeleton. You can make your version of a skeleton cartoon; you can create your style and interpretation. You can create a skeleton dog cartoon.
● You can use the method to make animations or even paint on your t-shirt or wall paintings to add a little quirkiness.
● The cartoon skeleton gives a cool vibe. You can use your animation as your wallpaper. Keep quirking!
[Top 10] Best and Fast Ways to Turn Image Into Gif
[Top 10] Best and Fast Ways to Turn Image into Gif
An easy yet powerful editor
Numerous effects to choose from
Detailed tutorials provided by the official channel
There are in fact ways to turn an image into GIF easily We’ll be showing off a couple of some of the easier ways below, including in-depth tutorials of some of the best methods so that you will no longer have to be troubled.
These tutorials, of course, will focus on teaching you how to create GIF from photos If that’s something you’re interested in, continue reading
In this article
01 [Why GIF?](#Part 1)
02 [How to Add an Image to a GIF?](#Part 2)
Part 1 Why GIF?
Before we move on to the tutorials, let’s do a brief account on GIF files We’ve also answered some of the more common questions regarding using a GIF image maker below for your edification
But, first: Why GIF? Well, it all comes down to what you’re looking for A lot of people use GIF files to create animated icons that they can use for their accounts. Some just genuinely want to create a GIF file that they can share with their friends and families (either for a laugh or something else) GIF files are a convenient vessel for doing this because they have a lot of flexibility and are accepted by most platforms
01Why Gif from My Images Are Blurry?
One of the biggest issues people tend to have when turning an image into GIF is that they come out of the process with a blurry end-product. No one wants that But, how are you supposed to avoid it? Well, it all depends on the tool that you’re using and your initial picture For the former, it’s best to review the upload requirements of your chosen GIF maker to get a better end result. For the latter, it’s best to pick a good, high-quality GIF creator for a better outcome
02There Are Jaggy Strokes Around Gif?
Another issue that you might suffer from while trying to create GIFs from photos is jaggy or raggedy strokes around the GIF when converted. These occur often with GIF makers that support transparency If you find these happening to you, adjust the transparency settings to get rid of the white pixel outline around your converted GIF.
Part 2 How to Add an Image to a GIF?
Now it’s finally time for the tutorials that we promised at the beginning of this article These tutorials will range from online to software solutions — so that you can get a clear idea of what you can expect from all these different GIF makers. To be more specific, we’ll be demonstrating with an online images to GIF converter, how to create animated GIF photoshop, and how to easily turn any image into GIF with the photo GIF creator, Wondershare Filmora Video Editor.
01Image to GIF: How to Turn Photos into Animated GIFs
For our first tutorial, we’re going to be demonstrating how to create GIF from photos with an online photo GIF creator More specifically, we’ll be demonstrating with Loading.IO, which is an online tool that you can use to create animated icons for your profiles or on your video content It comes with several animation options and other settings that you can use to quickly create GIFs from photos
**Step 1: Go to Loading.IO
Of course, we start off this tutorial by opening the GIF maker. In this case, since the tool is hosted online, that’s as easy as opening the link that we’ve provided below It will take you directly to the online GIF creator.
URL: https://loading.io/animation/icon/

**Step 2: Upload Photo
Once on-site, it’s time to upload the photo that you want to turn into a GIF As this is an icon creator, you should pick a photo with the proper parameters
To upload your icon for animating, select the ‘Upload’ button and browse your computer or your Google Drive for the image in question.

**Step 3: Choose animation Style
Next, choose how you want the uploaded photo to be animated Loading.IO offers a couple of animations that you can choose from Including the ‘beat’ animation, which is what we choose for our example

**Step 4: Adjust Settings
This step is technically optional, as there are default settings already prepared if you have no other specifications for your image-turned GIF. But, if you want, you can adjust certain settings for a better outcome
For example, you can speed up the animation with the ‘Speed’ slider. Or, you can increase the number of times the GIF loops by adjusting the ‘Repeat’ slider. Test out a couple of settings to get the best result

**Step 5: Download as GIF
To wrap things up, it’s time to download your finished animation Loading.IO gives several options for this. But, of course, in our case, we choose to ‘Download As: GIF’

02How to Make an Animated GIF in Photoshop [Tutorial]
For the next tutorial, we’ll be showing you how to use Photoshop to create and edit an animated GIF This process is fairly lengthy and is not recommended for beginners. But, it is a very professional method of creating an animated GIF — one that will allow you to control every step of the process (which may be exactly what you want)
**Step 1: Import Images into an Image Stack
First, starting on a new product, upload the images that you want to turn into a GIF into a photoshop ‘Image Stack’. This can be done by clicking the ‘File’ tab and selecting the ‘Scripts > Load Files into Stack…’ option
Afterward, a pop-up window will appear where you will be prompted to browse your computer for the aforementioned images Click ‘OK’ when done

**Step 2: Organize Layers
Check the ‘Layers’ panel for the images that you uploaded and organize them based on how you want them to appear for your animated GIF

**Step 3: (Optional) Import Video
If you want to work on a video to turn into a GIF instead, you can do such by selecting the ‘File’ tab and clicking on the ‘Import > Video Frames to Layers…’ option. This will get you to the same place shown in Step 2
Note: Just be careful that you do not transfer an image that is too long Photoshop may not be able to properly break it down, if so.

**Step 4: Open Timeline Then Create Frame Animation
Next, in order to start working on your animation, open the Timeline Window This can be done by clicking the ‘Window’ tab and selecting ‘Timeline’
With the ‘Timeline’ Window now open, select the ‘Create Frame Animation’ option to begin working

**Step 5: Make Frame from Layers
In order to transfer your uploaded images from the ‘Layers’ panel to your timeline, select the ‘Menu’ option on the top-right hand corner of the ‘Timeline’ window and select the ‘Make Frames From Layers’ option

**Step 6: Preview Animation and Adjust as Needed
To preview your animation, click the ‘Play’ button This is the best time to check that your frames have been organized correctly If they are not, you can adjust them by dragging and dropping them on the timeline.
OR, you can use the ‘Reverse Frames’ option if your animation has been completely flipped around

**Step 7: Create an Animation Loop
In order to be a proper looped GIF, the animation should repeat endlessly You can make sure of this by changing the ‘Repeat’ option to ‘Forever’ (as is shown in the image below).

**Step 8: Export Finished Animation to Gif
In order to finish turning your image into GIF, you’ll need to export it in the proper format This is possible by selecting the ‘File’ tab and then clicking the ‘Export > Save for Web (Legacy)…’ option
A pop-up window should appear where you can control export settings Do so in order to ensure that you have the best outcome

03How To Make an Animated GIF in Wondershare Filmora Video Editor (Fast & Easy)
For Win 7 or later (64-bit)
For macOS 10.12 or later
For our last tutorial, we’ll be showing you how to make an animated GIF with the use of Wondershare Wondershare Filmora Video Editor . Filmora is a video editor, one that is used by professionals all over to produce high-quality content And, of course, as a video editor, it works just as well as a GIF maker. One that you can use to create images into a GIF easily
**Step 1: Launch Filmora
First, download and install Filmora If you want to follow along with this demonstration, you can Wondershare offers a FREE trial where you can test out all of the software’s functions before making a commitment

Step 2: Upload Video to Turn into GIF
For this next step, we do something akin to what we did earlier with Photoshop. And that is to upload images or a video to fit into a timeline
This process is started by first uploading images, which you can do by clicking the ‘File’ tab and selecting the ‘Import Media > Import Media Files’ option

**Step 3: Drag Media to Timeline
With Filmora, the ‘Timeline’ window is already open Also, you won’t have to do anything complicated to get your media onto the said timeline. Just drag and drop it from the Media library (as is shown in the image below).

**Step 4: Edit or Adjust GIF
Before moving forward, you should take this chance to make adjustments to the media that you uploaded into your timeline There are many things that you can do at this stage so feel free to experiment
For our example, we cut down the video that we uploaded by using the ‘Trim’ option (which you can find by right-clicking on video media).

**Step 5: Export into GIF
Finally, to finish us off, we export our finished GIF This can be done by selecting the ‘Export’ tab and then clicking the ‘Create Video’ option A pop-up window will appear where you can adjust export settings

● Key Takeaways from This Episode →
● GIFs are fun and easy-to-share content It’s accepted by most platforms and can even be used to create professional, animated icons to be added to video content
● The process of turning an image into a GIF can be a bit tricky. But, don’t worry, so long as you start with high-quality media and use a reliable Photo-GIF Creator, then you should be fine
● If you’re struggling with turning your images into GIFs, check out one of the tutorials that we’ve offered We specifically chose the three GIF creators that we demonstrated to offer multiple methods that you can choose from
There are in fact ways to turn an image into GIF easily We’ll be showing off a couple of some of the easier ways below, including in-depth tutorials of some of the best methods so that you will no longer have to be troubled.
These tutorials, of course, will focus on teaching you how to create GIF from photos If that’s something you’re interested in, continue reading
In this article
01 [Why GIF?](#Part 1)
02 [How to Add an Image to a GIF?](#Part 2)
Part 1 Why GIF?
Before we move on to the tutorials, let’s do a brief account on GIF files We’ve also answered some of the more common questions regarding using a GIF image maker below for your edification
But, first: Why GIF? Well, it all comes down to what you’re looking for A lot of people use GIF files to create animated icons that they can use for their accounts. Some just genuinely want to create a GIF file that they can share with their friends and families (either for a laugh or something else) GIF files are a convenient vessel for doing this because they have a lot of flexibility and are accepted by most platforms
01Why Gif from My Images Are Blurry?
One of the biggest issues people tend to have when turning an image into GIF is that they come out of the process with a blurry end-product. No one wants that But, how are you supposed to avoid it? Well, it all depends on the tool that you’re using and your initial picture For the former, it’s best to review the upload requirements of your chosen GIF maker to get a better end result. For the latter, it’s best to pick a good, high-quality GIF creator for a better outcome
02There Are Jaggy Strokes Around Gif?
Another issue that you might suffer from while trying to create GIFs from photos is jaggy or raggedy strokes around the GIF when converted. These occur often with GIF makers that support transparency If you find these happening to you, adjust the transparency settings to get rid of the white pixel outline around your converted GIF.
Part 2 How to Add an Image to a GIF?
Now it’s finally time for the tutorials that we promised at the beginning of this article These tutorials will range from online to software solutions — so that you can get a clear idea of what you can expect from all these different GIF makers. To be more specific, we’ll be demonstrating with an online images to GIF converter, how to create animated GIF photoshop, and how to easily turn any image into GIF with the photo GIF creator, Wondershare Filmora Video Editor.
01Image to GIF: How to Turn Photos into Animated GIFs
For our first tutorial, we’re going to be demonstrating how to create GIF from photos with an online photo GIF creator More specifically, we’ll be demonstrating with Loading.IO, which is an online tool that you can use to create animated icons for your profiles or on your video content It comes with several animation options and other settings that you can use to quickly create GIFs from photos
**Step 1: Go to Loading.IO
Of course, we start off this tutorial by opening the GIF maker. In this case, since the tool is hosted online, that’s as easy as opening the link that we’ve provided below It will take you directly to the online GIF creator.
URL: https://loading.io/animation/icon/
**Step 2: Upload Photo
Once on-site, it’s time to upload the photo that you want to turn into a GIF As this is an icon creator, you should pick a photo with the proper parameters
To upload your icon for animating, select the ‘Upload’ button and browse your computer or your Google Drive for the image in question.
**Step 3: Choose animation Style
Next, choose how you want the uploaded photo to be animated Loading.IO offers a couple of animations that you can choose from Including the ‘beat’ animation, which is what we choose for our example
**Step 4: Adjust Settings
This step is technically optional, as there are default settings already prepared if you have no other specifications for your image-turned GIF. But, if you want, you can adjust certain settings for a better outcome
For example, you can speed up the animation with the ‘Speed’ slider. Or, you can increase the number of times the GIF loops by adjusting the ‘Repeat’ slider. Test out a couple of settings to get the best result
**Step 5: Download as GIF
To wrap things up, it’s time to download your finished animation Loading.IO gives several options for this. But, of course, in our case, we choose to ‘Download As: GIF’
02How to Make an Animated GIF in Photoshop [Tutorial]
For the next tutorial, we’ll be showing you how to use Photoshop to create and edit an animated GIF This process is fairly lengthy and is not recommended for beginners. But, it is a very professional method of creating an animated GIF — one that will allow you to control every step of the process (which may be exactly what you want)
**Step 1: Import Images into an Image Stack
First, starting on a new product, upload the images that you want to turn into a GIF into a photoshop ‘Image Stack’. This can be done by clicking the ‘File’ tab and selecting the ‘Scripts > Load Files into Stack…’ option
Afterward, a pop-up window will appear where you will be prompted to browse your computer for the aforementioned images Click ‘OK’ when done
**Step 2: Organize Layers
Check the ‘Layers’ panel for the images that you uploaded and organize them based on how you want them to appear for your animated GIF
**Step 3: (Optional) Import Video
If you want to work on a video to turn into a GIF instead, you can do such by selecting the ‘File’ tab and clicking on the ‘Import > Video Frames to Layers…’ option. This will get you to the same place shown in Step 2
Note: Just be careful that you do not transfer an image that is too long Photoshop may not be able to properly break it down, if so.
**Step 4: Open Timeline Then Create Frame Animation
Next, in order to start working on your animation, open the Timeline Window This can be done by clicking the ‘Window’ tab and selecting ‘Timeline’
With the ‘Timeline’ Window now open, select the ‘Create Frame Animation’ option to begin working
**Step 5: Make Frame from Layers
In order to transfer your uploaded images from the ‘Layers’ panel to your timeline, select the ‘Menu’ option on the top-right hand corner of the ‘Timeline’ window and select the ‘Make Frames From Layers’ option
**Step 6: Preview Animation and Adjust as Needed
To preview your animation, click the ‘Play’ button This is the best time to check that your frames have been organized correctly If they are not, you can adjust them by dragging and dropping them on the timeline.
OR, you can use the ‘Reverse Frames’ option if your animation has been completely flipped around
**Step 7: Create an Animation Loop
In order to be a proper looped GIF, the animation should repeat endlessly You can make sure of this by changing the ‘Repeat’ option to ‘Forever’ (as is shown in the image below).
**Step 8: Export Finished Animation to Gif
In order to finish turning your image into GIF, you’ll need to export it in the proper format This is possible by selecting the ‘File’ tab and then clicking the ‘Export > Save for Web (Legacy)…’ option
A pop-up window should appear where you can control export settings Do so in order to ensure that you have the best outcome
03How To Make an Animated GIF in Wondershare Filmora Video Editor (Fast & Easy)
For Win 7 or later (64-bit)
For macOS 10.12 or later
For our last tutorial, we’ll be showing you how to make an animated GIF with the use of Wondershare Wondershare Filmora Video Editor . Filmora is a video editor, one that is used by professionals all over to produce high-quality content And, of course, as a video editor, it works just as well as a GIF maker. One that you can use to create images into a GIF easily
**Step 1: Launch Filmora
First, download and install Filmora If you want to follow along with this demonstration, you can Wondershare offers a FREE trial where you can test out all of the software’s functions before making a commitment
Step 2: Upload Video to Turn into GIF
For this next step, we do something akin to what we did earlier with Photoshop. And that is to upload images or a video to fit into a timeline
This process is started by first uploading images, which you can do by clicking the ‘File’ tab and selecting the ‘Import Media > Import Media Files’ option
**Step 3: Drag Media to Timeline
With Filmora, the ‘Timeline’ window is already open Also, you won’t have to do anything complicated to get your media onto the said timeline. Just drag and drop it from the Media library (as is shown in the image below).
**Step 4: Edit or Adjust GIF
Before moving forward, you should take this chance to make adjustments to the media that you uploaded into your timeline There are many things that you can do at this stage so feel free to experiment
For our example, we cut down the video that we uploaded by using the ‘Trim’ option (which you can find by right-clicking on video media).
**Step 5: Export into GIF
Finally, to finish us off, we export our finished GIF This can be done by selecting the ‘Export’ tab and then clicking the ‘Create Video’ option A pop-up window will appear where you can adjust export settings
● Key Takeaways from This Episode →
● GIFs are fun and easy-to-share content It’s accepted by most platforms and can even be used to create professional, animated icons to be added to video content
● The process of turning an image into a GIF can be a bit tricky. But, don’t worry, so long as you start with high-quality media and use a reliable Photo-GIF Creator, then you should be fine
● If you’re struggling with turning your images into GIFs, check out one of the tutorials that we’ve offered We specifically chose the three GIF creators that we demonstrated to offer multiple methods that you can choose from
Animated Business Logos and Tools to Create
Know All About Animated Business Logos and the Best Tools to Create One
An easy yet powerful editor
Numerous effects to choose from
Detailed tutorials provided by the official channel
Just like people, brands and businesses also have their own identities.
If you too want to reap the benefits of an animated business logo, creating an impressive one is important and to get the task done, there are several software and other tools available.
In this article
01 [About animated business logos and how they can help in the growth of the business?](#Part 1)
02 [Tips for making an effective animated business logo](#Part 2)
03 [Types of animated business logo makers](#Part 3)
04 [The best tool to create an animated business logo effortlessly- Wondershare Filmora](#Part 4)
Part 1 About Animated Business Logos and How They Can Help in the Growth of the Business?
An animated logo is a logo that has rich motion graphics. These logos are catchy and get the instant attention of the viewers. A well-created animated business logo not only gives a professional look but also helps in creating awareness about the brand, supports the story of the brand, and enhances visual appearance.
There are several ways in which an animated business logo can be used for the growth of the business. Summarized below are some of the major ones.
01Use animated logos at the start or the end of the videos
An animated logo creates a lasting impression and thus including then in the marketing videos at the starting or the end helps in the business growth. These logos can be added to the videos that are created for internal communication as well as for the public.
02Using animated logos for e-commerce
If your business is related to products, then adding animated logos to the product movies will make them look interesting.
03Use animated logos for YouTube videos
If you are using YouTube videos for your business promotion, ensure to add the animated logos for branding as it makes the videos look different from the other regular ones and thus creates an interest among the viewers.
04Using animated logos for YouTube ads
Using these motion graphic logos as short YouTube ads will work as an effective way for promoting the business and for their growth as well.
05Use animated logos for the films on your website
If you are making videos for your business websites as introduction videos or explainer videos, using animated logos adds a professional and dynamic touch.
06Using animated logos for social media sites
The number of users on social media sites is increasing every day and thus promoting your business on these sites helps you reach a wider audience. So, if you too are planning a video campaign on Facebook, Twitter, Instagram, and other sites use animated logos in the newsfeed.

Part 2 Tips for making an effective an animated business logo
The below-listed tips can help you create an impressive and interesting animated logo for your business.
● Create short animated logos: Animated logos should be short and convey the meaning and purpose of your business and brand. A long video can be boring and the target audience can lose interest and thus they have to be short, immersive, and impactful.
● Create an impression: Create an animated logo that can create a positive impression. Your animated logo needs to match the style of your business and get the interest of the viewers.
● Use the correct animation style: Several animation styles can be used for creating your business logo like 2D, 3D, traditional, and more. Different designs leave a different impact among the viewers and create a different understanding of the brand. Thus, while using the animation style, choose the one that matches your business style.
Part 3 Types of animated business logo makers
If you are looking for created animated logos, there is no dearth of tools. The majority of the editing and animated software can help you get the task done. There is several online and desktop software available using which you can either add your own logo and make an animated version of it or can design an animation from the scratch.
The choice of the tool selection depends on your budget and the features required. Some of the popularly used tools that can be considered are as below.
Popularly Used Tools →
● Renderforest
● Adobe Spark
● Logo Maker Plus
● Animaker
● Viddyoze
Popularly Used Tools →
● Offeo
● Canva
● Design Free Logo
● Tube Arsenal
● MotionDen
Part 4 The best tool to create an animated business logo effortlessly- Wondershare Filmora
To create animated logos effortlessly and use the best features Wondershare Filmora is an excellent choice. This desktop software can be quickly downloaded and installed on your Windows and Mac after which it can be used for multitasking like editing, creating animations, logos, and much more. The interface is simple and user-friendly which makes the program popular among all user types.
Wondershare Filmora
Power Up Your Story with Filmora. Professional video editing is made easy.
Key features of the software:
● Allows creating different types of animations including animated business logos.
● Allows creating 2D and 3D animated logos.
● Allows creating logos using keyframing for better customization.
● Multiple effects can be added like titles, tiles, warp, masking, distort, lights, flares, and more.
● To further enhance the overall looks of your animation the software offers better control over the colors and other parameters through tools like color wheels, auto-correction, scopes, and more.
● Audio controls are also offered through features like audio compression, audio noise correction, audio sync, transitions, and more.
● Compatible with all the latest Windows and Mac.
Key Takeaways from This Episode
● Animated business logos are an important aspect of any business promotion and marketing strategy.
● An impressive animated logo can help a business grow in several ways and several factors should be considered while creating an animated logo.
● Different types of desktop and online tools for animated business logos are present.
● Wondershare Filmora works as the best animation logo that can create impressive animated logos in no time.


Just like people, brands and businesses also have their own identities.
If you too want to reap the benefits of an animated business logo, creating an impressive one is important and to get the task done, there are several software and other tools available.
In this article
01 [About animated business logos and how they can help in the growth of the business?](#Part 1)
02 [Tips for making an effective animated business logo](#Part 2)
03 [Types of animated business logo makers](#Part 3)
04 [The best tool to create an animated business logo effortlessly- Wondershare Filmora](#Part 4)
Part 1 About Animated Business Logos and How They Can Help in the Growth of the Business?
An animated logo is a logo that has rich motion graphics. These logos are catchy and get the instant attention of the viewers. A well-created animated business logo not only gives a professional look but also helps in creating awareness about the brand, supports the story of the brand, and enhances visual appearance.
There are several ways in which an animated business logo can be used for the growth of the business. Summarized below are some of the major ones.
01Use animated logos at the start or the end of the videos
An animated logo creates a lasting impression and thus including then in the marketing videos at the starting or the end helps in the business growth. These logos can be added to the videos that are created for internal communication as well as for the public.
02Using animated logos for e-commerce
If your business is related to products, then adding animated logos to the product movies will make them look interesting.
03Use animated logos for YouTube videos
If you are using YouTube videos for your business promotion, ensure to add the animated logos for branding as it makes the videos look different from the other regular ones and thus creates an interest among the viewers.
04Using animated logos for YouTube ads
Using these motion graphic logos as short YouTube ads will work as an effective way for promoting the business and for their growth as well.
05Use animated logos for the films on your website
If you are making videos for your business websites as introduction videos or explainer videos, using animated logos adds a professional and dynamic touch.
06Using animated logos for social media sites
The number of users on social media sites is increasing every day and thus promoting your business on these sites helps you reach a wider audience. So, if you too are planning a video campaign on Facebook, Twitter, Instagram, and other sites use animated logos in the newsfeed.
Part 2 Tips for making an effective an animated business logo
The below-listed tips can help you create an impressive and interesting animated logo for your business.
● Create short animated logos: Animated logos should be short and convey the meaning and purpose of your business and brand. A long video can be boring and the target audience can lose interest and thus they have to be short, immersive, and impactful.
● Create an impression: Create an animated logo that can create a positive impression. Your animated logo needs to match the style of your business and get the interest of the viewers.
● Use the correct animation style: Several animation styles can be used for creating your business logo like 2D, 3D, traditional, and more. Different designs leave a different impact among the viewers and create a different understanding of the brand. Thus, while using the animation style, choose the one that matches your business style.
Part 3 Types of animated business logo makers
If you are looking for created animated logos, there is no dearth of tools. The majority of the editing and animated software can help you get the task done. There is several online and desktop software available using which you can either add your own logo and make an animated version of it or can design an animation from the scratch.
The choice of the tool selection depends on your budget and the features required. Some of the popularly used tools that can be considered are as below.
Popularly Used Tools →
● Renderforest
● Adobe Spark
● Logo Maker Plus
● Animaker
● Viddyoze
Popularly Used Tools →
● Offeo
● Canva
● Design Free Logo
● Tube Arsenal
● MotionDen
Part 4 The best tool to create an animated business logo effortlessly- Wondershare Filmora
To create animated logos effortlessly and use the best features Wondershare Filmora is an excellent choice. This desktop software can be quickly downloaded and installed on your Windows and Mac after which it can be used for multitasking like editing, creating animations, logos, and much more. The interface is simple and user-friendly which makes the program popular among all user types.
Wondershare Filmora
Power Up Your Story with Filmora. Professional video editing is made easy.
Key features of the software:
● Allows creating different types of animations including animated business logos.
● Allows creating 2D and 3D animated logos.
● Allows creating logos using keyframing for better customization.
● Multiple effects can be added like titles, tiles, warp, masking, distort, lights, flares, and more.
● To further enhance the overall looks of your animation the software offers better control over the colors and other parameters through tools like color wheels, auto-correction, scopes, and more.
● Audio controls are also offered through features like audio compression, audio noise correction, audio sync, transitions, and more.
● Compatible with all the latest Windows and Mac.
Key Takeaways from This Episode
● Animated business logos are an important aspect of any business promotion and marketing strategy.
● An impressive animated logo can help a business grow in several ways and several factors should be considered while creating an animated logo.
● Different types of desktop and online tools for animated business logos are present.
● Wondershare Filmora works as the best animation logo that can create impressive animated logos in no time.
Also read:
- New 5 Foolproof Amazing Anime Text to Speech Tips
- How to Find & Make Animated Christmas GIFs?
- New 12 Dubbed Anime Websites to Watch for Free
- New Best 12 Video to GIF Converters High Quality to Check Out
- New How I Animate Discord Profile Pictures (& You Can Too)
- Updated How to Create an Adobe Collage?
- New Best 10 Photo Animator Templates for 2024
- New Easy Shortcut to Convert Videos to Gifs on iPhone for 2024
- Updated In 2024, 4 Things You Should Know About Pinterest GIF
- Updated In 2024, Ways to Master to Find 10 Best Free Animated Text Generator
- Adobe Animate Riggings Tutorial for You
- How to Create YouTube Intro Animation Like a Pro for 2024
- Updated Have You Seen the Facebook Cartoon App Everyones Using Recently for 2024
- Updated Whats Music Video GIF & How to Add Music to GIF Files
- How To Learn Cartoon Sketch Drawing
- In 2024, How to Lock Apps on Xiaomi 14 to Protect Your Individual Information
- In 2024, Disabled iPhone 11 Pro Max How to Unlock a Disabled iPhone 11 Pro Max?
- Read This Guide to Find a Reliable Alternative to Fake GPS On Gionee F3 Pro | Dr.fone
- Detailed Guide on Removing Apple iPhone 11 Pro Max Activation Lock without Previous Owner?
- In 2024, How to Reset Gmail Password on Samsung Galaxy XCover 6 Pro Tactical Edition Devices
- How to Track Nokia XR21 Location without Installing Software? | Dr.fone
- Dose Life360 Notify Me When Someone Checks My Location On Samsung Galaxy A05s? | Dr.fone
- In 2024, How to Transfer Contacts from Realme C55 to Outlook | Dr.fone
- How To Free Up iPhone 13 Space | Dr.fone
- Fake Android Location without Rooting For Your Oppo A56s 5G | Dr.fone
- 10 Free Location Spoofers to Fake GPS Location on your Realme Narzo N53 | Dr.fone
- Title: Updated 2024 Approved The Best 8 Places for High-Quality Royalty Free Gifs
- Author: Elon
- Created at : 2024-05-19 03:05:47
- Updated at : 2024-05-20 03:05:47
- Link: https://animation-videos.techidaily.com/updated-2024-approved-the-best-8-places-for-high-quality-royalty-free-gifs/
- License: This work is licensed under CC BY-NC-SA 4.0.
