
:max_bytes(150000):strip_icc():format(webp)/GettyImages-14050070541-0fc96b82fdc54287bf3bbce3ba323342.jpg)
Updated Learn 3D Logo Animation and Templates
Learn 3D Logo Animation and Templates
Learn All About 3D Logo Animation and Templates
An easy yet powerful editor
Numerous effects to choose from
Detailed tutorials provided by the official channel
If you too are keen to have an animated logo for your brand, product, or business several readymade templates can be used.
![]()
There are types of 3D logo animation tools available that can be used for customizing these templates or creating a logo from scratch as per your requirements.
In this article
01 [Benefits of Using 3d Logo Animation?](#Part 1)
02 [Where to Use Animated Logos?](#Part 2)
03 [Tips to make animated logos effective](#Part 3)
04 [Top 3D-logo Animation Template Sites](#Part 4)
05 [Top Software for Creating 3D Animated Logos](#Part 5)
Part 1 Benefits of using 3D logo animation?
Animated logos offers multiple benefits to a business or a brand. Some of the major ones are gathered for you as below.
01Increase brand awareness
Animations add life to your logos and thus can help in raising brand awareness and creating an instant connection with the clients and audience. The chances of remembering an animated logo are high and this in turn will get the attention and engagement of the audience.
02Better storytelling
The combination of images, sound, and motion in a 3D logo helps in creating an emotional connection with the audience. An animated logo supports the brand story more efficiently than a static logo and can further help to create a detailed explanation of the story.
03Adds a modern and professional look
An animated logo will add a professional and modern look to your business, product, brand, company, site, and others. An animated logo will make the audience feel that you are innovative and go with the latest trends that in turn add to the professionalism.
04Look unique and stand out from the crowd
With similar-looking designs and logos, animation can make your brand and business look apart from the others and thus get the attention of prospective clients and customers.
05Creates a pleasant first impression
It is the first impression that can make or break the image of a brand or a product. So, to ensure that the first impression of your brand or business is excellent, animated logos works to a great extent.
![]()
Part 2 Where to use Animated Logos?
Though animated logos can be used for an array of business types and platforms, there are a few certain ones where they are most effective. Check these as below.
● Social Media
● Paid Ads
● Branded Videos
● Email signatures
● Websites
● Brands and business
● Products and e-commerce
Part 3 Tips to make animated logos effective
Animated logos are created to get the attention of the audience and thus create brand awareness and for this, several factors can be considered.
● Firstly, analyze the goals of the company before creating an animated logo. It is important to know what will be the brand personality that you wish to portray through the logo.
● The logos should be created based on the preferences of the users and thus making research of the same before finalizing the animation is important.
● Animated logos should be short and interesting. Long ones are boring and will also result in the loss of interest.
● It is interesting to include a surprise element in your logo by creating them in a manner so that they are unpredictable.
● Use professional software to create impressive software that will not only make the task easier but will also save time.
![]()
Part 4 Top 3D-logo animation template sites
There are several sites where you can check readymade animated logo templates that will make your animation creating task quick and easy. These templates have a readymade design for the animated logo and these designs can be further customized to create a logo of your choice. Most of the sites with templates also have a built-in editor that can be used for editing the templates. If not, you can download the template and can then edit them using professional editing software like Wondershare Filmora Video Editor .
Some of the sites where you can check 3D logo animation free download and paid download of the templates in different categories.
● Storyblocks
● FlexClip
● MotionArray
● AfterEffects and more.
You can check out the various templates available at one of these sites and choose the one that best matches your company or product’s personality and fit your requirements.
Part 5 Top software for creating 3D Animated Logos
If you want a customized logo to be created as per your needs or want to edit the templates, there are several animations creating software available. Below we have shortlisted some of the major ones.
01**Wondershare Filmora Video Editor **
This Windows and Mac-based software is an excellent tool for all types of video editing and creating requirements. Using the tool, you can create a 3D animated logo or can even edit the templates to meet your requirements. A simple interface makes the software apt for all users and the process is also fast.
Key features:
● Create the desired animation using keyframing.
● Use motion-blur to enhance the animation.
● Edit the animation and other videos using multiple editing effects.
● Allows adding interesting effects like transitions, filters, and more.
● Enhanced audio using features like background noise removal, audio equalizer, keyframe audio editing, and more.
● Support fast rendering and fast import and export of the files.
● Windows and Mac support.
For Win 7 or later (64-bit)
For macOS 10.12 or later
02Viddyoze
This is another popular and user-friendly software that can be used for creating 3D animated logos and other animations. The tool comes packed with multiple features and templates that allow creating the desired animation in no time.
Key features
● A user-friendly tool with an intuitive interface.
● Comes with multiple templates to choose from.
● The template can be customized by changing several parameters like text, colors, and more.
● Comes with multiple editing tools and has multi-font support.
● The custom-created audio track for live templates.
● Support multi-ratio templates to make them compatible with different platforms and sites.
![]()
03Renderforest
This is an online 3D animated logo maker that comes with multiple templates and tools. Simple to use, the tool needs no software download or installation.
Key features
● This 3D logo animation online free tool is simple to use and does not require any software download.
● Comes with multiple templates and animation designs like fire logo, shattering logo, splash logo, and more.
● 3D effects of the tool can be used for creating 3D animated logos.
![]()
04Adobe After Effects
Adobe is a reputed software for all types of video editing requirements and its long list of functions also includes 3D animated logo making. Though the learning curve of the software is steep, once you get the hang of it, you can easily create professional animations and edit files.
Key features
● Create high-quality animations including 3D logos.
● Allows adding keyframes for animations and add exciting effects.
● Support features like the 3D ground plane, 3D draught preview, extended viewport, 3D transform gizmos, and more.
● Comes with a wide range of readymade templates for creating logos.
● 3D logo animation after effects tool allows media replacement in motion graphic templates.
![]()
05Animaker
This is another widely used online tool that allows creating of decent 3D animated logos. The interface is simple and there is no requirement for any software download.
Key features
● Simple and user-friendly interface with support to drop and drag.
● Comes with over 20 readymade templates for creating animated logos.
● Audio files and music to the animations can also be added.
● Support to more than 50 languages which makes it accessible across the world.
● Created animations can also be uploaded to YouTube and Facebook.
![]()
● Key Takeaways from This Episode →
● 3D animated logos work magic for your business and brand by creating awareness, catching the attention of the audience, and also keeping them engaged.
● Animated logos are used by different types of businesses and industries and for different platforms.
● There are several sites where readymade templates for creating 3D animated logos are available. These templates can be customized as needed.
● An array of 3D animated logo-making software is available and one of the best on the list is Wondershare Filmora Video Editor that is effective and also user-friendly.
10 Great MP4 to GIF Converters to Get Perfect-Made GIF
10 Must-Use MP4 to GIF Converters to Get Perfect-Made GIF
An easy yet powerful editor
Numerous effects to choose from
Detailed tutorials provided by the official channel
GIFs are becoming more common day by day. They are used for a wide range of purposes, from chatting and expressing emotions on social media to promoting products and services. GIFs are image formats that are relatively easy to download and upload and easy to convey messages and thoughts to a wide range of people. On the other hand, MP4 are video files that contain audio. These files are large and require special requirements to run and work properly.
There are a lot of advantages of using GIF files, like they are easy to make and store, help create animations quickly, and convey messages and emotions more conveniently. With the increasing usage of GIF files, it has become important to know and understand the tools used to convert the MP4 files into GIF formats.
In this article
01 [5 Offline MP4 to GIF Converters](#Part 1)
02 [5 Online MP4 to GIF Converters](#Part 2)
Part 1 5 Offline MP4 to GIF Converters
Offline MP4 to GIF converter is the best option as it helps to create GIF files quickly and easily, without any quality loss. The following offline converters can be used effectively to turn MP4 into GIF formats very easily and quickly:
01Any GIF Animator
Any GIF Animator is one of the great offline tools used for converting videos to GIF files very quickly. It can easily convert the videos into attractive GIFs in seconds.
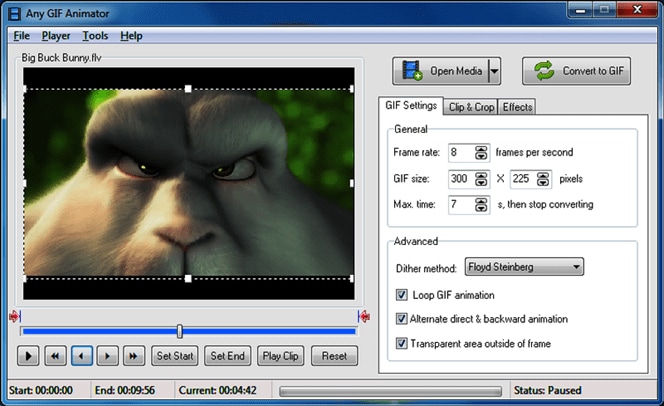
Key Features:
● It has a very easy-to-use interface for user convenience.
● It sustains a considerable number of video formats.
● It allows the users to edit converted GIFs like adding frames, forward and backward looping, etc.
● It will enable you to edit the files imported from DVDs and WebCam recorded files.
● It has an in-built animation wizard.
Pros:
● It works for both Mac as well as Windows
● Any GIF Animator can be downloaded freely.
● It can convert both videos as well as images.
Cons:
● It crashes at times while processing the videos.
● Uploading the files takes a longer time than usual.
02DVDFab
DVDFab is another offline tool that converts the files from MP4 to GIF in very little time without compromising the quality of the outcome.

Key Features:
● It supports a large number of video formats.
● It has a user-friendly interface.
● It can be used for both Mac & Windows.
● It is a great multimedia solution software.
● It comes with affordable pricing.
Pros:
● It is quick & easy to use.
● It delivers high-quality outputs.
● It allows the users to completely control the looping, frequency, and size of the files.
Cons:
● Being a multimedia software, it requires learning.
● Complete beginners can get confused.
03Wondershare TunesGo
TunesGo was developed by one of the most trusted software companies – Wondershare. It is a great tool used to make GIFs from MP4 files.
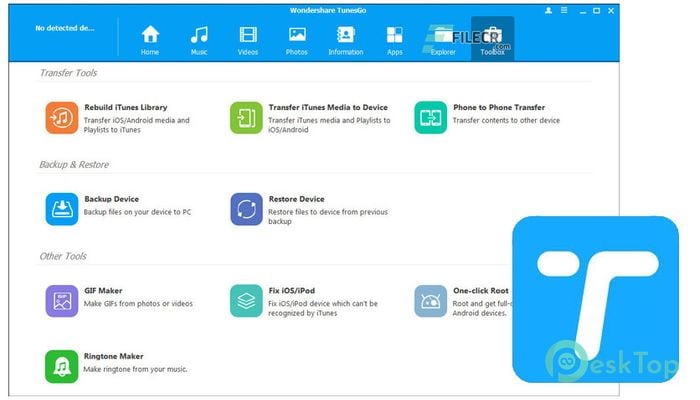
Key Features:
● Developed by one of the most trusted software development companies.
● Compatible for all iOS devices.
● A user-friendly interface is suitable for complete beginners.
● A trial version is available.
● Works faster and delivers high-resolution output.
Pros:
● Supports; almost all types of video formats.
● It permits you to edit the videos before converting.
● It can also convert images and live videos to GIFs.
Cons:
● It is costly.
● It doesn’t allow you to edit Smart playlists.
04KickMyGraphics
It is another powerful offline tool to convert MP4 to high-quality GIF files. It allows users to convert different formats of videos and images into GIFs.
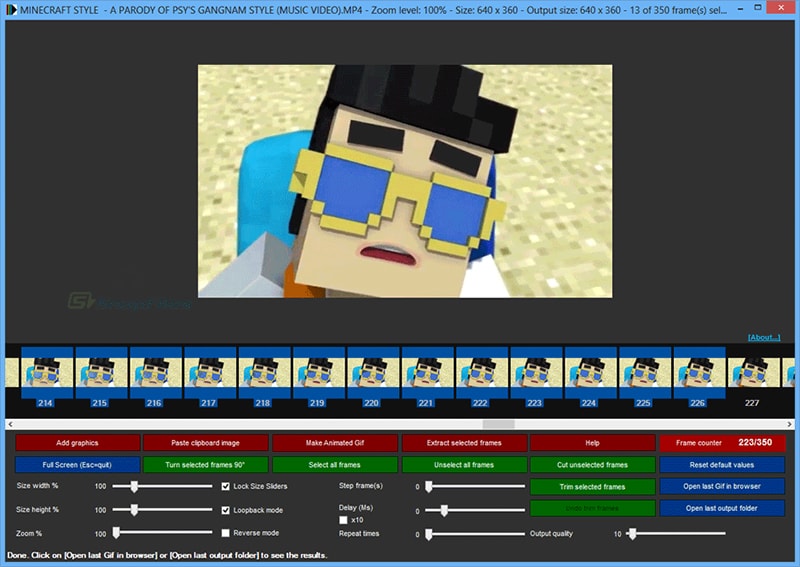
Key Features:
● Compatibility lies with Mac and Windows both.
● Users can instantly upload various video formats like MPG, MP4, AVI, etc.
● Users can directly upload considerable image formats like JPG, PNG, BMP, etc.
● It has a user-friendly interface.
● It is a freeware offline GIF converter.
Pros:
● It has an in-built editing tool for easy customization.
● It supports direct recording of the animated GIFs.
● It also allows you to use different editing features like the loop, pan, reverse, etc.
Cons:
● Its usage is somehow complicated for beginners.
● It doesn’t support all types of video formats.
05Movavi
It is tremendous offline software that can be downloaded for Mac & PC. It helps in converting the MP4 to GIFs very quickly and easily.
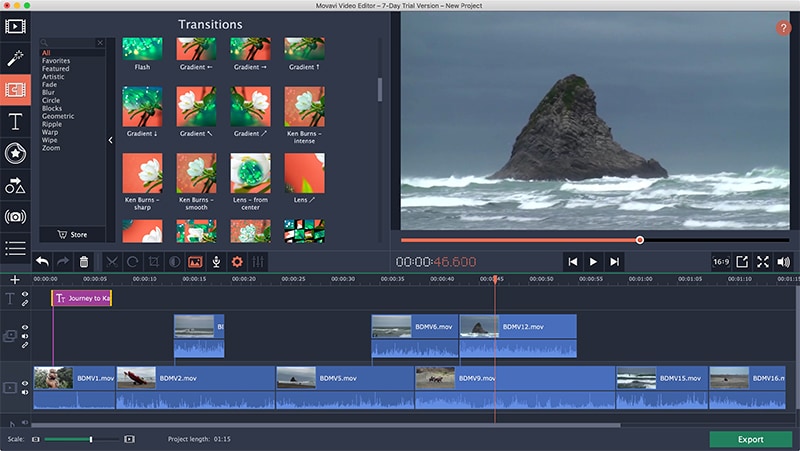
Key Features:
● Mac and Windows are completely supported.
● It allows the users to edit their creations.
● It is also available for all android devices.
● It converts the files very quickly without compromising the quality of the content.
● It is an excellent tool for converting and editing GIFs.
Pros:
● Easy and beneficial for beginners
● Compatible with video formats like MOV, MP4, MPG, AVI, etc.
● It has an in-built AI feature to upscale the output quality.
Cons:
● It has fundamental video editing features.
● It doesn’t allow to copy-paste the video effect while editing.
Part 2 5 Online MP4 to GIF Converters
Online tools for converting files from MP4 to GIF are effortless and convenient because they can be used on any operating system. The following given are some of the great online tools to convert MP4 to GIF with ease and convenience:
01GIF Maker by Giphy
Giphy is known as the king of the online GIF maker tools. It is a GIF converter great tool with around 300 million users daily using it. It allows the users to convert the GIFs by pasting the video links from third-party websites like YouTube.
Key Features:
● Being an online tool, it is compatible with all types of devices.
● It is elementary to use for all types of users.
● It allows the users to add stickers and captions to their GIFs.
● No fee for this so you can use it free of cost.
● It is a website, so it doesn’t require to be downloaded.
Pros:
● Straightforward and quick to use.
● It delivers a high-resolution output with many customization features.
● It can also convert the GIFs using the links of videos from third-party hosting like YouTube.
Cons:
● Speed of the internet connection matters.
● It comes with a limited edition of colors.
02**Wondershare Filmora Video Editor **
Filmora is one of the best online video editing tools created by Wondershare. Filmora can be used to convert files from MP4 to GIF very effectively and efficiently.
For Win 7 or later (64-bit)
For macOS 10.12 or later
Wondershare Filmora
Get started easily with Filmora’s powerful performance, intuitive interface, and countless effects!
Try It Free Try It Free Try It Free Learn More >

Key Features:
● Fully compatible with any operating system.
● It is a great video editing software with many features like adding music, subtitles, etc.
● It can be also be downloaded on Mac and Windows OS.
● It comes with an annual premium subscription for $51.99.
● It can also be purchased with a one-time fee of $79.99.
Pros:
● It has great video editing features.
● It can convert a large number of video formats to high-resolution GIF files.
● You can customize your GIFs as per your requirements using this tool.
Cons:
● Being an all-in-one video editing tool, this can be much more if you just need GIF creations.
● You cannot remove the watermark and use many editing features if you use a trial version.
03CloudConvert
CloudConvert is another easy-to-use MP4 to GIF converter online. It converts all types of video files into GIFs in a concise time.
Key Features:
● It is easy to use.
● It converts MP4 to GIF very quickly.
● It is free of cost.
● It doesn’t require third-party installation.
● It uses compression algorithms.
Pros:
● It is an open-source converter.
● It allows you to add texts.
● It helps in creating GIFs for web publishing.
Cons:
● Complicated for large files.
● Requires; steady internet connection.
04Convertio
Convertio is another online GIF converter that anyone can use. You just need to upload the MP4 file using Dropbox and hit the ‘Convert’ button.
Key Features:
● Effortless and anyone can easily use it.
● One can easily upload files from Dropbox and Google Drive.
● It also has a drag and drops component for uploading the files.
● It is entirely free to use.
● It is online and doesn’t require any installation.
Pros:
● It converts MP4 to GIF very quickly.
● It delivers high-quality output.
● User-friendly interface.
Cons:
● It doesn’t allow the users to edit their GIFs.
● It doesn’t have the customizing feature and is not user-specific.
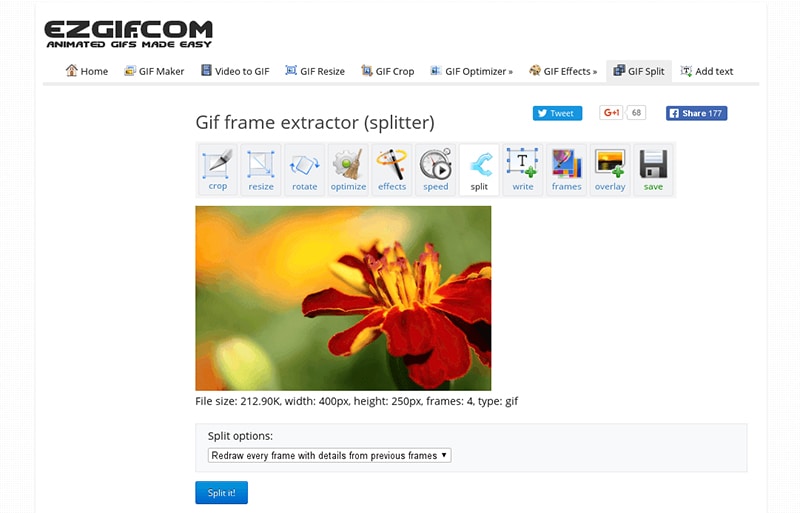
05Ezgif
Ezgif is free of cost and an easy-to-use online tool that helps you create GIFs in two easy steps, i.e., upload and convert.
Key Features:
● It is an online tool compatible with both Mac and Windows.
● No download and installation required.
● It is a freeware program.
● It maintains the quality of the outcome.
● It converts GIFs very quickly.
Pros:
● User-friendly and can be used by all.
● It has amazing features that assist you while you convert MP4 to GIF.
● It is not complicated for beginners.
Cons:
● It has limited editing features.
● Only 3 minutes video can be done at maximum.
● Key Takeaways from This Episode →
●The demand for GIF files increases with each passing day due to its many advantages. As a result, many people are looking for easy MP4 to GIF converters that are easy and convenient to use.
●Above mentioned online and offline converters can quickly help you turn MP4 into GIF files without compromising the quality of the graphics.
●These converters are readily available and can easily be used on both Mac and Windows with many conveniences.
●They can help you convert the MP4 files into GIF format very quickly, no matter how large the video size is. GIFs being smaller in size and easily transferrable provide many advantages to the users.
GIFs are becoming more common day by day. They are used for a wide range of purposes, from chatting and expressing emotions on social media to promoting products and services. GIFs are image formats that are relatively easy to download and upload and easy to convey messages and thoughts to a wide range of people. On the other hand, MP4 are video files that contain audio. These files are large and require special requirements to run and work properly.
There are a lot of advantages of using GIF files, like they are easy to make and store, help create animations quickly, and convey messages and emotions more conveniently. With the increasing usage of GIF files, it has become important to know and understand the tools used to convert the MP4 files into GIF formats.
In this article
01 [5 Offline MP4 to GIF Converters](#Part 1)
02 [5 Online MP4 to GIF Converters](#Part 2)
Part 1 5 Offline MP4 to GIF Converters
Offline MP4 to GIF converter is the best option as it helps to create GIF files quickly and easily, without any quality loss. The following offline converters can be used effectively to turn MP4 into GIF formats very easily and quickly:
01Any GIF Animator
Any GIF Animator is one of the great offline tools used for converting videos to GIF files very quickly. It can easily convert the videos into attractive GIFs in seconds.
Key Features:
● It has a very easy-to-use interface for user convenience.
● It sustains a considerable number of video formats.
● It allows the users to edit converted GIFs like adding frames, forward and backward looping, etc.
● It will enable you to edit the files imported from DVDs and WebCam recorded files.
● It has an in-built animation wizard.
Pros:
● It works for both Mac as well as Windows
● Any GIF Animator can be downloaded freely.
● It can convert both videos as well as images.
Cons:
● It crashes at times while processing the videos.
● Uploading the files takes a longer time than usual.
02DVDFab
DVDFab is another offline tool that converts the files from MP4 to GIF in very little time without compromising the quality of the outcome.
Key Features:
● It supports a large number of video formats.
● It has a user-friendly interface.
● It can be used for both Mac & Windows.
● It is a great multimedia solution software.
● It comes with affordable pricing.
Pros:
● It is quick & easy to use.
● It delivers high-quality outputs.
● It allows the users to completely control the looping, frequency, and size of the files.
Cons:
● Being a multimedia software, it requires learning.
● Complete beginners can get confused.
03Wondershare TunesGo
TunesGo was developed by one of the most trusted software companies – Wondershare. It is a great tool used to make GIFs from MP4 files.
Key Features:
● Developed by one of the most trusted software development companies.
● Compatible for all iOS devices.
● A user-friendly interface is suitable for complete beginners.
● A trial version is available.
● Works faster and delivers high-resolution output.
Pros:
● Supports; almost all types of video formats.
● It permits you to edit the videos before converting.
● It can also convert images and live videos to GIFs.
Cons:
● It is costly.
● It doesn’t allow you to edit Smart playlists.
04KickMyGraphics
It is another powerful offline tool to convert MP4 to high-quality GIF files. It allows users to convert different formats of videos and images into GIFs.
Key Features:
● Compatibility lies with Mac and Windows both.
● Users can instantly upload various video formats like MPG, MP4, AVI, etc.
● Users can directly upload considerable image formats like JPG, PNG, BMP, etc.
● It has a user-friendly interface.
● It is a freeware offline GIF converter.
Pros:
● It has an in-built editing tool for easy customization.
● It supports direct recording of the animated GIFs.
● It also allows you to use different editing features like the loop, pan, reverse, etc.
Cons:
● Its usage is somehow complicated for beginners.
● It doesn’t support all types of video formats.
05Movavi
It is tremendous offline software that can be downloaded for Mac & PC. It helps in converting the MP4 to GIFs very quickly and easily.
Key Features:
● Mac and Windows are completely supported.
● It allows the users to edit their creations.
● It is also available for all android devices.
● It converts the files very quickly without compromising the quality of the content.
● It is an excellent tool for converting and editing GIFs.
Pros:
● Easy and beneficial for beginners
● Compatible with video formats like MOV, MP4, MPG, AVI, etc.
● It has an in-built AI feature to upscale the output quality.
Cons:
● It has fundamental video editing features.
● It doesn’t allow to copy-paste the video effect while editing.
Part 2 5 Online MP4 to GIF Converters
Online tools for converting files from MP4 to GIF are effortless and convenient because they can be used on any operating system. The following given are some of the great online tools to convert MP4 to GIF with ease and convenience:
01GIF Maker by Giphy
Giphy is known as the king of the online GIF maker tools. It is a GIF converter great tool with around 300 million users daily using it. It allows the users to convert the GIFs by pasting the video links from third-party websites like YouTube.
Key Features:
● Being an online tool, it is compatible with all types of devices.
● It is elementary to use for all types of users.
● It allows the users to add stickers and captions to their GIFs.
● No fee for this so you can use it free of cost.
● It is a website, so it doesn’t require to be downloaded.
Pros:
● Straightforward and quick to use.
● It delivers a high-resolution output with many customization features.
● It can also convert the GIFs using the links of videos from third-party hosting like YouTube.
Cons:
● Speed of the internet connection matters.
● It comes with a limited edition of colors.
02**Wondershare Filmora Video Editor **
Filmora is one of the best online video editing tools created by Wondershare. Filmora can be used to convert files from MP4 to GIF very effectively and efficiently.
For Win 7 or later (64-bit)
For macOS 10.12 or later
Wondershare Filmora
Get started easily with Filmora’s powerful performance, intuitive interface, and countless effects!
Try It Free Try It Free Try It Free Learn More >
Key Features:
● Fully compatible with any operating system.
● It is a great video editing software with many features like adding music, subtitles, etc.
● It can be also be downloaded on Mac and Windows OS.
● It comes with an annual premium subscription for $51.99.
● It can also be purchased with a one-time fee of $79.99.
Pros:
● It has great video editing features.
● It can convert a large number of video formats to high-resolution GIF files.
● You can customize your GIFs as per your requirements using this tool.
Cons:
● Being an all-in-one video editing tool, this can be much more if you just need GIF creations.
● You cannot remove the watermark and use many editing features if you use a trial version.
03CloudConvert
CloudConvert is another easy-to-use MP4 to GIF converter online. It converts all types of video files into GIFs in a concise time.
Key Features:
● It is easy to use.
● It converts MP4 to GIF very quickly.
● It is free of cost.
● It doesn’t require third-party installation.
● It uses compression algorithms.
Pros:
● It is an open-source converter.
● It allows you to add texts.
● It helps in creating GIFs for web publishing.
Cons:
● Complicated for large files.
● Requires; steady internet connection.
04Convertio
Convertio is another online GIF converter that anyone can use. You just need to upload the MP4 file using Dropbox and hit the ‘Convert’ button.
Key Features:
● Effortless and anyone can easily use it.
● One can easily upload files from Dropbox and Google Drive.
● It also has a drag and drops component for uploading the files.
● It is entirely free to use.
● It is online and doesn’t require any installation.
Pros:
● It converts MP4 to GIF very quickly.
● It delivers high-quality output.
● User-friendly interface.
Cons:
● It doesn’t allow the users to edit their GIFs.
● It doesn’t have the customizing feature and is not user-specific.
05Ezgif
Ezgif is free of cost and an easy-to-use online tool that helps you create GIFs in two easy steps, i.e., upload and convert.
Key Features:
● It is an online tool compatible with both Mac and Windows.
● No download and installation required.
● It is a freeware program.
● It maintains the quality of the outcome.
● It converts GIFs very quickly.
Pros:
● User-friendly and can be used by all.
● It has amazing features that assist you while you convert MP4 to GIF.
● It is not complicated for beginners.
Cons:
● It has limited editing features.
● Only 3 minutes video can be done at maximum.
● Key Takeaways from This Episode →
●The demand for GIF files increases with each passing day due to its many advantages. As a result, many people are looking for easy MP4 to GIF converters that are easy and convenient to use.
●Above mentioned online and offline converters can quickly help you turn MP4 into GIF files without compromising the quality of the graphics.
●These converters are readily available and can easily be used on both Mac and Windows with many conveniences.
●They can help you convert the MP4 files into GIF format very quickly, no matter how large the video size is. GIFs being smaller in size and easily transferrable provide many advantages to the users.
Techniques for Making After Effects 2D Animation
Blender is a widely popular animation tool that designers primarily use to create 3D animations. It offers a full-scale editing panel and a plethora of features that allow designers to create visually enticing 3D animations for videos, games, and marketing purposes. But, can you use Blender to create 2D animations? Even though the tool is marketed as a 3D animation creator, it’s worth noting that one can use it for 2D animations as well. Now, the process may not be as straightforward as using a dedicated 2D animation creator, you can still get the job done using Blender. This will be pretty helpful if you are already a Blender user and want to create 2D animations for a project.
To help you along the way, we have put together a detailed guide on how to create Blender 2D animations and use them in your videos to make them look more stunning. So, without any further ado, let’s get started.
In this article
01 [Is Blender 2D Animation As Awesome AS 3D?](#Part 1)
02 [How to Mix 2D & 3D Animation in Blender?](#Part 2)
03 [5 Amazing Blender 2D Animation Examples](#Part 3)
Part 1 Is Blender 2D Animation As Awesome AS 3D?
There’s no arguing the fact that Blender is a remarkable tool for 3D animations. Its worldwide popularity is clear proof of what one can achieve while creating a 3D animation with Blender. But, the real question is - are Blender 2D animations as good as their 3D alternatives. Well, the answer is Yes! Blender has a built-in feature known as Grease Pencil that’s specifically designed to create 2D animations. With Grease Pencil, you can create different 2D layouts from scratch and turn them into visually appealing animations to engage the potential viewers.
Part 2 How to Mix 2D & 3D Animation in Blender?
So, how can you create 2D animations in Blender? Well, it depends! The process to create a 2D animation in Blender mainly depends on what you want to design. You can find different Blender 2D animation tutorials on YouTube and use them to get started with 2D animations in Blender. But, we would like to point out that there’s a generic process that’ll remain consistent in every situation. If you are also getting started with creating 2D animations in Blender, here’s the step-by-step process that’ll help you start sailing in the right direction and make the 2D animation designing a hassle-free task.
Step 1
First and foremost, launch Blender on your system and set it up to get started. On the home screen, click on “File>New” and then, select “2D Animation”.

Step 2
Now, click on the Grease Pencil tool and use it to draw any shape on the canvas. If you want to add multiple objects to the animation, you can also draw multiple shapes.

Step 3
The next step would be to apply the array modifier to these shapes, considering you want to add a specific movement to them. So, add an array modifier first and then apply it over the desired shapes.
Step 4
After you have applied the array modifier, go ahead and start adding colors to the animation. Keep in mind the more colors you use, the better the Blender 2D animation will appear at the end.

Step 5
Now, through the editing panel, right-click on the shape you’ve drawn on the screen and then, select “Rotation and Scale”. A separate editing window will pop up on your screen. Here you can customize the movement of the object by changing its scaling options through keyframing.
That’s it; your 2D animation is now ready and you can save it on your computer.
Part 3 5 Amazing Blender 2D Animation Tutorials
So, now that you know how to create Blender 2D animations, let’s take a look at a few of the 2D animation tutorials that’ll help you get started with your first animation. All these tutorials are available on YouTube and share a detailed insight into different elements of using Blender to create 2D animation.
1. Blender Guru’s Donut Tutorial
If you search Blender on YouTube, this will be the first video you’ll see in the search results. With 11 million views on YouTube, this Blender 2D animation tutorial is one of the most sought-after tutorials on the platforms.
This 14-minute long video will walk you through the step-by-step process of creating a dedicated 2D animation for a donut using different elements of Blender. What’s more interesting is that there’s a second part to this video that’ll help you move a step forward and dive into advanced editing. Basically, if you want to get familiar with Blender’s 2D animation architecture, this video will help you embark on the right track.
2. Blender Lighting Tutorial
Gleb Alexandrov is undoubtedly one of the most talented animation experts who has created hundreds of stunning animations during his career. In this video, he has shared his years of knowledge and expertise and explained different ways to use lighting in your Blender 2D animation.
If you have ever worked on animation or even a regular YouTube video in the past, you may already be familiar with the importance of lighting. If the lighting is right, the subjects look more stunning and the overall frame becomes visually engaging. If you also want to know how to use lighting in a 2D animation, this 19-minutes long video is your answer.
3. Blender Fundamentals
If you are an absolute beginner, it would be better to first familiarize yourself with different elements of the software. Without knowing what a particular tool can do, you’ll most likely struggle to pour your creativity into the Blender 2D animation. So, before working on your first 2D animation, make sure to take your time to go through these Blender 2D animation tutorials uploaded by the tech giant itself.
Keep in mind that it’s not a single video, but a series of episodes that’ll walk you through the basics of Blender and how to start with your first 2D/3D animation. If you are serious about working with Blender, this series is your one-stop solution to get familiar with the application.
4. Character Creation and Rigging
Every 2D animation requires at least one character that would act as the main subject of the animation. And, in case you are planning to create a 3D animation with extensive movement, you’ll also have to incorporate Rigging to ensure that any movement looks realistic.
This video is for anyone who has a basic understanding of 2D animation in Blender and wants to step up their game. Here you’ll learn how to design a specific character on the canvas and how to use rigging to configure its movement. Again, this is not a single video, but a series of episodes, which means it would be better if you sit with your coffee in your hand.
5. CG Geek’s 2D Animation Tutorial in Blender
Now, if you are specifically looking for a video that only talks about Blender 2D animations and nothing else, this tutorial by CG Geek is the most suitable option. In this video, CG Geek goes on explaining how to use the Grease Pencil feature in Blender for 2D animation. He has also explained how to keyframe your 2D animation on Blender’s timeline so that any movement looks as realistic as possible.
6. Wondershare Filmora - A Reliable Alternative to Blender for Video Editors
Now, if you are a video editor and only want to create an animation for one of your videos, it would not be a wise decision to use Blender. Why? Because the tool has a steep learning curve and it’s not worth investing your time if you only want to create a 10-seconds animation. So, what’s the next best solution?
The answer is Wondershare Filmora Video Editor . It’s a full-scale video editing tool that’s designed to help editors enhance their productivity through ready-to-use templates. It has a built-in media library where you’ll find dozens of animation templates. You can simply drag these templates to your timeline and customize them to match the overall theme of your video itself.
With its timeline-based editing panel, you’ll be able to speed up the overall editing process and create visually stunning videos in no time. The tool also has a stack of ready-to-use transitions, special effects, and sounds that you can apply to the video and improve the overall production quality. In short, if your only goal is to add a 2D animation to your video, it won’t be a wise decision to rely on Blender. Instead, download and install Wondershare Filmora Pro on your system and use it to edit the video.
For Win 7 or later (64-bit)
For macOS 10.12 or later
Key Takeaways from This Episode
● Even though Blender is a3D animation software, one can use it to create stunning 2D animations as well..
● Blender has a dedicated feature known as “Grease Pencil” that’ll allow you to create your 2D animations and customize them to make them look stunning.
● Despite its advanced features, Blender is difficult to use. So, if you are looking for an alternative to Blender (only if you want to create 2D animations for your videos), Wondershare Filmora Pro is the right solution.
02 [How to Mix 2D & 3D Animation in Blender?](#Part 2)
03 [5 Amazing Blender 2D Animation Examples](#Part 3)
Part 1 Is Blender 2D Animation As Awesome AS 3D?
There’s no arguing the fact that Blender is a remarkable tool for 3D animations. Its worldwide popularity is clear proof of what one can achieve while creating a 3D animation with Blender. But, the real question is - are Blender 2D animations as good as their 3D alternatives. Well, the answer is Yes! Blender has a built-in feature known as Grease Pencil that’s specifically designed to create 2D animations. With Grease Pencil, you can create different 2D layouts from scratch and turn them into visually appealing animations to engage the potential viewers.
Part 2 How to Mix 2D & 3D Animation in Blender?
So, how can you create 2D animations in Blender? Well, it depends! The process to create a 2D animation in Blender mainly depends on what you want to design. You can find different Blender 2D animation tutorials on YouTube and use them to get started with 2D animations in Blender. But, we would like to point out that there’s a generic process that’ll remain consistent in every situation. If you are also getting started with creating 2D animations in Blender, here’s the step-by-step process that’ll help you start sailing in the right direction and make the 2D animation designing a hassle-free task.
Step 1
First and foremost, launch Blender on your system and set it up to get started. On the home screen, click on “File>New” and then, select “2D Animation”.
Step 2
Now, click on the Grease Pencil tool and use it to draw any shape on the canvas. If you want to add multiple objects to the animation, you can also draw multiple shapes.
Step 3
The next step would be to apply the array modifier to these shapes, considering you want to add a specific movement to them. So, add an array modifier first and then apply it over the desired shapes.
Step 4
After you have applied the array modifier, go ahead and start adding colors to the animation. Keep in mind the more colors you use, the better the Blender 2D animation will appear at the end.
Step 5
Now, through the editing panel, right-click on the shape you’ve drawn on the screen and then, select “Rotation and Scale”. A separate editing window will pop up on your screen. Here you can customize the movement of the object by changing its scaling options through keyframing.
That’s it; your 2D animation is now ready and you can save it on your computer.
Part 3 5 Amazing Blender 2D Animation Tutorials
So, now that you know how to create Blender 2D animations, let’s take a look at a few of the 2D animation tutorials that’ll help you get started with your first animation. All these tutorials are available on YouTube and share a detailed insight into different elements of using Blender to create 2D animation.
1. Blender Guru’s Donut Tutorial
If you search Blender on YouTube, this will be the first video you’ll see in the search results. With 11 million views on YouTube, this Blender 2D animation tutorial is one of the most sought-after tutorials on the platforms.
This 14-minute long video will walk you through the step-by-step process of creating a dedicated 2D animation for a donut using different elements of Blender. What’s more interesting is that there’s a second part to this video that’ll help you move a step forward and dive into advanced editing. Basically, if you want to get familiar with Blender’s 2D animation architecture, this video will help you embark on the right track.
2. Blender Lighting Tutorial
Gleb Alexandrov is undoubtedly one of the most talented animation experts who has created hundreds of stunning animations during his career. In this video, he has shared his years of knowledge and expertise and explained different ways to use lighting in your Blender 2D animation.
If you have ever worked on animation or even a regular YouTube video in the past, you may already be familiar with the importance of lighting. If the lighting is right, the subjects look more stunning and the overall frame becomes visually engaging. If you also want to know how to use lighting in a 2D animation, this 19-minutes long video is your answer.
3. Blender Fundamentals
If you are an absolute beginner, it would be better to first familiarize yourself with different elements of the software. Without knowing what a particular tool can do, you’ll most likely struggle to pour your creativity into the Blender 2D animation. So, before working on your first 2D animation, make sure to take your time to go through these Blender 2D animation tutorials uploaded by the tech giant itself.
Keep in mind that it’s not a single video, but a series of episodes that’ll walk you through the basics of Blender and how to start with your first 2D/3D animation. If you are serious about working with Blender, this series is your one-stop solution to get familiar with the application.
4. Character Creation and Rigging
Every 2D animation requires at least one character that would act as the main subject of the animation. And, in case you are planning to create a 3D animation with extensive movement, you’ll also have to incorporate Rigging to ensure that any movement looks realistic.
This video is for anyone who has a basic understanding of 2D animation in Blender and wants to step up their game. Here you’ll learn how to design a specific character on the canvas and how to use rigging to configure its movement. Again, this is not a single video, but a series of episodes, which means it would be better if you sit with your coffee in your hand.
5. CG Geek’s 2D Animation Tutorial in Blender
Now, if you are specifically looking for a video that only talks about Blender 2D animations and nothing else, this tutorial by CG Geek is the most suitable option. In this video, CG Geek goes on explaining how to use the Grease Pencil feature in Blender for 2D animation. He has also explained how to keyframe your 2D animation on Blender’s timeline so that any movement looks as realistic as possible.
6. Wondershare Filmora - A Reliable Alternative to Blender for Video Editors
Now, if you are a video editor and only want to create an animation for one of your videos, it would not be a wise decision to use Blender. Why? Because the tool has a steep learning curve and it’s not worth investing your time if you only want to create a 10-seconds animation. So, what’s the next best solution?
The answer is Wondershare Filmora Video Editor . It’s a full-scale video editing tool that’s designed to help editors enhance their productivity through ready-to-use templates. It has a built-in media library where you’ll find dozens of animation templates. You can simply drag these templates to your timeline and customize them to match the overall theme of your video itself.
With its timeline-based editing panel, you’ll be able to speed up the overall editing process and create visually stunning videos in no time. The tool also has a stack of ready-to-use transitions, special effects, and sounds that you can apply to the video and improve the overall production quality. In short, if your only goal is to add a 2D animation to your video, it won’t be a wise decision to rely on Blender. Instead, download and install Wondershare Filmora Pro on your system and use it to edit the video.
For Win 7 or later (64-bit)
For macOS 10.12 or later
Key Takeaways from This Episode
● Even though Blender is a3D animation software, one can use it to create stunning 2D animations as well..
● Blender has a dedicated feature known as “Grease Pencil” that’ll allow you to create your 2D animations and customize them to make them look stunning.
● Despite its advanced features, Blender is difficult to use. So, if you are looking for an alternative to Blender (only if you want to create 2D animations for your videos), Wondershare Filmora Pro is the right solution.
How to Create Photo Collage Frame for Free in Minutes?
How to Create Photo Collage Frame for Free in Minutes?
An easy yet powerful editor
Numerous effects to choose from
Detailed tutorials provided by the official channel
Decoration of pictures and collages can be done by making beautiful and stylish frames. A family picture or collage can be beautified by adding an attractive frame to it. Know about Best App for Photo Frames Online so you can create photo collages easily in minutes.
In this article
01 [How Do You Make a Collage Picture Frame?](#Part 1)
02 [What is the Best App for Photo Frames?](#Part 2)
Part 1 How Do You Make a Collage Picture Frame?
A beautiful collage without a stylish frame will not be attractive. When a family collage is accompanied by an artistic frame, it adds beauty to it and will be an attraction point for the visitors in the home. Wondering where to get it from? You can do it easily through some most popular apps. Yes, you can get your photo collage framed by yourself.

A wall can be decorated with collage picture frames by following just a few simple steps. Let’s begin with!!!
● Selection of the place where the collage frame is required to be hung: The place should be selected based on certain factors such as being easily approachable, proper lighting, and matching with the theme of the home. The place should be sufficient to add on some more picture frames in the future. The wall picture collage frames shall be created based on the room themes like kid’s room, living room, or bedroom. The position of the frames should be marked with tape so that the exact dimension can be known.
● 2. Select the online application to create frames: There are many applications available online that offer pictures collage frames. Choose one application as per the interest and explore it over the phone or desktop. There are various collage picture frame templates available at the application.
● 3. Uploading the pictures: Select the frame that is best for the picture. The frames shall be selected as per the size of the collage. Several pictures can be selected to make a collage and fix the frame. The frame style can be changed that suits best to the picture or collage. A family picture can be uploaded to create a beautiful and perfect size family photo frame collage.
● 4. Customization: The Photo Collage Frame can be even made better with customization over online applications. Text and style can be included in the frames to give it a better look. Grid frame for picture collage is also available which can be created that fits perfectly to the pictures.
● 5. A collage photo frame is ready to hang on the wall & share: The photo collage with frame can be downloaded from the application. A beautiful picture frame collage wall can be hung in the living room or can be shared online with family and friends to print the same. More frames can be added in the future by choosing the same theme and customization.
Part 2 Part2 what is the Best App for Photo Frames?
Selecting the best App for a photo frame enhances the appearance of any ordinary picture. Some of the top Applications used for frame collage wall are as mentioned:

02 PhotoDirector
This app is popular due to its great AI tools, attractive picture effects, and advanced color control. It has a massive collection of frames that fits perfectly for a single picture as well as a collage. The style options of frames available on the app are classic, modern, and whimsical. Animation and glitch effects add an extra feature to this app.
Pros:
1. Wide range of frames is available.
2. It is easy to use as it can work on Android, iOS, macOS, and Windows devices.
3. Free version is available and photo frames can be shared over social media platforms.
Cons:
1. a Large number of editing options makes it confusing.
2. Fewer features are available.
3. Difficulty in finding plug-in features.

03PicsArt-Our Choice
PicsArt-Our Choice app is having a good combination best photo frames and multi-functional photo editing tools. Clip art, text option, frame editing, and making attractive collages make this app a masterpiece. This app can be used over smartphones and the pictures can be easily shared over social media platforms.
Pros:
1. Availability of tools to make clipart and collages.
2. Option to edit frames and objects.
3. Fully packed with a lot of stickers, frames, and filter options.
Cons:
1. The processing of images is slower.
2. Frequent ads disturb the process of editing and frame creation.
3. The application requires more space on downloading over the phone

04 PicFrame
This application has features to combine multiple pictures in one frame and the created frames can be easily shared over social media platforms. A great artwork can be done by using advanced tools such as filters, attractive frames, and drawing tools. The adjustable photo effects, background patterns and fully customized frames allow creating some attractive pictures and collage frame design.
Pros:
1. Option to save pictures in different resolutions.
2. Great tools for reshaping pictures and wide frame patterns
3. Work also on iPhone and iPad.
Cons:
1. With more new and advanced apps, it has become slightly outdated.
2. It closes very frequently, so sometimes work done on the application is lost.
3. Time to create frames is longer.

05Photo Grid
Photo Grid is an App that offers great photo editing features with more than three hundred layouts to give an attractive look to a picture. The users can transform their various pictures into beautiful collages. Filters, stickers, makeup tools, animated emoticons, and customized background features have made this app a bit popular. Extra pages can be added and the Lightbox feature makes it good for presentation.
Pros:
1. Massive collection of photo frames with customized features
2. Easy to use.
3. Various photo editing option
Cons:
1. It comes with various ads that trouble making frames and collages.
2. Lot of flexibility is not there regarding making videos with pictures.
3. Own frames cannot be created.

06ImgLabs
ImgLabs is one of the best applications to decorate photos and add creativity to them. Easy editing, beautify and stickers can be done over pictures and can be easily shared over Instagram and Facebook. More than twenty images can be added along with beautiful frames through this app. Cool photo filters, drawing tools, collage photo frame design tools, and texture effects make it a great photo frame application.
Pros:
1. The Android and iOS versions of the app are easy to use.
2. Attractive blurring and background effects give an attractive look to the images and picture frames.
3. Well-developed photo editing tools are available.
Cons:
1. The frames available are less as compared to other photo & frame editing applications.
2. Difference in functions is noticed in iOS and Android apps.
3. Installation issues in photo edit and stickers

So, these were some of the applications that offer to make some creative photo edits, collages, and frames. Turning to high definition of pictures and frames, most of the applications are coming up with new and advanced features to give the best picture experience to people. One of the applications which any creative person loves to use is Filmora.
****Wondershare Filmora Video Editor ** that creates attractive and professional quality videos for both business and personal purposes. It transforms the video by adding various stylish effects. One can edit the clips, add watermarks, and can adjust the brightness of the videos in simple steps. A wide range of stickers, animated texts, sound effects, filters, and inserting colorful borders over videos make it a great app.
For Win 7 or later (64-bit)
For macOS 10.12 or later
The videos can be made in different file formats such as mp4, wmv, avi, gif, and mp3 and can be easily shared over social media platforms. This app has great importance for business as it offers various facilities such as Multi-channel marketing, social advertising, and social promotion. It is good for user and brand management also.
So, making any video from pictures or movies through Filmora app will be an amazing idea. With advanced texting, color tuning, and 3D effects, one can be so creative. Even Filmora can be used to create video projects.
● Key Takeaways from This Episode →
● Simple pictures or collages can be taken to next level by adding alluring frames to them. With advanced drawing tools, pictures, and light effects, a stylish collage photo frame design can be created online. It allows bringing so many memories of people in one beautiful frame.
● Photo frame collage wall can be created over many applications. There are Android applications that offer many advanced features required to give a fine touch to the pictures, collages, and frames. They can be used and frames for family pictures can be made easily by following simple steps.
● he selection of the application should be made based on the several options available with the app. For example, an app that has easy to use, is good for all devices, has great editing features, eye-catching eye work and mesmerizing effect shall be preferred.
● So, try some amazing and advanced online Apps to create beautiful picture frames for you and your family now!!!
Decoration of pictures and collages can be done by making beautiful and stylish frames. A family picture or collage can be beautified by adding an attractive frame to it. Know about Best App for Photo Frames Online so you can create photo collages easily in minutes.
In this article
01 [How Do You Make a Collage Picture Frame?](#Part 1)
02 [What is the Best App for Photo Frames?](#Part 2)
Part 1 How Do You Make a Collage Picture Frame?
A beautiful collage without a stylish frame will not be attractive. When a family collage is accompanied by an artistic frame, it adds beauty to it and will be an attraction point for the visitors in the home. Wondering where to get it from? You can do it easily through some most popular apps. Yes, you can get your photo collage framed by yourself.
A wall can be decorated with collage picture frames by following just a few simple steps. Let’s begin with!!!
● Selection of the place where the collage frame is required to be hung: The place should be selected based on certain factors such as being easily approachable, proper lighting, and matching with the theme of the home. The place should be sufficient to add on some more picture frames in the future. The wall picture collage frames shall be created based on the room themes like kid’s room, living room, or bedroom. The position of the frames should be marked with tape so that the exact dimension can be known.
● 2. Select the online application to create frames: There are many applications available online that offer pictures collage frames. Choose one application as per the interest and explore it over the phone or desktop. There are various collage picture frame templates available at the application.
● 3. Uploading the pictures: Select the frame that is best for the picture. The frames shall be selected as per the size of the collage. Several pictures can be selected to make a collage and fix the frame. The frame style can be changed that suits best to the picture or collage. A family picture can be uploaded to create a beautiful and perfect size family photo frame collage.
● 4. Customization: The Photo Collage Frame can be even made better with customization over online applications. Text and style can be included in the frames to give it a better look. Grid frame for picture collage is also available which can be created that fits perfectly to the pictures.
● 5. A collage photo frame is ready to hang on the wall & share: The photo collage with frame can be downloaded from the application. A beautiful picture frame collage wall can be hung in the living room or can be shared online with family and friends to print the same. More frames can be added in the future by choosing the same theme and customization.
Part 2 Part2 what is the Best App for Photo Frames?
Selecting the best App for a photo frame enhances the appearance of any ordinary picture. Some of the top Applications used for frame collage wall are as mentioned:
02 PhotoDirector
This app is popular due to its great AI tools, attractive picture effects, and advanced color control. It has a massive collection of frames that fits perfectly for a single picture as well as a collage. The style options of frames available on the app are classic, modern, and whimsical. Animation and glitch effects add an extra feature to this app.
Pros:
1. Wide range of frames is available.
2. It is easy to use as it can work on Android, iOS, macOS, and Windows devices.
3. Free version is available and photo frames can be shared over social media platforms.
Cons:
1. a Large number of editing options makes it confusing.
2. Fewer features are available.
3. Difficulty in finding plug-in features.
03PicsArt-Our Choice
PicsArt-Our Choice app is having a good combination best photo frames and multi-functional photo editing tools. Clip art, text option, frame editing, and making attractive collages make this app a masterpiece. This app can be used over smartphones and the pictures can be easily shared over social media platforms.
Pros:
1. Availability of tools to make clipart and collages.
2. Option to edit frames and objects.
3. Fully packed with a lot of stickers, frames, and filter options.
Cons:
1. The processing of images is slower.
2. Frequent ads disturb the process of editing and frame creation.
3. The application requires more space on downloading over the phone
04 PicFrame
This application has features to combine multiple pictures in one frame and the created frames can be easily shared over social media platforms. A great artwork can be done by using advanced tools such as filters, attractive frames, and drawing tools. The adjustable photo effects, background patterns and fully customized frames allow creating some attractive pictures and collage frame design.
Pros:
1. Option to save pictures in different resolutions.
2. Great tools for reshaping pictures and wide frame patterns
3. Work also on iPhone and iPad.
Cons:
1. With more new and advanced apps, it has become slightly outdated.
2. It closes very frequently, so sometimes work done on the application is lost.
3. Time to create frames is longer.
05Photo Grid
Photo Grid is an App that offers great photo editing features with more than three hundred layouts to give an attractive look to a picture. The users can transform their various pictures into beautiful collages. Filters, stickers, makeup tools, animated emoticons, and customized background features have made this app a bit popular. Extra pages can be added and the Lightbox feature makes it good for presentation.
Pros:
1. Massive collection of photo frames with customized features
2. Easy to use.
3. Various photo editing option
Cons:
1. It comes with various ads that trouble making frames and collages.
2. Lot of flexibility is not there regarding making videos with pictures.
3. Own frames cannot be created.
06ImgLabs
ImgLabs is one of the best applications to decorate photos and add creativity to them. Easy editing, beautify and stickers can be done over pictures and can be easily shared over Instagram and Facebook. More than twenty images can be added along with beautiful frames through this app. Cool photo filters, drawing tools, collage photo frame design tools, and texture effects make it a great photo frame application.
Pros:
1. The Android and iOS versions of the app are easy to use.
2. Attractive blurring and background effects give an attractive look to the images and picture frames.
3. Well-developed photo editing tools are available.
Cons:
1. The frames available are less as compared to other photo & frame editing applications.
2. Difference in functions is noticed in iOS and Android apps.
3. Installation issues in photo edit and stickers
So, these were some of the applications that offer to make some creative photo edits, collages, and frames. Turning to high definition of pictures and frames, most of the applications are coming up with new and advanced features to give the best picture experience to people. One of the applications which any creative person loves to use is Filmora.
****Wondershare Filmora Video Editor ** that creates attractive and professional quality videos for both business and personal purposes. It transforms the video by adding various stylish effects. One can edit the clips, add watermarks, and can adjust the brightness of the videos in simple steps. A wide range of stickers, animated texts, sound effects, filters, and inserting colorful borders over videos make it a great app.
For Win 7 or later (64-bit)
For macOS 10.12 or later
The videos can be made in different file formats such as mp4, wmv, avi, gif, and mp3 and can be easily shared over social media platforms. This app has great importance for business as it offers various facilities such as Multi-channel marketing, social advertising, and social promotion. It is good for user and brand management also.
So, making any video from pictures or movies through Filmora app will be an amazing idea. With advanced texting, color tuning, and 3D effects, one can be so creative. Even Filmora can be used to create video projects.
● Key Takeaways from This Episode →
● Simple pictures or collages can be taken to next level by adding alluring frames to them. With advanced drawing tools, pictures, and light effects, a stylish collage photo frame design can be created online. It allows bringing so many memories of people in one beautiful frame.
● Photo frame collage wall can be created over many applications. There are Android applications that offer many advanced features required to give a fine touch to the pictures, collages, and frames. They can be used and frames for family pictures can be made easily by following simple steps.
● he selection of the application should be made based on the several options available with the app. For example, an app that has easy to use, is good for all devices, has great editing features, eye-catching eye work and mesmerizing effect shall be preferred.
● So, try some amazing and advanced online Apps to create beautiful picture frames for you and your family now!!!
How to Make a 3D Cartoon of Yourself
How to Make a 3D Cartoon of Yourself
An easy yet powerful editor
Numerous effects to choose from
Detailed tutorials provided by the official channel
From among the several trends that emerged on Social Media, making a 3D cartoon of yourself is probably the most popular.
Learning how to make 3D cartoons may just be in the height of demand in the near future.
In this article
01 [What is AI Artist? Plus how to cartoon yourself with it ](#Part 1)
02 [How to Create a 3D Cartoon of Yourself for Meta ](#Part 2)
03 [How to make 3D Cartoon From a Photo ](#Part 3)
04 [Five 3D cartoon Disney-Fied yourself apps ](#Part 4)
05 [More New Useful Tools to Upgrade Your Animation/Cartoon](#Part 5)
Part 1 What is AI Artist? Plus how to cartoon yourself with it
We all remember the Cartoon filter challenge on Facebook, right? Everyone was excited to transform themselves into a cartoon. The options of making personalized cartoon representations of yourself was pretty limited back then. With the Voila AI artist app you can choose at least 3 different cartoon variations of yourself.

The Voila AI artist app can be downloaded from the Apple App store and Android Play Store. You can use the app for free but for faster editing and an ad free experience, you will need to upgrade to the paid version. Other than just creating a cartoon of yourself, you can also create renaissance portraits and caricatures.
● Step 1: Download the Voila AI artist App for your device, and complete the installation process. Allow the app to access your Phone’s Camera rolling permission.
● Step 2: Select the style option you want to use. What we are using here is 3D cartoon (other options: 2D Cartoon, Caricature & and the rest). Touch the arrow and start.
● Step 3: Now, with your camera roll open, click a new one or choose from your gallery. You can also find a celebrities option where you can search for celebrities. This generates a four-grid choice. If you are using the free version, then be prepared to encounter one or two ads. After a few seconds, you can exit out and get back to your images.
● Step 4: You will receive a composite grid of four options; your original image, plus three cartoon representations (Royalty 3D, Baby 3D & Cartoon 3D). Here, you can select the option you like the most and start editing. Locate the up arrow button to immediately share on your preferred social media or simply save a copy in your device.
If the AI artist app has any paid and premium version, upon subscribing you will get ad free & watermark free animated representations.
Part 2 How to Create a 3D Cartoon of Yourself for Meta
Facebook only recently rebranded themselves as Meta. This has now started the rush to create a live virtual interaction space, and big companies like Microsoft and Nvidia are now competing with each other to bridge the gap.
Soon, activities like convening meetings, attending live events or even dating online would take place in virtual environments. So best be prepared for the future by creating a 3D avatar for yourself.
Your virtual avatar would be able to interact with the real world through a virtual platform by using VR headsets and other tech. Sensing your virtual presence would be almost the same as the real world for your peers and colleagues. You can attend a meeting without ever having to travel.
The process behind creating a 3D cartoon of yourself for Meta platforms starts by establishing a facial rig which is like a framework for the cartoon animations to sit on. These days, most apps come with automatic FACS facial rigging which is why certain Instagram filters like the Puppy nose filter was possible.
Presently, creating a complete 3D virtual model of yourself is a bit complicated to do on your own but soon this service will be automated in an app for you.
Part 3 How to make 3D Cartoon From a Photo
Photoshop is no doubt one of the most influential digital assets that allow you to do virtually anything with your photos. Of course, this includes turning your photos into 3D cartoon.
There are advanced techniques and tools you can use to retouch your image to achieve an animated like look for your portraits.
Of course, you can find multiple Photoshop hacks online but the following guide can give you an easy to follow idea of how to go about creating your own 3D cartoon out of an image.

Note; These steps are to be perceived as a simplified overview of your objectives when editing on Photoshop;
● To start out on turning your image into a 3D character, you need to learn how to create layers and then stack them on each other.
● You can then ‘liquify’ these layers to form a mould for your image.
● Apply skin softening techniques to take away the realistic features of the photo before working on turning it into a cartoon.
● Now you can start focus on applying the details to features like eyes, hair, nose and facial lines on your cartoon image.
● You can also change the colour of any individual features on your image. This method is applicable in making caricatures of your photo as well.
Part 4 Five 3D cartoon Disney-Fied yourself apps
Vibrant colours, gorgeous large eyes and shiny hair – pretty much sums up every Disney character you have ever seen. Now, everyone is obsessed with making their own Disney avatar and for good reason. You can use it as filter or upload it on your profile. Here are some of the most in-trend AI powered 3D Disneyfied apps you can use;
01Voila AI Artist

The Voila AI Artist app was released back in March of 2021 and has been the rage among Disneyfied apps. To clarify, the app has nothing to do with the Disney animation company but is perceived by users as the most successful app for disneyfication. Its on-board AI can create 3D and 2D renderings for your image along with hand drawn caricatures. You can download the app on App Store and Google Play.
02ToonMe

The next best app on our Disneyfied list is ToonMe. It also uses AI to turn photos into Disney Characters. The app keeps updating new cartoonish filters which you can use over your images. There are various other features which you can try as well like recreating your photos into classic vectors. The results are of extraordinary quality and can be uploaded on Instagram. You can download the app for free from Play store and App store.
03Snapchat

Snapchat has been around for some time now so you might already have it on your phone. Snapchat offers a vast range of filters and effects that of course includes Disneyfied filters and 3D cartoon images. You can look for them on the Snapchat search bar. New filters keep popping up every day which you can apply over your own images.
04Prisma

Prisma is a notoriously well know pop photo editor – which means it makes your photos ‘pop’. You can use it to edit photos on both Android and iPhone. It also comes with its own range of filters for turning your photos into cartoon images. There are hundreds of variations to choose from so you will definitely be spoilt for choices.
05Clip2Comic Cartoon

This app is only available on the App stores and is well known among iPhone users for turning photos into cartoons and caricatures. It is not exactly a Disneyfied app but it has a plethora of filters and a combination of editing tools to help personalize your 3D photos and comics. You can also directly upload these photos to your Social Media Accounts.
Key Takeaways from This Episode
● With the help of AI and other amazing features, you can use your everyday pictures to make a 3D cartoon of yourself.
● The Metaverse is her and soon we all will be interacting in a virtual space. So best learn how to rig your face with an animation filter.
● Apps like Voila AI artist, you can disneyfy your images quite easily. Explore dozens of such filters and effects with Disneyfied apps.
From among the several trends that emerged on Social Media, making a 3D cartoon of yourself is probably the most popular.
Learning how to make 3D cartoons may just be in the height of demand in the near future.
In this article
01 [What is AI Artist? Plus how to cartoon yourself with it ](#Part 1)
02 [How to Create a 3D Cartoon of Yourself for Meta ](#Part 2)
03 [How to make 3D Cartoon From a Photo ](#Part 3)
04 [Five 3D cartoon Disney-Fied yourself apps ](#Part 4)
05 [More New Useful Tools to Upgrade Your Animation/Cartoon](#Part 5)
Part 1 What is AI Artist? Plus how to cartoon yourself with it
We all remember the Cartoon filter challenge on Facebook, right? Everyone was excited to transform themselves into a cartoon. The options of making personalized cartoon representations of yourself was pretty limited back then. With the Voila AI artist app you can choose at least 3 different cartoon variations of yourself.
The Voila AI artist app can be downloaded from the Apple App store and Android Play Store. You can use the app for free but for faster editing and an ad free experience, you will need to upgrade to the paid version. Other than just creating a cartoon of yourself, you can also create renaissance portraits and caricatures.
● Step 1: Download the Voila AI artist App for your device, and complete the installation process. Allow the app to access your Phone’s Camera rolling permission.
● Step 2: Select the style option you want to use. What we are using here is 3D cartoon (other options: 2D Cartoon, Caricature & and the rest). Touch the arrow and start.
● Step 3: Now, with your camera roll open, click a new one or choose from your gallery. You can also find a celebrities option where you can search for celebrities. This generates a four-grid choice. If you are using the free version, then be prepared to encounter one or two ads. After a few seconds, you can exit out and get back to your images.
● Step 4: You will receive a composite grid of four options; your original image, plus three cartoon representations (Royalty 3D, Baby 3D & Cartoon 3D). Here, you can select the option you like the most and start editing. Locate the up arrow button to immediately share on your preferred social media or simply save a copy in your device.
If the AI artist app has any paid and premium version, upon subscribing you will get ad free & watermark free animated representations.
Part 2 How to Create a 3D Cartoon of Yourself for Meta
Facebook only recently rebranded themselves as Meta. This has now started the rush to create a live virtual interaction space, and big companies like Microsoft and Nvidia are now competing with each other to bridge the gap.
Soon, activities like convening meetings, attending live events or even dating online would take place in virtual environments. So best be prepared for the future by creating a 3D avatar for yourself.
Your virtual avatar would be able to interact with the real world through a virtual platform by using VR headsets and other tech. Sensing your virtual presence would be almost the same as the real world for your peers and colleagues. You can attend a meeting without ever having to travel.
The process behind creating a 3D cartoon of yourself for Meta platforms starts by establishing a facial rig which is like a framework for the cartoon animations to sit on. These days, most apps come with automatic FACS facial rigging which is why certain Instagram filters like the Puppy nose filter was possible.
Presently, creating a complete 3D virtual model of yourself is a bit complicated to do on your own but soon this service will be automated in an app for you.
Part 3 How to make 3D Cartoon From a Photo
Photoshop is no doubt one of the most influential digital assets that allow you to do virtually anything with your photos. Of course, this includes turning your photos into 3D cartoon.
There are advanced techniques and tools you can use to retouch your image to achieve an animated like look for your portraits.
Of course, you can find multiple Photoshop hacks online but the following guide can give you an easy to follow idea of how to go about creating your own 3D cartoon out of an image.
Note; These steps are to be perceived as a simplified overview of your objectives when editing on Photoshop;
● To start out on turning your image into a 3D character, you need to learn how to create layers and then stack them on each other.
● You can then ‘liquify’ these layers to form a mould for your image.
● Apply skin softening techniques to take away the realistic features of the photo before working on turning it into a cartoon.
● Now you can start focus on applying the details to features like eyes, hair, nose and facial lines on your cartoon image.
● You can also change the colour of any individual features on your image. This method is applicable in making caricatures of your photo as well.
Part 4 Five 3D cartoon Disney-Fied yourself apps
Vibrant colours, gorgeous large eyes and shiny hair – pretty much sums up every Disney character you have ever seen. Now, everyone is obsessed with making their own Disney avatar and for good reason. You can use it as filter or upload it on your profile. Here are some of the most in-trend AI powered 3D Disneyfied apps you can use;
01Voila AI Artist
The Voila AI Artist app was released back in March of 2021 and has been the rage among Disneyfied apps. To clarify, the app has nothing to do with the Disney animation company but is perceived by users as the most successful app for disneyfication. Its on-board AI can create 3D and 2D renderings for your image along with hand drawn caricatures. You can download the app on App Store and Google Play.
02ToonMe
The next best app on our Disneyfied list is ToonMe. It also uses AI to turn photos into Disney Characters. The app keeps updating new cartoonish filters which you can use over your images. There are various other features which you can try as well like recreating your photos into classic vectors. The results are of extraordinary quality and can be uploaded on Instagram. You can download the app for free from Play store and App store.
03Snapchat
Snapchat has been around for some time now so you might already have it on your phone. Snapchat offers a vast range of filters and effects that of course includes Disneyfied filters and 3D cartoon images. You can look for them on the Snapchat search bar. New filters keep popping up every day which you can apply over your own images.
04Prisma
Prisma is a notoriously well know pop photo editor – which means it makes your photos ‘pop’. You can use it to edit photos on both Android and iPhone. It also comes with its own range of filters for turning your photos into cartoon images. There are hundreds of variations to choose from so you will definitely be spoilt for choices.
05Clip2Comic Cartoon
This app is only available on the App stores and is well known among iPhone users for turning photos into cartoons and caricatures. It is not exactly a Disneyfied app but it has a plethora of filters and a combination of editing tools to help personalize your 3D photos and comics. You can also directly upload these photos to your Social Media Accounts.
Key Takeaways from This Episode
● With the help of AI and other amazing features, you can use your everyday pictures to make a 3D cartoon of yourself.
● The Metaverse is her and soon we all will be interacting in a virtual space. So best learn how to rig your face with an animation filter.
● Apps like Voila AI artist, you can disneyfy your images quite easily. Explore dozens of such filters and effects with Disneyfied apps.
Learn About Lip-Syncing in Animation
Learn all about Lip-Syncing in Animation
An easy yet powerful editor
Numerous effects to choose from
Detailed tutorials provided by the official channel
Lip syncing is one of the important parts of animations that need to be done perfectly. As children we have all enjoyed the special way in which Donald Duck or Mickey Mouse used to talk in cartoons, this is all because of the perfect lip-syncing.

Lip-sync animation tutorial are available that can assist you with the task.
In this article
01 [What is lip-syncing and its importance in animations?](#Part 1)
02 [Key factors to consider while lip-syncing in animations.](#Part 2)
03 [Best software for lip-syncing animations.](#Part 3)
04 [Best all-in-one video editing software for creating impressive animations.](#Part 4)
Part 1 What is Lip-syncing and Its Importance in Animations
In the simplest terms, lip-syncing can be termed as the process and way in which the sound is synchronized to the characters in animation. It is lip-syncing which brings life to the characters and makes them look talking. The process of lip-syncing in animations includes the dialogues and the mouth charts. The dialogues are broken into the phonetic syllables and the frames required for these syllables are then accessed.
Animations are moving and talking images and liveliness come from the dialogues that they speak. So, to make these talks appear real, flawless lip-syncing is very important.
Part 2 Key Factors to Consider While Lip-syncing in Animations
To make the lip-syncing in your animation look perfect several factors need to be taken care of. Some of these important ones are enlisted below.
01 Perfect Match of the Keyframes
The keyframes for the shapes of the words phrase by phrase needs to be perfect to make it look right. The right lip sync will have the correct timings from the mouth open to the mouth close.
02 Adding Body Language
To make the characters in your animations look real and lively, adding gestures and body language will play a huge role. Moreover, lip-syncing along with facial expressions will add to the overall richness of the animations.
03 Watch Yourself or Record Sample Videos
To get the correct lip-syncing for your animations, you can first try and practice by using a mirror or recording some trial videos. In these videos, you can speak and observe the jaw motion.
04 Use Blending
The technique of blending can also be used where the focus is on the most important shape of the mouth rather than each syllable. These shapes can then be blended and used in different ways and combinations.
05 Emphasize Eyes
Eyes need special focus as they can be used for expressing several emotions. Especially during the close-up shots in animations, a person looks at the eyes before the rest of the face.
06 Use the Apt Voice
No matter how perfectly the lip-syncing is done, it will not look good if the voice does not match the characters in your animations. So, make sure to select the voice that matches the looks and the personality of your characters.
Part 3 Best Software for Lip-syncing Animations
Lip sync in animations has become an easier and hassle-free task thanks to the advanced technology and several software and programs available. These 2D and 3D animation-supported tools allow syncing the mouth of the animated character with the dialogues and audio tracks. A few widely used tools for the task are enlisted below.
01 Anime Studio
This is a Windows and Mac-based professional software that supports multiple advanced functions like bone-rigging, automatic image tracing, integrated lip-synching, motion tracking, 3D shape design, character wizard, and many more. Using the vector-based tools of the software, you can add drawings and images for creating customized characters. There is a built-in character wizard that can be used for quick drawing and rigging the characters from the starting. Anime Studio allows recording the sound clip and then these can be synced to the animated characters. Several pre-set props, scenes, videos, stock audio, and characters are also available to choose from.

02 DAZ Studio
This is free-to-use software that can create impressive animations using multiple advanced features. The simple interface and functioning of the software make it apt even for users who have no prior experience in animations. The lip-sync feature of the software can be used to add audio to the created animations. Additional functions include morphing, adjusting different camera angles, plug-ins with advanced capabilities, and more.

03 Crazy Talk
To create impressive animations and add lip-syncing this is one of the popularly used tools. Quick to download, the software allows adding images and pictures to the tool, and then the head, mouth, and eye movement can be added along with lip-synced audio for creating impressive animations. The built-in timeline of the software offers you complete control over the animations, audio, and other parameters. Detailed customization options are supported including the teeth in the mouth of the character. The software is available for Windows and Mac systems.

04 Toon Boom Studio
To help you create rich animations for movies, games, learning, social media sites and any other purpose this is an apt tool to use. The software has a basic version for beginners while an advanced version for professionals. You can import media files in an array of formats like AI, JPEG, TGA, GIF, and others to create animations of your choice. Audio files in WAV, AIFF, and MP3 formats can be added to the created animations and the lip-sync analyzer tool can be used for that perfect syncing. Additional features include zoom-in, zoom-out, skeleton effect, support to the 3D background, multiple formats for exporting files, and more.

05 Crazy Talk Animator
This 2D animation tool can be used for creating rich animations by adding motion and different effects to your images. You can also create landscapes and scenes to further enhance the overall clip. Lip-sync to the animations is supported by the tool and you can even create marks for facial expression and use them to morph. Several tutorials and web resources are available for a better understanding of the tool and its functioning.

Adobe is also a good tool for all types of animation requirements and you can also check the adobe animate lip sync tutorial for your lip-syncing task.
Key Takeaways from This Episode
● Lip-syncing is an important and inevitable part of animations. Lip-syncing brings richness and liveliness to the clips.
● An array of tools and software are available that can help you effortlessly lip-sync animations.
● or all types of video editing needs and for creating animations, Wondershare Filmora works as an excellent all-in-one software.
Lip syncing is one of the important parts of animations that need to be done perfectly. As children we have all enjoyed the special way in which Donald Duck or Mickey Mouse used to talk in cartoons, this is all because of the perfect lip-syncing.
Lip-sync animation tutorial are available that can assist you with the task.
In this article
01 [What is lip-syncing and its importance in animations?](#Part 1)
02 [Key factors to consider while lip-syncing in animations.](#Part 2)
03 [Best software for lip-syncing animations.](#Part 3)
04 [Best all-in-one video editing software for creating impressive animations.](#Part 4)
Part 1 What is Lip-syncing and Its Importance in Animations
In the simplest terms, lip-syncing can be termed as the process and way in which the sound is synchronized to the characters in animation. It is lip-syncing which brings life to the characters and makes them look talking. The process of lip-syncing in animations includes the dialogues and the mouth charts. The dialogues are broken into the phonetic syllables and the frames required for these syllables are then accessed.
Animations are moving and talking images and liveliness come from the dialogues that they speak. So, to make these talks appear real, flawless lip-syncing is very important.
Part 2 Key Factors to Consider While Lip-syncing in Animations
To make the lip-syncing in your animation look perfect several factors need to be taken care of. Some of these important ones are enlisted below.
01 Perfect Match of the Keyframes
The keyframes for the shapes of the words phrase by phrase needs to be perfect to make it look right. The right lip sync will have the correct timings from the mouth open to the mouth close.
02 Adding Body Language
To make the characters in your animations look real and lively, adding gestures and body language will play a huge role. Moreover, lip-syncing along with facial expressions will add to the overall richness of the animations.
03 Watch Yourself or Record Sample Videos
To get the correct lip-syncing for your animations, you can first try and practice by using a mirror or recording some trial videos. In these videos, you can speak and observe the jaw motion.
04 Use Blending
The technique of blending can also be used where the focus is on the most important shape of the mouth rather than each syllable. These shapes can then be blended and used in different ways and combinations.
05 Emphasize Eyes
Eyes need special focus as they can be used for expressing several emotions. Especially during the close-up shots in animations, a person looks at the eyes before the rest of the face.
06 Use the Apt Voice
No matter how perfectly the lip-syncing is done, it will not look good if the voice does not match the characters in your animations. So, make sure to select the voice that matches the looks and the personality of your characters.
Part 3 Best Software for Lip-syncing Animations
Lip sync in animations has become an easier and hassle-free task thanks to the advanced technology and several software and programs available. These 2D and 3D animation-supported tools allow syncing the mouth of the animated character with the dialogues and audio tracks. A few widely used tools for the task are enlisted below.
01 Anime Studio
This is a Windows and Mac-based professional software that supports multiple advanced functions like bone-rigging, automatic image tracing, integrated lip-synching, motion tracking, 3D shape design, character wizard, and many more. Using the vector-based tools of the software, you can add drawings and images for creating customized characters. There is a built-in character wizard that can be used for quick drawing and rigging the characters from the starting. Anime Studio allows recording the sound clip and then these can be synced to the animated characters. Several pre-set props, scenes, videos, stock audio, and characters are also available to choose from.
02 DAZ Studio
This is free-to-use software that can create impressive animations using multiple advanced features. The simple interface and functioning of the software make it apt even for users who have no prior experience in animations. The lip-sync feature of the software can be used to add audio to the created animations. Additional functions include morphing, adjusting different camera angles, plug-ins with advanced capabilities, and more.
03 Crazy Talk
To create impressive animations and add lip-syncing this is one of the popularly used tools. Quick to download, the software allows adding images and pictures to the tool, and then the head, mouth, and eye movement can be added along with lip-synced audio for creating impressive animations. The built-in timeline of the software offers you complete control over the animations, audio, and other parameters. Detailed customization options are supported including the teeth in the mouth of the character. The software is available for Windows and Mac systems.
04 Toon Boom Studio
To help you create rich animations for movies, games, learning, social media sites and any other purpose this is an apt tool to use. The software has a basic version for beginners while an advanced version for professionals. You can import media files in an array of formats like AI, JPEG, TGA, GIF, and others to create animations of your choice. Audio files in WAV, AIFF, and MP3 formats can be added to the created animations and the lip-sync analyzer tool can be used for that perfect syncing. Additional features include zoom-in, zoom-out, skeleton effect, support to the 3D background, multiple formats for exporting files, and more.
05 Crazy Talk Animator
This 2D animation tool can be used for creating rich animations by adding motion and different effects to your images. You can also create landscapes and scenes to further enhance the overall clip. Lip-sync to the animations is supported by the tool and you can even create marks for facial expression and use them to morph. Several tutorials and web resources are available for a better understanding of the tool and its functioning.
Adobe is also a good tool for all types of animation requirements and you can also check the adobe animate lip sync tutorial for your lip-syncing task.
Key Takeaways from This Episode
● Lip-syncing is an important and inevitable part of animations. Lip-syncing brings richness and liveliness to the clips.
● An array of tools and software are available that can help you effortlessly lip-sync animations.
● or all types of video editing needs and for creating animations, Wondershare Filmora works as an excellent all-in-one software.
12 Websites with Triggered Animate on Scroll Examples
12 Captivating Websites with Triggered Animate on Scroll Examples
An easy yet powerful editor
Numerous effects to choose from
Detailed tutorials provided by the official channel
It is impossible to imagine any website that doesn’t have any dynamic elements. It has almost become a compulsion to use dynamic elements in websites. Nowadays we look for websites that are more engaging and interactive.
This is where the popular Scroll-Triggered Animations in websites come in. Filmora Pro is one of the best website development companies that develops websites with a triggered animate scroll for customers all around the world. Filmora Pro wonderfully animate elements on scroll for the websites they develop.
In this article
01 [What Are Scroll-Triggered Animations?](#Part 1)
02 [Best 12 Websites With Triggered Animate On Scroll Examples](#Part 2)
Part 1 What Are Scroll-Triggered Animations?
Scroll-triggered animations are that strong trend that has been with us for many years. It is the most effective way to animate elements on scrolls like the graphics, texts, videos, and photos and bring all of them to life while you scroll down a website page. Scroll animations are used to grab the attention of the user and make a website more interesting and attractive.
Part 2 Best 12 Websites with triggered animate on scroll examples
Given below are the 12 best Websites with triggered animate on scroll examples.
01Joey Bada$ Political MC

The website of Joey Bada$ Political MC is considered to be one of the most exquisite examples of how scroll-triggered animations can be used effectively to say a story. This website is a collaboration between Shoes Up - The French magazine and American MC. This is a satirical website and resembles a political campaign. To build this website scroll-triggered animation was used all through. The scrolling is designed in such a way that it changes from horizontal to vertical. Each scroll delivers many interesting facts about Joey’s political beliefs.
02Vincent Saïsset

Vincent Saïsset, the first thing that you will see is a white background with a very big white letter V on it. The letter V symbolizes the artist’s initials. There is an arrow pointing downward that encourages you to start exploring the website. As you start to scroll you will see a wave of animated typefaces with a monochromatic interplay. The website is designed with horizontal and vertical scroll transitions. It also has a playful micro-interaction that is there between the letters and the cursor.
03Home Société

The website of Home Société amazingly depicts all the interior design work of the company. The design of this website is very simple but at the same rich with graphic elements, animations, and typography. The animated elements used are rhythmically intersecting and overlapping with each other. The images that are used in the background are changing constantly with eye-catching typefaces. The best part that it makes different from other websites is the horizontal scroll; this portrays a whole new dimension giving the users an experience of infinite scroll.
04Sally

This company is from NYC and they rent cars to Lyft, Via Juno, and Uber. The website of Sally might look minimal when it comes to color and designs or exquisite detailing. But what makes the website captivating is a car’s 3D model and seventy other animations which gives the look that the car is moving. It is the perfect example where you can animate elements on scroll one can move the model from one section to the other by moving the cursor or just scrolling. All the transitions used are synchronized eloquently and there is no hitch in the entire website.
05Yuto Takahashi

The website of Yuto Takahashi’s is that of a portfolio website. This website is another amazing example of scroll-triggered animations. The very first thing that one will notice is a rotating circle that is made with the words of the artist’s name. Then instructions will pop up and ask one to hold on to the mouse to access the artist’s works. The typefaces used are Serif that surrounds the photographs. With every new scroll, some sort of liquid animation can be viewed over the photographs. While if one clicks any of the featured works one can see scroll-triggered animations are used on every single work.
06Editorial New

The website of Editorial New is a collaboration between the Pangram Pangram Foundry and the Locomotive. The typeface of this website has a reflection of the designs of the ‘90s. The website starts with a newspaper look-alike section that keeps rotating as you scroll and stops until it covers the screen completely. You will then come across various typefaces showcasing their versatility. You will also find a magazine cover being created by using the beautiful font. While you click on the Randomize button you will see that the cover changes and shows font in various other sizes.
07Danilo De Marco

The website of Danilo De Marco’s is a collaboration with Studio K95. This website is developed with the view of promoting all these works. In this website, the scroll-triggered animations are used in some specific sections, yet they are prominent. The logo along with the font used is animated in an enchanting way. The vibrant green color used will not let you move away from the screen. The typography used is very dominant. And if you click on any of his featured work you will be directed to reach the page that is solely dedicated to that particular work. While scrolling the photographs it will seem as they are drifting further away.
08K24 Moscow

K24 Moscow is one of the most captivating websites built for a modern architectural project. The website recalls the spirit of Russian suprematism and avant-garde. Scroll-triggered animations are used to animate elements on scroll throughout the full presentation. With every new scroll, you will discover something new. The combination of white, black, and red color sections that move and overlap with changes in size make a distinct typeface. These combine to make it an exciting website while keeping the Russian avant-garde spirit.
09Green Chameleon

The website of Green Chameleon was created to showcase all of their cherished achievements and memories from 2018. On the website at the very beginning, you will be greeted with an introductory graphic and then you will begin exploring the site. You will have the feeling like you have entered into a time capsule. You will be able to see the works month by month. And when you click on any particular project the picture will get displayed right on the center of the screen. With it, you will find relevant information underneath. The background color keeps changing while navigating through a 3D space.
10Bewegen

The website of Bewegen is a showcase of animations, rich content, and interactions. Bewegen is a popular world-class system known for sharing bikes. The scroll-triggered animations along with the zoom shots give a detailed view of the popular Bewegen Pedelec bike. While one scroll down further one will get related information about the bike-sharing system and also get details on how to use it. There is also the option where anyone can create their sharing system just by choosing the city and the number of heads to be included in the project while choosing the color and other features of the bike.
11Wtower

The website of Wtower is built to an interactive virtual world that tells the story of the world’s largest water tower in past - Ural’s White Tower. This website is another amazing storytelling website where the scroll-triggered animation fits like puzzle pieces. The scrolling takes to a 3D space where you will be able to learn how the tower originated and what the current state is in present. You will find a progress bar at the bottom and this appears every time there is some useful element to be delivered. Also, you can check how much of the story you have listened to and how much is left.
12Parmigiani Fleurier

The website of Parmigiani Fleurier is a website for Swiss watchmakers. This website is also another amazing animate on scroll example. The layout of the website is elegant as well as demure. While one scroll one can explore the entire collection by using the rows used on both sides of the screen. After you find the model that attracts your eye, you can view the detailed information that shows in an asymmetrical pattern around the watch. You will also come to know about other details like the case, dial, strap, winding system, and other technical specifications. The animations used are very subtle and well-balanced.
Part 3 Advantages and Disadvantages of These 12 Websites
| Name of Website | Advantage | Disadvantage |
|---|---|---|
| Joey Bada$ Political MC | Scroll-triggered animation was used all through. The scrolling is designed in such a way that it changes from horizontal to vertical. | Resource intensive. |
| Vincent Saïsset | It has a playful micro-interaction that is there between the letters and the cursor. | Components use is intensive. |
| Home Société | The horizontal scroll portrays a whole new dimension giving the users an experience of infinite scroll. | Memory usage is high. |
| Sally | The captivating part is the car’s 3D model and seventy other animations which give the look that the car is moving. | Very resource intensive. |
| Yuto Takahashi | With every new scroll, some sort of liquid animation can be viewed over the photographs | Requires High Bandwidth. |
| Editorial New | While a click is made on the Randomize button it will be seen that the cover changes and shows font in various other sizes. | Needs good Internet. |
| Danilo De Marco | The typography used is very dominant. | Resource intensive. |
| K24 Moscow | The combination of white, black, and red color sections that move and overlap with changes in size make a distinct typeface. | Requires High Bandwidth. |
| Green Chameleon | One will have the feeling like one has entered into a time capsule. | The website is resource-intensive. |
| Bewegen | There is also the option where anyone can create their sharing system just by choosing the city and the number of heads to be included in the project while choosing the color and other features of the bike. | Components use is intensive. |
| Wtower | A progress bar at the bottom and appears every time there is some useful element to be delivered. | The website is resource-intensive. |
| Parmigiani Fleurier | One can explore the entire collection by using the rows used on both sides of the screen. | Very resource-intensive |
Key Takeaways from This Episode
● At the end of this article, you have understood what Scroll-triggered animations are all about.
● You also got the view as to why you need Scroll-triggered animations while you develop a website for yourself.
● The article also tells you about the 12 best captivating Scroll-triggered animation websites which will give you various ideas for your next website.
It is impossible to imagine any website that doesn’t have any dynamic elements. It has almost become a compulsion to use dynamic elements in websites. Nowadays we look for websites that are more engaging and interactive.
This is where the popular Scroll-Triggered Animations in websites come in. Filmora Pro is one of the best website development companies that develops websites with a triggered animate scroll for customers all around the world. Filmora Pro wonderfully animate elements on scroll for the websites they develop.
In this article
01 [What Are Scroll-Triggered Animations?](#Part 1)
02 [Best 12 Websites With Triggered Animate On Scroll Examples](#Part 2)
Part 1 What Are Scroll-Triggered Animations?
Scroll-triggered animations are that strong trend that has been with us for many years. It is the most effective way to animate elements on scrolls like the graphics, texts, videos, and photos and bring all of them to life while you scroll down a website page. Scroll animations are used to grab the attention of the user and make a website more interesting and attractive.
Part 2 Best 12 Websites with triggered animate on scroll examples
Given below are the 12 best Websites with triggered animate on scroll examples.
01Joey Bada$ Political MC
The website of Joey Bada$ Political MC is considered to be one of the most exquisite examples of how scroll-triggered animations can be used effectively to say a story. This website is a collaboration between Shoes Up - The French magazine and American MC. This is a satirical website and resembles a political campaign. To build this website scroll-triggered animation was used all through. The scrolling is designed in such a way that it changes from horizontal to vertical. Each scroll delivers many interesting facts about Joey’s political beliefs.
02Vincent Saïsset
Vincent Saïsset, the first thing that you will see is a white background with a very big white letter V on it. The letter V symbolizes the artist’s initials. There is an arrow pointing downward that encourages you to start exploring the website. As you start to scroll you will see a wave of animated typefaces with a monochromatic interplay. The website is designed with horizontal and vertical scroll transitions. It also has a playful micro-interaction that is there between the letters and the cursor.
03Home Société
The website of Home Société amazingly depicts all the interior design work of the company. The design of this website is very simple but at the same rich with graphic elements, animations, and typography. The animated elements used are rhythmically intersecting and overlapping with each other. The images that are used in the background are changing constantly with eye-catching typefaces. The best part that it makes different from other websites is the horizontal scroll; this portrays a whole new dimension giving the users an experience of infinite scroll.
04Sally
This company is from NYC and they rent cars to Lyft, Via Juno, and Uber. The website of Sally might look minimal when it comes to color and designs or exquisite detailing. But what makes the website captivating is a car’s 3D model and seventy other animations which gives the look that the car is moving. It is the perfect example where you can animate elements on scroll one can move the model from one section to the other by moving the cursor or just scrolling. All the transitions used are synchronized eloquently and there is no hitch in the entire website.
05Yuto Takahashi
The website of Yuto Takahashi’s is that of a portfolio website. This website is another amazing example of scroll-triggered animations. The very first thing that one will notice is a rotating circle that is made with the words of the artist’s name. Then instructions will pop up and ask one to hold on to the mouse to access the artist’s works. The typefaces used are Serif that surrounds the photographs. With every new scroll, some sort of liquid animation can be viewed over the photographs. While if one clicks any of the featured works one can see scroll-triggered animations are used on every single work.
06Editorial New
The website of Editorial New is a collaboration between the Pangram Pangram Foundry and the Locomotive. The typeface of this website has a reflection of the designs of the ‘90s. The website starts with a newspaper look-alike section that keeps rotating as you scroll and stops until it covers the screen completely. You will then come across various typefaces showcasing their versatility. You will also find a magazine cover being created by using the beautiful font. While you click on the Randomize button you will see that the cover changes and shows font in various other sizes.
07Danilo De Marco
The website of Danilo De Marco’s is a collaboration with Studio K95. This website is developed with the view of promoting all these works. In this website, the scroll-triggered animations are used in some specific sections, yet they are prominent. The logo along with the font used is animated in an enchanting way. The vibrant green color used will not let you move away from the screen. The typography used is very dominant. And if you click on any of his featured work you will be directed to reach the page that is solely dedicated to that particular work. While scrolling the photographs it will seem as they are drifting further away.
08K24 Moscow
K24 Moscow is one of the most captivating websites built for a modern architectural project. The website recalls the spirit of Russian suprematism and avant-garde. Scroll-triggered animations are used to animate elements on scroll throughout the full presentation. With every new scroll, you will discover something new. The combination of white, black, and red color sections that move and overlap with changes in size make a distinct typeface. These combine to make it an exciting website while keeping the Russian avant-garde spirit.
09Green Chameleon
The website of Green Chameleon was created to showcase all of their cherished achievements and memories from 2018. On the website at the very beginning, you will be greeted with an introductory graphic and then you will begin exploring the site. You will have the feeling like you have entered into a time capsule. You will be able to see the works month by month. And when you click on any particular project the picture will get displayed right on the center of the screen. With it, you will find relevant information underneath. The background color keeps changing while navigating through a 3D space.
10Bewegen
The website of Bewegen is a showcase of animations, rich content, and interactions. Bewegen is a popular world-class system known for sharing bikes. The scroll-triggered animations along with the zoom shots give a detailed view of the popular Bewegen Pedelec bike. While one scroll down further one will get related information about the bike-sharing system and also get details on how to use it. There is also the option where anyone can create their sharing system just by choosing the city and the number of heads to be included in the project while choosing the color and other features of the bike.
11Wtower
The website of Wtower is built to an interactive virtual world that tells the story of the world’s largest water tower in past - Ural’s White Tower. This website is another amazing storytelling website where the scroll-triggered animation fits like puzzle pieces. The scrolling takes to a 3D space where you will be able to learn how the tower originated and what the current state is in present. You will find a progress bar at the bottom and this appears every time there is some useful element to be delivered. Also, you can check how much of the story you have listened to and how much is left.
12Parmigiani Fleurier
The website of Parmigiani Fleurier is a website for Swiss watchmakers. This website is also another amazing animate on scroll example. The layout of the website is elegant as well as demure. While one scroll one can explore the entire collection by using the rows used on both sides of the screen. After you find the model that attracts your eye, you can view the detailed information that shows in an asymmetrical pattern around the watch. You will also come to know about other details like the case, dial, strap, winding system, and other technical specifications. The animations used are very subtle and well-balanced.
Part 3 Advantages and Disadvantages of These 12 Websites
| Name of Website | Advantage | Disadvantage |
|---|---|---|
| Joey Bada$ Political MC | Scroll-triggered animation was used all through. The scrolling is designed in such a way that it changes from horizontal to vertical. | Resource intensive. |
| Vincent Saïsset | It has a playful micro-interaction that is there between the letters and the cursor. | Components use is intensive. |
| Home Société | The horizontal scroll portrays a whole new dimension giving the users an experience of infinite scroll. | Memory usage is high. |
| Sally | The captivating part is the car’s 3D model and seventy other animations which give the look that the car is moving. | Very resource intensive. |
| Yuto Takahashi | With every new scroll, some sort of liquid animation can be viewed over the photographs | Requires High Bandwidth. |
| Editorial New | While a click is made on the Randomize button it will be seen that the cover changes and shows font in various other sizes. | Needs good Internet. |
| Danilo De Marco | The typography used is very dominant. | Resource intensive. |
| K24 Moscow | The combination of white, black, and red color sections that move and overlap with changes in size make a distinct typeface. | Requires High Bandwidth. |
| Green Chameleon | One will have the feeling like one has entered into a time capsule. | The website is resource-intensive. |
| Bewegen | There is also the option where anyone can create their sharing system just by choosing the city and the number of heads to be included in the project while choosing the color and other features of the bike. | Components use is intensive. |
| Wtower | A progress bar at the bottom and appears every time there is some useful element to be delivered. | The website is resource-intensive. |
| Parmigiani Fleurier | One can explore the entire collection by using the rows used on both sides of the screen. | Very resource-intensive |
Key Takeaways from This Episode
● At the end of this article, you have understood what Scroll-triggered animations are all about.
● You also got the view as to why you need Scroll-triggered animations while you develop a website for yourself.
● The article also tells you about the 12 best captivating Scroll-triggered animation websites which will give you various ideas for your next website.
Also read:
- Learn Easy Blender Rigging in Only 2 Minutes
- 2024 Approved How to Make an Animation With 7 Steps
- New 2024 Approved Best Practices on Online 3D Avatar Creator
- New 5 Free Animated Gif Sources You Must Check
- Updated Finding Some Different Ways to Animated Cartoon of Yourself
- Whats Rigging Animation and Why It Matters
- Best 12 2D Animation Studios All Should Check Out for 2024
- In-Depth Study of Cartoon Painting Starts From Learning to Draw It
- Updated In 2024, Best Websites to Download Animated GIFs for Free-Free GIF Download
- 10 Caricature Makers to Turn Photo to Caricature Effects for 2024
- New 2024 Approved 10 Creative Wallpaper Collage Ideas and Photos
- Updated In 2024, How to Make Creative Animation Videos
- New How To Turn Yourself Into Anime Character for 2024
- 5 Websites with Animated Logos That Can Catch Your Eyes for 2024
- Updated In 2024, Whats Music Video GIF & How to Add Music to GIF Files
- New 5 Different Animation Styles A Simple but Comprehensive Guide
- Ways on How to Liven Up Your Animate Website on Scroll
- Updated Best Canva 10 Animated Templates for 2024
- New How to Convert Animated GIF From Video
- In 2024, What Is Still Motion Animation and How Does It Work?
- Updated 2024 Approved How to Learn Cartoon Characters Sketch Quickly
- 18 Best Tools and Services to Create Animated Videos for Business 2023
- 2024 Approved Guide on How to Create GIF in WhatsApp iPhone
- New Is It That Easy to Make My Own Animated Character?
- Updated 2024 Approved 8 Top Motion Graphics Online Tools for Your Inspiration
- Updated Amazing Ways to Find Suitable Animated Graphic Maker
- New Are You Ready to Animate Game Character From Scratch?
- New What Is Anime? Anime VS Manga VS Cartoon for 2024
- New 10 Best Tools to Make Pic Collage for Windows
- FREE Top 21 Best Anime Websites to Watch Anime Online
- New 10 Great MP4 to GIF Converters to Get Perfect-Made GIF for 2024
- Updated How to Create a YouTube Intro Animation Like a Pro for 2024
- New Whats Music Video GIF & How to Add Music to Your GIF Files for 2024
- New 10 Great Moving Animation PowerPoint Techniques
- New 2024 Approved 10 Caricature Makers to Turn Your Photo to Caricature Effects
- 2024 Approved Top 10 Online Animated Logo Makers Everyone Should Know
- New 2024 Approved The Only Guide Youll Ever Need to Learn That Make 2D Rigging Clear to You
- New Nurturing Mind, Heart, and Soul on the Top 5 Anime Streaming Sanctuaries
- Updated
- New The 10 Most Adorable Aesthetic Cartoon Characters
- How to sign a Excel 2000 document online
- Read This Guide to Find a Reliable Alternative to Fake GPS On Infinix Note 30 | Dr.fone
- Top 6 Apps/Services to Trace Any Vivo Y200 Location By Mobile Number | Dr.fone
- How to Downgrade Apple iPhone 13 mini without Losing Any Content? | Dr.fone
- How to Reset Xiaomi Civi 3 without Losing Data | Dr.fone
- How to Fix My Apple iPhone 6 Location Is Wrong | Dr.fone
- How to Stop Google Chrome from Tracking Your Location On Google Pixel 7a? | Dr.fone
- In 2024, Fake the Location to Get Around the MLB Blackouts on Tecno Camon 20 Pro 5G | Dr.fone
- In 2024, The Most Useful Tips for Pokemon Go Ultra League On Lava Blaze Pro 5G | Dr.fone
- In 2024, Learn How To Lock Stolen Your iPhone SE (2022) Properly
- Proven Ways in How To Hide Location on Life360 For Nokia 105 Classic | Dr.fone
- How To Unlock SIM Cards Of OnePlus Ace 2 Without PUK Codes
- Is your Vivo T2x 5G working too slow? Heres how you can hard reset it | Dr.fone
- In 2024, 8 Best Apps for Screen Mirroring Vivo V29e PC | Dr.fone
- 9 Mind-Blowing Tricks to Hatch Eggs in Pokemon Go Without Walking On Tecno Phantom V Fold | Dr.fone
- Best Ways on How to Unlock/Bypass/Swipe/Remove Motorola Edge 40 Neo Fingerprint Lock
- Catch or Beat Sleeping Snorlax on Pokemon Go For Lava Blaze 2 5G | Dr.fone
- In 2024, Top 10 Free Video Translators to Mitigate Translation Risks
- Life360 Learn How Everything Works On Vivo Y100 5G | Dr.fone
- How to Use Life360 on Windows PC For Apple iPhone 15 Plus? | Dr.fone
- Hassle-Free Ways to Remove FRP Lock from Motorola Edge 40 Phones with/without a PC
- 5 Ways to Restart Nokia C12 Plus Without Power Button | Dr.fone
- Realme Bypass Tools to Bypass Lock Screen(Realme Narzo N53)
- In 2024, Preparation to Beat Giovani in Pokemon Go For Poco M6 Pro 5G | Dr.fone
- 9 Quick Fixes to Unfortunately TouchWiz has stopped Of Poco M6 Pro 5G | Dr.fone
- Best Video Repair tool to Fix and Repair Corrupted video files of Itel
- Fixes for Apps Keep Crashing on Meizu 21 Pro | Dr.fone
- How to Turn Off Google Location to Stop Tracking You on Xiaomi Redmi A2 | Dr.fone
- How To Remove Phone Number From Your Apple ID on Your iPhone 8 Plus?
- How To Unlock Cricket Apple iPhone 15 for Free
- Title: Updated Learn 3D Logo Animation and Templates
- Author: Elon
- Created at : 2024-05-19 03:04:32
- Updated at : 2024-05-20 03:04:32
- Link: https://animation-videos.techidaily.com/updated-learn-3d-logo-animation-and-templates/
- License: This work is licensed under CC BY-NC-SA 4.0.
